
If you're using a View-based layout, there are three main choices for implementing toggles. We recommend using the SwitchMaterial component from the Material Components library:
<androidx.constraintlayout.widget.ConstraintLayout xmlns:android="http://schemas.android.com/apk/res/android" xmlns:app="http://schemas.android.com/apk/res-auto" android:layout_width="match_parent" android:layout_height="match_parent" android:padding="16dp"> <com.google.android.material.switchmaterial.SwitchMaterial android:id="@+id/material_switch" android:layout_width="wrap_content" android:layout_height="wrap_content" android:text="@string/material_switch" app:layout_constraintEnd_toEndOf="parent" app:layout_constraintStart_toStartOf="parent" app:layout_constraintTop_toTopOf="parent" /> </androidx.constraintlayout.widget.ConstraintLayout> Legacy apps might still use the older SwitchCompat AppCompat component, as shown in the following example:
<androidx.constraintlayout.widget.ConstraintLayout xmlns:android="http://schemas.android.com/apk/res/android" xmlns:app="http://schemas.android.com/apk/res-auto" android:layout_width="match_parent" android:layout_height="match_parent" android:padding="16dp"> <androidx.appcompat.widget.SwitchCompat android:id="@+id/switchcompat" android:layout_width="wrap_content" android:layout_height="wrap_content" android:text="@string/switchcompat" app:layout_constraintEnd_toEndOf="parent" app:layout_constraintStart_toStartOf="parent" app:layout_constraintTop_toTopOf="parent" /> </androidx.constraintlayout.widget.ConstraintLayout> The following example shows AppCompatToggleButton, which is another legacy component that has a noticeably different UI:
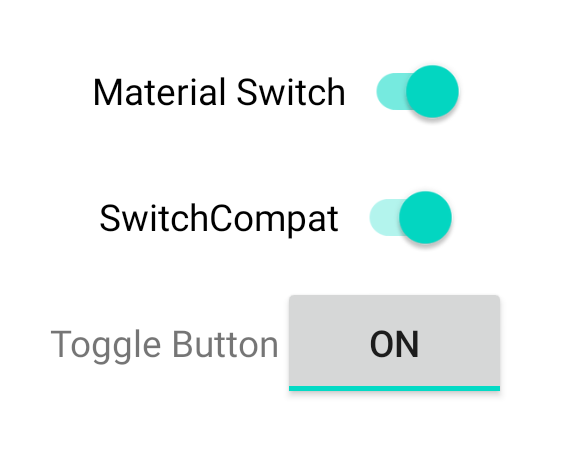
<androidx.constraintlayout.widget.ConstraintLayout xmlns:android="http://schemas.android.com/apk/res/android" xmlns:app="http://schemas.android.com/apk/res-auto" android:layout_width="match_parent" android:layout_height="match_parent" android:padding="16dp"> <TextView android:id="@+id/toggle_button_label" android:layout_width="wrap_content" android:layout_height="wrap_content" app:layout_constraintStart_toStartOf="parent" app:layout_constraintEnd_toStartOf="@id/toggle" app:layout_constraintHorizontal_chainStyle="packed" app:layout_constraintBaseline_toBaselineOf="@id/toggle" android:text="@string/toggle_button" /> <androidx.appcompat.widget.AppCompatToggleButton android:id="@+id/toggle" android:layout_width="wrap_content" android:layout_height="wrap_content" app:layout_constraintEnd_toEndOf="parent" app:layout_constraintStart_toEndOf="@id/toggle_button_label" app:layout_constraintTop_toTopOf="parent" app:layout_constraintBottom_toBottomOf="parent"/> </androidx.constraintlayout.widget.ConstraintLayout> These three components offer the same behavior but look different. The differences between the SwitchMaterial and SwitchCompat are subtle, but AppCompatToggleButton is noticeably different:
Handle state changes
SwitchMaterial, SwitchCompat, and AppCompatToggleButton are all subclasses of CompoundButton, which gives them a common mechanism for handling checked state changes. You implement an instance of CompoundButton.OnCheckedChangeListener and add it to the button, as shown in the following example:
Kotlin
class MainActivity : AppCompatActivity() { override fun onCreate(savedInstanceState: Bundle?) { super.onCreate(savedInstanceState) val binding: SwitchLayoutBinding = SwitchLayoutBinding.inflate(layoutInflater) setContentView(binding.root) binding.materialSwitch.setOnCheckedChangeListener { _, isChecked -> if (isChecked) { // The switch is checked. } else { // The switch isn't checked. } } } }
Java
public class MainActivity extends AppCompatActivity { @Override protected void onCreate(Bundle savedInstanceState) { super.onCreate(savedInstanceState); SwitchLayoutBinding binding = SwitchLayoutBinding.inflate(getLayoutInflater()); setContentView(binding.getRoot()); binding.materialSwitch.setOnCheckedChangeListener((buttonView, isChecked) -> { if (isChecked) { // The switch is checked. } else { // The switch isn't checked. } }); } }
CompoundButton.OnCheckedChangeListener is a single abstract method interface (or SAM interface), so you can implement it as a lambda. The lambda is called whenever the checked state changes, and the value of the isChecked boolean that is passed to the lambda indicates the new checked state.