# 【小场景训练营】商品下单支付场景,DDD设计实现「支付宝沙箱」
作者:小傅哥
博客:https://bugstack.cn (opens new window)
沉淀、分享、成长,让自己和他人都能有所收获!😄
哈喽,大家伙我是技术UP主小傅哥。
经历了半年多💐,《DDD 技术小册》 整个系列已完成理论知识与技术实践两个部分,接下来小傅哥将带着小伙伴们开启DDD 技术小册之场景方案的学习旅程。—— 学理论、练技术、找场景锻炼,综合的学习会快速的提高编程技术。
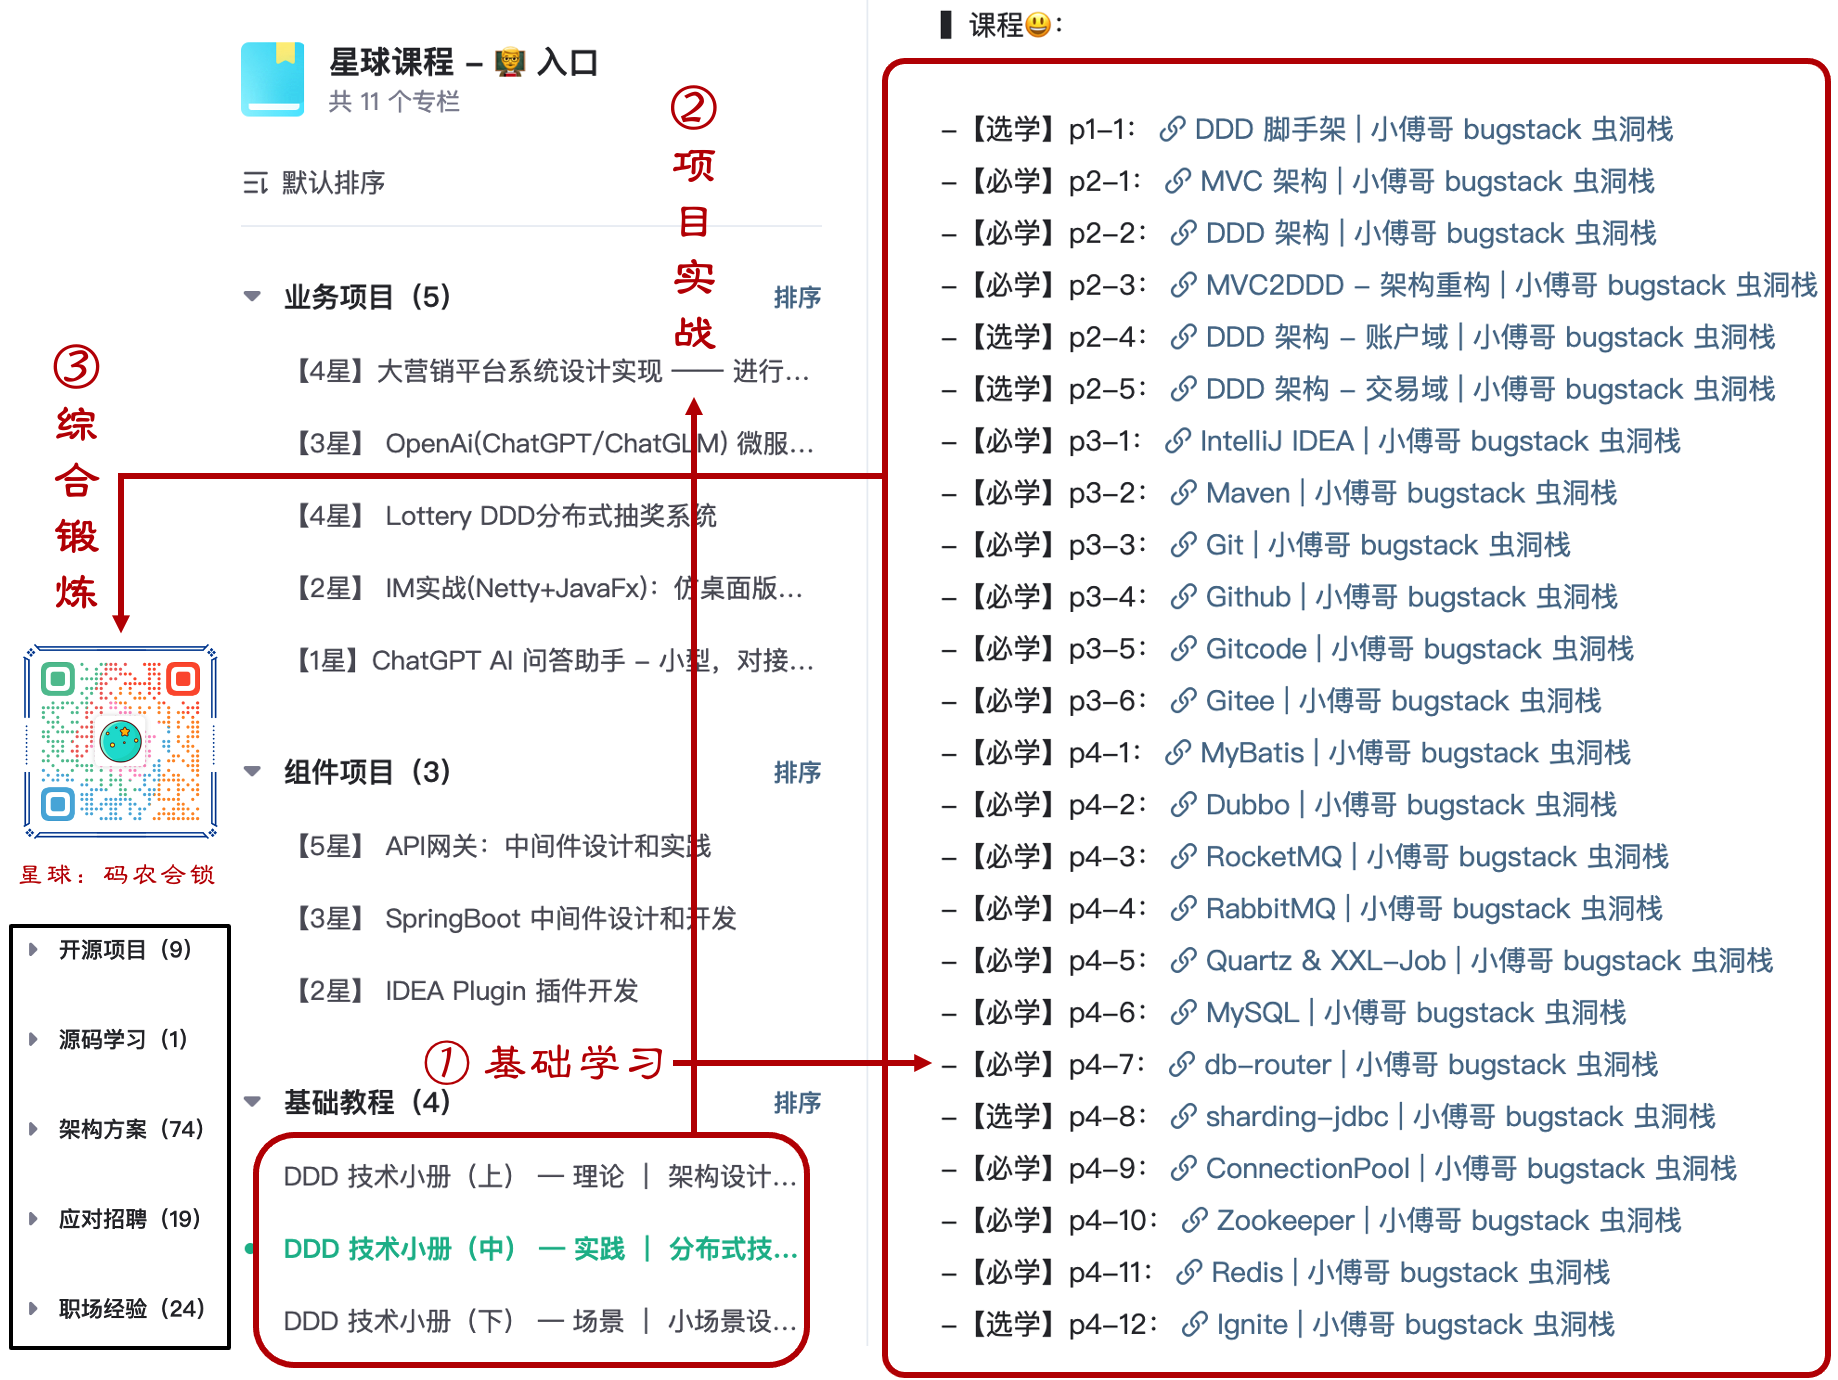
技术,是承接业务需求提供解决方案的综合运用,而从实际需求中摘取出来的小场景学习,包括;支付、短信、地图、人脸、规则、短信猫、三方登录等,都可以非常好的锻炼思维,提高编码能力。
那么,本节我们先来完成下支付场景在 DDD 领域驱动下的场景设计和编码实现。这里选用支付宝的沙箱支付,因为这个支付对接非常好申请,这样可以方便大家一起参与学习。
文末提供了「星球:码农会锁」优惠加入学习方式,不仅可以学习碎片化的即使知识,还可以综合锻炼实战项目。项目演示地址:https://gaga.plus (opens new window)
# 一、场景说明
在本节小傅哥会带着大家先以最简单的方式完成对接支付验证。再以商品下单模型,通过 DDD 的领域驱动设计,最终完成对支付宝沙箱的对接使用。【如图】
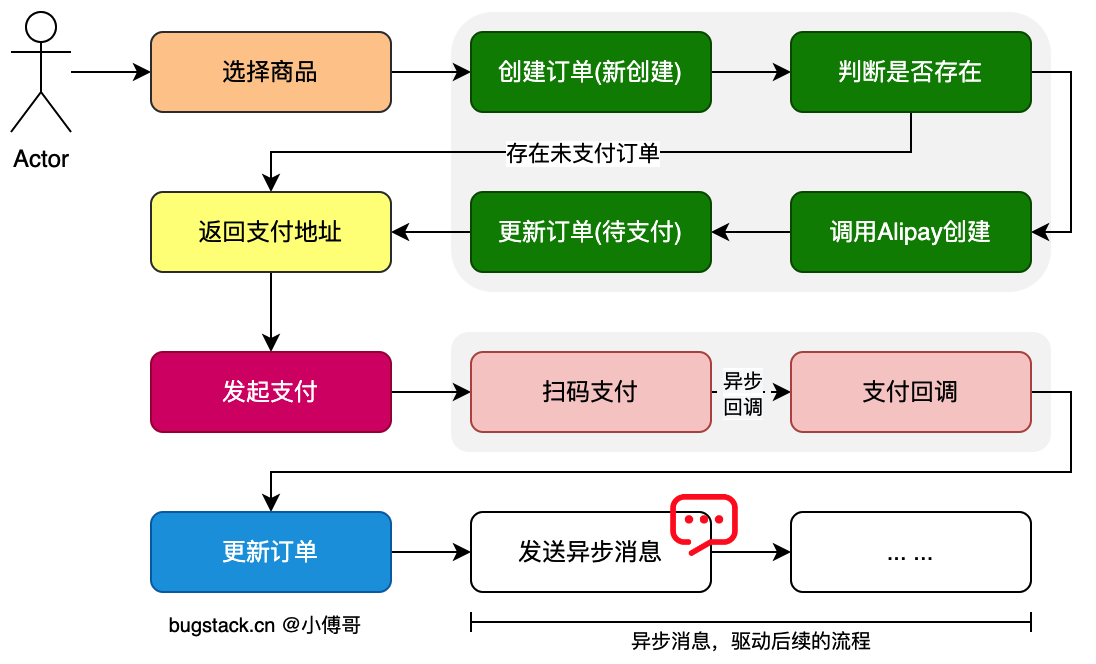
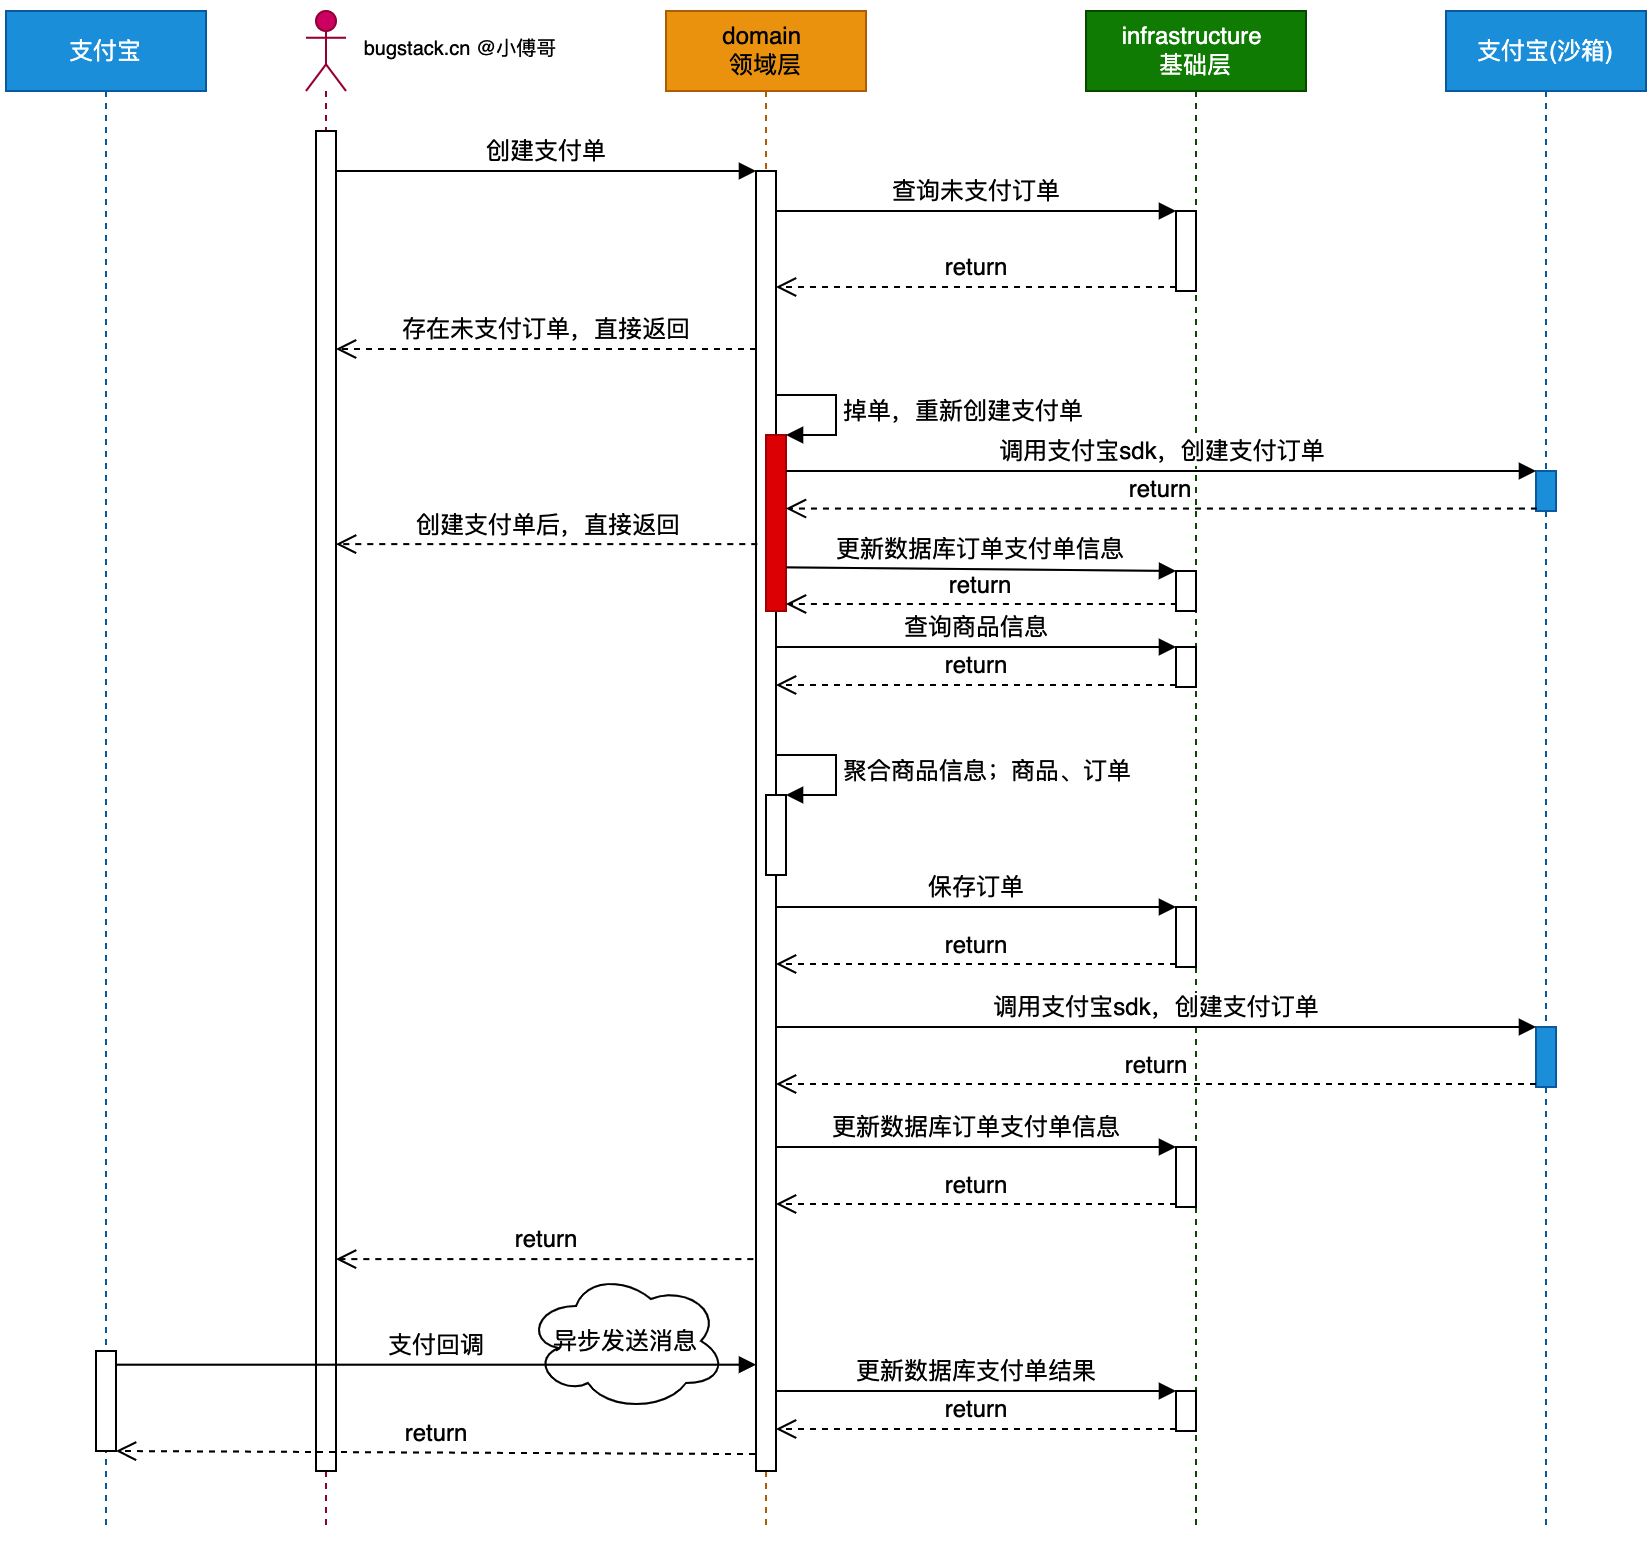
- 包括;商城、出行、外卖等场景,凡是对接支付,都会先创建一条订单。在基于订单的唯一ID创建支付单。这是因为调用的支付都是外部的接口提供,没法和自己流程做一个统一的事务。那么这里就需要考虑最终一致性问题,要幂等可重试。—— 所以有这样的流程,调单也可以补偿。
- 商品支付完成后,会收到支付完成的回调。回调调用你提供好的一个接口,用于接收支付完成的通知。这个通知用于变更支付单的状态,以及自己系统内再发一个异步的MQ消息,用于处理后续的流程。
- 所有的这些流程节点,支付掉单、回调失败、MQ发送失败,在各个流程节点都有唯一ID,所以都可以用定时任务补偿。
# 二、支付申请 - Alipay 沙箱支付
# 1. 沙箱应用
支付宝|开放平台 地址:https://open.alipay.com/develop/manage (opens new window) - 任何人都可以申请,不要企业资质

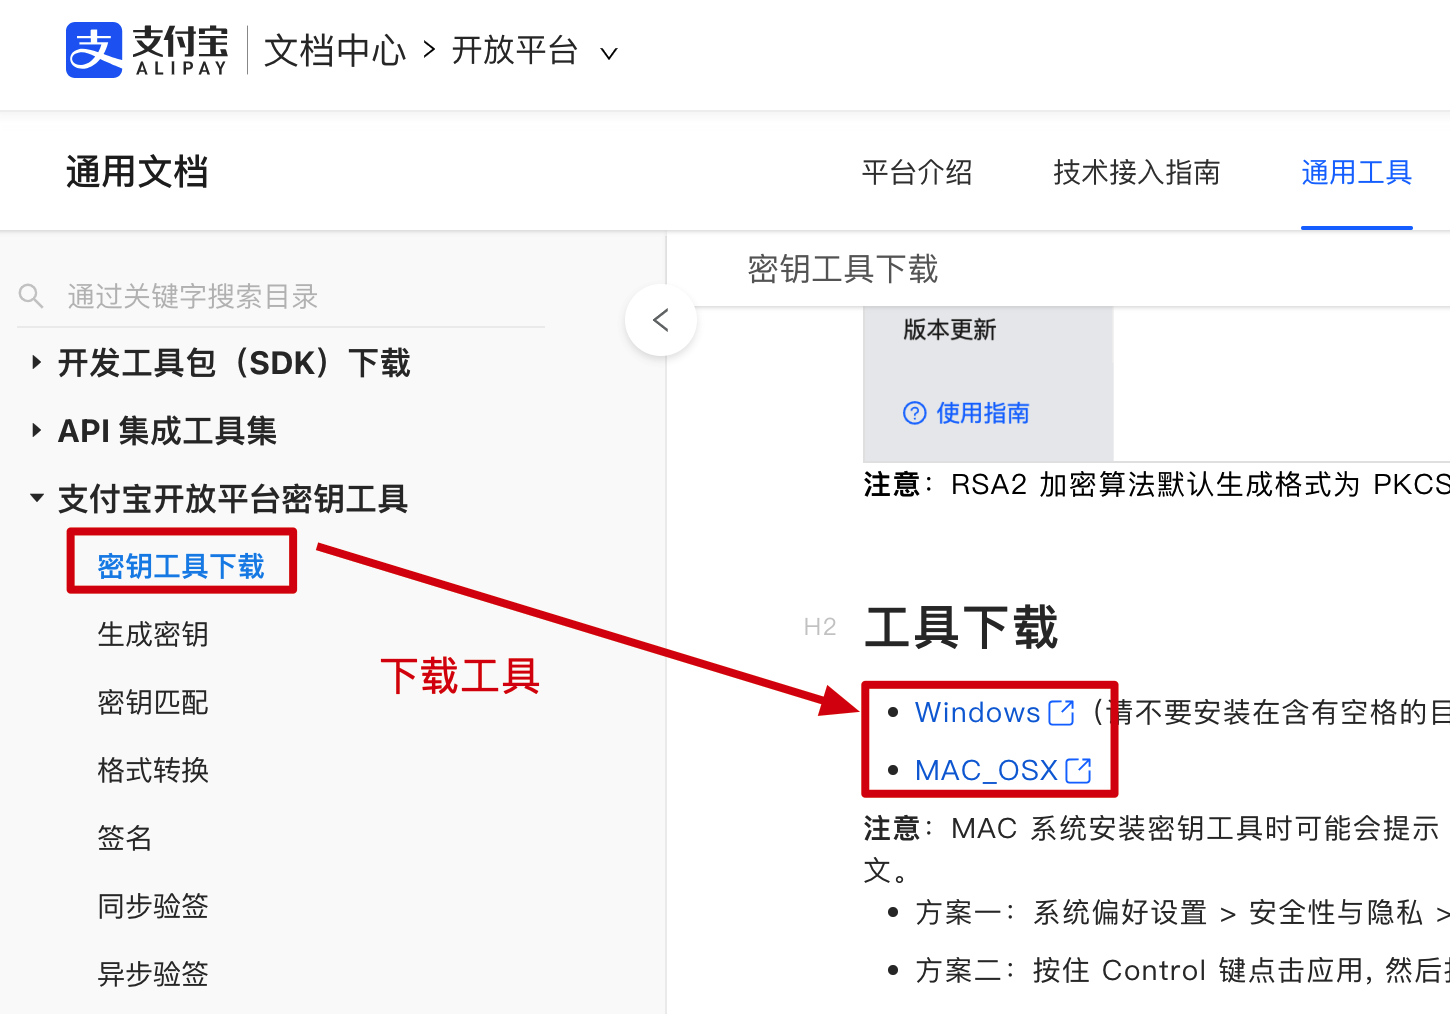
# 2. 秘钥工具
文档中心 | 开放平台 地址:https://opendocs.alipay.com/common/02kipk (opens new window) - 下载支付宝开放平台秘钥工具 在文档的介绍中,也有很详细的说明。

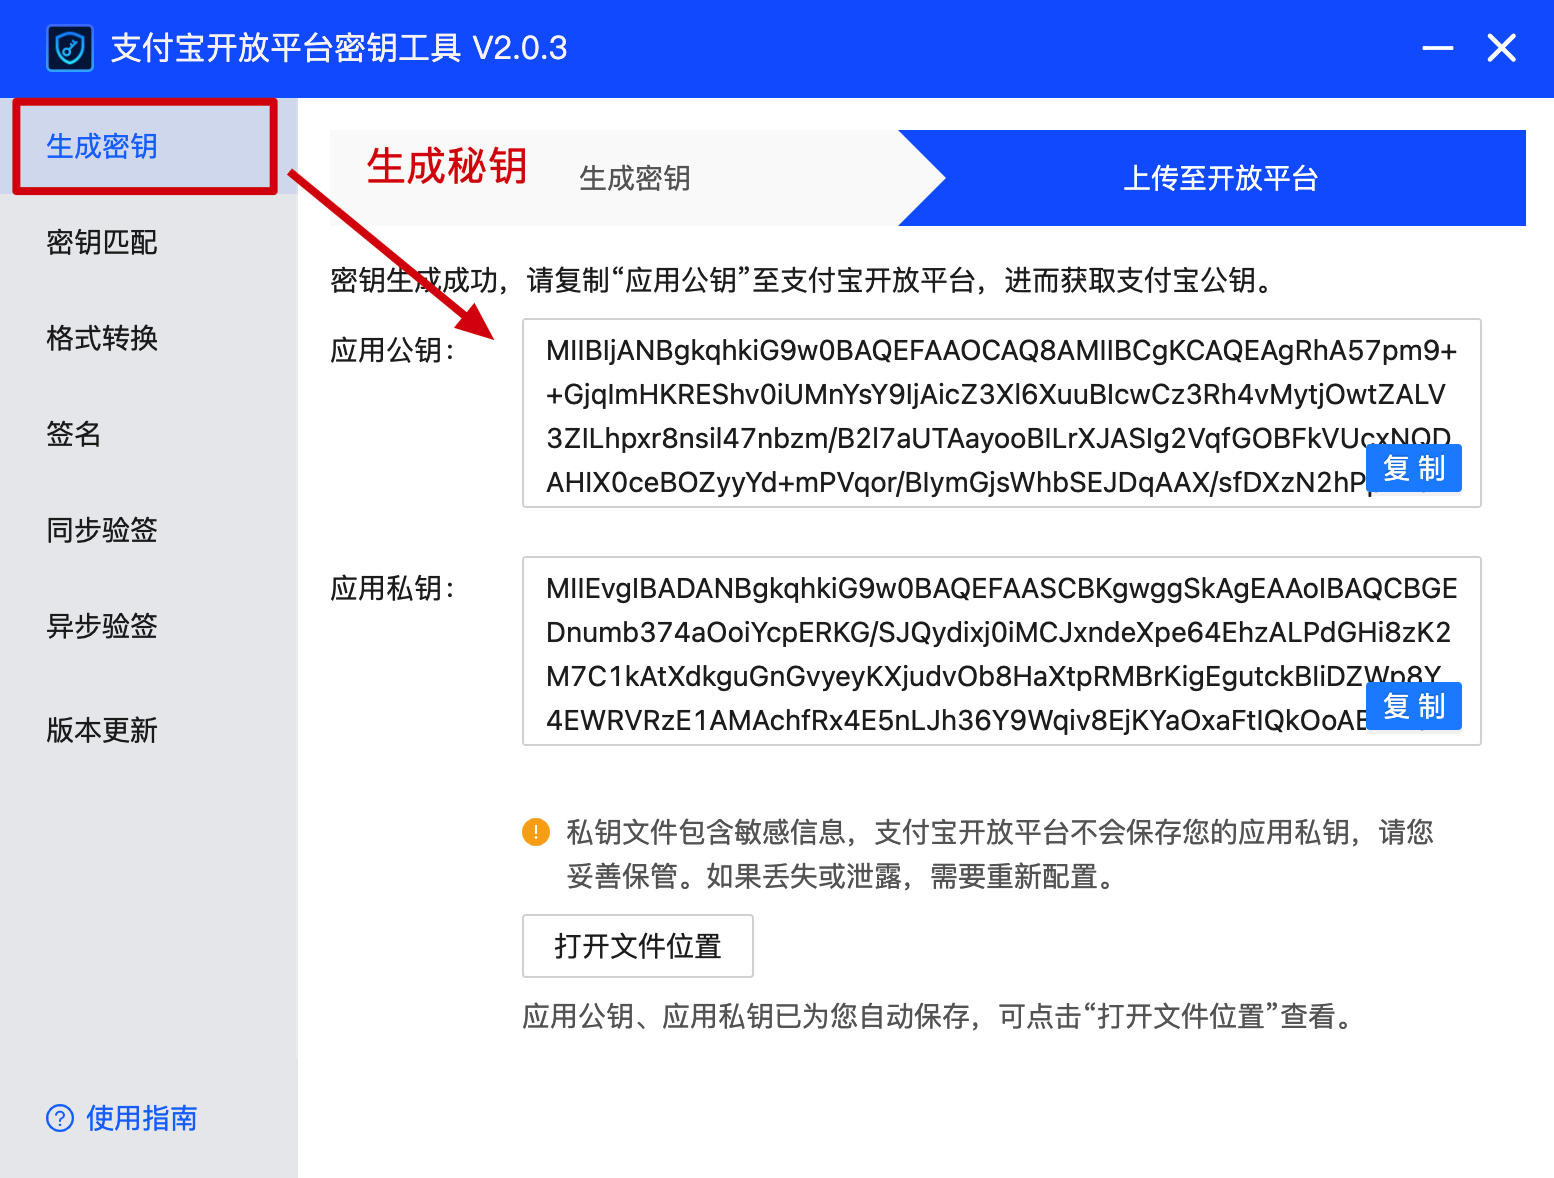
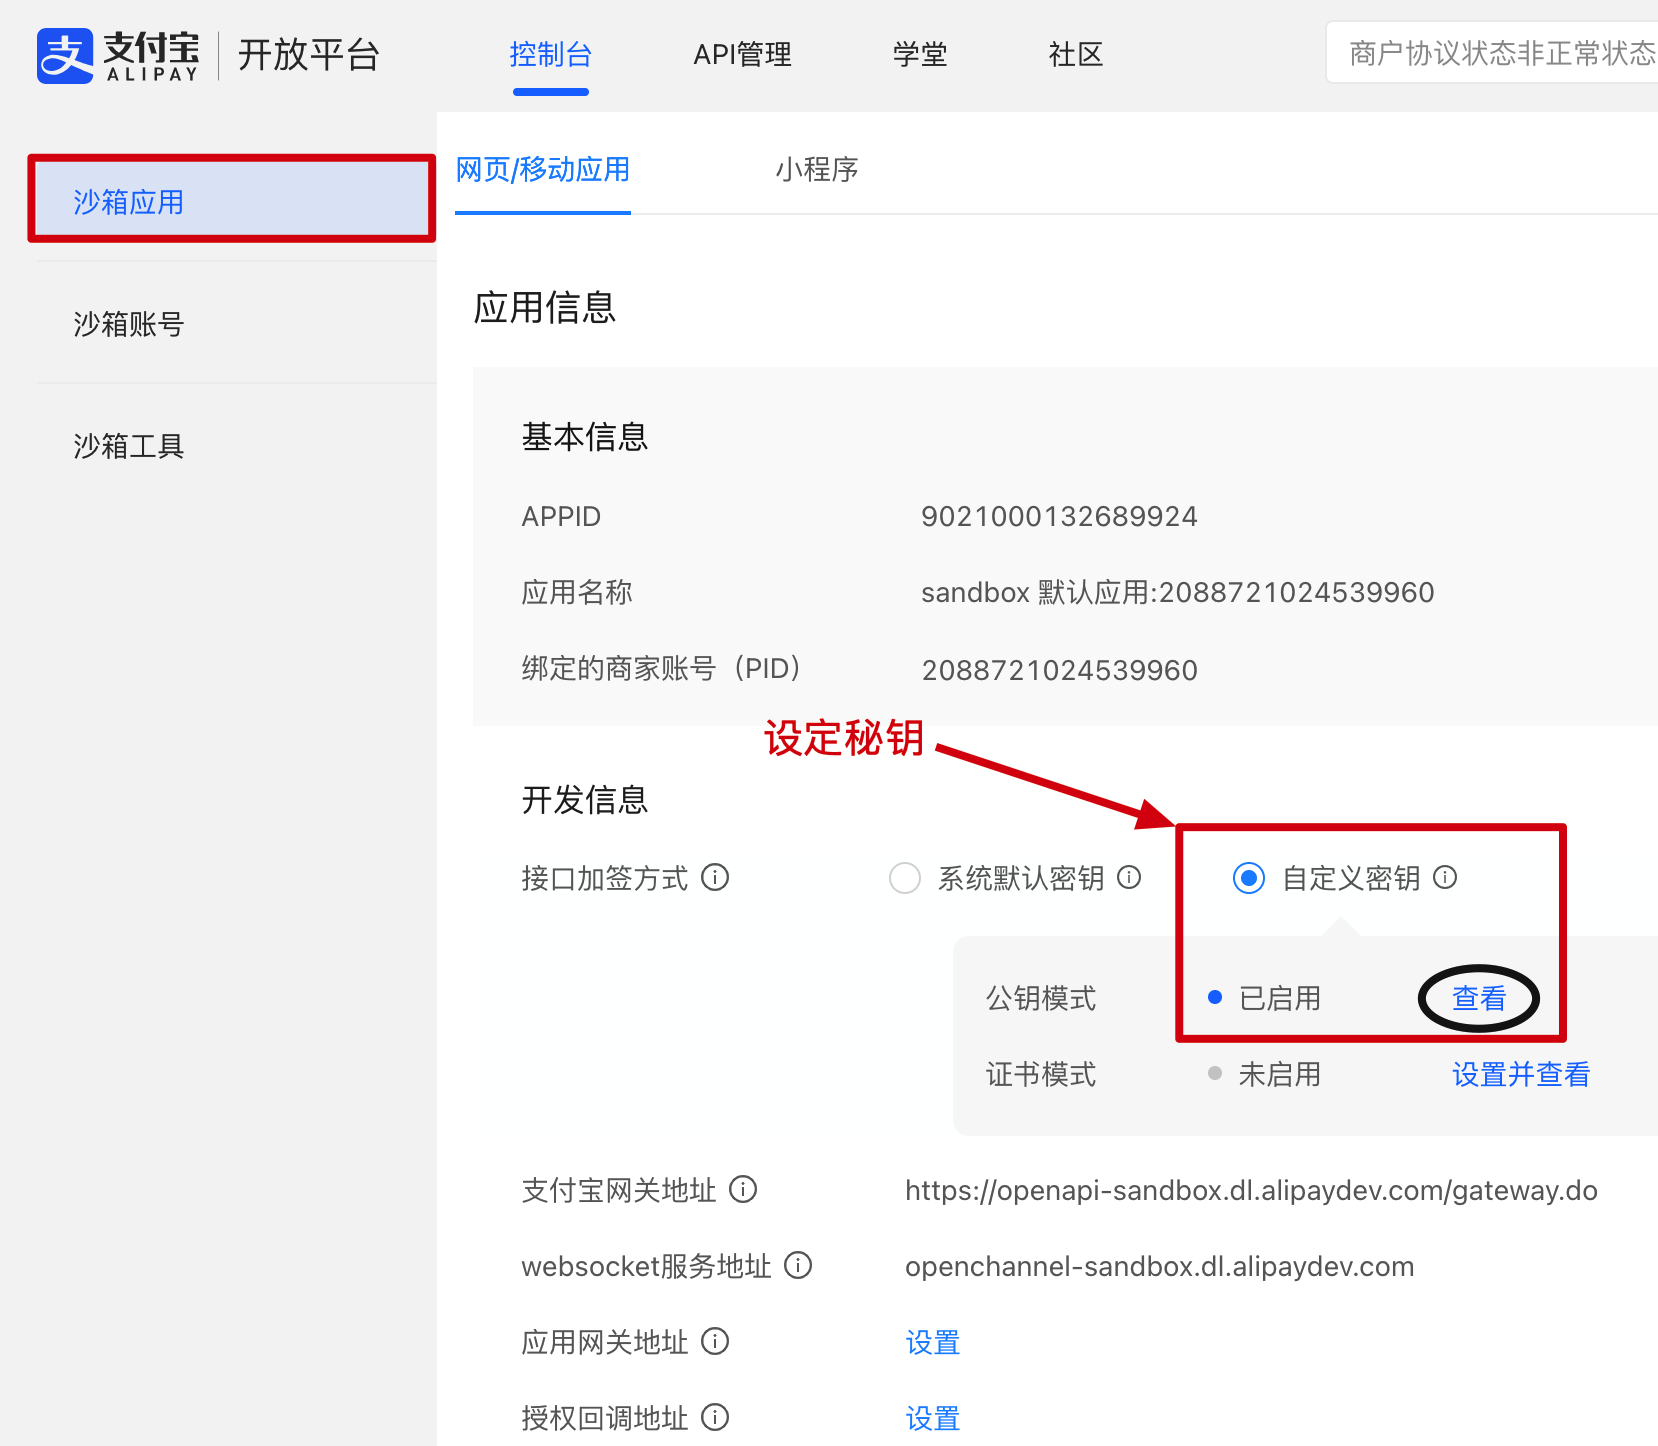
# 3. 秘钥填写
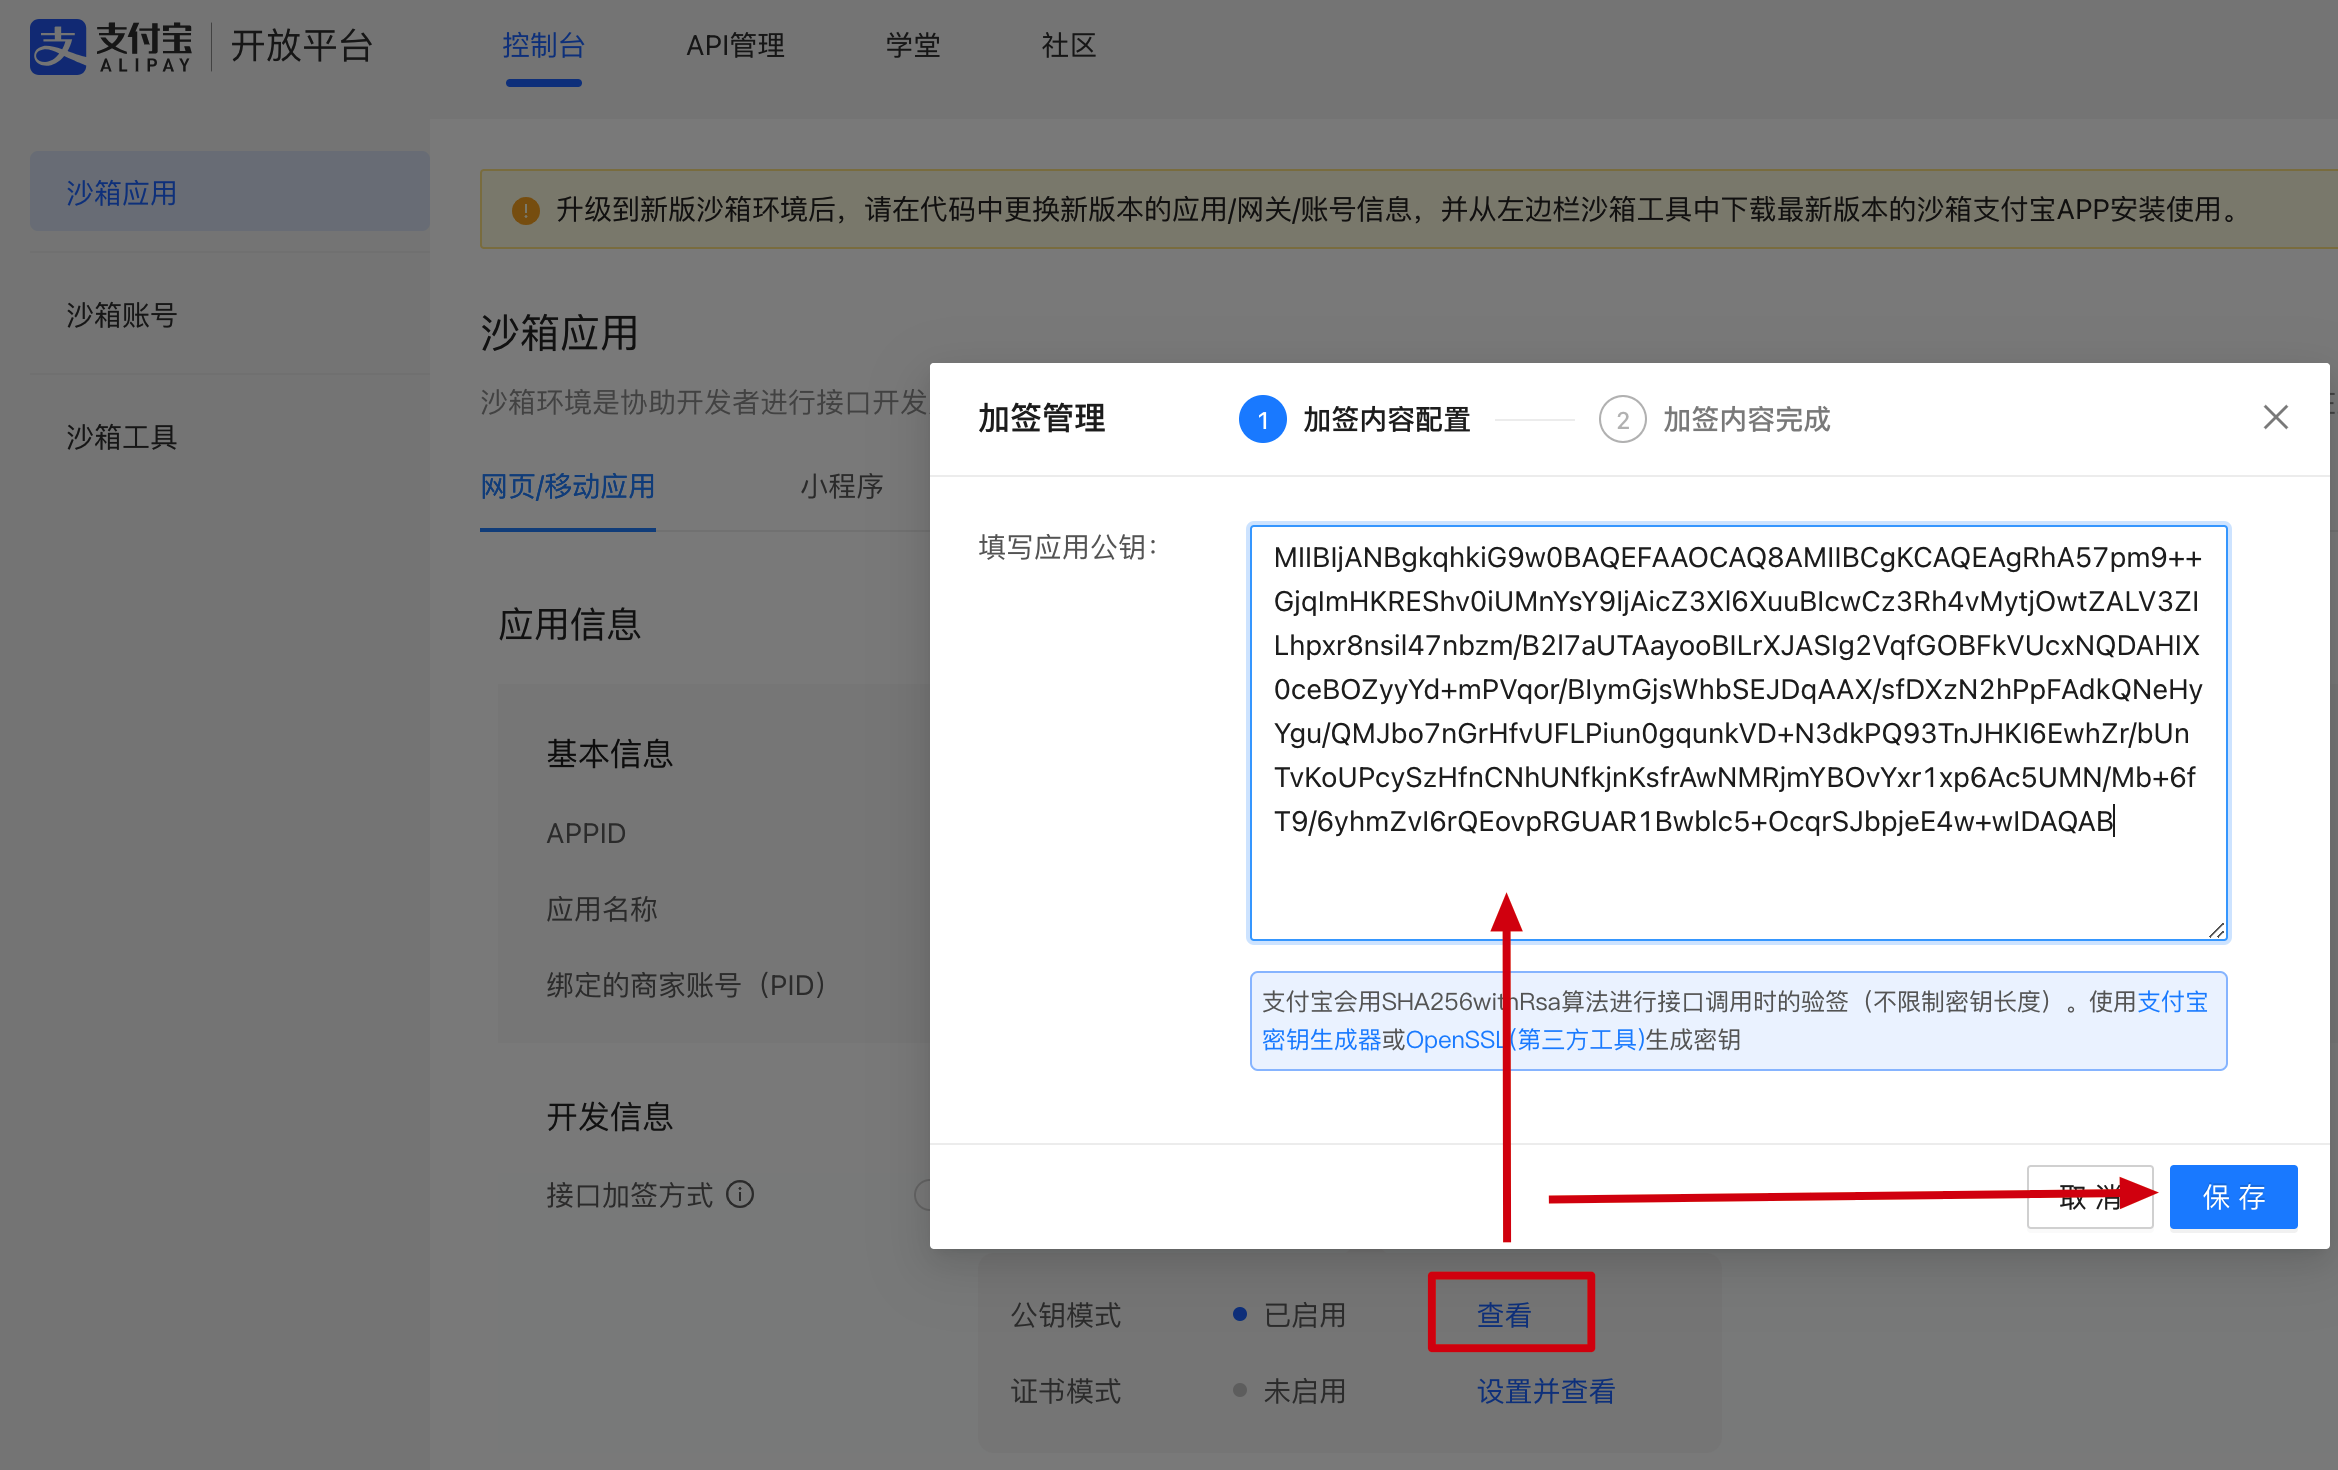
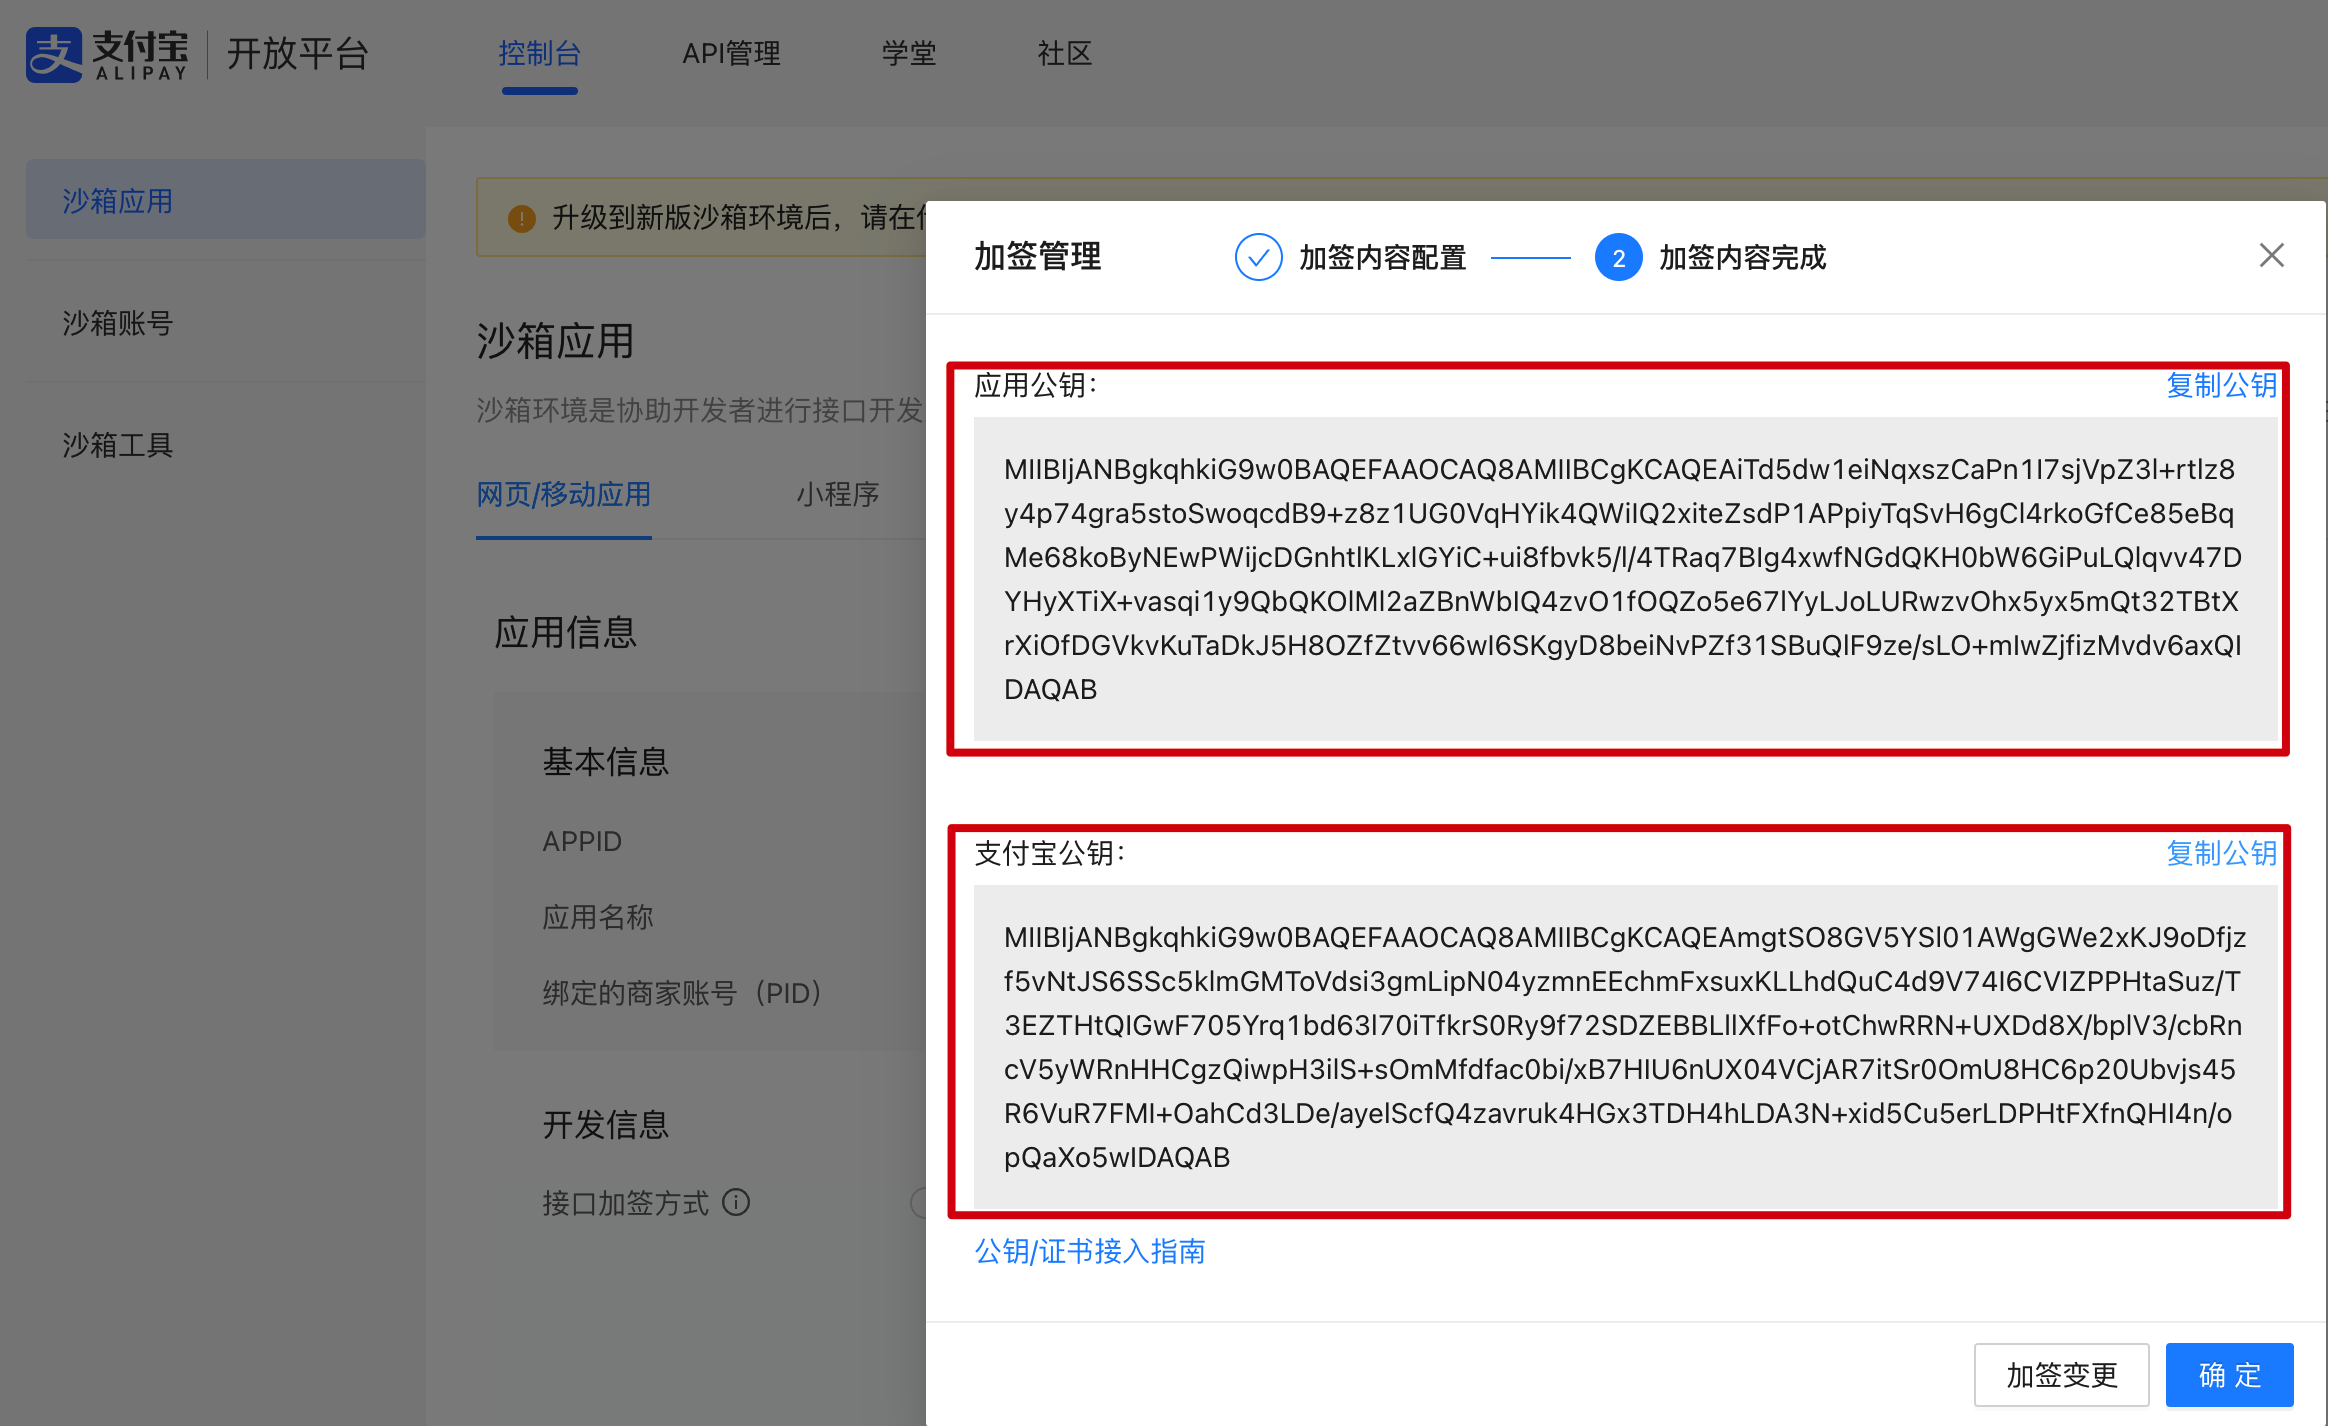
- 在秘钥工具中生成的应用公钥,复制到如图中填写保存。填写后就可以看到对应的支付宝公钥了。
# 三、简单案例
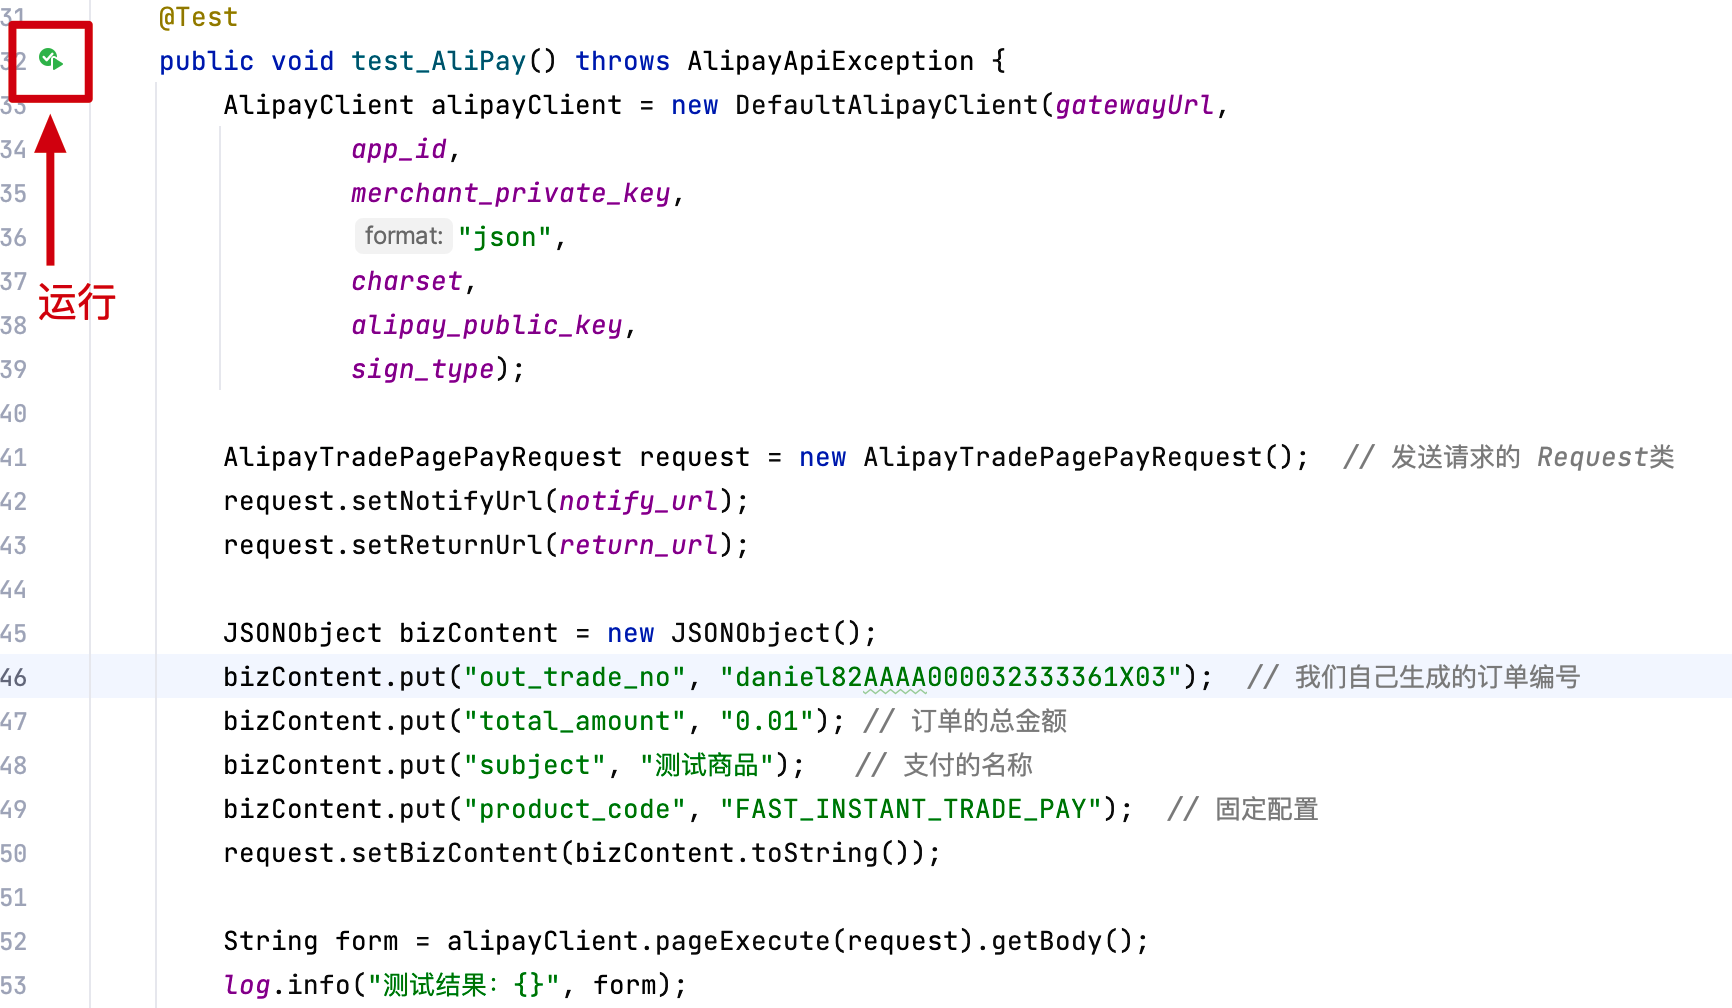
有了前面这些步骤的申请操作,接下来我们就可以先做一个小支付案例了。这个支付案例在工程代码中 xfg-dev-tech-app ApiTest 下。
# 1. 后端代码
源码:cn.bugstack.xfg.dev.tech.test.ApiTest
@Slf4j public class ApiTest { // 「沙箱环境」应用ID - 您的APPID,收款账号既是你的APPID对应支付宝账号。获取地址;https://open.alipay.com/develop/sandbox/app public static String app_id = "9021000132689924"; // 「沙箱环境」商户私钥,你的PKCS8格式RSA2私钥 public static String merchant_private_key = "上文中,【秘钥工具】所创建的公户私钥"; // 「沙箱环境」支付宝公钥 public static String alipay_public_key = "上文中,【秘钥填写】后提供给你的支付宝公钥"; // 「沙箱环境」服务器异步通知页面路径。这里小傅哥用了 natapp.cn 内网穿透工具 public static String notify_url = "https://xfg.natapp.cn/api/v1/alipay/alipay_notify_url"; // 「沙箱环境」页面跳转同步通知页面路径 需http://格式的完整路径,必须外网可以正常访问,才会同步跳转 public static String return_url = "https://gaga.plus"; // 「沙箱环境」 public static String gatewayUrl = "https://openapi-sandbox.dl.alipaydev.com/gateway.do"; // 签名方式 public static String sign_type = "RSA2"; // 字符编码格式 public static String charset = "utf-8"; @Test public void test_AliPay() throws AlipayApiException { AlipayClient alipayClient = new DefaultAlipayClient(gatewayUrl, app_id, merchant_private_key, "json", charset, alipay_public_key, sign_type); AlipayTradePagePayRequest request = new AlipayTradePagePayRequest(); // 发送请求的 Request类 request.setNotifyUrl(notify_url); request.setReturnUrl(return_url); JSONObject bizContent = new JSONObject(); bizContent.put("out_trade_no", "daniel82AAAA000032333361X02"); // 我们自己生成的订单编号 bizContent.put("total_amount", "0.01"); // 订单的总金额 bizContent.put("subject", "测试商品"); // 支付的名称 bizContent.put("product_code", "FAST_INSTANT_TRADE_PAY"); // 固定配置 request.setBizContent(bizContent.toString()); String form = alipayClient.pageExecute(request).getBody(); log.info("测试结果:{}", form); } 2
3
4
5
6
7
8
9
10
11
12
13
14
15
16
17
18
19
20
21
22
23
24
25
26
27
28
29
30
31
32
33
34
35
36
37
38
39
40
41
42
43
44
45
支付配置:
- app_id:应用ID - 您的APPID,收款账号既是你的APPID对应支付宝账号。获取地址;https://open.alipay.com/develop/sandbox/app (opens new window)
- merchant_private_key:商户私钥,【通过支付宝开放平台秘钥工具】创建出来的私钥。公钥填写到网页上,私钥程序里使用。
- alipay_public_key:支付宝公钥,在网页上填写公钥后,会给你一个支付宝的公钥。
- notify_url:服务器异步通知回调地址,也就是你支付完成后,支付宝调用你的地址。因为我们是在本地做测试,外网是访问不到的。所以为了能做这样的测试,可以回调到我们。那么这里需要使用 natapp.cn 做一个内网穿透。
- return_url:支付完成后跳转的地址
- gatewayUrl:支付宝沙箱环境的地址,固定的。
- sign_type:签名方式固定的
- charset:字符编码固定的
调用配置
- out_trade_no:你的单号,用你的单号类生成支付单信息。
- total_amount:支付金额
- subject:商品名称
- product_code:固定值;FAST_INSTANT_TRADE_PAY
测试结果
<form name="punchout_form" method="post" action="https://openapi-sandbox.dl.alipaydev.com/gateway.do?charset=utf-8&method=alipay.trade.page.pay&sign=J1BBEkS9SIRKTL9sdyFhJ4rUCkJL0HaSOnQ%2BIr5Iy9TdYUigoNfplYfSTFlfjHP8Fq5Me33k7LWNJUH0HzubXxL1vg7P1QOcgzG5K%2Bu5HzWDCkbG4TYhJ%2FOHjYw0nTeRdu%2BkEw%2FMfWr3y4YYpO5oUPEtFMjmvB1UrKmx2%2Buwx0zJk1qrpQWAOfmuS27hf2qda1SVUMs4vdNrKIEKZy1Fysaoo2J6Bqzw2CAFS1QtwN5wm2%2F%2F4uQpxA3TlV1%2BaDvh3Ve5NNTFhiREqW7QPNalFHI0AvGQq6MYKnamaEiNPTFMXUDVsOPFcVqsLZKSvovNlK1CPFp67ZfCTMZP%2BZK3Rw%3D%3D&return_url=https%3A%2F%2Fgaga.plus¬ify_url=https%3A%2F%2Fxfg.natapp.cn%2Fapi%2Fv1%2Falipay%2Falipay_notify_url&version=1.0&app_id=9021000132689924&sign_type=RSA2×tamp=2023-12-17+11%3A55%3A51&alipay_sdk=alipay-sdk-java-4.38.157.ALL&format=json"> <input type="hidden" name="biz_content" value="{"out_trade_no":"daniel82AAAA000032333361X03","total_amount":"0.01","subject":"测试商品","product_code":"FAST_INSTANT_TRADE_PAY"}"> <input type="submit" value="立即支付" style="display:none" > </form> <script>document.forms[0].submit();</script> 2
3
4
5
- 运行后你会得到一份 HTML 脚本,这份脚本就可以在浏览器打开。
- 如果你想少量的存储信息,也可以把必要的数据存到数据库,不用全存储。
# 2. 前端代码
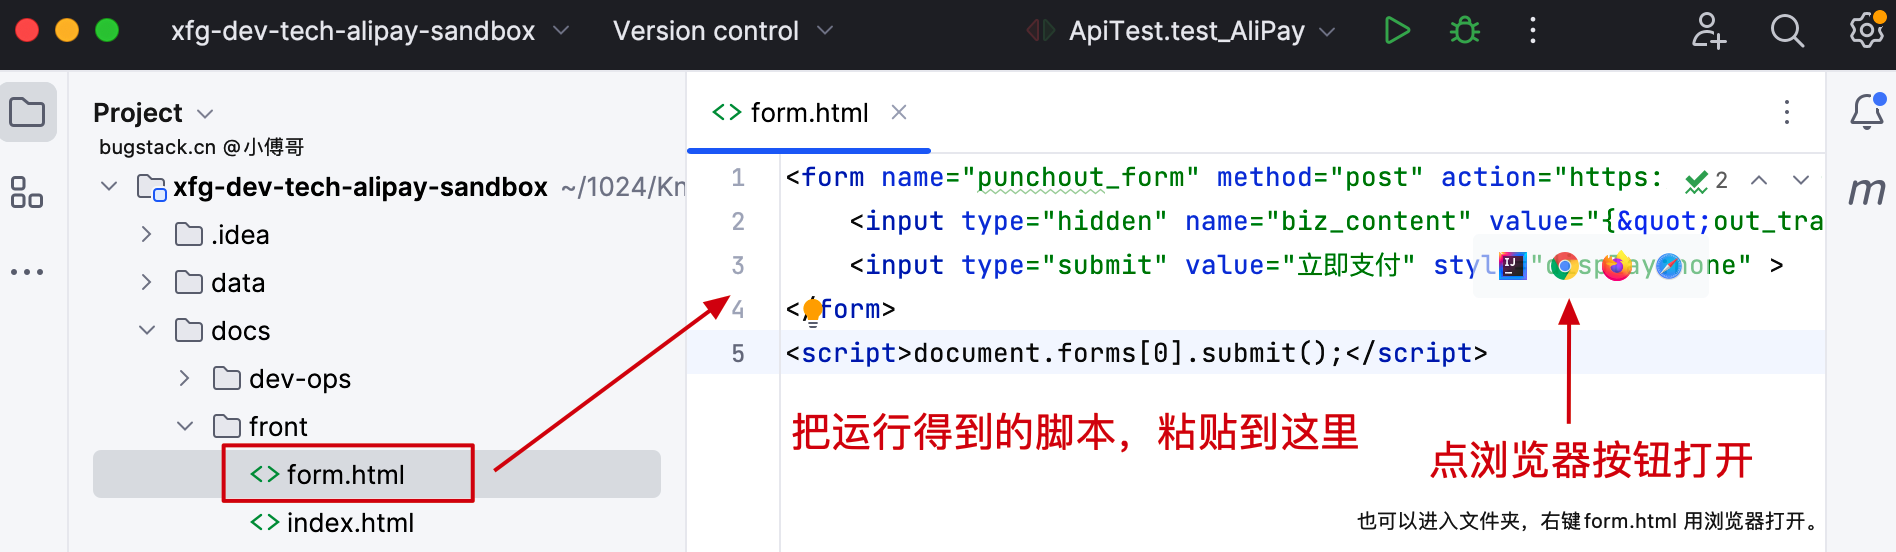
- 把后端运行生成的代码,粘贴到 form.html 文件中,之后点浏览器按钮运行打开。
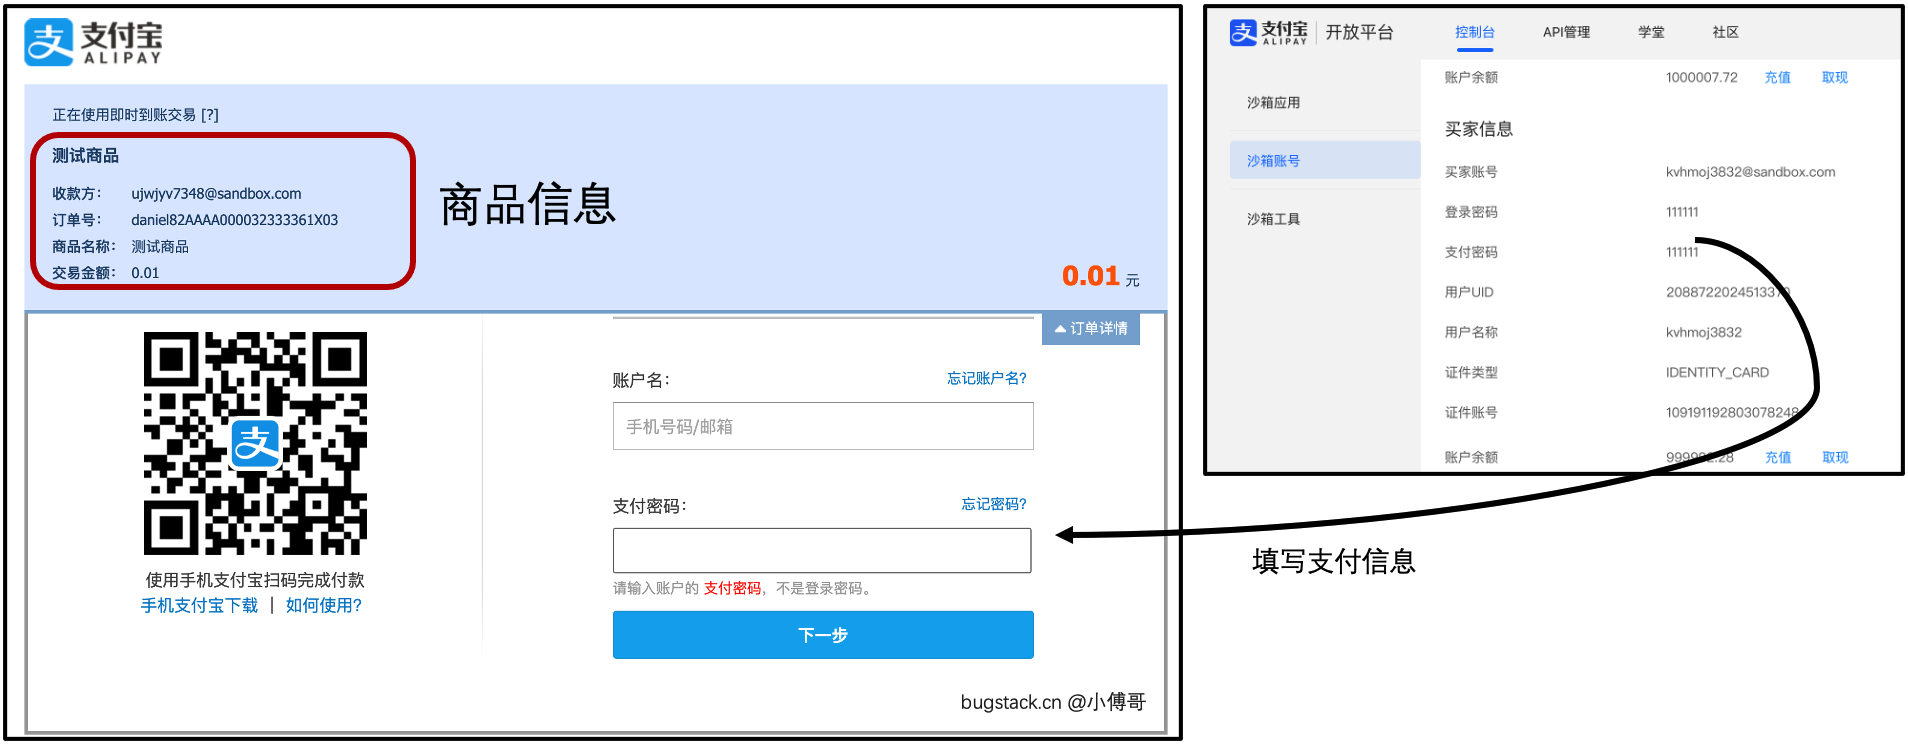
- 打开后,会跳转到支付宝支付页面,之后你可以从【支付宝 | 开放平台】沙箱账号中获取你的账号信息。地址:https://open.alipay.com/develop/sandbox/account (opens new window)
到这支付宝的沙箱申请和简单案例已经做完了,之后我们进入场景应用的训练。
# 四、场景介绍
支付,可以说是一个对接的渠道,那么结合到我们的实际场景中应该如何使用呢?比如流程的执行、订单的创建、数据的保存、回调的处理等,这些都是实际业务中要做的东西,接下来我们就做下这个场景学习。
# 1. 支付界面

# 2. 业务流程
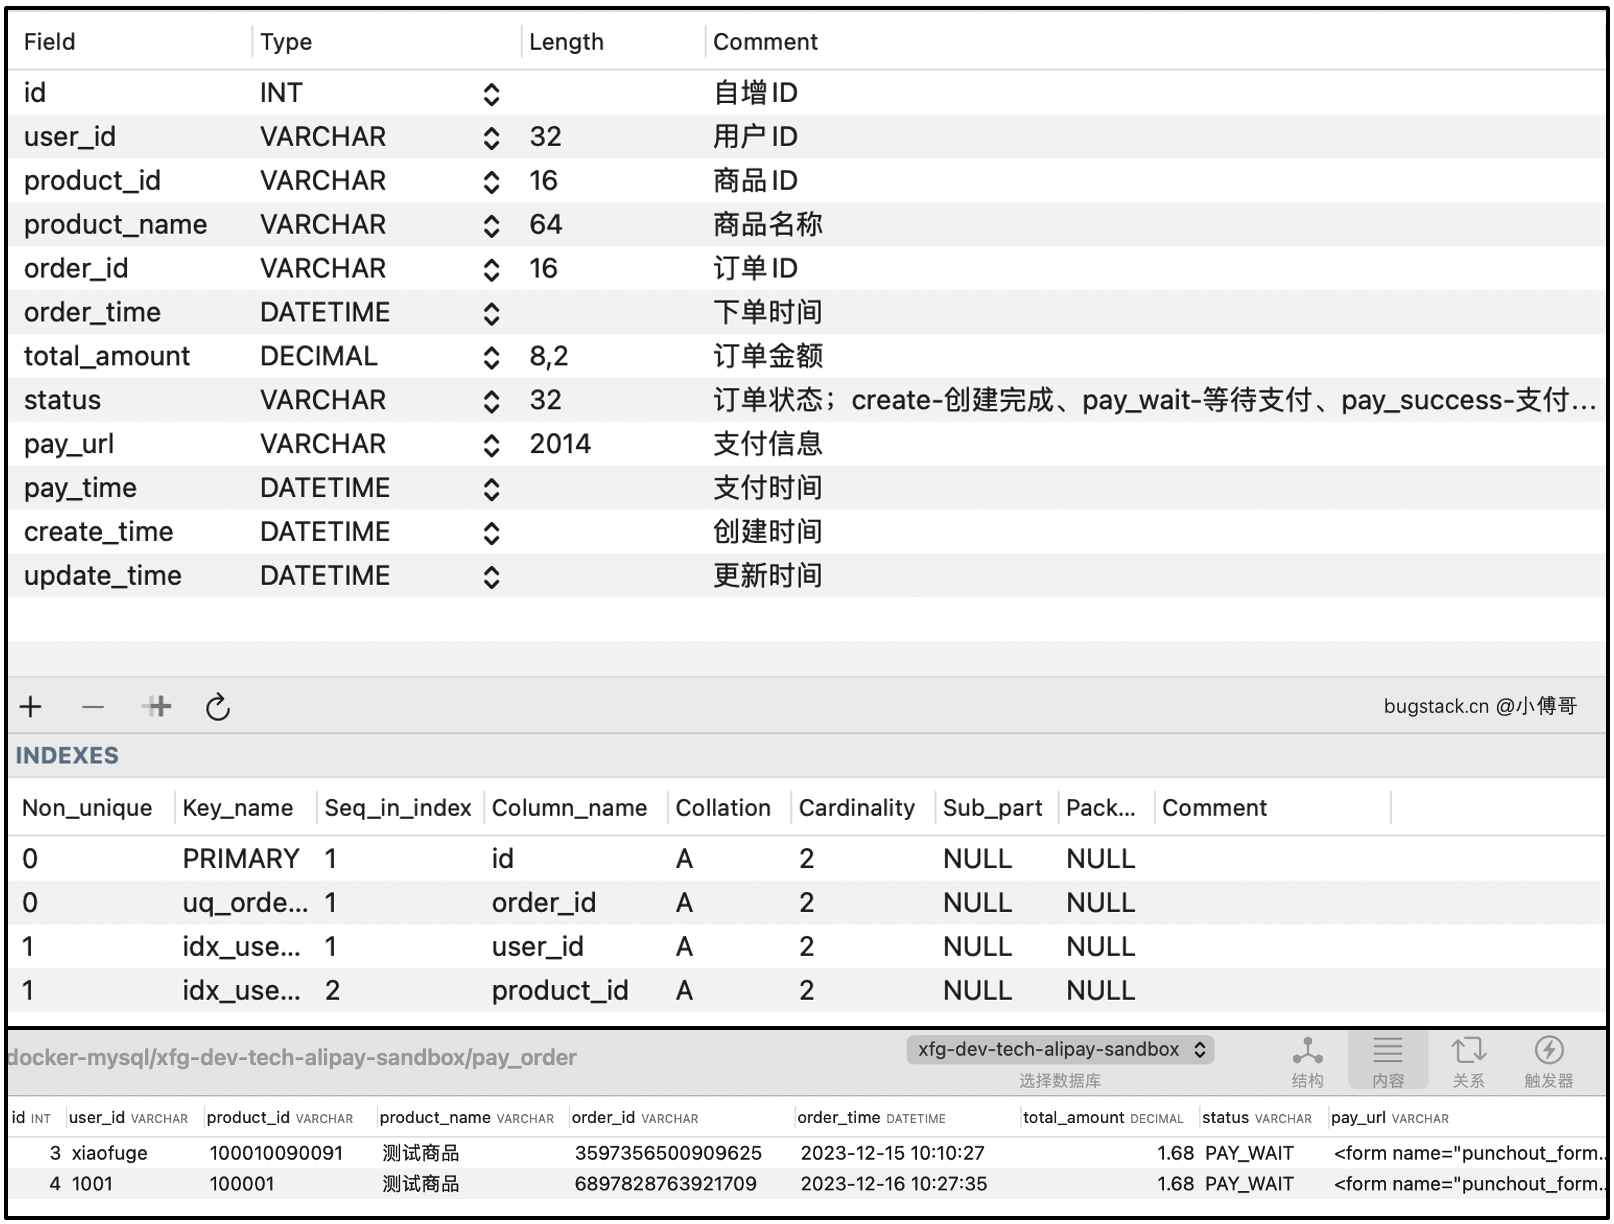
# 3. 库表设计
# 五、工程实现

此项目为「星球:码农会锁」小场景训练营的一部分 —— 地址:https://gitcode.net/KnowledgePlanet/ddd-scene-solution (opens new window) - 星球内还包括了大量的实战项目;大营销平台、OpenAI项目、API网关、Lottery抽奖、IM通信、SpringBoot Starter 组件开发、IDEA Plugin 插件开发等
# 1. 工程结构
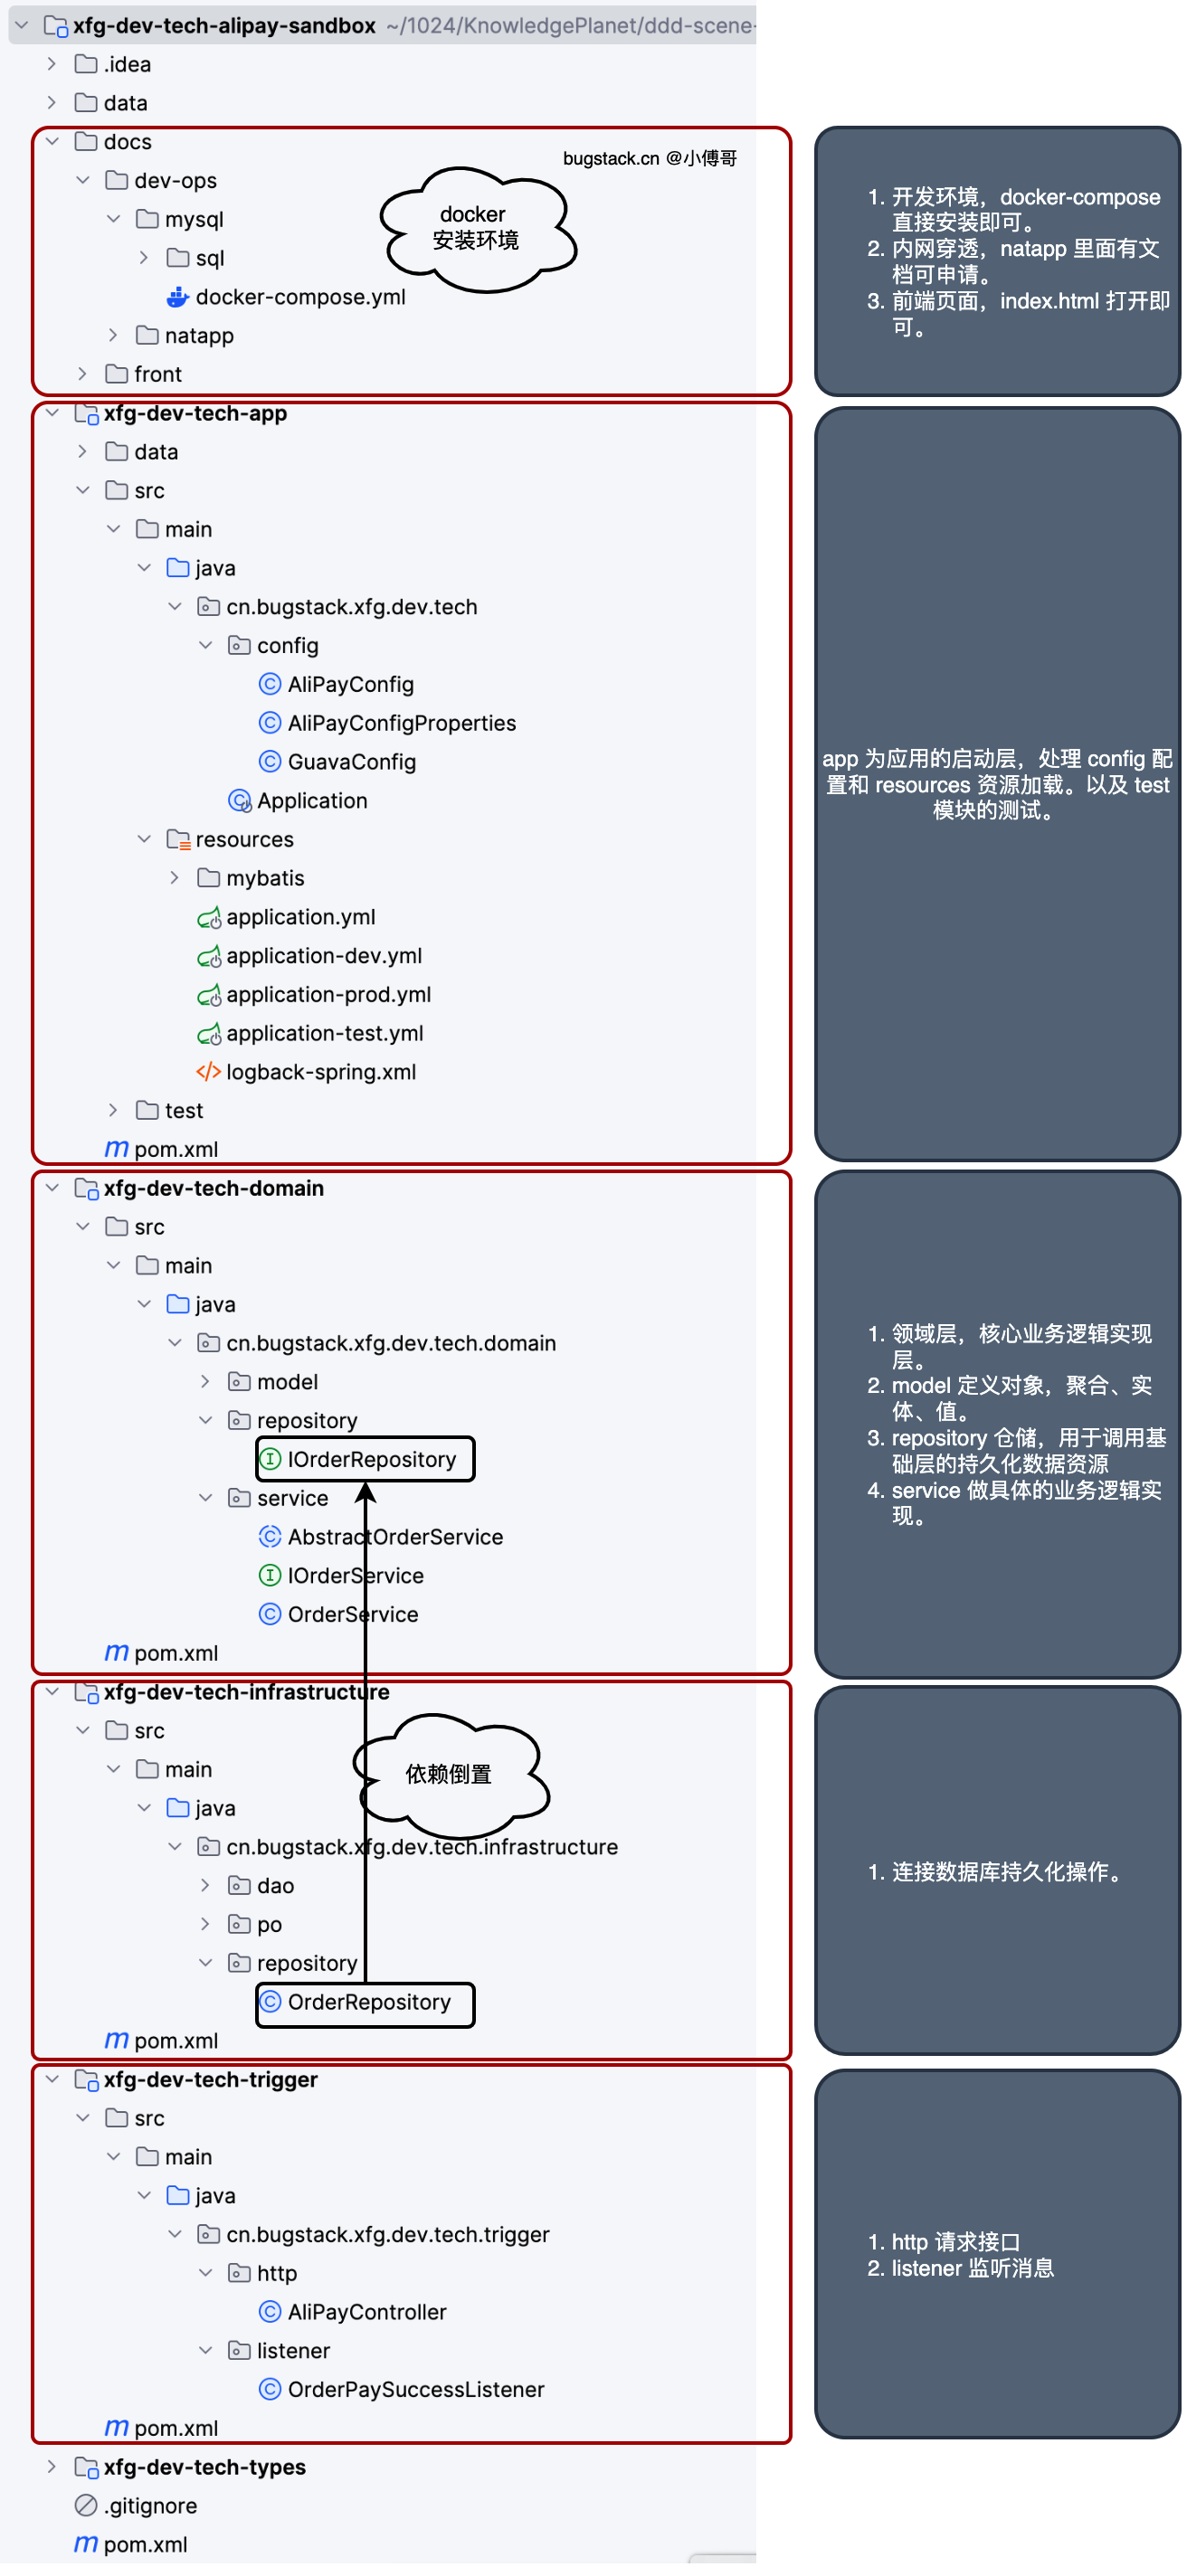
分层介绍:
- docs:这里提供了工程所需的资源,docker 安装 msyql、natapp 内网穿透【需要自己申请一个地址】、front 前端页面。
- app:应用的启动层,处理 config 配置和 resources 资源加载。以及 test 模块的测试。
- domain:领域层,处理核心业务逻辑。
- infrastructure:基础设施层,如管理持久化数据。
- trigger:触发器层,统一管理 http、mq、listener、job 等入口调用。
# 2. 环境安装
# 2.1 MySQL
# 命令执行 docker-compose up -d version: '3.9' services: mysql: image: mysql:8.0.32 container_name: mysql command: --default-authentication-plugin=mysql_native_password restart: always environment: TZ: Asia/Shanghai MYSQL_ROOT_PASSWORD: 123456 MYSQL_USER: xfg MYSQL_PASSWORD: 123456 depends_on: - mysql-job-dbdata ports: - "13306:3306" volumes: - ./sql:/docker-entrypoint-initdb.d volumes_from: - mysql-job-dbdata healthcheck: test: [ "CMD", "mysqladmin" ,"ping", "-h", "localhost" ] interval: 5s timeout: 10s retries: 10 start_period: 15s networks: - my-network # phpmyadmin https://hub.docker.com/_/phpmyadmin phpmyadmin: image: phpmyadmin:5.2.1 container_name: phpmyadmin hostname: phpmyadmin ports: - 8899:80 environment: - PMA_HOST=mysql - PMA_PORT=3306 - MYSQL_ROOT_PASSWORD=123qwe!@#QWE depends_on: mysql: condition: service_healthy networks: - my-network # 自动加载数据 mysql-job-dbdata: image: alpine:3.18.2 container_name: mysql-job-dbdata volumes: - /var/lib/mysql networks: my-network: driver: bridge 2
3
4
5
6
7
8
9
10
11
12
13
14
15
16
17
18
19
20
21
22
23
24
25
26
27
28
29
30
31
32
33
34
35
36
37
38
39
40
41
42
43
44
45
46
47
48
49
50
51
52
53
54
55
56
57
- 直接在 docker 下安装环境,安装时会自动的帮你把 dev-ops/mysql/sql 下的脚本创建到数据库中。
- 并且这里提供了 phpmyadmin 可以让你直接在线上就能管理数据库。
- 如果你本地有 msyql 8.x 那么可以直接导入数据库脚本。
dev-ops/mysql/sql/xfg-dev-tech-alipay-sandbox.sql
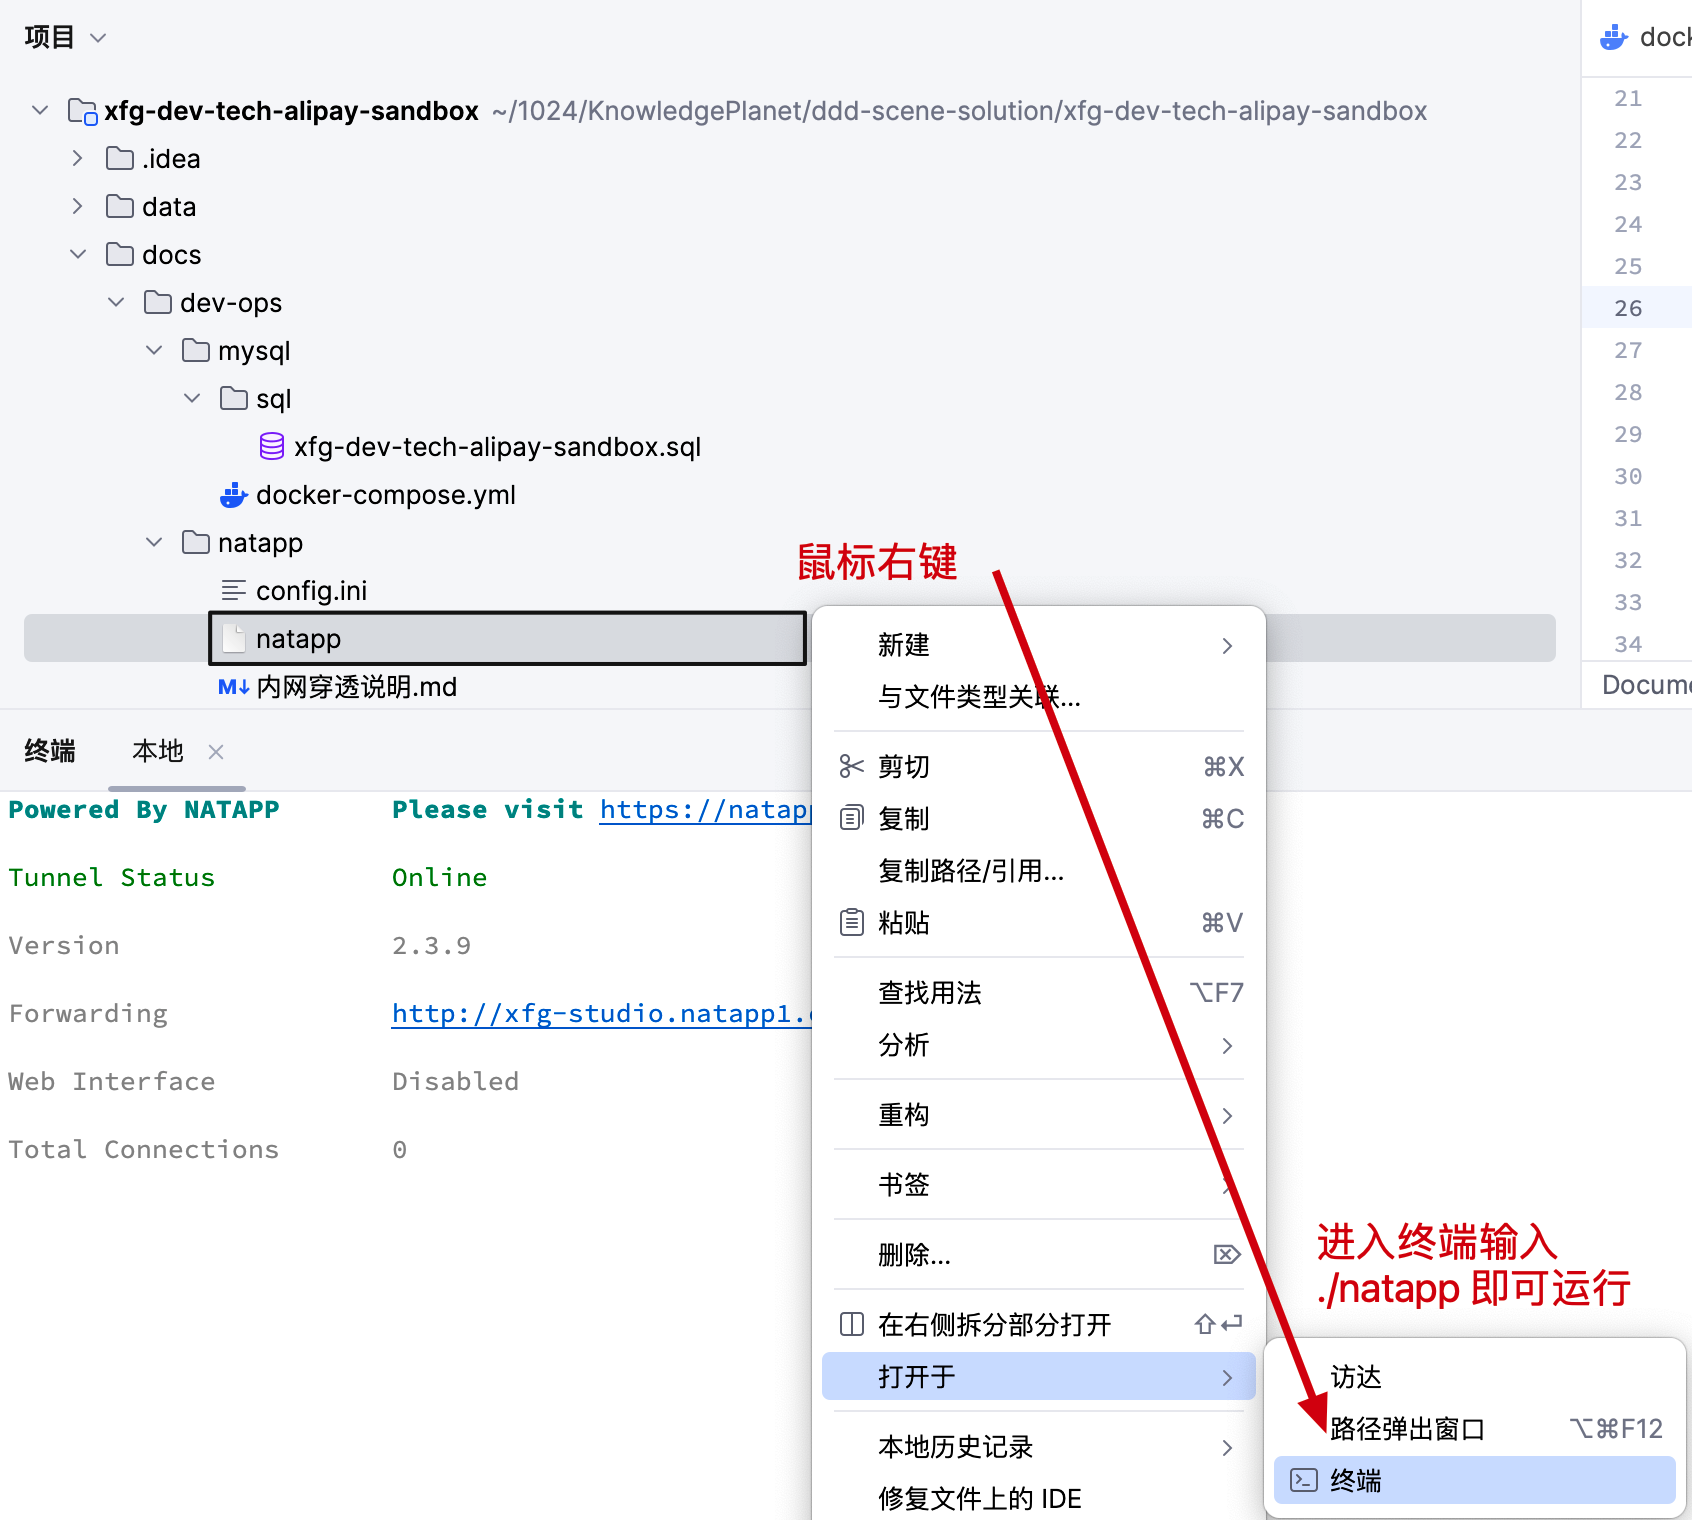
# 2.2 内网穿透
登录:https://natapp.cn/ (opens new window) - 内网穿透的主要作用就是让你的本地应用地址,可以被支付宝回调调用到
- 开通自己的免费/付费渠道,用于内网穿透。本地内网穿透的地址,就可以被公网访问,也就是可以被支付回调。
- 开通后,登录后复制自己的渠道 token 粘贴到 config.ini 文件 authtoken 下。如果是Windows电脑,可以自己在官网下载。地址:https://natapp.cn/#download (opens new window)
# 3. 工程配置
源码:cn.bugstack.xfg.dev.tech.config.AliPayConfig
@Configuration @EnableConfigurationProperties(AliPayConfigProperties.class) public class AliPayConfig { @Bean(name = "alipayClient") @ConditionalOnProperty(value = "alipay.enabled", havingValue = "true", matchIfMissing = false) public AlipayClient alipayClient(AliPayConfigProperties properties){ return new DefaultAlipayClient(properties.getGatewayUrl(), properties.getApp_id(), properties.getMerchant_private_key(), properties.getFormat(), properties.getCharset(), properties.getAlipay_public_key(), properties.getSign_type()); } } 2
3
4
5
6
7
8
9
10
11
12
13
14
15
16
17
# application-dev.yml # 支付宝支付 - 沙箱 https://opendocs.alipay.com/common/02kkv7 alipay: enabled: true app_id: 9021000132689924 merchant_private_key: alipay_public_key: notify_url: http://xfg-studio.natapp1.cc/api/v1/alipay/pay_notify return_url: https://gaga.plus gatewayUrl: https://openapi-sandbox.dl.alipaydev.com/gateway.do 2
3
4
5
6
7
8
9
10
- 你可以参照【简单案例】配置以上内容,包括;app_id、merchant_private_key、alipay_public_key、notify_url 这些参数。
# 4. 代码实现
# 4.1 订单服务
源码:cn.bugstack.xfg.dev.tech.domain.service.IOrderService
public interface IOrderService { /** * 通过购物车实体对象,创建支付单实体(用于支付)—— 所有的订单下单都从购物车开始触发 * * @param shopCartEntity 购物车实体 * @return 支付单实体 */ PayOrderEntity createOrder(ShopCartEntity shopCartEntity) throws Exception; /** * 更新订单状态 * @param orderId 订单ID */ void changeOrderPaySuccess(String orderId); } 2
3
4
5
6
7
8
9
10
11
12
13
14
15
16
17
# 4.2 模板模式
源码:cn.bugstack.xfg.dev.tech.domain.service.AbstractOrderService
@Override public PayOrderEntity createOrder(ShopCartEntity shopCartEntity) throws Exception{ // 1. 查询当前用户是否存在掉单和未支付订单 OrderEntity unpaidOrderEntity = repository.queryUnPayOrder(shopCartEntity); if (null != unpaidOrderEntity && OrderStatusVO.PAY_WAIT.equals(unpaidOrderEntity.getOrderStatus())) { log.info("创建订单-存在,已存在未支付订单。userId:{} productId:{} orderId:{}", shopCartEntity.getUserId(), shopCartEntity.getProductId(), unpaidOrderEntity.getOrderId()); return PayOrderEntity.builder() .orderId(unpaidOrderEntity.getOrderId()) .payUrl(unpaidOrderEntity.getPayUrl()) .build(); } else if (null != unpaidOrderEntity && OrderStatusVO.CREATE.equals(unpaidOrderEntity.getOrderStatus())) { log.info("创建订单-存在,存在未创建支付单订单,创建支付单开始 userId:{} productId:{} orderId:{}", shopCartEntity.getUserId(), shopCartEntity.getProductId(), unpaidOrderEntity.getOrderId()); PayOrderEntity payOrderEntity = this.doPrepayOrder(shopCartEntity.getUserId(), shopCartEntity.getProductId(), unpaidOrderEntity.getProductName(), unpaidOrderEntity.getOrderId(), unpaidOrderEntity.getTotalAmount()); return PayOrderEntity.builder() .orderId(payOrderEntity.getOrderId()) .payUrl(payOrderEntity.getPayUrl()) .build(); } // 2. 查询商品 & 聚合订单 ProductEntity productEntity = repository.queryProductByProductId(shopCartEntity.getProductId()); OrderEntity orderEntity = OrderEntity.builder() .productId(productEntity.getProductId()) .productName(productEntity.getProductName()) .orderId(RandomStringUtils.randomNumeric(16)) .orderTime(new Date()) .orderStatus(OrderStatusVO.CREATE) .build(); CreateOrderAggregate orderAggregate = CreateOrderAggregate.builder() .userId(shopCartEntity.getUserId()) .productEntity(productEntity) .orderEntity(orderEntity) .build(); // 3. 保存订单 - 保存一份订单,再用订单生成ID生成支付单信息 this.doSaveOrder(orderAggregate); // 4. 创建支付单 PayOrderEntity payOrderEntity = this.doPrepayOrder(shopCartEntity.getUserId(), productEntity.getProductId(), productEntity.getProductName(), orderEntity.getOrderId(), productEntity.getPrice()); log.info("创建订单-完成,生成支付单。userId: {} orderId: {} payUrl: {}", shopCartEntity.getUserId(), orderEntity.getOrderId(), payOrderEntity.getPayUrl()); return PayOrderEntity.builder() .orderId(payOrderEntity.getOrderId()) .payUrl(payOrderEntity.getPayUrl()) .build(); } 2
3
4
5
6
7
8
9
10
11
12
13
14
15
16
17
18
19
20
21
22
23
24
25
26
27
28
29
30
31
32
33
34
35
36
37
38
39
40
41
42
43
44
45
46
- 通过模板模式,定义出整个下单过程的标准流程和抽象方法。
# 4.3 支付接口
源码:cn.bugstack.xfg.dev.tech.trigger.http.AliPayController#createParOrder
@RequestMapping(value = "create_pay_order", method = RequestMethod.POST) public Response<String> createParOrder(@RequestParam String userId, @RequestParam String productId) { try { log.info("商品下单,根据商品ID创建支付单开始 userId:{} productId:{}", userId, productId); ShopCartEntity shopCartEntity = ShopCartEntity.builder().userId(userId).productId(productId).build(); PayOrderEntity payOrderEntity = orderService.createOrder(shopCartEntity); log.info("商品下单,根据商品ID创建支付单完成 userId:{} productId:{} orderId:{}", userId, productId, payOrderEntity.getOrderId()); return Response.<String>builder() .code(ResponseCode.SUCCESS.getCode()) .info(ResponseCode.SUCCESS.getInfo()) .data(payOrderEntity.getPayUrl()) .build(); } catch (Exception e) { log.error("商品下单,根据商品ID创建支付单失败 userId:{} productId:{}", userId, productId, e); return Response.<String>builder() .code(ResponseCode.UN_ERROR.getCode()) .info(ResponseCode.UN_ERROR.getInfo()) .build(); } } 2
3
4
5
6
7
8
9
10
11
12
13
14
15
16
17
18
19
20
- 地址:http://localhost:8091/api/v1/alipay/create_pay_order?userId=1001&productId=100001 (opens new window)
- 说明:这里模拟了一个调用接口进行创建支付单的实现。
# 4.4 回调接口
源码:cn.bugstack.xfg.dev.tech.trigger.http.AliPayController#payNotify
@RequestMapping(value = "pay_notify", method = RequestMethod.POST) public String payNotify(HttpServletRequest request) { try { log.info("支付回调,消息接收 {}", request.getParameter("trade_status")); if (request.getParameter("trade_status").equals("TRADE_SUCCESS")) { Map<String, String> params = new HashMap<>(); Map<String, String[]> requestParams = request.getParameterMap(); for (String name : requestParams.keySet()) { params.put(name, request.getParameter(name)); } String tradeNo = params.get("out_trade_no"); String gmtPayment = params.get("gmt_payment"); String alipayTradeNo = params.get("trade_no"); String sign = params.get("sign"); String content = AlipaySignature.getSignCheckContentV1(params); boolean checkSignature = AlipaySignature.rsa256CheckContent(content, sign, alipayPublicKey, "UTF-8"); // 验证签名 // 支付宝验签 if (checkSignature) { // 验签通过 log.info("支付回调,交易名称: {}", params.get("subject")); log.info("支付回调,交易状态: {}", params.get("trade_status")); log.info("支付回调,支付宝交易凭证号: {}", params.get("trade_no")); log.info("支付回调,商户订单号: {}", params.get("out_trade_no")); log.info("支付回调,交易金额: {}", params.get("total_amount")); log.info("支付回调,买家在支付宝唯一id: {}", params.get("buyer_id")); log.info("支付回调,买家付款时间: {}", params.get("gmt_payment")); log.info("支付回调,买家付款金额: {}", params.get("buyer_pay_amount")); log.info("支付回调,支付回调,更新订单 {}", tradeNo); // 更新订单未已支付 orderService.changeOrderPaySuccess(tradeNo); // 推送消息【自己的业务场景中可以使用MQ消息】 eventBus.post(tradeNo); } } return "success"; } catch (Exception e) { log.error("支付回调,处理失败", e); return "false"; } } 2
3
4
5
6
7
8
9
10
11
12
13
14
15
16
17
18
19
20
21
22
23
24
25
26
27
28
29
30
31
32
33
34
35
36
37
38
39
40
- 地址:http://xfg-studio.natapp1.cc/api/v1/alipay/pay_notify (opens new window)
- 说明 :回调是支付宝调用我们的接口。默认是 https://localhost:8091 因为使用了 natapp 就可以把本地的地址+端口,映射到一个 natapp 内网穿透地址。所以地址为:http://xfg-studio.natapp1.cc/api/v1/alipay/pay_notify
# 六、功能验证
# 1. 前置
- 安装 MySQL 8.0 数据库 + 初始化库表。如果你是低版本的数据库,需要自己创建下库表。
- 打开 natapp.cn 配置一个自己的内网穿透渠道,渠道内配置工程映射地址 8091 如果你是其他端口则配置为其他的地址即可。之后本地启动 natapp
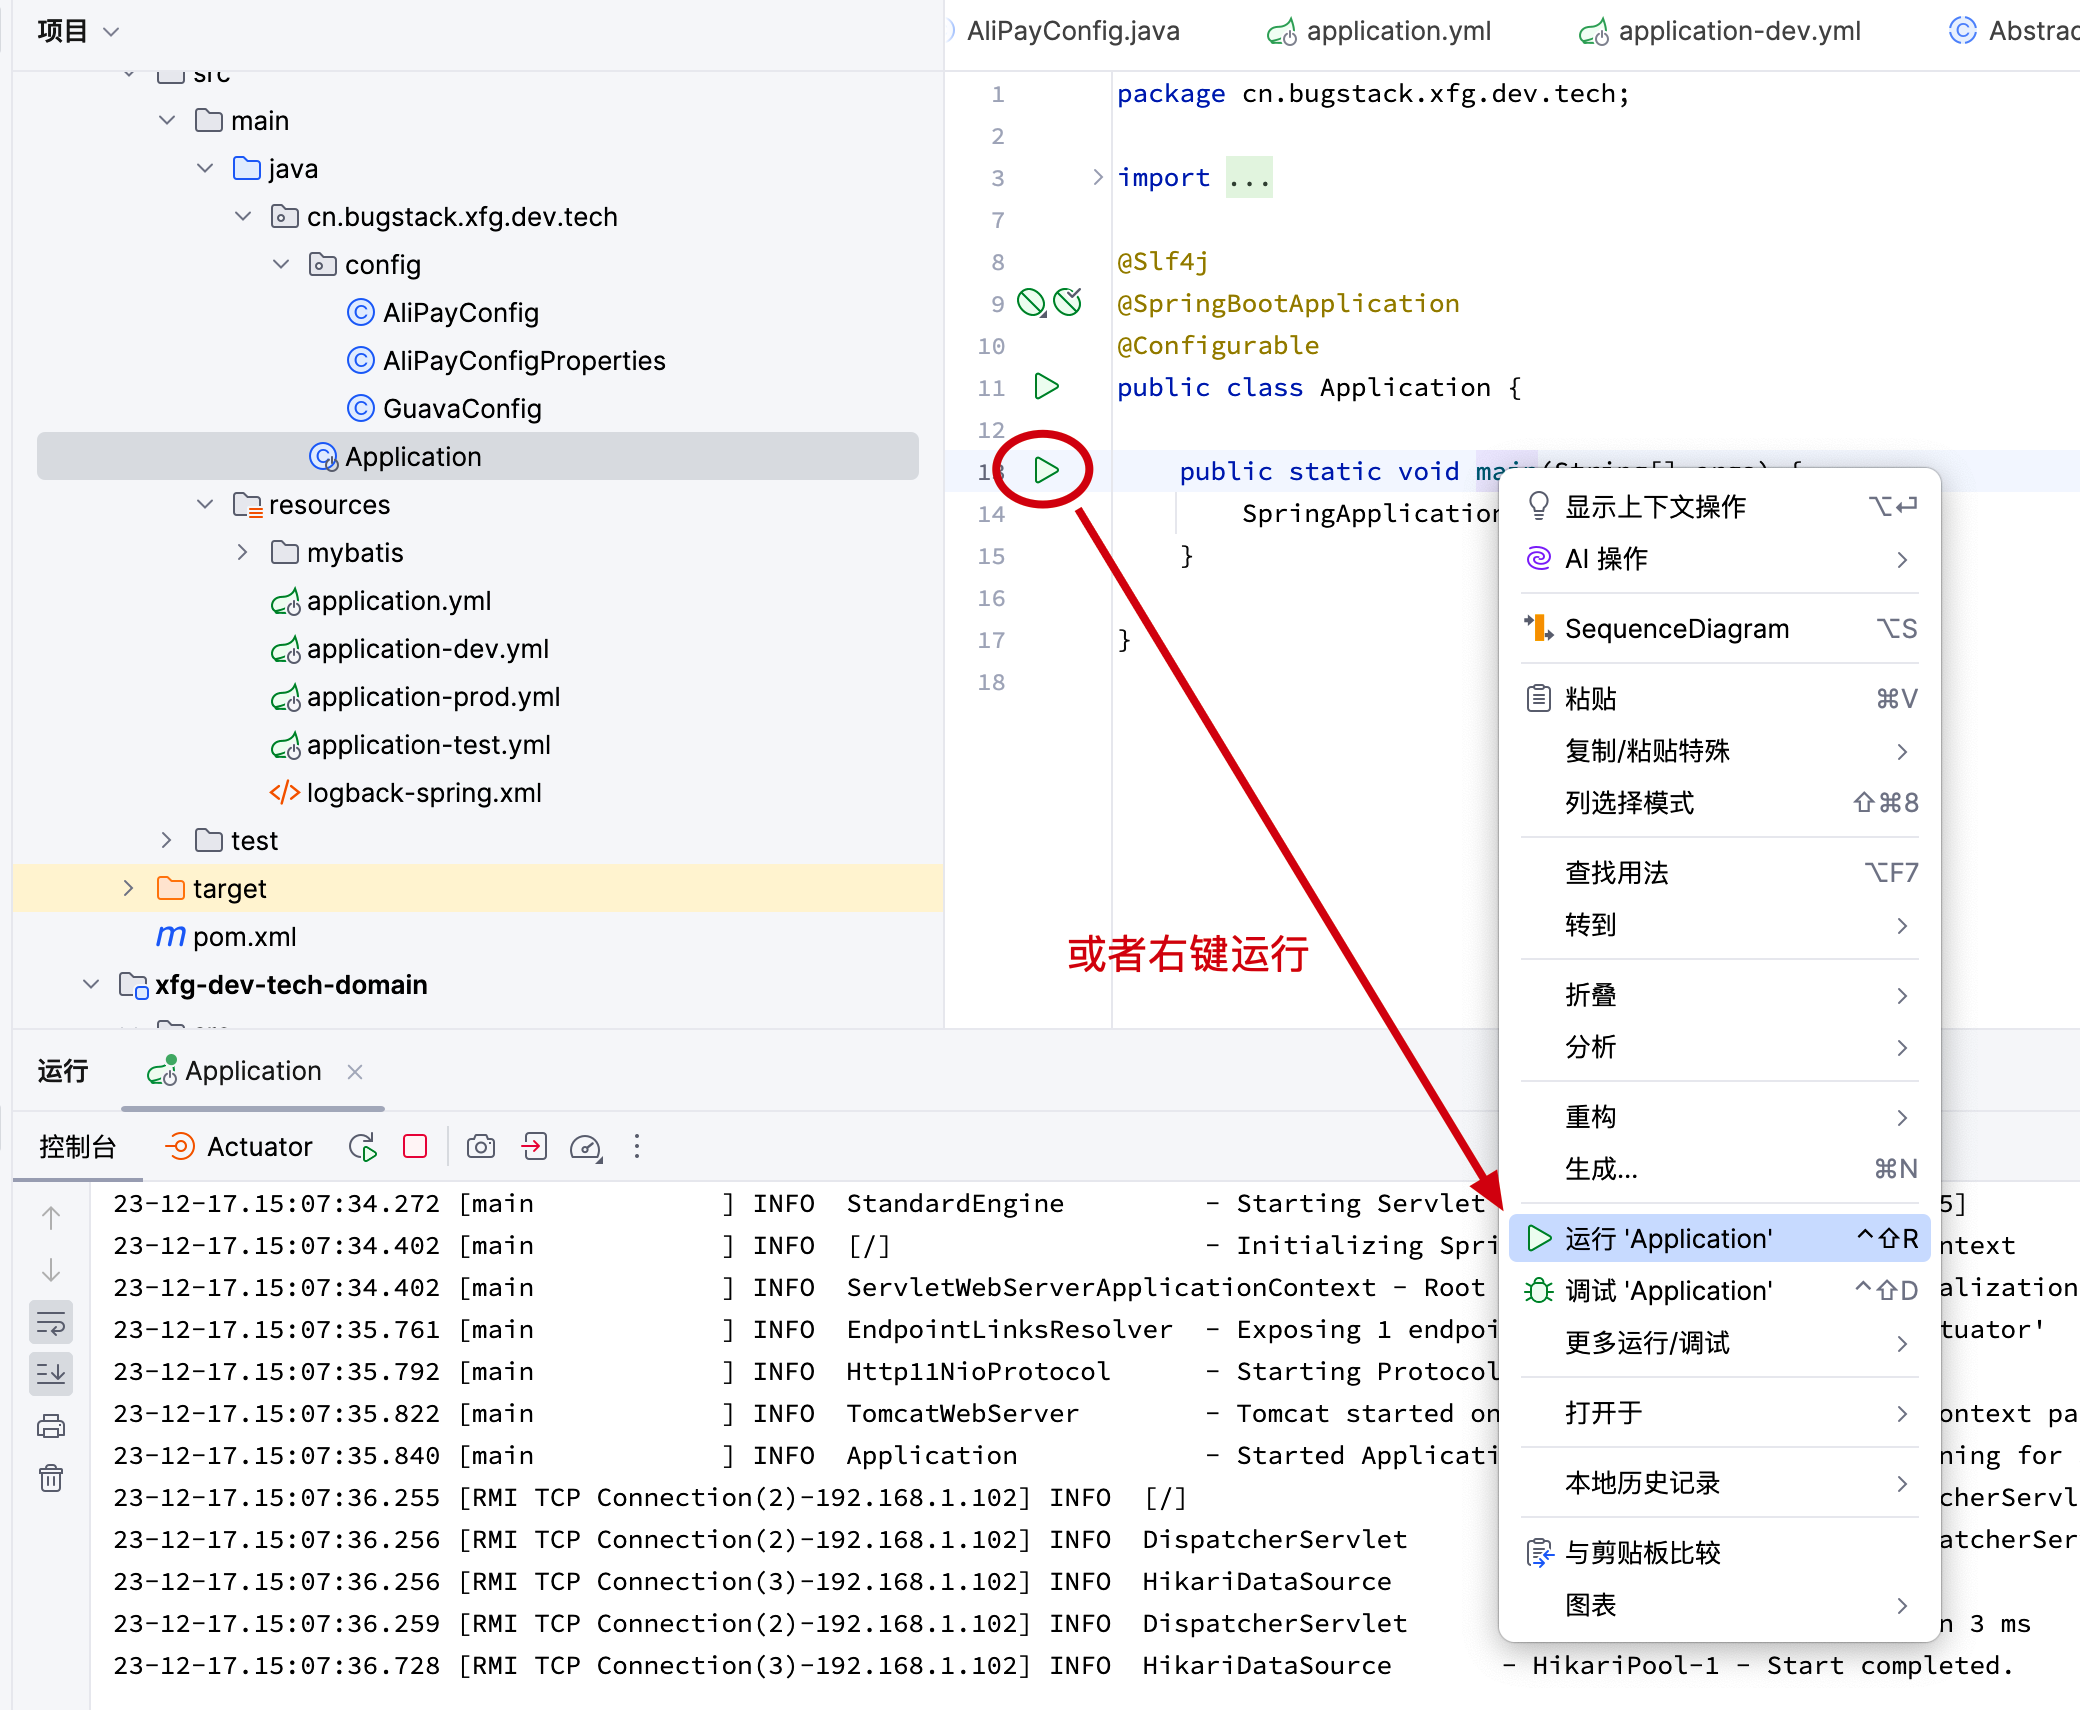
- 启动 xfg-dev-tech-alipay-sandbox 应用。
# 2. 测试
# 2.1 启动 natapp
# 2.2 启动工程
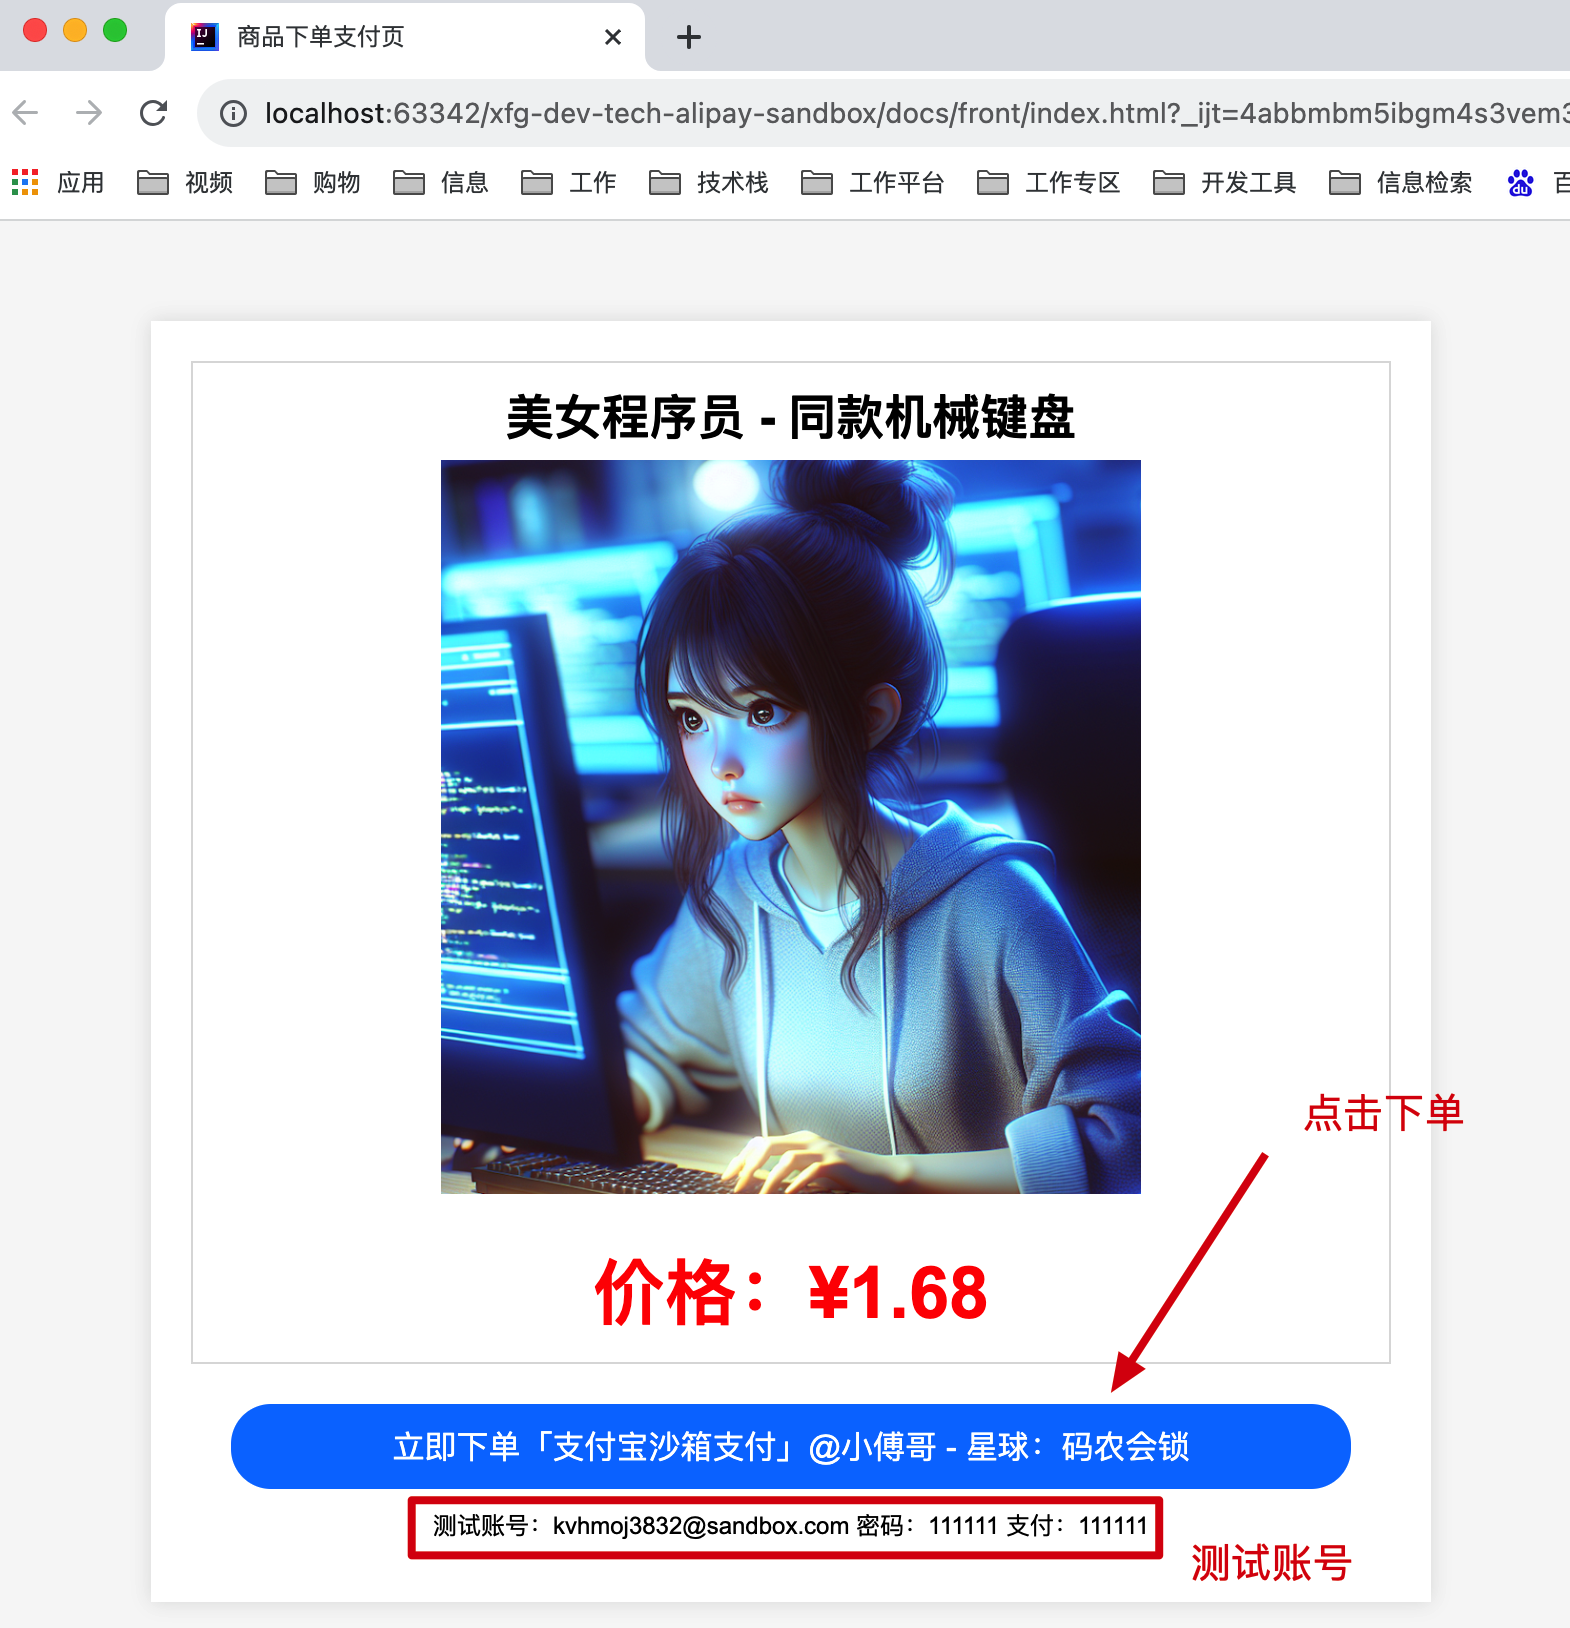
# 2.3 下单页面
进入到工程 docs/dev-ops/front 下,打开 index.html 文件。点击下单,这个时候你会进入到支付页面。
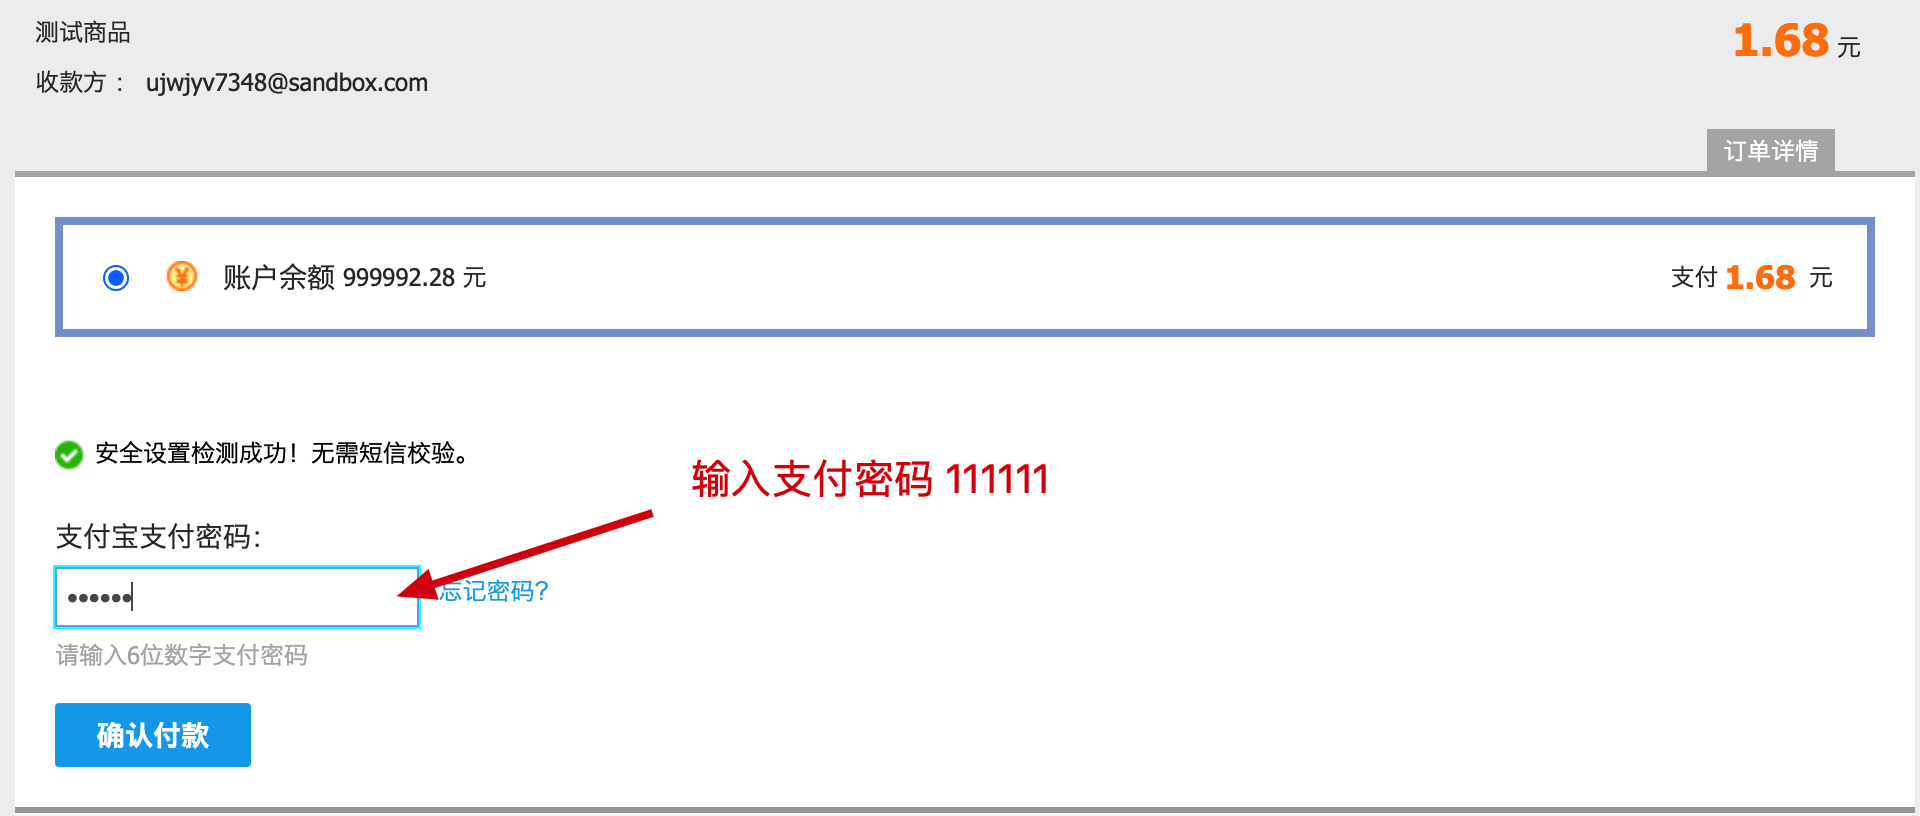
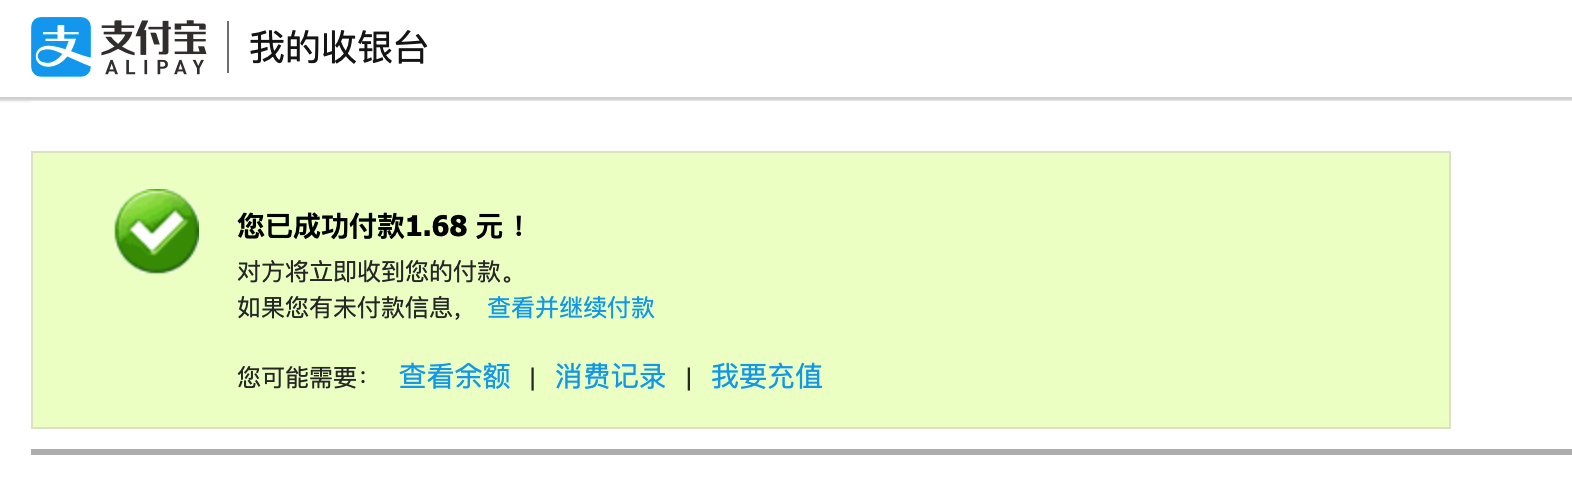
# 2.4 商品支付

# 2.5 库表数据

# 3. 日志
23-12-17.15:11:55.692 [http-nio-8091-exec-4] INFO AliPayController - 商品下单,根据商品ID创建支付单开始 userId:xiaofuge productId:100010090091 23-12-17.15:11:55.908 [http-nio-8091-exec-4] INFO AbstractOrderService - 创建订单-完成,生成支付单。userId: xiaofuge orderId: 1620564694789743 payUrl: <form name="punchout_form" method="post" action="https://openapi-sandbox.dl.alipaydev.com/gateway.do?charset=utf-8&method=alipay.trade.page.pay&sign=dh959MC1wu4JD%2B5%2Fxs5HMLaapqFB2zpH5ceDI5B9tIDsNxq22lRawhQcBL%2BNt8zKpb%2BB9fua5VJnm6PGnq0GRqpE2CIwb99stQuTbwyZDRtRq327Dm%2FvQTXw5vil%2FrIkRC9j8SRH9sCk5ZdiedQqoCXZfacNK2dO87T%2BrOACJDT1RkGxJNl4aZ%2FJCrZlGuEcXccc%2BrZVVRY9spBLXOLJwwNcDZkqJtFkxbZUJbZ86hfkW4ihIDf2Q7nMwTyobyINnNgkbfk2z2dxeK8YAccp16Z5P9uMGvhlIqF6u5itcsFFsxoR43n8%2Fj77aKsFbfLUftJ%2BGpEUEY4smAfSV0eyxw%3D%3D&return_url=https%3A%2F%2Fgaga.plus¬ify_url=http%3A%2F%2Fxfg-studio.natapp1.cc%2Fapi%2Fv1%2Falipay%2Fpay_notify&version=1.0&app_id=9021000132689924&sign_type=RSA2×tamp=2023-12-17+15%3A11%3A55&alipay_sdk=alipay-sdk-java-4.38.157.ALL&format=json"> <input type="hidden" name="biz_content" value="{"out_trade_no":"1620564694789743","total_amount":"1.68","subject":"测试商品","product_code":"FAST_INSTANT_TRADE_PAY"}"> <input type="submit" value="立即支付" style="display:none" > </form> <script>document.forms[0].submit();</script> 23-12-17.15:11:55.909 [http-nio-8091-exec-4] INFO AliPayController - 商品下单,根据商品ID创建支付单完成 userId:xiaofuge productId:100010090091 orderId:1620564694789743 23-12-17.15:12:37.553 [http-nio-8091-exec-5] INFO AliPayController - 支付回调,消息接收 TRADE_SUCCESS 23-12-17.15:12:37.558 [http-nio-8091-exec-5] INFO AliPayController - 支付回调,交易名称: 测试商品 23-12-17.15:12:37.558 [http-nio-8091-exec-5] INFO AliPayController - 支付回调,交易状态: TRADE_SUCCESS 23-12-17.15:12:37.558 [http-nio-8091-exec-5] INFO AliPayController - 支付回调,支付宝交易凭证号: 2023121722001413370501437659 23-12-17.15:12:37.558 [http-nio-8091-exec-5] INFO AliPayController - 支付回调,商户订单号: 1620564694789743 23-12-17.15:12:37.558 [http-nio-8091-exec-5] INFO AliPayController - 支付回调,交易金额: 1.68 23-12-17.15:12:37.562 [http-nio-8091-exec-5] INFO AliPayController - 支付回调,买家在支付宝唯一id: 2088722024513370 23-12-17.15:12:37.562 [http-nio-8091-exec-5] INFO AliPayController - 支付回调,买家付款时间: 2023-12-17 15:12:35 23-12-17.15:12:37.562 [http-nio-8091-exec-5] INFO AliPayController - 支付回调,买家付款金额: 1.68 23-12-17.15:12:37.562 [http-nio-8091-exec-5] INFO AliPayController - 支付回调,支付回调,更新订单 1620564694789743 23-12-17.15:12:37.584 [http-nio-8091-exec-5] INFO OrderPaySuccessListener - 收到支付成功消息,可以做接下来的事情了【发货、充值、开会员】orderId:1620564694789743 2
3
4
5
6
7
8
9
10
11
12
13
14
15
16
17
18
- 以上为整个项目运行过程所产生的日志数据。通过日志可清楚知道每一步的操作过程。
# 七、加入学习
注意📢,本项目也只是【星球:码农会锁】众多项目中的1个,其他的项目还包括:大营销平台系统、OpenAI 大模型应用、API网关、Lottery抽奖、IM通信、SpringBoot Starter 组件开发、IDEA Plugin 插件开发等,并还有开源项目学习。
如果大家希望通过做有价值的编程项目,提高自己的编程思维和编码能力,可以加入小傅哥的【星球:码农会锁】。加入后解锁🔓所有往期项目,还可以学习后续新开发的项目。
加入后即可解锁全部学习资源,项目演示地址:https://gaga.plus (opens new window)

京公网安备 11030102010881号
| GPL Licensed | Copyright © 2019 小傅哥,All rights reserved.