This guide explains how to configure the OpenStack Cloud Provider for Kubernetes in your bare metal cluster. The OpenStack Cloud Provider must be configured to expose Kubernetes Services using the OpenStack LBaaS.
Prerequisites
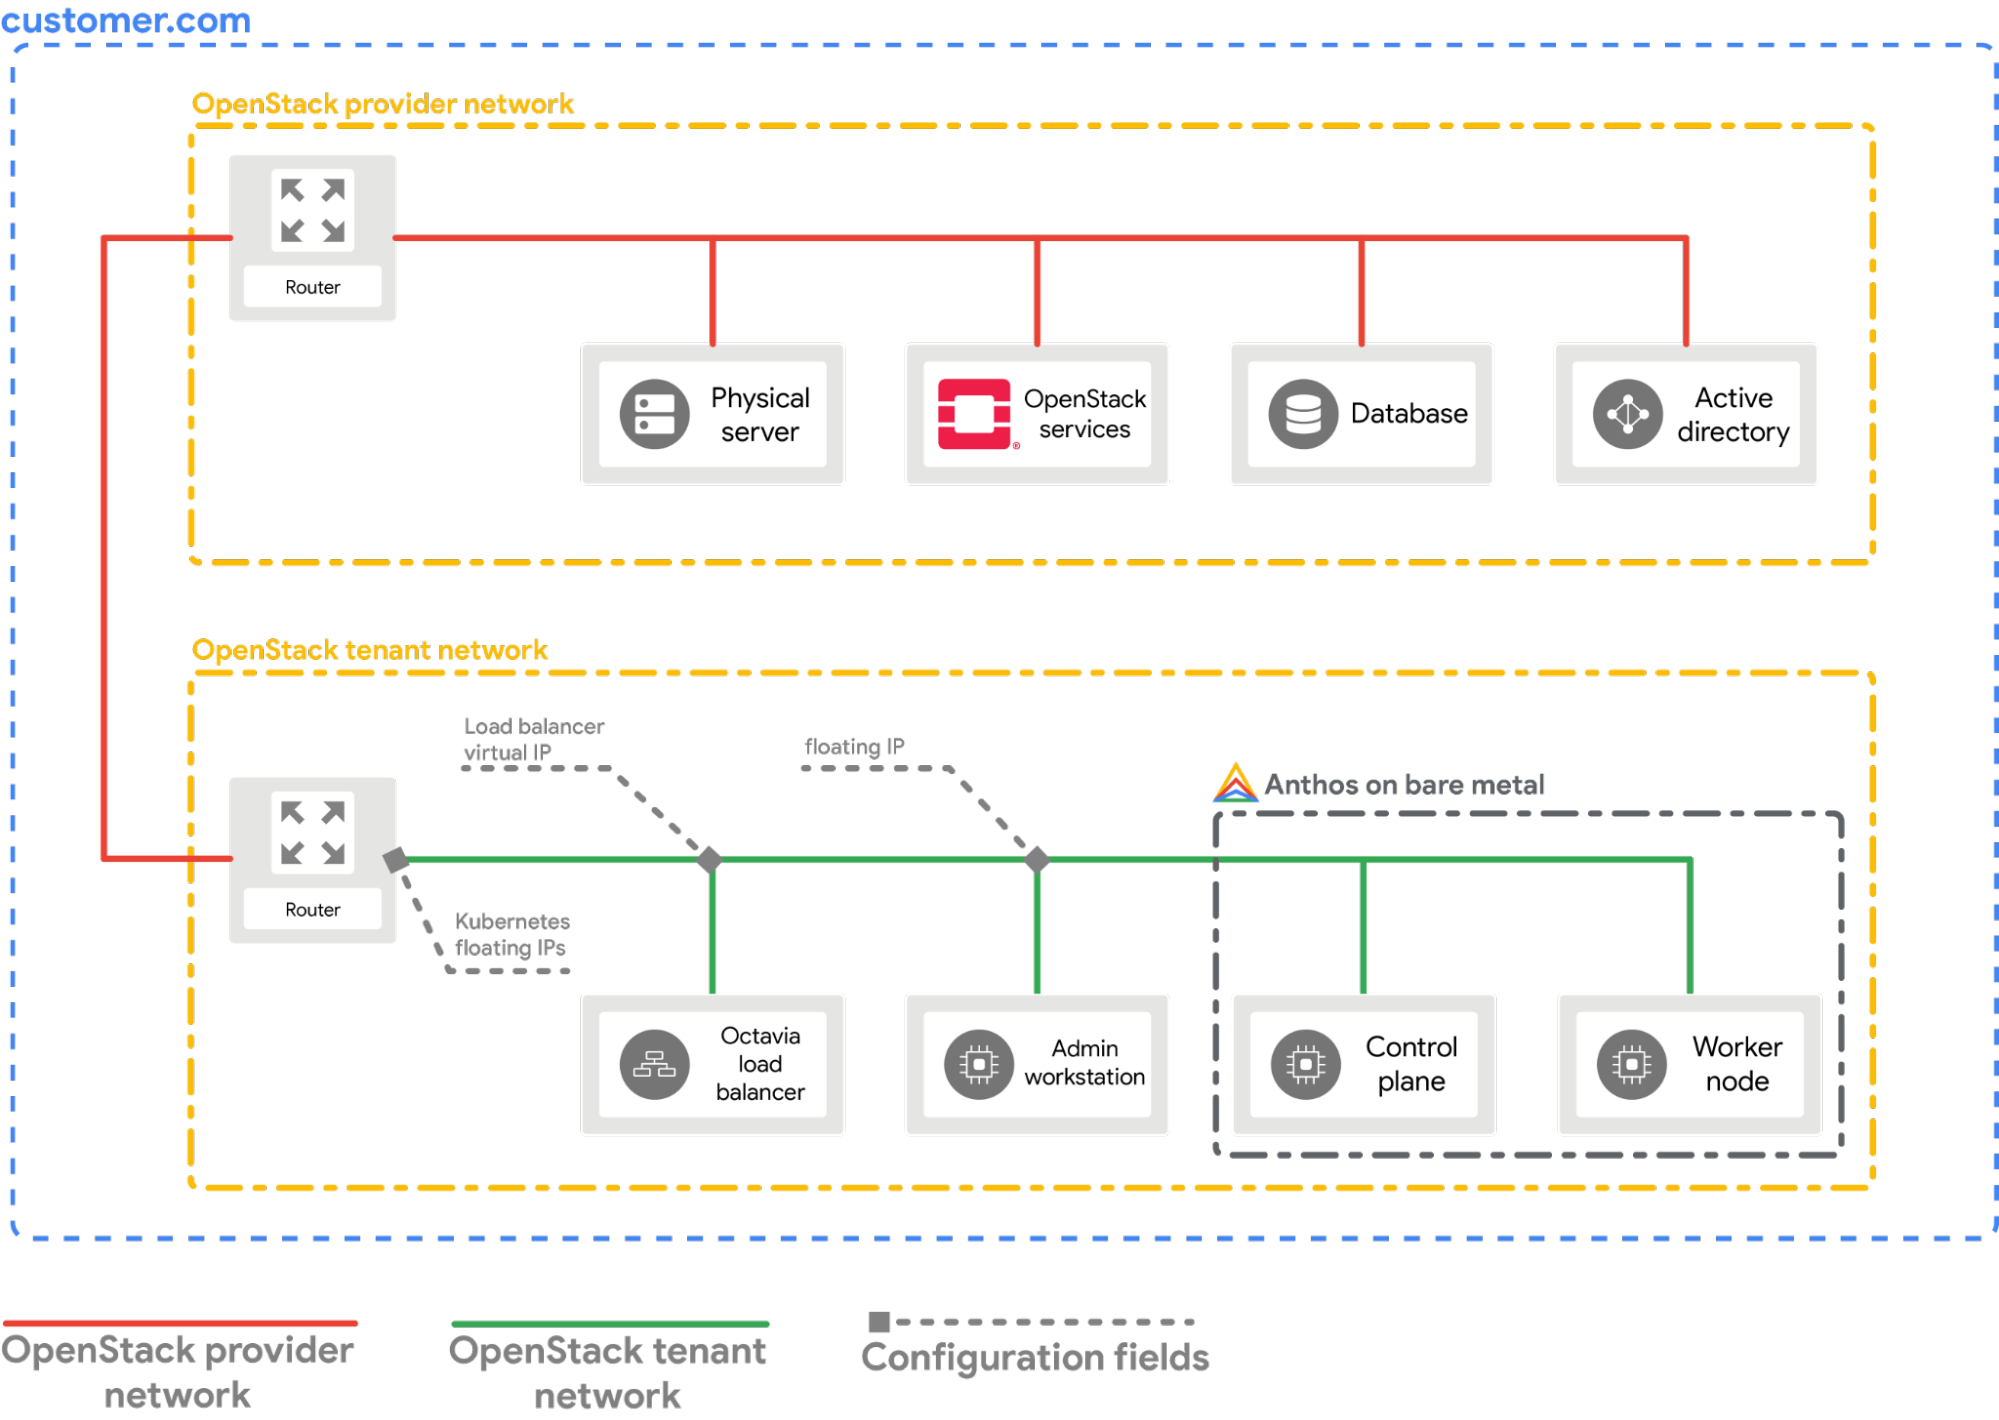
This guide assumes that you have a cluster created with Google Distributed Cloud running in your OpenStack environment with a setup similar to what is explained in the Deploy a bare metal cluster on OpenStack guide. Follow that guide first before trying these steps.
Configure the provider
The following section assumes that you are starting from a terminal window in your local workstation.
Source the OpenStack client configuration (
openrc) file. You can download it from the OpenStack WebUI.source PATH_TO_OPENRC_FILE/openrcCreate the configuration file for the OpenStack Kubernetes Cloud Provider.
cat > cloud.conf << EOF [Global] auth-url=${OS_AUTH_URL} username=${OS_USERNAME} password=${OS_PASSWORD} region=RegionOne tenant-name=admin domain-id=default # this is for using a self-signed cert if your using a CA then comment this line # and point to the CA certificate using the "ca-file" arg tls-Insecure=true [LoadBalancer] use-octavia=true # this is generally the public network on OpenStack floating-network-id=PUBLIC_NETWORK_ID # this should be private network subnet where vip is allocated for the ABM nodes subnet-id=ABM_NETWORK_SUBNET_ID [BlockStorage] bs-version=v2 EOFReplace the following:
OS_AUTH_URL,OS_USERNAME,OS_PASSWORD: These variables should be already set in the environment by source-ing theopenrcfile. Thus, they will be automatically picked up.PUBLIC_NETWORK_ID: This is the publicly accessible network in your OpenStack deployment from which Floating IP addresses are allocated. It is from this network theLoadBalancer IPsfor the Kubernetes services will be assigned. You can use a one-line command to fetch this IP from your OpenStack environment.ABM_NETWORK_SUBNET_ID: This is the subnet on the private network in your OpenStack deployment from which IPs are allocated for the VMs running Google Distributed Cloud software-only. You can use a command similar to Get the ID of the public network in OpenStack to fetch this IP from your OpenStack environment.
Fetch the public floating IP address of the
abm-wsVM.export OPENSTACK_IPS=$(openstack floating ip list --tags=abm_ws_floatingip -f json) export FLOATING_IP=$(jq -c '.[]."Floating IP Address"' <<< $OPENSTACK_IPS | tr -d '"')Copy the
cloud.conffile into theabm-wsVM in OpenStack.scp ./cloud.conf ubuntu@$FLOATING_IP:~Use SSH to connect securely to the
abm-wsVM and sign in as arootuser.The
rootuser as configured by the Terraform scripts isabm.ssh ubuntu@$FLOATING_IP sudo -u abm -iCopy the
cloud.conffiles into the$HOMEdirectory of therootuser.cp /home/ubuntu/cloud.conf $HOMECreate a
Kubernetes Secretwith the configuration.# make sure the kubectl client is pointing towards your cluster export KUBECONFIG=~/bmctl-workspace/CLUSTER_NAME/CLUSTER_NAME-kubeconfig # store the provider configurations as a Kubernetes secret kubectl create secret -n kube-system generic cloud-config --from-file=cloud.confInstall the OpenStack Cloud Provider for Kubernetes.
# create the necessary roles for the OpenStack provider kubectl apply -f https://raw.githubusercontent.com/kubernetes/cloud-provider-openstack/master/manifests/controller-manager/cloud-controller-manager-roles.yaml # create the required role-bindings for the OpenStack provider kubectl apply -f https://raw.githubusercontent.com/kubernetes/cloud-provider-openstack/master/manifests/controller-manager/cloud-controller-manager-role-bindings.yaml # create the OpenStack controller manager kubectl apply -f https://raw.githubusercontent.com/kubernetes/cloud-provider-openstack/master/manifests/controller-manager/openstack-cloud-controller-manager-ds.yaml
Validate the OpenStack integration
Deploy the sample Point-Of-Sales application.
kubectl apply -f https://raw.githubusercontent.com/GoogleCloudPlatform/anthos-samples/master/anthos-bm-openstack-terraform/resources/point-of-sales.yamlVerify if the application pods are running.
kubectl get podsExpected output:
NAME READY STATUS RESTARTS AGE api-server-7db4777f7f-zflk5 1/1 Running 0 74s inventory-58c6fb5568-dqk2x 1/1 Running 0 74s payments-68d5d65d5c-5mjl6 1/1 Running 0 74sExposed the application through a service of type
LoadBalancer.kubectl apply -f https://raw.githubusercontent.com/GoogleCloudPlatform/anthos-samples/master/anthos-bm-openstack-terraform/resources/point-of-sales-service.yamlTry accessing the service from a browser.
# wait for the external IP to be assigned kubectl get service api-server-lb NAME TYPE CLUSTER-IP EXTERNAL-IP PORT(S) AGE api-server-lb LoadBalancer 10.203.77.215 172.29.249.159 80:32378/TCP 4m12sPoint-Of-Sales application accessed using the
EXTERNAL-IP.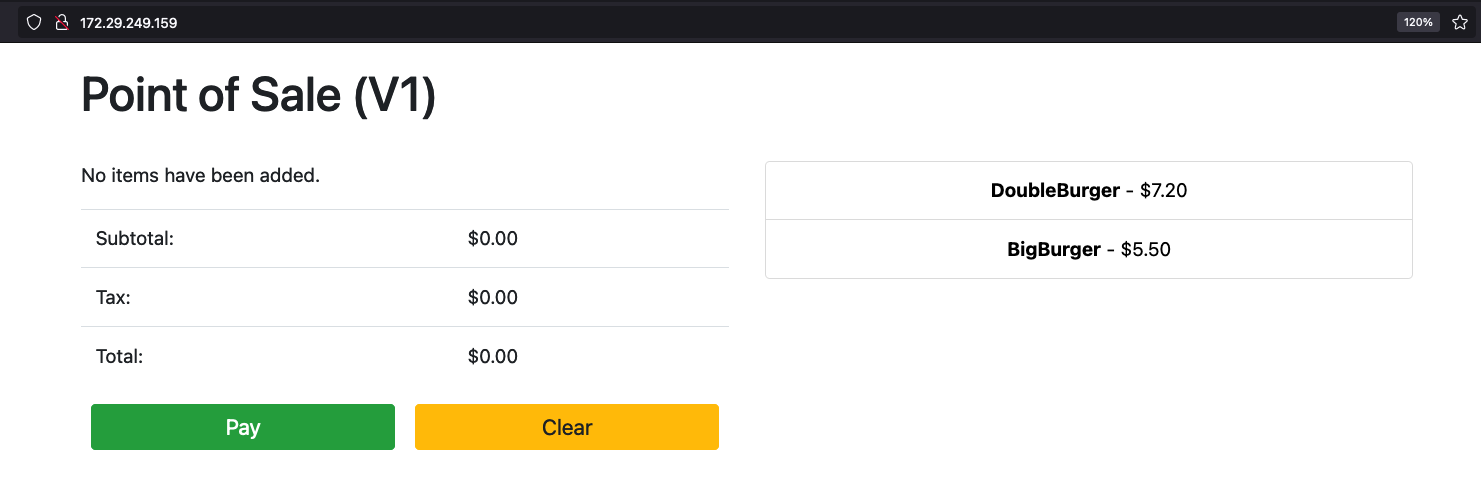
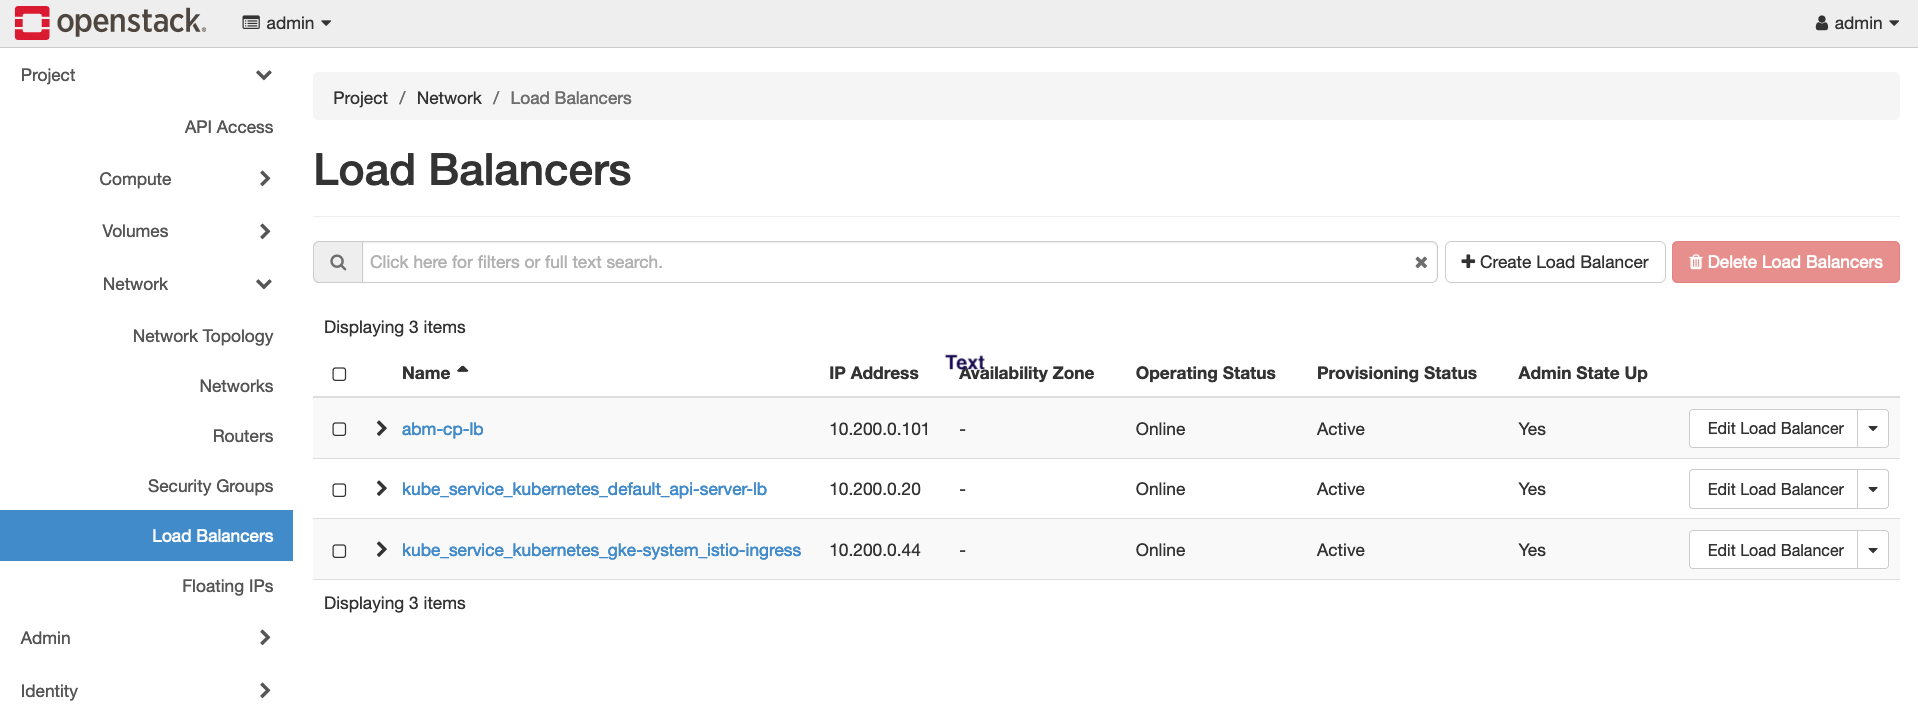
You can notice a new OpenStack Load Balancer being created in OpenStack by visiting the OpenStack WebUI.