Spring Boot offers an opinionated way to bootstrap applications by favoring auto-configuration and making reasonable assumptions about how your application operates.
To configure a data source using Spring Data, you can add the following properties to application.properties:
spring.datasource.url=jdbc:mysql://localhost:3306/my_database spring.datasource.username=sqluser spring.datasource.password=p@55w0rd Under the hood, Spring Boot will instantiate and wire up all of the classes needed to connect to your database.
But what happens if you need to connect to multiple databases? In this post, I'll show you how to configure Spring Boot to work with two entities on two separate databases.
Create a New Spring Boot Project
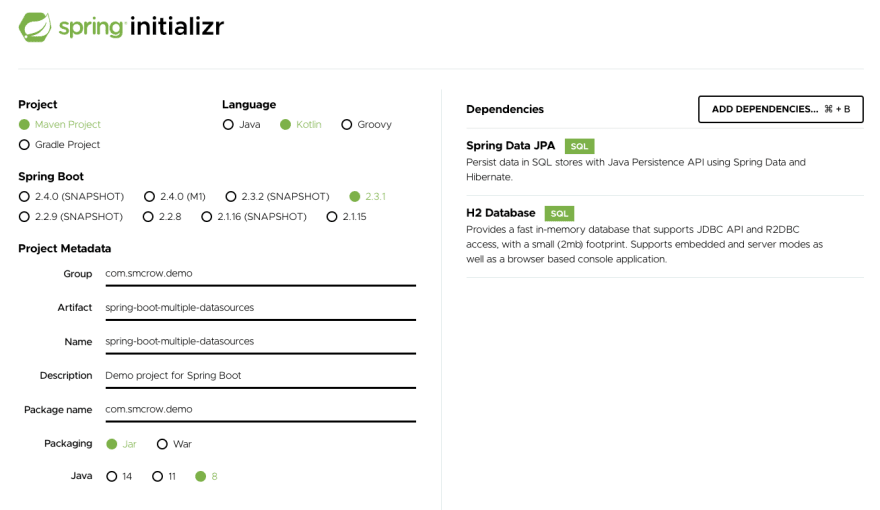
The Spring Initializr can be used to make a new Spring Boot project.
You can also access the Initializr with curl:
curl https://start.spring.io/starter.zip -d dependencies=data-jpa,h2 \ -d language=kotlin \ -d packageName=com.smcrow.demo \ -d artifactId=spring-boot-multiple-datasources \ -d groupId=com.smcrow.demo \ -d baseDir=spring-boot-multiple-datasource | tar -xzvf - Create the Entities
For this example, you're going to create two entities:
-
com.smcrow.demo.farm.Animalwill be used to access information from theAnimaltable of theFarmdatabase. -
com.smcrow.demo.factory.Workerwill be used to access information from theWorkertable of theFactorydatabase.
Create the Animal Entity
First, create a new class to represent an Animal. This class will be created in the com.smcrow.demo.farm package:
package com.smcrow.demo.farm import org.springframework.data.jpa.repository.JpaRepository import org.springframework.stereotype.Repository import javax.persistence.Entity import javax.persistence.GeneratedValue import javax.persistence.GenerationType import javax.persistence.Id @Entity class Animal( @Id @GeneratedValue(strategy = GenerationType.IDENTITY) val id: Long = 0, val name: String ) @Repository interface AnimalRepository : JpaRepository<Animal, Long> I like to put my JpaRepository interfaces inside of the same file as the class.
Create the Worker Entity
Now, create a new class to represent a Worker. This class will be created in the com.smcrow.demo.factory package. Separating the Worker and Animal classes into different packages will help later with configuration:
package com.smcrow.demo.factory import org.springframework.data.jpa.repository.JpaRepository import org.springframework.stereotype.Repository import javax.persistence.Entity import javax.persistence.GeneratedValue import javax.persistence.GenerationType import javax.persistence.Id @Entity class Worker( @Id @GeneratedValue(strategy = GenerationType.IDENTITY) val id: Long = 0, val name: String ) @Repository interface WorkerRepository : JpaRepository<Worker, Long> Add Database Configuration to application.properties
Since the worker and the animal tables exist in different databases, two configuration blocks are necessary.
You can define multiple data sources inside of application.properties:
# Farm DB Connection spring.datasource-farm.jdbcUrl=jdbc:h2:mem:farm spring.datasource-farm.username=sa spring.datasource-farm.password= # Factory DB Connection spring.datasource-factory.jdbcUrl=jdbc:h2:mem:factory spring.datasource-factory.username=sa spring.datasource-factory.password= Register the Database Connections
Normally, Spring Boot expects to find database credentials as part of the spring.datasource.* configuration prefix. Instead of using the automatic configuration, the data sources must be defined manually.
Create the Farm Data Source Configuration
Create a new class inside of the com.smcrow.demo.farm package called FarmDataSourceConfiguration:
package com.smcrow.demo.farm import org.springframework.boot.context.properties.ConfigurationProperties import org.springframework.boot.jdbc.DataSourceBuilder import org.springframework.context.annotation.Bean import org.springframework.context.annotation.Configuration import org.springframework.data.jpa.repository.config.EnableJpaRepositories import org.springframework.orm.jpa.JpaTransactionManager import org.springframework.orm.jpa.LocalContainerEntityManagerFactoryBean import org.springframework.orm.jpa.vendor.HibernateJpaVendorAdapter import javax.sql.DataSource @Configuration @EnableJpaRepositories( basePackages = ["com.smcrow.demo.farm"], entityManagerFactoryRef = "farmEntityManager", transactionManagerRef = "farmTransactionManager" ) class FarmDataSourceConfiguration { @Bean @ConfigurationProperties(prefix = "spring.datasource-farm") fun farmDataSource(): DataSource = DataSourceBuilder.create().build() @Bean fun farmEntityManager(): LocalContainerEntityManagerFactoryBean = (LocalContainerEntityManagerFactoryBean()).apply { dataSource = farmDataSource() setPackagesToScan("com.smcrow.demo.farm") jpaVendorAdapter = HibernateJpaVendorAdapter() } @Bean fun farmTransactionManager() = JpaTransactionManager(farmEntityManager().`object`!!) } Create the Factory Data Source Configuration
Create a new class inside of the com.smcrow.demo.factory package called FactoryDataSourceConfiguration:
package com.smcrow.demo.factory import org.springframework.boot.context.properties.ConfigurationProperties import org.springframework.boot.jdbc.DataSourceBuilder import org.springframework.context.annotation.Bean import org.springframework.context.annotation.Configuration import org.springframework.data.jpa.repository.config.EnableJpaRepositories import org.springframework.orm.jpa.JpaTransactionManager import org.springframework.orm.jpa.LocalContainerEntityManagerFactoryBean import org.springframework.orm.jpa.vendor.HibernateJpaVendorAdapter import javax.sql.DataSource @Configuration @EnableJpaRepositories( basePackages = ["com.smcrow.demo.factory"], entityManagerFactoryRef = "factoryEntityManager", transactionManagerRef = "factoryTransactionManager" ) class FactoryDataSourceConfiguration { @Bean @ConfigurationProperties(prefix = "spring.datasource-factory") fun factoryDataSource(): DataSource = DataSourceBuilder.create().build() @Bean fun factoryEntityManager(): LocalContainerEntityManagerFactoryBean = (LocalContainerEntityManagerFactoryBean()).apply { dataSource = factoryDataSource() setPackagesToScan("com.smcrow.demo.factory") jpaVendorAdapter = HibernateJpaVendorAdapter() } @Bean fun factoryTransactionManager() = JpaTransactionManager(factoryEntityManager().`object`!!) } More Detail
Now let's break down the configuration classes.
Each configuration class has an @EnableJpaRepositories annotation. This enables package scanning for interfaces annotated with @Repository.
The basePackages is an array of packages that contain the @Repositories that will be associated with the specific data source being configured.
There are three beans that are created in each configuration class.
The first is the data source which represents a connection to a physical data source. The @ConfigurationProperties annotation allows the properties from spring.datasource-factory to be loaded into the DataSource.
@Bean @ConfigurationProperties(prefix = "spring.datasource-factory") fun factoryDataSource(): DataSource = DataSourceBuilder.create().build() The next bean is the LocalContainerEntityManagerFactoryBean which is used to create the EntityManagerFactory
@Bean fun factoryEntityManager(): LocalContainerEntityManagerFactoryBean = (LocalContainerEntityManagerFactoryBean()).apply { dataSource = factoryDataSource() setPackagesToScan("com.smcrow.demo.factory") jpaVendorAdapter = HibernateJpaVendorAdapter() } And the third is the JpaTransactionManager:
@Bean fun factoryTransactionManager() = JpaTransactionManager(factoryEntityManager().`object`!!) Summary
I hope that this helps serve as a quick reference guide for setting up multiple data sources in Spring Boot and Kotlin.
The full code repository can be found on GitHub: cr0wst/spring-boot-multiple-datasource
I've found a few other resources for configuring this in Java, but none of them were written with Kotlin in mind. They can be found here:

Top comments (2)
Thanks! This setup worked for me except that I needed to install jakarta persistence package as I was facing issue with unmet dependency for javax.persistence.
thanks!