1、程序结构:
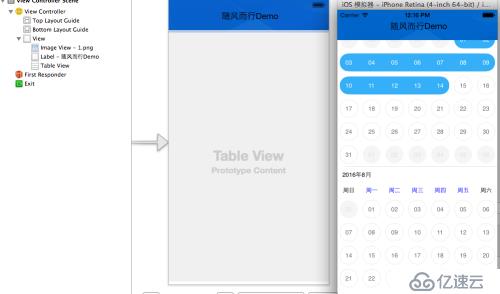
千言万语,不如一张图来的清晰

1) 由于CalendarController包含了一个UITableView指针,因此CalendarController需要实现UITableDataSource以及UITableViewDelegate与UITableView进行交互。 2) UITableView包含多个CalendarView,这样就能利用UITableView的手势滑动功能以及Cell重用功能。 3) CalendarView继承自UIControl,因为UIControl将相对底层的触摸事件转换为容易操作的控件事件。主要为了使用UIControlEventTouchUpInside这个事件。 4) CalendarDelegate仿照ios mvc模式,用于类之间的解耦(面向接口编程)以及类之间的通信。
2、 CalendarDelegate 协议:
@protocol CalendarDelegate <NSObject> //年月和UITableView以及其中CalendarView之间关系映射 //具体见下面代码分析 -(int) calcCalendarCount; -(SDate) mapIndexToYearMonth : (int) index; -(int) mapYearMonthToIndex : (SDate) date; //用于显示到指定的年月范围 -(void) showCalendarAtYearMonth : (SDate) date; //用于时间期限管理以及选中判断 -(BOOL) isInSelectedDateRange : (SDate) date; -(void) setSelectedDateRangeStart : (SDate) start end : (SDate) end; -(void) setEndSelectedDate : (SDate) end; //迫使整个UITableView重绘 -(void) repaintCalendarViews; //计数器,用于判断touch次数 -(void) updateHitCounter; -(int) getHitCounter; @end
3、 CalendarController:
//.h文件接口声明 #import <UIKit/UIKit.h> @interface ViewController :UIViewController @end
//.m文件 #import "ViewController.h" #import "CalendarDelegate.h" #import "CalendarView.h" //实现了如下三个delegate @interface ViewController () <UITableViewDataSource,UITableViewDelegate,CalendarDelegate> { //用于计算出多少个月历,具体见下面代码 int _startYear; int _endYear; //每个月历控件的高度,上面的个数和此地的高度,就可以计算整个UITableView的高度以及进行定位操作 float _calendarHeight; //用于选中操作时候,时间范围的比较(time_t实际是个64位的整型值,适合做比较操作,具体看实现代码) time_t _startTime; time_t _endTime; } //选中值的年月表示方式,方便显示而已,实际操作都转换成time_t类型 @property (nonatomic,assign) SDate begDate; @property (nonatomic,assign) SDate endDate; //点击计数器,用于确定当前点击的奇偶性,因此改月历控件涉及两次操作,用于区域选者 @property (nonatomic) int hitCounter; //作为Calendar的父容器,用于处理滑动以及cell重用 @property (weak, nonatomic) IBOutlet UITableView *tableView; @end-(int) calcCalendarCount { SDate date; date_get_now(&date); //计算出当前的年月到n年前的1月份的月数 //加设当前为2016年8月,n为5,则月份范围为[2011年1月---2016年8月 总计月数为68],具体算法如下: int diff = _endYear - _startYear + 1; diff = diff * 12; diff -= 12 - date.month; return diff; } //UITableView的DatatSource有个必须实现的协议函数,用于返回当前UITableView可以容纳的总数: - (NSInteger)tableView:(UITableView *)tableView numberOfRowsInSection:(NSInteger)section { int ret = [self calcCalendarCount]; return ret; }- (CGFloat)tableView:(UITableView*)tableView heightForRowAtIndexPath:(NSIndexPath *)indexPath { //返回的是当前的calendarView的高度 //UITableView需要知道月历(月份)的个数以及月历控件的高度,就可以计算出整个UITableView的Content的height了 return _calendarHeight; }千言万语,不如再来一张图来的清晰
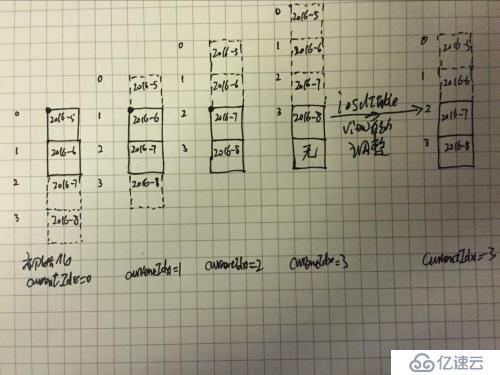
-(SDate) mapIndexToYearMonth : (int) index { SDate ret; //调用c函数,将索引号映射成年月,用于UITableView创建calendarView时现实月历标题 date_map_index_to_year_month(&ret, _startYear, index); return ret; } //调用mapIndexToYearMonth: - (UITableViewCell *)tableView:(UITableView *)tableView cellForRowAtIndexPath:(NSIndexPath *)indexPath { static NSString* calendarID = @"calendarID"; float width = self.tableView.frame.size.width; //从行索引号映射到年月 SDate date = [self mapIndexToYearMonth:(int)indexPath.row]; //获取重用的cell UITableViewCell *cell = [tableView dequeueReusableCellWithIdentifier:calendarID ]; //如果为null,说明不存在,创建该cell if(cell == nil) { //可以在此断点,查看一下具体生成了多少个calendarView(我这里生成了3个) //说明UITableView可见rect有三个calendarView相交 cell = [[UITableViewCell alloc] initWithStyle:UITableViewCellStyleDefault reuseIdentifier:calendarID]; [cell setTag:10]; //手动创建CalendarView CalendarView* calendarView = [[CalendarView alloc] initWithFrame:CGRectMake(0, 0, width, _calendarHeight)]; //设置CalednarDelegate calendarView.calendarDelegate = self; //给定一个tag号,用于重用时获得该view [calendarView setTag:1000]; [cell.contentView addSubview:calendarView]; } //通过tag号,获取view CalendarView* view =(CalendarView*) [cell.contentView viewWithTag:1000]; //设置CalendarView的年月 [view setYearMonth:date.year month:date.month]; //[view setNeedsDisplay]; return cell; } -(int) mapYearMonthToIndex:(SDate)date { int yearDiff = date.year - _startYear; int index = yearDiff * 12; index += date.month; index -= 1; return index; } //调用mapYearMonthToIndex -(void) showCalendarAtYearMonth:(SDate)date { if(date.year < _startYear || date.year > _endYear) return; //将年月表示映射成UITableView中的索引号,根据索引计算出要滚动到的目的地 int idx = [self mapYearMonthToIndex:date]; //如上图所示:当idx = calendarViews.length-1时,可能存在超过整个UITableView ContentSize.height情况,此时,UITableView会自动调整contentOffset的值,使其符合定位到最底端,android listview也是如此。 self.tableView.contentOffset = CGPointMake(0.0F, idx * _calendarHeight ); }1) 从上图以及代码,应该很清楚的了解了映射和定位问题的过程 2) 从上图中,我们也可以了解到UITableView的滚动原理,UITableView的Frame是Clip区域,滚动的内容存放于Content中。 3) UITableView可以说是移动开发中最常用,最重要的一个控件(还有一个是UICollectionView)。有两个主要功能点:滚动(UIScrollView父类)和cell复用。以后有机会我们来从头到尾实现一个带有上述功能的控件。
- (void)viewDidLoad { [super viewDidLoad]; // Do any additional setup after loading the view, typically from a nib. //获取当前的年月 SDate date; date_get_now(&date); //default有3年 _startYear = date.year-3; _endYear = date.year; /* //当年也支持 _startYear = date.year; _endYear = date.year; */ //touch 计数器 _hitCounter = 0; float scale = 0.6F;//硬编码,最好由外部设置 //float scale = 0.5F;//硬编码,最好由外部设置 _calendarHeight = self.tableView.frame.size.height * scale; self.tableView.dataSource = self; self.tableView.delegate = self; //default定位显示当前月份 if (self.begDate.year == 0) { self.begDate = date; [self showCalendarAtYearMonth:date]; }else{ //当然你也可以设置具体月份重点显示 [self showCalendarAtYearMonth:self.begDate]; } }到目前为止,支持CalendarController运行的所有方法都分析完毕,接下来我们要看一下CalendarView相关的实现。(CalendarDelegate还有一些方法没分析,因为这些方法是由CalendarView调用的,由此可见,IOS中的Delegate除了面向接口编程外,还有一个功能就是类之间的通信)
4、 CalendarView:
//.h文件 @interface CalendarView : UIControl -(void) setYearMonth : (int) year month : (int) month; @property (weak, nonatomic) id calendarDelegate; @end
//.m文件 @interface CalendarView() { /* blf: 引用c结构,所有月历相关操作委托给SCalendar的相关函数 SCalendar 使用栈内存分配 */ SCalendar _calendar; //这是一个很重要的变量,具体源码中说明 int _lastMonthDayCount; //存放月历的日期和星期字符串 NSMutableArray* _dayAndWeekStringArray; //string绘制时的大小 CGSize _dayStringDrawingSize; CGSize _weekStringDrawingSize; }- (id)initWithFrame:(CGRect)frame { self = [super initWithFrame:frame]; if (self) { // Initialization code //年月区块和星期区块的大小按当前view高度的比例来设定 float yearMonthHeight = frame.size.height * 0.095F; float weekHeight = frame.size.height * 0.089F; //初始化月历控件,计算出各个区块部分的大小 calendar_init(&_calendar, frame.size, yearMonthHeight, weekHeight); SDate date = _calendar.date; //此时date是上个月 date_get_prev_month(&date, 1); self.backgroundColor = [UIColor clearColor]; //设置日期区块的大小 CGRect rc; calendar_get_day_cell_rect(&_calendar,&rc,0,0); CGSize size; size.height = rc.size.height- 15 ; size.width = rc.size.width - 15; //预先分配38个字符串容量的数组 _dayAndWeekStringArray = [NSMutableArray arrayWithCapacity:38]; //0--30表示最多31天日期字符串 for(int i = 0; i < 31; i++) [_dayAndWeekStringArray addObject: [NSString stringWithFormat:@"%02d",i+1]]; //31--37存储星期字符串 [_dayAndWeekStringArray addObject:@"周日"]; [_dayAndWeekStringArray addObject:@"周一"]; [_dayAndWeekStringArray addObject:@"周二"]; [_dayAndWeekStringArray addObject:@"周三"]; [_dayAndWeekStringArray addObject:@"周四"]; [_dayAndWeekStringArray addObject:@"周五"]; [_dayAndWeekStringArray addObject:@"周六"]; //计算出日期字符串的绘制用尺寸 _dayStringDrawingSize = [self getStringDrawingSize: [_dayAndWeekStringArray objectAtIndex:0]]; //计算出星期字符串的绘制用尺寸 _weekStringDrawingSize = [self getStringDrawingSize: [_dayAndWeekStringArray objectAtIndex:31]]; //UIControl基于控件的事件处理系统,挂接UIControlEventTouchUpInside处理程序 [self addTarget:self action:@selector(handleTouchEvent:forEvent:) forControlEvents:UIControlEventTouchUpInside]; } return self; } //计算要绘制字符串的尺寸的函数如下: -(CGSize) getStringDrawingSize:(NSString*)str { NSAttributedString* attStr = [[NSAttributedString alloc] initWithString:str]; NSRange range = NSMakeRange(0, attStr.length); NSDictionary* dic = [attStr attributesAtIndex:0 effectiveRange:&range]; CGRect rect = [str boundingRectWithSize:CGSizeMake(0, 0) options:NSStringDrawingUsesLineFragmentOrigin attributes:dic context:nil]; return rect.size; }从上面类声明和初始化代码,引出几个问题:
1)为什么继承自UIControl? 2)为什么delegate使用weak? 3)为什么delegate 声明为id? 4)为什么栈分配? 5)为什么同一个CalendarView的类声明需要分别在.h和.m文件中,或者换种说法:这样做有什么好处? 6)为什么初始化只实现了initWithFrame,没有实现initWithCoder,在哪种情况下,还需要override initWithCoder函数?
-(void) drawStringInRectWithSize : (NSString*) string rect:(CGRect)rect size:(CGSize) size color : (UIColor*) color { CGPoint pos; //下面算法是让文字位于要绘制的Rect的水平和垂直中心 //也就是剧中对齐 pos.x = (rect.size.width - size.width) * 0.5F; pos.y = (rect.size.height - size.height) * 0.5F; pos.x += rect.origin.x; pos.y += rect.origin.y; //由于周日和周六与平常文字颜色有差别,因此需要color NSDictionary * attsDict = [NSDictionary dictionaryWithObjectsAndKeys: color, NSForegroundColorAttributeName, nil ]; [string drawAtPoint:pos withAttributes:attsDict]; }1) opengles API 利用gpu加速,速度最快,难度相对最大,自由度也最高,需要创建专用的GL上下文环境。基于状态机模式,需要设置各种绘制状态以及恢复状态。最重要的是跨平台,android以及windows,Linux都可以用(cocos2d-x基于opengles)。 2) quartz API 使用cpu光栅化,不需要GL上下文环境,直接可在控件表面进行绘制,相对底层,基于状态机模式,需要设置各种绘制状态以及恢复状态 3) UIKit中对quartz API的二次封装,例如UIBezierPath类,封装了大部分的shape,方便易用,我们就用这个类来进行绘制。上面两种API,以后有机会我们可以专门来分析一下。
圆的贝塞尔路径对象(由圆心和半径定义):
-(void) drawCircleInRect : (CGRect) rect color : (UIColor*) color isFill : (BOOL) isFill { //取width和height最小的值作为要绘制的圆的直径,这样就不会将圆绘制范围超出rect float radiu = rect.size.width < rect.size.height ? rect.size.width : rect.size.height; //将圆的中心点从rect的左上角平移到rect的中心点 CGPoint center; center.x = rect.origin.x + rect.size.width * 0.5F; center.y = rect.origin. y + rect.size.height * 0.5F; //圆是由圆心和半径定义的 radiu *= 0.5F; //创建一个圆的bezier路径对象 UIBezierPath* circle = [UIBezierPath bezierPathWithArcCenter:center radius:radiu startAngle:0.0F endAngle:2.0F*3.1415926F clockwise:true]; //填充绘制(日期选中状态) if(isFill == YES) { [color setFill]; [circle fill]; } else { //没选中状态,用stroke方式绘制 [color setStroke]; [circle stroke]; } }圆角矩形的贝塞尔对象(由Rect和半径定义):
-(void) drawRoundRect : (CGRect) rect radius : (CGFloat)radius { UIBezierPath* roundRect = [UIBezierPath bezierPathWithRoundedRect:rect cornerRadius:radius]; [[UIColor colorWithRed:52/255.0 green:175/255.0 blue:248/255.0 alpha:1.0] setFill]; [roundRect fill]; }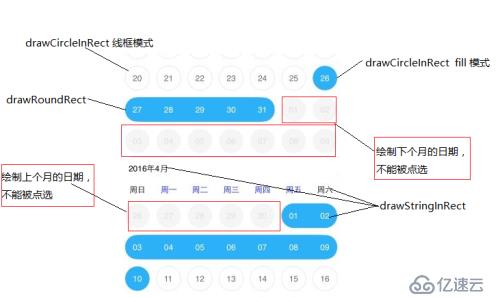
代码很长,我们拆分成几个区块来分析
//1、见上图,绘制年月信息 //blf:获取原生绘图context指针,所有原生绘图api都是c语言api方式 //CGContextRef context = UIGraphicsGetCurrentContext(); CGRect rc; calendar_get_year_month_section_rect(&_calendar, &rc); //NSString* drawStr = @" " + _calendar.date.year + @"年" + _calendar.date.month + @"月"; NSString* drawStr = [NSString stringWithFormat:@"%d年%d月",_calendar.date.year,_calendar.date.month]; //绘制年月信息 [self drawYearMonthStr:drawStr rect:rc];
//2、见上图,绘制星期信息 //_dayAndWeekStringArray中31-37索引保存的是星期字符串 for(int i= 0; i < 7; i++) { //获取星期区块中某个cell的rect calendar_get_week_cell_rect(&_calendar, &rc, i); if(i == 0 || i == 6) { //双休日黑色 [self drawStringInRectWithSize:[_dayAndWeekStringArray objectAtIndex:31 + i] rect:rc size:_weekStringDrawingSize color: [UIColor blackColor]]; } else { //其他时间蓝色 [self drawStringInRectWithSize:[_dayAndWeekStringArray objectAtIndex:31 + i] rect:rc size:_weekStringDrawingSize color: [UIColor blueColor]]; } }//3、见上图红色边框部分,绘制上个月日期信息 CGPoint dayRectOffset; //获取日期区块的rect calendar_get_day_section_rect(&_calendar, &rc); //纪录日期区块的起始位置 dayRectOffset = rc.origin; //当前月份1号在日期cells中的起始索引号 int begin = _calendar.dayBeginIdx; //当前月份结束索引号 int end = begin + _calendar.dayCount; //绘制上个月的日期,假设begin = 5 i=[4,3,2,1,0] for(int i = begin - 1; i >= 0; i--) { calendar_get_day_cell_rect_by_index(&_calendar, &rc, i); //计算出位置偏移量 rc.origin.x += dayRectOffset.x; rc.origin.y += dayRectOffset.y; //缩小一下绘制rect的尺寸而已 rc.origin.x += 5; rc.origin.y += 5; rc.size.width -= 10; rc.size.height -= 10; //绘制圆圈 [self drawCircleInRect:rc color:[UIColor colorWithRed:245/255.0 green:245/255.0 blue:245/255.0 alpha:1.0] isFill:YES]; //计算方式涉及到了_lastMonthDayCount //假设上个月有30天,本月的begin为5,则 //则30-(5-4)= 29 ---->0base--->30号 // 30- (5-3)= 28 ---->0base--->29号 // 30- (5-2)= 27 ---->0base--->28号 // 30- (5-1)= 26 ---->0base--->27号 // 30- (5-0)= 25 ---->0base--->26号 int dayIdx = _lastMonthDayCount - (begin - i); //绘制圆圈中的日期 [self drawStringInRectWithSize:[_dayAndWeekStringArray objectAtIndex: dayIdx] rect:rc size:_dayStringDrawingSize color:[UIColor colorWithRed:223/255.0 green:223/255.0 blue:223/255.0 alpha:1.0]]; }//4、见上图红色边框部分,绘制下个月日期信息 for(int i = end; i < 42; i++) { calendar_get_day_cell_rect_by_index(&_calendar, &rc, i); rc.origin.x += dayRectOffset.x; rc.origin.y += dayRectOffset.y; rc.origin.x += 5; rc.origin.y += 5; rc.size.width -= 10; rc.size.height -= 10; [self drawCircleInRect:rc color:[UIColor colorWithRed:245/255.0 green:245/255.0 blue:245/255.0 alpha:1.0] isFill:YES]; //索引是i-end,很容易理解的 [self drawStringInRectWithSize:[_dayAndWeekStringArray objectAtIndex: i - end] rect:rc size:_dayStringDrawingSize color:[UIColor colorWithRed:223/255.0 green:223/255.0 blue:223/255.0 alpha:1.0]]; }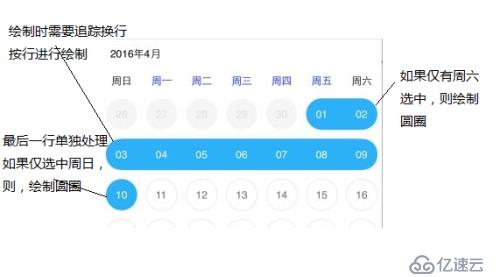
typedef struct _selectRange { int rowIdx; //为了方便处理是否同一行 int columIdx;//行列转换一纬数组索引 CGRect rect; //纪录要绘制的rect } selectRange;//5、绘制当前月份的日期,包括选中,未选中以及日期文字 //使用c结构,并初始化相关变量 selectRange ranges[31]; memset(ranges,0,sizeof(ranges)); int rangeCount = 0; //绘制当前月的日期 for(int i = begin ; i < end; i++) { calendar_get_day_cell_rect_by_index(&_calendar, &rc, i); rc.origin.x += dayRectOffset.x; rc.origin.y += dayRectOffset.y; rc.origin.x += 5; rc.origin.y += 5; rc.size.width -= 10; rc.size.height -= 10; SDate date; date_set(&date, _calendar.date.year, _calendar.date.month, i - begin + 1 ); //如果当前日期在选中时间范围内,则batch起来,由drawSelectRange进行绘制 //因为需要处理换行这种效果(drawSelectRange中处理,因此缓存起来二次处理比较方便) //与delegate通信 if([self.calendarDelegate isInSelectedDateRange:date]) { ranges[rangeCount].rowIdx = i / 7; //映射成行索引 ranges[rangeCount].columIdx = i % 7; //映射成列索引 ranges[rangeCount].rect = rc; //当前行列的rect纪录下来 rangeCount++; //计数器增加1 } else { //没有选中的,就直接绘制圆圈和当中的日期号 [self drawCircleInRect:rc color:[UIColor colorWithRed:234/255.0 green:234/255.0 blue:234/255.0 alpha:1.0] isFill:NO]; [self drawStringInRectWithSize:[_dayAndWeekStringArray objectAtIndex: i - _calendar.dayBeginIdx] rect:rc size:_dayStringDrawingSize color:[UIColor colorWithRed:107/255.0 green:107/255.0 blue:107/255.0 alpha:1.0]]; } } //NSLog(@"select day count = %d",rangeCount); //rangeCount纪录了选中的数量,ranges则纪录了要绘制的所有信息 [self drawSelectRange:ranges count:rangeCount]; //选中的圈圈的文字由下面代码绘制 for(int i = 0; i < rangeCount; i++) { //重新将行列(二维)索引号映射一纬数组索引号 int idx = ranges[i].rowIdx * 7 + ranges[i].columIdx; //idx - begin就是当前的要绘制的日期文字的索引号 [self drawStringInRectWithSize:[_dayAndWeekStringArray objectAtIndex: idx - begin] rect:ranges[i].rect size:_dayStringDrawingSize color:[UIColor whiteColor]]; }//blf:注意 参数ranges是数组名,数组名表示数组的首地址 // 还有就是selectRange是c结构,当做指针操作时要用->而不是.寻址操作符 -(void) drawSelectRange : (selectRange* ) ranges count : (int) count { //两种情况下count = 1 //第一选则,或者第二次选中的和第一次选中的是同一个日期cell //此时是绘制圆形而不是roundedRect if(count == 1) { [self drawCircleInRect : ranges[0].rect color:[UIColor colorWithRed:52/255.0 green:175/255.0 blue:248/255.0 alpha:1.0] isFill:YES]; //退出函数 return; } //并不是第一次选者且第二次选者不是和第一次选者一致时 //获取cell rect的width CGRect rect; calendar_get_day_cell_rect_by_index(&_calendar, &rect, 0); float width = rect.size.width; //用于纪录上一次的行号,初始化,纪录的是第一行的索引号 int lastRowIdx = ranges[0].rowIdx; //计数器,用来纪录当前行的cell的数量 int sameRowCellCount = 0; for(int i = 0; i < count; i++) { //从ranges数组中获取一个结构时候,使用了&取地址操作符 //因为防止发生拷贝,如果不是取地址的话,赋值会发生memcopy行为 selectRange* range = &ranges[i]; //行号相同,则同一行啦 if(range->rowIdx == lastRowIdx) { sameRowCellCount++; } else { //行号不同,说明换行了,因此要绘制当前行 CGRect rc; //i - sameRowCellCount找到起始索引 rc.origin = ranges[i - sameRowCellCount].rect.origin; rc.size.height = range->rect.size.height; rc.size.width = width* (sameRowCellCount) - 10.0F; //很可能存在这种情况,既选中的是周六开始的,因此绘制的是圆形而不是roundedRect if(sameRowCellCount == 1) { [self drawCircleInRect:rc color:[UIColor colorWithRed:52/255.0 green:175/255.0 blue:248/255.0 alpha:1.0] isFill:YES]; } else { //一般情况,绘制roundedRect [self drawRoundRect:rc radius:rc.size.height]; } sameRowCellCount = 1;//标记值,为了下面绘制最后一行的代码使用,=1和>1要分别处理 //纪录上一次的行号 lastRowIdx = range->rowIdx; } } //将最后一行拆分出来单独处理,这样就方便处理一些特殊情况 //绘制最后一行 if(sameRowCellCount > 0) { CGRect rc; rc.origin = ranges[count - sameRowCellCount].rect.origin; rc.size.height = ranges[count - sameRowCellCount].rect.size.height; rc.size.width = width* (sameRowCellCount) - 10.0F; //最后一行有多个cell被选中 if(sameRowCellCount != 1) { [self drawRoundRect:rc radius:rc.size.height]; } else//最后一行仅周日被选中,只有一个,圆圈 [self drawCircleInRect:rc color:[UIColor colorWithRed:52/255.0 green:175/255.0 blue:248/255.0 alpha:1.0] isFill:YES]; } }//由于UITableView采用了cell重用机制,因此仅有很屏幕rect相交的cell存在 //所以是cells一直轮替交换,所以我们必须在每次自绘时候判断当前的cell中的月历的每个日期是否处于选中状态 //而本函数就是起到这样的作用,判断月历中某个日期是否处于选中的区间范围 -(BOOL)isInSelectedDateRange : (SDate) date { time_t curr = date_get_time_t(&date); if(curr < _startTime || curr > _endTime) return NO; return YES; }控件的状态初始化 控件的绘制 控件的事件触发和处理 控件的布局
-(void) handleTouchEvent:(id) sender forEvent:(UIEvent *)event { NSSet *touches = [event allTouches]; UITouch *touch = [touches anyObject]; //获取UITouch,将其转换到当前CalendarView的局部坐标系表示 CGPoint upLoc = [touch locationInView:self]; //通过局部坐标系的点获取点击处的cell的索引号,优化部分请看c的相关实现 //这个碰撞检测原理实际在游戏中经常使用,分区缩小范围,然后检测该范围内所有物体的与点(2D) //或光线(3D)是否发生碰撞,用于此处也非常适合 int hitIdx = calendar_get_hitted_day_cell_index(&_calendar, upLoc); //选中了,则 if(hitIdx != -1) { SDate date; date_set(&date, _calendar.date.year, _calendar.date.month, hitIdx - _calendar.dayBeginIdx + 1); //=0为第一次点击,仅选中一个cell //mod为了周而复始,并在[0,1]之间 if([self.calendarDelegate getHitCounter] % 2 == 0) { //第一次点击,让开始和结束Date相同 [self.calendarDelegate setSelectedDateRangeStart:date end:date]; } else//=1为第二次点击,形成选区 { [self.calendarDelegate setEndSelectedDate:date]; } //每次点击,delegate中的点击计数器都要递增的 [self.calendarDelegate updateHitCounter]; //需要触发重绘,让ios进行重新绘制,这个很关键,有一些细节,在下面会说明的 [self.calendarDelegate repaintCalendarViews]; } }//属于CalendarDelegate的接口函数,实现代码如下: -(void) repaintCalendarViews { //[self.tableView setNeedsDisplay]; for(UIView * subview in self.tableView.subviews) { for(UIView* view2 in subview.subviews) { UITableViewCell* cell = (UITableViewCell*)view2; CalendarView* cview =(CalendarView*) [cell.contentView.subviews objectAtIndex:0]; [cview setNeedsDisplay]; } } }1) 由于calendarView的选择可能跨越多个CalendarView,因此不能仅仅在CalendarView级别setNeedsDisplay,而是需要让整个UITableView以及他的所有子孙控件都要重绘。 2) 按照正常思路,你在UITableView上调用setNeedsDisplay,你会发现无效。 3) 由此可见,IOS中的脏区局部刷新机制采用的是以控件为基础的后备缓冲图,而不是以整个屏幕为基础的后背缓冲图。 4) 以控件为基础的后备缓冲图内存消耗高,但是能够解决重复绘制,提高效率,典型的以空间换时间策略。 介绍一个微软开源项目WinObjc,非常强大,可以在gitHub中去查找。 为win10和Winphone实现了整个ios sdk,目的是让ios的app直接在winphone上跑。 我研究过他整个局部刷新的机制,还是蛮帅的。 foundation,uikit, glkit,spritekit,gamekit,homekit....各种kit都实现了。而且最重要的是有源码。 5) 以整个屏幕(或者说整个APP显示根节点的size)为大小的后备缓冲区,其只需要增加一张内存位图。 获取脏区后,仅仅递归该脏区以及所有和父节点脏区相交部分的区域 进行更新,因此更新区域会逐渐减小,但是不能完全去除重复绘制。 我曾经实现了opengl和dx版本的2D局部刷新机制,并入到一个2d UI引擎中,利用后背缓冲区以及 基于修改投影矩阵方式,在光栅化之前裁剪掉所有不可见的顶点后, 其渲染速度飞速提高,并且CPU使用率控制在5%以下,大部分时间都是 在1%)。源码不能公布,因为是商业代码,但是demo以后可以在github上下载,很帅的IPhone4仿真模拟。
#define MYSWAP(x,y,type) \ { \ type t = x; \ x = y; \ y = t; \ } -(void)setSelectedDateRangeStart:(SDate)start end:(SDate)end { //将date转换为time_t _startTime = date_get_time_t(&start); _endTime = date_get_time_t(&end); //如果起始时间大于结束时间,说明先点击后一天,再点击前一天,绘制时的逻辑不正确,需要交换一下时间 if(_startTime > _endTime) { MYSWAP(_startTime,_endTime,time_t); //纪录下年月表示起始结束date _begDate = end; _endDate = start; }else{ _begDate = start;//记录日期 _endDate = end; } } -(void)setEndSelectedDate:(SDate)end { //同上,只是针对第二次点击而已 _endTime = date_get_time_t(&end); if(_startTime > _endTime) { MYSWAP(_startTime,_endTime,time_t); _endDate = _begDate; _begDate = end; }else{ _endDate = end; } } -(void) updateHitCounter { _hitCounter++; } -(int) getHitCounter { return _hitCounter; }至此,IOS版本的源码全部分析完毕,希望对大家有帮助。
关于控件的布局,本DEMO中没什么用到,控件的布局可以说是比较复杂的部分,有各种算法,各种方法,是个比较大的主题,以后有机会探讨。
总体来说,apple公司的objc编译器前端程序Clang支持Objc,c,c++的词法分析,AST的产生,然后进入llvm,生成对应CPU的指令。再在IOS上运行,由于都是二进制,所以效率非常高(苹果公司不允许使用虚拟机代码方式,只能以静态链接库【二进制】方式 运行app,高效, 难以反编译,因此相对非常安全,唯一的例外是运行于浏览器中的js代码)。
免责声明:本站发布的内容(图片、视频和文字)以原创、转载和分享为主,文章观点不代表本网站立场,如果涉及侵权请联系站长邮箱:is@yisu.com进行举报,并提供相关证据,一经查实,将立刻删除涉嫌侵权内容。


