жё©йҰЁжҸҗзӨәГ—
жӮЁеҘҪпјҢзҷ»еҪ•еҗҺжүҚиғҪдёӢи®ўеҚ•е“ҰпјҒ
еҜҶз Ғзҷ»еҪ•Г—
зҷ»еҪ•жіЁеҶҢГ—
зӮ№еҮ» зҷ»еҪ•жіЁеҶҢ еҚіиЎЁзӨәеҗҢж„ҸгҖҠдәҝйҖҹдә‘з”ЁжҲ·жңҚеҠЎжқЎж¬ҫгҖӢ
з”ЁжҲ·зҷ»еҪ•Г—
жӮЁеҘҪпјҢзҷ»еҪ•еҗҺжүҚиғҪдёӢи®ўеҚ•е“ҰпјҒ
иҝҷзҜҮж–Үз« е°ҶдёәеӨ§е®¶иҜҰз»Ҷи®Іи§Јжңүе…іPHPжҖҺд№ҲеҲ©з”ЁPHPMailerе®һзҺ°йӮ®д»¶еҸ‘йҖҒеҠҹиғҪпјҢе°Ҹзј–и§үеҫ—жҢәе®һз”Ёзҡ„пјҢеӣ жӯӨеҲҶдә«з»ҷеӨ§е®¶еҒҡдёӘеҸӮиҖғпјҢеёҢжңӣеӨ§е®¶йҳ…иҜ»е®ҢиҝҷзҜҮж–Үз« еҗҺеҸҜд»ҘжңүжүҖ收иҺ·гҖӮ
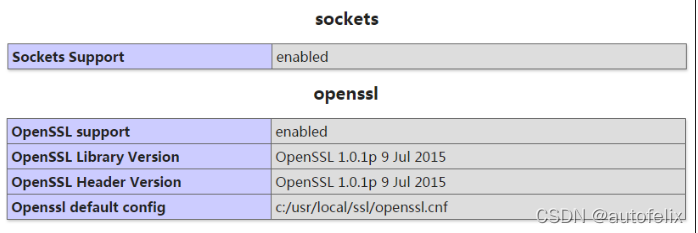
PHPMailer йңҖиҰҒ PHP зҡ„ sockets жү©еұ•ж”ҜжҢҒ
еҸҰеӨ–зҷ»еҪ• QQ йӮ®з®ұ SMTP жңҚеҠЎеҷЁеҲҷеҝ…йЎ»йҖҡиҝҮ SSL еҠ еҜҶзҡ„пјҢ PHP иҝҳеҫ—еҢ…еҗ« openssl зҡ„ж”ҜжҢҒ
ең°еқҖ: https://github.com/PHPMailer/PHPMailer/
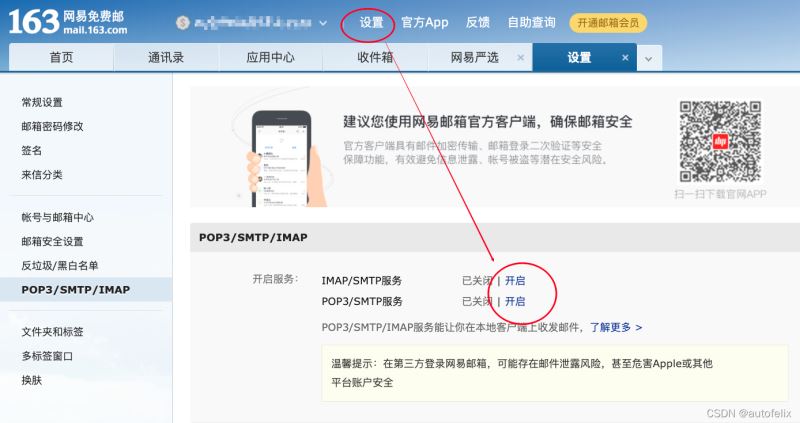
жүҖжңүзҡ„дё»жөҒйӮ®з®ұйғҪж”ҜжҢҒ SMTP еҚҸи®®пјҢдҪҶ并йқһжүҖжңүйӮ®з®ұйғҪй»ҳи®ӨејҖеҗҜ
жӮЁеҸҜд»ҘеңЁйӮ®з®ұзҡ„и®ҫзҪ®йҮҢйқўжүӢеҠЁејҖеҗҜ
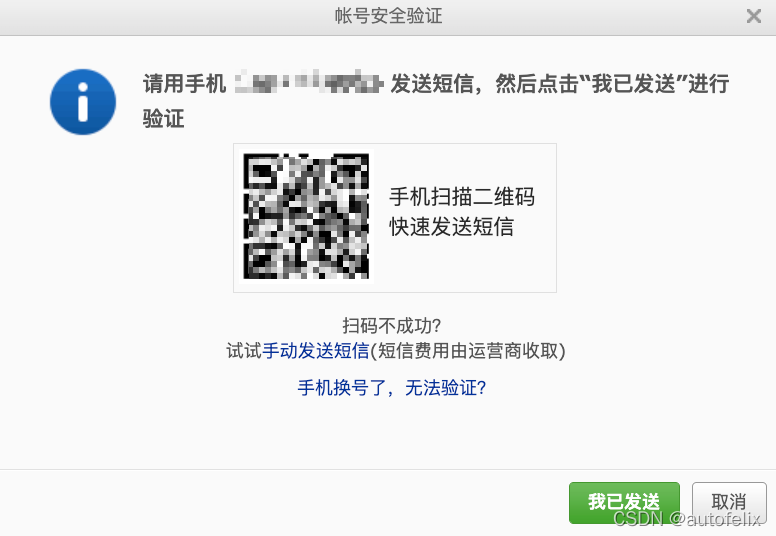
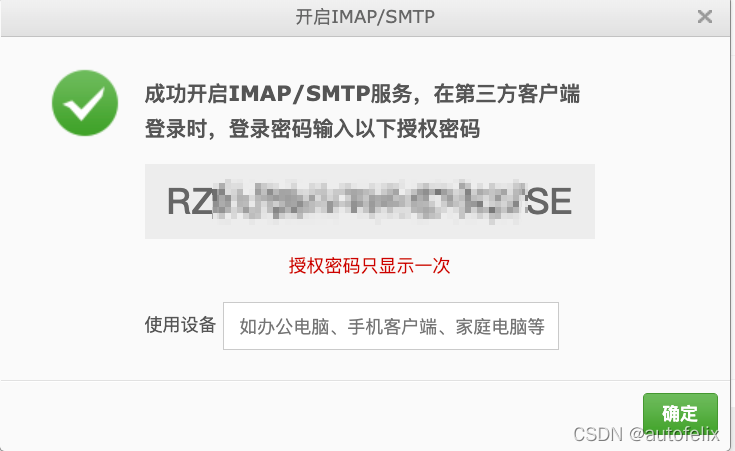
第дёүж–№жңҚеҠЎеңЁжҸҗдҫӣдәҶиҙҰеҸ·е’ҢеҜҶз Ғд№ӢеҗҺе°ұеҸҜд»Ҙзҷ»еҪ• SMTP жңҚеҠЎеҷЁ
йҖҡиҝҮе®ғжқҘжҺ§еҲ¶йӮ®д»¶зҡ„дёӯиҪ¬ж–№ејҸ
SMTP жңҚеҠЎеҷЁи®ӨиҜҒеҜҶз ҒпјҢйңҖиҰҒеҰҘе–„дҝқз®Ў

<?php // еј•е…ҘPHPMailerзҡ„ж ёеҝғж–Ү件 require_once("PHPMailer/class.phpmailer.php"); require_once("PHPMailer/class.smtp.php"); // е®һдҫӢеҢ–PHPMailerж ёеҝғзұ» $mail = new PHPMailer(); // жҳҜеҗҰеҗҜз”Ёsmtpзҡ„debugиҝӣиЎҢи°ғиҜ• ејҖеҸ‘зҺҜеўғе»әи®®ејҖеҗҜ з”ҹдә§зҺҜеўғжіЁйҮҠжҺүеҚіеҸҜ й»ҳи®Өе…ій—ӯdebugи°ғиҜ•жЁЎејҸ $mail->SMTPDebug = 1; // дҪҝз”Ёsmtpйүҙжқғж–№ејҸеҸ‘йҖҒйӮ®д»¶ $mail->isSMTP(); // smtpйңҖиҰҒйүҙжқғ иҝҷдёӘеҝ…йЎ»жҳҜtrue $mail->SMTPAuth = true; // й“ҫжҺҘqqеҹҹеҗҚйӮ®з®ұзҡ„жңҚеҠЎеҷЁең°еқҖ $mail->Host = 'smtp.qq.com'; // и®ҫзҪ®дҪҝз”ЁsslеҠ еҜҶж–№ејҸзҷ»еҪ•йүҙжқғ $mail->SMTPSecure = 'ssl'; // и®ҫзҪ®sslиҝһжҺҘsmtpжңҚеҠЎеҷЁзҡ„иҝңзЁӢжңҚеҠЎеҷЁз«ҜеҸЈеҸ· $mail->Port = 465; // и®ҫзҪ®еҸ‘йҖҒзҡ„йӮ®д»¶зҡ„зј–з Ғ $mail->CharSet = 'UTF-8'; // и®ҫзҪ®еҸ‘件дәәжҳөз§° жҳҫзӨәеңЁж”¶д»¶дәәйӮ®д»¶зҡ„еҸ‘件дәәйӮ®з®ұең°еқҖеүҚзҡ„еҸ‘件дәә姓еҗҚ $mail->FromName = 'еҸ‘件дәәжҳөз§°'; // smtpзҷ»еҪ•зҡ„иҙҰеҸ· д»»ж„ҸйӮ®з®ұеҚіеҸҜ $mail->Username = 'xxxxxxx@163.com'; // smtpзҷ»еҪ•зҡ„еҜҶз Ғ дҪҝз”Ёз”ҹжҲҗзҡ„жҺҲжқғз Ғ $mail->Password = '**********'; // и®ҫзҪ®еҸ‘件дәәйӮ®з®ұең°еқҖ еҗҢзҷ»еҪ•иҙҰеҸ· $mail->From = 'xxxxxxx@qq.com'; // йӮ®д»¶жӯЈж–ҮжҳҜеҗҰдёәhtmlзј–з Ғ жіЁж„ҸжӯӨеӨ„жҳҜдёҖдёӘж–№жі• $mail->isHTML(true); // и®ҫзҪ®ж”¶д»¶дәәйӮ®з®ұең°еқҖ $mail->addAddress('xxxxxxxxx@qq.com'); // ж·»еҠ еӨҡдёӘ收件дәә еҲҷеӨҡж¬Ўи°ғз”Ёж–№жі•еҚіеҸҜ $mail->addAddress('xxxxxxxxx@163.com'); // ж·»еҠ иҜҘйӮ®д»¶зҡ„дё»йўҳ $mail->Subject = 'йӮ®д»¶дё»йўҳ'; // ж·»еҠ йӮ®д»¶жӯЈж–Ү $mail->Body = '<h2>Hello, i am autofelix</h2>'; // дёәиҜҘйӮ®д»¶ж·»еҠ йҷ„件 $mail->addAttachment('./йҷ„件.pdf'); // еҸ‘йҖҒйӮ®д»¶ иҝ”еӣһзҠ¶жҖҒ $status = $mail->send();е…ҲдҪҝз”ЁcomposerиҝӣиЎҢе®үиЈ…пјҡcomposer require phpmailer/phpmailer ^6.5
дҪҝз”Ё
<?php use PHPMailer\PHPMailer\PHPMailer; use PHPMailer\PHPMailer\SMTP; use PHPMailer\PHPMailer\Exception; class mail { public function send() { //Create an instance; passing `true` enables exceptions $mail = new PHPMailer(true); try { //Server settings $mail->SMTPDebug = SMTP::DEBUG_SERVER; //Enable verbose debug output $mail->isSMTP(); //Send using SMTP $mail->Host = 'smtp.example.com'; //Set the SMTP server to send through $mail->SMTPAuth = true; //Enable SMTP authentication $mail->Username = 'user@example.com'; //SMTP username $mail->Password = 'secret'; //SMTP password $mail->SMTPSecure = PHPMailer::ENCRYPTION_SMTPS; //Enable implicit TLS encryption $mail->Port = 465; //TCP port to connect to; use 587 if you have set `SMTPSecure = PHPMailer::ENCRYPTION_STARTTLS` //Recipients $mail->setFrom('from@example.com', 'Mailer'); $mail->addAddress('joe@example.net', 'Joe User'); //Add a recipient $mail->addAddress('ellen@example.com'); //Name is optional $mail->addReplyTo('info@example.com', 'Information'); $mail->addCC('cc@example.com'); $mail->addBCC('bcc@example.com'); //Attachments $mail->addAttachment('/var/tmp/file.tar.gz'); //Add attachments $mail->addAttachment('/tmp/image.jpg', 'new.jpg'); //Optional name //Content $mail->isHTML(true); //Set email format to HTML $mail->Subject = 'Here is the subject'; $mail->Body = 'This is the HTML message body <b>in bold!</b>'; $mail->AltBody = 'This is the body in plain text for non-HTML mail clients'; $mail->send(); echo 'Message has been sent'; } catch (Exception $e) { echo "Message could not be sent. Mailer Error: {$mail->ErrorInfo}"; } } }е…ідәҺвҖңPHPжҖҺд№ҲеҲ©з”ЁPHPMailerе®һзҺ°йӮ®д»¶еҸ‘йҖҒеҠҹиғҪвҖқиҝҷзҜҮж–Үз« е°ұеҲҶдә«еҲ°иҝҷйҮҢдәҶпјҢеёҢжңӣд»ҘдёҠеҶ…е®№еҸҜд»ҘеҜ№еӨ§е®¶жңүдёҖе®ҡзҡ„её®еҠ©пјҢдҪҝеҗ„дҪҚеҸҜд»ҘеӯҰеҲ°жӣҙеӨҡзҹҘиҜҶпјҢеҰӮжһңи§үеҫ—ж–Үз« дёҚй”ҷпјҢиҜ·жҠҠе®ғеҲҶдә«еҮәеҺ»и®©жӣҙеӨҡзҡ„дәәзңӢеҲ°гҖӮ
е…ҚиҙЈеЈ°жҳҺпјҡжң¬з«ҷеҸ‘еёғзҡ„еҶ…е®№пјҲеӣҫзүҮгҖҒи§Ҷйў‘е’Ңж–Үеӯ—пјүд»ҘеҺҹеҲӣгҖҒиҪ¬иҪҪе’ҢеҲҶдә«дёәдё»пјҢж–Үз« и§ӮзӮ№дёҚд»ЈиЎЁжң¬зҪ‘з«ҷз«ӢеңәпјҢеҰӮжһңж¶үеҸҠдҫөжқғиҜ·иҒ”зі»з«ҷй•ҝйӮ®з®ұпјҡis@yisu.comиҝӣиЎҢдёҫжҠҘпјҢ并жҸҗдҫӣзӣёе…іиҜҒжҚ®пјҢдёҖз»ҸжҹҘе®һпјҢе°Ҷз«ӢеҲ»еҲ йҷӨж¶үе«ҢдҫөжқғеҶ…е®№гҖӮ

дәҝйҖҹдә‘е…¬дј—еҸ·

жүӢжңәзҪ‘з«ҷдәҢз»ҙз Ғ


