这篇文章将为大家详细讲解有关Element-UI有哪些使用技巧,小编觉得挺实用的,因此分享给大家做个参考,希望大家阅读完这篇文章后可以有所收获。
看到这个组件是不是有点陌生,陌生就对了,因为它从来没有出现在 element 官网上(估计是性能问题),但好东西怎么能藏着掖着,来上效果图。

是不是比原生的滚动条美观多了,使用方法也非常简单:
<el-scrollbar> <div class="box"> <p v-for="item in 15" :key="item">欢迎使用 el-scrollbar {{item}}</p> </div> </el-scrollbar> <style scoped> .el-scrollbar { border: 1px solid #ddd; height: 200px; } .el-scrollbar ::v-deep .el-scrollbar__wrap { overflow-y: scroll; overflow-x: hidden; } </style>只要 scrollbar 内部盒子的高度超过 scrollbar 的高度就会出现滚动条,横向滚动条同理。
有时候我们想用 el-upload 的上传功能,但又不想用 el-upload 的样式,如何实现呢?方法也很简单,隐藏 el-upload,然后再模拟点击就可以了。
<button @click="handleUpload">上传文件</button> <el-upload v-show="false" class="upload-resource" multiple action="" :http-request="clickUploadFile" ref="upload" :on-success="uploadSuccess" > 上传本地文件 </el-upload> <script> export default { methods: { // 模拟点击 handleUpload() { document.querySelector(".upload-resource .el-upload").click() }, // 上传文件 async clickUploadFile(file) { const formData = new FormData() formData.append('file', file.file) const res = await api.post(`xxx`, formData) } // 上传成功后,清空组件自带的文件列表 uploadSuccess() { this.$refs.upload.clearFiles() } } } </script>很多时候下拉框的内容是不可控的,如果下拉框选项内容过长,势必会导致页面非常不协调,解决办法就是,单行省略加文字提示。
<el-select popper-class="popper-class" :popper-append-to-body="false" v-model="value" placeholder="请选择"> <el-option v-for="item in options" :key="item.value" :label="item.label" :value="item.value" > <el-tooltip placement="top" :disabled="item.label.length<17" > <div slot="content"> <span>{{item.label}}</span> </div> <div class="iclass-text-ellipsis">{{ item.label }}</div> </el-tooltip> </el-option> </el-select> <script> export default { data() { return { options: [{ value: '选项1', label: '黄金糕黄金糕黄金糕黄金糕黄金糕黄金糕黄金糕黄金糕黄金糕' }, { value: '选项2', label: '双皮奶双皮奶双皮奶双皮奶双皮奶双皮奶双皮奶双皮奶双皮奶' }, { value: '选项3', label: '蚵仔煎蚵仔煎蚵仔煎蚵仔煎蚵仔煎蚵仔煎蚵仔煎蚵仔煎蚵仔煎' }], value: '' } } } </script> <style scoped> .el-select { width: 300px; } .el-select ::v-deep .popper-class { width: 300px; } .iclass-text-ellipsis { white-space: nowrap; overflow: hidden; text-overflow: ellipsis; } </style>效果如下:

我们在使用 input 输入框时,大多不希望用户在前后输入空格,有没有简单的校验方法呢,当然是有的。
<el-form :rules="rules" :model="form" label-width="80px"> <el-form-item label="活动名称" prop="name"> <el-input v-model="form.name"></el-input> </el-form-item> </el-form> <script> export default { data() { return { form: { name: '' }, rules: { name: [ { required: true, message: '请输入活动名称', trigger: 'blur'}, { pattern: /^(?!\s+).*(?<!\s)$/, message: '首尾不能为空格', trigger: 'blur' } ] } } } } </script>效果如下:

当 el-input 设置 type="number" 时,输入中文,虽然中文不会显示出来,但焦点会上移。

解决办法:
<style scoped> ::v-deep .el-input__inner { line-height: 1px !important; } </style>
解决办法:
<el-input class="clear-number-input" type="number"></el-input> <style scoped> .clear-number-input ::v-deep input[type="number"]::-webkit-outer-spin-button, .clear-number-input ::v-deep input[type="number"]::-webkit-inner-spin-button { -webkit-appearance: none !important; } </style>有时候我们需要单独校验一些字段,比如发送验证码,单独对手机号进行校验,可以这样做:
this.$refs.form.validateField('name', valid => { if (valid) { console.log('send!'); } else { console.log('error send!'); return false; } })有人会在打开弹窗时,在$nextTick里重置表单,而我选择在关闭弹窗后进行重置:
<el-dialog @closed="resetForm"> <el-form ref="form"> </el-form> </el-dialog> <script> export default { methods: { resetForm() { this.$refs.form.resetFields() } } } </script>destroy-on-close 设置为 true 后发现弹窗关闭后 DOM 元素仍在,没有被销毁。
解决办法:在 el-dialog 上添加 v-if。
<el-dialog :visible.sync="visible" v-if="visible" destroy-on-close> </el-dialog>
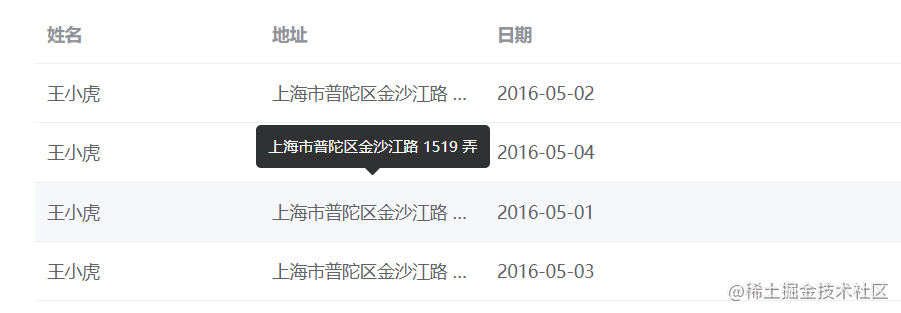
当表格内容过长时,手动添加样式比较麻烦,偷偷告诉你,只需要添加一个 show-overflow-tooltip 就可以搞定。
<el-table-column prop="address" label="地址" width="180" show-overflow-tooltip > </el-table-column>
效果如下:
关于“Element-UI有哪些使用技巧”这篇文章就分享到这里了,希望以上内容可以对大家有一定的帮助,使各位可以学到更多知识,如果觉得文章不错,请把它分享出去让更多的人看到。
免责声明:本站发布的内容(图片、视频和文字)以原创、转载和分享为主,文章观点不代表本网站立场,如果涉及侵权请联系站长邮箱:is@yisu.com进行举报,并提供相关证据,一经查实,将立刻删除涉嫌侵权内容。


