这篇文章主要为大家展示了“springsecurity如何实现基于token的认证方式”,内容简而易懂,条理清晰,希望能够帮助大家解决疑惑,下面让小编带领大家一起研究并学习一下“springsecurity如何实现基于token的认证方式”这篇文章吧。
在简析了spring security oauth的源码之后,我们发现,其实有些源码我们并不能用,至少,TokenEndPoint这个组件,我们就没法用,因为这个组件只会响应/oauth/token的请求,而且spring security oauth会根据OAuth协议中常用的4种授权模式去生成令牌,而我们这里是自定义的登录,自然用不上OAuth协议中的授权模式,因此我们改造自定义的登录,只能借鉴其令牌生成方式。
如果有印象,在前几篇博客中总结过自定义登录成功处理的方式,无论前面登录逻辑如何认证,我们只需要在认证成功之后,自定义生成AccessToken 即可,因此我们只需要重新处理我们自定义登录成功的处理方式即可。
那么如何处理,依旧是一个问题,这就回到了上一篇博客中的内容,构造AccessToken需要OAuth3Request和Authentication,其中Authentication是登录成功后的认证详情信息,在登录成功处理器中,会有相关参数传递进来。OAuth3Request由ClientDeatails和TokenRequest组成,这在上一篇博客中我们已经总结过了,ClientDetails根据传递参数中的ClientId和clientSecret等client配置信息组成,TokenRequest则由请求中其他参数实例化而成,具体如下图所示

相关改造代码如下
/** * autor:liman * createtime:2021/7/10 * comment: 自定义登录成功处理器 */ @Component("selfAuthenticationSuccessHandler") @Slf4j public class SelfAuthenticationSuccessHandler extends SimpleUrlAuthenticationSuccessHandler { @Autowired private SecurityProperties securityProperties; @Autowired private ObjectMapper objectMapper; @Autowired private ClientDetailsService clientDetailsService; @Autowired private AuthorizationServerTokenServices authenticationServerTokenServices; @Override public void onAuthenticationSuccess(HttpServletRequest request, HttpServletResponse response , Authentication authentication) throws IOException, ServletException { log.info("自定义登录成功的处理器"); String header = request.getHeader("Authorization"); if (header == null || !header.startsWith("Basic ")) { throw new UnapprovedClientAuthenticationException("请求头中没有client相关的信息"); } String[] tokens = extractAndDecodeHeader(header, request); assert tokens.length == 2; String clientId = tokens[0]; String clientSecret = tokens[1]; //得到clientDeatils信息 ClientDetails clientDetails = clientDetailsService.loadClientByClientId(clientId);//得到clientDetails信息 if (null == clientDetails) { throw new UnapprovedClientAuthenticationException("clientid对应的信息不存在" + clientId); } else if (!StringUtils.equals(clientSecret, clientDetails.getClientSecret())) { throw new UnapprovedClientAuthenticationException("clientSecret信息不匹配" + clientSecret); } //构建自己的tokenRequest,由于这里不能使用OAuth3中的四种授权模式,因此这里第四个参数设置为"customer" //同理,第一个参数主要用于组装并生成Authentication,而这里的Authentication已经通过参数传递进来,因此可以直接赋一个空的Map TokenRequest tokenRequest = new TokenRequest(MapUtils.EMPTY_MAP, clientId, clientDetails.getScope(), "customer"); //构建OAuth3Request OAuth3Request oAuth3Request = tokenRequest.createOAuth3Request(clientDetails); //构建 OAuth3Authentication OAuth3Authentication oAuth3Authentication = new OAuth3Authentication(oAuth3Request, authentication); //生成accessToken,这里依旧使用的是spring security oauth中默认的DefaultTokenService OAuth3AccessToken accessToken = authenticationServerTokenServices.createAccessToken(oAuth3Authentication); response.setContentType("application/json;charset=utf-8"); response.getWriter().write(objectMapper.writeValueAsString(accessToken));//将authentication作为json写到前端 } /** * Decodes the header into a username and password. * * @throws BadCredentialsException if the Basic header is not present or is not valid * Base64 */ //TODO:解码请求头中的Base64编码的 appId和AppSecret private String[] extractAndDecodeHeader(String header, HttpServletRequest request) throws IOException { //格式:Basic+空格+Base64加密的appid和AppSecret,所以这里substring(6) byte[] base64Token = header.substring(6).getBytes("UTF-8"); byte[] decoded; try { decoded = Base64.decode(base64Token); } catch (IllegalArgumentException e) { throw new BadCredentialsException( "Failed to decode basic authentication token"); } String token = new String(decoded, "UTF-8"); int delim = token.indexOf(":"); if (delim == -1) { throw new BadCredentialsException("Invalid basic authentication token"); } return new String[]{token.substring(0, delim), token.substring(delim + 1)}; } }之前提到过,由于基于token的认证交互,其实不一定会有session会话的概念,如果我们的验证码依旧存于session中,则并不能正常校验,因此在基于token的短信验证码登录的重构中,我们唯一要做的,就是将验证码存于Redis等缓存中间件中,验证码的key值为deviceid。
方案比较简单,这里只贴出Redis操作验证码的方法
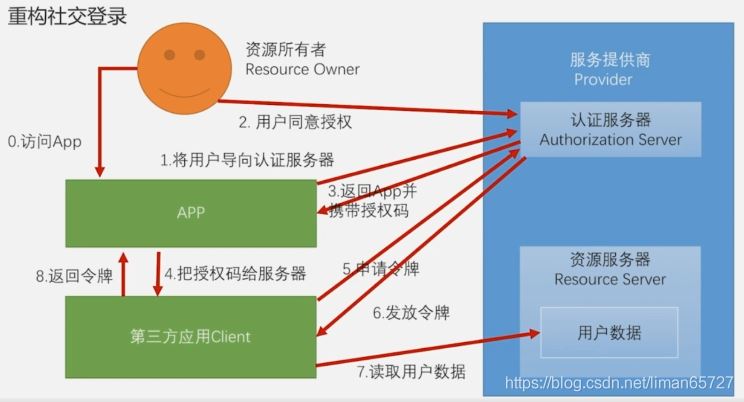
/** * 基于redis的验证码存取器,避免由于没有session导致无法存取验证码的问题 */ @Component public class RedisValidateCodeRepository implements ValidateCodeRepository { @Autowired private RedisTemplate<Object, Object> redisTemplate; /* * (non-Javadoc) */ @Override public void save(ServletWebRequest request, ValidateCode code, ValidateCodeType type) { redisTemplate.opsForValue().set(buildKey(request, type), code, 30, TimeUnit.MINUTES); } /* * (non-Javadoc) */ @Override public ValidateCode get(ServletWebRequest request, ValidateCodeType type) { Object value = redisTemplate.opsForValue().get(buildKey(request, type)); if (value == null) { return null; } return (ValidateCode) value; } /* * (non-Javadoc) * */ @Override public void remove(ServletWebRequest request, ValidateCodeType type) { redisTemplate.delete(buildKey(request, type)); } /** * @param request * @param type * @return */ private String buildKey(ServletWebRequest request, ValidateCodeType type) { String deviceId = request.getHeader("deviceId"); if (StringUtils.isBlank(deviceId)) { throw new ValidateCodeException("请在请求头中携带deviceId参数"); } return "code:" + type.toString().toLowerCase() + ":" + deviceId; } }在调通微信社交登录之后,再进行总结,只是需要明确的是,这里分为两种情况,一种是简化模式,一种是标准的OAuth3授权模式(这两种的区别,在QQ登录和微信登录流程中有详细的体现)。
简化的OAuth模式,OAuth协议简化的认证模式,与标准最大的不同,其实就是在获取授权码的时候,顺带将openId(第三方用户id)和accessToken(获取用户信息的令牌),在这种前后端彻底分离的架构中,前三步前端可以通过服务提供商的SDK完成openId和AccessToken的获取。但是并不能根据openId作为我们自己登录系统凭证,因此我们需要提供一个根据openId进行登录的方式这个与之前短信登录方式大同小异

1、OpenIdAuthenticationToken
/** * autor:liman * createtime:2021/8/4 * comment:OpenIdAuthenticationToken */ public class OpenIdAuthenticationToken extends AbstractAuthenticationToken { private static final long serialVersionUID = SpringSecurityCoreVersion.SERIAL_VERSION_UID; private final Object principal; private String providerId; /** openId,和providerId作为principal */ public OpenIdAuthenticationToken(String openId, String providerId) { super(null); this.principal = openId; this.providerId = providerId; setAuthenticated(false); } /** * This constructor should only be used by <code>AuthenticationManager</code> or * <code>AuthenticationProvider</code> implementations that are satisfied with * producing a trusted (i.e. {@link #isAuthenticated()} = <code>true</code>) * authentication token. * * @param principal * @param credentials * @param authorities */ public OpenIdAuthenticationToken(Object principal, Collection<? extends GrantedAuthority> authorities) { super(authorities); this.principal = principal; super.setAuthenticated(true); // must use super, as we override } public Object getCredentials() { return null; } public Object getPrincipal() { return this.principal; } public String getProviderId() { return providerId; } public void setAuthenticated(boolean isAuthenticated) throws IllegalArgumentException { if (isAuthenticated) { throw new IllegalArgumentException( "Cannot set this token to trusted - use constructor which takes a GrantedAuthority list instead"); } super.setAuthenticated(false); } @Override public void eraseCredentials() { super.eraseCredentials(); } }2、OpenIdAuthenticationFilter
/** * autor:liman * createtime:2021/8/4 * comment:基于openId登录的过滤器 */ @Slf4j public class OpenIdAuthenticationFilter extends AbstractAuthenticationProcessingFilter { private String openIdParameter = "openId"; private String providerIdParameter = "providerId"; private boolean postOnly = true; public OpenIdAuthenticationFilter() { super(new AntPathRequestMatcher("/authentication/openid", "POST")); } public Authentication attemptAuthentication(HttpServletRequest request, HttpServletResponse response) throws AuthenticationException { if (postOnly && !request.getMethod().equals("POST")) { throw new AuthenticationServiceException("Authentication method not supported: " + request.getMethod()); } //获取请求中的openId和providerId String openid = obtainOpenId(request); String providerId = obtainProviderId(request); if (openid == null) { openid = ""; } if (providerId == null) { providerId = ""; } openid = openid.trim(); providerId = providerId.trim(); //构造OpenIdAuthenticationToken OpenIdAuthenticationToken authRequest = new OpenIdAuthenticationToken(openid, providerId); // Allow subclasses to set the "details" property setDetails(request, authRequest); //交给AuthenticationManager进行认证 return this.getAuthenticationManager().authenticate(authRequest); } /** * 获取openId */ protected String obtainOpenId(HttpServletRequest request) { return request.getParameter(openIdParameter); } /** * 获取提供商id */ protected String obtainProviderId(HttpServletRequest request) { return request.getParameter(providerIdParameter); } protected void setDetails(HttpServletRequest request, OpenIdAuthenticationToken authRequest) { authRequest.setDetails(authenticationDetailsSource.buildDetails(request)); } public void setOpenIdParameter(String openIdParameter) { Assert.hasText(openIdParameter, "Username parameter must not be empty or null"); this.openIdParameter = openIdParameter; } public void setPostOnly(boolean postOnly) { this.postOnly = postOnly; } public final String getOpenIdParameter() { return openIdParameter; } public String getProviderIdParameter() { return providerIdParameter; } public void setProviderIdParameter(String providerIdParameter) { this.providerIdParameter = providerIdParameter; } }3、OpenIdAuthenticationProvider
/** * */ package com.learn.springsecurity.app.social.openid; /** * @author zhailiang * */ public class OpenIdAuthenticationProvider implements AuthenticationProvider { private SocialUserDetailsService userDetailsService; private UsersConnectionRepository usersConnectionRepository; /* * (non-Javadoc) * * @see org.springframework.security.authentication.AuthenticationProvider# * authenticate(org.springframework.security.core.Authentication) */ @Override public Authentication authenticate(Authentication authentication) throws AuthenticationException { OpenIdAuthenticationToken authenticationToken = (OpenIdAuthenticationToken) authentication; Set<String> providerUserIds = new HashSet<>(); providerUserIds.add((String) authenticationToken.getPrincipal()); //之前社交登录中介绍的usersConnectionRepository,从user_connection表中根据providerId和openId查询用户id Set<String> userIds = usersConnectionRepository.findUserIdsConnectedTo(authenticationToken.getProviderId(), providerUserIds); if(CollectionUtils.isEmpty(userIds) || userIds.size() != 1) { throw new InternalAuthenticationServiceException("无法获取用户信息"); } //获取到userId了 String userId = userIds.iterator().next(); //利用UserDetailsService根据userId查询用户信息 UserDetails user = userDetailsService.loadUserByUserId(userId); if (user == null) { throw new InternalAuthenticationServiceException("无法获取用户信息"); } OpenIdAuthenticationToken authenticationResult = new OpenIdAuthenticationToken(user, user.getAuthorities()); authenticationResult.setDetails(authenticationToken.getDetails()); return authenticationResult; } /* * (non-Javadoc) * * @see org.springframework.security.authentication.AuthenticationProvider# * supports(java.lang.Class) */ @Override public boolean supports(Class<?> authentication) { return OpenIdAuthenticationToken.class.isAssignableFrom(authentication); } public SocialUserDetailsService getUserDetailsService() { return userDetailsService; } public void setUserDetailsService(SocialUserDetailsService userDetailsService) { this.userDetailsService = userDetailsService; } public UsersConnectionRepository getUsersConnectionRepository() { return usersConnectionRepository; } public void setUsersConnectionRepository(UsersConnectionRepository usersConnectionRepository) { this.usersConnectionRepository = usersConnectionRepository; } }4、配置类
/** * @author zhailiang * */ @Component public class OpenIdAuthenticationSecurityConfig extends SecurityConfigurerAdapter<DefaultSecurityFilterChain, HttpSecurity> { @Autowired private AuthenticationSuccessHandler selfAuthenticationSuccessHandler; @Autowired private AuthenticationFailureHandler selfAuthenticationFailureHandler; @Autowired private SocialUserDetailsService userDetailsService; @Autowired private UsersConnectionRepository usersConnectionRepository; @Override public void configure(HttpSecurity http) throws Exception { OpenIdAuthenticationFilter OpenIdAuthenticationFilter = new OpenIdAuthenticationFilter(); OpenIdAuthenticationFilter.setAuthenticationManager(http.getSharedObject(AuthenticationManager.class)); OpenIdAuthenticationFilter.setAuthenticationSuccessHandler(selfAuthenticationSuccessHandler); OpenIdAuthenticationFilter.setAuthenticationFailureHandler(selfAuthenticationFailureHandler); OpenIdAuthenticationProvider OpenIdAuthenticationProvider = new OpenIdAuthenticationProvider(); OpenIdAuthenticationProvider.setUserDetailsService(userDetailsService); OpenIdAuthenticationProvider.setUsersConnectionRepository(usersConnectionRepository); http.authenticationProvider(OpenIdAuthenticationProvider) .addFilterAfter(OpenIdAuthenticationFilter, UsernamePasswordAuthenticationFilter.class); } }测试结果

标准的OAuth模式
针对标准的授权模式,我们并不需要做多少改动,因为在社交登录那一节中我们已经做了相关开发,只是需要说明的是,只是在spring-social的过滤器——SocialAuthenticationFilter中,在正常社交登录流程完成之后会默认跳转到某个页面,而这个并不适用于前后端分离的项目,因此要针对这个问题定制化解决。这需要回到之前SocialAuthenticationFilter加入到认证过滤器链上的代码。之前我们说过社交登录的过滤器链不需要我们手动配置,只需要初始化SpringSocialConfiguer的时候,会自动加入到社交登录的认证过滤器链上
@Configuration @EnableSocial public class SocialConfig extends SocialConfigurerAdapter { @Bean public SpringSocialConfigurer selfSocialSecurityConfig(){ SpringSocialConfigurer selfSpringSocialConfig = new SpringSocialConfigurer(); return selfSpringSocialConfig; } }我们只需要改变SocialAuthenticationFilter的默认处理即可,因此我们给他加一个后置处理器,但是这个后置处理器是在SpringSocialConfigurer的postProcess函数中进行处理
/** * autor:liman * createtime:2021/7/15 * comment:自定义的springsocial配置类 */ public class SelfSpringSocialConfig extends SpringSocialConfigurer { private String processFilterUrl; @Autowired(required = false) private ConnectionSignUp connectionSignUp; @Autowired(required = false) private SocialAuthenticationFilterPostProcessor socialAuthenticationFilterPostProcessor; public SelfSpringSocialConfig(String processFilterUrl) { this.processFilterUrl = processFilterUrl; } @Override protected <T> T postProcess(T object) { SocialAuthenticationFilter socialAuthenticationFilter = (SocialAuthenticationFilter) super.postProcess(object); socialAuthenticationFilter.setFilterProcessesUrl(processFilterUrl); if(null!=socialAuthenticationFilterPostProcessor){ socialAuthenticationFilterPostProcessor.process(socialAuthenticationFilter); } return (T) socialAuthenticationFilter; } public ConnectionSignUp getConnectionSignUp() { return connectionSignUp; } public void setConnectionSignUp(ConnectionSignUp connectionSignUp) { this.connectionSignUp = connectionSignUp; } public SocialAuthenticationFilterPostProcessor getSocialAuthenticationFilterPostProcessor() { return socialAuthenticationFilterPostProcessor; } public void setSocialAuthenticationFilterPostProcessor(SocialAuthenticationFilterPostProcessor socialAuthenticationFilterPostProcessor) { this.socialAuthenticationFilterPostProcessor = socialAuthenticationFilterPostProcessor; } } //将我们自定义的 SpringSocialConfigurer交给spring托管 @Configuration @EnableSocial public class SocialConfig extends SocialConfigurerAdapter { @Bean public SpringSocialConfigurer selfSocialSecurityConfig(){ String processFilterUrl = securityProperties.getSocial().getProcessFilterUrl(); SelfSpringSocialConfig selfSpringSocialConfig = new SelfSpringSocialConfig(processFilterUrl); //指定第三方用户信息认证不存在的注册页 selfSpringSocialConfig.signupUrl(securityProperties.getBrowser().getSiguUpPage()); selfSpringSocialConfig.setConnectionSignUp(connectionSignUp); selfSpringSocialConfig.setSocialAuthenticationFilterPostProcessor(socialAuthenticationFilterPostProcessor); return selfSpringSocialConfig; } }我们自定义的过滤器后置处理器如下
/** * autor:liman * createtime:2021/8/7 * comment:APP社交登录认证后置处理器 */ @Component public class AppSocialAuthenticationFilterPostProcessor implements SocialAuthenticationFilterPostProcessor { @Autowired private AuthenticationSuccessHandler selfAuthenticationSuccessHandler; @Override public void process(SocialAuthenticationFilter socialAuthenticationFilter) { socialAuthenticationFilter.setAuthenticationSuccessHandler(selfAuthenticationSuccessHandler); } }这里需要总结一下之前的社交登录中用户注册绑定的操作。
在之前的社交登录中,如果spring social发现用户是第一次登录,则会跳转到相关的页面,这个页面我们其实也可以自己定义并配置
@Configuration @EnableSocial public class SocialConfig extends SocialConfigurerAdapter { @Bean public SpringSocialConfigurer selfSocialSecurityConfig(){ String processFilterUrl = securityProperties.getSocial().getProcessFilterUrl(); SelfSpringSocialConfig selfSpringSocialConfig = new SelfSpringSocialConfig(processFilterUrl); //指定第三方用户信息认证不存在的注册页 selfSpringSocialConfig.signupUrl(securityProperties.getBrowser().getSiguUpPage()); selfSpringSocialConfig.setConnectionSignUp(connectionSignUp); selfSpringSocialConfig.setSocialAuthenticationFilterPostProcessor(socialAuthenticationFilterPostProcessor); return selfSpringSocialConfig; } @Bean public ProviderSignInUtils providerSignInUtils(ConnectionFactoryLocator connectionFactoryLocator){ return new ProviderSignInUtils(connectionFactoryLocator, getUsersConnectionRepository(connectionFactoryLocator)); } }我们配置的代码中,可以自定义页面路径,我们自定义页面如下(一个简单的登录绑定页面)
<!DOCTYPE html> <html> <head> <meta charset="UTF-8"> <title>登录</title> </head> <body> <h3>Demo注册页</h3> <form action="user/regist" method="post"> <table> <tr> <td>用户名:</td> <td><input type="text" name="username"></td> </tr> <tr> <td>密码:</td> <td><input type="password" name="password"></td> </tr> <tr> <td colspan="2"> <button type="submit" name="type" value="regist">注册</button> <button type="submit" name="type" value="binding">绑定</button> </td> </tr> </table> </form> </body> </html>
在用户第一次跳转到这个页面的用户选择注册,或者绑定,都会请求/user/register接口,这个接口借助providerSignInUtils完成会话中的用户数据更新
@Autowired private ProviderSignInUtils providerSignInUtils; @PostMapping("/register") public void userRegister(@RequestBody User user, HttpServletRequest request) { //利用providerSignInUtils,将注册之后的用户信息,关联到会话中 providerSignInUtils.doPostSignUp(user.getId(),new ServletWebRequest(request)); }在跳转之前,spring social已经帮我们将用户信息存入会话(在SocialAuthenticationFilter中可以看到相关代码)
//以下代码位于:org.springframework.social.security.SocialAuthenticationFilter#doAuthentication private Authentication doAuthentication(SocialAuthenticationService<?> authService, HttpServletRequest request, SocialAuthenticationToken token) { try { if (!authService.getConnectionCardinality().isAuthenticatePossible()) return null; token.setDetails(authenticationDetailsSource.buildDetails(request)); Authentication success = getAuthenticationManager().authenticate(token); Assert.isInstanceOf(SocialUserDetails.class, success.getPrincipal(), "unexpected principle type"); updateConnections(authService, token, success); return success; } catch (BadCredentialsException e) { // connection unknown, register new user? if (signupUrl != null) { //这里就是将社交用户信息存入会话 // store ConnectionData in session and redirect to register page sessionStrategy.setAttribute(new ServletWebRequest(request), ProviderSignInAttempt.SESSION_ATTRIBUTE, new ProviderSignInAttempt(token.getConnection())); throw new SocialAuthenticationRedirectException(buildSignupUrl(request)); } throw e; } }但是基于前后端分离,且并没有会话对象交互的系统,这种方式并不适用,因为并不存在会话,如何处理,需要用其他方案,其实我们可以在验证码登录的改造中受到启发,将用户数据存入会话即可,我们自定义实现一个providerSignInUtils将用户信息存入Redis即可。
1、将第三方用户数据存入Redis的工具类
/** * autor:liman * createtime:2021/8/7 * comment:app端用户信息存入Redis的工具类 */ @Component public class AppSignUpUtils { public static final String SOCIAL_REDIS_USER_PREFIX = "self:security:social:connectionData"; @Autowired private RedisTemplate<Object, Object> redisTemplate; @Autowired private UsersConnectionRepository usersConnectionRepository; @Autowired private ConnectionFactoryLocator connectionFactoryLocator; public void saveConnectionData(WebRequest webRequest, ConnectionData connectionData) { redisTemplate.opsForValue().set(getKey(webRequest), connectionData, 10, TimeUnit.MINUTES); } /** * 将用户与数据库中的信息进行绑定 * @param request * @param userId */ public void doPostSignUp(WebRequest request,String userId){ String key = getKey(request); if(!redisTemplate.hasKey(key)){ throw new RuntimeException("无法找到缓存的用户社交账号信息"); } ConnectionData connectionData = (ConnectionData) redisTemplate.opsForValue().get(key); //根据ConnectionData实例化创建一个Connection Connection<?> connection = connectionFactoryLocator.getConnectionFactory(connectionData.getProviderId()) .createConnection(connectionData); //将数据库中的用户与Redis中的用户信息关联 usersConnectionRepository.createConnectionRepository(userId).addConnection(connection); } /** * 获取设备id作为key * * @param webRequest * @return */ public String getKey(WebRequest webRequest) { String deviceId = webRequest.getHeader("deviceId"); if (StringUtils.isBlank(deviceId)) { throw new RuntimeException("设备id不能为空"); } return SOCIAL_REDIS_USER_PREFIX + deviceId; } }2、复写掉原来的配置类
为了避免对原有代码的侵入性处理,这里我们需要自定义一个实现BeanPostProcessor接口的类
/** * autor:liman * createtime:2021/8/7 * comment:由于app端的社交用户绑定,不能采用跳转,也不能操作会话,需要用自定义的providerSignUpUtils工具类 * 因此需要定义一个后置处理器,针对SpringSocialConfigurer进行一些后置处理 */ @Component public class AppSpringSocialConfigurerPostProcessor implements BeanPostProcessor { @Override public Object postProcessBeforeInitialization(Object bean, String beanName) throws BeansException { return null; } @Override public Object postProcessAfterInitialization(Object bean, String beanName) throws BeansException { if(StringUtils.equals(beanName,"selfSocialSecurityConfig")){ SelfSpringSocialConfig configurer = (SelfSpringSocialConfig) bean; //复写掉原有的SelfSpringSocialConfig的signupUrl configurer.signupUrl("/app/social/signup"); return configurer; } return bean; } }针对上述的请求路径,我们也要写一个对应路径的controller处理方法
@RestController @Slf4j public class AppSecurityController { @Autowired private ProviderSignInUtils providerSignInUtils; @Autowired private AppSignUpUtils appSignUpUtils; @GetMapping("/app/social/signup") @ResponseStatus(HttpStatus.UNAUTHORIZED) public BaseResponse getSocialUserInfo(HttpServletRequest request){ BaseResponse result = new BaseResponse(StatusCode.Success); log.info("【app模式】开始获取会话中的第三方用户信息"); //先从其中拿出数据,毕竟这个时候还没有完全跳转,下一个会话,就没有该数据了 Connection<?> connectionFromSession = providerSignInUtils.getConnectionFromSession(new ServletWebRequest(request)); SocialUserInfo socialUserInfo = new SocialUserInfo(); socialUserInfo.setProviderId(connectionFromSession.getKey().getProviderId()); socialUserInfo.setProviderUserId(connectionFromSession.getKey().getProviderUserId()); socialUserInfo.setNickName(connectionFromSession.getDisplayName()); socialUserInfo.setHeadImg(connectionFromSession.getImageUrl()); //转存到自己的工具类中 appSignUpUtils.saveConnectionData(new ServletWebRequest(request),connectionFromSession.createData()); result.setData(socialUserInfo); return result; } }对于用户注册的接口也需要做调整
@PostMapping("/register") public void userRegister(@RequestBody User user, HttpServletRequest request) { //如果是浏览器的应用利用providerSignInUtils,将注册之后的用户信息,关联到会话中 providerSignInUtils.doPostSignUp(user.getId(),new ServletWebRequest(request)); //如果是app的应用,则利用appSignUpUtils 将注册之后的用户信息,关联到会话中 appSignUpUtils.doPostSignUp(new ServletWebRequest(request),user.getId()); }以上是“springsecurity如何实现基于token的认证方式”这篇文章的所有内容,感谢各位的阅读!相信大家都有了一定的了解,希望分享的内容对大家有所帮助,如果还想学习更多知识,欢迎关注亿速云行业资讯频道!
免责声明:本站发布的内容(图片、视频和文字)以原创、转载和分享为主,文章观点不代表本网站立场,如果涉及侵权请联系站长邮箱:is@yisu.com进行举报,并提供相关证据,一经查实,将立刻删除涉嫌侵权内容。


