这篇文章主要介绍“如何用Vue实现图片裁剪组件”,在日常操作中,相信很多人在如何用Vue实现图片裁剪组件问题上存在疑惑,小编查阅了各式资料,整理出简单好用的操作方法,希望对大家解答”如何用Vue实现图片裁剪组件”的疑惑有所帮助!接下来,请跟着小编一起来学习吧!
示例:
tip: 该组件基于vue-cropper二次封装
安装插件
npm install vue-cropper yarn add vue-cropper
写入封装的组件
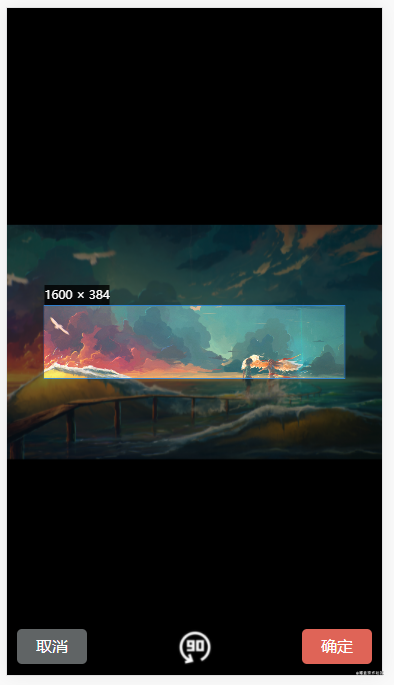
<!-- 简易图片裁剪组件 --- 二次封装 --> <!-- 更多api https://github.com/xyxiao001/vue-cropper --> <!-- 使用:传入图片 比例 显示隐藏。方法:监听底部按钮点击即可 ---更多props查询文档自行添加 --> <template> <div v-if="value" :value="value" @input="val => $emit('input', val)" class="conbox"> <div class="info"> <vueCropper ref="cropper" :img="img" :outputSize="outputSize" :outputType="outputType" :info="info" :canScale="canScale" :autoCrop="autoCrop" :fixed="fixed" :fixedNumber="fixedNumber" :full="full" :fixedBox="fixedBox" :canMove="canMove" :canMoveBox="canMoveBox" :original="original" :centerBox="centerBox" :infoTrue="infoTrue" :mode="mode" ></vueCropper> </div> <div class="btns"> <div @click="clickCancelCut" class="cancel">取消</div> <img @click="clickRotate" src="../../assets/paradise/rotate.png" alt="" /> <div @click="clickOk" class="okey">确定</div> </div> </div> </template> <script> import { VueCropper } from 'vue-cropper'; export default { name: 'PictureCropping', components: { VueCropper }, props: { value: { type: Boolean, default: false, }, //裁剪图片的地址 img: { type: String, default: '', }, //截图框的宽高比例 fixedNumber: { type: Array, default: () => { return [1, 1]; }, }, }, data() { return { // 裁剪组件的基础配置option // img: this.img, // 裁剪图片的地址 outputSize: 1, // 裁剪生成图片的质量 outputType: 'jpeg', // 裁剪生成图片的格式 info: true, // 裁剪框的大小信息 canScale: true, // 图片是否允许滚轮缩放 autoCrop: true, // 是否默认生成截图框 // autoCropWidth: 300, // 默认生成截图框宽度 // autoCropHeight: 200, // 默认生成截图框高度 fixed: true, // 是否开启截图框宽高固定比例 // fixedNumber: this.fixedNumber, // 截图框的宽高比例 full: true, // 是否输出原图比例的截图 fixedBox: true, // 固定截图框大小 不允许改变 canMove: true, //上传图片是否可以移动 canMoveBox: true, // 截图框能否拖动 original: false, // 上传图片按照原始比例渲染 centerBox: true, // 截图框是否被限制在图片里面 // high:true,// 是否按照设备的dpr 输出等比例图片 infoTrue: true, // true 为展示真实输出图片宽高 false 展示看到的截图框宽高 // maxImgSize: 2000, //限制图片最大宽度和高度 // enlarge: 1, //图片根据截图框输出比例倍数 mode: 'contain', //图片默认渲染方式 }; }, computed: {}, watch: {}, //生命周期 - 创建完成(访问当前this实例) created() {}, //生命周期 - 挂载完成(访问DOM元素) mounted() {}, methods: { clickCancelCut() { this.$emit('clickCancelCut', '点击取消'); this.$refs.cropper.stopCrop(); this.$refs.cropper.clearCrop(); }, clickRotate() { this.$refs.cropper.rotateRight(); this.$emit('clickRotate', '点击旋转'); }, clickOk() { //输出裁剪的base64 this.$refs.cropper.getCropData(data => { this.$emit('clickOk', data); this.$refs.cropper.stopCrop(); this.$refs.cropper.clearCrop(); }); }, }, }; </script> <style lang='less' scoped> /* @import url(); 引入css类 */ .conbox { position: fixed; top: 0; right: 0; bottom: 0; left: 0; box-sizing: border-box; height: 100vh; width: 100%; background-color: #000; display: flex; flex-direction: column; justify-content: center; .info { width: auto; height: 800px; .vue-cropper { background-image: none; background-color: #000; } } .btns { padding: 0 20px; color: #fff; text-align: center; display: flex; justify-content: space-between; align-items: center; position: absolute; left: 0; right: 0; bottom: 15px; img { width: 85px; height: 85px; } .cancel { background-color: #606465; padding: 15px 20px; width: 100px; border-radius: 10px; } .okey { background-color: #df6457; padding: 15px 20px; width: 100px; border-radius: 10px; } } } </style>到此,关于“如何用Vue实现图片裁剪组件”的学习就结束了,希望能够解决大家的疑惑。理论与实践的搭配能更好的帮助大家学习,快去试试吧!若想继续学习更多相关知识,请继续关注亿速云网站,小编会继续努力为大家带来更多实用的文章!
免责声明:本站发布的内容(图片、视频和文字)以原创、转载和分享为主,文章观点不代表本网站立场,如果涉及侵权请联系站长邮箱:is@yisu.com进行举报,并提供相关证据,一经查实,将立刻删除涉嫌侵权内容。


