本篇内容主要讲解“opencv图片任意角度旋转的实现方法”,感兴趣的朋友不妨来看看。本文介绍的方法操作简单快捷,实用性强。下面就让小编来带大家学习“opencv图片任意角度旋转的实现方法”吧!
一 旋转角度坐标的计算
二 旋转任意角度的步骤
三 实现
1.如果O点为圆心,则点P绕点O旋转redian弧度之后,点P的坐标变换为点Q的计算公式为:
Q.x=P.x*cos(redian)-P.y*sin(redian)
Q.y=P.x*sin(redian)+P.y*cos(redian)
redian表示的为弧度
弧度与角度的变换公式为:
redian=pi*180/angle
2. 如果O点不是圆心,则点P绕点O旋转redian弧度之后,点P的坐标变换为Q的计算公式如下:
Q.x=(P.x-O.x)*cos(redian)-(P.y-O.y)*sin(redian)+O.x
Q.y=(P.x-O.x)*sin(redian)+(P.y-O.y)*cos(redian)+O.y
1.首先默认旋转45度时,所扩展的图像最大,即为根号2倍的长或宽的最大值,将图像填充到可能达到的最大
2 使用getRotationMatrix2D函数求取旋转矩阵,使用warpAffine函数旋转矩阵
3 求旋转之后包括图像的最大的矩形
4 删除多余的黑色边框
#include <iostream> #include<opencv2/opencv.hpp> using namespace cv; void rotate_arbitrarily_angle(Mat &src,Mat &dst,float angle) { float radian = (float) (angle /180.0 * CV_PI); //填充图像 int maxBorder =(int) (max(src.cols, src.rows)* 1.414 ); //即为sqrt(2)*max int dx = (maxBorder - src.cols)/2; int dy = (maxBorder - src.rows)/2; copyMakeBorder(src, dst, dy, dy, dx, dx, BORDER_CONSTANT); //旋转 Point2f center( (float)(dst.cols/2) , (float) (dst.rows/2)); Mat affine_matrix = getRotationMatrix2D( center, angle, 1.0 );//求得旋转矩阵 warpAffine(dst, dst, affine_matrix, dst.size()); //计算图像旋转之后包含图像的最大的矩形 float sinVal = abs(sin(radian)); float cosVal = abs(cos(radian)); Size targetSize( (int)(src.cols * cosVal +src.rows * sinVal), (int)(src.cols * sinVal + src.rows * cosVal) ); //剪掉多余边框 int x = (dst.cols - targetSize.width) / 2; int y = (dst.rows - targetSize.height) / 2; Rect rect(x, y, targetSize.width, targetSize.height); dst = Mat(dst,rect); } int main() { cv::Mat src=cv::imread("../3.png"); cv::Mat dst; rotate_arbitrarily_angle(src,dst,30); cv::imshow("src",src); cv::imshow("dst",dst); cv::waitKey(0); return 0; }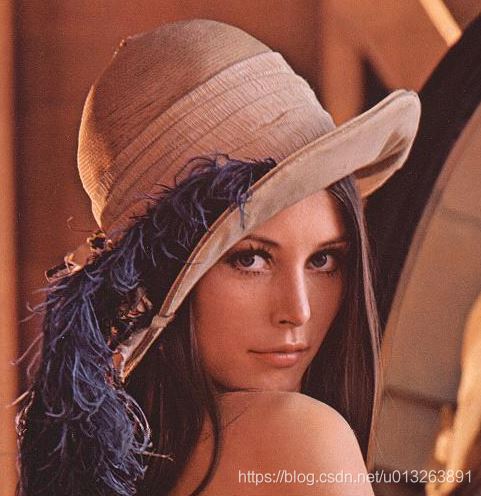
原图
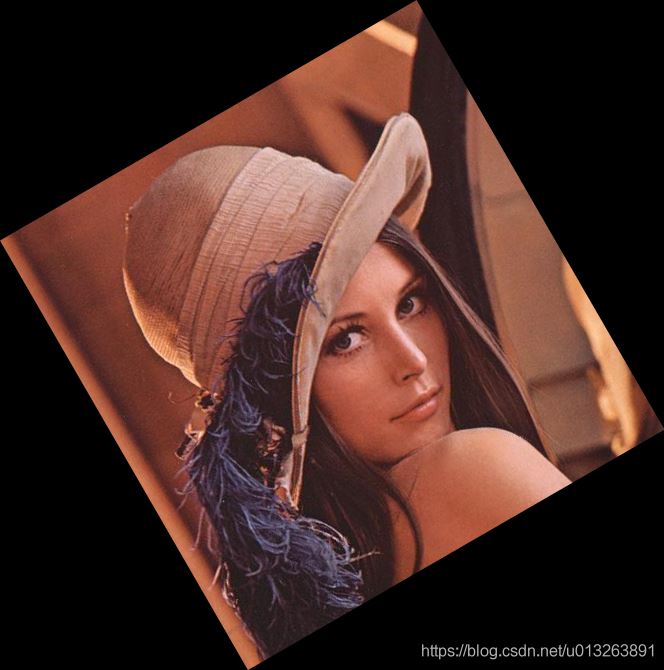
绕中心点旋转30度的结果
需要注意的是该方法仅适用于水平图像旋转到有角度的图像,至于可以随意旋转角度的方法我现在还不知道如何完成,以后有机会再做.
以上做法还有个最大的缺点是在旋转之后像素大小发生了变化,如果你要对像素操作就会产生很多问题,接下来的代码会将像素固定下来,不过也是针对旋转到一定角度之后再返回到水平位置的代码,具有很大的局限性,研究明白之后再更新其他情况
cv::Mat rotate_arbitrarily_angle1(cv::Mat matSrc, float angle, bool direction,int height,int width) { float theta = angle * CV_PI / 180.0; int nRowsSrc = matSrc.rows; int nColsSrc = matSrc.cols; // 如果是顺时针旋转 if (!direction) theta = 2 * CV_PI - theta; // 全部以逆时针旋转来计算 // 逆时针旋转矩阵 float matRotate[3][3]{ { std::cos(theta), -std::sin(theta), 0}, {std::sin(theta), std::cos(theta), 0 }, {0, 0, 1} }; float pt[3][2]{ { 0, nRowsSrc }, {nColsSrc, nRowsSrc}, {nColsSrc, 0} }; for (int i = 0; i < 3; i++) { float x = pt[i][0] * matRotate[0][0] + pt[i][1] * matRotate[1][0]; float y = pt[i][0] * matRotate[0][1] + pt[i][1] * matRotate[1][1]; pt[i][0] = x; pt[i][1] = y; } // 计算出旋转后图像的极值点和尺寸 float fMin_x = std::min(std::min(std::min(pt[0][0], pt[1][0]), pt[2][0]), (float)0.0); float fMin_y = std::min(std::min(std::min(pt[0][1], pt[1][1]), pt[2][1]), (float)0.0); float fMax_x = std::max(std::max(std::max(pt[0][0], pt[1][0]), pt[2][0]), (float)0.0); float fMax_y = std::max(std::max(std::max(pt[0][1], pt[1][1]), pt[2][1]), (float)0.0); int nRows = cvRound(fMax_y - fMin_y + 0.5) + 1; int nCols = cvRound(fMax_x - fMin_x + 0.5) + 1; int nMin_x = cvRound(fMin_x + 0.5); int nMin_y = cvRound(fMin_y + 0.5); // 拷贝输出图像 cv::Mat matRet(nRows, nCols, matSrc.type(), cv::Scalar(0)); for (int j = 0; j < nRows; j++) { for (int i = 0; i < nCols; i++) { // 计算出输出图像在原图像中的对应点的坐标,然后复制该坐标的灰度值 // 因为是逆时针转换,所以这里映射到原图像的时候可以看成是,输出图像 // 到顺时针旋转到原图像的,而顺时针旋转矩阵刚好是逆时针旋转矩阵的转置 // 同时还要考虑到要把旋转后的图像的左上角移动到坐标原点。 int x = (i + nMin_x) * matRotate[0][0] + (j + nMin_y) * matRotate[0][1]; int y = (i + nMin_x) * matRotate[1][0] + (j + nMin_y) * matRotate[1][1]; if (x >= 0 && x < nColsSrc && y >= 0 && y < nRowsSrc) { matRet.at<uchar>(j, i) = matSrc.at<uchar>(y, x); } } } if(direction== false){//当需要顺时针旋转回水平位置时 int x = (matRet.cols -width) / 2; int y = (matRet.rows -height) / 2; //width和height是水平条件下图像的宽高 cv::Rect rect(x, y, width, height); matRet = cv::Mat(matRet,rect); } return matRet; }到此,相信大家对“opencv图片任意角度旋转的实现方法”有了更深的了解,不妨来实际操作一番吧!这里是亿速云网站,更多相关内容可以进入相关频道进行查询,关注我们,继续学习!
免责声明:本站发布的内容(图片、视频和文字)以原创、转载和分享为主,文章观点不代表本网站立场,如果涉及侵权请联系站长邮箱:is@yisu.com进行举报,并提供相关证据,一经查实,将立刻删除涉嫌侵权内容。


