这篇文章给大家分享的是有关如何解决vue组件路由高亮的问题的内容。小编觉得挺实用的,因此分享给大家做个参考,一起跟随小编过来看看吧。
Vue是一套用于构建用户界面的渐进式JavaScript框架,Vue与其它大型框架的区别是,使用Vue可以自底向上逐层应用,其核心库只关注视图层,方便与第三方库和项目整合,且使用Vue可以采用单文件组件和Vue生态系统支持的库开发复杂的单页应用。
前言
之前我对于路由的高亮都是使用缓存,给他的所有路由遍历一遍,每点击一下的时候,给他的当前值高亮,赋值active。后来发现一刷新就不行,高亮的就变成默认值0了,这里主要是讲这个问题的解决办法。
第一种是通过这样的添加类:
.router{ font: 12px/40px '微软雅黑'; background: pink; background: pink; color: white; cursor: pointer; text-align: center; display: inline-block; width: 40px; background: pink; &.isActive{ background: blue; color:red; } }第二种是监听path:
原本的代码是这样的:
<template> <div id="main"> <ul > <li class="router" v-for="(item,index) in items" :key="index" :class="item.isActive?'isActive':''" @click="routerTo(item,index)"> <span >{{item.name}}</span> </li> </ul> <router-view></router-view> </div> </template> <script> export default { data () { return { activeIndex2:'0', items:[ {name:'twoPage',code:'twoPage',path:'/twoPage',defaultIcon:require('@/assets/icon/BehaviorRank-default.png'), activeIcon:require('@/assets/icon/behaviorrank-active.png'),isActive:true}, {name:'three',code:'three',path: '/three',defaultIcon:require('@/assets/icon/ChannelAllocation-default.png'), activeIcon:require('@/assets/icon/ChannelAllocation-active.png'),isActive:false}, {name:'four',code:'four',path:'/four',defaultIcon:require('@/assets/icon/myReport-default.png'), activeIcon:require('@/assets/icon/myReport-active.png'),isActive:false}, ], } }, methods:{ routerTo(item,index) { for (let i = 0; i < this.items.length; i++) { this.items[i].isActive=false } this.items[index].isActive=true this.$router.push({name:item.name}) }, } } </script> <style lang='less'> #main{ .router{ font: 12px/40px '微软雅黑'; background: pink; background: pink; color: white; cursor: pointer; text-align: center; display: inline-block; width: 40px; background: pink; } .isActive{ background: blue; color:red; } } </style>效果:
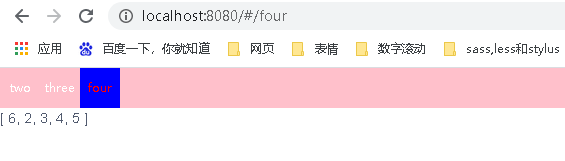
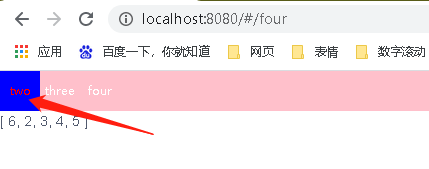
但如果点击刷新会这样:高亮的Index跑到了初始化0的位置。
如何解决这种问题
有一种方法是通过缓存sessionStorage。每次点击一下就存入缓存,刷新就从变量取值,变量没有值就从缓存取值。但一直存一直取可能有的人觉得麻烦。
还有一种方法就是初始化的时候获取路由,根据不同的路由激活对应的导航
created(){ // var path=window.location.hash.slice(2);//没有参数时这种写法也可以,不推荐 var path=this.$route.name//推荐这种 console.log(path) if(path){ for (let i = 0; i < this.items.length; i++) { this.items[i].isActive=false } switch(path){ case 'twoPage': this.items[0].isActive=true; break; case 'three': this.items[1].isActive=true; break; case 'four': this.items[2].isActive=true; break; } } },附:vue点击当前路由高亮的具体代码
功能展示:
组件代码:
标签上加exact
.router-link-active{ background: rgba(255,255,255,0.8); color: gray; }<template> <nav> <ul> <li> <router-link to="/" exact>博客</router-link> <router-link to="/AddBlog" exact>写博客</router-link> </li> </ul> </nav> </template> <script> export default { name: "bolgheader" } </script> <style scoped> ul{ list-style-type: none; text-align: center; margin:0; } li{ display: inline-block; margin:0 10px; } a{ color:rgb(102, 119, 204); text-decoration: none; padding:12px; border-radius: 5px; font-size:20px; } nav{ background: #eee; padding: 30px 0; margin-bottom: 40px; } .router-link-active{ background: rgba(255,255,255,0.8); color: gray; } </style>感谢各位的阅读!关于“如何解决vue组件路由高亮的问题”这篇文章就分享到这里了,希望以上内容可以对大家有一定的帮助,让大家可以学到更多知识,如果觉得文章不错,可以把它分享出去让更多的人看到吧!
免责声明:本站发布的内容(图片、视频和文字)以原创、转载和分享为主,文章观点不代表本网站立场,如果涉及侵权请联系站长邮箱:is@yisu.com进行举报,并提供相关证据,一经查实,将立刻删除涉嫌侵权内容。


