这篇文章将为大家详细讲解有关怎么在Android中通过自定义View实现一个圆弧进度效果,文章内容质量较高,因此小编分享给大家做个参考,希望大家阅读完这篇文章后对相关知识有一定的了解。
1.分析组件
自定义view首先我们要分析组件是由几部分组成,然后在依次顺序使用canvas画出组件,首先可以看出该组件由一个背景外部圆,一个圆弧,以及圆弧端点是由两个圆组成,内部是三个文字。分析完毕,我们就可以先定义组件属性了
2.组件属性
1.在values目录下新建attrs.xml文件,用来编写组件属性
<?xml version="1.0" encoding="utf-8"?> <resources> <declare-styleable name="ProgressView"> <attr name="title" format="string"/> <attr name="num" format="string"/> <attr name="unit" format="string"/> <attr name="titleTextsize" format="dimension"/> <attr name="numTextsize" format="dimension"/> <attr name="unitTextsize" format="dimension"/> <attr name="titleTextColor" format="color"/> <attr name="numTextColor" format="color"/> <attr name="unitTextColor" format="color"/> <attr name="backCircleWidth" format="dimension"/> <attr name="outerCircleWidth" format="dimension"/> <attr name="backCircleColor" format="color"/> <attr name="outerCircleColor" format="color"/> <attr name="endCircleWidth" format="dimension"/> <attr name="edgeDistance" format="dimension"/> <attr name="endCircleColor" format="color"/> <attr name="currentPercent" format="float"/> </declare-styleable> </resources>
2.自定义view继承View并实现构造方法
public class ProgressView extends View { /** * 在java代码里new的时候会用到 * @param context */ public ProgressView(Context context) { super(context); init(context, null); } /** * 在xml布局文件中使用时自动调用 * @param context */ public ProgressView(Context context, @Nullable AttributeSet attrs) { super(context, attrs); init(context,attrs); } /** * 不会自动调用,如果有默认style时,在第二个构造函数中调用 * @param context * @param attrs * @param defStyleAttr */ public ProgressView(Context context, @Nullable AttributeSet attrs, int defStyleAttr) { super(context, attrs, defStyleAttr); } }2.初始化属性
/** * 初始化属性 * @param context * @param attrs */ private void init(Context context,AttributeSet attrs){ this.mContext = context; if(attrs!=null){ TypedArray array = context.obtainStyledAttributes(attrs, R.styleable.ProgressView); title = array.getString(R.styleable.ProgressView_title); num = array.getString(R.styleable.ProgressView_num); unit = array.getString(R.styleable.ProgressView_unit); titleTextsize = array.getDimension(R.styleable.ProgressView_titleTextsize,24); numTextsize = array.getDimension(R.styleable.ProgressView_numTextsize,48); unitTextsize = array.getDimension(R.styleable.ProgressView_unitTextsize,24); titleTextColor = array.getColor(R.styleable.ProgressView_titleTextColor, Color.parseColor("#656d78")); numTextColor = array.getColor(R.styleable.ProgressView_numTextColor, Color.parseColor("#4fc1e9")); unitTextColor = array.getColor(R.styleable.ProgressView_unitTextColor, Color.parseColor("#4fc1e9")); backCircleWidth = array.getDimension(R.styleable.ProgressView_backCircleWidth, 12); outerCircleWidth = array.getDimension(R.styleable.ProgressView_outerCircleWidth, 20); backCircleColor = array.getColor(R.styleable.ProgressView_backCircleColor, Color.parseColor("#e6e9ed")); outerCircleColor = array.getColor(R.styleable.ProgressView_outerCircleColor, Color.parseColor("#4fc1e9")); endCircleWidth = array.getDimension(R.styleable.ProgressView_endCircleWidth,24); endCircleColor = array.getColor(R.styleable.ProgressView_endCircleColor, Color.parseColor("#4fc1e9")); edgeDistance = array.getDimension(R.styleable.ProgressView_edgeDistance, 12); currentPercent = array.getFloat(R.styleable.ProgressView_currentPercent, 0); if(currentPercent>1||currentPercent<0){ currentPercent = currentPercent>1?1:0; } //初始化画笔 backCirclePaint = new Paint(); backCirclePaint.setAntiAlias(true); backCirclePaint.setStrokeWidth(backCircleWidth); backCirclePaint.setColor(backCircleColor); backCirclePaint.setStyle(Paint.Style.STROKE); outerCirclePaint = new Paint(); outerCirclePaint.setAntiAlias(true); outerCirclePaint.setStrokeWidth(outerCircleWidth); outerCirclePaint.setColor(outerCircleColor); outerCirclePaint.setStyle(Paint.Style.STROKE); endBigCirclePaint = new Paint(); endBigCirclePaint.setAntiAlias(true); endBigCirclePaint.setStrokeWidth(endCircleWidth); endBigCirclePaint.setColor(endCircleColor); endBigCirclePaint.setStyle(Paint.Style.STROKE); endSmallCirclePaint = new Paint(); endSmallCirclePaint.setAntiAlias(true); endSmallCirclePaint.setColor(Color.WHITE); endSmallCirclePaint.setStyle(Paint.Style.FILL); titlePaint = new Paint(); //通过设置Flag来应用抗锯齿效果 titlePaint.setFlags(Paint.ANTI_ALIAS_FLAG); titlePaint.setAntiAlias(true); //设置文字居中 //titlePaint.setTextAlign(Paint.Align.CENTER); titlePaint.setColor(titleTextColor); titlePaint.setTextSize(titleTextsize); numPaint = new Paint(); numPaint.setAntiAlias(true); numPaint.setFlags(Paint.ANTI_ALIAS_FLAG); //设置文字居中 //numPaint.setTextAlign(Paint.Align.CENTER); numPaint.setColor(numTextColor); numPaint.setTextSize(numTextsize); unitPaint = new Paint(); unitPaint.setAntiAlias(true); unitPaint.setFlags(Paint.ANTI_ALIAS_FLAG); //unitPaint.setTextAlign(Paint.Align.CENTER); unitPaint.setColor(unitTextColor); unitPaint.setTextSize(unitTextsize); //释放 array.recycle(); } }3.获取组件高度宽度,重写onMeasure方法
@Override protected void onMeasure(int widthMeasureSpec, int heightMeasureSpec) { super.onMeasure(widthMeasureSpec, heightMeasureSpec); ///获取总宽度,是包含padding值 //处理WAP_CONTENT int widthSpecMode = MeasureSpec.getMode(widthMeasureSpec); width = MeasureSpec.getSize(widthMeasureSpec); int heightSpecMode = MeasureSpec.getMode(heightMeasureSpec); height = MeasureSpec.getSize(heightMeasureSpec); if (widthSpecMode == MeasureSpec.AT_MOST && heightSpecMode == MeasureSpec.AT_MOST) { //默认大小 200*200 setMeasuredDimension(200,200); }else if (widthSpecMode == MeasureSpec.AT_MOST) { setMeasuredDimension(height, height); }else if (heightSpecMode == MeasureSpec.AT_MOST) { setMeasuredDimension(width, width); } }4.重写onDraw()绘制组件各部分
@Override protected void onDraw(Canvas canvas) { super.onDraw(canvas); //圆心 int centerX = width / 2; int centerY = height / 2; //计算半径 float radius = centerX - edgeDistance; //画背景圆 drawBackCircle(canvas,centerX,centerY,radius); //绘制圆弧进度 drawProgress(canvas,centerX,centerY); //绘制标题 drawText(canvas); }```###### 4.1绘制背景圆
```java /** * 绘制背景圆 * @param canvas * @param x 圆心位置x * @param y 圆心位置y * @param radius 半径 */ private void drawBackCircle(Canvas canvas,int x,int y,float radius){ canvas.drawCircle(x,y,radius,backCirclePaint); }4.2 绘制圆弧进度
1.注意:圆弧上端点进度为0或者100不显示,此外端点的位置使用sin和cos来确定坐标;
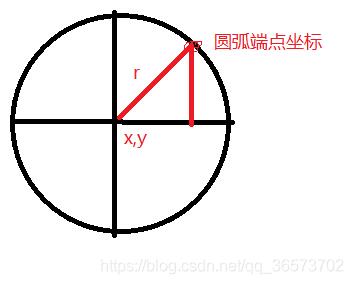
/** * 绘制圆弧进度 */ private void drawProgress(Canvas canvas,int x,int y){ //圆弧的范围 RectF rectF = new RectF(edgeDistance, edgeDistance, width - edgeDistance, height - edgeDistance); //定义的圆弧的形状和大小的范围 // 置圆弧是从哪个角度来顺时针绘画的 //设置圆弧扫过的角度 //设置我们的圆弧在绘画的时候,是否经过圆形 这里不需要 //画笔 canvas.drawArc(rectF, -90, 360 * currentPercent, false, outerCirclePaint); //绘制端圆 //进度在0~100%的时候才会画终点小圆,可以自由改动 if(currentPercent>0&¤tPercent<1){ //绘制外层大圆 canvas.drawCircle(x + rectF.width() / 2 * (float) Math.sin(360 * currentPercent * Math.PI / 180), y - rectF.width() / 2 * (float) Math.cos(360 * currentPercent * Math.PI / 180), endCircleWidth / 2, endBigCirclePaint); //绘制内层圆点 canvas.drawCircle(x + rectF.width() / 2 * (float) Math.sin(360 * currentPercent * Math.PI / 180), y - rectF.width() / 2 * (float) Math.cos(360 * currentPercent * Math.PI / 180), endCircleWidth / 4, endSmallCirclePaint); } }4.3 绘制文字
/** * 绘制标题 * @param canvas */ private void drawText(Canvas canvas) { Rect textRect = new Rect(); //返回的则是当前文本所需要的最小宽度,也就是整个文本外切矩形的宽度 titlePaint.getTextBounds(title, 0, title.length(), textRect);//25 50 175 //高度平分四部分 float h = height/ 4; //文字居中 canvas.drawText(title, width / 2 - textRect.width() / 2, h + textRect.height() / 2, titlePaint); numPaint.getTextBounds(num, 0, num.length(), textRect); canvas.drawText(num, width / 2 - textRect.width() / 2, h*2 + textRect.height() / 2, numPaint); unitPaint.getTextBounds(unit, 0, unit.length(), textRect); canvas.drawText(unit, width / 2 - textRect.width() / 2, 3*h + textRect.height() / 2, unitPaint); }4.4提供外部修改进度方法以及进度过度
/** * 设置进度 */ public void setProgress(final float progress){ new Thread(new Runnable() { @Override public void run() { for(int i=0;i<=progress*100;i++){ Message msg = new Message(); msg.what = 1; msg.obj = i; try { Thread.sleep(20); handler.sendMessage(msg); } catch (InterruptedException e) { e.printStackTrace(); } } } }).start(); } private Handler handler = new Handler(new Handler.Callback(){ @Override public boolean handleMessage(@NonNull Message msg) { if(msg.what==1){ currentPercent = ((float)Integer.valueOf(msg.obj+"")/100); System.out.println("更新"+currentPercent); invalidate(); } return false; } });关于怎么在Android中通过自定义View实现一个圆弧进度效果就分享到这里了,希望以上内容可以对大家有一定的帮助,可以学到更多知识。如果觉得文章不错,可以把它分享出去让更多的人看到。
免责声明:本站发布的内容(图片、视频和文字)以原创、转载和分享为主,文章观点不代表本网站立场,如果涉及侵权请联系站长邮箱:is@yisu.com进行举报,并提供相关证据,一经查实,将立刻删除涉嫌侵权内容。


