这篇文章给大家介绍如何在SpringMVC项目中使用rabbitmq,内容非常详细,感兴趣的小伙伴们可以参考借鉴,希望对大家能有所帮助。
1.添加maven依赖
<dependency> <groupId>com.rabbitmq</groupId> <artifactId>amqp-client</artifactId> <version>3.5.1</version> </dependency> <dependency> <groupId>org.springframework.amqp</groupId> <artifactId>spring-rabbit</artifactId> <version>1.4.5.RELEASE</version> </dependency>
2.spring主配置文件中加入rabbitMQ xml文件的配置
<!-- rabbitMQ 配置 --> <import resource="/application-mq.xml"/>
3.jdbc配置文件中加入 rabbitmq的链接配置
#rabbitMQ配置 mq.host=localhost mq.username=donghao mq.password=donghao mq.port=5672 mq.vhost=testMQ
4.新建application-mq.xml文件,添加配置信息
<beans xmlns="http://www.springframework.org/schema/beans" xmlns:xsi="http://www.w3.org/2001/XMLSchema-instance" xmlns:rabbit="http://www.springframework.org/schema/rabbit" xsi:schemaLocation="http://www.springframework.org/schema/beans http://www.springframework.org/schema/beans/spring-beans-3.0.xsd http://www.springframework.org/schema/rabbit http://www.springframework.org/schema/rabbit/spring-rabbit-1.0.xsd" > <description>rabbitmq 连接服务配置</description> <!-- 连接配置 --> <rabbit:connection-factory id="connectionFactory" host="${mq.host}" username="${mq.username}" password="${mq.password}" port="${mq.port}" virtual-host="${mq.vhost}"/> <rabbit:admin connection-factory="connectionFactory"/> <!-- spring template声明--> <rabbit:template exchange="koms" id="amqpTemplate" connection-factory="connectionFactory" message-converter="jsonMessageConverter" /> <!-- 消息对象json转换类 --> <bean id="jsonMessageConverter" class="org.springframework.amqp.support.converter.Jackson2JsonMessageConverter" /> <!-- durable:是否持久化 exclusive: 仅创建者可以使用的私有队列,断开后自动删除 auto_delete: 当所有消费客户端连接断开后,是否自动删除队列 --> <!-- 申明一个消息队列Queue --> <rabbit:queue id="order" name="order" durable="true" auto-delete="false" exclusive="false" /> <rabbit:queue id="activity" name="activity" durable="true" auto-delete="false" exclusive="false" /> <rabbit:queue id="mail" name="mail" durable="true" auto-delete="false" exclusive="false" /> <rabbit:queue id="stock" name="stock" durable="true" auto-delete="false" exclusive="false" /> <rabbit:queue id="autoPrint" name="autoPrint" durable="true" auto-delete="false" exclusive="false" /> <!-- rabbit:direct-exchange:定义exchange模式为direct,意思就是消息与一个特定的路由键完全匹配,才会转发。 rabbit:binding:设置消息queue匹配的key --> <!-- 交换机定义 --> <rabbit:direct-exchange name="koms" durable="true" auto-delete="false" id="koms"> <rabbit:bindings> <rabbit:binding queue="order" key="order"/> <rabbit:binding queue="activity" key="activity"/> <rabbit:binding queue="mail" key="mail"/> <rabbit:binding queue="stock" key="stock"/> <rabbit:binding queue="autoPrint" key="autoPrint"/> </rabbit:bindings> </rabbit:direct-exchange> <!-- queues:监听的队列,多个的话用逗号(,)分隔 ref:监听器 --> <!-- 配置监听 acknowledeg = "manual" 设置手动应答 当消息处理失败时:会一直重发 直到消息处理成功 --> <rabbit:listener-container connection-factory="connectionFactory" acknowledge="manual"> <!-- 配置监听器 --> <rabbit:listener queues="activity" ref="activityListener"/> <rabbit:listener queues="order" ref="orderListener"/> <rabbit:listener queues="mail" ref="mailListener"/> <rabbit:listener queues="stock" ref="stockListener"/> <rabbit:listener queues="autoPrint" ref="autoPrintListener"/> </rabbit:listener-container> </beans>5.新增公共入队类
@Service public class MQProducerImpl{ @Resource private AmqpTemplate amqpTemplate; private final static Logger logger = LoggerFactory.getLogger(MQProducerImpl.class); //公共入队方法 public void sendDataToQueue(String queueKey, Object object) { try { amqpTemplate.convertAndSend(queueKey, object); } catch (Exception e) { logger.error(e.toString()); } } }6.创建监听类
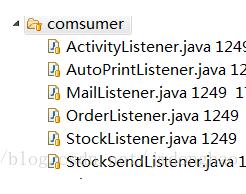
import java.io.IOException; import java.util.List; import javax.annotation.Resource; import org.slf4j.Logger; import org.slf4j.LoggerFactory; import org.springframework.amqp.core.Message; import org.springframework.amqp.rabbit.core.ChannelAwareMessageListener; import org.springframework.amqp.utils.SerializationUtils; import org.springframework.stereotype.Component; import org.springframework.transaction.annotation.Transactional; import com.cn.framework.domain.BaseDto; import com.cn.framework.util.ConstantUtils; import com.cn.framework.util.RabbitMq.producer.MQProducer; import com.kxs.service.activityService.IActivityService; import com.kxs.service.messageService.IMessageService; import com.rabbitmq.client.Channel; /** * 活动处理listener * @author * @date 2017年6月30日 **/ @Component public class ActivityListener implements ChannelAwareMessageListener { private static final Logger log = LoggerFactory.getLogger(ActivityListener.class); @Override @Transactional public void onMessage(Message message,Channel channel) { } }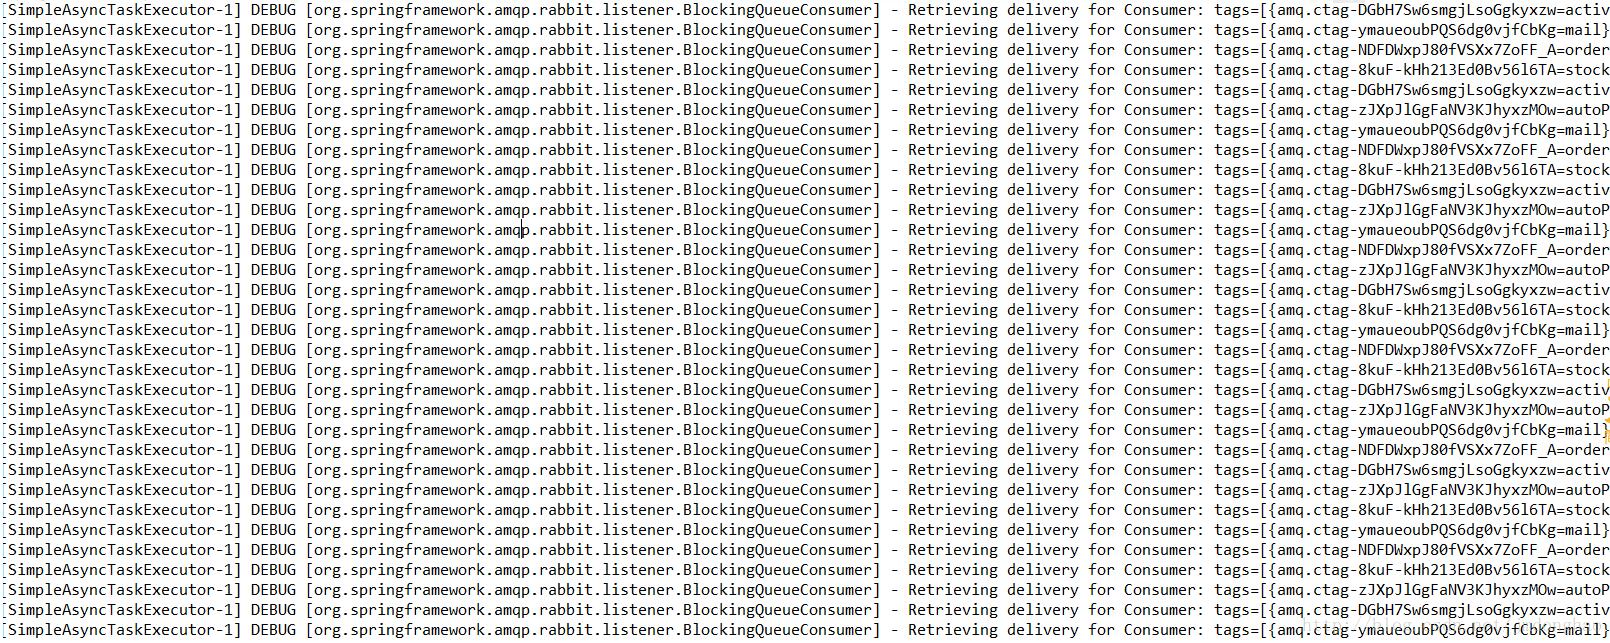
项目启动后 控制台会打印出监听的日志信息 这里写图片描述
结尾:仅供参考,自己用作学习记录,不喜勿喷,共勉!
补充:RabbitMQ与SpringMVC集成并实现发送消息和接收消息(持久化)方案
RabbitMQ本篇不介绍了,直接描述RabbitMQ与SpringMVC集成并实现发送消息和接收消息(持久化)。
使用了Spring-rabbit 发送消息和接收消息,我们使用的Maven来管理Jar包,在Maven的pom.xml文件中引入jar包
<span > <dependency> <groupId>org.springframework.amqp</groupId> <artifactId>spring-rabbit</artifactId> <version>1.3.6.RELEASE</version> </dependency></span>
1.实现生产者
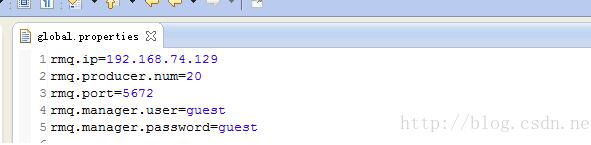
第一步:是要设置调用安装RabbitMQ的IP、端口等
配置一个global.properties文件
第二步:通过SpringMVC把global.properties文件读进来
<span ><!-- 注入属性文件 --> <bean id="propertyConfigurer" class="org.springframework.beans.factory.config.PropertyPlaceholderConfigurer"> <property name="locations"> <list> <value>classpath:global.properties</value> </list> </property> </bean> </span>
第三步:配置 RabbitMQ服务器连接、创建rabbitTemplate 消息模板类等,在SpringMVC的配置文件加入下面这些
<bean id="rmqProducer2" class="cn.test.spring.rabbitmq.RmqProducer"></bean> <span > <!-- 创建连接类 --> <bean id="connectionFactory" class="org.springframework.amqp.rabbit.connection.CachingConnectionFactory"> <constructor-arg value="localhost" /> <property name="username" value="${rmq.manager.user}" /> <property name="password" value="${rmq.manager.password}" /> <property name="host" value="${rmq.ip}" /> <property name="port" value="${rmq.port}" /> </bean> <bean id="rabbitAdmin" class="org.springframework.amqp.rabbit.core.RabbitAdmin"> <constructor-arg ref="connectionFactory" /> </bean> <!-- 创建rabbitTemplate 消息模板类 --> <bean id="rabbitTemplate" class="org.springframework.amqp.rabbit.core.RabbitTemplate"> <constructor-arg ref="connectionFactory"></constructor-arg> </bean> </span>第四步:实现消息类实体和发送消息
类实体
<span >/** * 消息 * */ public class RabbitMessage implements Serializable { private static final long serialVersionUID = -6487839157908352120L; private Class<?>[] paramTypes;//参数类型 private String exchange;//交换器 private Object[] params; private String routeKey;//路由key public RabbitMessage(){} public RabbitMessage(String exchange,String routeKey,Object...params) { this.params=params; this.exchange=exchange; this.routeKey=routeKey; } @SuppressWarnings("rawtypes") public RabbitMessage(String exchange,String routeKey,String methodName,Object...params) { this.params=params; this.exchange=exchange; this.routeKey=routeKey; int len=params.length; Class[] clazzArray=new Class[len]; for(int i=0;i<len;i++) clazzArray[i]=params[i].getClass(); this.paramTypes=clazzArray; } public byte[] getSerialBytes() { byte[] res=new byte[0]; ByteArrayOutputStream baos=new ByteArrayOutputStream(); ObjectOutputStream oos; try { oos = new ObjectOutputStream(baos); oos.writeObject(this); oos.close(); res=baos.toByteArray(); } catch (IOException e) { e.printStackTrace(); } return res; } public String getRouteKey() { return routeKey; } public String getExchange() { return exchange; } public void setExchange(String exchange) { this.exchange = exchange; } public void setRouteKey(String routeKey) { this.routeKey = routeKey; } public Class<?>[] getParamTypes() { return paramTypes; } public Object[] getParams() { return params; } } </span>发送消息
<span >/** * 生产着 * */ public class RmqProducer { @Resource private RabbitTemplate rabbitTemplate; /** * 发送信息 * @param msg */ public void sendMessage(RabbitMessage msg) { try { System.out.println(rabbitTemplate.getConnectionFactory().getHost()); System.out.println(rabbitTemplate.getConnectionFactory().getPort()); //发送信息 rabbitTemplate.convertAndSend(msg.getExchange(), msg.getRouteKey(), msg); } catch (Exception e) { } } }</span>说明:
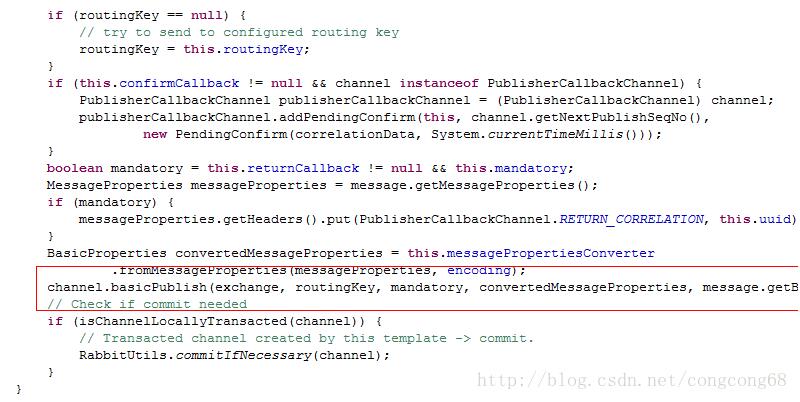
1. rabbitTemplate.convertAndSend(msg.getExchange(), msg.getRouteKey(), msg);
源代码中的send调用的方法,一些发送消息帮我们实现好了。
2.上面的代码实现没申明交换器和队列,RabbitMQ不知交换器和队列他们的绑定关系,如果RabbitMQ管理器上没有对应的交换器和队列是不会新建的和关联的,需要手动关联。
我们也可以用代码申明:
rabbitAdmin要申明:eclareExchange方法 参数是交换器
BindingBuilder.bind(queue).to(directExchange).with(queueName);//将queue绑定到exchange rabbitAdmin.declareBinding(binding);//声明绑定关系
源代码有这些方法:

这样就可以实现交换器和队列的绑定关系
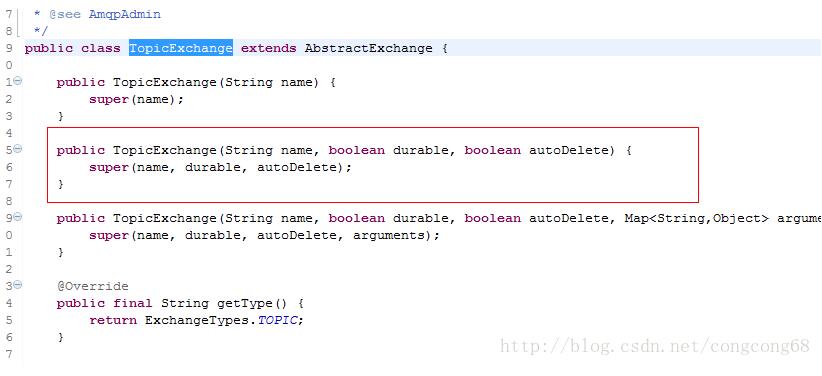
交换器我们可以申明为持久化,还有使用完不会自动删除
TopicExchange 参数的说明:name是交换器名称,durable:true 是持久化 autoDelete:false使用完不删除
源代码:
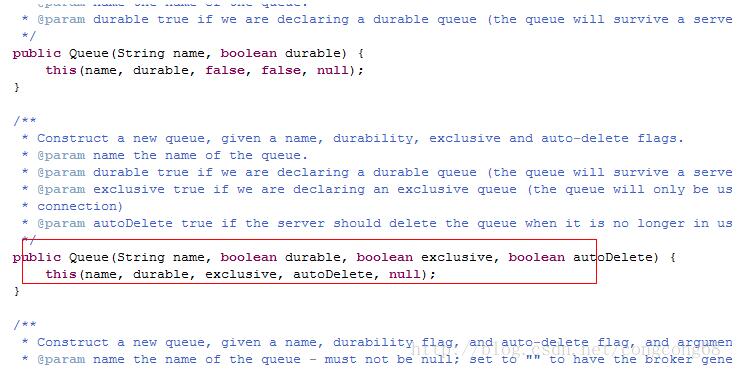
队列也可以申明为持久化
第五步:实现测试类
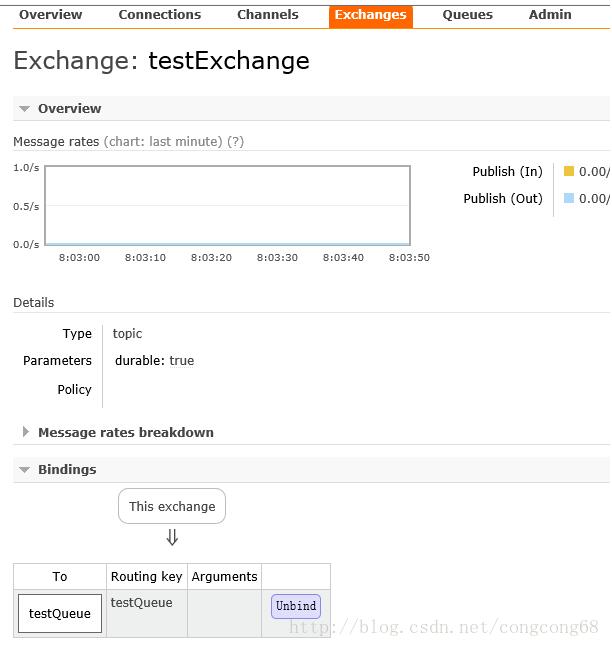
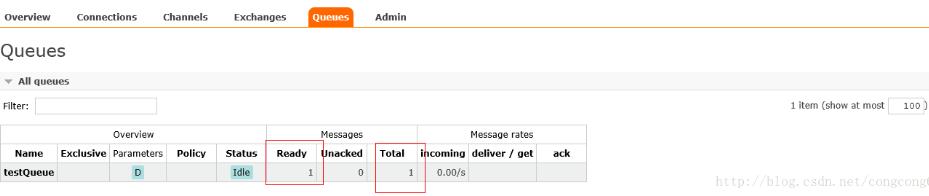
<span >@Resource private RmqProducer rmqProducer2; @Test public void test() throws IOException { String exchange="testExchange";交换器 String routeKey="testQueue";//队列 String methodName="test";//调用的方法 //参数 Map<String,Object> param=new HashMap<String, Object>(); param.put("data","hello"); RabbitMessage msg=new RabbitMessage(exchange,routeKey, methodName, param); //发送消息 rmqProducer2.sendMessage(msg); }</span>结果:RabbitMQ有一条消息
2.消费者
第一步:RabbitMQ服务器连接这些在生产者那边已经介绍了,这边就不介绍了,我们要配置 RabbitMQ服务器连接、创建rabbitTemplate 消息模板类、消息转换器、消息转换器监听器等,在SpringMVC的配置文件加入下面这些
<span > <!-- 创建连接类 --> <bean id="connectionFactory" class="org.springframework.amqp.rabbit.connection.CachingConnectionFactory"> <constructor-arg value="localhost" /> <property name="username" value="${rmq.manager.user}" /> <property name="password" value="${rmq.manager.password}" /> <property name="host" value="${rmq.ip}" /> <property name="port" value="${rmq.port}" /> </bean> <bean id="rabbitAdmin" class="org.springframework.amqp.rabbit.core.RabbitAdmin"> <constructor-arg ref="connectionFactory" /> </bean> <!-- 创建rabbitTemplate 消息模板类 --> <bean id="rabbitTemplate" class="org.springframework.amqp.rabbit.core.RabbitTemplate"> <constructor-arg ref="connectionFactory"></constructor-arg> </bean> <!-- 创建消息转换器为SimpleMessageConverter --> <bean id="serializerMessageConverter" class="org.springframework.amqp.support.converter.SimpleMessageConverter"></bean> <!-- 设置持久化的队列 --> <bean id="queue" class="org.springframework.amqp.core.Queue"> <constructor-arg index="0" value="testQueue"></constructor-arg> <constructor-arg index="1" value="true"></constructor-arg> <constructor-arg index="2" value="false"></constructor-arg> <constructor-arg index="3" value="false"></constructor-arg> </bean> <!--创建交换器的类型 并持久化--> <bean id="topicExchange" class="org.springframework.amqp.core.TopicExchange"> <constructor-arg index="0" value="testExchange"></constructor-arg> <constructor-arg index="1" value="true"></constructor-arg> <constructor-arg index="2" value="false"></constructor-arg> </bean> <util:map id="arguments"> </util:map> <!-- 绑定交换器、队列 --> <bean id="binding" class="org.springframework.amqp.core.Binding"> <constructor-arg index="0" value="testQueue"></constructor-arg> <constructor-arg index="1" value="QUEUE"></constructor-arg> <constructor-arg index="2" value="testExchange"></constructor-arg> <constructor-arg index="3" value="testQueue"></constructor-arg> <constructor-arg index="4" value="#{arguments}"></constructor-arg> </bean> <!-- 用于接收消息的处理类 --> <bean id="rmqConsumer" class="cn.test.spring.rabbitmq.RmqConsumer"></bean> <bean id="messageListenerAdapter" class="org.springframework.amqp.rabbit.listener.adapter.MessageListenerAdapter"> <constructor-arg ref="rmqConsumer" /> <property name="defaultListenerMethod" value="rmqProducerMessage"></property> <property name="messageConverter" ref="serializerMessageConverter"></property> </bean> <!-- 用于消息的监听的容器类SimpleMessageListenerContainer,监听队列 queues可以传多个--> <bean id="listenerContainer" class="org.springframework.amqp.rabbit.listener.SimpleMessageListenerContainer"> <property name="queues" ref="queue"></property> <property name="connectionFactory" ref="connectionFactory"></property> <property name="messageListener" ref="messageListenerAdapter"></property> </bean> </span>说明:
1.org.springframework.amqp.rabbit.listener.SimpleMessageListenerContainer中的queues可以传入多个队列
2.org.springframework.amqp.rabbit.listener.adapter.MessageListenerAdapter
有哪个消费者适配器来处理 ,参数defaultListenerMethod是默认调用方法来处理消息。
3.交换器和队列的持久化在生产者有介绍过了。
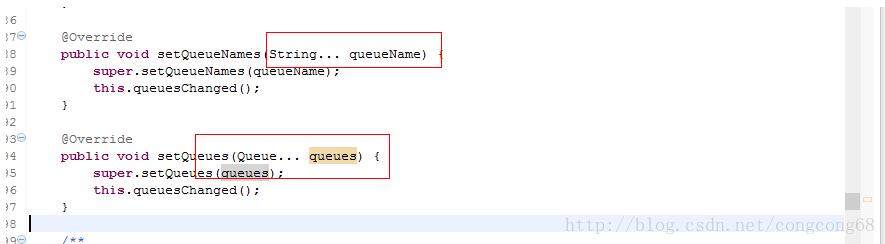
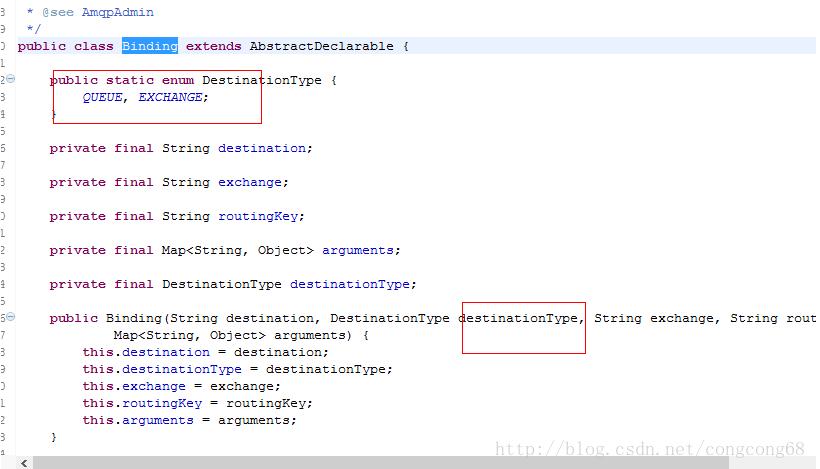
4.org.springframework.amqp.core.Binding这个类的绑定,在SpringMVC配置文件中配置时,
DestinationType这个参数要注意点
源代码:
第二步:处理消息
<span >/** * 消费者 * */ public class RmqConsumer { public void rmqProducerMessage(Object object){ RabbitMessage rabbitMessage=(RabbitMessage) object; System.out.println(rabbitMessage.getExchange()); System.out.println(rabbitMessage.getRouteKey()); System.out.println(rabbitMessage.getParams().toString()); } }</span>在启动过程中会报这样的错误,可能是你的交换器和队列没配置好

关于如何在SpringMVC项目中使用rabbitmq就分享到这里了,希望以上内容可以对大家有一定的帮助,可以学到更多知识。如果觉得文章不错,可以把它分享出去让更多的人看到。
免责声明:本站发布的内容(图片、视频和文字)以原创、转载和分享为主,文章观点不代表本网站立场,如果涉及侵权请联系站长邮箱:is@yisu.com进行举报,并提供相关证据,一经查实,将立刻删除涉嫌侵权内容。


