今天小编给大家分享一下CentOS7 Docker Nginx部署及运行的方法的相关知识点,内容详细,逻辑清晰,相信大部分人都还太了解这方面的知识,所以分享这篇文章给大家参考一下,希望大家阅读完这篇文章后有所收获,下面我们一起来了解一下吧。
1、资源准备
dockerfile文件
# "ported" by adam miller <maxamillion@fedoraproject.org> from # https://github.com/fedora-cloud/fedora-dockerfiles # # originally written for fedora-dockerfiles by # scollier <scollier@redhat.com> from centos:centos7 maintainer the centos project <cloud-ops@centos.org> run yum -y update; yum clean all run yum -y install epel-release tar ; yum clean all run yum -y install nginx ; yum clean all add nginx.conf /opt/deploy/nginx/nginx.conf run echo "daemon off;" >> /opt/deploy/nginx/nginx.conf #run curl https://git.centos.org/sources/httpd/c7/acf5cccf4afaecf3afeb18c50ae59fd5c6504910 \ # | tar -xz -c /usr/local/nginx/html \ # --strip-components=1 #run sed -i -e 's/apache/nginx/g' -e '/apache_pb.gif/d' \ # /usr/local/nginx/html/index.html expose 80 #cmd [ "/usr/local/nginx/sbin" ]
注意:路径需要在系统上面存在以及对应
nginx.conf文件
# for more information on configuration, see: # * official english documentation: http://nginx.org/en/docs/ # * official russian documentation: http://nginx.org/ru/docs/ user nginx; worker_processes 1; error_log /usr/logs/nginx/error.log; #error_log /var/log/nginx/error.log notice; #error_log /var/log/nginx/error.log info; pid /run/nginx.pid; events { worker_connections 1024; } http { include mime.types; default_type application/octet-stream; log_format main '$remote_addr - $remote_user [$time_local] "$request" ' '$status $body_bytes_sent "$http_referer" ' '"$http_user_agent" "$http_x_forwarded_for"'; access_log /usr/logs/nginx/access.log main; sendfile on; #tcp_nopush on; #keepalive_timeout 0; keepalive_timeout 65; #gzip on; # load modular configuration files from the /etc/nginx/conf.d directory. # see http://nginx.org/en/docs/ngx_core_module.html#include # for more information. #include /etc/nginx/conf.d/*.conf; index index.html index.htm; server { listen 80; server_name localhost; root /usr/share/nginx/html; #charset koi8-r; #access_log /var/log/nginx/host.access.log main; location / { autoindex on; } # redirect server error pages to the static page /40x.html # error_page 404 /404.html; location = /40x.html { } # redirect server error pages to the static page /50x.html # error_page 500 502 503 504 /50x.html; location = /50x.html { } # proxy the php scripts to apache listening on 127.0.0.1:80 # #location ~ \.php$ { # proxy_pass http://127.0.0.1; #} # pass the php scripts to fastcgi server listening on 127.0.0.1:9000 # #location ~ \.php$ { # root html; # fastcgi_pass 127.0.0.1:9000; # fastcgi_index index.php; # fastcgi_param script_filename /scripts$fastcgi_script_name; # include fastcgi_params; #} # deny access to .htaccess files, if apache's document root # concurs with nginx's one # #location ~ /\.ht { # deny all; #} } # another virtual host using mix of ip-, name-, and port-based configuration # #server { # listen 8000; # listen somename:8080; # server_name somename alias another.alias; # root html; # location / { # } #} # https server # #server { # listen 443; # server_name localhost; # root html; # ssl on; # ssl_certificate cert.pem; # ssl_certificate_key cert.key; # ssl_session_timeout 5m; # ssl_protocols sslv2 sslv3 tlsv1; # ssl_ciphers high:!anull:!md5; # ssl_prefer_server_ciphers on; # location / { # } #} }注意:路径需要在系统上面存在以及对应
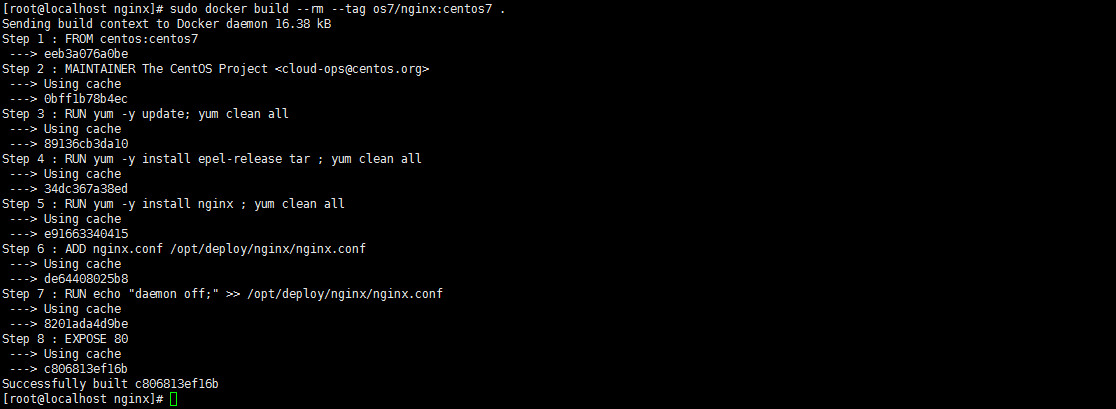
2、执行构建镜像命令
复制代码 代码如下:
[root@localhost nginx]# sudo docker build --rm --tag os7/nginx:centos7 .
执行结果截图:
3、查看镜像是否安装构建成功 docker images

4、创建容器 docker run -i -t -d -p 192.168.32.129:81:80 os7/nginx /bin/bash
注意:192.168.32.129这个ip的话,则需要在/etc/hosts中添加
192.168.32.129 localhost
5、查看容器是否创建成功并启动 docker ps

6、测试是否成功访问 curl http://192.168.32.129:81

会出现这个拒绝连接,那怎么办呢?有办法解决的,我们先进入该容器里面
7、进入容器 docker exec -i -t small_hodgkin /bin/sh

8、接着在容器里面执行(直接输入即可)
nginx
9、在容器外面执行 curl http://192.168.32.129:81

成功了。
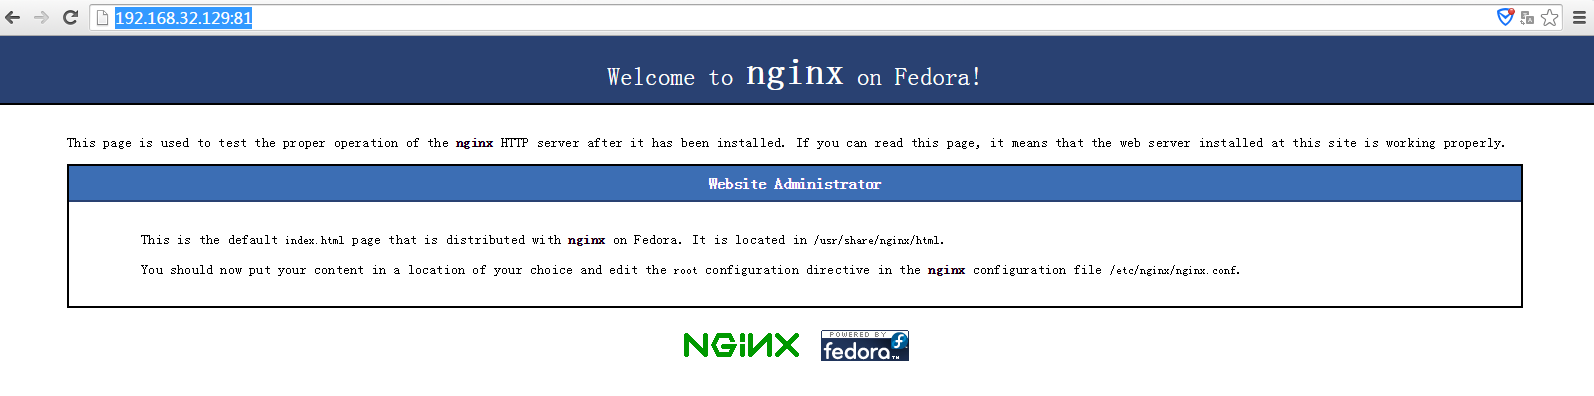
10、再到虚拟机外面通过浏览器访问
以上就是“CentOS7 Docker Nginx部署及运行的方法”这篇文章的所有内容,感谢各位的阅读!相信大家阅读完这篇文章都有很大的收获,小编每天都会为大家更新不同的知识,如果还想学习更多的知识,请关注亿速云行业资讯频道。
免责声明:本站发布的内容(图片、视频和文字)以原创、转载和分享为主,文章观点不代表本网站立场,如果涉及侵权请联系站长邮箱:is@yisu.com进行举报,并提供相关证据,一经查实,将立刻删除涉嫌侵权内容。


