这篇文章主要介绍“微信小程序中怎么实现天气预报功能”,在日常操作中,相信很多人在微信小程序中怎么实现天气预报功能问题上存在疑惑,小编查阅了各式资料,整理出简单好用的操作方法,希望对大家解答”微信小程序中怎么实现天气预报功能”的疑惑有所帮助!接下来,请跟着小编一起来学习吧!
微信小程序 天气预报
实例主要功能
自动定位所在城市
根据所定位的城市获取天气信息
显示未来几天的天气情况
查看当天天气的详情信息
先看效果图
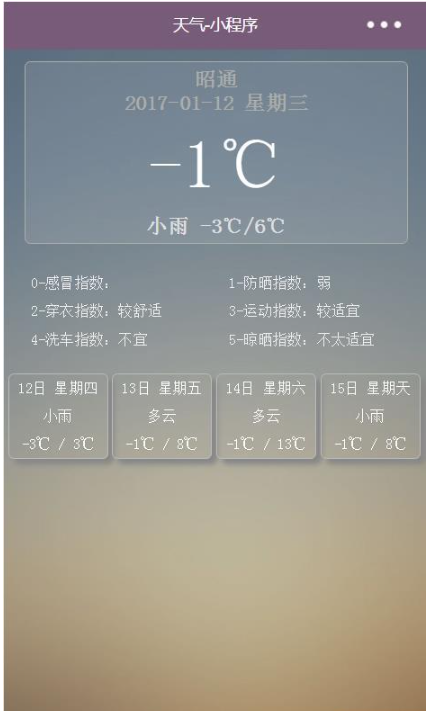
微信小程序-天气 首页
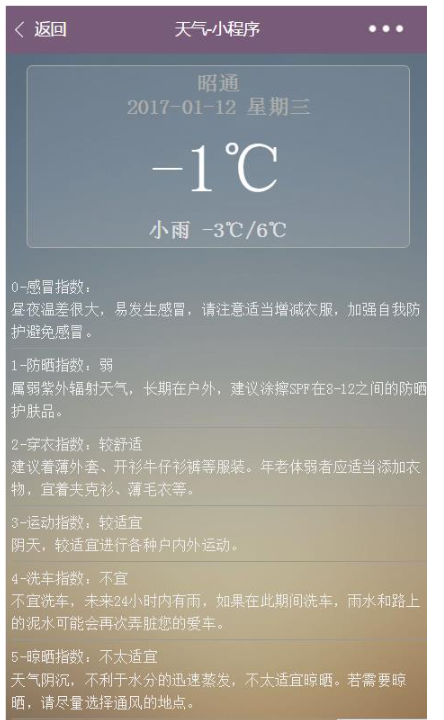
微信小程序-天气 详情页
思路及编码部份自动定位所在城市
wx.getLocation:通过官方文档的API中可以看到wx.getLocation可以获取到当前的地理位置和速度,不过获取到的地理位置只是经纬度,而不是真正的城市名称,但我们可以根据这个经纬度来获取城市名称等信息(需要用到第三方接口),再通过城市名称和城市ID获取对应的天气信息。
在.js逻辑层增加函数:
data:{ weatherApikey:'', //天气apikey,在http://apistore.baidu.com 上申请 city:'', //城市名称 areaid:'', //城市对应的id curWd:{}, //当天天气情况 indexs:{}, //当天天气详情说明 forecast:{} //未来4天的天气情况 }, onLoad:function(options){ // 生命周期函数--监听页面加载 this.setData({weatherApikey:getApp().globalData.weatherApikey}); this.loadLocation(); }, //获取当前的位置信息,即经纬度 loadLocation: function() { var page = this; wx.getLocation({ type: 'gcj02', // 默认为 wgs84 返回 gps 坐标,gcj02 返回可用于 wx.openLocation 的坐标 success: function(res){ // success var latitude = res.latitude; var longitude = res.longitude; //获取城市 page.loadCity(latitude, longitude); } }) }, //通过经纬度获取城市 loadCity: function(latitude, longitude) { var page = this; //这个key是自己在http://apistore.baidu.com上申请的 var key = "XSWBZ-EVQ3V-UMLPA-U4TP6-6MQFZ-UUFSL"; var url = "http://apis.map.qq.com/ws/geocoder/v1/?location="+latitude+","+longitude+"&key="+key+"&get_poi=1"; wx.request({ url: url, data: {}, method: 'GET', // OPTIONS, GET, HEAD, POST, PUT, DELETE, TRACE, CONNECT // header: {}, // 设置请求的 header success: function(res){ // success var city = res.data.result.address_component.city; city = city.replace("市", ""); //将“市”去掉,要不然取不了天气信息 page.setData({city: city}); page.loadId(city); } }) }, //通过城市名称获取城市的唯一ID loadId: function(city) { var page = this; var url = "http://apis.baidu.com/apistore/weatherservice/citylist"; wx.request({ url: url, data: { cityname: city }, header: { apikey:page.data.weatherApikey }, method: 'GET', // OPTIONS, GET, HEAD, POST, PUT, DELETE, TRACE, CONNECT success: function(res){ // success var cityid = res.data.retData[0].area_id; page.setData({areaid: cityid}); page.loadWeather(city, cityid); } }) }, //通过城市名称和城市ID获取天气情况 loadWeather: function(city, areaId) { var page = this; var url = "http://apis.baidu.com/apistore/weatherservice/recentweathers"; wx.request({ url: url, data: { cityname:city, cityid: areaId }, header: { apikey: page.data.weatherApikey }, method: 'GET', // OPTIONS, GET, HEAD, POST, PUT, DELETE, TRACE, CONNECT success: function(res){ // success page.setData({curWd : res.data.retData.today, indexs: res.data.retData.today.index, forecast:res.data.retData.forecast}); } }) }, //事件绑定,跳转到天气详情页面 gotoDetail: function(event) { // console.log(this.data.areaid+"==在这里跳转=="+this.data.city); wx.navigateTo({ url: '../detail/detail?city='+this.data.city+"&cityid="+this.data.areaid }) }注意:page.setData或this.setData都是用来设置data中的数据值的。通过上面的逻辑层可以看出在这里基本都是处理数据和一些事件绑定,而且微信本身已经为我们封装了很多实用的功能,这里用到的比如:wx.navigateTo、wx.request、wx.getLocation,在与视图通讯时有点类似AngularJS的双向数据绑定。
index.wxml解析
<view class="main-container"> <import src="../templates/today-tpl"/> <view bindtap="gotoDetail"> <template is="today-tpl" data="{{city, curWd}}"/> </view> <import src="../templates/index-tpl"/> <view class="index-content"> <block wx:for="{{indexs}}" wx:key="item" wx:for-index="idx"> <template is="index-tpl" data="{{item,idx}}"></template> </block> </view> <import src="../templates/forecast-tpl"/> <view class="forecast"> <block wx:for="{{forecast}}" wx:key="item"> <template is="forecast-tpl" data="{{item}}"/> </block> </view> </view>说明:在这里用到了微信的一些组件,如:view:视图容器;block:不会在页面上留下任何东西,循环时使用这个不会增加额外的标签;template:引用模板;import:导入模板信息,只有导入后才能引用;{{}}:引用数据;wx:for:循环。
模板文件
模板文件其实就是wxml文件
<template name="today-tpl"> <view class="today"> <view class="city">{{city}}</view> <view class="date">{{curWd.date}} {{curWd.week}}</view> <view class="temp">{{curWd.curTemp}}</view> <view class="weather">{{curWd.type}} {{curWd.lowtemp}}/{{curWd.hightemp}}</view> <view class="wd">{{curWd.wd}}</view> </view> </template>注意:关于模板的描述可以参考官方文档 模板 和 引用 。
到此,关于“微信小程序中怎么实现天气预报功能”的学习就结束了,希望能够解决大家的疑惑。理论与实践的搭配能更好的帮助大家学习,快去试试吧!若想继续学习更多相关知识,请继续关注亿速云网站,小编会继续努力为大家带来更多实用的文章!
免责声明:本站发布的内容(图片、视频和文字)以原创、转载和分享为主,文章观点不代表本网站立场,如果涉及侵权请联系站长邮箱:is@yisu.com进行举报,并提供相关证据,一经查实,将立刻删除涉嫌侵权内容。


