小编给大家分享一下实现python绘制混淆矩阵的方法,希望大家阅读完这篇文章后大所收获,下面让我们一起去探讨吧!
介绍:
混淆矩阵通过表示正确/不正确标签的计数来表示模型在表格格式中的准确性。
计算/绘制混淆矩阵:
以下是计算混淆矩阵的过程。
您需要一个包含预期结果值的测试数据集或验证数据集。
对测试数据集中的每一行进行预测。
从预期的结果和预测计数:
每个类的正确预测数量。
每个类的错误预测数量,由预测的类组织。
然后将这些数字组织成表格或矩阵,如下所示:
Expected down the side:矩阵的每一行都对应一个预测的类。
Predicted across the top:矩阵的每一列对应于一个实际的类。
然后将正确和不正确分类的计数填入表格中。
Reading混淆矩阵:
一个类的正确预测的总数进入该类值的预期行,以及该类值的预测列。
以同样的方式,一个类别的不正确预测总数进入该类别值的预期行,以及该类别值的预测列。
对角元素表示预测标签等于真实标签的点的数量,而非对角线元素是分类器错误标记的元素。混淆矩阵的对角线值越高越好,表明许多正确的预测。
用Python绘制混淆矩阵 :
import itertools import numpy as np import matplotlib.pyplot as plt from sklearn import svm, datasets from sklearn.model_selection import train_test_split from sklearn.metrics import confusion_matrix # import some data to play with iris = datasets.load_iris() X = iris.data y = iris.target class_names = iris.target_names # Split the data into a training set and a test set X_train, X_test, y_train, y_test = train_test_split(X, y, random_state=0) # Run classifier, using a model that is too regularized (C too low) to see # the impact on the results classifier = svm.SVC(kernel='linear', C=0.01) y_pred = classifier.fit(X_train, y_train).predict(X_test) def plot_confusion_matrix(cm, classes, normalize=False, title='Confusion matrix', cmap=plt.cm.Blues): """ This function prints and plots the confusion matrix. Normalization can be applied by setting `normalize=True`. """ if normalize: cm = cm.astype('float') / cm.sum(axis=1)[:, np.newaxis] print("Normalized confusion matrix") else: print('Confusion matrix, without normalization') print(cm) plt.imshow(cm, interpolation='nearest', cmap=cmap) plt.title(title) plt.colorbar() tick_marks = np.arange(len(classes)) plt.xticks(tick_marks, classes, rotation=45) plt.yticks(tick_marks, classes) fmt = '.2f' if normalize else 'd' thresh = cm.max() / 2. for i, j in itertools.product(range(cm.shape[0]), range(cm.shape[1])): plt.text(j, i, format(cm[i, j], fmt), horizontalalignment="center", color="white" if cm[i, j] > thresh else "black") color="white" if cm[i, j] > thresh else "black") plt.tight_layout() plt.ylabel('True label') plt.xlabel('Predicted label') # Compute confusion matrix cnf_matrix = confusion_matrix(y_test, y_pred) np.set_printoptions(precision=2) # Plot non-normalized confusion matrix plt.figure() plot_confusion_matrix(cnf_matrix, classes=class_names, title='Confusion matrix, without normalization') # Plot normalized confusion matrix plt.figure() plot_confusion_matrix(cnf_matrix, classes=class_names, normalize=True, title='Normalized confusion matrix') plt.show()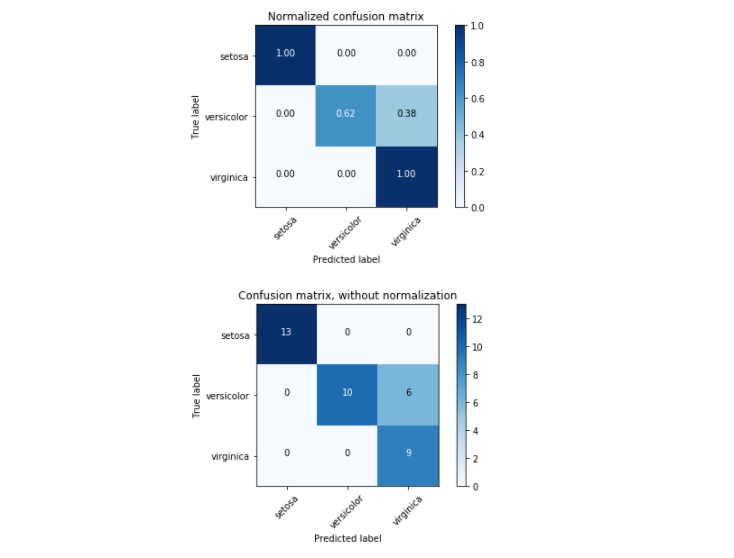
Confusion matrix, without normalization [[13 0 0] [ 0 10 6] [ 0 0 9]] Normalized confusion matrix [[ 1. 0. 0. ] [ 0. 0.62 0.38] [ 0. 0. 1. ]]
看完了这篇文章,相信你对实现python绘制混淆矩阵的方法有了一定的了解,想了解更多相关知识,欢迎关注亿速云行业资讯频道,感谢各位的阅读!
免责声明:本站发布的内容(图片、视频和文字)以原创、转载和分享为主,文章观点不代表本网站立场,如果涉及侵权请联系站长邮箱:is@yisu.com进行举报,并提供相关证据,一经查实,将立刻删除涉嫌侵权内容。


