жё©йҰЁжҸҗзӨәГ—
жӮЁеҘҪпјҢзҷ»еҪ•еҗҺжүҚиғҪдёӢи®ўеҚ•е“ҰпјҒ
еҜҶз Ғзҷ»еҪ•Г—
зҷ»еҪ•жіЁеҶҢГ—
зӮ№еҮ» зҷ»еҪ•жіЁеҶҢ еҚіиЎЁзӨәеҗҢж„ҸгҖҠдәҝйҖҹдә‘з”ЁжҲ·жңҚеҠЎжқЎж¬ҫгҖӢ
з”ЁжҲ·зҷ»еҪ•Г—
жӮЁеҘҪпјҢзҷ»еҪ•еҗҺжүҚиғҪдёӢи®ўеҚ•е“ҰпјҒ
жң¬зҜҮж–Үз« дёәеӨ§е®¶еұ•зӨәдәҶAndroidдёӯжҖҺд№Ҳе®һзҺ°еӨҡиҜӯиЁҖеҠЁжҖҒжӣҙж–°пјҢеҶ…е®№з®ҖжҳҺжүјиҰҒ并且容жҳ“зҗҶи§ЈпјҢз»қеҜ№иғҪдҪҝдҪ зңјеүҚдёҖдә®пјҢйҖҡиҝҮиҝҷзҜҮж–Үз« зҡ„иҜҰз»Ҷд»Ӣз»ҚеёҢжңӣдҪ иғҪжңүжүҖ收иҺ·гҖӮ
зҝ»иҜ‘зҡ„жөҒзЁӢжҳҜе®ўжҲ·з«ҜејҖеҸ‘зј–еҶҷдёӯж–Үж–ҮжЎҲ---зҝ»иҜ‘жҲҗиӢұж–Ү----еӨ–еҢ…зҝ»иҜ‘ж №жҚ®иӢұж–Үеӯ—з¬ҰдёІзҝ»иҜ‘е°ҸиҜӯз§ҚпјҢеңЁиҝҷдёӘжөҒзЁӢдёӯпјҢжңүдәӣеӨҡд№үиҜҚе’ҢдёҖдәӣж¶үеҸҠиҜӯеўғзҡ„иҜҚе°ұеҫҲе®№жҳ“зҝ»иҜ‘й”ҷиҜҜгҖӮ
еүҚйқўиҜҙдәҶпјҢзҝ»иҜ‘е…¬еҸёжҸҗдҫӣеӣһжқҘзҡ„еӯ—з¬ҰдёІжҲ‘们йғҪзңӢдёҚжҮӮпјҢй”ҷдәҶд№ҹдёҚзҹҘйҒ“пјҢеҮ д№ҺйғҪжҳҜдёҠзәҝд№ӢеҗҺпјҢз”ЁжҲ·еҸҚйҰҲиҝҮжқҘпјҢжҲ‘们жүҚзҹҘйҒ“гҖӮ
еӣ жӯӨе°ҸиҜӯз§Қзҡ„зҝ»иҜ‘bugдёҖзӣҙжҳҜйЎ№зӣ®йҮҢйқўжҜ”иҫғеӨҡзҡ„дёҖзұ»bugпјҢдәҺжҳҜе°ұйңҖиҰҒжҺўзҙўдёҖз§ҚеҸҜд»Ҙз”ЁдәҺеҠЁжҖҒжӣҙж–°зҝ»иҜ‘еӯ—з¬ҰдёІзҡ„ж–№жЎҲгҖӮ
еңЁAndroidдёӯпјҢеӨҡиҜӯиЁҖеӯ—з¬ҰдёІйғҪжҳҜд»Ҙеҗ„з§ҚдёҚеҗҢж–Ү件еӨ№дёӢзҡ„xmlдҝқеӯҳзҡ„пјҢжҜҸз§Қж–Ү件еӨ№дёӯзҡ„йҷҗе®ҡз¬ҰиЎЁзӨәдёҖз§ҚиҜӯиЁҖпјҢиҝҷдёӘдёҖиҲ¬Androidзҡ„ејҖеҸ‘дәәе‘ҳйғҪжҳҜдәҶи§Јзҡ„гҖӮ
еҰӮдёӢеӣҫжүҖзӨә
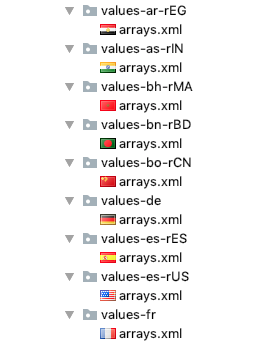
Stringж–Ү件дҪңдёәResourceзҡ„дёҖз§ҚпјҢеңЁдҪҝз”Ёж—¶дёҚз®ЎжҳҜlayoutдёӯдҪҝз”ЁиҝҳжҳҜеңЁjavaд»Јз ҒдёӯдҪҝз”Ёе…¶е®һйғҪжҳҜи°ғз”ЁResourceзҡ„еҗ„з§Қж–№жі•гҖӮ
йӮЈд№Ҳе…¶е®һзҝ»иҜ‘иҜӯиЁҖзҡ„еҠЁжҖҒжӣҙж–°е®һйҷ…дёҠжҳҜResourceиө„жәҗзҡ„жӣҝжҚўжӣҙж–°гҖӮ
еңЁж—©дәӣе№ҙзҡ„ејҖеҸ‘з»ҸйӘҢдёӯпјҢжҲ‘们йғҪзҹҘйҒ“жңүдёҖз§ҚAndroidжҚўдё»йўҳзҡ„ж–№жЎҲжқҘз»ҷеә”з”ЁиҝӣиЎҢиө„жәҗжӣҝжҚўпјҢз®ҖеҚ•жқҘи®Іж–№жЎҲжөҒзЁӢеҰӮдёӢпјҡ
дҪҝз”ЁaddAssertPathж–№жі•еҠ иҪҪsdеҚЎдёӯзҡ„apkеҢ…пјҢжһ„е»әAsserManagerе®һдҫӢгҖӮ
AsserManagerжһ„е»әPlugResourceе®һдҫӢгҖӮ
дҪҝз”ЁиЈ…йҘ°иҖ…жЁЎејҸзј–еҶҷProxyResource,еңЁеҗ„дёӘиҺ·еҸ–иө„жәҗзҡ„ж–№жі•дёӯдјҳе…ҲиҺ·еҸ–PlugResourceпјҢиҺ·еҸ–дёҚеҲ°еҶҚд»ҺеӨҮд»Ҫзҡ„AppResourceдёӯиҺ·еҸ–гҖӮ
жӣҝжҚўApplicationе’ҢActivityдёӯзҡ„ResourceеҜ№иұЎдёәProxyResourceгҖӮ
继жүҝLayoutInflater.Factory,жӢҰжҲӘlayoutз”ҹжҲҗиҝҮзЁӢпјҢ并е°Ҷиө„жәҗиҺ·еҸ–жҢҮеҗ‘ProxyResourceпјҢе®ҢжҲҗlayoutеҲқе§ӢеҢ–гҖӮ
既然жңүеҸҜеҸӮиҖғзҡ„ж–№жЎҲпјҢйӮЈе°ұеҸҜд»ҘзӣҙжҺҘејҖе·ҘдәҶгҖӮ
дәӢе®һдёҠеңЁеҗҺз»ӯзҡ„ејҖеҸ‘иҝҮзЁӢдёӯйҒҮеҲ°еҫҲеӨҡз»ҶиҠӮй—®йўҳпјҢдҪҶдёҮдәӢејҖеӨҙйҡҫпјҢжҲ‘们еҸҜд»Ҙе…Ҳд»Һ第дёҖжӯҘејҖе§ӢеҒҡиө·гҖӮ
AssetManager mLoadedAssetManager = AssetManager.class.newInstance(); Reflector.with(mLoadedAssetManager).method("addAssetPath", String.class).call(textResPath); Resources textResPackResources = new Resources(mLoadedAssetManager, appResources.getDisplayMetrics(), appResources.getConfiguration());public class TextRepairProxyResourcess extends Resources { private static final String TAG = "TextRepairProxyResourcess"; private Resources mResPackResources; private Resources mAppResources; private String mResPackPkgName; public TextRepairProxyResourcess(AssetManager assets, DisplayMetrics metrics, Configuration config) { super(assets, metrics, config); } public void prepare(Resources plugResources, Resources appResources, String pkgName) { mResPackResources = plugResources; mAppResources = appResources; mResPackPkgName = pkgName; } private void printLog(String tag, CharSequence messgae) { if (BuildConfig.DEBUG) { VLog.d(tag, messgae + ""); } } @NonNull @Override public CharSequence getText(int resId) throws NotFoundException { if (!checkNull()) { return super.getText(resId); } else if (!checkTextRepairOn()) { return mAppResources.getText(resId); } else { CharSequence charSequence; try { int plugId = getIdentifier(resId); if (plugId == 0) { charSequence = mAppResources.getText(resId); printLog(TAG, "getText res from app ---" + charSequence); } else { charSequence = mResPackResources.getText(plugId); printLog(TAG, "getText res from plug ---" + charSequence); } } catch (Throwable e) { charSequence = mAppResources.getText(resId); if (BuildConfig.DEBUG) { e.printStackTrace(); } } return charSequence; } } @NonNull @Override public CharSequence[] getTextArray(int resId) throws NotFoundException { ............. } @NonNull @Override public String[] getStringArray(int resId) throws NotFoundException { ............. } @NonNull @Override public String getString(int resId) throws NotFoundException { ............. } @NonNull @Override public CharSequence getQuantityText(int resId, int quantity) throws NotFoundException { ............. } @NonNull @Override public String getQuantityString(int resId, int quantity, Object... formatArgs) throws NotFoundException { ............. } public int getIdentifier(int resId) { if (!checkNull()) { return 0; } else { // жңүдәӣжғ…еҶөе°ұжҳҜеҫҲзү№ж®Ҡ жҜ”еҰӮwebViewзҡ„34800147иө„жәҗ дҪҝз”ЁmAppResources.getResourceEntryNameдјҡжҠӣеҮә // notfound ејӮеёё дҪҶжҳҜдҪҝз”ЁgetString еҚҙеҸҲеҸҜд»ҘжӢҝеҲ°иҝҷдёӘиө„жәҗзҡ„еӯ—з¬ҰдёІ try { String resName = mAppResources.getResourceEntryName(resId); String resType = mAppResources.getResourceTypeName(resId); int plugId = mResPackResources.getIdentifier(resName, resType, mResPackPkgName); return plugId; } catch (Throwable e) { return 0; } } } /** * жңүдәӣж–№жі•жҳҜеңЁsuperзҡ„жһ„йҖ ж–№жі•йҮҢйқўи°ғз”Ёзҡ„ йңҖиҰҒеҲӨз©әеӨ„зҗҶ * * @return */ private boolean checkNull() { if (mAppResources != null && mResPackResources != null) { return true; } else { return false; } } /** * жңүдәӣж–№жі•жҳҜеңЁsuperзҡ„жһ„йҖ ж–№жі•йҮҢйқўи°ғз”Ёзҡ„ йңҖиҰҒеҲӨз©әеӨ„зҗҶ * * @return */ private boolean checkTextRepairOn() { return TextRepairConfig.getInstance().isTextRepairOnThisSystem(); } }Reflector.with(appContext).field("mResources").set(textRepairProxyResourcess);Reflector.with(activityContext).field("mResources").set(textRepairProxyResourcess);public class TextRepairFactory implements LayoutInflater.Factory2 { private static final HashMap<String, Constructor<? extends View>> mConstructorMap = new HashMap<>(); /** * зі»з»ҹи°ғз”Ёзҡ„жҳҜдёӨдёӘеҸӮж•°зҡ„жһ„йҖ ж–№жі•пјҢжҲ‘们д№ҹи°ғз”ЁиҝҷдёӘжһ„йҖ ж–№жі• */ private static final Class<?>[] mConstructorSignature = new Class[] { Context.class, AttributeSet.class }; /** * дёҖиҲ¬ Android зі»з»ҹзҡ„ View йғҪеӯҳеӮЁеңЁиҝҷеҮ дёӘеҢ…дёӢйқў */ private final String[] a = new String[] { "android.widget.", "android.view.", "android.webkit." }; // еұһжҖ§еӨ„зҗҶзұ» TextRepairAttribute mTextRepairAttribute; public TextRepairFactory() { mTextRepairAttribute = new TextRepairAttribute(); } @Override public View onCreateView(View parent, String name, Context context, AttributeSet attrs) { /* * жҲ‘们模д»ҝжәҗз ҒйӮЈж ·жқҘеҲӣе»ә View */ View view = createViewFormTag(name, context, attrs); /* * иҝҷйҮҢеҰӮжһң View иҝ”еӣһзҡ„жҳҜ null зҡ„иҜқпјҢе°ұжҳҜиҮӘе®ҡд№үжҺ§д»¶пјҢ * иҮӘе®ҡд№үжҺ§д»¶дёҚйңҖиҰҒжҲ‘们иҝӣиЎҢжӢјжҺҘпјҢеҸҜд»ҘзӣҙжҺҘжӢҝеҲ°е…Ёзұ»еҗҚ */ if (view == null) { view = createView(name, context, attrs); } if (view != null) { mTextRepairAttribute.load(view, attrs); } return view; } @Override public View onCreateView(String name, Context context, AttributeSet attrs) { return null; } private View createView(String name, Context context, AttributeSet attrs) { Constructor<? extends View> constructor = findConstructor(context, name); try { return constructor.newInstance(context, attrs); } catch (Throwable e) { } return null; } private Constructor<? extends View> findConstructor(Context context, String name) { Constructor<? extends View> constructor = mConstructorMap.get(name); if (null == constructor) { try { // йҖҡиҝҮеҸҚе°„жқҘиҺ·еҸ– View е®һдҫӢеҜ№иұЎ Class<? extends View> clazz = context.getClassLoader().loadClass(name).asSubclass(View.class); constructor = clazz.getConstructor(mConstructorSignature); // зј“еӯҳViewзҡ„classеҜ№иұЎ mConstructorMap.put(name, constructor); } catch (Throwable e) { } } return constructor; } private View createViewFormTag(String name, Context context, AttributeSet attrs) { // еҢ…еҗ«иҮӘе®ҡд№үжҺ§д»¶ if (-1 != name.indexOf('.')) { return null; } View view = null; for (int i = 0; i < a.length; i++) { view = createView(a[i] + name, context, attrs); if (view != null) { break; } } return view; } }public class TextRepairActivityLifecycle implements Application.ActivityLifecycleCallbacks { @Override public void onActivityCreated(Activity activity, Bundle savedInstanceState) { LayoutInflater layoutInflater = LayoutInflater.from(activity); TextRepairFactory textRepairFactory = new TextRepairFactory(); LayoutInflaterCompat.setFactory2(layoutInflater, textRepairFactory); } }дҪҶжҳҜзңҹзҡ„е°ұе°ұиҝҷд№Ҳз®ҖеҚ•еҗ—пјҹ
дёҠиҝ°еҮ ж®өд»Јз Ғе°ұе·Із»Ҹжһ„жҲҗдәҶиө„жәҗжӣҝжҚўзҡ„йӣҸеҪўпјҢеҹәжң¬дёҠе®ҢжҲҗдәҶдёҖдёӘеҹәзЎҖзҡ„иө„жәҗжӣҝжҚўжөҒзЁӢгҖӮ
еҶҚеҗҺз»ӯзҡ„и°ғиҜ•зӮ№жЈҖиҝҮзЁӢз§ҚпјҢжҲ‘еҸ‘зҺ°иҝҷжүҚеҲҡеҲҡејҖе§Ӣе…Ҙеқ‘гҖӮ
demoдёҖи·‘иө·жқҘе°ұеҸ‘зҺ°logдёӯжү“еҚ°иҜёеӨҡе‘ҠиӯҰдҝЎжҒҜгҖӮ
еӣ дёәжҳҜдҪҝз”ЁеҸҚе°„зҡ„ж–№жі•е°ҶResourceжӣҝжҚўпјҢеӣ жӯӨд№ҹи§ҰеҸ‘дәҶGoogleзҡ„ApiйҷҗеҲ¶и°ғз”ЁжңәеҲ¶пјҢдәҺжҳҜз ”з©¶дәҶдёҖдёӢApiзҡ„йҷҗеҲ¶и°ғз”ЁгҖӮ
з»“и®әпјҡ
зі»з»ҹзӯҫеҗҚеә”з”ЁжҡӮж—¶жІЎжңүйҷҗеҲ¶пјҢеӣ дёәdemoдҪҝз”Ёзҡ„жҳҜи°ғиҜ•зӯҫеҗҚпјҢжҚўз”Ёзі»з»ҹзӯҫеҗҚд№ӢеҗҺпјҢе‘ҠиӯҰж¶ҲеӨұгҖӮ
дҪҝз”ЁsdеҚЎдёӯзҡ„plugapkеҢ…з”ҹжҲҗPlugResourcesпјҢдё»иҰҒжҳҜеңЁз”ҹжҲҗassetManagerиҝҮзЁӢпјҢиҜҘиҝҮзЁӢиҖ—ж—¶10-15msпјҢеҜ№дәҺйЎөйқўеҗҜеҠЁжқҘиҜҙпјҢиҝҷдёӘж—¶й—ҙиҝҳжҳҜеӨӘй•ҝдәҶпјҢдәҺжҳҜе°қиҜ•е°ҶAssetManagerзј“еӯҳиө·жқҘпјҢзј©зҹӯдәҶж—¶й—ҙгҖӮ
еңЁеҸҚе°„жӣҝжҚўresourceе®ҢжҲҗеҗҺпјҢи°ғз”ЁPlugResourcesзҡ„getTextж–№жі•пјҢиҰҒе…Ҳд»Һжң¬ең°Resourcesдёӯж №жҚ®IdиҺ·еҸ–еҺҹиө„жәҗзҡ„nameе’ҢtypeпјҢ然еҗҺеңЁдҪҝз”Ёnameе’Ңtypeи°ғз”ЁgetIndentifierиҺ·еҸ–PlugResourcesдёӯзҡ„resIdпјҢиҝҷдёӘиҝҮзЁӢиҖ—ж—¶иҫғй•ҝпјҢиҷҪ然д№ҹжҳҜзәіз§’зә§еҲ«зҡ„пјҢдҪҶе…¶иҖ—ж—¶жҜ”дёҚhookеңәжҷҜдёӢй«ҳдёҖдёӘж•°жҚ®зә§гҖӮ
然иҖҢе№ёиҝҗзҡ„жҳҜпјҢеңЁйЎөйқўжөҒз•…жҖ§жҖ§иғҪжөӢиҜ•дёӯпјҢ并没жңүеҸ‘зҺ°жөҒз•…жҖ§жңүжүҖдёӢйҷҚпјҢйЎөйқўеҗҜеҠЁйҖҹеәҰд№ҹжІЎжңүжҳҺжҳҫзҡ„дёӢйҷҚгҖӮ
зңҹжӯЈзҡ„еӨ§еқ‘жқҘдәҶгҖӮ
и§ЈеҶіе®Ңд№ӢеүҚзҡ„й—®йўҳд№ӢеҗҺпјҢејҖе§Ӣиҝӣе…ҘmonkeyжөӢиҜ•пјҢеңЁжөӢиҜ•дёӯеҸ‘зҺ°7.0д»ҘдёҠзҡ„жңәеҷЁпјҢеҸӘиҰҒеңЁwebViewз•Ңйқўй•ҝжҢүеҶ…е®№еј№еҮәеӨҚеҲ¶зІҳиҙҙеҜ№иҜқжЎҶпјҢе°ұдјҡеҙ©жәғд»Һж—Ҙеҝ—йҮҢйқўеҸҜд»ҘзңӢеҮәжқҘжҳҜжүҫдёҚеҲ°webViewзҡ„иө„жәҗеҜјиҮҙзҡ„пјҢеҰӮжһңжҲ‘tryдҪҸиҝҷдёӘеҙ©жәғпјҢеҺҹиө„жәҗдҪҚзҪ®жҳҫзӨәзҡ„еӯ—з¬ҰдёІе°ұдјҡеҸҳжҲҗзұ»дјј@1232432иҝҷз§Қidж ҮзӯҫгҖӮ
googleжҗңзҙўдәҶеҚҠеӨ©пјҢеҸ‘зҺ°зӣёе…іиө„ж–ҷз”ҡе°‘пјҢзңӢжқҘжҳҜйңҖиҰҒд»Һжәҗз ҒеұӮйқўдәҶи§ЈwebViewиө„жәҗеҠ иҪҪзҡ„зӣёе…ійҖ»иҫ‘жүҚиЎҢгҖӮ
зңӢжәҗз ҒпјҢжҖ»жҳҜйңҖиҰҒеёҰзқҖй—®йўҳеҺ»зңӢпјҢзӣ®ж ҮжүҚеӨҹжё…жҷ°гҖӮ
жғіиҰҒеҫ—еҲ°зӯ”жЎҲ пјҢе°ұеҫ—йҳ…иҜ»6.0е’Ң7.0д»ҘдёҠзҡ„Resourceжәҗз ҒпјҢе…Ҳд»Һ6.0зҡ„жәҗз ҒзңӢиө·гҖӮ
1гҖҒ6.0иө„жәҗз®ЎзҗҶжәҗз Ғи§Јжһҗ
ContextеҲқе§ӢеҢ–
private ContextImpl(ContextImpl container, ActivityThread mainThread, LoadedApk packageInfo, IBinder activityToken, UserHandle user, boolean restricted, Display display, Configuration overrideConfiguration, int createDisplayWithId) { mOuterContext = this; mMainThread = mainThread; mActivityToken = activityToken; mRestricted = restricted; гҖӮгҖӮгҖӮгҖӮгҖӮгҖӮгҖӮгҖӮгҖӮгҖӮ Resources resources = packageInfo.getResources(mainThread); if (resources != null) { if (displayId != Display.DEFAULT_DISPLAY || overrideConfiguration != null || (compatInfo != null && compatInfo.applicationScale != resources.getCompatibilityInfo().applicationScale)) { resources = mResourcesManager.getTopLevelResources(packageInfo.getResDir(), packageInfo.getSplitResDirs(), packageInfo.getOverlayDirs(), packageInfo.getApplicationInfo().sharedLibraryFiles, displayId, overrideConfiguration, compatInfo); } } mResources = resources; гҖӮгҖӮгҖӮгҖӮгҖӮгҖӮгҖӮгҖӮгҖӮгҖӮгҖӮ }еңЁContextеҲӣе»әд№ӢеҲқпјҢResourceе°ұе·Із»ҸеҲӣе»әе®ҢжҲҗгҖӮ
иҝҷйҮҢжңүдёӨдёӘең°ж–№ж¶үеҸҠеҲ°дәҶResourceеҲӣе»ә
resources =packageInfo.getResources(mainThread);
resources =mResourcesManager.getTopLevelResources(packageInfo.getResDir(),
е…Ҳд»ҺpackageInfo.getResources(mainThread); иҜҙиө·packageInfo е…¶е®һе°ұжҳҜLoadedApk
packageInfo зҡ„ getResources ж–№жі•
public Resources getResources(ActivityThread mainThread) { if (mResources == null) { mResources = mainThread.getTopLevelResources(mResDir, mSplitResDirs, mOverlayDirs, mApplicationInfo.sharedLibraryFiles, Display.DEFAULT_DISPLAY, null, this); } return mResources; }еҶҚзңӢActivityThread
ActivityThread зҡ„ getTopLevelResources ж–№жі•
Resources getTopLevelResources(String resDir, String[] splitResDirs, String[] overlayDirs, String[] libDirs, int displayId, Configuration overrideConfiguration, LoadedApk pkgInfo) { return mResourcesManager.getTopLevelResources(resDir, splitResDirs, overlayDirs, libDirs, displayId, overrideConfiguration, pkgInfo.getCompatibilityInfo());е…¶е®һи°ғз”Ёзҡ„йғҪжҳҜmResourcesManager.getTopLevelResources
Android M зҡ„ResourcesManagerеҶҷзҡ„жҜ”иҫғз®ҖеҚ•
е…¶еҶ…йғЁжңүдёҖдёӘResourceзј“еӯҳ
getTopLevelResource ж–№жі•дјҡдҪҝз”Ёдј е…Ҙзҡ„еҸӮж•° з»„иЈ…дёҖдёӘkey
ResourcesKey key = new ResourcesKey(resDir, displayId, overrideConfigCopy, scale);
дҪҝз”ЁиҝҷдёӘkeyеҺ»зј“еӯҳйҮҢйқўжүҫпјҢжүҫеҲ°дәҶе°ұжӢҝеҮәжқҘз”ЁгҖӮ
WeakReference<Resources> wr = mActiveResources.get(key);
жүҫдёҚеҲ°е°ұж–°еҲӣе»әдёҖдёӘassets жқҘз”ҹжҲҗдёҖдёӘResourceе®һдҫӢ
AssetManager assets = new AssetManager(); if (resDir != null) { if (assets.addAssetPath(resDir) == 0) { return null; } } if (splitResDirs != null) { for (String splitResDir : splitResDirs) { if (assets.addAssetPath(splitResDir) == 0) { return null; } } } if (overlayDirs != null) { for (String idmapPath : overlayDirs) { assets.addOverlayPath(idmapPath); } } if (libDirs != null) { for (String libDir : libDirs) { if (libDir.endsWith(".apk")) { // Avoid opening files we know do not have resources, // like code-only .jar files. if (assets.addAssetPath(libDir) == 0) { Log.w(TAG, "Asset path '" + libDir + "' does not exist or contains no resources."); } } } }зј“еӯҳзҡ„еҸҰдёҖдёӘдҪңз”Ёе°ұжҳҜconfigurationеҸҳеҢ–зҡ„ж—¶еҖҷ еҸҜд»Ҙд»Һзј“еӯҳйҮҢйқўжүҫеҲ°жүҖжңүеҪ“еүҚжӯЈеңЁжҝҖжҙ»зҠ¶жҖҒзҡ„ResourceгҖӮ
并且и°ғз”ЁиҝҷдәӣResourceзҡ„public void updateConfiguration(Configuration config,DisplayMetrics metrics, CompatibilityInfo compat) {ж–№жі•пјҢжңҖз»Ҳз”ҹж•Ҳзҡ„жҳҜеҜ№Resourceдёӯзҡ„mAssetsзҡ„configuration
еҶҚжқҘзңӢдёҖдёӢResource.java
е…¶ж ёеҝғеҢ…еҗ«дёӨдёӘйғЁеҲҶ
1пјҡе°ҒиЈ…AssetsпјҢи®ІжүҖжңүиө„жәҗи°ғз”ЁжңҖз»ҲйғҪжҳҜи°ғз”ЁеҲ°mAssetsзҡ„ж–№жі•
public CharSequence getText(@StringRes int id) throws NotFoundException { CharSequence res = mAssets.getResourceText(id); if (res != null) { return res; } throw new NotFoundException("String resource ID #0x" + Integer.toHexString(id)); }2пјҡжҸҗдҫӣзј“еӯҳ
private static final LongSparseArray<ConstantState>[] sPreloadedDrawables; private static final LongSparseArray<ConstantState> sPreloadedColorDrawables = new LongSparseArray<>(); private static final LongSparseArray<android.content.res.ConstantState<ColorStateList>> sPreloadedColorStateLists = new LongSparseArray<>(); private final DrawableCache mDrawableCache = new DrawableCache(this); private final DrawableCache mColorDrawableCache = new DrawableCache(this); private final ConfigurationBoundResourceCache<ColorStateList> mColorStateListCache = new ConfigurationBoundResourceCache<>(this); private final ConfigurationBoundResourceCache<Animator> mAnimatorCache = new ConfigurationBoundResourceCache<>(this); private final ConfigurationBoundResourceCache<StateListAnimator> mStateListAnimatorCache = new ConfigurationBoundResourceCache<>(this); е°Ҷд»ҺmAssertsдёӯеҸ–еҮәзҡ„еӨ§иө„жәҗиҝӣиЎҢзј“еӯҳпјҢйҒҝе…ҚиҜ»еҸ–иҖ—ж—¶е’ҢеҶ…еӯҳеҚ з”Ё
зңӢе®Ң6.0зҡ„жәҗз ҒжҲ‘们еҶҚжүҫдёҖд»Ҫ9.0зҡ„д»Јз ҒжқҘзңӢдёӢпјҢ9.0зҡ„иө„жәҗз®ЎзҗҶеҹәжң¬дёҠдёҺ7.0дёҖи„үзӣёжүҝпјҢеӣ жӯӨжҲ‘们зӣҙжҺҘдҪҝз”ЁдәҶ9.0зҡ„жәҗз ҒжқҘиҝӣиЎҢеҲҶжһҗгҖӮ
зӣёжҜ”дәҺAndroid6.0 пјҢ9.0жәҗз ҒдёӯResourcesдёӯдёҚеңЁз»ҙжҠӨAssertManager иҖҢжҳҜе°ҶAssertManagerдёҺе…¶д»–зҡ„дёҖдәӣзј“еӯҳ е°ҒиЈ…жҲҗдәҶдёҖдёӘResourcesImplгҖӮ
public class Resources { static final String TAG = "Resources"; static Resources mSystem = null; private ResourcesImpl mResourcesImpl; private TypedValue mTmpValue = new TypedValue(); final ClassLoader mClassLoader;public class ResourcesImpl { private static final LongSparseArray<Drawable.ConstantState>[] sPreloadedDrawables; private static final LongSparseArray<Drawable.ConstantState> sPreloadedColorDrawables = new LongSparseArray<>(); private static final LongSparseArray<android.content.res.ConstantState<ComplexColor>> sPreloadedComplexColors = new LongSparseArray<>(); // These are protected by mAccessLock. private final Configuration mTmpConfig = new Configuration(); private final DrawableCache mDrawableCache = new DrawableCache(); private final DrawableCache mColorDrawableCache = new DrawableCache(); private final ConfigurationBoundResourceCache<ComplexColor> mComplexColorCache = new ConfigurationBoundResourceCache<>(); private final ConfigurationBoundResourceCache<Animator> mAnimatorCache = new ConfigurationBoundResourceCache<>(); private final ConfigurationBoundResourceCache<StateListAnimator> mStateListAnimatorCache = new ConfigurationBoundResourceCache<>(); final AssetManager mAssets; private final DisplayMetrics mMetrics = new DisplayMetrics(); private final DisplayAdjustments mDisplayAdjustments; private PluralRules mPluralRule; private final Configuration mConfiguration = new Configuration(); }ResourcesImpl жүҝжӢ…зқҖиҖҒзүҲжң¬йҮҢйқўResourcesзҡ„иҒҢиҙЈпјҢ еҢ…иЈ…AssertManager е’Ң з»ҙжҠӨж•°жҚ®зј“еӯҳгҖӮ
иҖҢResourcesзҡ„д»Јз Ғд№ҹеҸҳзҡ„жӣҙеҠ з®ҖеҚ•пјҢе…¶ж–№жі•и°ғз”ЁжңҖз»ҲйғҪжҳҜдәӨз»ҷдәҶResourcesImplжқҘе®һзҺ°гҖӮ
дёҚеҸҳзҡ„жҳҜResourcesзҡ„з®ЎзҗҶиҝҳжҳҜиҰҒдәӨз»ҷResourcesManagerжқҘз®ЎзҗҶзҡ„пјҢи·ҹAndroid6.0дёҖж ·ResourcesManagerжҳҜдёҖдёӘеҚ•дҫӢжЁЎејҸгҖӮ
йӮЈд№Ҳ9.0зҡ„ResourcesManagerдёҺ6.0зҡ„ResourcesManagerжңүе’ҢдёҚеҗҢпјҹ
иҝҳжҳҜд»Һеә”з”ЁеҗҜеҠЁејҖе§ӢзңӢиө·пјҢиҝҳжҳҜзҶҹжӮүзҡ„ContextImplгҖӮ
2гҖҒ9.0иө„жәҗз®ЎзҗҶжәҗз Ғи§Јжһҗ
static ContextImpl createAppContext(ActivityThread mainThread, LoadedApk packageInfo) { if (packageInfo == null) throw new IllegalArgumentException("packageInfo"); ContextImpl context = new ContextImpl(null, mainThread, packageInfo, null, null, null, 0, null); context.setResources(packageInfo.getResources()); return context; }static ContextImpl createActivityContext(ActivityThread mainThread, LoadedApk packageInfo, ActivityInfo activityInfo, IBinder activityToken, int displayId, Configuration overrideConfiguration) { гҖӮгҖӮгҖӮгҖӮгҖӮгҖӮгҖӮгҖӮ ContextImpl context = new ContextImpl(null, mainThread, packageInfo, activityInfo.splitName, activityToken, null, 0, classLoader); final ResourcesManager resourcesManager = ResourcesManager.getInstance(); context.setResources(resourcesManager.createBaseActivityResources(activityToken, packageInfo.getResDir(), splitDirs, packageInfo.getOverlayDirs(), packageInfo.getApplicationInfo().sharedLibraryFiles, displayId, overrideConfiguration, compatInfo, classLoader)); context.mDisplay = resourcesManager.getAdjustedDisplay(displayId, context.getResources()); return context; }ж— и®әжҳҜз”ҹжҲҗApplicationзҡ„ResourceиҝҳжҳҜз”ҹжҲҗActivityзҡ„ResourceжңҖз»Ҳи°ғз”Ёзҡ„жҳҜResourceManagerдёӯзҡ„ж–№жі•еҢәеҲ«гҖӮеңЁдәҺдёҖдёӘи°ғз”Ёзҡ„жҳҜ
ResourcesManager.getInstance().getResources пјҢеҸҰдёҖдёӘи°ғз”Ёзҡ„жҳҜresourcesManager.createBaseActivityResourcesгҖӮ
OK жҲ‘们зңӢдёҖдёӢResourcesManagerзҡ„жәҗз ҒгҖӮ
е…ҲзңӢдёӢе®ғжҸҗдҫӣзҡ„еҗ„з§ҚеұһжҖ§пјҢжҲ‘们жҢ‘йҮҚиҰҒзҡ„ж”ҫдёҠжқҘгҖӮ
/** * ResourceImplsеҸҠе…¶й…ҚзҪ®зҡ„жҳ е°„гҖӮиҝҷдәӣйғҪжҳҜеҚ з”ЁиҫғеӨ§еҶ…еӯҳзҡ„ж•°жҚ® * еә”иҜҘе°ҪеҸҜиғҪйҮҚз”ЁгҖӮжүҖжңүзҡ„з”ұResourcesManagerз”ҹжҲҗзҡ„ResourcesImplйғҪдјҡиў«зј“еӯҳеңЁиҝҷдёӘmapдёӯ */ private final ArrayMap<ResourcesKey, WeakReference<ResourcesImpl>> mResourceImpls = new ArrayMap<>(); /** *еҸҜд»ҘйҮҚз”Ёзҡ„иө„жәҗеј•з”ЁеҲ—иЎЁгҖӮжіЁж„ҸдёҖдёӢ иҝҷдёӘlistйҮҢйқўеӯҳеӮЁзҡ„并дёҚжҳҜActivityзҡ„Resourcesзј“еӯҳпјҢжҢүз…§жҲ‘зҡ„зҗҶи§ЈпјҢжүҖжңүйқһActivcityзҡ„ResourceйғҪдјҡиў«зј“еӯҳеңЁжӯӨеӨ„пјҢжҜ”еҰӮApplicationзҡ„Resource */ private final ArrayList<WeakReference<Resources>> mResourceReferences = new ArrayList<>(); /** * жҜҸдёӘActivityйғҪжңүдёҖдёӘеҹәжң¬иҰҶзӣ–й…ҚзҪ®пјҢиҜҘй…ҚзҪ®еә”з”ЁдәҺжҜҸдёӘResourcesеҜ№иұЎпјҢиҖҢиҝҷдәӣеҜ№иұЎеҸҲеҸҜд»ҘжҢҮе®ҡиҮӘе·ұзҡ„иҰҶзӣ–й…ҚзҪ®гҖӮ иҝҷдёӘзј“еӯҳйҮҢйқўдҝқеӯҳзҡ„йғҪжҳҜActrivityзҡ„Resourceзҡ„зј“еӯҳпјҢActivityResourcesжҳҜдёҖдёӘеҜ№иұЎпјҢйҮҢйқўеҢ…еҗ«дәҶдёҖдёӘActivityжүҖжӢҘжңүзҡ„Configurationе’ҢжүҖжңүеҸҜиғҪжӢҘжңүиҝҮзҡ„ResourcesпјҢжҜ”еҰӮдёҖдёӘActivityпјҢеңЁжҹҗдәӣжғ…еҶөдёӢд»–зҡ„ResourcesImplеҸ‘з”ҹдәҶеҸҳеҢ–пјҢйӮЈд№ҲиҝҷдёӘж—¶еҖҷе°ұActivityResourcesе°ұеҸҜиғҪдјҡжҢҒжңүеӨҡдёӘResourceеј•з”Ё */ private final WeakHashMap<IBinder, ActivityResources> mActivityResourceReferences = new WeakHashMap<>(); /** * зј“еӯҳзҡ„ApkAssetsпјҢиҝҷдёӘеҸҜд»Ҙе…ҲдёҚзңӢ */ private final LruCache<ApkKey, ApkAssets> mLoadedApkAssets = new LruCache<>(3); /** * иҝҷд№ҹжҳҜApkAssetsзҡ„дёҖдёӘзј“еӯҳ иҝҷдёӘд№ҹеҸҜд»Ҙе…ҲдёҚзңӢ */ private final ArrayMap<ApkKey, WeakReference<ApkAssets>> mCachedApkAssets = new ArrayMap<>(); private static class ApkKey { public final String path; public final boolean sharedLib; public final boolean overlay; } /** * дёҺActivityе…іиҒ”зҡ„иө„жәҗе’Ңеҹәжң¬й…ҚзҪ®иҰҶзӣ–гҖӮ */ private static class ActivityResources { public final Configuration overrideConfig = new Configuration(); //жҢү照常规зҡ„зҗҶи§Ј дёҖдёӘActivityеҸӘжңүдёҖдёӘResources дҪҶжҳҜиҝҷйҮҢеҚҙдҪҝз”ЁдәҶдёҖдёӘlistжқҘеӯҳеӮЁпјҢиҝҷжҳҜиҖғиҷ‘еҰӮжһңActivityеҸ‘з”ҹеҸҳеҢ–пјҢйҮҚж–°з”ҹжҲҗдәҶResourceпјҢиҝҷдёӘеҲ—иЎЁе°ұдјҡе°ҶActivityеҺҶеҸІдҪҝз”ЁиҝҮзҡ„ResourcesйғҪеӯҳеңЁйҮҢйқўпјҢеҪ“然пјҢеҰӮжһңжІЎжңүдәәеҶҚжҢҒжңүиҝҷдәӣResourcesпјҢе°ұдјҡиў«еӣһ收 public final ArrayList<WeakReference<Resources>> activityResources = new ArrayList<>(); }дәҶи§ЈдәҶиҝҷдәӣйҮҚиҰҒзҡ„еұһжҖ§д№ӢеҗҺпјҢжҲ‘们еҶҚжқҘзңӢдёҖдёӢResourceManagerжҸҗдҫӣзҡ„иҜёеӨҡж–№жі•гҖӮ
ResourceManagerжҸҗдҫӣдәҶеҰӮдёӢд»ҘеҶҷpublicж–№жі•дҫӣи°ғз”ЁгҖӮ
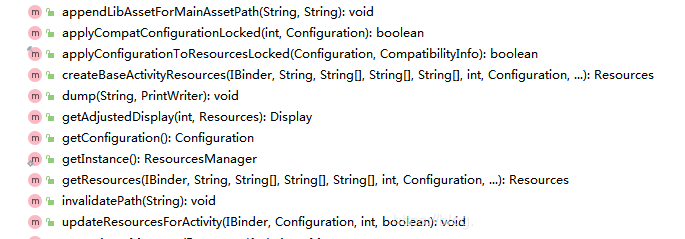
е…ҲзңӢgetResourcesе’ҢcreateBaseActivityResources жңҖз»ҲйғҪжҳҜдҪҝз”ЁдёҖдёӘResourcesKeyеҺ»и°ғз”ЁgetOrCreateResourcesгҖӮ
Resources getResources(@Nullable IBinder activityToken, @Nullable String resDir, @Nullable String[] splitResDirs, @Nullable String[] overlayDirs, @Nullable String[] libDirs, int displayId, @Nullable Configuration overrideConfig, @NonNull CompatibilityInfo compatInfo, @Nullable ClassLoader classLoader) { try { final ResourcesKey key = new ResourcesKey(resDir, splitResDirs, overlayDirs, libDirs, displayId, overrideConfig != null ? new Configuration(overrideConfig) : null,compatInfo); classLoader = classLoader != null ? classLoader : ClassLoader.getSystemClassLoader(); return getOrCreateResources(activityToken, key, classLoader); } finally { } }Resources createBaseActivityResources(@NonNull IBinder activityToken, @Nullable String resDir, @Nullable String[] splitResDirs, @Nullable String[] overlayDirs, @Nullable String[] libDirs, int displayId, @Nullable Configuration overrideConfig, @NonNull CompatibilityInfo compatInfo, @Nullable ClassLoader classLoader) { try { final ResourcesKey key = new ResourcesKey(resDir, splitResDirs, overlayDirs, libDirs, displayId, overrideConfig != null ? new Configuration(overrideConfig) : null, compatInfo); classLoader = classLoader != null ? classLoader : ClassLoader.getSystemClassLoader(); synchronized (this) { // ејәеҲ¶еҲӣе»әActivityResourcesеҜ№иұЎе№¶ж”ҫеҲ°зј“еӯҳйҮҢйқў getOrCreateActivityResourcesStructLocked(activityToken); } // жӣҙж–°д»»дҪ•зҺ°жңүзҡ„Activity Resourcesеј•з”ЁгҖӮ updateResourcesForActivity(activityToken, overrideConfig, displayId, false /* movedToDifferentDisplay */); // зҺ°еңЁиҜ·жұӮдёҖдёӘе®һйҷ…зҡ„ResourcesеҜ№иұЎгҖӮ return getOrCreateResources(activityToken, key, classLoader); } finally { } }getOrCreateResources жҲ‘еңЁеҗ„иЎҢд»Јз ҒеӨ„йғҪеҶҷдәҶжіЁйҮҠпјҢеӨ§е®¶жіЁж„ҸзңӢд»Јз Ғдёӯзҡ„жіЁйҮҠпјҢйғЁеҲҶжіЁйҮҠжҳҜеҜ№д»Јз Ғдёӯеј•ж–ҮжіЁйҮҠзҡ„зҝ»иҜ‘гҖӮ
private @Nullable Resources getOrCreateResources(@Nullable IBinder activityToken, @NonNull ResourcesKey key, @NonNull ClassLoader classLoader) { synchronized (this) { if (activityToken != null) { final ActivityResources activityResources = getOrCreateActivityResourcesStructLocked(activityToken); // жё…зҗҶе·Із»Ҹиў«еӣһ收зҡ„зј“еӯҳ ArrayUtils.unstableRemoveIf(activityResources.activityResources, sEmptyReferencePredicate); // Rebase the key's override config on top of the Activity's base override. if (key.hasOverrideConfiguration() && !activityResources.overrideConfig.equals(Configuration.EMPTY)) { final Configuration temp = new Configuration(activityResources.overrideConfig); temp.updateFrom(key.mOverrideConfiguration); key.mOverrideConfiguration.setTo(temp); } //ж №жҚ®еҜ№еә”зҡ„key еҺ»иҺ·еҸ–дёҖдёӘResourcesImpl жңүеҸҜиғҪжҳҜж–°зҡ„д№ҹжңүеҸҜиғҪжҳҜзј“еӯҳйҮҢйқўзҡ„ ResourcesImpl resourcesImpl = findResourcesImplForKeyLocked(key); if (resourcesImpl != null) { //дҪҝз”ЁResourcesImpl еҺ»з”ҹжҲҗдёҖдёӘResources return getOrCreateResourcesForActivityLocked(activityToken, classLoader, resourcesImpl, key.mCompatInfo); } // We will create the ResourcesImpl object outside of holding this lock. } else { // жё…зҗҶ еӣ дёәmResourceReferencesйҮҢйқўж”ҫзҡ„йғҪжҳҜејұеј•з”ЁпјҢиҰҒеҲӨж–ӯиҝҷдәӣејұеј•з”ЁжҳҜеҗҰйғҪе·Із»Ҹиў«йҮҠж”ҫпјҢеҰӮжһңйҮҠж”ҫзҡ„иҜқе°ұиҰҒд»ҺArrayйҮҢйқўз§»йҷӨжҺү ArrayUtils.unstableRemoveIf(mResourceReferences, sEmptyReferencePredicate); // дёҚдҫқиө–дәҺActivityпјҢжүҫеҲ°е…·жңүжӯЈзЎ®ResourcesImplзҡ„е…ұдә«иө„жәҗ иҝҷйҮҢе°ұжҳҜж №жҚ®keyеҺ»mResourceImplsзҡ„зј“еӯҳйҮҢйқўжүҫ ResourcesImpl resourcesImpl = findResourcesImplForKeyLocked(key); if (resourcesImpl != null) { //еҰӮжһңжүҫеҲ°resourcesImplзҡ„иҜқе°ұеҺ»д»ҺmResourceReferencesзңӢжңүжІЎжңүеҸҜз”Ёзҡ„resources еҰӮжһңзұ»еҠ иҪҪеҷЁе’ҢResourcesImplзӣёеҗҢпјҢеҲҷиҺ·еҸ–зҺ°жңүзҡ„ResourcesеҜ№иұЎпјҢеҗҰеҲҷдјҡеҲӣе»әдёҖдёӘж–°зҡ„ResourcesеҜ№иұЎгҖӮ return getOrCreateResourcesLocked(classLoader, resourcesImpl, key.mCompatInfo); } // жҲ‘们е°ҶеңЁжҢҒжңүжӯӨй”Ғд№ӢеӨ–еҲӣе»әResourcesImplеҜ№иұЎгҖӮ } // еҰӮжһңжҲ‘们иө°еҲ°дәҶиҝҷйҮҢпјҢжҲ‘们жүҫдёҚеҲ°еҗҲйҖӮзҡ„ResourcesImplжқҘдҪҝз”ЁпјҢжүҖд»ҘзҺ°еңЁеҲӣе»әдёҖдёӘгҖӮ ResourcesImpl resourcesImpl = createResourcesImpl(key); if (resourcesImpl == null) { return null; } // е°ҶжӯӨResourcesImplж·»еҠ еҲ°зј“еӯҳдёӯгҖӮ mResourceImpls.put(key, new WeakReference<>(resourcesImpl)); final Resources resources; if (activityToken != null) { //д»ҺmActivityResourceReferences йҮҢйқўеҺ»жүҫ зңӢжңүжІЎжңүеҗҲйҖӮзҡ„ResourcesеҸҜз”Ё еҰӮжһңжІЎжңүе°ұжһ„е»әдёҖдёӘResourcesе…өж·»еҠ еҲ°mActivityResourceReferencesйҮҢйқў resources = getOrCreateResourcesForActivityLocked(activityToken, classLoader, resourcesImpl, key.mCompatInfo); } else { //дҪҝз”ЁеҲӣе»әеҮәжқҘзҡ„ResourcesImplеҺ»еҢ№й…ҚдёҖдёӘResourceпјҢе…·дҪ“жҳҜд»Һзј“еӯҳmResourceReferencesйҮҢйқўеҸ–пјҲеҰӮжһңжңүзҡ„иҜқпјүиҝҳжҳҜеҲӣе»әж–°зҡ„з”ұдёӢйқўзҡ„ж–№жі•еҶіе®ҡ resources = getOrCreateResourcesLocked(classLoader, resourcesImpl, key.mCompatInfo); } return resources; } }з”»дёӘжөҒзЁӢеӣҫзңӢдёӢ

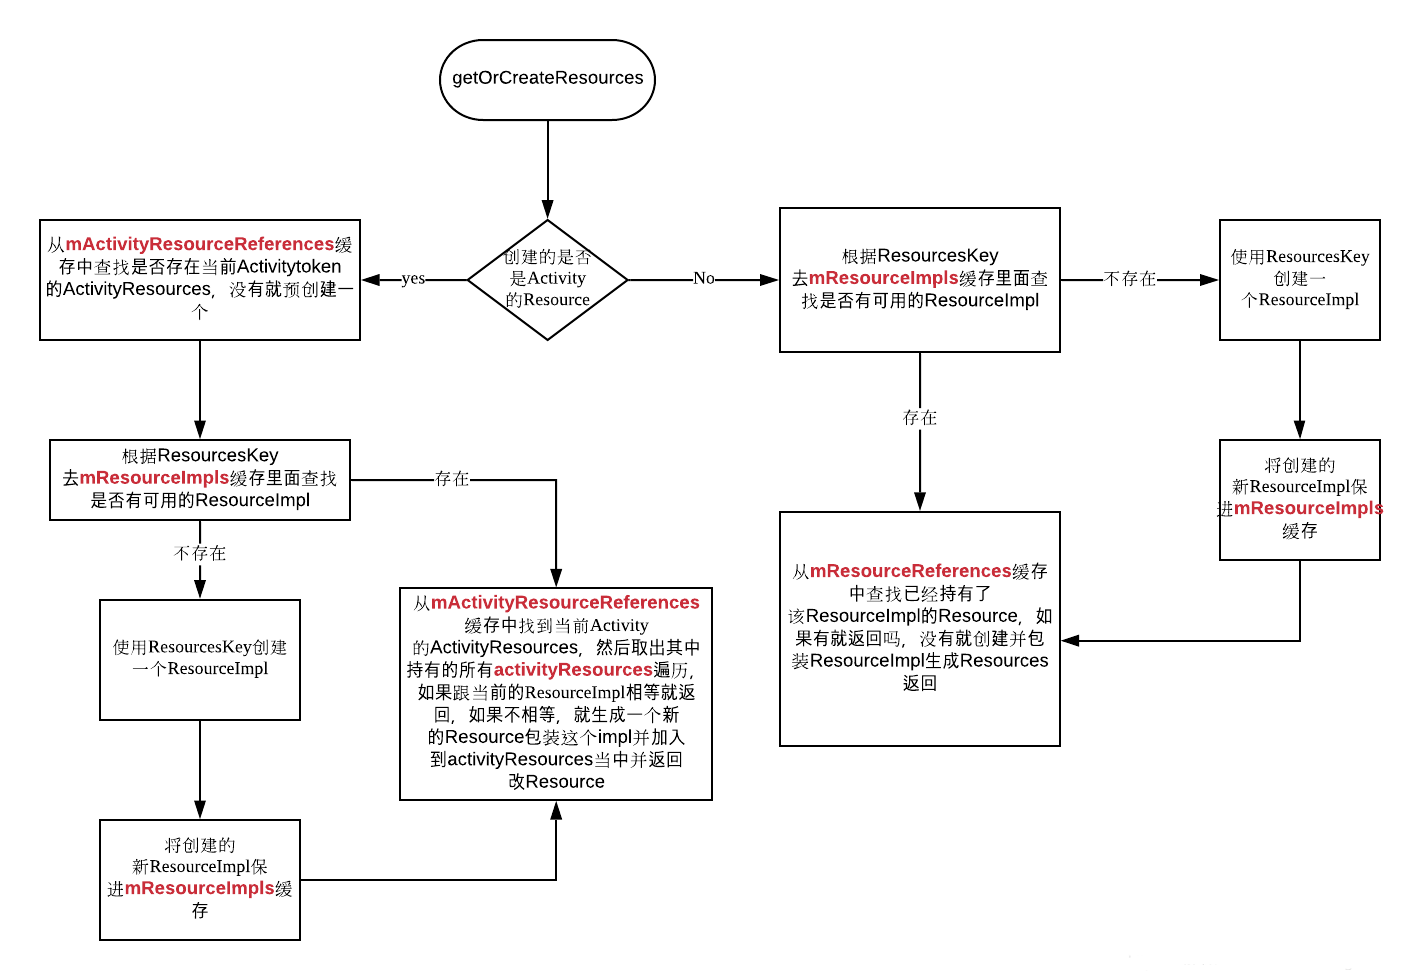
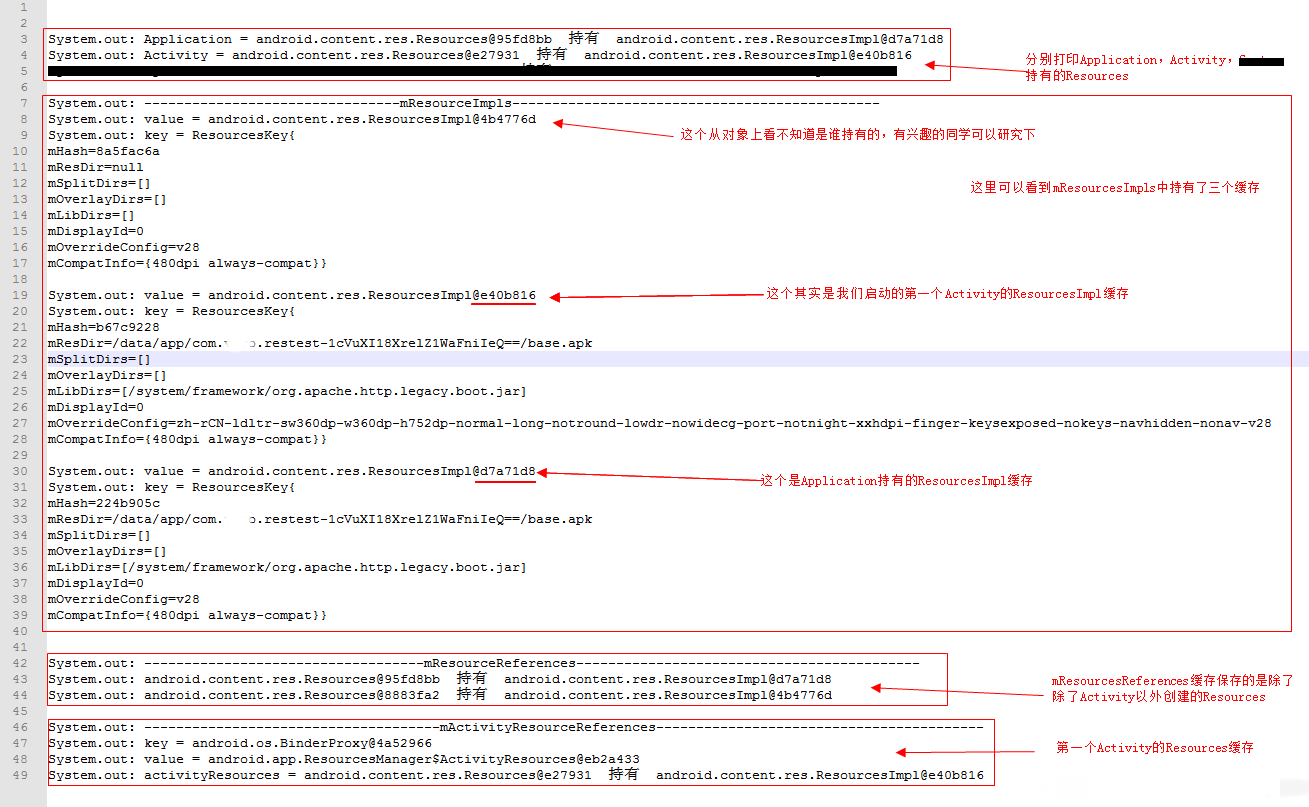
зңӢе®ҢиҝҷдёӘеӣҫеҹәжң¬дёҠеӨ§дҪ“зҡ„йҖ»иҫ‘е°ұйҖҡжҲ‘们дҪҝз”ЁеҰӮдёӢзҡ„д»Јз Ғ hook зі»з»ҹResourcesMangerзҡ„еҮ дёӘзј“еӯҳ зңӢдёҖдёӢеҪ“дёҖдёӘAppеҗҜеҠЁе№¶дё”жү“ејҖдёҖдёӘActivityж—¶пјҢиҝҷдәӣзј“еӯҳйҮҢйқўйғҪеҢ…еҗ«дәҶе“ӘдәӣеҜ№иұЎгҖӮ
try { System.out.println("Application = " + getApplicationContext().getResources() + " жҢҒжңү " + Reflector.with(getApplicationContext().getResources()).method("getImpl").call()); System.out.println("Activity = " + getResources() + " жҢҒжңү " + Reflector.with(getResources()).method("getImpl").call()); System.out.println("System = " + Resources.getSystem() + " жҢҒжңү " + Reflector.with(Resources.getSystem()).method("getImpl").call()); ResourcesManager resourcesManager = ResourcesManager.getInstance(); System.out.println("--------------------------------mResourceImpls----------------------------------------------"); ArrayMap<ResourcesKey, WeakReference<ResourcesImpl>> mResourceImpls = Reflector.with(resourcesManager).field("mResourceImpls").get(); Iterator<ResourcesKey> resourcesKeyIterator = mResourceImpls.keySet().iterator(); while (resourcesKeyIterator.hasNext()) { ResourcesKey key = resourcesKeyIterator.next(); WeakReference<ResourcesImpl> value = mResourceImpls.get(key); System.out.println("key = " + key); System.out.println("value = " + value.get()); } System.out.println("-----------------------------------mResourceReferences-------------------------------------------"); ArrayList<WeakReference<Resources>> mResourceReferences = Reflector.with(resourcesManager).field("mResourceReferences").get(); for (WeakReference<Resources> weakReference : mResourceReferences) { Resources resources = weakReference.get(); if (resources != null) { System.out.println(resources + " жҢҒжңү " + Reflector.with(resources).method("getImpl").call()); } } System.out.println("-------------------------------------mActivityResourceReferences-----------------------------------------"); WeakHashMap<IBinder, Object> mActivityResourceReferences = Reflector.with(resourcesManager).field("mActivityResourceReferences").get(); Iterator<IBinder> iBinderIterator = mActivityResourceReferences.keySet().iterator(); while (iBinderIterator.hasNext()) { IBinder key = iBinderIterator.next(); Object value = mActivityResourceReferences.get(key); System.out.println("key = " + key); System.out.println("value = " + value); Object overrideConfig = Reflector.with(value).field("overrideConfig").get(); System.out.println("overrideConfig = " + overrideConfig); Object activityResources = Reflector.with(value).field("activityResources").get(); try { ArrayList<WeakReference<Resources>> list = (ArrayList<WeakReference<Resources>>) activityResources; for (WeakReference<Resources> weakReference : list) { Resources resources = weakReference.get(); System.out.println("activityResources = " + resources + " жҢҒжңү " + Reflector.with(resources).method("getImpl").call()); } } catch (Reflector.ReflectedException e) { e.printStackTrace(); } } } catch (Exception e) { e.printStackTrace(); }жү“еҚ°еҮәжқҘзҡ„з»“жһңеҰӮдёӢеӣҫпјҡ

еҲҶжһҗе®ҢдёӨдёӘдёҚеҗҢapi levelзҡ„иө„жәҗз®ЎзҗҶжәҗз ҒпјҢжҲ‘们еҶҚжқҘеҲҶжһҗдёҖдёӢдёӨдёӘдёҚеҗҢapiLevelеңЁеҠ иҪҪе®ҢжҲҗдёҖдёӘwebView组件д№ӢеҗҺResourceзҡ„еҢәеҲ«гҖӮ
е…ҲиҜҙд»ҘдёӢ6.0зҡ„ гҖӮ
ж №жҚ®6.0 ResourceManagerзҡ„д»Јз Ғ жҲ‘们е…ҲеҒҡдёҖдёӘжөӢиҜ•пјҡ
зј–еҶҷеҰӮдёӢд»Јз Ғ жҲ‘们е°ҶmActiveResourcesдёӯдҝқеӯҳзҡ„еҶ…е®№жү“еҚ°еҮәжқҘгҖӮ
3гҖҒ6.0 webиө„жәҗжіЁе…ҘеҲҶжһҗ
ResourcesManager resourcesManager = ResourcesManager.getInstance(); //6.0жү“еҚ° try { ArrayMap<Object, WeakReference<Object>> map = Reflector.with(resourcesManager).field("mActiveResources").get(); for (int i = 0; i < map.size(); i++) { Object a = map.keyAt(i); Object b = map.valueAt(i).get(); System.out.println(Reflector.with(a).field("mResDir").get()); System.out.println(b.toString()); } } catch (Exception e) { e.printStackTrace(); }жү“еҚ°иҫ“еҮә
10-12 15:47:02.816 10785-10785/com.xxxx.res_manager_study I/System.out: /data/app/com.xxxx.res_manager_study-1/base.apk 10-12 15:47:02.816 10785-10785/com.xxxx.res_manager_study I/System.out: android.content.res.Resources@f911117
еҸҜд»ҘзңӢеҲ°еҪ“еүҚеҢ…зҡ„Resourcesе·Із»Ҹиў«еҠ е…ҘеҲ°mActiveResourcesдёӯдәҶгҖӮ
еҶҚдҝ®ж”№д»Јз Ғпјҡ
еңЁжү“еҚ°д№ӢеүҚж·»еҠ webViewеҲқе§ӢеҢ– WebView webView = new WebView(context);
жү“еҚ°иҫ“еҮәпјҡ
10-12 15:48:48.586 10985-10985/com.xxxx.res_manager_study I/System.out: /data/app/com.google.android.webview-1/base.apk 10-12 15:48:48.586 10985-10985/com.xxxx.res_manager_study I/System.out: android.content.res.Resources@9bc9c4 10-12 15:48:48.586 10985-10985/com.xxxx.res_manager_study I/System.out: /data/app/com.xxxx.res_manager_study-2/base.apk 10-12 15:48:48.586 10985-10985/com.xxxx.res_manager_study I/System.out: android.content.res.Resources@b66d0ad
еҸҜд»ҘзңӢеҲ°ж·»еҠ дәҶwebViewеҲқе§ӢеҢ–д»Јз Ғд№ӢеҗҺ mActiveResourcesдёӯеўһеҠ дәҶдёҖдёӘResourcesе®һдҫӢпјҢиҜҘе®һдҫӢжҢҮеҗ‘webView组件е®үиЈ…и·Ҝеҫ„гҖӮ
WebViewе°ұжҳҜд»ҺиҝҷдёӘResourcesеҸ–еҲ°дәҶиҮӘе·ұжүҖйңҖиҰҒзҡ„иө„жәҗгҖӮиҝҷд№ҹжҳҜ7.0д»ҘдёӢзүҲжң¬дёӯжӣҝжҚўActivityе’ҢApplicationзҡ„ResourcesдёҚдјҡеҮәзҺ°Web组件еҙ©жәғзҡ„еҺҹеӣ пјҢеӣ дёәеңЁиҝҷдёӘlevelзҡ„зі»з»ҹдёӯпјҢweb组件иө„жәҗдёҺдё»apkиө„жәҗжҳҜеҲҶзҰ»зҡ„гҖӮ
OK еҲҶжһҗе®Ң6.0зҡ„еҶҚзңӢ9.0зҡ„гҖӮ
9.0зҡ„ResourceManagerзӣёеҜ№еӨҚжқӮпјҢжҲ‘们д№ҹжҳҜдҪҝз”ЁеҸҚе°„зҡ„ж–№жі•е°ҶдёӨз§Қжғ…еҶөдёӢзҡ„ResourceManagerж•°жҚ®жү“еҚ°еҮәжқҘгҖӮ
зј–еҶҷжү“еҚ°д»Јз ҒгҖӮ
4гҖҒ9.0 webиө„жәҗжіЁе…ҘеҲҶжһҗ
System.out.println(" жү“еҚ° mResourceImpls дёӯзј“еӯҳзҡ„ ResourceImpl"); ResourcesManager resourcesManager = ResourcesManager.getInstance(); // 9.0жәҗз Ғ try { ArrayMap map = Reflector.with(resourcesManager).field("mResourceImpls").get(); for (int i = 0; i < map.size(); i++) { Object key = map.keyAt(i); WeakReference value = (WeakReference) map.get(key); System.out.println(value.get() + " " + key); } } catch (Reflector.ReflectedException e) { e.printStackTrace(); } System.out.println(" жү“еҚ° mActivityResourceReferences дёӯзј“еӯҳзҡ„ Activity Resources"); try { WeakHashMap<Object, Object> map = Reflector.with(resourcesManager).field("mActivityResourceReferences").get(); for (Map.Entry<Object, Object> entry : map.entrySet()) { Object activityResources = entry.getValue(); ArrayList<WeakReference<Resources>> list = Reflector.with(activityResources).field("activityResources").get(); for (WeakReference<Resources> weakReference : list) { Resources resources = weakReference.get(); Object resourcesImpl = Reflector.with(resources).field("mResourcesImpl").get(); System.out.println(resourcesImpl); } } } catch (Exception e) { e.printStackTrace(); }жү“еҚ°иҫ“еҮәеңЁиҝҷд»Ҫжү“еҚ°д»Јз Ғдёӯ жҲ‘们иҫ“еҮәдәҶmResourceImplsе’ҢmActivityResourceReferencesдёӯзҡ„ж•°жҚ® дёҚзҗҶи§ЈиҝҷдёӨдёӘзј“еӯҳдҪңз”Ёзҡ„еҸҜд»ҘеҺ»зңӢд№ӢеүҚзҡ„ж–Үз« гҖӮ
I/System.out: жү“еҚ° mResourceImpls дёӯзј“еӯҳзҡ„ ResourceImpl I/System.out: android.content.res.ResourcesImpl@c0c1962 ResourcesKey{ mHash=8a5fac6a mResDir=null mSplitDirs=[] mOverlayDirs=[] mLibDirs=[] mDisplayId=0 mOverrideConfig=v28 mCompatInfo={480dpi always-compat}} I/System.out: android.content.res.ResourcesImpl@4aedaf3 ResourcesKey{ mHash=bafccb1 mResDir=/data/app/com.xxxx.res_manager_study-_k1QRBE8jUyrPTVnJDIbsA==/base.apk mSplitDirs=[] mOverlayDirs=[] mLibDirs=[/system/framework/org.apache.http.legacy.boot.jar] mDisplayId=0 mOverrideConfig=v28 mCompatInfo={480dpi always-compat}} I/System.out: android.content.res.ResourcesImpl@1b73b0 ResourcesKey{ mHash=30333beb mResDir=/data/app/com.xxxx.res_manager_study-_k1QRBE8jUyrPTVnJDIbsA==/base.apk mSplitDirs=[] mOverlayDirs=[] mLibDirs=[/system/framework/org.apache.http.legacy.boot.jar] mDisplayId=0 mOverrideConfig=en-rUS-ldltr-sw360dp-w360dp-h752dp-normal-long-notround-lowdr-nowidecg-port-notnight-xxhdpi-finger-keysexposed-nokeys-navhidden-nonav-v28 mCompatInfo={480dpi always-compat}} I/System.out: жү“еҚ° mActivityResourceReferences дёӯзј“еӯҳзҡ„ Activity Resources I/System.out: android.content.res.ResourcesImpl@1b73b0ж №жҚ® mActivityResourceReferencesдёӯAcitvityResource жҲ‘们жүҫеҲ°еҜ№еә”зҡ„ResourcesImplе№¶дё”ж №жҚ®ResourceKeyеҫ—зҹҘдәҶResourcesImplдёӯзҡ„еҶ…е®№гҖӮ
mResDir=/data/app/com.xxxx.res_manager_study-_k1QRBE8jUyrPTVnJDIbsA==/base.apk mSplitDirs=[] mOverlayDirs=[] mLibDirs=[/system/framework/org.apache.http.legacy.boot.jar] mDisplayId=0 mOverrideConfig=en-rUS-ldltr-sw360dp-w360dp-h752dp-normal-long-notround-lowdr-nowidecg-port-notnight-xxhdpi-finger-keysexposed-nokeys-navhidden-nonav-v28 mCompatInfo={480dpi always-compat}}жү“еҚ°иҫ“еҮәдёӢйқўжҲ‘们еңЁжү“еҚ°д»Јз Ғд№ӢеүҚж·»еҠ еҲқе§ӢеҢ–webViewзҡ„жәҗз Ғ WebView webView = new WebView(context);
I/System.out: жү“еҚ° mResourceImpls дёӯзј“еӯҳзҡ„ ResourceImpl I/System.out: android.content.res.ResourcesImpl@cbc1adc ResourcesKey{ mHash=8a5fac6a mResDir=null mSplitDirs=[] mOverlayDirs=[] mLibDirs=[] mDisplayId=0 mOverrideConfig=v28 mCompatInfo={480dpi always-compat}} I/System.out: android.content.res.ResourcesImpl@aa8a10 ResourcesKey{ mHash=25ddf2aa mResDir=/data/app/com.xxxx.res_manager_study-sVY46cDW2JT2hEkohn2GJw==/base.apk mSplitDirs=[] mOverlayDirs=[] mLibDirs=[/system/framework/org.apache.http.legacy.boot.jar,/data/app/com.android.chrome-dO2jAeCdfgkLjVHzK2yx0Q==/base.apk] mDisplayId=0 mOverrideConfig=v28 mCompatInfo={480dpi always-compat}} I/System.out: android.content.res.ResourcesImpl@e6ea7e5 ResourcesKey{ mHash=4114b0be mResDir=/data/app/com.android.chrome-dO2jAeCdfgkLjVHzK2yx0Q==/base.apk mSplitDirs=[/data/app/com.android.chrome-dO2jAeCdfgkLjVHzK2yx0Q==/split_autofill_assistant.apk,/data/app/com.android.chrome-dO2jAeCdfgkLjVHzK2yx0Q==/split_autofill_assistant.config.en.apk,/data/app/com.android.chrome-dO2jAeCdfgkLjVHzK2yx0Q==/split_autofill_assistant.config.in.apk,/data/app/com.android.chrome-dO2jAeCdfgkLjVHzK2yx0Q==/split_autofill_assistant.config.ms.apk,/data/app/com.android.chrome-dO2jAeCdfgkLjVHzK2yx0Q==/split_autofill_assistant.config.zh.apk,/data/app/com.android.chrome-dO2jAeCdfgkLjVHzK2yx0Q==/split_config.en.apk,/data/app/com.android.chrome-dO2jAeCdfgkLjVHzK2yx0Q==/split_config.in.apk,/data/app/com.android.chrome-dO2jAeCdfgkLjVHzK2yx0Q==/split_config.ms.apk,/data/app/com.android.chrome-dO2jAeCdfgkLjVHzK2yx0Q==/split_config.zh.apk] mOverlayDirs=[] mLibDirs=[] mDisplayId=0 mOverrideConfig=v28 mCompatInfo={480dpi always-compat}} I/System.out: android.content.res.ResourcesImpl@70dd909 ResourcesKey{ mHash=4a6161e4 mResDir=/data/app/com.xxxx.res_manager_study-sVY46cDW2JT2hEkohn2GJw==/base.apk mSplitDirs=[] mOverlayDirs=[] mLibDirs=[/system/framework/org.apache.http.legacy.boot.jar,/data/app/com.android.chrome-dO2jAeCdfgkLjVHzK2yx0Q==/base.apk] mDisplayId=0 mOverrideConfig=en-rUS-ldltr-sw360dp-w360dp-h752dp-normal-long-notround-lowdr-nowidecg-port-notnight-xxhdpi-finger-keysexposed-nokeys-navhidden-nonav-v28 mCompatInfo={480dpi always-compat}} I/System.out: android.content.res.ResourcesImpl@81669ae ResourcesKey{ mHash=578cb784 mResDir=/data/app/com.xxxx.res_manager_study-sVY46cDW2JT2hEkohn2GJw==/base.apk mSplitDirs=[] mOverlayDirs=[] mLibDirs=[/system/framework/org.apache.http.legacy.boot.jar] mDisplayId=0 mOverrideConfig=v28 mCompatInfo={480dpi always-compat}} I/System.out: android.content.res.ResourcesImpl@52334f ResourcesKey{ mHash=7c1026be mResDir=/data/app/com.xxxx.res_manager_study-sVY46cDW2JT2hEkohn2GJw==/base.apk mSplitDirs=[] mOverlayDirs=[] mLibDirs=[/system/framework/org.apache.http.legacy.boot.jar] mDisplayId=0 mOverrideConfig=en-rUS-ldltr-sw360dp-w360dp-h752dp-normal-long-notround-lowdr-nowidecg-port-notnight-xxhdpi-finger-keysexposed-nokeys-navhidden-nonav-v28 mCompatInfo={480dpi always-compat}} I/System.out: жү“еҚ° mActivityResourceReferences дёӯзј“еӯҳзҡ„ Activity Resources I/System.out: android.content.res.ResourcesImpl@70dd909еҗҢж · ж №жҚ® mActivityResourceReferencesдёӯAcitvityResource жҲ‘们жүҫеҲ°еҜ№еә”зҡ„ResourcesImplе№¶дё”ж №жҚ®ResourceKeyеҫ—зҹҘдәҶResourcesImplдёӯзҡ„еҶ…е®№гҖӮ
еҜ№жҜ”жІЎжңүж·»еҠ webview е®һдҫӢеҢ–д№ӢеүҚзҡ„д»Јз Ғ жҲ‘们еҸ‘зҺ°mLibDirsдёӯж–°еўһдәҶ/data/app/com.android.chrome-dO2jAeCdfgkLjVHzK2yx0Q==/base.apk
**з»“и®әпјҡ**9.0жәҗз Ғдёӯ androidе°ҶWeb组件иө„жәҗдҪңдёәlibDirж·»еҠ иҮіAssertдёӯпјҢз”ЁдәҺиө„жәҗжҹҘжүҫпјҢжІЎжңүдҪҝз”ЁResourceеҲҶзҰ»зҡ„ж–№ејҸгҖӮ
дәҶи§ЈдәҶиҝҷдёӘеҺҹеӣ д№ӢеҗҺ жҲ‘们иҝӣдёҖжӯҘеҜ»жүҫlibDirж·»еҠ web组件иө„жәҗзҡ„ең°ж–№гҖӮ
webViewеңЁеҲқе§ӢеҢ–йҳ¶ж®ө дјҡи°ғз”ЁWebViewDelegateзҡ„addWebViewAssetPathж–№жі•гҖӮ
public void addWebViewAssetPath(Context context) { final String newAssetPath = WebViewFactory.getLoadedPackageInfo().applicationInfo.sourceDir; final ApplicationInfo appInfo = context.getApplicationInfo(); final String[] libs = appInfo.sharedLibraryFiles; if (!ArrayUtils.contains(libs, newAssetPath)) { // Build the new library asset path list. final int newLibAssetsCount = 1 + (libs != null ? libs.length : 0); final String[] newLibAssets = new String[newLibAssetsCount]; if (libs != null) { System.arraycopy(libs, 0, newLibAssets, 0, libs.length); } newLibAssets[newLibAssetsCount - 1] = newAssetPath; // Update the ApplicationInfo object with the new list. // We know this will persist and future Resources created via ResourcesManager // will include the shared library because this ApplicationInfo comes from the // underlying LoadedApk in ContextImpl, which does not change during the life of the // application. appInfo.sharedLibraryFiles = newLibAssets; // Update existing Resources with the WebView library. ResourcesManager.getInstance().appendLibAssetForMainAssetPath( appInfo.getBaseResourcePath(), newAssetPath); } }жңҖз»Ҳи°ғз”Ёзҡ„ж–№жі•жҳҜ ResourcesManager.getInstance().appendLibAssetForMainAssetPath(appInfo.getBaseResourcePath(), newAssetPath);
дј е…ҘдёӨдёӘеҸӮж•° 第дёҖдёӘжҳҜеҪ“еүҚеә”з”Ёзҡ„respath 第дәҢдёӘжҳҜwebViewзҡ„resPath е…·дҪ“зңӢеҰӮдёӢжәҗз ҒжіЁйҮҠгҖӮ
public void appendLibAssetForMainAssetPath(String assetPath, String libAsset) { synchronized (this) { // Record which ResourcesImpl need updating // (and what ResourcesKey they should update to). final ArrayMap<ResourcesImpl, ResourcesKey> updatedResourceKeys = new ArrayMap<>(); final int implCount = mResourceImpls.size(); //йҒҚеҺҶжүҖжңүзҡ„ResourcesImpl ResourcesImplжҳҜз»„жҲҗRescourceзҡ„ж ёеҝғ 他们д№Ӣй—ҙзҡ„е…ізі»жҳҜResourceеҢ…еҗ«ResourcesImplеҢ…еҗ«AssertManager for (int i = 0; i < implCount; i++) { final ResourcesKey key = mResourceImpls.keyAt(i); final WeakReference<ResourcesImpl> weakImplRef = mResourceImpls.valueAt(i); final ResourcesImpl impl = weakImplRef != null ? weakImplRef.get() : null; //иҝҷйҮҢйҰ–е…ҲиҝӣиЎҢеҲӨж–ӯзҡ„ResourcesImplжҳҜеҗҰеҢ…еҗ«assetPath д№ҹе°ұжҳҜиҜҙеҰӮжһңдёҖдёӘResourcesImplзҡ„mResDirдёҚжҳҜеҪ“еүҚеә”з”Ёзҡ„ еҲҷдёҚдјҡиҝӣиЎҢеӨ„зҗҶ if (impl != null && Objects.equals(key.mResDir, assetPath)) { //иҝҳиҰҒеҲӨж–ӯж–°зҡ„иө„жәҗи·Ҝеҫ„жҳҜдёҚжҳҜе·Із»ҸеӯҳеңЁдәҶ еҰӮжһңеӯҳеңЁдәҶе°ұдёҚеҒҡеӨ„зҗҶ if (!ArrayUtils.contains(key.mLibDirs, libAsset)) { final int newLibAssetCount = 1 + (key.mLibDirs != null ? key.mLibDirs.length : 0); final String[] newLibAssets = new String[newLibAssetCount]; if (key.mLibDirs != null) { //иҝҷйҮҢе°ұе°Ҷж–°зҡ„и·Ҝеҫ„ж·»еҠ еҲ°йңҖиҰҒж·»еҠ зҡ„ResourcesImplжүҖеҜ№еә”зҡ„ResourcesKeyзҡ„libDirдёҠйқўдәҶ System.arraycopy(key.mLibDirs, 0, newLibAssets, 0, key.mLibDirs.length); } newLibAssets[newLibAssetCount - 1] = libAsset; updatedResourceKeys.put(impl, new ResourcesKey(key.mResDir, key.mSplitResDirs, key.mOverlayDirs, newLibAssets, key.mDisplayId, key.mOverrideConfiguration, key.mCompatInfo)); } } } redirectResourcesToNewImplLocked(updatedResourceKeys); } }//иҝҷдёӘж–№жі•жҳҜжӣҙж–°еҪ“еүҚжҢҒжңүResourcesImplзҡ„Resource private void redirectResourcesToNewImplLocked(@NonNull final ArrayMap<ResourcesImpl, ResourcesKey> updatedResourceKeys) { // Bail early if there is no work to do. if (updatedResourceKeys.isEmpty()) { return; } // Update any references to ResourcesImpl that require reloading. final int resourcesCount = mResourceReferences.size(); for (int i = 0; i < resourcesCount; i++) { final WeakReference<Resources> ref = mResourceReferences.get(i); final Resources r = ref != null ? ref.get() : null; if (r != null) { //йҰ–е…ҲжҳҜж №жҚ®иҖҒзҡ„ResourcesImplжүҫеҲ°ж–°зҡ„ResourcesKey final ResourcesKey key = updatedResourceKeys.get(r.getImpl()); if (key != null) { //然еҗҺж №жҚ®ж–°зҡ„ResourcesKeyз”ҹжҲҗж–°зҡ„ResourcesImpl final ResourcesImpl impl = findOrCreateResourcesImplForKeyLocked(key); if (impl == null) { throw new Resources.NotFoundException("failed to redirect ResourcesImpl"); } //жңҖеҗҺеңЁжӣҝжҚўжҺүResourcesдёӯзҡ„ResourcesImpl r.setImpl(impl); } } } // Update any references to ResourcesImpl that require reloading for each Activity. //иҝҷиҫ№и·ҹдёҠйқўжҳҜдёҖж ·зҡ„йҒ“зҗҶ еҸӘдёҚиҝҮиҝҷйҮҢеӨ„зҗҶзҡ„жҳҜжүҖжңүи®°еҪ•зҡ„Activityзҡ„Resource for (ActivityResources activityResources : mActivityResourceReferences.values()) { final int resCount = activityResources.activityResources.size(); for (int i = 0; i < resCount; i++) { final WeakReference<Resources> ref = activityResources.activityResources.get(i); final Resources r = ref != null ? ref.get() : null; if (r != null) { final ResourcesKey key = updatedResourceKeys.get(r.getImpl()); if (key != null) { final ResourcesImpl impl = findOrCreateResourcesImplForKeyLocked(key); if (impl == null) { throw new Resources.NotFoundException("failed to redirect ResourcesImpl"); } r.setImpl(impl); } } } } }еҪ“appendLibAssetForMainAssetPathж–№жі•иў«и°ғз”Ёж—¶пјҢйҖ»иҫ‘йЎәеәҸеҰӮдёӢеҘҪеҗ§пјҢдёҚе–ңж¬ўзңӢжәҗз ҒпјҢиҝҳжҳҜжқҘдёӘз”»дёӘжөҒзЁӢеӣҫеҗ§гҖӮ

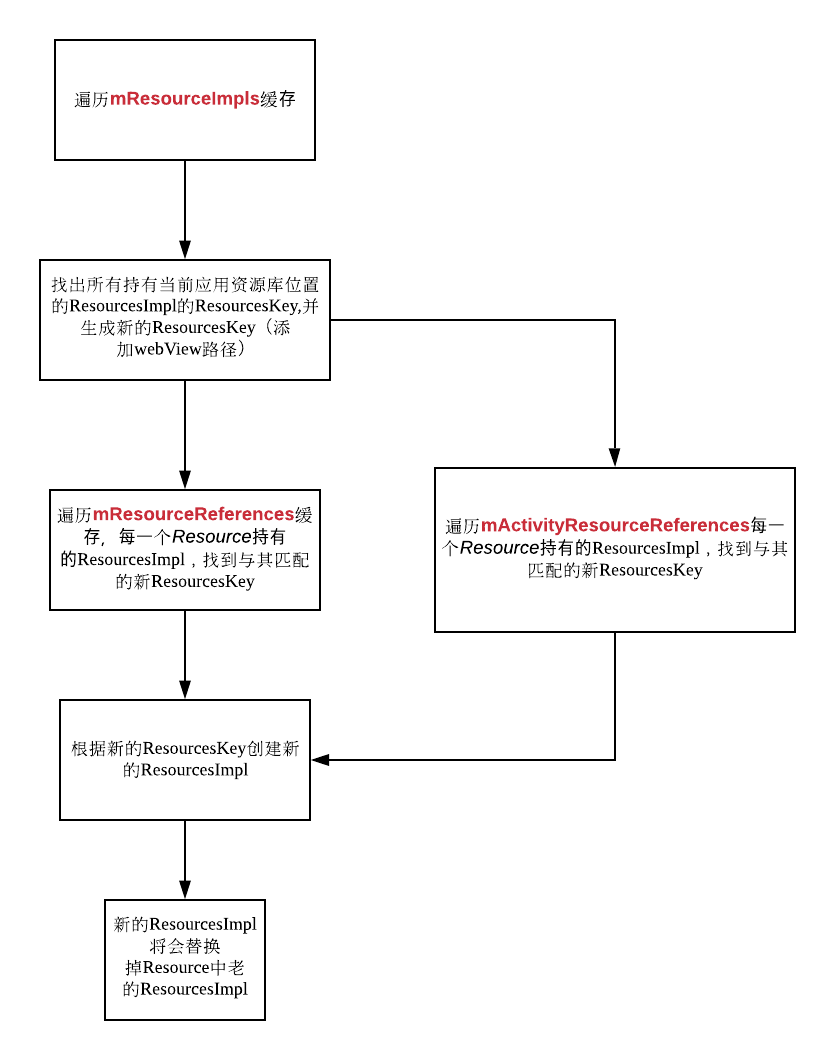
WebViewе°ұжҳҜйҖҡиҝҮиҝҷз§Қж–№ејҸпјҢеңЁActivityзҡ„ResourceдёӯеҠ е…ҘдәҶWebViewзҡ„иө„жәҗгҖӮ
жңҖз»Ҳи§ЈеҶіж–№жЎҲ
иҝҷж ·е…¶е®һжҲ‘们е°ұе·Із»ҸеҲҶжһҗеҮәеңЁ7.0д»ҘдёҠзҡ„жңәеҷЁдёӯй•ҝжҢүWebView еӣ дёәиө„жәҗзјәеӨұеҜјиҮҙеҙ©жәғзҡ„еҺҹеӣ дәҶгҖӮ
жҲ‘们еңЁиө„жәҗжӣҝжҚўж–№жЎҲдёӯе°ҶContextзҡ„ResourceжӣҝжҚўжҲҗдәҶжҲ‘们зҡ„ProxyResourcesпјҢиҖҢProxyResourcesе…¶е®һ并没жңүиў«ResourcesManagerз®ЎзҗҶпјҢд№ҹе°ұжҳҜиҜҙwebViewиө„жәҗжіЁе…Ҙзҡ„ж—¶еҖҷ жҲ‘们зҡ„ProxyResources并没жңүиў«жӣҙж–°гҖӮ
дәҶи§ЈдәҶе…ЁйғЁеҺҹзҗҶд№ӢеҗҺ и§ЈеҶіж–№жі•дёҖзӣ®дәҶ然гҖӮ
и§ҒеҰӮдёӢд»Јз Ғпјҡ
// step 4 е°Ҷд»ЈзҗҶзҡ„ResourcesеҗҲ并еҲ°ResourcesManagerдёӯз»ҹдёҖз®ЎжҺ§ еӣ дёәжҲ‘们зҡ„ProxyResourcessзҡ„ResPathжҳҜеә”з”Ёзҡ„pathпјҢжүҖд»ҘwebViewиө„жәҗжіЁе…Ҙзҡ„ж—¶еҖҷе°ұдјҡеҗҢжӯҘеҲ°иҝҷдёӘResйҮҢйқў if (Build.VERSION.SDK_INT >= Build.VERSION_CODES.N) { synchronized (ResourcesManager.getInstance()) { //дёҚз”ЁжӢ…еҝғеңЁlistдёӯдёҚж–ӯзҡ„ж·»еҠ дјҡйҖ жҲҗж•°йҮҸжҡҙеўһпјҢеӣ дёәж·»еҠ зҡ„жҳҜејұеј•з”ЁпјҢеҰӮжһңйЎөйқўиў«е…ій—ӯпјҢдјҡиҮӘеҠЁеӣһ收 ArrayList<WeakReference<Resources>> list = Reflector.with(ResourcesManager.getInstance()).field("mResourceReferences").get(); list.add(new WeakReference<Resources>(textRepairProxyResourcess)); } }иҮіжӯӨпјҢwebViewеҙ©жәғй—®йўҳи§ЈеҶігҖӮ
дёәд»Җд№ҲиҰҒеңЁattachBaseContextдёӯиҝӣиЎҢеҸҚе°„жӣҝжҚўResourceпјҹ
еӣһзӯ”пјҡ
дёҚз®ЎжӣҝжҚўзҡ„жҳҜApplicationиҝҳжҳҜActivityзҡ„mResources дёҖе®ҡжҳҜеңЁattachBaseContextйҮҢйқўеҜ№baseContextиҝӣиЎҢHookпјҢзӣҙжҺҘе°ҶActivityжҲ–иҖ…Applicationжң¬иә«иҝӣиЎҢhookжҳҜдёҚжҲҗеҠҹзҡ„ еӣ дёәActivityжҲ–иҖ…Applicationжң¬иә«е№¶дёҚжҳҜContextпјҢд»–еҸӘжҳҜдёҖдёӘContextWapperгҖӮиҖҢContextWapperдёӯзңҹжӯЈзҡ„Contextе…¶е®һе°ұжҳҜеңЁattachBaseContextж—¶иөӢеҖјзҡ„гҖӮ
既然已з»ҸжӣҝжҚўдәҶActivityе’ҢApplicationзҡ„ResourceпјҢдёәд»Җд№ҲиҝҳиҰҒдҪҝз”ЁfactoryеӨ„зҗҶlayoutеҲқе§ӢеҢ–пјҢйҡҫйҒ“layoutеҲқе§ӢеҢ–дёҚжҳҜдҪҝз”ЁActivityдёӯзҡ„Resourceеҗ—пјҹ
еӣһзӯ”пјҡ
жҲ‘们еҜ№ActivityжҲ–иҖ…Applicationзҡ„mResourcesиҝӣиЎҢдәҶжӣҝжҚўпјҢдҪҶжҳҜеҰӮжһңдёҚе®һзҺ°жөҒзЁӢ5дёӯзҡ„ActivtyLifecycleCallbacksпјҢйӮЈд№ҲXMLдёӯзј–еҶҷзҡ„textж— жі•е®һзҺ°жӣҝжҚўпјҢеҺҹеӣ еңЁдәҺViewдҪҝз”ЁTypedArrayеңЁиҝӣиЎҢиөӢеҖјзҡ„ж—¶еҖҷпјҢ并дёҚжҳҜзӣҙжҺҘдҪҝз”ЁmResources,иҖҢжҳҜзӣҙжҺҘдҪҝз”ЁmResourcesImplпјҢжүҖд»ҘзӣҙжҺҘhookeдәҶmResourcesиҝҳжҳҜжІЎз”ЁпјҢе…¶е®һmResourcesзҡ„getTextж–№жі•д№ҹжҳҜи°ғз”ЁmResourcesдёӯзҡ„mResourcesImplзҡ„ж–№жі•гҖӮ
еҜ№дәҺе·Із»ҸдҪҝз”ЁдәҶжҚўиӮӨжЁЎејҸзҡ„app(жҜ”еҰӮиҜҙжөҸи§ҲеҷЁ)еҰӮдҪ•еҒҡStringеңЁзәҝжӣҙж–°пјҹ
еӣһзӯ”пјҡ
еҸӘйңҖиҰҒдҝ®ж”№еҺҹжңүжҚўиӮӨжЁЎејҸдҪҝз”Ёзҡ„SkinProxyResourceпјҢ并getTextпјҢgetStringзӯүж–№жі•д»ЈзҗҶеҲ°еңЁзәҝжӣҙж–°зҡ„TextProxyResourcesдёҠеҚіеҸҜгҖӮ
дёҠиҝ°еҶ…е®№е°ұжҳҜAndroidдёӯжҖҺд№Ҳе®һзҺ°еӨҡиҜӯиЁҖеҠЁжҖҒжӣҙж–°пјҢдҪ 们еӯҰеҲ°зҹҘиҜҶжҲ–жҠҖиғҪдәҶеҗ—пјҹеҰӮжһңиҝҳжғіеӯҰеҲ°жӣҙеӨҡжҠҖиғҪжҲ–иҖ…дё°еҜҢиҮӘе·ұзҡ„зҹҘиҜҶеӮЁеӨҮпјҢж¬ўиҝҺе…іжіЁдәҝйҖҹдә‘иЎҢдёҡиө„и®Ҝйў‘йҒ“гҖӮ
е…ҚиҙЈеЈ°жҳҺпјҡжң¬з«ҷеҸ‘еёғзҡ„еҶ…е®№пјҲеӣҫзүҮгҖҒи§Ҷйў‘е’Ңж–Үеӯ—пјүд»ҘеҺҹеҲӣгҖҒиҪ¬иҪҪе’ҢеҲҶдә«дёәдё»пјҢж–Үз« и§ӮзӮ№дёҚд»ЈиЎЁжң¬зҪ‘з«ҷз«ӢеңәпјҢеҰӮжһңж¶үеҸҠдҫөжқғиҜ·иҒ”зі»з«ҷй•ҝйӮ®з®ұпјҡis@yisu.comиҝӣиЎҢдёҫжҠҘпјҢ并жҸҗдҫӣзӣёе…іиҜҒжҚ®пјҢдёҖз»ҸжҹҘе®һпјҢе°Ҷз«ӢеҲ»еҲ йҷӨж¶үе«ҢдҫөжқғеҶ…е®№гҖӮ

дәҝйҖҹдә‘е…¬дј—еҸ·

жүӢжңәзҪ‘з«ҷдәҢз»ҙз Ғ


