本文小编为大家详细介绍“jQuery插件ImgAreaSelect怎么实现头像上传预览和裁剪功能”,内容详细,步骤清晰,细节处理妥当,希望这篇“jQuery插件ImgAreaSelect怎么实现头像上传预览和裁剪功能”文章能帮助大家解决疑惑,下面跟着小编的思路慢慢深入,一起来学习新知识吧。
首先,要知道我们应该实现什么功能?
(1)图片能够实现上传预览功能
(2)拖拽裁剪图片,使其能够显示裁剪后的区域
(3)显示要裁剪区域的坐标
其次,该如何引用该插件呢?
那就具体看一下吧!
第一步:先将样式和文件包引入(根据你自己的位置引入)
<!--引入imgareaselect的css样式--> <link rel="stylesheet" type="text/css" href="../jquery.imgareaselect-0.9.10/css/imgareaselect-default.css" rel="external nofollow" rel="external nofollow" /> <!--引入jquery包--> <script type="text/javascript" src="../jquery-1.11.2.min.js"></script> <!--引入imgareaselect的js文件--> <script type="text/javascript" src="../jquery.imgareaselect-0.9.10/scripts/jquery.imgareaselect.pack.js"></script>
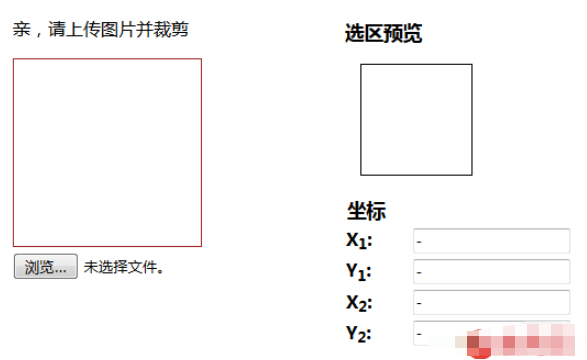
第二步:先用div布局样式,如下图所示
<body> <div > <p>亲,请上传图片并裁剪</p> <div > <!--原图--> <img id="uploadPreview"/> <input id="uploadImage" type="file" name="photoimage" class="fimg1" onchange="PreviewImage();" /> <!--//对这个按钮加一个事件--> </div> </div> <div > <p > 选区预览 </p> <div > <div id="preview" > <!--裁剪后的图片--> <img id="tp" > </div> </div> <!--做一个表格用来放选取图片的坐标--> <table > <thead> <tr> <th colspan="2" > 坐标</th> </tr> </thead> <tbody> <tr> <td ><b>X<sub>1</sub>:</b></td> <td ><input type="text" id="x1" value="-" /></td> </tr> <tr> <td><b>Y<sub>1</sub>:</b></td> <td><input type="text" id="y1" value="-" /></td> </tr> <tr> <td><b>X<sub>2</sub>:</b></td> <td><input type="text" id="x2" value="-" /></td> </tr> <tr> <td><b>Y<sub>2</sub>:</b></td> <td><input type="text" id="y2" value="-" /></td> </tr> </tbody> </table> </div> </div> </body>
css样式:
<style> #uploadPreview { width: 170px; height: 170px; background-position: center center; background-size: cover; border: 1px solid brown; -webkit-box-shadow: 0 0 0px 0px rgba(0, 0, 0, 0); display: inline-block; } </style>第三步:实现图片的上传预览效果
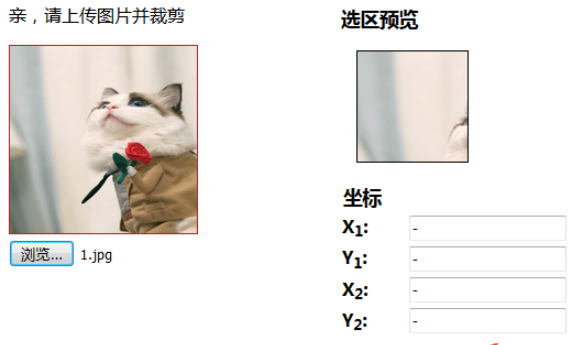
思路:通过input 将图片的 src传给第一个img,然后再将第一个img的src传给第二个img的src
<script> //通过input将图片路径传给第一个img $("#uploadImage").on("change", function(){ // 得到一个参考文件列表 var files = !!this.files ? this.files : []; // 如果没有选择任何文件,或者没有文件读到就返回 if (!files.length || !window.FileReader) return; // 只有进行选择的文件是一个形象 if (/^image/.test( files[0].type)){ // 创建一个新的FileReader的实例 var reader = new FileReader(); // 读取本地文件作为一个DataURL reader.readAsDataURL(files[0]); // 当加载时,图像数据设置为背景的div reader.onloadend = function(){ //给第一个img添加路径 $("#uploadPreview").attr("src",this.result); //给第二个img添加路径 $("#tp").attr("src",this.result); //开启裁剪功能 $('#uploadPreview ').imgAreaSelect( {handles:true, fadeSpeed:200, onSelectEnd : preview}); } } }); </script>这样,就能够实现如下效果:
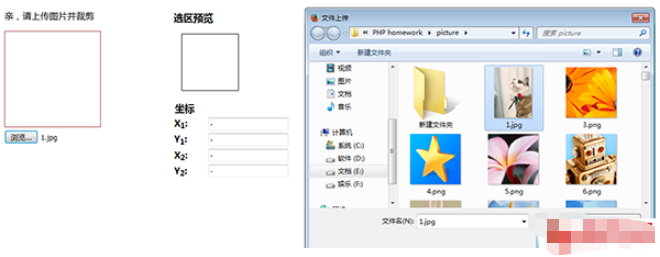
点击选择 :
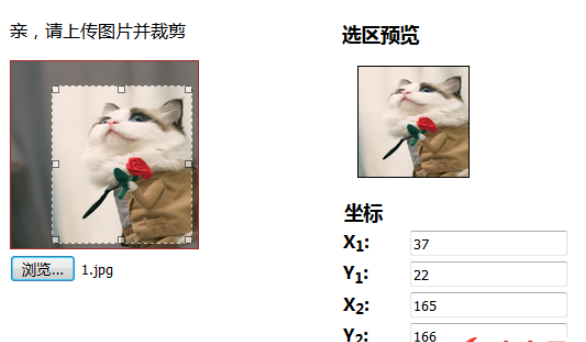
第四步:实现区域选择功能
<script> function preview(img, selection) { if(!selection.width || !selection.height) //判断选取区域不为空 return; //分别取高宽比率 var scaleX = 100 / selection.width; var scaleY = 100 / selection.height; var img = new Image(); //传路径 img.src = document.getElementById('uploadPreview').src; //给裁剪的图片定义高和宽 $('#preview img').css( { width : Math.round(scaleX * 170), //170为第一个img的宽,不然截取的图片会有所缺失,可以自己试试 height: Math.round(scaleY * 170), //170为第一个img的高 marginLeft: -Math.round(scaleX * selection.x1), marginTop: -Math.round(scaleY * selection.y1) }); //显示坐标 $('#x1').val(selection.x1); $('#y1').val(selection.y1); $('#x2').val(selection.x2); $('#y2').val(selection.y2); } </script>这样就可以实现如下效果啦~~~
到这一步就可以实现头像的上传以及裁剪功能了,当然后期还要将路径添加到数据库就更完美了~~~~
(------------------------------------------------------------------------此处应有分割线----------------------------------------------------------------------)
如果你只想实现简单的图片裁剪功能,那么可以看看下面代码,此处不做注释了~~~
当然,如果上边的代码看不太明白,也可以参照下面的这个进行修改,将图片上传预览功能添加上即可哈~~~~
效果图:(对比图片就可以知道,下面这个就只是少了浏览功能,其他完全一样)
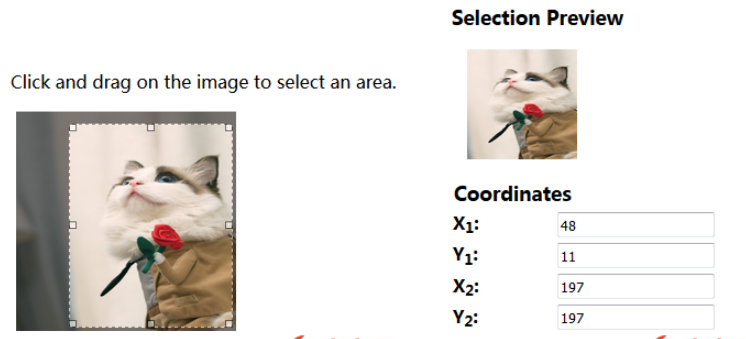
<!DOCTYPE html> <html> <head> <meta charset="UTF-8"> <title></title> <!--在HTML头部加入:--> <link rel="stylesheet" type="text/css" href="../jquery.imgareaselect-0.9.10/css/imgareaselect-default.css" rel="external nofollow" rel="external nofollow" /> <script type="text/javascript" src="../jquery-1.11.2.min.js"></script> <script type="text/javascript" src="../jquery.imgareaselect-0.9.10/scripts/jquery.imgareaselect.pack.js"></script> <script type="text/javascript"> $(document).ready(function() { $('#photo').imgAreaSelect( {handles:true, fadeSpeed:200, onSelectEnd : preview}); }); // 如果加上aspectRatio: '1:1',$('#photo').imgAreaSelect( {aspectRatio: '1:1',handles:true, fadeSpeed:200, onSelectEnd : preview});则选取区域固定为正方形。 function preview(img, selection) { //等同于var scaleX = 100 / (selection.width || 1) //先对||前面的进行布尔运算,如果结果是true(即width存在且不是0),就使用width,否则使用||后的变量1 //也就是先检查 selection.width 有没有值,有的话就用 100 / 该值再付给 scaleX,没的话就用 100 / 1 来赋值; if(!selection.width || !selection.height) return; var scaleX = 100 / selection.width; var scaleY = 100 / selection.height; //设置裁剪后图片的宽高 $('#preview img').css( { width : Math.round(scaleX * 200), height: Math.round(scaleY * 200), marginLeft: -Math.round(scaleX * selection.x1), marginTop: -Math.round(scaleY * selection.y1) }); $('#x1').val(selection.x1); $('#y1').val(selection.y1); $('#x2').val(selection.x2); $('#y2').val(selection.y2); $('w').val(selection.width); $('h').val(selection.height); } </script> </head> <body> <div> <!--选取的图片--> <div > <p> Click and drag on the image to select an area. </p> <div > <img id="photo" src="./images/1.jpg" /> </div> </div> <!--截取的图片--> <div > <p > Selection Preview </p> <div > <div id="preview" > <img src="./images/1.jpg" > </div> </div> <table > <thead> <tr> <th colspan="2" > Coordinates</th> </tr> </thead> <tbody> <tr> <td ><b>X<sub>1</sub>:</b></td> <td ><input type="text" id="x1" value="-" /></td> </tr> <tr> <td><b>Y<sub>1</sub>:</b></td> <td><input type="text" id="y1" value="-" /></td> </tr> <tr> <td><b>X<sub>2</sub>:</b></td> <td><input type="text" id="x2" value="-" /></td> </tr> <tr> <td><b>Y<sub>2</sub>:</b></td> <td><input type="text" id="y2" value="-" /></td> </tr> </tbody> </table> </div> </div> </body> </html>读到这里,这篇“jQuery插件ImgAreaSelect怎么实现头像上传预览和裁剪功能”文章已经介绍完毕,想要掌握这篇文章的知识点还需要大家自己动手实践使用过才能领会,如果想了解更多相关内容的文章,欢迎关注亿速云行业资讯频道。
免责声明:本站发布的内容(图片、视频和文字)以原创、转载和分享为主,文章观点不代表本网站立场,如果涉及侵权请联系站长邮箱:is@yisu.com进行举报,并提供相关证据,一经查实,将立刻删除涉嫌侵权内容。


