这篇文章主要介绍“Linux下的进程虚拟内存结构是什么”,在日常操作中,相信很多人在Linux下的进程虚拟内存结构是什么问题上存在疑惑,小编查阅了各式资料,整理出简单好用的操作方法,希望对大家解答”Linux下的进程虚拟内存结构是什么”的疑惑有所帮助!接下来,请跟着小编一起来学习吧!
PostgreSQL使用进程架构,每个连接对应一个后台进程,为了更好的理解这种架构,有必要深入理解进程的相关知识
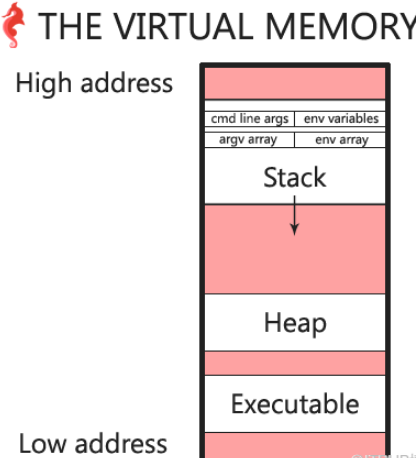
进程虚拟内存的详细结构如下图所示:
C样例程序如下:
#include <stdlib.h> #include <stdio.h> #include <string.h> /** * f - print locations of various elements * * Returns: nothing */ void f(void)//子函数 { int a; int b; int c; a = 98; b = 1024; c = a * b; printf("[f] a = %d, b = %d, c = a * b = %d\n", a, b, c); printf("[f] Adresses of a: %p, b = %p, c = %p\n", (void *)&a, (void *)&b, (void *)&c); } /** * main - print locations of various elements * * Return: EXIT_FAILURE if something failed. Otherwise EXIT_SUCCESS */ int main(int ac, char **av, char **env) { int a;//本地变量,位于栈中 void *p;//指针,在堆中分配内存 int i; int size; printf("Address of a: %p\n", (void *)&a); p = malloc(98);//在堆中分配内存 if (p == NULL) { fprintf(stderr, "Can't malloc\n"); return (EXIT_FAILURE); } printf("Allocated space in the heap: %p\n", p); printf("Address of function main: %p\n", (void *)main);//main函数所在的内存地址 printf("First bytes of the main function:\n\t"); for (i = 0; i < 15; i++) { printf("%02x ", ((unsigned char *)main)[i]);//首16个字节 } printf("\n"); printf("Address of the array of arguments: %p\n", (void *)av);//输入参数数组地址 printf("Addresses of the arguments:\n\t");// for (i = 0; i < ac; i++) { printf("[%s]:%p ", av[i], av[i]);//打印输入参数 } printf("\n"); printf("Address of the array of environment variables: %p\n", (void *)env);//环境变量地址 printf("Address of the first environment variables:\n");//环境变量信息 for (i = 0; i < 3; i++) { printf("\t[%p]:\"%s\"\n", env[i], env[i]); } /* size of the env array */ i = 0; while (env[i] != NULL)//以NULL作为终结 { i++; } i++; /* the NULL pointer */ size = i * sizeof(char *); printf("Size of the array env: %d elements -> %d bytes (0x%x)\n", i, size, size);//计算环境变量数组大小 f();//调用函数 getchar();//接受输入,进程不退出 return (EXIT_SUCCESS); }编译并执行
[root@localhost hacker]# gcc -Wall -Wextra -Werror main-7.c -o 7 [root@localhost hacker]# ./7 Hello Hacker Jack! Address of a: 0x7fff5b327bb8 --> 位于栈中 Allocated space in the heap: 0x9b6010 --> 位于堆中 Address of function main: 0x400729 --> 可执行文件 First bytes of the main function: 55 48 89 e5 48 83 ec 40 89 7d dc 48 89 75 d0 Address of the array of arguments: 0x7fff5b327cb8 -->参数数组地址 Addresses of the arguments: [./7]:0x7fff5b329808 [Hello]:0x7fff5b32980c [Hacker]:0x7fff5b329812 [Jack!]:0x7fff5b329819 --> 输入参数 Address of the array of environment variables: 0x7fff5b327ce0 --> 环境变量数组 Address of the first environment variables: [0x7fff5b32981f]:"XDG_SESSION_ID=1" [0x7fff5b329830]:"HOSTNAME=localhost.localdomain" [0x7fff5b32984f]:"SELINUX_ROLE_REQUESTED=" Size of the array env: 27 elements -> 216 bytes (0xd8) [f] a = 98, b = 1024, c = a * b = 100352 [f] Adresses of a: 0x7fff5b327b7c, b = 0x7fff5b327b78, c = 0x7fff5b327b74 --> 函数f中的变量地址
通过udis86可反编译,得到汇编代码
[root@localhost install]# echo "55 48 89 e5 48 83 ec 10 48 8d 45 f0 48 89 c6" | udcli -64 -x -o 400729 0000000000400729 55 push rbp 000000000040072a 4889e5 mov rbp, rsp 000000000040072d 4883ec10 sub rsp, 0x10 0000000000400731 488d45f0 lea rax, [rbp-0x10] 0000000000400735 4889c6 mov rsi, rax [root@localhost install]#
查看该进程的内存映射信息
[root@localhost install]# ps aux | grep "./7" | grep -v grep root 6471 0.0 0.0 4348 348 pts/0 S+ 15:24 0:00 ./7 Hello Hacker Jack! [root@localhost install]# cat /proc/6471/maps 00400000-00401000 r-xp 00000000 fd:00 134287606 /data/source/hacker/7 00600000-00601000 r--p 00000000 fd:00 134287606 /data/source/hacker/7 00601000-00602000 rw-p 00001000 fd:00 134287606 /data/source/hacker/7 009b6000-009d7000 rw-p 00000000 00:00 0 [heap] 7f95b5d16000-7f95b5ed8000 r-xp 00000000 fd:00 151914 /usr/lib64/libc-2.17.so 7f95b5ed8000-7f95b60d8000 ---p 001c2000 fd:00 151914 /usr/lib64/libc-2.17.so 7f95b60d8000-7f95b60dc000 r--p 001c2000 fd:00 151914 /usr/lib64/libc-2.17.so 7f95b60dc000-7f95b60de000 rw-p 001c6000 fd:00 151914 /usr/lib64/libc-2.17.so 7f95b60de000-7f95b60e3000 rw-p 00000000 00:00 0 7f95b60e3000-7f95b6105000 r-xp 00000000 fd:00 151907 /usr/lib64/ld-2.17.so 7f95b62f8000-7f95b62fb000 rw-p 00000000 00:00 0 7f95b6301000-7f95b6304000 rw-p 00000000 00:00 0 7f95b6304000-7f95b6305000 r--p 00021000 fd:00 151907 /usr/lib64/ld-2.17.so 7f95b6305000-7f95b6306000 rw-p 00022000 fd:00 151907 /usr/lib64/ld-2.17.so 7f95b6306000-7f95b6307000 rw-p 00000000 00:00 0 7fff5b309000-7fff5b32a000 rw-p 00000000 00:00 0 [stack] 7fff5b3f1000-7fff5b3f3000 r-xp 00000000 00:00 0 [vdso] ffffffffff600000-ffffffffff601000 r-xp 00000000 00:00 0 [vsyscall] [root@localhost install]#
到此,关于“Linux下的进程虚拟内存结构是什么”的学习就结束了,希望能够解决大家的疑惑。理论与实践的搭配能更好的帮助大家学习,快去试试吧!若想继续学习更多相关知识,请继续关注亿速云网站,小编会继续努力为大家带来更多实用的文章!
免责声明:本站发布的内容(图片、视频和文字)以原创、转载和分享为主,文章观点不代表本网站立场,如果涉及侵权请联系站长邮箱:is@yisu.com进行举报,并提供相关证据,一经查实,将立刻删除涉嫌侵权内容。


