服务的三要素:安装-配置-启动
1.使用yum安装DNS yum install bind -y
2.修改配置文件
vi /etc/named.conf 修改以下内容: listen-on port 53 { any; }; allow-query { any; };vi /etc/named.rfc1912.zones 在末尾添加以下内容: zone "hello.com" IN { -----正向解析 type master; file "hello.com.zone"; }; zone "80.168.192.in-addr.arpa" IN { -----反向解析 type master; file "hello.com.local"; };wq --保存退出cd /var/named/cp -p named.localhost hello.com.zone ---复制模板创建一个正向解析文件跟你 file "hello.com.zone",文件名要一样;
vi hello.com.zone --- $TTL 1D @ IN SOA hello.com. 123213123.qq.com ( 1 ; serial 1D ; refresh 1H ; retry 1W ; expire 3H ) ; minimum NS dns.hello.com. dns IN A 192.168.80.100 www IN A 192.168.80.101 ftp IN A 192.168.80.102 创建一个反向解析 file "hello.com.local",文件名要一样;
vi hello.com.local $TTL 1D @ IN SOA hello.com. 12123123.qq.com ( 0 ; serial 1D ; refresh 1H ; retry 1W ; expire 3H ) ; minimum NS dns.hello.com. 100 IN PTR dns.hello.com. 101 IN PTR www.hello.com.检查主配置文件语法;
named-checkconf3.启动DNS服务systemctl start named
查看DNS服务是否启动成功 `netstat -anpt | grep named`
测试DNS服务 1.安装nslookup命令 `yum install bind-utils -y` 2.给网卡指定DNS `vi /etc/sysconfig/network-scripts/ifcfg-ens32 ` 在末尾添加以下内容: ``` DNS1=192.168.80.100 (根据实际情况添写DNS地址) wq ---保存退出 systemc restart network ---重新启动网卡服务 3.使用nslookup测试正向解析和反向解析 正向解析就是根据网址解析出ip地址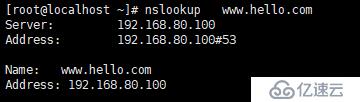
反向解析就是根据ip地址解析出网址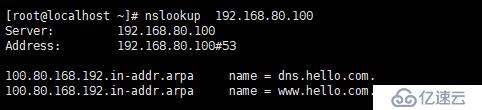
免责声明:本站发布的内容(图片、视频和文字)以原创、转载和分享为主,文章观点不代表本网站立场,如果涉及侵权请联系站长邮箱:is@yisu.com进行举报,并提供相关证据,一经查实,将立刻删除涉嫌侵权内容。


