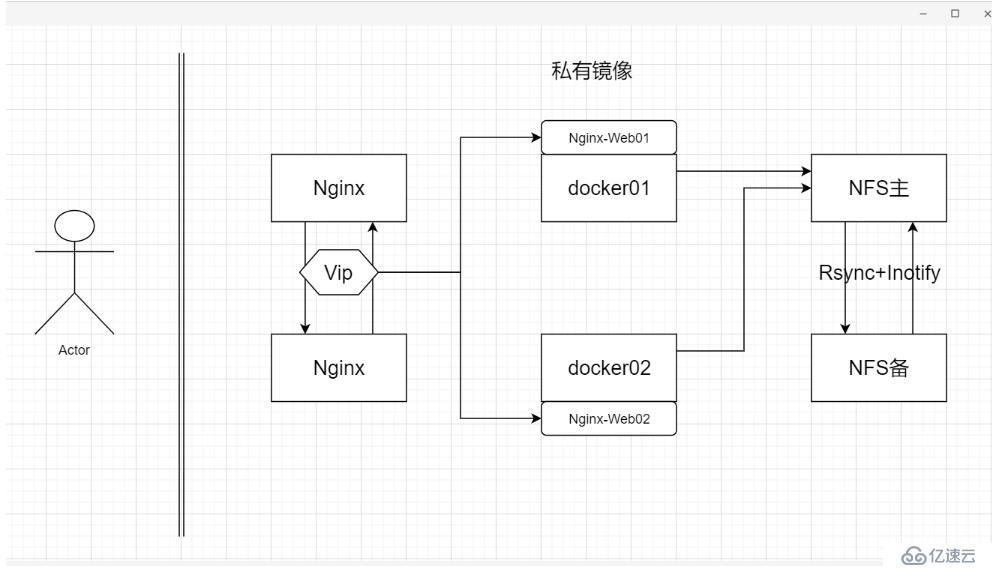
nginx1 192.168.1.10
nginx2 192.168.1.20
docker01 192.168.1.30
docker02 192.168.1.40
nfs主 192.168.1.50
nfs备 192.168.1.60
[root@nfs01 ~]# yum -y install nfs-utils [root@nfs01 ~]# cd /datashare/ [root@nfs01 datashare]# vim /etc/exports 添加: /datashare *(rw,sync,no_root_squash)启动:
[root@nfs01 datashare]# systemctl start rpcbind [root@nfs01 datashare]# systemctl enable rpcbind [root@nfs01 datashare]# systemctl start nfs-server [root@nfs01 datashare]# systemctl enable nfs-server导入镜像:
[root@docker01 ~]# docker load < nginx.tar [root@docker01 ~]# mkdir /wwwroot [root@docker01 ~]# mkdir /docker [root@docker01 ~]# docker run -itd --name test nginx:latest [root@docker01 ~]# docker cp test:/etc/nginx /docker/ [root@docker01 ~]# docker cp test:/usr/share/nginx/html /wwwroot/[root@docker01 ~]# showmount -e 192.168.1.50 Export list for 192.168.1.50: /datashare * [root@docker01 ~]# mount 192.168.1.50:/datashare /wwwroot/html/ [root@docker01 ~]# docker run -itd --name nginx-web1 -v /docker/nginx:/etc/nginx -v /wwwroot/html:/usr/share/nginx/html -p 80:80 nginx:latest导入镜像:

[root@docker02 ~]# docker load < nginx.tar [root@docker02 ~]# mkdir /wwwroot [root@docker02 ~]# mkdir /docker [root@docker02 ~]# docker run -itd --name test nginx:latest [root@docker02 ~]# docker cp test:/etc/nginx /docker/ [root@docker02 ~]# docker cp test:/usr/share/nginx/html /wwwroot/[root@docker02 ~]# showmount -e 192.168.1.50 Export list for 192.168.1.50: /datashare * [root@docker02 ~]# mount 192.168.1.50:/datashare /wwwroot/html/ [root@docker02 ~]# docker run -itd --name nginx-web2 -v /docker/nginx:/etc/nginx -v /wwwroot/html:/usr/share/nginx/html -p 80:80 nginx:latest [root@docker01 ~]# cd /wwwroot/html/ [root@docker01 html]# cat index.html skx nginx [root@docker01 html]# curl 127.0.0.1 skx nginx [root@docker02 ~]# curl 127.0.0.1 skx nginx 验证成功[root@nginx01 ~]# yum -y install pcre-devel openssl-devel导入镜像:

[root@nginx01 ~]# tar zxf ngx_cache_purge-2.3.tar.gz [root@nginx01 ~]# unzip nginx-sticky-module.zip [root@nginx01 ~]# tar zxf nginx-1.14.0.tar.gz [root@nginx01 ~]# cd nginx-1.14.0/ [root@nginx01 nginx-1.14.0]# ./configure --prefix=/usr/local/nginx1.14 --user=www --group=www --with-http_stub_status_module --with-http_realip_module --with-http_ssl_module --with-http_gzip_static_module --http-client-body-temp-path=/var/tmp/nginx/client --http-proxy-temp-path=/var/tmp/nginx/proxy --http-fastcgi-temp-path=/var/tmp/nginx/fcgi --with-pcre --with-http_flv_module --add-module=../nginx-sticky-module --add-module=../ngx_cache_purge-2.3 && make && make install [root@nginx01 nginx-1.14.0]# ln -s /usr/local/nginx1.14/sbin/nginx /usr/local/sbin/ [root@nginx01 nginx-1.14.0]# useradd www -s /sbin/nologin -M [root@nginx01 nginx-1.14.0]# mkdir -p /var/tmp/nginx/client [root@nginx01 nginx-1.14.0]# nginx [root@nginx01 nginx-1.14.0]# netstat -anpt | grep 80 tcp 0 0 0.0.0.0:80 0.0.0.0:* LISTEN 7711/nginx: master 
[root@nginx02 ~]# tar zxf ngx_cache_purge-2.3.tar.gz [root@nginx02 ~]# unzip nginx-sticky-module.zip [root@nginx02 ~]# tar zxf nginx-1.14.0.tar.gz [root@nginx02 ~]# yum -y install pcre-devel openssl-devel [root@nginx02 ~]# cd nginx-1.14.0/ [root@nginx02 nginx-1.14.0]# ./configure --prefix=/usr/local/nginx1.14 --user=www --group=www --with-http_stub_status_module --with-http_realip_module --with-http_ssl_module --with-http_gzip_static_module --http-client-body-temp-path=/var/tmp/nginx/client --http-proxy-temp-path=/var/tmp/nginx/proxy --http-fastcgi-temp-path=/var/tmp/nginx/fcgi --with-pcre --with-http_flv_module --add-module=../nginx-sticky-module --add-module=../ngx_cache_purge-2.3 && make && make install [root@nginx02 nginx-1.14.0]# ln -s /usr/local/nginx1.14/sbin/nginx /usr/local/sbin/ [root@nginx02 nginx-1.14.0]# useradd www -s /sbin/nologin -M [root@nginx02 nginx-1.14.0]# mkdir -p /var/tmp/nginx/client [root@nginx02 nginx-1.14.0]# nginx [root@nginx02 nginx-1.14.0]# netstat -anpt | grep 80 tcp 0 0 0.0.0.0:80 0.0.0.0:* LISTEN 7355/nginx: master 
[root@nginx01 ~]# tar -zxvf keepalived-1.2.13.tar.gz [root@nginx01 ~]# cd keepalived-1.2.13/ [root@nginx01 keepalived-1.2.13]# ./configure --prefix=/ [root@nginx01 keepalived-1.2.13]# make && make install[root@nginx01 keepalived-1.2.13]# vim /etc/keepalived/keepalived.conf 3行: global_defs { router_id LVS_DEVEL_1 } 14行: interface ens33 22行: virtual_ipaddress { 192.168.1.254 } 
[root@nginx01 ~]# tar -zxvf keepalived-1.2.13.tar.gz
[root@nginx01 ~]# cd keepalived-1.2.13/
[root@nginx01 keepalived-1.2.13]# ./configure --prefix=/
[root@nginx01 keepalived-1.2.13]# make && make install
[root@nginx02 keepalived-1.2.13]# vim /etc/keepalived/keepalived.conf
3行:
global_defs {
router_id LVS_DEVEL_2
}
14行:
interface ens33
22行:
virtual_ipaddress {
192.168.1.254
}
docker01和docker02启动服务: [root@nginx02 keepalived-1.2.13]# /etc/init.d/keepalived start
Reloading systemd: [ OK ]
Starting keepalived (via systemctl): [ OK ]
访问:  #### docker01和docker02做反向代理: #### docker01: [root@nginx01 ~]# vim /usr/local/nginx1.14/conf/nginx.conf
21行添加:
upstream backend {
ip_hash;
server 192.168.1.30:80 weight=1 max_fails=2 fail_timeout=10s;
server 192.168.1.40:80 weight=1 max_fails=2 fail_timeout=10s;
}
49行添加:
proxy_pass http://backend;
重启服务: [root@nginx01 ~]# nginx -t
nginx: the configuration file /usr/local/nginx1.14/conf/nginx.conf syntax is ok
nginx: configuration file /usr/local/nginx1.14/conf/nginx.conf test is successful
[root@nginx01 ~]# nginx -s reload
#### docker02: 33行添加:
upstream backend {
ip_hash;
server 192.168.1.30:80 weight=1 max_fails=2 fail_timeout=10s;
server 192.168.1.40:80 weight=1 max_fails=2 fail_timeout=10s;
}
50行添加:
proxy_pass http://backend;
重启服务: [root@nginx01 ~]# nginx -t
nginx: the configuration file /usr/local/nginx1.14/conf/nginx.conf syntax is ok
nginx: configuration file /usr/local/nginx1.14/conf/nginx.conf test is successful
[root@nginx01 ~]# nginx -s reload
浏览器用漂流地址访问 #### 做NFS的Rsync+Inotify #### nfs01: [root@nfs01 ~]# tar zxf inotify-tools-3.14.tar.gz
[root@nfs01 ~]# cd inotify-tools-3.14/
[root@nfs01 inotify-tools-3.14]# ./configure && make && make install
[root@nfs01 inotify-tools-3.14]# vim /etc/rsyncd.conf
最后一行添加:
gid = nobody
use chroot = yes
address = 192.168.1.50
port 873
log file = /var/log/rsyncd.log
pid file = /var/run/rsyncd.pid
hosts allow = 192.168.1.0/24
[wwwroot]
path = /datashare
read only = no
dont compress = .gz .tgz .zip .z .Z .rpm .deb .bz2
#### 编写脚本来实现实时同步: [root@nfs01 ~]# vim /inotify_sync.sh
#!/bin/bash
inotify_cmd="inotifywait -mrq -e modify,create,attrib,move,delete /datashare"
rsync_cmd="rsync -azH /datashare/* 192.168.2.40::wwwroot"
$inotify_cmd | while read DIRECTORY EVENT FILE
do
$rsync_cmd
done
[root@nfs01 ~]# chmod +x /inotify_sync.sh
启动服务:
[root@nfs01 ~]# rsync --daemon
#### nfs02: [root@nfs02 ~]# yum -y install rsync
[root@nfs02 ~]# vim /etc/rsyncd.conf
uid = nobody
gid = nobody
use chroot = yes
address = 192.168.1.60
port 873
log file = /var/log/rsyncd.log
pid file = /var/run/rsyncd.pid
hosts allow = 192.168.1.0/24
[wwwroot]
path = /datashare
read only = no
dont compress = .gz .tgz .zip .z .Z .rpm .deb .bz2
[root@nfs02 ~]# mkdir /datashare
#### nfs01: [root@nfs01 ~]# sh /inotify_sync.sh
nfs02:
#### 验证: [root@nfs02 ~]# cat /datashare/
免责声明:本站发布的内容(图片、视频和文字)以原创、转载和分享为主,文章观点不代表本网站立场,如果涉及侵权请联系站长邮箱:is@yisu.com进行举报,并提供相关证据,一经查实,将立刻删除涉嫌侵权内容。


