这篇文章主要介绍Android如何实现自定义可拖拽的悬浮按钮DragFloatingActionButton,文中介绍的非常详细,具有一定的参考价值,感兴趣的小伙伴们一定要看完!
悬浮按钮FloatingActionButton是Android 5.0系统添加的新控件,FloatingActionButton是继承至ImageView,所以FloatingActionButton拥有ImageView的所有属性。本文讲解的是一个实现了可拖拽的悬浮按钮,并为此添加了类似于qq的吸附边框的功能。在此之前,先了解下其简单的使用方式吧:
首先你得添加其依赖
compile 'com.android.support:design:25.3.1'
然后在布局文件中使用。
<android.support.design.widget.FloatingActionButton android:layout_width="wrap_content" android:layout_height="wrap_content" android:layout_gravity="right|bottom" android:src="@drawable/ic_launcher" />
如图:
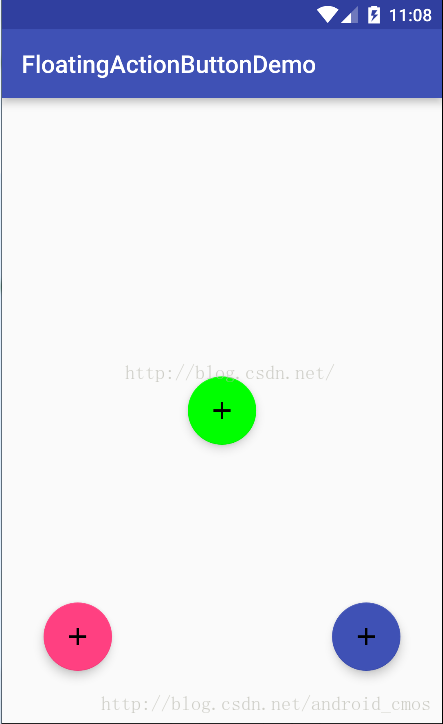
FloatingActionButton正常显示的情况下有个填充的颜色,有个阴影;点击的时候会有一个rippleColor,并且阴影的范围可以增大。其中:
1、填充的颜色默认使用就是style当中的colorAccent。
2、rippleColor默认取的是Theme当中的colorControlHighlight。
3、elevation和pressedTranslationZ,前者用户设置正常显示的阴影大小;后者是点击时显示的阴影大小。
好了,现在介绍本文的重点:可拖拽的,有吸附功能的悬浮按钮
先上代码。
import android.animation.ObjectAnimator; import android.content.Context; import android.support.design.widget.FloatingActionButton; import android.util.AttributeSet; import android.util.Log; import android.view.MotionEvent; import android.view.animation.DecelerateInterpolator; public class DragFloatActionButton extends FloatingActionButton { private int screenWidth; private int screenHeight; private int screenWidthHalf; private int statusHeight; private int virtualHeight; public DragFloatActionButton(Context context) { super(context); init(); } public DragFloatActionButton(Context context, AttributeSet attrs) { super(context, attrs); init(); } public DragFloatActionButton(Context context, AttributeSet attrs, int defStyleAttr) { super(context, attrs, defStyleAttr); init(); } private void init() { screenWidth = ScreenUtils.getScreenWidth(getContext()); screenWidthHalf = screenWidth / 2; screenHeight = ScreenUtils.getScreenHeight(getContext()); statusHeight = ScreenUtils.getStatusHeight(getContext()); virtualHeight=ScreenUtils.getVirtualBarHeigh(getContext()); } private int lastX; private int lastY; private boolean isDrag; @Override public boolean onTouchEvent(MotionEvent event) { int rawX = (int) event.getRawX(); int rawY = (int) event.getRawY(); switch (event.getAction() & MotionEvent.ACTION_MASK) { case MotionEvent.ACTION_DOWN: isDrag = false; getParent().requestDisallowInterceptTouchEvent(true); lastX = rawX; lastY = rawY; Log.e("down---->", "getX=" + getX() + ";screenWidthHalf=" + screenWidthHalf); break; case MotionEvent.ACTION_MOVE: isDrag = true; //计算手指移动了多少 int dx = rawX - lastX; int dy = rawY - lastY; //这里修复一些手机无法触发点击事件的问题 int distance= (int) Math.sqrt(dx*dx+dy*dy); Log.e("distance---->",distance+""); if(distance<3){//给个容错范围,不然有部分手机还是无法点击 isDrag=false; break; } float x = getX() + dx; float y = getY() + dy; //检测是否到达边缘 左上右下 x = x < 0 ? 0 : x > screenWidth - getWidth() ? screenWidth - getWidth() : x; // y = y < statusHeight ? statusHeight : (y + getHeight() >= screenHeight ? screenHeight - getHeight() : y); if (y<0){ y=0; } if (y>screenHeight-statusHeight-getHeight()){ y=screenHeight-statusHeight-getHeight(); } setX(x); setY(y); lastX = rawX; lastY = rawY; Log.e("move---->", "getX=" + getX() + ";screenWidthHalf=" + screenWidthHalf + " " + isDrag+" statusHeight="+statusHeight+ " virtualHeight"+virtualHeight+ " screenHeight"+ screenHeight+" getHeight="+getHeight()+" y"+y); break; case MotionEvent.ACTION_UP: if (isDrag) { //恢复按压效果 setPressed(false); Log.e("ACTION_UP---->", "getX=" + getX() + ";screenWidthHalf=" + screenWidthHalf); if (rawX >= screenWidthHalf) { animate().setInterpolator(new DecelerateInterpolator()) .setDuration(500) .xBy(screenWidth - getWidth() - getX()) .start(); } else { ObjectAnimator oa = ObjectAnimator.ofFloat(this, "x", getX(), 0); oa.setInterpolator(new DecelerateInterpolator()); oa.setDuration(500); oa.start(); } } Log.e("up---->",isDrag+""); break; } //如果是拖拽则消耗事件,否则正常传递即可。 return isDrag || super.onTouchEvent(event); } }ScreenUtils.Java
package com.example.cmos.retrofitdemo; import android.app.Activity; import android.content.Context; import android.graphics.Rect; import android.util.DisplayMetrics; import android.view.Display; import android.view.Window; import android.view.WindowManager; import java.lang.reflect.Method; /** * Created by gongwq on 2017/6/14 0014. */ public class ScreenUtils { private ScreenUtils() { /* cannot be instantiated */ throw new UnsupportedOperationException("cannot be instantiated"); } /** * 获得屏幕高度 * * @param context * @return */ public static int getScreenWidth(Context context) { WindowManager wm = (WindowManager) context .getSystemService(Context.WINDOW_SERVICE); DisplayMetrics outMetrics = new DisplayMetrics(); wm.getDefaultDisplay().getMetrics(outMetrics); return outMetrics.widthPixels; } /** * 获得屏幕宽度 * * @param context * @return */ public static int getScreenHeight(Context context) { WindowManager wm = (WindowManager) context .getSystemService(Context.WINDOW_SERVICE); DisplayMetrics outMetrics = new DisplayMetrics(); wm.getDefaultDisplay().getMetrics(outMetrics); return outMetrics.heightPixels; } /** * 获得状态栏的高度 * * @param context * @return */ public static int getStatusHeight(Context context) { int statusHeight = -1; try { Class<?> clazz = Class.forName("com.android.internal.R$dimen"); Object object = clazz.newInstance(); int height = Integer.parseInt(clazz.getField("status_bar_height") .get(object).toString()); statusHeight = context.getResources().getDimensionPixelSize(height); } catch (Exception e) { e.printStackTrace(); } return statusHeight; } /** * 获取虚拟功能键高度 */ public static int getVirtualBarHeigh(Context context) { int vh = 0; WindowManager windowManager = (WindowManager) context.getSystemService(Context.WINDOW_SERVICE); Display display = windowManager.getDefaultDisplay(); DisplayMetrics dm = new DisplayMetrics(); try { @SuppressWarnings("rawtypes") Class c = Class.forName("android.view.Display"); @SuppressWarnings("unchecked") Method method = c.getMethod("getRealMetrics", DisplayMetrics.class); method.invoke(display, dm); vh = dm.heightPixels - windowManager.getDefaultDisplay().getHeight(); } catch (Exception e) { e.printStackTrace(); } return vh; } public static int getVirtualBarHeigh(Activity activity) { int titleHeight = 0; Rect frame = new Rect(); activity.getWindow().getDecorView().getWindowVisibleDisplayFrame(frame); int statusHeight = frame.top; titleHeight = activity.getWindow().findViewById(Window.ID_ANDROID_CONTENT).getTop() - statusHeight; return titleHeight; } }上面的代码也很简单,相信看代码中的注释就可以看的明白了。但是这里还是讲下其实现原理:这个自定义的悬浮按钮,我们主要是重写了其onTouch事件,捕捉触摸事件,然后利用setX(),setY()方法将其移动。而吸附效果,主要是利用的属性动画,最后,不要忘了return 是否还在拖拽的结果,免得无法触发点击事件。
PS
最后贴一个弹出框。推荐用popmenu,相比于popwindow,这个会自动调整显示的位置,这在拖拽的悬浮按钮中很有用,因为如果用后者,你将按钮移到屏幕上方,而当你的弹出框也是设置在显示的悬浮按钮的上方,那么就有可能会遮挡弹出框的内容。
dragFloatActionButton= (DragFloatActionButton) findViewById(R.id.floatBtn); dragFloatActionButton.setOnClickListener(this); .... @Override public void onClick(View view) { switch (view.getId()) { case R.id.floatBtn: PopupMenu popupMenu=new PopupMenu(this,view); getMenuInflater().inflate(R.menu.pop_item,popupMenu.getMenu()); popupMenu.setOnMenuItemClickListener(new PopupMenu.OnMenuItemClickListener() { @Override public boolean onMenuItemClick(MenuItem menuItem) { switch (menuItem.getItemId()){ case R.id.action_last: Toast.makeText(TestActivity.this,""+menuItem.getItemId(),Toast.LENGTH_SHORT).show(); break; case R.id.action_next: Toast.makeText(TestActivity.this,""+menuItem.getItemId(),Toast.LENGTH_SHORT).show(); break; } return false; } }); popupMenu.show(); Log.e("****--->","float"); // Toast.makeText(this,"flaot---",Toast.LENGTH_SHORT).show(); break; } }新建menu文件夹,在里面添加pop_item.xml文件
<?xml version="1.0" encoding="utf-8"?> <menu xmlns:android="http://schemas.android.com/apk/res/android" xmlns:app="http://schemas.android.com/apk/res-auto"> <item android:id="@+id/action_delete" android:orderInCategory="100" android:title="删除" app:showAsAction="never" /> <item android:id="@+id/action_save" android:orderInCategory="200" android:title="保存" app:showAsAction="never" /> <item android:id="@+id/action_last" android:orderInCategory="300" android:title="上一步" app:showAsAction="never" /> <item android:id="@+id/action_next" android:icon="@null" android:orderInCategory="400" android:title="下一步" app:showAsAction="never" /> </menu>
以上是“Android如何实现自定义可拖拽的悬浮按钮DragFloatingActionButton”这篇文章的所有内容,感谢各位的阅读!希望分享的内容对大家有帮助,更多相关知识,欢迎关注亿速云行业资讯频道!
免责声明:本站发布的内容(图片、视频和文字)以原创、转载和分享为主,文章观点不代表本网站立场,如果涉及侵权请联系站长邮箱:is@yisu.com进行举报,并提供相关证据,一经查实,将立刻删除涉嫌侵权内容。


