檩鶮жПРз§Ї√Ч
жВ®е•љпЉМзЩїељХеРОжЙНиГљдЄЛиЃҐеНХеУ¶пЉБ
еѓЖз†БзЩїељХ√Ч
зЩїељХж≥®еЖМ√Ч
зВєеЗї зЩїељХж≥®еЖМ еН≥и°®з§ЇеРМжДПгАКдЇњйАЯдЇСзФ®жИЈжЬНеК°жЭ°жђЊгАЛ
зФ®жИЈзЩїељХ√Ч
жВ®е•љпЉМзЩїељХеРОжЙНиГљдЄЛиЃҐеНХеУ¶пЉБ
жЬђзѓЗжЦЗзЂ†зїЩе§ІеЃґеИЖдЇЂзЪДжШѓжЬЙеЕ≥жАОдєИеЬ®AndroidдЄ≠дљњзФ®PaintињЫи°МзїШеЫЊпЉМе∞ПзЉЦиІЙеЊЧжМЇеЃЮзФ®зЪДпЉМеЫ†ж≠§еИЖдЇЂзїЩе§ІеЃґе≠¶дє†пЉМеЄМжЬЫе§ІеЃґйШЕиѓїеЃМињЩзѓЗжЦЗзЂ†еРОеПѓдї•жЬЙжЙАжФґиОЈпЉМиѓЭдЄНе§ЪиѓіпЉМиЈЯзЭАе∞ПзЉЦдЄАиµЈжЭ•зЬЛзЬЛеРІгАВ
PaintзЪДдљњзФ®
дљњзФ®PaintдєЛеЙНйЬАи¶БеИЭеІЛеМЦ
mPaint = new Paint();
иЃЊзљЃзђФпЉИPaintпЉЙзЪДйҐЬиЙ≤еТМalphaеАЉпЉЪ
mPaint.setColor(Color.BLUE); mPaint.setAlpha(255);
ж≥®жДПпЉЪalphaзЪДиМГеЫіжШѓ[0..255]пЉМиАМдЄНжШѓ[0..1]пЉМжШѓдЄАдЄ™intеАЉгАВ
иЃЊзљЃзФїзђФзЪДж†ЈеЉПпЉЪйАЪињЗmPaint.setStyle()жЭ•иЃЊзљЃж†ЈеЉПгАВ
public enum Style { /** * Geometry and text drawn with this style will be filled, ignoring all * stroke-related settings in the paint. */ FILL (0), /** * Geometry and text drawn with this style will be stroked, respecting * the stroke-related fields on the paint. */ STROKE (1), /** * Geometry and text drawn with this style will be both filled and * stroked at the same time, respecting the stroke-related fields on * the paint. This mode can give unexpected results if the geometry * is oriented counter-clockwise. This restriction does not apply to * either FILL or STROKE. */ FILL_AND_STROKE (2); Style(int nativeInt) { this.nativeInt = nativeInt; } final int nativeInt; }жАїеЕ±жЬЙдЄЙзІНзФїзђФзЪДж†ЈеЉП
FILLпЉЪе°ЂеЕЕеЖЕеЃєпЉЫ
STROKEпЉЪжППиЊєпЉЫ
FILL_AND_STROKEпЉЪе°ЂеЕЕеЖЕеЃєеєґжППиЊєгАВ
иЃЊзљЃзФїзђФзЪДеЃљеЇ¶
mPaint.setStrokeWidth(50);
иЃЊзљЃзФїзђФзЪДзЇњеЄљ
йАЪињЗmPaint.setStrokeCapжЭ•иЃЊзљЃзЇњеЄљпЉМжАїеЕ±жЬЙдЄЙзІНзЇњеЄљ
/** * The Cap specifies the treatment for the beginning and ending of * stroked lines and paths. The default is BUTT. */ public enum Cap { /** * The stroke ends with the path, and does not project beyond it. */ BUTT (0), /** * The stroke projects out as a semicircle, with the center at the * end of the path. */ ROUND (1), /** * The stroke projects out as a square, with the center at the end * of the path. */ SQUARE (2); private Cap(int nativeInt) { this.nativeInt = nativeInt; } final int nativeInt; }BUTTпЉЪж≤°жЬЙзЇњеЄљпЉМйїШиЃ§ж®°еЉП
ROUNDпЉЪеЬЖ嚥
SQUAREпЉЪжֺ嚥
дЄЙзІНзЇњеЄљеѓєжѓФпЉЪ
@Override protected void onDraw(Canvas canvas) { super.onDraw(canvas); mPaint.setColor(Color.BLUE); mPaint.setAlpha(255); //иЃЊзљЃзФїзђФзЪДж†ЈеЉП mPaint.setStyle(Paint.Style.FILL_AND_STROKE); //зФїзђФзЪДеЃљеЇ¶ mPaint.setStrokeWidth(50); mPaint.setStrokeCap(Paint.Cap.SQUARE);//жֺ嚥 mPaint.setStrokeJoin(Paint.Join.BEVEL);//зЫізЇњ Path path = new Path(); path.moveTo(100, 100); path.lineTo(300, 100); canvas.drawPath(path, mPaint); mPaint.reset();//йЗНзљЃ mPaint.setColor(Color.RED); mPaint.setStyle(Paint.Style.FILL_AND_STROKE); mPaint.setStrokeWidth(50); mPaint.setStrokeCap(Paint.Cap.ROUND);//еЬЖ嚥 mPaint.setStrokeJoin(Paint.Join.BEVEL);//зЫізЇњ Path path2 = new Path(); path2.moveTo(100, 200); path2.lineTo(300, 200); canvas.drawPath(path2, mPaint); mPaint.reset();//йЗНзљЃ mPaint.setColor(Color.GREEN); mPaint.setStyle(Paint.Style.FILL_AND_STROKE); mPaint.setStrokeWidth(50); mPaint.setStrokeCap(Paint.Cap.BUTT);//ж≤°жЬЙ mPaint.setStrokeJoin(Paint.Join.BEVEL);//зЫізЇњ Path path3 = new Path(); path3.moveTo(100, 300); path3.lineTo(300, 300); canvas.drawPath(path3, mPaint); }дЄКйЭҐдї£з†БдЄ≠жЬЙдЄ™йЗНзљЃзФїзђФпЉМињЩжЧґеАЩйЬАи¶БйЗНжЦ∞иЃЊзљЃзФїзђФгАВ
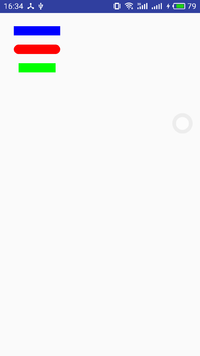
зЇњеЄљеѓєжѓФ
иЃЊзљЃJoin
дљњзФ®setStrokeJoinжЦєж≥ХжЭ•иЃЊзљЃJoinпЉМJoinжЬЙдЄЙзІНз±їеЮЛпЉЪ
BEVELпЉЪзЫізЇњ
ROUNDпЉЪеЬЖиІТ
MITERпЉЪйФРиІТ
@Override protected void onDraw(Canvas canvas) { super.onDraw(canvas); mPaint.setColor(Color.BLUE); mPaint.setAlpha(255); mPaint.setStyle(Paint.Style.STROKE);//иЃЊзљЃзФїзђФзЪДж†ЈеЉП mPaint.setStrokeWidth(50);//зФїзђФзЪДеЃљеЇ¶ mPaint.setStrokeCap(Paint.Cap.BUTT);//зЇњеЄљ mPaint.setStrokeJoin(Paint.Join.BEVEL); Path path = new Path(); path.moveTo(100, 100); path.lineTo(300, 100); path.lineTo(100, 300); path.close(); canvas.drawPath(path, mPaint); mPaint.reset();//йЗНзљЃ mPaint.setColor(Color.RED); mPaint.setStyle(Paint.Style.FILL_AND_STROKE); mPaint.setStrokeWidth(50); mPaint.setStrokeCap(Paint.Cap.BUTT);//еЬЖ嚥 mPaint.setStrokeJoin(Paint.Join.ROUND);//еЬЖеЉІ Path path2 = new Path(); path2.moveTo(100, 400); path2.lineTo(300, 400); path2.lineTo(100, 700); path2.close(); canvas.drawPath(path2, mPaint); mPaint.reset();//йЗНзљЃ mPaint.setColor(Color.GREEN); mPaint.setStyle(Paint.Style.FILL_AND_STROKE); mPaint.setStrokeWidth(50); mPaint.setStrokeCap(Paint.Cap.BUTT);//ж≤°жЬЙ mPaint.setStrokeJoin(Paint.Join.MITER);//йФРиІТ Path path3 = new Path(); path3.moveTo(100, 800); path3.lineTo(300, 800); path3.lineTo(100, 1100); path3.close(); canvas.drawPath(path3, mPaint); }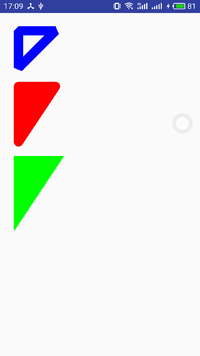
JoinеѓєжѓФ
дї•дЄКе∞±жШѓJoinдЄЙзІНз±їеЮЛеѓєжѓФгАВ
иЃЊзљЃйШ≤йФѓйљњ
mPaint.setAntiAlias(true);
е¶ВжЮЬиЃЊзљЃйШ≤йФѓйљњпЉМдЉЪжНЯ姱дЄАеЃЪзЪДжАІиГљ
жКЦеК®е§ДзРЖ
дљњзФ®mPaint.setDither()жЦєж≥ХпЉМиЃЊзљЃжШѓеР¶дљњзФ®еЫЊеГПжКЦеК®е§ДзРЖгАВдЉЪдљњзїШеИґзЪДеЫЊзЙЗз≠ЙйҐЬиЙ≤жЫіеК†зЪДжЄЕжЩ∞дї•еПКй•±жї°пЉМдєЯжШѓжНЯ姱жАІиГљгАВ
дљњзФ®PathзїШеИґеی嚥
PathзїШеИґеی嚥
зВєзїДжИРзЇњпЉМзЇњзїДжИРйЭҐпЉМињЩж†ЈPathеПѓдї•зїШеИґеРДзІНеРДж†ЈзЪДеی嚥пЉМеПѓдї•иѓіжШѓжЧ†жЙАдЄНиГљзЪДдЇЖпЉМдљЖжШѓPathдєЯжПРдЊЫдЇЖеЊИе§ЪжЦєж≥ХпЉМжЭ•зїШеИґеی嚥гАВ
жЦЗжЬђзїШеИґ
дЄКжЦЗдЄ≠пЉМдїЛзїНдЇЖPaintзФїзђФпЉМеТМзїШеИґдЇЖдЄАдЇЫеی嚥гАВдљЖжШѓдїЛзїНPaintзЪДжЧґеАЩпЉМжИСдїђзЯ•йБУеЃГеПѓдї•зїШеИґеی嚥пЉМжЦЗжЬђеТМbitmapпЉМжЙАдї•PaintжШѓйЭЮеЄЄеЉЇе§ІзЪДдЇЖпЉМжИСдїђзЬЛдЄЛPaintжШѓе¶ВдљХзїШеИґжЦЗжЬђзЪДгАВ
иЃЊзљЃе≠Чзђ¶дєЛйЧізЪДйЧіиЈЭ
setLetterSpacing
иЃЊзљЃжЦЗжЬђеИ†йЩ§зЇњ
mPaint.setStrikeThruText(true);
жШѓеР¶иЃЊзљЃдЄЛеИТзЇњ
mPaint.setUnderlineText(true);
иЃЊзљЃжЦЗжЬђе§Іе∞П
mPaint.setTextSize(textSize);
иЃЊзљЃе≠ЧдљУз±їеЮЛ
mPaint.setTypeface(Typeface.BOLD); // Style public static final int NORMAL = 0;//еЄЄиІД public static final int BOLD = 1;//з≤ЧдљУ public static final int ITALIC = 2; //жЦЬдљУ public static final int BOLD_ITALIC = 3;//з≤ЧжЦЬдљУ
е≠ЧдљУз±їеЮЛжЬЙдї•дЄКеЫЫзІНз±їеЮЛеПѓдї•иЃЊзљЃгАВ
еК†иљљиЗ™еЃЪдєЙе≠ЧдљУ
Typeface.create(familyName, style)
жЦЗе≠ЧеАЊжЦЬ
mPaint.setTextSkewX(-0.25f);
жЦЗе≠ЧеАЊжЦЬйїШиЃ§дЄЇ0пЉМеЃШжЦєжО®иНРзЪД-0.25fжШѓжЦЬдљУ
жЦЗжЬђеѓєйљРжЦєеЉП
mPaint.setTextAlign(Align.LEFT)
жЬЙдЄЙзІНпЉЪ
public enum Align { /** * The text is drawn to the right of the x,y origin */ LEFT (0),//еЈ¶еѓєйљР /** * The text is drawn centered horizontally on the x,y origin */ CENTER (1),//е±ЕдЄ≠ /** * The text is drawn to the left of the x,y origin */ RIGHT (2);//еП≥еѓєйљР private Align(int nativeInt) { this.nativeInt = nativeInt; } final int nativeInt; }иЃ°зЃЧеИґеЃЪйХњеЇ¶зЪДе≠Чзђ¶дЄ≤
int breadText = mPaint.breakText(text, measureForwards, maxWidth, measuredWidth)
ж≥®жДПпЉЪе≠Чзђ¶йХњеЇ¶гАБе≠Чзђ¶дЄ™жХ∞гАБжШЊз§ЇзЪДжЧґеАЩжШѓзЬЯеЃЮзЪДйХњеЇ¶
Rect boundsиОЈеПЦжЦЗжЬђзЪДзߩ嚥еМЇеЯЯпЉИеЃљйЂШпЉЙ mPaint.getTextBounds(text, index, count, bounds) mPaint.getTextBounds(text, start, end, bounds) //иОЈеПЦжЦЗжЬђзЪДеЃљеЇ¶пЉМеТМдЄКйЭҐз±їдЉЉпЉМдљЖжШѓжШѓдЄАдЄ™жѓФиЊГз≤ЧзХ•зЪДзїУжЮЬ float measureText = mPaint.measureText(str); //иОЈеПЦжЦЗжЬђзЪДеЃљеЇ¶пЉМеТМдЄКйЭҐз±їдЉЉпЉМдљЖжШѓжШѓжѓФиЊГз≤ЊеЗЖзЪДгАВ float[] measuredWidth = new float[10]; //measuredWidthеЊЧеИ∞жѓПдЄАдЄ™е≠Чзђ¶зЪДеЃљеЇ¶пЉЫtextWidthsе≠Чзђ¶жХ∞ int textWidths = mPaint.getTextWidths(str, measuredWidth); mPaint.getTextWidths(text, start, end, widths)
дљњзФ®drawTextзїШеИґжЦЗжЬђ
public class PaintView extends View { private Paint mPaint; private String text = "дљ†жШѓжИСдЄЦзХМдєЛеЕЙпЉМжИСењГеП¶дЄАеНК"; public PaintView(Context context) { this(context,null); } public PaintView(Context context, @Nullable AttributeSet attrs) { this(context, attrs,0); } public PaintView(Context context, @Nullable AttributeSet attrs, int defStyleAttr) { super(context, attrs, defStyleAttr); init(context, attrs, defStyleAttr); } private void init(Context context, AttributeSet attrs, int defStyleAttr) { mPaint = new Paint(); } @Override protected void onDraw(Canvas canvas) { super.onDraw(canvas); mPaint.setColor(Color.BLUE); mPaint.setStyle(Paint.Style.STROKE);//иЃЊзљЃзФїзђФзЪДж†ЈеЉП mPaint.setStrokeCap(Paint.Cap.BUTT);//зЇњеЄљ mPaint.setStrokeJoin(Paint.Join.BEVEL); int top = 100; int baselineX = 0; mPaint.setTextSize(50); mPaint.setTextAlign(Paint.Align.LEFT); canvas.drawLine(0, top, 2000, top, mPaint); //жЦЗжЬђMetrics Paint.FontMetrics fontMetrics = mPaint.getFontMetrics(); float baselineY = top - fontMetrics.top; canvas.drawText(text, baselineX, baselineY, mPaint); } }
зїШеИґжЦЗжЬђ
зїШеИґжЦЗжЬђжЧґпЉМињШжЬЙдЄАдЄ™еЊИйЗНи¶БзЪДзЯ•иѓЖзВєе∞±жШѓеЯЇзЇњзЪДз°ЃеЃЪ
DrawText еЯЇзЇњзЪДз°ЃеЃЪ
еЬ®иЗ™еЃЪдєЙжОІдїґзЪДжЧґеАЩпЉМжЬЙжЧґеАЩдЉЪзФ®еИ∞DrawText жЦєж≥Х.
еЕИжККиЗ™еЃЪдєЙTextViewзЪДиііеЗЇжЭ•
@Override protected void onDraw(Canvas canvas) { super.onDraw(canvas); int x = getPaddingLeft(); //dy дї£и°®зЪДжШѓпЉЪйЂШеЇ¶зЪДдЄАеНКеИ∞ baseLineзЪДиЈЭз¶ї Paint.FontMetricsInt fontMetrics = paint.getFontMetricsInt(); // top жШѓдЄАдЄ™иіЯеАЉ bottom жШѓдЄАдЄ™ж≠£еАЉ topпЉМbttomзЪДеАЉдї£и°®жШѓ bottomжШѓbaseLineеИ∞жЦЗе≠ЧеЇХйГ®зЪДиЈЭз¶їпЉИж≠£еАЉпЉЙ // ењЕй°їи¶БжЄЕж•ЪзЪДпЉМеПѓдї•иЗ™еЈ±жЙУеН∞е∞±е•љ int dy = (fontMetrics.bottom - fontMetrics.top)/2 - fontMetrics.bottom; int baseLine = getHeight()/2 + dy; canvas.drawText(costom_text,x,baseLine,paint); }/** * Draw the text, with origin at (x,y), using the specified paint. The * origin is interpreted based on the Align setting in the paint. * * @param text The text to be drawn * @param x The x-coordinate of the origin of the text being drawn * @param y The y-coordinate of the baseline of the text being drawn * @param paint The paint used for the text (e.g. color, size, style) */ public void drawText(@NonNull String text, float x, float y, @NonNull Paint paint) { native_drawText(mNativeCanvasWrapper, text, 0, text.length(), x, y, paint.mBidiFlags, paint.getNativeInstance(), paint.mNativeTypeface); }xпЉМy еИЖеИЂи°®з§Ї еЯЇзЇњзЪДеЉАеІЛеЭРж†ЗпЉМеєґдЄНжШѓ жЦЗе≠ЧеЈ¶дЄКиІТзЪДеЭРж†ЗпЉМеЫ†дЄЇжЦЗе≠ЧзЪДзїШеИґжШѓдї•еЯЇзЇњдЄЇеЯЇз°АзЪД

еЫЊдЄ≠зЪД дЇФиІТжШЯ жЙАеЬ®зЪДзЇњ е∞±жШѓеЯЇзЇњ BaseLine,йВ£дєИе¶ВдљХз°ЃеЃЪеЯЇзЇњзЪДx,yеЭРж†ЗеСҐ?
й¶ЦеЖЩжИСдїђеЕИз°ЃеЃЪдЄАдЄЛxеЭРж†З пЉЪint x = getPaddingLeft(); дєЯе∞±жШѓжЦЗе≠ЧиЈЭеЈ¶иЊєзЪДиЈЭз¶ї
yеЭРж†ЗпЉЪ
1гАБжИСдїђеЕИиЃ°зЃЧдЄАдЄЛжЦЗе≠ЧйЂШеЇ¶зЪДдЄАеНКеИ∞ baseLineзЪДиЈЭз¶їгАВ
int dy = (fontMetrics.bottom - fontMetrics.top)/2 - fontMetrics.bottom;
2гАБдєЛеРОжИСдїђеЖНдљњзФ®жОІдїґйЂШеЇ¶зЪДдЄАиИђпЉМеК†дЄКжЦЗе≠ЧйЂШеЇ¶зЪДдЄАеНКеИ∞ baseLineзЪДиЈЭз¶їпЉМе∞±жШѓеЯЇзЇњзЪДyеЭРж†З
int baseLine = getHeight()/2 + dy;
дї•дЄКе∞±жШѓжАОдєИеЬ®AndroidдЄ≠дљњзФ®PaintињЫи°МзїШеЫЊпЉМе∞ПзЉЦзЫЄдњ°жЬЙйГ®еИЖзЯ•иѓЖзВєеПѓиГљжШѓжИСдїђжЧ•еЄЄеЈ•дљЬдЉЪиІБеИ∞жИЦзФ®еИ∞зЪДгАВеЄМжЬЫдљ†иГљйАЪињЗињЩзѓЗжЦЗзЂ†е≠¶еИ∞жЫіе§ЪзЯ•иѓЖгАВжЫіе§Ъиѓ¶жГЕжХђиѓЈеЕ≥ж≥®дЇњйАЯдЇСи°МдЄЪиµДиЃѓйҐСйБУгАВ
еЕНиі£е£∞жШОпЉЪжЬђзЂЩеПСеЄГзЪДеЖЕеЃєпЉИеЫЊзЙЗгАБиІЖйҐСеТМжЦЗе≠ЧпЉЙдї•еОЯеИЫгАБиљђиљљеТМеИЖдЇЂдЄЇдЄїпЉМжЦЗзЂ†иІВзВєдЄНдї£и°®жЬђзљСзЂЩзЂЛеЬЇпЉМе¶ВжЮЬжґЙеПКдЊµжЭГиѓЈиБФз≥їзЂЩйХњйВЃзЃ±пЉЪis@yisu.comињЫи°МдЄЊжК•пЉМеєґжПРдЊЫзЫЄеЕ≥иѓБжНЃпЉМдЄАзїПжЯ•еЃЮпЉМе∞ЖзЂЛеИїеИ†йЩ§жґЙеЂМдЊµжЭГеЖЕеЃєгАВ

дЇњйАЯдЇСеЕђдЉЧеПЈ

жЙЛжЬЇзљСзЂЩдЇМзїіз†Б


