这篇文章主要为大家展示了“spring boot中如何使用RabbitMQ routing路由”,内容简而易懂,条理清晰,希望能够帮助大家解决疑惑,下面让小编带领大家一起研究并学习一下“spring boot中如何使用RabbitMQ routing路由”这篇文章吧。
要做什么?Routing 路由
在这个教程中,添加一个新的特性,我们可以只订阅消息的一部分。例如,将只连接我们感兴趣的颜色("orange", "black", "green"),并且把消息全部打印在控制台上。
绑定
交换器和队列是一种绑定关系。简单的理解为:队列对来自这个交换器中的信息感兴趣。
绑定可以加上一个额外的参数routingKey。Spring-amqp使用通俗易懂的API(建造者模式)使它们之间的关系非常清晰。把交换器和队列放入BindingBuilder中并可以很容易的把队列用路由键(routingKey)绑定到交换器上。
@Bean public Binding binding0a(DirectExchange directExchange, Queue autoDeleteQueue0) { return BindingBuilder.bind(autoDeleteQueue0).to(directExchange).with("orange"); }这个意味着,绑定键依赖交换器类型,fanout交换器就不行没有可以绑定的选项。
直连交换器
前一个教程中我们的消息系统是以广播的形式传递给所有的消费者。我们想要扩展一下功能,加入基于颜色类型的过滤器。例如,我们想要程序一个接收详细的错误消息并写入硬盘作为日志,不接收Info或者警告日志。
fanout交换器不能实现这个操作,因为它只能笨笨的广播。
我们使用直连direct交换器替代。直连交换器背后的路由算法很简单,绑定的键要精确匹配消息的路由键后,这个消息才能进入队列中。
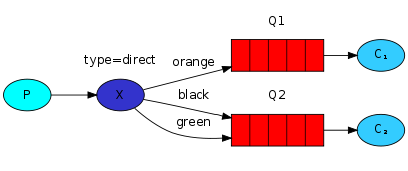
橙色、黑色、绿色三种路由键
如上图,直连交换器x上绑定了2个队列。第一个队列使用路由键是orange,第二个有2个路由键,black和green。
在这个设定中,把一个使用路由键为orange的消息推送到交换器上时,那么这个消息将会被路由到队列Q1上。消息使用的路由键是black或者green时将会被路由到Q2。其余没有使用路由键的消息将会被丢弃。
并联绑定
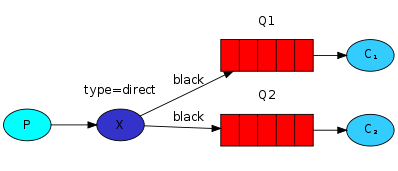
并联绑定
这个可以实现类似fanout交换器的功能。
差不多了,看代码
Config.java
package com.zb.rabbitMQtest.t4routing.config; import org.springframework.amqp.core.*; import org.springframework.context.annotation.Bean; import org.springframework.context.annotation.Configuration; /** * @author 张博 */ @Configuration(value = "t4Config") public class Config { /** * 创建人:张博 * 时间:2018/3/5 上午10:45 * @apiNote 定义直连交换器 */ @Bean public DirectExchange directExchange() { return new DirectExchange("direct-exchange"); } /** * 创建人:张博 * 时间:2018/3/5 上午10:48 * @apiNote 定义自动删除匿名队列 */ @Bean public Queue autoDeleteQueue0() { return new AnonymousQueue(); } /** * 创建人:张博 * 时间:2018/3/5 上午10:48 * @apiNote 定义自动删除匿名队列 */ @Bean public Queue autoDeleteQueue1() { return new AnonymousQueue(); } /** * 创建人:张博 * 时间:2018/3/5 上午10:48 * @param directExchange 直连交换器 * @param autoDeleteQueue0 自动删除队列 * @apiNote 绑定使用路由键为 orange 的 autoDeleteQueue0 队列到直连交换器上 * @return Binding */ @Bean public Binding binding0a(DirectExchange directExchange, Queue autoDeleteQueue0) { return BindingBuilder.bind(autoDeleteQueue0).to(directExchange).with("orange"); } /** * 创建人:张博 * 时间:2018/3/5 上午10:48 * @param directExchange 直连交换器 * @param autoDeleteQueue0 自动删除队列 * @apiNote 绑定使用路由键为 black 的 autoDeleteQueue0 队列到直连交换器上 * @return Binding */ @Bean public Binding binding0b(DirectExchange directExchange, Queue autoDeleteQueue0) { return BindingBuilder.bind(autoDeleteQueue0).to(directExchange).with("black"); } /** * 创建人:张博 * 时间:2018/3/5 上午10:48 * @param directExchange 直连交换器 * @param autoDeleteQueue1 自动删除队列 * @apiNote 绑定使用路由键为 black 的 autoDeleteQueue1 队列到直连交换器上 * @return Binding */ @Bean public Binding binding1a(DirectExchange directExchange, Queue autoDeleteQueue1) { return BindingBuilder.bind(autoDeleteQueue1).to(directExchange).with("black"); } /** * 创建人:张博 * 时间:2018/3/5 上午10:48 * @param directExchange 直连交换器 * @param autoDeleteQueue1 自动删除队列 * @apiNote 绑定使用路由键为 green 的 autoDeleteQueue1 队列到直连交换器上 * @return Binding */ @Bean public Binding binding1b(DirectExchange directExchange, Queue autoDeleteQueue1) { return BindingBuilder.bind(autoDeleteQueue1).to(directExchange).with("green"); } }Receiver.java
package com.zb.rabbitMQtest.t4routing.receiver; import org.springframework.amqp.rabbit.annotation.RabbitListener; import org.springframework.stereotype.Component; /** * @author 张博 */ @Component(value = "t4Receiver") public class Receiver { @RabbitListener(queues = "#{autoDeleteQueue0.name}") public void receiver0(String str) { System.out.println("receiver0++++++++++:" + str); } @RabbitListener(queues = "#{autoDeleteQueue1.name}") public void receiver1(String str) { System.out.println("receiver1++++++++++:" + str); } }Send.java
package com.zb.rabbitMQtest.t4routing.send; import org.springframework.amqp.core.DirectExchange; import org.springframework.amqp.rabbit.core.RabbitTemplate; import org.springframework.beans.factory.annotation.Autowired; import org.springframework.stereotype.Component; /** * @author 张博【zhangb@lianliantech.cn】 */ @Component(value = "t4Send") public class Send { @Autowired private DirectExchange directExchange; @Autowired private RabbitTemplate rabbitTemplate; private String[] keys = {"orange", "black", "green"}; public void send() { String message = "哈哈哈"; for (int i = 0; i < 5; i++) { System.out.println("send++++++++++:".concat(message)); rabbitTemplate.convertAndSend(directExchange.getName(), keys[2], message); } } }SendTest.java
package com.zb.rabbitMQtest.t4routing.send; import org.junit.Test; import org.junit.runner.RunWith; import org.springframework.beans.factory.annotation.Autowired; import org.springframework.boot.test.context.SpringBootTest; import org.springframework.test.context.junit4.SpringRunner; /** * @author 张博 */ @RunWith(SpringRunner.class) @SpringBootTest public class SendTest { @Autowired private Send send; @Test public void send() throws Exception { send.send(); } }测试结果,如果是keys[0]那么只有receiver0,如果是keys[1]那么就是类似广播那样,有receive0和receive1,如果是keys[2]那么只有receive1
当keys[0]时
send++++++++++:哈哈哈
send++++++++++:哈哈哈
send++++++++++:哈哈哈
send++++++++++:哈哈哈
send++++++++++:哈哈哈
receiver0++++++++++:哈哈哈
receiver0++++++++++:哈哈哈
receiver0++++++++++:哈哈哈
receiver0++++++++++:哈哈哈
receiver0++++++++++:哈哈哈当keys[1]时
send++++++++++:哈哈哈
send++++++++++:哈哈哈
send++++++++++:哈哈哈
send++++++++++:哈哈哈
send++++++++++:哈哈哈
receiver1++++++++++:哈哈哈
receiver1++++++++++:哈哈哈
receiver0++++++++++:哈哈哈
receiver0++++++++++:哈哈哈
receiver0++++++++++:哈哈哈
receiver1++++++++++:哈哈哈
receiver1++++++++++:哈哈哈
receiver0++++++++++:哈哈哈
receiver1++++++++++:哈哈哈
receiver0++++++++++:哈哈哈当keys[2]时
send++++++++++:哈哈哈
send++++++++++:哈哈哈
send++++++++++:哈哈哈
send++++++++++:哈哈哈
send++++++++++:哈哈哈
receiver1++++++++++:哈哈哈
receiver1++++++++++:哈哈哈
receiver1++++++++++:哈哈哈
receiver1++++++++++:哈哈哈
receiver1++++++++++:哈哈哈
以上是“spring boot中如何使用RabbitMQ routing路由”这篇文章的所有内容,感谢各位的阅读!相信大家都有了一定的了解,希望分享的内容对大家有所帮助,如果还想学习更多知识,欢迎关注亿速云行业资讯频道!
免责声明:本站发布的内容(图片、视频和文字)以原创、转载和分享为主,文章观点不代表本网站立场,如果涉及侵权请联系站长邮箱:is@yisu.com进行举报,并提供相关证据,一经查实,将立刻删除涉嫌侵权内容。


