这篇文章主要介绍了Spring boot2.x中集成H2数据库代码实例,文中通过示例代码介绍的非常详细,对大家的学习或者工作具有一定的参考学习价值,需要的朋友可以参考下
在spring boot中集成
1.添加依赖
<dependency> <groupId>org.springframework.boot</groupId> <artifactId>spring-boot-starter-data-jpa</artifactId> </dependency> <dependency> <groupId>com.h3database</groupId> <artifactId>h3</artifactId> <scope>runtime</scope> </dependency> <dependency> <groupId>org.projectlombok</groupId> <artifactId>lombok</artifactId> </dependency>
2.添加H2相关配置,修改application.properties文件
spring.jpa.database=h3 spring.jpa.show-sql=true #ddl执行方式,update create 等 spring.datasource.url=jdbc:h3:./data/test;AUTO_SERVER=TRUE spring.jpa.hibernate.ddl-auto=update spring.datasource.username=sa spring.datasource.password=123456 spring.datasource.driverClassName=org.h3.Driver spring.h3.console.path=/h3-console spring.h3.console.enabled=true
说明:
spring.datasource.url
数据库文件
(1)内存数据库
jdbc:h3:mem:DBName
内存数据库的数据存在内存中,当程序停止时,不会被保存会丢失
eg:
spring.datasource.url=jdbc:h3:mem:test
(2)文件数据库
jdbc:h3:file:{FilePath} 也可以简化为 jdbc:h3:{FilePath}
FilePath的格式
(3)远程数据库
jdbc:h3:tcp://<{IP|hostname}>[:{Port}]/[]<{dbName}>
附加参数:
3.代码
domain层,即User类(entity)
package com.example.demo.domain; import lombok.AllArgsConstructor; import lombok.Data; import lombok.NoArgsConstructor; import javax.persistence.*; @Entity @Table(name = "user") @Data public class User { @Id @GeneratedValue(strategy= GenerationType.AUTO) private int id; private String name; public int getId() { return id; } public void setId(int id) { this.id = id; } public String getName() { return name; } public void setName(String name) { this.name = name; } } dao层,即UserRepository 接口
package com.example.demo.dao; import com.example.demo.domain.User; import org.springframework.data.jpa.repository.JpaRepository; import org.springframework.stereotype.Repository; import java.util.List; @Repository public interface UserRepository extends JpaRepository<User,Integer> { List<User> getUsersByName(String Name); } controller层,即Demo
package com.example.demo.controller; import com.example.demo.dao.UserRepository; import com.example.demo.domain.User; import org.springframework.beans.factory.annotation.Autowired; import org.springframework.web.bind.annotation.RequestMapping; import org.springframework.web.bind.annotation.RestController; import java.util.List; @RestController public class Demo { @Autowired private UserRepository repo; @RequestMapping("find") public List<User> find() { return (List<User>) repo.findAll(); } } 编写DemoApplication
package com.example.demo; import com.example.demo.dao.UserRepository; import com.example.demo.domain.User; import org.springframework.beans.factory.InitializingBean; import org.springframework.boot.SpringApplication; import org.springframework.boot.autoconfigure.SpringBootApplication; import org.springframework.context.annotation.Bean; @SpringBootApplication public class DemoApplication { @Bean InitializingBean saveData(UserRepository repo){ return ()->{ User u = new User(); u.setName("abc"); repo.save(u); User u1 = new User(); u1.setName("zyx"); repo.save(u1); }; } public static void main(String[] args) { SpringApplication.run(DemoApplication.class, args); } } 启动项目,打开浏览器访问http://localhost:8080/find

访问http://localhost:8080/h3-console/
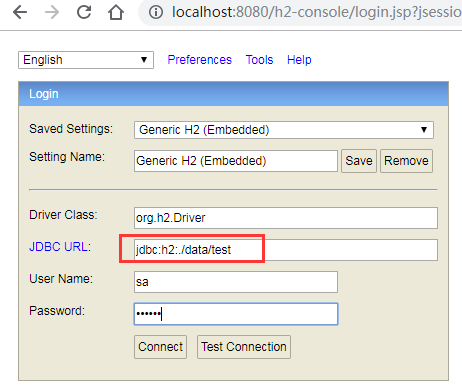
连接上后查询数据

以上就是本文的全部内容,希望对大家的学习有所帮助,也希望大家多多支持亿速云。
免责声明:本站发布的内容(图片、视频和文字)以原创、转载和分享为主,文章观点不代表本网站立场,如果涉及侵权请联系站长邮箱:is@yisu.com进行举报,并提供相关证据,一经查实,将立刻删除涉嫌侵权内容。


