使用JavaWeb怎么实现邮件发送功能?很多新手对此不是很清楚,为了帮助大家解决这个难题,下面小编将为大家详细讲解,有这方面需求的人可以来学习下,希望你能有所收获。
项目中遇到的问题:
1、在执行到 File file = new File(“D:\Chat_Software\sky.JPG”);时出现错误,之前写的时xlsx文件,测试期间可以对.xls,jpg,文本,.doc文件进行发送。发送xlsx文件时出现报错。
问题解决方案:
.xls文件扩展名对应的是Microsoft Office EXCEL 2003及以前的版本。
.xlsx文件扩展名对应的是Microsoft Office EXCEL 2007及后期的版本。
有可能时你下载的mai不是1.6以上版本的,建议下载1.6以上版本的mail
2、在执行到 message.saveChanges(); 方法报错无法进行保存设置,也有可能时你的mail版本较低造成的。
在书写 File file = new File(); 时注意修改正确的路径,也可以写在form表单里用file进行传值,主题和内容也写在了方法里因人而异如果其他需求可以需改参数进行传值。
本次用到的主要jar包如下:
javax.mail-1.6.0.jar
activation.jar
代码如下:

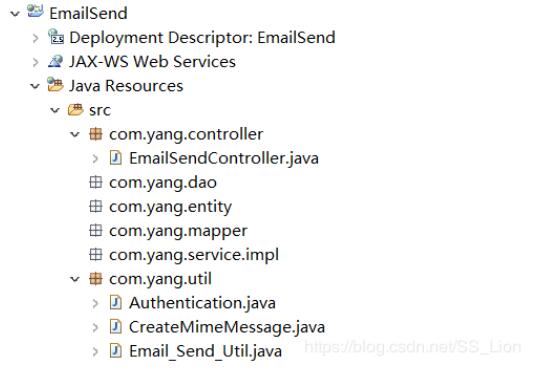
EmailSendController.java
package com.yang.controller; import javax.servlet.http.HttpServletRequest; import org.springframework.stereotype.Controller; import org.springframework.web.bind.annotation.RequestMapping; import org.springframework.web.bind.annotation.ResponseBody; import com.yang.util.Email_Send_Util; @Controller @RequestMapping("/email") public class EmailSendController { @RequestMapping(value = "/send.do") @ResponseBody public boolean impotr(HttpServletRequest request) { String toMail = request.getParameter("toMail"); String myMail = request.getParameter("myMail"); String userPwd = request.getParameter("userPwd"); System.out.println( toMail+myMail+userPwd); boolean bool=Email_Send_Util.send( toMail,myMail, userPwd); return bool ; } }Authentication.java
package com.yang.util; import javax.mail.Authenticator; import javax.mail.PasswordAuthentication; public class Authentication extends Authenticator { String username = null; String password = null; public Authentication() { } public Authentication(String username, String password) { this.username = username; this.password = password; } protected PasswordAuthentication getPasswordAuthentication(){ PasswordAuthentication pa = new PasswordAuthentication(username, password); return pa; } }CreateMimeMessage.java
package com.yang.util; import java.io.File; import java.util.Date; import javax.activation.DataHandler; import javax.activation.FileDataSource; import javax.mail.Message.RecipientType; import javax.mail.Address; import javax.mail.Message; import javax.mail.Session; import javax.mail.internet.InternetAddress; import javax.mail.internet.MimeBodyPart; import javax.mail.internet.MimeMessage; import javax.mail.internet.MimeMultipart; import javax.mail.internet.MimeUtility; /** * 创建一封复杂邮件(文本+图片+附件) */ public class CreateMimeMessage { public static MimeMessage createMimeMessage(Session session, String myMail, String toMail) throws Exception { // 1. 创建邮件对象 MimeMessage message = new MimeMessage(session); // 2. From: 发件人 message.setFrom(new InternetAddress(myMail, "我的测试邮件_发件人昵称", "UTF-8")); // 3. To: 收件人(可以增加多个收件人、抄送、密送) message.addRecipient(RecipientType.TO, new InternetAddress(toMail, "我的测试邮件_收件人昵称", "UTF-8")); // 4. Subject: 邮件主题 message.setSubject("TEST邮件主题(文本+图片+附件)", "UTF-8"); // 抄送人 Address ccAddress = new InternetAddress("*********@qq.com", "我的测试邮件_抄送人昵称", "UTF-8"); message.addRecipient(Message.RecipientType.CC, ccAddress); /* * 下面是邮件内容的创建: */ // 5. 创建图片“节点” MimeBodyPart image = new MimeBodyPart(); File file = new File("D:\\Chat_Software\\sky.JPG"); DataHandler dh = new DataHandler(new FileDataSource(file)); // 读取本地文件 image.setDataHandler(dh); // 将图片数据添加到“节点” // image.setContentID("image_fairy_tail");// 为“节点”设置一个唯一编号(在文本“节点”将引用该ID) image.setFileName(MimeUtility.encodeText(file.getName())); // 6. 创建文本“节点” MimeBodyPart text = new MimeBodyPart(); // text.setContent("这是一张图片<br/>测试图片<br/><img // src='cid:image_fairy_tail'/>", "text/html;charset=UTF-8"); text.setContent("这是一张图片<br/>测试图片", "text/html;charset=UTF-8"); // 7. (文本+图片)设置 文本 和 图片 “节点”的关系(将 文本 和 图片 “节点”合成一个混合“节点”) MimeMultipart mm_text_image = new MimeMultipart(); mm_text_image.addBodyPart(text); mm_text_image.addBodyPart(image); mm_text_image.setSubType("related"); // 关联关系 // 8. 将 文本+图片 的混合“节点”封装成一个普通“节点” // 最终添加到邮件的 Content 是由多个 BodyPart 组成的 Multipart, 所以我们需要的是 BodyPart, // 上面的 mm_text_image 并非 BodyPart, 所有要把 mm_text_image 封装成一个 BodyPart MimeBodyPart text_image = new MimeBodyPart(); text_image.setContent(mm_text_image); // 9. 创建附件“节点” MimeBodyPart attachment = new MimeBodyPart(); File file2 = new File("E:\\boHaiBank\\Test\\test.xlsx"); DataHandler dh3 = new DataHandler(new FileDataSource(file2)); // 读取本地文件 attachment.setDataHandler(dh3); // 将附件数据添加到“节点” attachment.setFileName(MimeUtility.encodeText(dh3.getName())); // 设置附件的文件名 // 10. 设置(文本+图片)和 附件 的关系(合成一个大的混合“节点” / Multipart ) MimeMultipart mm = new MimeMultipart(); mm.addBodyPart(text_image); mm.addBodyPart(attachment); // 如果有多个附件,可以创建多个多次添加 mm.setSubType("mixed"); // 混合关系 // 11. 设置整个邮件的关系(将最终的混合“节点”作为邮件的内容添加到邮件对象) message.setContent(mm); // 12. 设置发件时间 message.setSentDate(new Date()); // 13. 保存上面的所有设置 message.saveChanges(); return message; } }Email_Send_Util.java
package com.yang.util; import java.util.Properties; import javax.mail.Authenticator; import javax.mail.Session; import javax.mail.Transport; import javax.mail.internet.MimeMessage; public class Email_Send_Util { public static boolean send(String toMail,String myMail, String userPwd) { // QQ邮箱发件的服务器和端口 Properties props = new Properties(); props.put("mail.transport.protocol", "SMTP");// 设置发送邮件使用的协议 props.put("mail.smtp.host", "smtp.qq.com");// 指定邮件发送服务器服务器 "smtp.qq.com" props.put("mail.smtp.port", "25"); props.put("mail.smtp.auth", "true"); // 设置需要身份验证(不验证会不通过) Authenticator authentication = new Authentication(myMail, "你的邮箱授权码"); Session session = Session.getDefaultInstance(props, authentication); MimeMessage message; try { message = CreateMimeMessage.createMimeMessage(session, myMail, toMail); // 获取发送方对象 Transport transport = session.getTransport("smtp"); // 连接邮件服务器,链接您的QQ邮箱,用户名(可以不用带后缀)、密码 transport.connect(myMail, userPwd); // 发送邮件 // 第一个参数:邮件的消息体 // 第二个参数:邮件所有的接收人/抄送人 transport.sendMessage(message, message.getAllRecipients()); transport.close(); return true; } catch (Exception e) { e.printStackTrace(); return false; } } }测试发送邮箱的jsp页面
<%@ page language="java" contentType="text/html; charset=UTF-8" pageEncoding="UTF-8"%> <!DOCTYPE html PUBLIC "-//W3C//DTD HTML 4.01 Transitional//EN" "http://www.w3.org/TR/html4/loose.dtd"> <% String path = request.getContextPath(); String basePath = request.getScheme() + "://" + request.getServerName() + ":" + request.getServerPort() + path + "/"; %> <html> <head> <meta http-equiv="Content-Type" content="text/html; charset=UTF-8"> <title>邮件发送</title> <script type="text/javascript" src="js/jquery-1.10.2.js"></script> <script type="text/javascript" src="js/jquery-2.1.1.min.js"></script> </head> <body> <div> <form id="login_form" method="post"> <table border="1px" width="750px" height="400px" align="center" cellpadding="0px" cellspacing="0px" bgcolor="white" > <tr height="40px"> <td colspan="2"> <font size="4">邮件发送</font> Email </td> </tr> <tr> <td>收件人</td><td><input type="text" name="toMail" size="34px"/></td> </tr> <tr> <td>邮件发送人</td><td><input type="text" name="myMail" size="34px"/></td> </tr> <tr> <td>密码</td><td><input type="text" name="userPwd" size="34px"/></td> </tr> </table> <input type="button" onclick="emailsend()" value="发送"> </form> </div> <script type="text/javascript"> function emailsend() { $.ajax({ url : "email/send.do", type : "POST", data : $("#login_form").serialize(), beforeSend : function() { console.log("正在进行,请稍候"); }, success : function(e) { if (e == true) { alert("发送成功"); } else { alert("发送失败"); } } }); } </script> </body> </html>看完上述内容是否对您有帮助呢?如果还想对相关知识有进一步的了解或阅读更多相关文章,请关注亿速云行业资讯频道,感谢您对亿速云的支持。
免责声明:本站发布的内容(图片、视频和文字)以原创、转载和分享为主,文章观点不代表本网站立场,如果涉及侵权请联系站长邮箱:is@yisu.com进行举报,并提供相关证据,一经查实,将立刻删除涉嫌侵权内容。