檩鶮жПРз§Ї√Ч
жВ®е•љпЉМзЩїељХеРОжЙНиГљдЄЛиЃҐеНХеУ¶пЉБ
еѓЖз†БзЩїељХ√Ч
зЩїељХж≥®еЖМ√Ч
зВєеЗї зЩїељХж≥®еЖМ еН≥и°®з§ЇеРМжДПгАКдЇњйАЯдЇСзФ®жИЈжЬНеК°жЭ°жђЊгАЛ
зФ®жИЈзЩїељХ√Ч
жВ®е•љпЉМзЩїељХеРОжЙНиГљдЄЛиЃҐеНХеУ¶пЉБ
е∞ПзЉЦзїЩе§ІеЃґеИЖдЇЂдЄАдЄЛIOSе¶ВдљХеЃЮзО∞з≠ЊеИ∞жХ£иК±жХИжЮЬпЉМзЫЄдњ°е§ІйГ®еИЖдЇЇйГљињШдЄНжАОдєИдЇЖиІ£пЉМеЫ†ж≠§еИЖдЇЂињЩзѓЗжЦЗзЂ†зїЩе§ІеЃґеПВиАГдЄАдЄЛпЉМеЄМжЬЫе§ІеЃґйШЕиѓїеЃМињЩзѓЗжЦЗзЂ†еРОе§ІжЬЙжФґиОЈпЉМдЄЛйЭҐиЃ©жИСдїђдЄАиµЈеОїдЇЖиІ£дЄАдЄЛеРІпЉБ
жЬђжЦЗиЃ≤ињ∞дЇЖIOSеЃЮзО∞з≠ЊеИ∞зЙєжХИ(жХ£иК±жХИжЮЬ)еЃЮдЊЛдї£з†БгАВеИЖдЇЂзїЩе§ІеЃґдЊЫе§ІеЃґеПВиАГпЉМеЕЈдљУе¶ВдЄЛпЉЪ
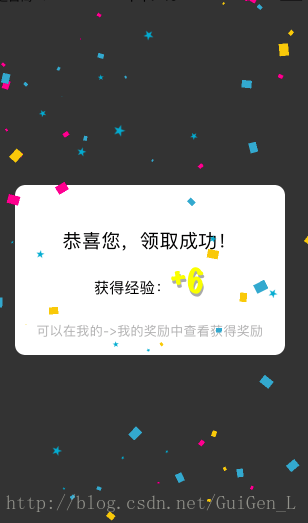
жХ£иК±зЙєжХИ
#import <Foundation/Foundation.h> /// йҐЖеПЦе•ЦеК±жИРеКЯ @interface RewardSuccess : NSObject /** * жИРеКЯеК®зФї */ + (void)show; @end
#import "RewardSuccess.h" #import "RewardSuccessWindow.h" #define EmitterColor_Red [UIColor colorWithRed:255/255.0 green:0 blue:139/255.0 alpha:1] #define EmitterColor_Yellow [UIColor colorWithRed:251/255.0 green:197/255.0 blue:13/255.0 alpha:1] #define EmitterColor_Blue [UIColor colorWithRed:50/255.0 green:170/255.0 blue:207/255.0 alpha:1] @implementation RewardSuccess + (void)show { UIWindow *window = [UIApplication sharedApplication].keyWindow; UIView *backgroundView = [[UIView alloc] initWithFrame:window.bounds]; backgroundView.backgroundColor = [UIColor colorWithRed:0 green:0 blue:0 alpha:0.8]; [window addSubview:backgroundView]; RewardSuccessWindow *successWindow = [[RewardSuccessWindow alloc] initWithFrame:CGRectZero]; [backgroundView addSubview:successWindow]; //зЉ©жФЊ successWindow.transform=CGAffineTransformMakeScale(0.01f, 0.01f); successWindow.alpha = 0; [UIView animateWithDuration:0.4 animations:^{ successWindow.transform = CGAffineTransformMakeScale(1.0f, 1.0f); successWindow.alpha = 1; }]; //3s жґИ姱 double delayInSeconds = 3; dispatch_time_t delayInNanoSeconds = dispatch_time(DISPATCH_TIME_NOW, delayInSeconds * NSEC_PER_SEC); dispatch_after(delayInNanoSeconds, dispatch_get_main_queue(), ^(void){ [UIView animateWithDuration:0.4 animations:^{ successWindow.transform = CGAffineTransformMakeScale(.3f, .3f); successWindow.alpha = 0; }completion:^(BOOL finished) { [backgroundView removeFromSuperview]; }]; }); //еЉАеІЛз≤Те≠РжХИжЮЬ CAEmitterLayer *emitterLayer = addEmitterLayer(backgroundView,successWindow); startAnimate(emitterLayer); } CAEmitterLayer *addEmitterLayer(UIView *view,UIView *window) { //иЙ≤еЭЧз≤Те≠Р CAEmitterCell *subCell1 = subCell(imageWithColor(EmitterColor_Red)); subCell1.name = @"red"; CAEmitterCell *subCell2 = subCell(imageWithColor(EmitterColor_Yellow)); subCell2.name = @"yellow"; CAEmitterCell *subCell3 = subCell(imageWithColor(EmitterColor_Blue)); subCell3.name = @"blue"; CAEmitterCell *subCell4 = subCell([UIImage imageNamed:@"success_star"]); subCell4.name = @"star"; CAEmitterLayer *emitterLayer = [CAEmitterLayer layer]; emitterLayer.emitterPosition = window.center; emitterLayer.emitterPosition = window.center; emitterLayer.emitterSize = window.bounds.size; emitterLayer.emitterMode = kCAEmitterLayerOutline; emitterLayer.emitterShape = kCAEmitterLayerRectangle; emitterLayer.renderMode = kCAEmitterLayerOldestFirst; emitterLayer.emitterCells = @[subCell1,subCell2,subCell3,subCell4]; [view.layer addSublayer:emitterLayer]; return emitterLayer; } void startAnimate(CAEmitterLayer *emitterLayer) { CABasicAnimation *redBurst = [CABasicAnimation animationWithKeyPath:@"emitterCells.red.birthRate"]; redBurst.fromValue = [NSNumber numberWithFloat:30]; redBurst.toValue = [NSNumber numberWithFloat: 0.0]; redBurst.duration = 0.5; redBurst.timingFunction = [CAMediaTimingFunction functionWithName:kCAMediaTimingFunctionLinear]; CABasicAnimation *yellowBurst = [CABasicAnimation animationWithKeyPath:@"emitterCells.yellow.birthRate"]; yellowBurst.fromValue = [NSNumber numberWithFloat:30]; yellowBurst.toValue = [NSNumber numberWithFloat: 0.0]; yellowBurst.duration = 0.5; yellowBurst.timingFunction = [CAMediaTimingFunction functionWithName:kCAMediaTimingFunctionLinear]; CABasicAnimation *blueBurst = [CABasicAnimation animationWithKeyPath:@"emitterCells.blue.birthRate"]; blueBurst.fromValue = [NSNumber numberWithFloat:30]; blueBurst.toValue = [NSNumber numberWithFloat: 0.0]; blueBurst.duration = 0.5; blueBurst.timingFunction = [CAMediaTimingFunction functionWithName:kCAMediaTimingFunctionLinear]; CABasicAnimation *starBurst = [CABasicAnimation animationWithKeyPath:@"emitterCells.star.birthRate"]; starBurst.fromValue = [NSNumber numberWithFloat:30]; starBurst.toValue = [NSNumber numberWithFloat: 0.0]; starBurst.duration = 0.5; starBurst.timingFunction = [CAMediaTimingFunction functionWithName:kCAMediaTimingFunctionLinear]; CAAnimationGroup *group = [CAAnimationGroup animation]; group.animations = @[redBurst,yellowBurst,blueBurst,starBurst]; [emitterLayer addAnimation:group forKey:@"heartsBurst"]; } CAEmitterCell *subCell(UIImage *image) { CAEmitterCell * cell = [CAEmitterCell emitterCell]; cell.name = @"heart"; cell.contents = (__bridge id _Nullable)image.CGImage; // зЉ©жФЊжѓФдЊЛ cell.scale = 0.6; cell.scaleRange = 0.6; // жѓПзІТдЇІзФЯзЪДжХ∞йЗП // cell.birthRate = 40; cell.lifetime = 20; // жѓПзІТеПШйАПжШОзЪДйАЯеЇ¶ // snowCell.alphaSpeed = -0.7; // snowCell.redSpeed = 0.1; // зІТйАЯ cell.velocity = 200; cell.velocityRange = 200; cell.yAcceleration = 9.8; cell.xAcceleration = 0; //жОЙиРљзЪДиІТеЇ¶иМГеЫі cell.emissionRange = M_PI; cell.scaleSpeed = -0.05; //// cell.alphaSpeed = -0.3; cell.spin = 2 * M_PI; cell.spinRange = 2 * M_PI; return cell; } UIImage *imageWithColor(UIColor *color) { CGRect rect = CGRectMake(0, 0, 13, 17); UIGraphicsBeginImageContext(rect.size); CGContextRef context = UIGraphicsGetCurrentContext(); CGContextSetFillColorWithColor(context, [color CGColor]); CGContextFillRect(context, rect); UIImage *image = UIGraphicsGetImageFromCurrentImageContext(); UIGraphicsEndImageContext(); return image; } @endйҐЖеПЦе•ЦеК±жИРеКЯжПРз§Їж°Ж
#import <UIKit/UIKit.h> /// йҐЖеПЦе•ЦеК±жИРеКЯжПРз§Їж°Ж @interface RewardSuccessWindow : UIView @end
#import "RewardSuccessWindow.h" static CGFloat SuccessWindow_width = 270; static CGFloat SuccessWindow_hight = 170; @implementation RewardSuccessWindow (instancetype)initWithFrame:(CGRect)frame { CGSize screenSize = [UIScreen mainScreen].bounds.size; self = [super initWithFrame:CGRectMake((screenSize.width - SuccessWindow_width)/2.0 , (screenSize.height - SuccessWindow_hight)/2.0, SuccessWindow_width, SuccessWindow_hight)]; if (self) { [self configSubViews]; } return self; } - (void)configSubViews { self.backgroundColor = [UIColor whiteColor]; self.layer.cornerRadius = 10; self.layer.masksToBounds = YES; UILabel *titleLabel = [[UILabel alloc] initWithFrame:CGRectMake(0, 45, SuccessWindow_width, 22)]; titleLabel.text = @"жБ≠еЦЬжВ®пЉМйҐЖеПЦжИРеКЯпЉБ"; titleLabel.font = [UIFont systemFontOfSize:19.0]; titleLabel.textAlignment = NSTextAlignmentCenter; [self addSubview:titleLabel]; UILabel *expLabel = [[UILabel alloc] initWithFrame:CGRectMake(0, 75, SuccessWindow_width, 43)]; expLabel.font = [UIFont systemFontOfSize:15]; expLabel.textAlignment = NSTextAlignmentCenter; [self addSubview:expLabel]; NSString *string = @"иОЈеЊЧзїПй™МпЉЪ+6"; NSMutableAttributedString *attributedString = [[NSMutableAttributedString alloc] initWithString:string]; [attributedString addAttribute:NSFontAttributeName value:[UIFont systemFontOfSize:15] range:NSMakeRange(0, string.length)]; [attributedString addAttribute:NSFontAttributeName value:[UIFont fontWithName:@"MarkerFelt-Thin" size:35] range:NSMakeRange(5,2)]; NSShadow *shadow =[[NSShadow alloc] init]; shadow.shadowOffset = CGSizeMake(1, 3); [attributedString addAttribute:NSShadowAttributeName value:shadow range:NSMakeRange(5,2)]; [attributedString addAttribute:NSForegroundColorAttributeName value:[UIColor yellowColor] range:NSMakeRange(5,2)]; expLabel.attributedText = attributedString; UILabel *bottomLabel = [[UILabel alloc] initWithFrame:CGRectMake(0, 135, SuccessWindow_width, 22)]; bottomLabel.text = @"еПѓдї•еЬ®жИСзЪД->жИСзЪДе•ЦеК±дЄ≠жЯ•зЬЛиОЈеЊЧе•ЦеК±"; bottomLabel.font = [UIFont systemFontOfSize:13.0]; bottomLabel.textAlignment = NSTextAlignmentCenter; bottomLabel.textColor = [UIColor colorWithRed:177/255.0 green:177/255.0 blue:177/255.0 alpha:1]; [self addSubview:bottomLabel]; } @endдї•дЄКжШѓвАЬIOSе¶ВдљХеЃЮзО∞з≠ЊеИ∞жХ£иК±жХИжЮЬвАЭињЩзѓЗжЦЗзЂ†зЪДжЙАжЬЙеЖЕеЃєпЉМжДЯи∞ҐеРДдљНзЪДйШЕиѓїпЉБзЫЄдњ°е§ІеЃґйГљжЬЙдЇЖдЄАеЃЪзЪДдЇЖиІ£пЉМеЄМжЬЫеИЖдЇЂзЪДеЖЕеЃєеѓєе§ІеЃґжЬЙжЙАеЄЃеК©пЉМе¶ВжЮЬињШжГ≥е≠¶дє†жЫіе§ЪзЯ•иѓЖпЉМ搥ињОеЕ≥ж≥®дЇњйАЯдЇСи°МдЄЪиµДиЃѓйҐСйБУпЉБ
еЕНиі£е£∞жШОпЉЪжЬђзЂЩеПСеЄГзЪДеЖЕеЃєпЉИеЫЊзЙЗгАБиІЖйҐСеТМжЦЗе≠ЧпЉЙдї•еОЯеИЫгАБиљђиљљеТМеИЖдЇЂдЄЇдЄїпЉМжЦЗзЂ†иІВзВєдЄНдї£и°®жЬђзљСзЂЩзЂЛеЬЇпЉМе¶ВжЮЬжґЙеПКдЊµжЭГиѓЈиБФз≥їзЂЩйХњйВЃзЃ±пЉЪis@yisu.comињЫи°МдЄЊжК•пЉМеєґжПРдЊЫзЫЄеЕ≥иѓБжНЃпЉМдЄАзїПжЯ•еЃЮпЉМе∞ЖзЂЛеИїеИ†йЩ§жґЙеЂМдЊµжЭГеЖЕеЃєгАВ

дЇњйАЯдЇСеЕђдЉЧеПЈ

жЙЛжЬЇзљСзЂЩдЇМзїіз†Б


