жё©йҰЁжҸҗзӨәГ—
жӮЁеҘҪпјҢзҷ»еҪ•еҗҺжүҚиғҪдёӢи®ўеҚ•е“ҰпјҒ
еҜҶз Ғзҷ»еҪ•Г—
зҷ»еҪ•жіЁеҶҢГ—
зӮ№еҮ» зҷ»еҪ•жіЁеҶҢ еҚіиЎЁзӨәеҗҢж„ҸгҖҠдәҝйҖҹдә‘з”ЁжҲ·жңҚеҠЎжқЎж¬ҫгҖӢ
з”ЁжҲ·зҷ»еҪ•Г—
жӮЁеҘҪпјҢзҷ»еҪ•еҗҺжүҚиғҪдёӢи®ўеҚ•е“ҰпјҒ
жң¬зҜҮж–Үз« дёәеӨ§е®¶еұ•зӨәдәҶеҰӮдҪ•еңЁABPжЎҶжһ¶дёӯдҪҝз”ЁBootstrapTable组件пјҢеҶ…е®№з®ҖжҳҺжүјиҰҒ并且容жҳ“зҗҶи§ЈпјҢз»қеҜ№иғҪдҪҝдҪ зңјеүҚдёҖдә®пјҢйҖҡиҝҮиҝҷзҜҮж–Үз« зҡ„иҜҰз»Ҷд»Ӣз»ҚеёҢжңӣдҪ иғҪжңүжүҖ收иҺ·гҖӮ
дёҖгҖҒе…ідәҺABP
ABPжҳҜвҖңASP.NET Boilerplate Project (ASP.NETж ·жқҝйЎ№зӣ®)вҖқзҡ„з®Җз§°пјҢе®ғжҳҜдёҖдёӘжҲҗзҶҹзҡ„ејҖжәҗжЎҶжһ¶пјҢеҹәдәҺDDD+RepositoryжЁЎејҸпјҢиҮӘеёҰZeroжқғйҷҗе’Ңи®ӨиҜҒжЁЎеқ—пјҢйҒҝе…ҚдәҶд»Һйӣ¶ејҖе§Ӣжҗӯе»әжЎҶжһ¶зҡ„зғҰжҒјгҖӮе…ідәҺABPзҡ„жЎҶжһ¶дјҳеҠҝе°ұжӯӨжү“дҪҸпјҢеӣ дёәиҝҷж ·иҜҙдёӢеҺ»иҰҒиҜҙдёүеӨ©дёүеӨңпјҢи„ұзҰ»ж–Үжң¬дё»йўҳгҖӮ
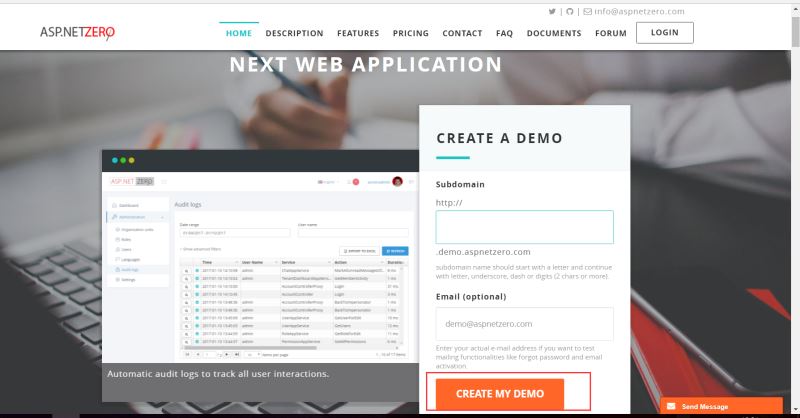
зӮ№еҮ»CREATE MY DEMOжҢүй’®пјҢзі»з»ҹдјҡиҮӘеҠЁдёәдҪ з”ҹжҲҗжј”зӨәең°еқҖ
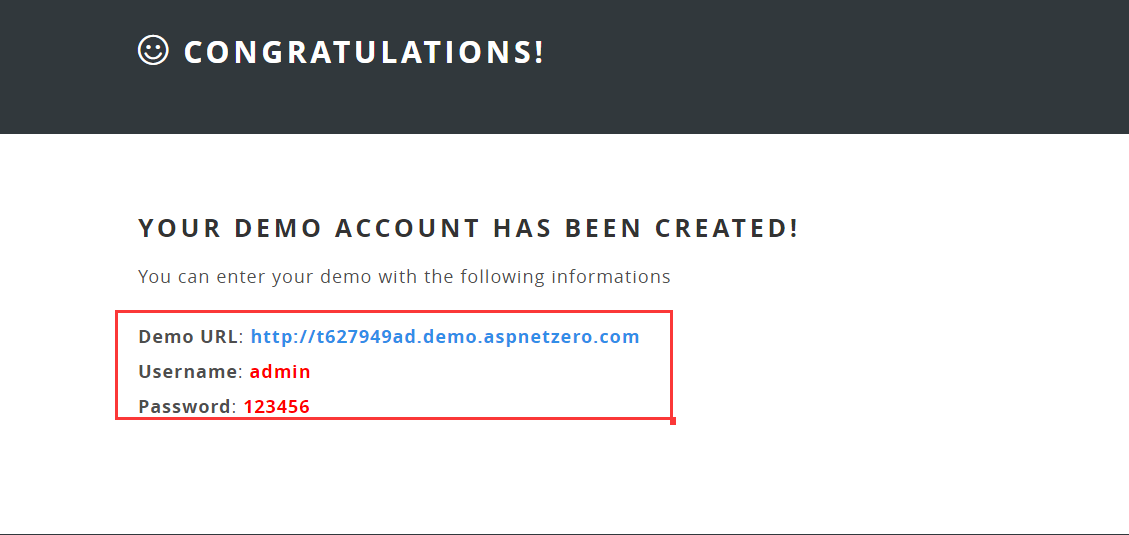
иҝӣе…ҘеҜ№еә”зҡ„Demo URL
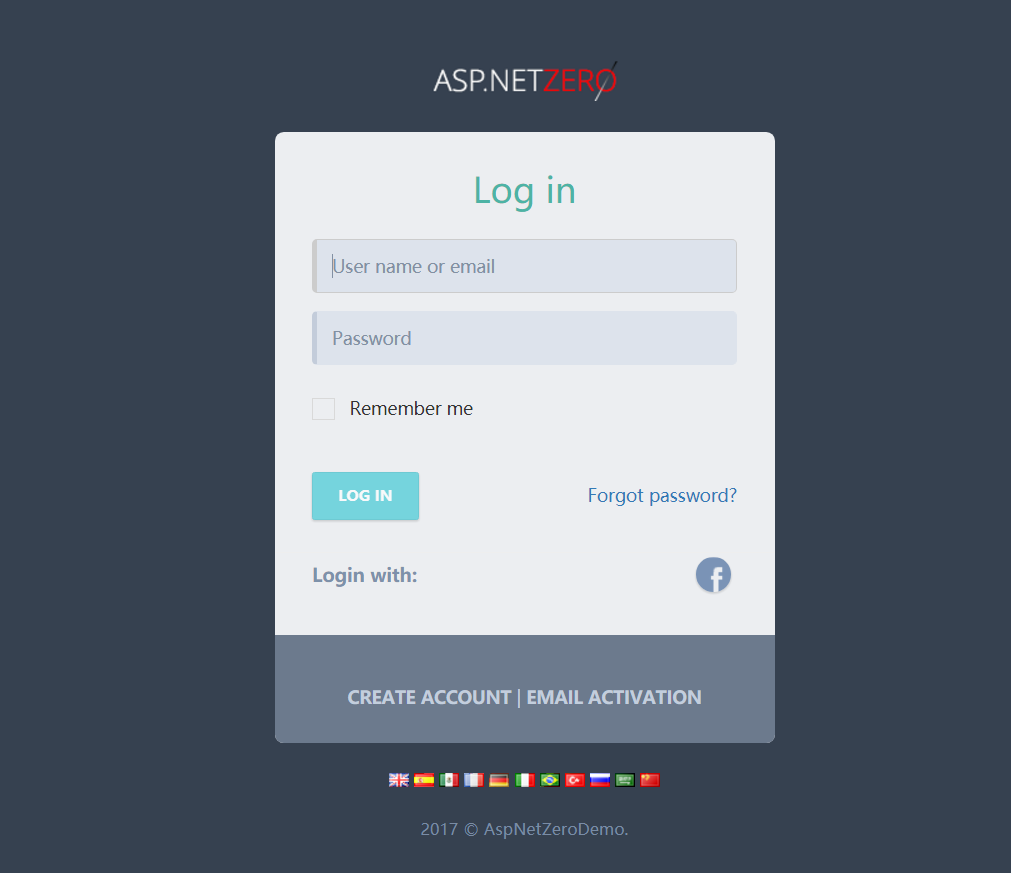
дҪҝз”Ёжј”зӨәзҡ„з”ЁжҲ·еҗҚе’ҢеҜҶз Ғзҷ»йҷҶиҝӣеҺ»
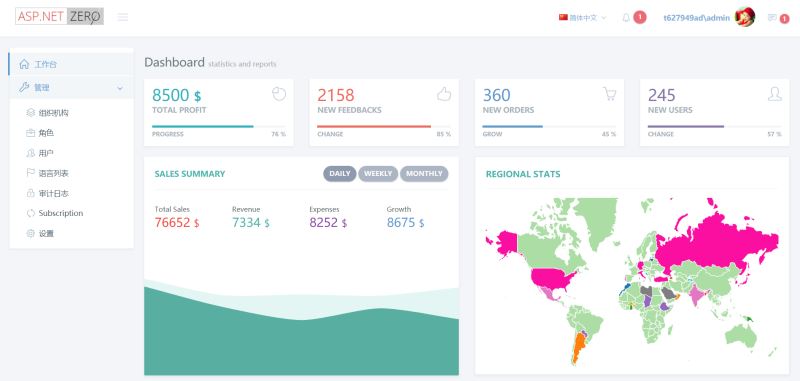
еҸҜд»ҘзңӢеҲ°ZeroжЁЎеқ—зҡ„е®һзҺ°ж•ҲжһңгҖӮ
дәҢгҖҒjTableеңЁABPдёӯзҡ„иҝҗз”Ё
еҰӮжһңдҪ дёӢиҪҪABPзҡ„жәҗз ҒпјҢ并且йҖүжӢ©зҡ„жҳҜж··еҗҲејҖеҸ‘жЁЎејҸпјҲABPжҸҗдҫӣдәҶдёӨз§ҚејҖеҸ‘жЁЎејҸпјҢдёҖз§ҚжҳҜеҹәдәҺMVVMзҡ„Angular.jsзҡ„жЁЎејҸпјӣеҸҰдёҖз§Қе°ұжҳҜMVC+jQueryзҡ„ж··еҗҲејҖеҸ‘жЁЎејҸпјүпјҢеҰӮдёӢеӣҫпјҡ
еҪ“дҪ DownдёӢжқҘжәҗз Ғд№ӢеҗҺдҪ е°ұдјҡеҸ‘зҺ°пјҢABPзҡ„жәҗз ҒйҮҢйқўзҡ„UIйғЁеҲҶзҡ„иЎЁж јйғҪжҳҜдҪҝз”ЁjTableеҺ»е®һзҺ°зҡ„гҖӮдёәд»Җд№Ҳдјҡз”ЁjTableпјҹеҺҹеӣ еҫҲз®ҖеҚ•пјҢjTableжҳҜABPзҡ„дҪңиҖ…kalkanеҶҷзҡ„дёҖж¬ҫејҖжәҗжҸ’件пјҢиҮӘе·ұеҶҷзҡ„иӮҜе®ҡз”ЁиҮӘе·ұзҡ„дёңиҘҝе–ҪгҖӮдёӢйқўjTableзҡ„ж•ҲжһңжқҘдёҖеҸ‘гҖӮ
жқҘдёҖдёӘjtableзҡ„зҲ¶еӯҗиЎЁпјҡ
еҰӮжһңжҳҜдёҚеёҰзҲ¶еӯҗиЎЁзҡ„з®ҖеҚ•иЎЁж јпјҢе…¶е®һjTableзҡ„ж•Ҳжһңе…¶е®һиҝҳиЎҢпјҢеҸҜжҳҜеҠ дёҠдёҖдәӣеӨҚжқӮзҡ„еҠҹиғҪд№ӢеҗҺпјҢйӮЈдёҖзүҮзүҮи“қиүІзҡ„еҢәеҹҹдёҚеҝҚзӣҙи§ҶпјҢ并且jTableзҡ„apiиҝҳжңүеҫ…е®Ңе–„пјҢеҫҲеӨҡйңҖиҰҒзҡ„еҠҹиғҪйғҪйңҖиҰҒиҮӘе·ұеҺ»е®һзҺ°пјҢдәҺжҳҜе°ұжҺҘеҲ°дәҶе°ҶжүҖжңүзҡ„иЎЁж јз»„д»¶жҚўжҲҗBootstrapTableзҡ„йңҖжұӮпјҢжүҚжңүдәҶд»ҠеӨ©зҡ„дё»йўҳпјҡеңЁABPдёӯе°ҒиЈ…BootstrapTableгҖӮ
дёүгҖҒBootstrap TableеңЁABPдёӯзҡ„е°ҒиЈ…
жҺҘеҲ°йңҖжұӮпјҢеҚҡдё»еҗ„з§ҚзҷҫеәҰгҖҒеҗ„з§Қи°·жӯҢпјҢйғҪжүҫдёҚеҲ°Bootstrap Table组件еңЁABPдёӯзҡ„е°ҒиЈ…пјҢжңүзҡ„еҸӘжҳҜеңЁABPзҡ„йЎ№зӣ®йҮҢйқўз®ҖеҚ•зҡ„з”Ёдј з»ҹзҡ„ж–№ејҸеҺ»еҲқе§ӢеҢ–组件пјҢиҝҷ并дёҚжҳҜеҚҡдё»жғіиҰҒзҡ„гҖӮиҜҙеҲ°иҝҷйҮҢдёҚеҫ—дёҚиҜҙдёҖдёӢпјҢеҰӮжһңдҪ дҪҝз”ЁABPејҖеҸ‘зҡ„иҝҮзЁӢдёӯйҒҮеҲ°дёҖдәӣйҡҫйўҳпјҢдҪ дјҡеҸ‘зҺ°еҫҲйҡҫд»ҺзҷҫеәҰйҮҢйқўжҗңзҙўеҲ°зӣёе…ізӯ”жЎҲпјҢи°·жӯҢйҮҢйқўжңүж—¶иғҪжүҫеҲ°пјҢдҪҶеӨ§йғЁеҲҶйғҪжҳҜиӢұж–ҮзӨҫеҢәпјҢжүҖд»ҘеҰӮжһңдҪ иӢұж–ҮиҫғејұпјҢеңЁжҹҘжүҫиө„ж–ҷдёҠйқўдјҡеҫҲеҗғдәҸпјҢжңүж—¶дёҖдёӘз®ҖеҚ•зҡ„й…ҚзҪ®й—®йўҳйңҖиҰҒжҠҳи…ҫеҫҲд№…гҖӮ
1гҖҒjTableеңЁABPйЎ№зӣ®йҮҢйқўзҡ„еҲқе§ӢеҢ–
йҰ–е…ҲжқҘзңӢзңӢjTableеңЁдёҖиҲ¬зҡ„ABPйЎ№зӣ®йҮҢйқўжҳҜеҰӮдҪ•еҲқе§ӢеҢ–зҡ„гҖӮжҜ”еҰӮжҲ‘们еңЁApplicationйҮҢйқўжңүдёҖдёӘеҰӮдёӢзҡ„жҺҘеҸЈе’Ңе®һзҺ°
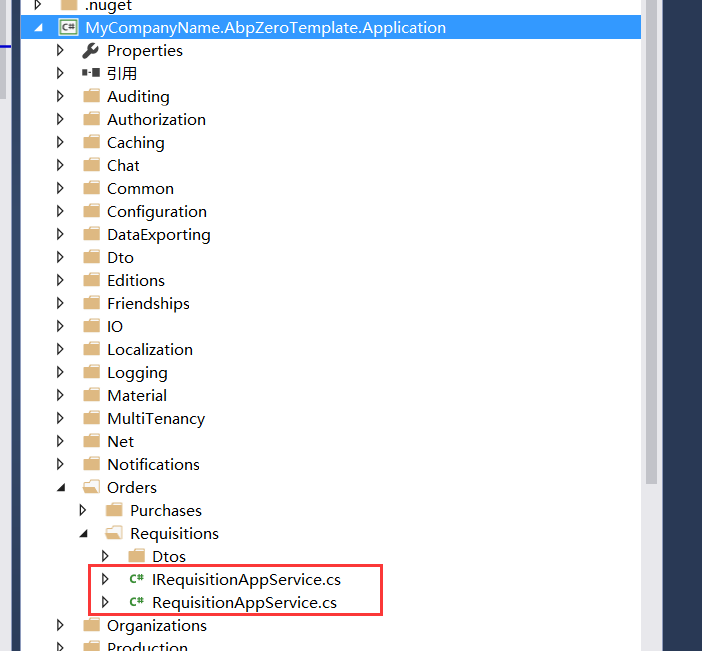
public interface IRequisitionAppService : IApplicationService { Task<PagedResultDto<RequisitionListDto>> GetRequisitionListAsync(GetRequisitionListInput input); } гҖҖгҖҖ[AbpAuthorize(OrderAppPermissions.Pages_Order_Requisition)] public class RequisitionAppService : AbpZeroTemplateAppServiceBase, IRequisitionAppService { private readonly IRepository<Requisition, long> _requisitionRepository; public RequisitionAppService(IRepository<Requisition, long> requisitionRepository) { _requisitionRepository = requisitionRepository; } гҖҖгҖҖгҖҖгҖҖ public async Task<PagedResultDto<RequisitionListDto>> GetRequisitionListAsync(GetRequisitionListInput input) { var query = _requisitionRepository.GetAll() .WhereIf(input.Status != null, w => (int)w.Status == input.Status.Value) .WhereIf( !input.Filter.IsNullOrWhiteSpace(), u => u.No.Contains(input.Filter) || u.Remark.Contains(input.Filter) ); var count = await query.CountAsync(); var list = await query .OrderBy(input.Sorting) .PageBy(input) .ToListAsync(); var dtos = list.MapTo<List<RequisitionListDto>>(); return new PagedResultDto<RequisitionListDto>( count, dtos ); } }然еҗҺжҲ‘们еүҚз«ҜжңүдёҖдёӘйЎөйқўзҡ„еҲ—иЎЁж•°жҚ®д»ҺиҝҷдёӘжҺҘеҸЈGetRequisitionListAsync()иҺ·еҸ–
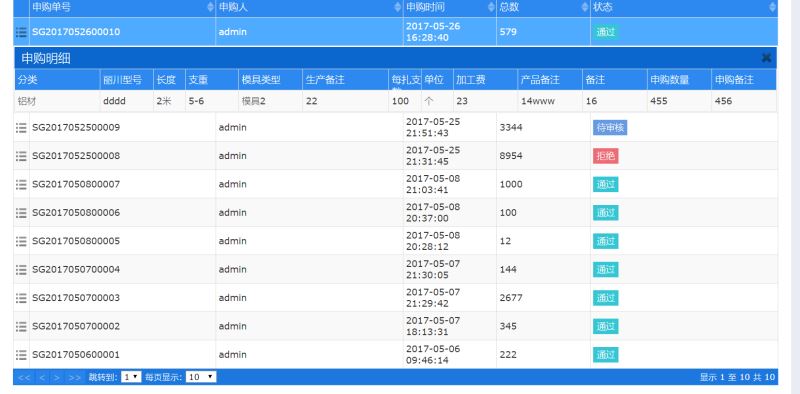
<div class="portlet-body"> <div id="dataListTable"></div> </div> (function () { $(function () { var _$dataListTable = $('#dataListTable'); var _service = abp.services.app.requisition; _$dataListTable.jtable({ paging: true, sorting: true, selecting: true, actions: { listAction: { method: _service.getRequisitionListAsync } }, fields: { id: { key: true, list: false }, details: { width: '1%', sorting: false, edit: false, create: false, listClass: 'child-opener-image-column', display: function (detailData) { var $img = $('<img class="child-opener-image" src="/Common/Images/list_metro.png" title="з”іиҙӯжҳҺз»Ҷ" />'); $img.click(function () { _$dataListTable.jtable('openChildTable', $img.closest('tr'), { title: "з”іиҙӯжҳҺз»Ҷ", showCloseButton: true, actions: { listAction: { method: _service.getRequisitionDetailListByIdAsync } }, fields: { materialClassParentNameAndName: { title: app.localize('MaterialClassName'), width: '8%' }, materialInfoTypeNo: { title: app.localize('TypeNo'), width: '5%' }, materialInfoLengthDisplayName: { title: app.localize('LengthDisplayName'), width: '3%' }, materialInfoWeight: { title: app.localize('Weight'), width: '5%', display: function (data) { return data.record.materialInfoMinWeight + '-' + data.record.materialInfoMaxWeight; } }, materialInfoMouldTypeDisplayName: { title: app.localize('MouldTypeDisplayName'), width: '6%' }, materialInfoProductionRemark: { title: app.localize('ProductionRemark'), width: '8%' }, materialInfoBundleCountDisplayName: { title: app.localize('BundleCountDisplayName'), width: '3%' }, materialInfoUnitDisplayName: { title: app.localize('UnitDisplayName'), width: '3%' }, materialInfoProcessCost: { title: app.localize('ProcessCost'), width: '6%' }, materialInfoProductRemark: { title: app.localize('ProductRemark'), width: '6%' }, materialInfoRemark: { title: app.localize('Remark'), width: '6%' }, count: { title: app.localize('з”іиҙӯж•°йҮҸ'), width: '6%' }, remark: { title: app.localize('з”іиҙӯеӨҮжіЁ'), width: '6%' } } }, function (data) { data.childTable.jtable('load', { requisitionId: detailData.record.id } ); }); }); return $img; } }, no: { title: "з”іиҙӯеҚ•еҸ·", width: '20%' }, creatorUserName: { title: "з”іиҙӯдәә", width: '20%' }, creationTime: { title: "з”іиҙӯж—¶й—ҙ", width: '10%', display: function (data) { return moment(data.record.creationTime).format('YYYY-MM-DD HH:mm:ss'); } }, sumCount: { title: "жҖ»ж•°", width: '10%' }, status: { title: "зҠ¶жҖҒ", width: '20%', display: function (data) { if (data.record.status === app.order.requisitionAuditStatus.audit) return '<span class="label label-info">' + app.localize('Autdit') + '</span>' else if (data.record.status === app.order.requisitionAuditStatus.auditPass) return '<span class="label label-success">' + app.localize('Pass') + '</span>' else if (data.record.status === app.order.requisitionAuditStatus.auditReject) return '<span class="label label-danger">' + app.localize('Reject') + '</span>' else if (data.record.status === app.order.requisitionAuditStatus.delete) return '<span class="label label-danger">' + app.localize('Abandon') + '</span>' else return '<span class="label label-danger">' + app.localize('Unknown') + '</span>' } } } }); }); })();еҫ—еҲ°еҰӮдёӢж•Ҳжһңпјҡ
д»Јз ҒйҮҠз–‘пјҡ
пјҲ1пјү var _service = abp.services.app.requisition; иҝҷдёҖеҸҘеЈ°жҳҺеҪ“еүҚйЎөйқўйңҖиҰҒдҪҝз”Ёе“ӘдёӘжңҚеҠЎгҖӮ
пјҲ2пјү _service.getRequisitionListAsync иҝҷдёҖеҸҘеҜ№еә”зҡ„жҳҜжңҚеҠЎи°ғз”Ёзҡ„ж–№жі•пјҢдҪ дјҡеҸ‘зҺ°еңЁеҗҺеҸ°ж–№жі•еҗҚжҳҜGetRequisitionListAsync()пјҢиҖҢеңЁjsйҮҢйқўеҚҙеҸҳжҲҗдәҶgetRequisitionListAsync()пјҢжҲ‘们жҡӮдё”з§°д№ӢдёәвҖңжҪң规еҲҷвҖқгҖӮ
2гҖҒbootstrapTableеңЁABPйЎ№зӣ®йҮҢйқўзҡ„е°ҒиЈ…
йҖҡиҝҮдёҠиҝ°д»Јз ҒдҪ дјҡеҸ‘зҺ°пјҢABPеңЁapplicationеұӮйҮҢйқўе®ҡд№үзҡ„ж–№жі•пјҢжңҖз»Ҳдјҡз”ҹжҲҗжҹҗдёҖдәӣjsеҜ№еә”зҡ„functionпјҢиҝҷйҮҢйҡҫзӮ№жқҘдәҶгҖӮжҲ‘们жүҫйҒҚдәҶbootstrapTable组件зҡ„apiпјҢйғҪжІЎжңүйҖҡиҝҮжҹҗдёҖдёӘfunctionеҺ»иҺ·еҸ–ж•°жҚ®зҡ„е•ҠгҖӮиҝҷеҸҜеҰӮдҪ•жҳҜеҘҪпјҹдёәиҝҷдёӘй—®йўҳпјҢеҚҡдё»жҠҳи…ҫдәҶдёӨеӨ©гҖӮжңҖејҖе§ӢеҚҡдё»жғіпјҢfunctionжңҖз»ҲиҝҳдёҚжҳҜиҰҒжҚўжҲҗhttpиҜ·жұӮзҡ„пјҢжҲ‘们еҸӘиҰҒжӢҝеҲ°httpиҜ·жұӮзҡ„urlпјҢ然еҗҺе°ҶfunctionиҪ¬жҚўдёәurlдёҚе°ұиЎҢдәҶд№Ҳпјҡ

жҲ‘们дҪҝз”ЁbootstrapTable组件еҲқе§ӢеҢ–зҡ„ж—¶еҖҷеЈ°жҳҺ {url:'/api/services/app/requisition/GetRequisitionListAsync'} иҝҷж ·дёҚе°ұиЎҢдәҶд№Ҳпјҹе‘өе‘өпјҢз»ҸиҝҮжөӢиҜ•пјҢиҝҷж ·зЎ®е®һиғҪжӯЈзЎ®еҸ–еҲ°ж•°жҚ®гҖӮдҪҶжҳҜдёҚеӨҹзҗҶжғіпјҢеӣ дёәиҝҷеүҚйқўзҡ„еүҚзјҖжҳҜABPз»ҷжҲ‘们з”ҹжҲҗзҡ„пјҢжҳҜеҗҰдјҡеҸҳеҢ–жҲ‘们е°ҡдё”дёҚиҜҙпјҢз»ҷжҜҸдёҖдёӘurlеҠ дёҠиҝҷд№ҲдёҖй•ҝдёІзқҖе®һзңӢзқҖеҫҲдёҚзҲҪпјҢдәҺжҳҜиҝӣдёҖжӯҘжғіпјҢжҳҜеҗҰжҲ‘们зҡ„bootstrapTableд№ҹеҸҜд»ҘдҪҝз”ЁfunctionеҺ»еҲқе§ӢеҢ–е‘ўпјҢ组件没жңүпјҢйҡҫйҒ“жҲ‘们е°ұдёҚиғҪз»ҷд»–жү©еұ•дёҖдёӘеҗ—пјҹжҲ‘们дёҚз”ЁurlиҺ·еҸ–ж•°жҚ®пјҢйҖҡиҝҮи°ғз”ЁиҝҷдёӘfunctionеҸ–еҲ°ж•°жҚ®пјҢ然еҗҺе°Ҷж•°жҚ®жёІжҹ“еҲ°з»„件дёҚе°ұиЎҢдәҶгҖӮжҖқи·ҜжңүдәҶпјҢйӮЈд№ҲиҝҷйҮҢжңүдёӨдёӘйҡҫйўҳпјҡдёҖжҳҜеҰӮдҪ•е°ҶеҺҹжқҘurlзҡ„ж–№ејҸеҸҳжҲҗиҝҷйҮҢзҡ„и°ғз”Ёfunctionзҡ„ж–№ејҸе‘ўпјҹдәҢжҳҜеҸӮж•°зҡ„е°ҒиЈ…гҖӮз»ҸиҝҮжҹҘзңӢ组件зҡ„жәҗз ҒеҸ‘зҺ°пјҢеҰӮжһңжҳҜжңҚеҠЎз«ҜеҲҶйЎөпјҢ组件жңҖз»ҲжҳҜиҝӣе…ҘеҲ°initServer()иҝҷдёӘж–№жі•еҺ»иҺ·еҸ–ж•°жҚ®пјҢ然еҗҺжёІжҹ“еҲ°йЎөйқўдёҠйқўзҡ„пјҢ组件еҺҹе§Ӣзҡ„initServer()ж–№жі•еҰӮдёӢпјҡ
BootstrapTable.prototype.initServer = function (silent, query) { var that = this, data = {}, params = { pageSize: this.options.pageSize === this.options.formatAllRows() ? this.options.totalRows : this.options.pageSize, pageNumber: this.options.pageNumber, searchText: this.searchText, sortName: this.options.sortName, sortOrder: this.options.sortOrder }, request; if (!this.options.url && !this.options.ajax) { return; } if (this.options.queryParamsType === 'limit') { params = { search: params.searchText, sort: params.sortName, order: params.sortOrder }; if (this.options.pagination) { params.limit = this.options.pageSize === this.options.formatAllRows() ? this.options.totalRows : this.options.pageSize; params.offset = this.options.pageSize === this.options.formatAllRows() ? : this.options.pageSize * (this.options.pageNumber - 1); } } if (!($.isEmptyObject(this.filterColumnsPartial))) { params['filter'] = JSON.stringify(this.filterColumnsPartial, null); } data = calculateObjectValue(this.options, this.options.queryParams, [params], data); $.extend(data, query || {}); // false to stop request if (data === false) { return; } if (!silent) { this.$tableLoading.show(); } request = $.extend({}, calculateObjectValue(null, this.options.ajaxOptions), { type: this.options.method, url: this.options.url, data: this.options.contentType === 'application/json' && this.options.method === 'post' ? JSON.stringify(data) : data, cache: this.options.cache, contentType: this.options.contentType, dataType: this.options.dataType, success: function (res) { res = calculateObjectValue(that.options, that.options.responseHandler, [res], res); that.load(res); that.trigger('load-success', res); }, error: function (res) { that.trigger('load-error', res.status, res); }, complete: function () { if (!silent) { that.$tableLoading.hide(); } } }); if (this.options.ajax) { calculateObjectValue(this, this.options.ajax, [request], null); } else { $.ajax(request); } };д»Јз ҒдёҚйҡҫиҜ»жҮӮпјҢи§ЈжһҗеҸӮж•°пјҢж•ҙеҗҲеҸӮж•°пјҢеҫ—еҲ°еҸӮж•°пјҢеҸ‘йҖҒajaxиҜ·жұӮпјҢеңЁsuccessдәӢ件йҮҢйқўе°Ҷеҫ—еҲ°зҡ„ж•°жҚ®жёІжҹ“еҲ°з•ҢйқўгҖӮиҜ»жҮӮдәҶиҝҷж®өд»Јз ҒпјҢжҲ‘们еҶҚжқҘе°ҒиЈ…functionе°ұе®№жҳ“еӨҡдәҶгҖӮ
жңҖз»ҲжҲ‘们е°ҒиЈ…зҡ„д»Јз ҒеҰӮдёӢпјҡ
(function ($) { 'use strict'; //debugger; //йҖҡиҝҮжһ„йҖ еҮҪж•°иҺ·еҸ–еҲ°bootstrapTableйҮҢйқўзҡ„еҲқе§ӢеҢ–ж–№жі• var BootstrapTable = $.fn.bootstrapTable.Constructor, _initData = BootstrapTable.prototype.initData, _initPagination = BootstrapTable.prototype.initPagination, _initBody = BootstrapTable.prototype.initBody, _initServer = BootstrapTable.prototype.initServer, _initContainer = BootstrapTable.prototype.initContainer; //йҮҚеҶҷ BootstrapTable.prototype.initData = function () { _initData.apply(this, Array.prototype.slice.apply(arguments)); }; BootstrapTable.prototype.initPagination = function () { _initPagination.apply(this, Array.prototype.slice.apply(arguments)); }; BootstrapTable.prototype.initBody = function (fixedScroll) { _initBody.apply(this, Array.prototype.slice.apply(arguments)); }; BootstrapTable.prototype.initServer = function (silent, query) { //жһ„йҖ иҮӘе®ҡд№үеҸӮж•° for (var key in this.options.methodParams) { $.fn.bootstrapTable.defaults.methodParams[key] = this.options.methodParams[key]; } //еҰӮжһңдј дәҶurlпјҢеҲҷиө°еҺҹжқҘзҡ„йҖ»иҫ‘ if (this.options.url) { _initServer.apply(this, Array.prototype.slice.apply(arguments)); return; } //еҰӮжһңе®ҡд№үдәҶabpMethodпјҢеҲҷиө°abpMethodзҡ„йҖ»иҫ‘ if (!this.options.abpMethod) { return; } var that = this, data = {}, params = { pageSize: this.options.pageSize === this.options.formatAllRows() ? this.options.totalRows : this.options.pageSize, pageNumber: this.options.pageNumber, searchText: this.searchText, sortName: this.options.sortName, sortOrder: this.options.sortOrder }, request; //debugger; if (this.options.queryParamsType === 'limit') { params = { search: params.searchText, sort: params.sortName, order: params.sortOrder }; if (this.options.pagination) { params.limit = this.options.pageSize === this.options.formatAllRows() ? this.options.totalRows : this.options.pageSize; params.offset = this.options.pageSize === this.options.formatAllRows() ? 0 : this.options.pageSize * (this.options.pageNumber - 1); } } if (!($.isEmptyObject(this.filterColumnsPartial))) { params['filter'] = JSON.stringify(this.filterColumnsPartial, null); } data = $.fn.bootstrapTable.utils.calculateObjectValue(this.options, this.options.queryParams, [params], data); $.extend(data, query || {}); // false to stop request if (data === false) { return; } if (!silent) { this.$tableLoading.show(); } this.options.abpMethod(data).done(function (result) { result = $.fn.bootstrapTable.utils.calculateObjectValue(that.options, that.options.responseHandler, [result], result); that.load(result); that.trigger('load-success', result); }); request = $.extend({}, $.fn.bootstrapTable.utils.calculateObjectValue(null, this.options.ajaxOptions), { type: this.options.method, url: this.options.url, data: this.options.contentType === 'application/json' && this.options.method === 'post' ? JSON.stringify(data) : data, cache: this.options.cache, contentType: this.options.contentType, dataType: this.options.dataType, success: function (res) { debugger; res = $.fn.bootstrapTable.utils.calculateObjectValue(that.options, that.options.responseHandler, [res], res); that.load(res); that.trigger('load-success', res); }, error: function (res) { that.trigger('load-error', res.status, res); }, complete: function () { if (!silent) { that.$tableLoading.hide(); } } }); if (this.options.ajax) { $.fn.bootstrapTable.utils.calculateObjectValue(this, this.options.ajax, [request], null); } else { $.ajax(request); } } BootstrapTable.prototype.initContainer = function () { _initContainer.apply(this, Array.prototype.slice.apply(arguments)); }; abp.bootstrapTableDefaults = { striped: false, classes: 'table table-striped table-bordered table-advance table-hover', pagination: true, cache: false, sidePagination: 'server', uniqueId: 'id', showRefresh: false, search: false, method: 'post', //toolbar: '#toolbar', pageSize: 10, paginationPreText: 'дёҠдёҖйЎө', paginationNextText: 'дёӢдёҖйЎө', queryParams: function (param) { //$.fn.bootstrapTable.defaults.methodParams.propertyIsEnumerable() var abpParam = { Sorting: param.sort, filter: param.search, skipCount: param.offset, maxResultCount: param.limit }; for (var key in $.fn.bootstrapTable.defaults.methodParams) { abpParam[key] = $.fn.bootstrapTable.defaults.methodParams[key]; } return abpParam; }, responseHandler: function (res) { if (res.totalCount) return { total: res.totalCount, rows: res.items }; else return { total: res.result.totalCount, rows: res.result.items }; }, methodParams: {}, abpMethod: function () { } }; $.extend($.fn.bootstrapTable.defaults, abp.bootstrapTableDefaults); })(jQuery);д»Јз ҒйҮҠз–‘пјҡеўһеҠ дёӨдёӘеҸӮж•° methodParams: {},abpMethod: function () { } жқҘиҺ·еҸ–abpзҡ„functionе’ҢеҸӮж•°пјҢ然еҗҺиҺ·еҸ–ж•°жҚ®зҡ„ж—¶еҖҷеҰӮжһңе®ҡд№үдәҶabpMethodпјҢеҲҷйҖҡиҝҮfunctionиҺ·еҸ–ж•°жҚ®пјҢеҗҰеҲҷиҝҳжҳҜиө°еҺҹжқҘзҡ„йҖ»иҫ‘гҖӮ
然еҗҺжҲ‘们и°ғз”Ёе°ұз®ҖеҚ•дәҶ
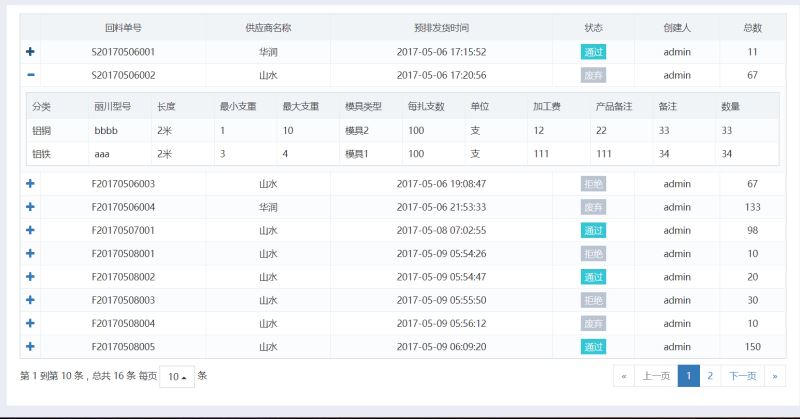
//йҖүеҸ–з•ҢйқўдёҠиҰҒе…Ҳж•°жҚ®зҡ„иЎЁж ј var _$SendOrdersTable = $('#SendOrdersTable'); //иҺ·еҸ–жңҚеҠЎеұӮж–№жі• var _SendOrderService = abp.services.app.sendOrder; _$SendOrdersTable.bootstrapTable({ abpMethod: _SendOrderService.getSendOrderListAsync, detailView: true, onExpandRow: function (index, row, $detail) { var cur_table = $detail.html('<table></table>').find('table'); $(cur_table).bootstrapTable({ showRefresh: false, search: false, pagination: false, abpMethod: _SendOrderService.getSendOrderDetailListAsync, methodParams: { SendOrderId: row.id }, columns: [ { field: 'materialClassName', title: app.localize('MaterialClassName'), width: '8%' }, { field: 'typeNo', title: app.localize('TypeNo'), width: '8%' } ] }); }, columns: [{ field: 'no', title: app.localize('SendOrderNO'), align: 'center' }, { field: 'supplierName', title: app.localize('SupplierName'), align: 'center' }, { title: app.localize('SendOrderTime'), align: 'center', field: 'createdDate', formatter: function (data) { return moment(data).format('YYYY-MM-DD HH:mm:ss'); } }, { field: 'status', align: 'center', title: app.localize('SendOrderStatus'), formatter: function (data) { var value = ""; if (data == 1) { value = '<span class="label label-info">' + app.localize('Autdit') + '</span>'; } else if (data == 2) { value = '<span class="label label-success">' + app.localize('Pass') + '</span>'; } else if (data == 3) { value = '<span class="label label-default">' + app.localize('Reject') + '</span>'; } else value = '<span class="label label-default">' + app.localize('Abandon') + '</span>'; return value; } }, { field: 'createName', align: 'center', title: app.localize('SendOrderCreator'), }, { field: 'sumCount', align: 'center', title: app.localize('SendOrderTotalCount'), }, ] });еҫ—еҲ°еҰӮдёӢж•Ҳжһң
дёҠиҝ°еҶ…е®№е°ұжҳҜеҰӮдҪ•еңЁABPжЎҶжһ¶дёӯдҪҝз”ЁBootstrapTable组件пјҢдҪ 们еӯҰеҲ°зҹҘиҜҶжҲ–жҠҖиғҪдәҶеҗ—пјҹеҰӮжһңиҝҳжғіеӯҰеҲ°жӣҙеӨҡжҠҖиғҪжҲ–иҖ…дё°еҜҢиҮӘе·ұзҡ„зҹҘиҜҶеӮЁеӨҮпјҢж¬ўиҝҺе…іжіЁдәҝйҖҹдә‘иЎҢдёҡиө„и®Ҝйў‘йҒ“гҖӮ
е…ҚиҙЈеЈ°жҳҺпјҡжң¬з«ҷеҸ‘еёғзҡ„еҶ…е®№пјҲеӣҫзүҮгҖҒи§Ҷйў‘е’Ңж–Үеӯ—пјүд»ҘеҺҹеҲӣгҖҒиҪ¬иҪҪе’ҢеҲҶдә«дёәдё»пјҢж–Үз« и§ӮзӮ№дёҚд»ЈиЎЁжң¬зҪ‘з«ҷз«ӢеңәпјҢеҰӮжһңж¶үеҸҠдҫөжқғиҜ·иҒ”зі»з«ҷй•ҝйӮ®з®ұпјҡis@yisu.comиҝӣиЎҢдёҫжҠҘпјҢ并жҸҗдҫӣзӣёе…іиҜҒжҚ®пјҢдёҖз»ҸжҹҘе®һпјҢе°Ҷз«ӢеҲ»еҲ йҷӨж¶үе«ҢдҫөжқғеҶ…е®№гҖӮ

дәҝйҖҹдә‘е…¬дј—еҸ·

жүӢжңәзҪ‘з«ҷдәҢз»ҙз Ғ


