这篇文章主要介绍如何搭建laravel5.4+vue+element环境,文中介绍的非常详细,具有一定的参考价值,感兴趣的小伙伴们一定要看完!
具体步骤如下:
1.下载laravel5.4,这边是下载地址(里面的配置文件都写得差不多了)!
2.打开package.json
内容如下
{ "private": true, "scripts": { "dev": "node node_modules/cross-env/bin/cross-env.js NODE_ENV=development node_modules/webpack/bin/webpack.js --progress --hide-modules --config=node_modules/laravel-mix/setup/webpack.config.js", "watch": "node node_modules/cross-env/bin/cross-env.js NODE_ENV=development node_modules/webpack/bin/webpack.js --watch --progress --hide-modules --config=node_modules/laravel-mix/setup/webpack.config.js", "hot": "node node_modules/cross-env/bin/cross-env.js NODE_ENV=development node_modules/webpack-dev-server/bin/webpack-dev-server.js --inline --hot --config=node_modules/laravel-mix/setup/webpack.config.js", "production": "node node_modules/cross-env/bin/cross-env.js NODE_ENV=production node_modules/webpack/bin/webpack.js --progress --hide-modules --config=node_modules/laravel-mix/setup/webpack.config.js" }, "devDependencies": { "axios": "^0.15.2", "bootstrap-sass": "^3.3.7", "jquery": "^3.1.0", "laravel-mix": "^0.6.0", "lodash": "^4.16.2", "vue": "^2.0.1" } }修改一下
{ "private": true, "scripts": { "dev": "cross-env NODE_ENV=development node_modules/webpack/bin/webpack.js --progress --hide-modules --config=node_modules/laravel-mix/setup/webpack.config.js", "watch": "cross-en NODE_ENV=development node_modules/webpack/bin/webpack.js --watch --progress --hide-modules --config=node_modules/laravel-mix/setup/webpack.config.js", "hot": "cross-env NODE_ENV=development node_modules/webpack-dev-server/bin/webpack-dev-server.js --inline --hot --config=node_modules/laravel-mix/setup/webpack.config.js", "production": "cross-env NODE_ENV=production node_modules/webpack/bin/webpack.js --progress --hide-modules --config=node_modules/laravel-mix/setup/webpack.config.js" }, "devDependencies": { "axios": "^0.15.3", "bootstrap-sass": "^3.3.7", "jquery": "^3.1.1", "laravel-mix": "^0.8.3", "cross-env": "^3.2.3", "lodash": "^4.17.4", "vue": "^2.1.10", "element-ui": "^1.2.8", "vue-loader": "^11.3.4", "vue-router": "^2.4.0" } }修改的地方看清楚哦
lodash的版本改为^4.17.4,否则编译会出错,请注意红色字体
laravel5.4的mix挺好用,建议大家去看一下,这是地址
3.在根目录运行 cnpm install
注意是cnpm,尤其是windows用户,不然将会报错
4.然后修改resources/assets/js/bootstrap.js
30多行有
复制代码 代码如下:
window.axios.defaults.headers.common = { 'X-CSRF-TOKEN': ......., 'X-Requested-With': 'XMLHttpRequest'};
把'X-CSRF-TOKEN'这一项改为
复制代码 代码如下:
'X-CSRF-TOKEN': document.querySelector('meta[name="X-CSRF-TOKEN"]').content,
否则,不能成功获取csrf
5.修改resources/assets/js/app.js
这里简单测试一下,并没有引入element
/** * First we will load all of this project's JavaScript dependencies which * includes Vue and other libraries. It is a great starting point when * building robust, powerful web applications using Vue and Laravel. */ require('./bootstrap'); /** * Next, we will create a fresh Vue application instance and attach it to * the page. Then, you may begin adding components to this application * or customize the JavaScript scaffolding to fit your unique needs. */ import App from "./components/Example.vue" const app = new Vue({ el: '#app', render: h => h(App) });6.修改resources/views/welcome.blade.php
<!DOCTYPE html> <html lang="{{ config('app.locale') }}"> <head> <meta charset="utf-8"> <meta http-equiv="X-UA-Compatible" content="IE=edge"> <meta name="viewport" content="width=device-width, initial-scale=1"> <meta name="X-CSRF-TOKEN" content="{{csrf_token()}}"> <title>123</title> </head> <body> <div id="app"></div> <script src="{{ mix('js/app.js') }}"></script> </body> </html>然后运行npm run watch
这就简单搭建成功了
第二种方法,没有用到mix
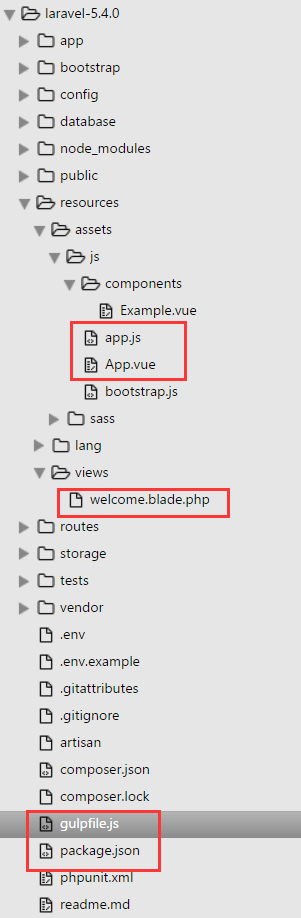
下图为我动到的文件
1.下载laravel5.4
2.命令行(laravel5.4目录下):composer install
3.新建.env文件,把.env.example里的内容复制到.env文件中
4.生成key,命令行:PHP artisan key:generate
5.配置文件package.json,内容如下:
{ "private": true, "scripts": { "prod": "gulp --production", "dev": "gulp watch" }, "devDependencies": { "babel-core": "^6.20.0", "babel-loader": "^6.2.9", "css-loader": "^0.25.0", "element-ui": "^1.1.1", "gulp": "^3.9.1", "handsontable": "0.27.0", "laravel-elixir": "^6.0.0-15", "laravel-elixir-vue-2": "^0.2.0", "laravel-elixir-webpack-official": "^1.0.10", "style-loader": "^0.13.1", "vue": "^2.1.4", "vue-loader": "^10.0.0", "vue-resource": "^1.0.3", "vue-router": "^2.1.1", "vue-template-compiler": "^2.1.4", "axios": "^0.15.2", "bootstrap-sass": "^3.3.7", "jquery": "^3.1.0", "laravel-mix": "^0.5.0", "lodash": "^4.16.2" }, "dependencies": {} }6.命令行(没有npm的自行下载):npm install
7.resources/assets/js下新建App.vue文件,内容如下:
<template> <div id="app"> <router-view></router-view> </div> </template>
8.resources/assets/js/app.js
/** * First we will load all of this project's JavaScript dependencies which * includes Vue and other libraries. It is a great starting point when * building robust, powerful web applications using Vue and Laravel. */ require('./bootstrap'); /** * Next, we will create a fresh Vue application instance and attach it to * the page. Then, you may begin adding components to this application * or customize the JavaScript scaffolding to fit your unique needs. */ import App from './App.vue' import VueRouter from 'vue-router' import ElementUI from 'element-ui' import 'element-ui/lib/theme-default/index.css' Vue.use(VueRouter) Vue.use(ElementUI) const router = new VueRouter({ routes: [ { path: '/', component: require('./components/Example.vue') } ] }) const app = new Vue({ el: '#app', router, template: '<App/>', components: { App } });9.把resources/view/welcome.blade.php改为:
<!DOCTYPE html> <html lang="en"> <head> <meta charset="UTF-8"> <title>Hello</title> </head> <body> <div id="app"></div> <script src="{{ asset('js/app.js') }}"></script> </body> </html>10.在主目录下新建gulpfile.js文件,内容:
const elixir = require('laravel-elixir'); const path = require('path'); require('laravel-elixir-vue-2'); /* |-------------------------------------------------------------------------- | Elixir Asset Management |-------------------------------------------------------------------------- | | Elixir provides a clean, fluent API for defining some basic Gulp tasks | for your Laravel application. By default, we are compiling the Sass | file for our application, as well as publishing vendor resources. | */ elixir(mix => { // Elixir.webpack.config.module.loaders = []; Elixir.webpack.mergeConfig({ resolveLoader: { root: path.join(__dirname, 'node_modules'), }, module: { loaders: [ { test: /\.css$/, loader: 'style!css' } ] } }); mix.sass('app.scss') .webpack('app.js') });11.命令行(没有gulp,自行下载):gulp watch
这样就简单的搭建完成了,可以访问了!
以上是“如何搭建laravel5.4+vue+element环境”这篇文章的所有内容,感谢各位的阅读!希望分享的内容对大家有帮助,更多相关知识,欢迎关注亿速云行业资讯频道!
免责声明:本站发布的内容(图片、视频和文字)以原创、转载和分享为主,文章观点不代表本网站立场,如果涉及侵权请联系站长邮箱:is@yisu.com进行举报,并提供相关证据,一经查实,将立刻删除涉嫌侵权内容。


