这篇文章将为大家详细讲解有关基于mpvue的小程序项目怎么搭建,小编觉得挺实用的,因此分享给大家做个参考,希望大家阅读完这篇文章后可以有所收获。
前言
mpvue 是美团开源的一套语法与vue.js一致的、快速开发小程序的前端框架,按官网说可以达到小程序与H5界面使用一套代码。使用此框架,开发者将得到完整的 Vue.js 开发体验,同时为 H5 和小程序提供了代码复用的能力。如果想将 H5 项目改造为小程序,或开发小程序后希望将其转换为 H5,mpvue 将是十分契合的一种解决方案。
为什么要用mpvue
首先微信小程序推荐简洁的开发方式,通过多页面聚合完成轻量的产品功能。小程序以离线包方式下载到本地,通过微信客户端载入和启动,开发规范简洁,技术封装彻底,自成开发体系,本身定位为一个简单的逻辑视图层框架,官方并不推荐用来开发复杂应用,但业务需求却难以做到精简。复杂的应用对开发方式有较高的要求,如组件和模块化、自动构建和集成、代码复用和开发效率等,但小程序开发规范较大的限制了这部分能力。所以为了解决上述问题,提高开发效率,提供更好的开发体验,通过使用基于 Vue.js 的mpvue框架来开发微信小程序。
mpvue的特点
彻底的组件化开发能力:提高代码
完整的 Vue.js 开发体验
方便的 Vuex 数据管理方案:方便构建复杂应用
快捷的 webpack 构建机制:自定义构建策略、开发阶段 hotReload
支持使用 npm 外部依赖
使用 Vue.js 命令行工具 vue-cli 快速初始化项目
H5 代码转换编译成小程序目标代码的能力
项目搭建
项目构成
1、采用mpvue 官方脚手架搭建项目底层结构
2、采用Fly.js 作为http 请求库
3、采用stylus作为项目css预处理工具。
项目框架结构和文件目录结构
主要关注应用程序代码所在的src目录
├── src // 我们的项目的源码编写文件 │ ├── components // 组件目录 │ │ └── head //导航组件 │ ├── config //公共配置 │ │ └── tips // 提示与加载工具类 │ ├── http //http请求配置文件 │ │ └── api // 接口调用文件 │ │ └── config //fly 配置文件 │ ├── pages //项目页面目录 │ ├── store //状态管理 vuex配置目录 │ │ └── actions.js //actions异步修改状态 │ │ └── getters.js //getters计算过滤操作 │ │ └── mutation-types.js //mutations 类型 │ │ └── mutations.js //修改状态 │ │ └── index.js //我们组装模块并导出 store 的地方 │ │ └── state.js //数据源定义 │ ├── stylus //stylus css处理器目录 │ │ └── common.styl // 全局css样式 │ │ └── index.styl // stylus 出口 │ │ └── mixin.styl //mixin 方法 │ │ └── reset.styl //reset css │ ├── untils //工具函数目录 │ │ └── index.js │ ├── App.vue // APP入口文件 │ ├── main.js // 主配置文件
搭建过程
一、通过官方文档 快速创建一个小程序http://mpvue.com/mpvue/
# 全局安装 vue-cli $ npm install --global vue-cli # 创建一个基于 mpvue-quickstart 模板的新项目 $ vue init mpvue/mpvue-quickstart my-project # 安装依赖 $ cd my-project $ npm install # 启动构建 $ npm run dev
二、微信开发者工具打开dist目录,查看页面是否显示。
三、配置 fly
# npm安装 flyio $ npm install flyio --save
1、在src下 创建 http目录 目录结构为:
│ ├── http //http请求配置文件 │ │ └── api.js // 接口调用文件 │ │ └── config.js //fly 配置文件
2、config.js
//引入 fly var Fly=require("flyio/dist/npm/wx") var fly=new Fly; //配置请求基地址 // //定义公共headers // fly.config.headers={xx:5,bb:6,dd:7} // //设置超时 // fly.config.timeout=10000; // //设置请求基地址 // fly.config.baseURL="https://wendux.github.io/" //添加拦截器 fly.interceptors.request.use((config,promise)=>{ //给所有请求添加自定义header config.headers["X-Tag"]="flyio"; return config; }) // Vue.prototype.$http=fly //将fly实例挂在vue原型上 export default fly3、api.js
import fly from './config' import qs from 'qs' // 配置API接口地址 let root ='接口域名'; /** * 接口模版====post * * export const test = params => {return fly.post(`${root}/xx/xx`, qs.stringify(params))}; * * 接口模版====get * * export const test1 = function(){return fly.get(`${root}/api/getNewsList`)} * * * 用法: * 在 页面用引入 test * import {test} from '../../http/api.js' * * test(params).then(res=>{ console.log(res) }) */ export const test = params => {return fly.post(`${root}/xx/xx`, qs.stringify(params))};四、配置 stylus
# npm安装 flyio $ npm install stylus --save-dev $ npm install stylus-loader --save-dev
1、在src下 创建 stylus目录 目录结构为:
│ ├── stylus //stylus css处理器目录 │ │ └── common.styl // 全局css样式 │ │ └── index.styl // stylus 出口 │ │ └── mixin.styl //mixin 方法 │ │ └── reset.styl //reset css
2、mixin.stylus
考虑到将来可能要复用到h6项目中 所以这里写了一个 单位转换的方法【px2rem】,并没有使用存在平台差异的rpx,以后即便迁移到web 端, 只需要处理【px2rem】的单位转换逻辑就好
// 单行显示省略号 no-wrap() text-overflow: ellipsis overflow: hidden white-space: nowrap // 多行显示省略号 no-wrap-more($col) display: -webkit-box -webkit-box-orient: vertical -webkit-line-clamp: $col overflow: hidden //rem转换 $px / 75 *1rem px2rem($px) $px * 1rpx
3、index.stylus
@import "./mixin.styl" @import "./reset.styl" @import "./common.styl"
4、引入
在 app.vue 中引入
<style lang="stylus" type="text/stylus" rel="stylesheet/stylus"> @import "stylus/index.styl" </style>
**如果要用到mixin.stylus中的方法,需要在页面的stylus文件中 单独引用 mixin.stylus
五 配置 config目录
1、在src下 创建 config目录 目录结构为:
│ ├── config //公共配置 │ │ └── tips.js // 提示与加载工具类
2、tips.js
考虑到将来可能要复用到h6项目中 所以这里将微信提供的提示与加载框封装成工具类,以后即便迁移到web 端, 只需要删除tips.js的wx api就可以了。
可以在 main.js中引入,绑定到原型上
import Tips from './config/tip' Vue.prototype.$tips=Tips
在页面中 this.$tips.alert("请输入手机号")调用
/** * 提示与加载工具类 */ export default class Tips { constructor() { this.isLoading = false; } /** * 弹出提示框 */ static success(title, duration = 500) { setTimeout(() => { wx.showToast({ title: title, icon: "success", mask: true, duration: duration }); }, 300); if (duration > 0) { return new Promise((resolve, reject) => { setTimeout(() => { resolve(); }, duration); }); } } /** * 弹出确认窗口 */ static confirm(text, payload = {}, title = "提示") { return new Promise((resolve, reject) => { wx.showModal({ title: title, content: text, showCancel: true, success: res => { if (res.confirm) { resolve(payload); } else if (res.cancel) { reject(payload); } }, fail: res => { reject(payload); } }); }); } static toast(title, onHide, icon = "success") { setTimeout(() => { wx.showToast({ title: title, icon: icon, mask: true, duration: 500 }); }, 300); // 隐藏结束回调 if (onHide) { setTimeout(() => { onHide(); }, 500); } } /** * 弹出加载提示 */ static loading(title = "加载中") { if (Tips.isLoading) { return; } Tips.isLoading = true; wx.showLoading({ title: title, mask: true }); } /** * 加载完毕 */ static loaded() { if (Tips.isLoading) { Tips.isLoading = false; wx.hideLoading(); } } static share(title, url, desc) { return { title: title, path: url, desc: desc, success: function(res) { Tips.toast("分享成功"); } }; } static alert (text, ok) { if (ok === void 0) { ok = function (res) { }; } if (!text) { return; } wx.showModal({ content: text, showCancel: false, confirmColor: '#000000', cancelColor: '#000000', success: ok }); }; } /** * 静态变量,是否加载中 */ Tips.isLoading = false;六、配置vuex
1、在src下 创建 store目录 目录结构为:
│ ├── store //状态管理 vuex配置目录 │ │ └── actions.js //actions异步修改状态 │ │ └── getters.js //getters计算过滤操作 │ │ └── mutation-types.js //mutations 类型 │ │ └── mutations.js //修改状态 │ │ └── index.js //我们组装模块并导出 store 的地方 │ │ └── state.js //数据源定义
2、main.js中引入store, 并绑定到Vue构造函数的原型上,这样在每个vue的组件都可以通过this.$store访问store对象。
import store from './store' Vue.prototype.$store=store;
3、state.js
在数据源文件中定义变量:
const state={ test: 0, } export default state4、mutation-types.js
在mutation-types.js中定义你的Mutation的名字
export const TEST = 'TEST' // 这是测试的
5、mutations.js
在mutations.js中写处理方法
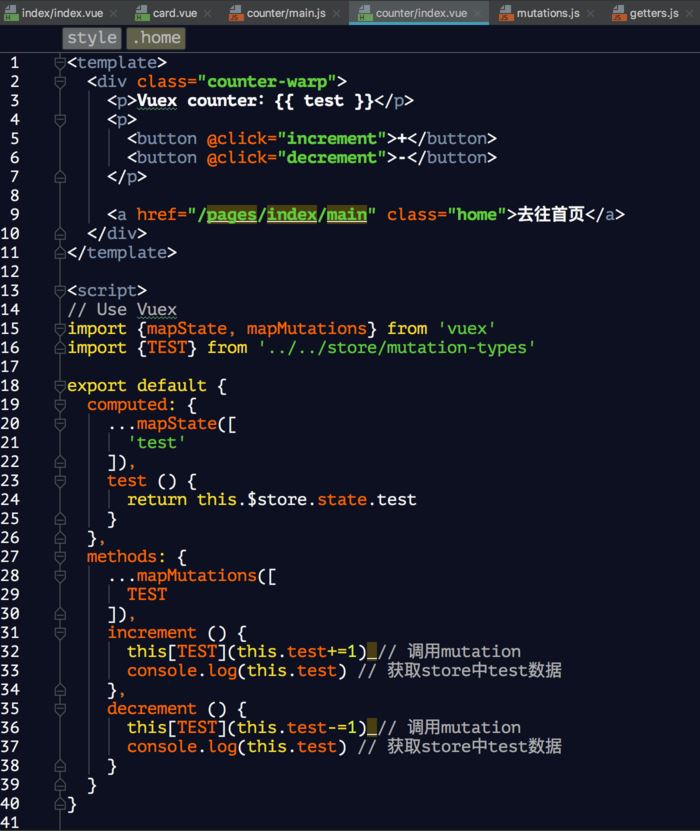
import * as types from './mutation-types' const matations={ /** * state:当前状态树 * data: 提交matations时传的参数 */ //是否有渠道 [types.TEST] (state,data) { state.TEST = data; }, } export default matations6、使用方法
# 在 store index.js 中引入 import Vue from 'vue'; import Vuex from 'vuex'; import state from './state' import mutations from './mutations' Vue.use(Vuex); export default new Vuex.Store({ state, mutations, })在页面中引用
7、将vuex中的数据持久化到本地 (使用vuex-persistedstate)
# 安装vuex-persistedstate $ npm install vuex-persistedstate --save
在 store index.js 引入
import Vue from 'vue'; import Vuex from 'vuex'; import state from './state' import mutations from './mutations' import createPersistedState from 'vuex-persistedstate' Vue.use(Vuex); export default new Vuex.Store({ state, mutations, plugins: [ createPersistedState({ storage: { getItem: key => wx.getStorageSync(key), setItem: (key, value) => wx.setStorageSync(key, value), removeItem: key => {} } }) ] })关于“基于mpvue的小程序项目怎么搭建”这篇文章就分享到这里了,希望以上内容可以对大家有一定的帮助,使各位可以学到更多知识,如果觉得文章不错,请把它分享出去让更多的人看到。
免责声明:本站发布的内容(图片、视频和文字)以原创、转载和分享为主,文章观点不代表本网站立场,如果涉及侵权请联系站长邮箱:is@yisu.com进行举报,并提供相关证据,一经查实,将立刻删除涉嫌侵权内容。


