本篇文章为大家展示了使用vue组件怎么实现一个横向树,内容简明扼要并且容易理解,绝对能使你眼前一亮,通过这篇文章的详细介绍希望你能有所收获。
代码:
<template> <div class="tree"> <ul v-if="treeData && treeData.length"> <li v-for="(column,index) in treeData"> <span class="root">{{column.name}}</span> <ul v-if="column.children && column.children.length"> <li v-for="(childrenColumn,index) in column.children"> <span>{{childrenColumn.name}}</span> <ul v-if="childrenColumn.children && childrenColumn.children.length"> <li v-for="(grandChildrenColumn,index) in childrenColumn.children"> <span>{{grandChildrenColumn.name}}</span> </li> </ul> </li> </ul> </li> </ul> </div> </template> <script> export default { name: 'transverseTree', props: { treeData:{ type:Array, default:[] } }, methods: { editDom(){ if($('.root').siblings('ul').children('li').length==1){ let num = 26*($('.root').siblings('ul').children('li').find('li').length-1); $('.root').css({ 'top': num }); $('.root').siblings('ul').children('li').css({ 'top': num }); $('.root').siblings('ul').find('ul').css({ 'top': -num }); if($('.root').siblings('ul').find('li').length > 1){ $('.root').siblings('ul').children('li').children('span').addClass('hasChild'); } }else{ $('.root').css({ 'top': 26 * ($('.root').siblings('ul').children('li').length - 1) }); } } }, mounted() { this.$nextTick(()=>{ this.editDom(); }); } }; </script> <style scope> .tree{ position: relative; margin: -16px -16px 0; min-height: 400px; padding-left: 11px; overflow: auto; } .tree ul{ width: 210px; height: 100%; position: absolute; } .tree ul ul{ left: 226px; top: 0; } .tree li{ float: left; list-style-type: none; position: relative; padding: 16px 5px 0 5px; } .tree li span{ position: relative; display: inline-block; width: 200px; height: 36px; background: #F0F0F5; border-radius: 4px; text-decoration: none; color: #2D2D2D; font-size: 14px; line-height: 36px; text-align: center; } .tree li::before{ box-sizing:inherit; content: ''; position: absolute; top: 33px; left: -7px; border-top: 2px solid #D2D2D7; width: 12px; } .tree li::after{ box-sizing:inherit; content: ''; position: absolute; top: 8px; left: -9px; height: 100%; border-left: 2px solid #D2D2D7; } .tree li:first-child::after{ height: 51%; border-left: 2px solid #D2D2D7; border-top: 2px solid #D2D2D7; top: 33px; width: 1px; border-top-left-radius: 4px; } .tree li:last-child::after{ height: 25px; border-left: 2px solid #D2D2D7; border-bottom: 2px solid #D2D2D7; top: 8px; width: 1px; border-bottom-left-radius: 4px; } .tree li:only-child::after, .tree li:only-child::before{ display: none; } .tree ul ul li:only-child::before{ display: inline-block; } .tree ul ul li:only-child span::before{ display: inline-block; } .tree li:only-child span.root::before,.tree li:only-child span.hasChild::before{ content: ''; position: absolute; top: 17px; right: -14px; border-top: 2px solid #D2D2D7; width: 14px; } .tree ul ul ul li:only-child span::before{ content: ''; position: absolute; top: 17px; left: -26px; border-top: 2px solid #D2D2D7; width: 26px; } </style>在父组件中使用import引入该组件:
import transverseTree from './transverseTree'
注册组件:
components: { ifbpInfolistCard,transverseTree },在template中使用:
<transverse-tree :treeData='treeData'></transverse-tree>
其中,treeData为一个数组,在data中给treeData一个初始值:
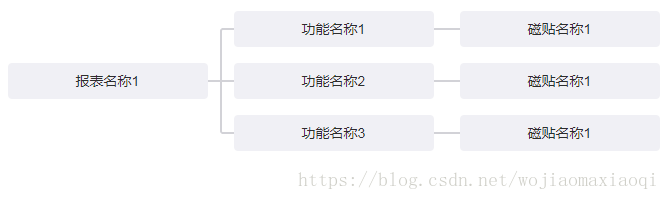
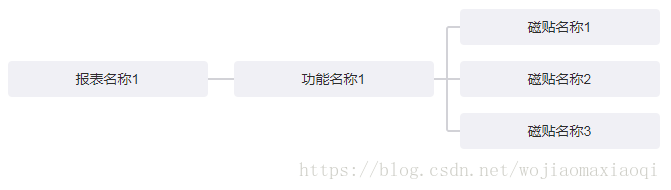
treeData: [ {name:'报表名称1', children:[ {name:'功能名称1', children:[ {name:'磁贴名称1'} ]}, {name:'功能名称2', children:[ {name:'磁贴名称1'} ]}, {name:'功能名称3', children:[ {name:'磁贴名称1'} ]}, ]} ]实现效果:
上述内容就是使用vue组件怎么实现一个横向树,你们学到知识或技能了吗?如果还想学到更多技能或者丰富自己的知识储备,欢迎关注亿速云行业资讯频道。
免责声明:本站发布的内容(图片、视频和文字)以原创、转载和分享为主,文章观点不代表本网站立场,如果涉及侵权请联系站长邮箱:is@yisu.com进行举报,并提供相关证据,一经查实,将立刻删除涉嫌侵权内容。


