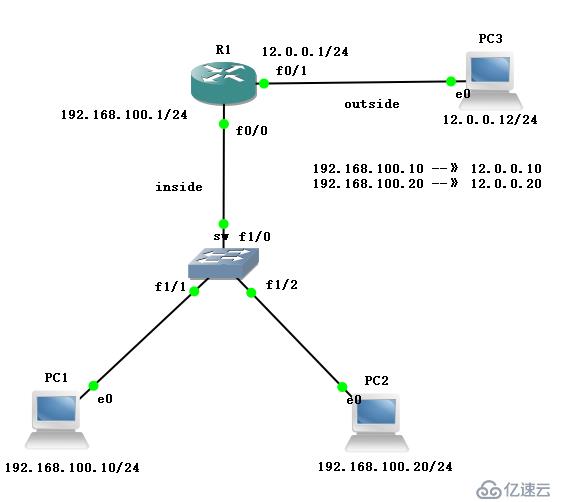
1、配置主机地址:
PC1> ip 192.168.100.10 192.168.100.1 Checking for duplicate address... PC1 : 192.168.100.10 255.255.255.0 gateway 192.168.100.1 PC2> ip 192.168.100.20 192.168.100.1 Checking for duplicate address... PC1 : 192.168.100.20 255.255.255.0 gateway 192.168.100.1 PC3> ip 12.0.0.12 12.0.0.1 Checking for duplicate address... PC1 : 13.0.0.13 255.255.255.0 gateway 13.0.0.12、配置R1路由
R1#conf t R1(config)#int f0/0 R1(config-if)#ip add 192.168.100.1 255.255.255.0 R1(config-if)#no shut R1(config)#int f0/1 R1(config-if)#ip add 12.0.0.1 255.255.255.0 R1(config-if)#no shut3、关闭sw路由功能
no ip routing4、配置主机地址
PC1> ip 192.168.100.10 192.168.100.1 Checking for duplicate address... PC1 : 192.168.100.10 255.255.255.0 gateway 192.168.100.1 PC2> ip 192.168.100.20 192.168.100.1 Checking for duplicate address... PC1 : 192.168.100.20 255.255.255.0 gateway 192.168.100.1 PC3> ip 12.0.0.12 12.0.0.1 Checking for duplicate address... PC1 : 12.0.0.12 255.255.255.0 gateway 12.0.0.15、互联互通测试
PC1> ping 192.168.100.20 84 bytes from 192.168.100.20 icmp_seq=1 ttl=64 time=0.000 ms 84 bytes from 192.168.100.20 icmp_seq=2 ttl=64 time=0.000 ms 84 bytes from 192.168.100.20 icmp_seq=3 ttl=64 time=0.000 ms 84 bytes from 192.168.100.20 icmp_seq=4 ttl=64 time=0.000 ms 84 bytes from 192.168.100.20 icmp_seq=5 ttl=64 time=0.000 ms PC1> ping 12.0.0.12 13.0.0.13 icmp_seq=1 timeout 13.0.0.13 icmp_seq=2 timeout 84 bytes from 12.0.0.12 icmp_seq=3 ttl=62 time=62.485 ms 84 bytes from 12.0.0.12 icmp_seq=4 ttl=62 time=69.039 ms 84 bytes from 12.0.0.12 icmp_seq=5 ttl=62 time=69.046 ms6、配置静态NAT列表
R1(config)#ip nat inside source static 192.168.100.10 12.0.0.10 R1(config)#ip nat inside source static 192.168.100.20 12.0.0.20 R1(config)#int f0/0 R1(config-if)#ip nat inside R1(config-if)#int f0/1 R1(config-if)#ip nat outside R1(config-if)#end R1#debug ip nat IP NAT debugging is on7、测试连通性
PC1> ping 12.0.0.12 13.0.0.13 icmp_seq=1 timeout 13.0.0.13 icmp_seq=2 timeout 84 bytes from 12.0.0.12 icmp_seq=3 ttl=62 time=84.698 ms 84 bytes from 12.0.0.12 icmp_seq=4 ttl=62 time=85.265 ms 84 bytes from 12.0.0.12 icmp_seq=5 ttl=62 time=69.205 ms *Mar 1 00:23:50.619: NAT*: s=192.168.100.10 -> 12.0.0.10,d=12.0.0.12[5464] *Mar 1 00:23:51.831: NAT*: s=192.168.100.10->12.0.0.10, d=12.0.0.12 [5465] #将目标地址12.0.0.10转换成192.168.100.10,这个就是静态地址转换的过程1、实验环境
Linux搭建的一台Web服务器,局域网地址为192.168.100.100,默认端口号80。局域网的网关192.168.100.1,映射地址:192.168.100.100:80—>12.0.0.100:8080。
别人只能看到公网IP地址,私网地址不能被直接访问。
2、实验目的
广域网的客户机无法直接访问100.100地址,如果想访问的话就需要做端口映射。
3、实验图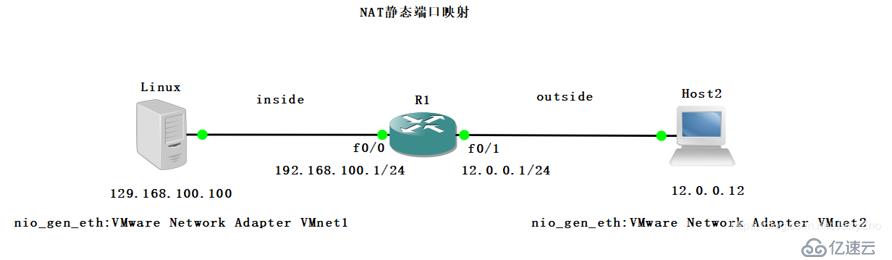
4、在Linux中安装httpd的服务软件包,并开启httpd服务,写测试网页等
[root@localhost ~]# yum install httpd -y [root@localhost ~]# vim /var/www/html/index.html //写测试网页 <h2>this is inside web</h2> [root@localhost ~]# systemctl start httpd [root@localhost ~]# systemctl stop firewalld.service [root@localhost ~]# setenforce 05、配置网关地址
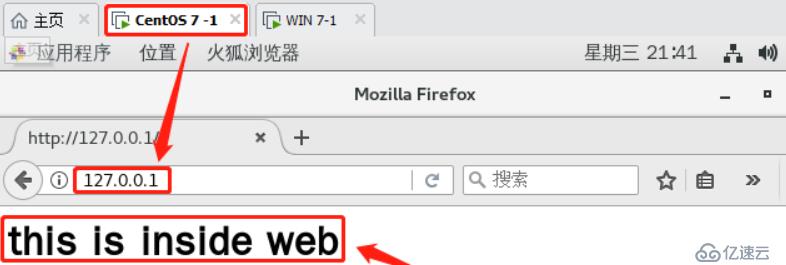
R1#conf t R1(config)#int f0/0 R1(config-if)#ip add 192.168.100.1 255.255.255.0 R1(config-if)#no shut R1(config-if)#ex R1(config)#int f0/1 R1(config-if)#ip add 12.0.0.1 255.255.255.0 R1(config-if)#no shut R1(config-if)#ex6、通过centos中的浏览器可看到测试页面(ping 192.168.100.100或127.0.0.1都行)
7、给Linux绑定VMnet1网卡,给Host绑定VMnet2网卡,配置静态地址
8、访问对方192.168.100.100,此时是可以访问的,但是真实情况下是无法直接访问对方私有地址的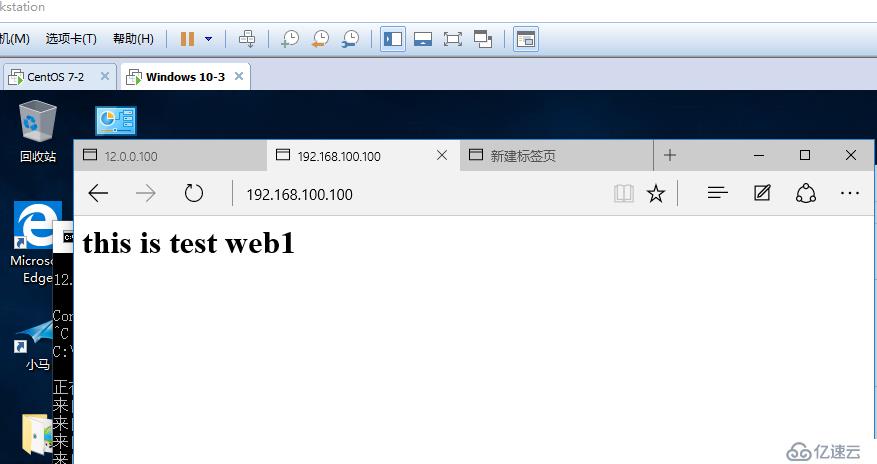
9、静态端口映射配置
R1(config)# ip nat inside source static tcp 192.168.100.100 80 12.0.0.100 8080 extendable R1(config)#int f0/0 R1(config-if)#ip nat inside R1(config-if)#int f0/1 R1(config-if)#ip nat outsid R1(config-if)#end R1#debug ip nat IP NAT debugging is on *Mar 1 00:36:59.327: NAT*: TCP s=49160, d=8080->80 *Mar 1 00:36:59.327: NAT*: s=12.0.0.12, d=12.0.0.100->192.168.100.100 [364] # 端口和地址都进行了转换10、再次尝试使用公网地址在win7进行访问,此时可以成功,实验成功!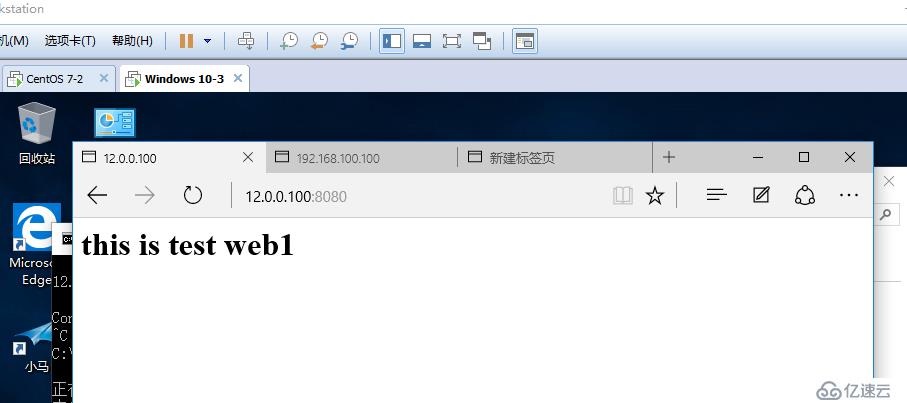
免责声明:本站发布的内容(图片、视频和文字)以原创、转载和分享为主,文章观点不代表本网站立场,如果涉及侵权请联系站长邮箱:is@yisu.com进行举报,并提供相关证据,一经查实,将立刻删除涉嫌侵权内容。


