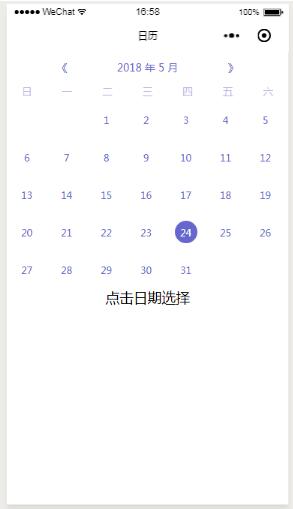
这篇文章给大家分享的是有关微信小程序中日历/日期选择插件怎么用的内容。小编觉得挺实用的,因此分享给大家做个参考,一起跟随小编过来看看吧。
具体内容如下
wxml
<view class="canlendarBgView"> <view class="canlendarView"> <view class="canlendarTopView"> <view class="leftBgView" bindtap="handleCalendar" data-handle="prev"> <view class="leftView">《</view> </view> <view class="centerView">{{cur_year || "--"}} 年 {{cur_month || "--"}} 月</view> <view class="rightBgView" bindtap="handleCalendar" data-handle="next"> <view class="rightView">》</view> </view> </view> <view class="weekBgView"> <view class="weekView" wx:for="{{weeks_ch}}" wx:key="{{index}}" data-idx="{{index}}">{{item}}</view> </view> <view class="dateBgView"> <view wx:if="{{hasEmptyGrid}}" class="dateEmptyView" wx:for="{{empytGrids}}" wx:key="{{index}}" data-idx="{{index}}"> </view> <view class="dateView" wx:for="{{days}}" wx:key="{{index}}" data-idx="{{index}}" bindtap="dateSelectAction"> <view class="datesView {{index == todayIndex ? 'dateSelectView' : ''}}">{{item}}</view> </view> </view> </view> <view>点击日期选择</view> </view>js
//index.js //获取应用实例 Page({ data: { hasEmptyGrid: false, cur_year: '', cur_month: '', }, onLoad(options) { this.setNowDate(); }, dateSelectAction: function (e) { var cur_day = e.currentTarget.dataset.idx; this.setData({ todayIndex: cur_day }) console.log(`点击的日期:${this.data.cur_year}年${this.data.cur_month}月${cur_day + 1}日`); }, setNowDate: function () { const date = new Date(); const cur_year = date.getFullYear(); const cur_month = date.getMonth() + 1; const todayIndex = date.getDate() - 1; console.log(`日期:${todayIndex}`) const weeks_ch = ['日', '一', '二', '三', '四', '五', '六']; this.calculateEmptyGrids(cur_year, cur_month); this.calculateDays(cur_year, cur_month); this.setData({ cur_year: cur_year, cur_month: cur_month, weeks_ch, todayIndex, }) }, getThisMonthDays(year, month) { return new Date(year, month, 0).getDate(); }, getFirstDayOfWeek(year, month) { return new Date(Date.UTC(year, month - 1, 1)).getDay(); }, calculateEmptyGrids(year, month) { const firstDayOfWeek = this.getFirstDayOfWeek(year, month); let empytGrids = []; if (firstDayOfWeek > 0) { for (let i = 0; i < firstDayOfWeek; i++) { empytGrids.push(i); } this.setData({ hasEmptyGrid: true, empytGrids }); } else { this.setData({ hasEmptyGrid: false, empytGrids: [] }); } }, calculateDays(year, month) { let days = []; const thisMonthDays = this.getThisMonthDays(year, month); for (let i = 1; i <= thisMonthDays; i++) { days.push(i); } this.setData({ days }); }, handleCalendar(e) { const handle = e.currentTarget.dataset.handle; const cur_year = this.data.cur_year; const cur_month = this.data.cur_month; if (handle === 'prev') { let newMonth = cur_month - 1; let newYear = cur_year; if (newMonth < 1) { newYear = cur_year - 1; newMonth = 12; } this.calculateDays(newYear, newMonth); this.calculateEmptyGrids(newYear, newMonth); this.setData({ cur_year: newYear, cur_month: newMonth }) } else { let newMonth = cur_month + 1; let newYear = cur_year; if (newMonth > 12) { newYear = cur_year + 1; newMonth = 1; } this.calculateDays(newYear, newMonth); this.calculateEmptyGrids(newYear, newMonth); this.setData({ cur_year: newYear, cur_month: newMonth }) } } })感谢各位的阅读!关于“微信小程序中日历/日期选择插件怎么用”这篇文章就分享到这里了,希望以上内容可以对大家有一定的帮助,让大家可以学到更多知识,如果觉得文章不错,可以把它分享出去让更多的人看到吧!
免责声明:本站发布的内容(图片、视频和文字)以原创、转载和分享为主,文章观点不代表本网站立场,如果涉及侵权请联系站长邮箱:is@yisu.com进行举报,并提供相关证据,一经查实,将立刻删除涉嫌侵权内容。


