这篇文章主要介绍了Linux系统中如何扩容根目录磁盘空间,具有一定借鉴价值,感兴趣的朋友可以参考下,希望大家阅读完这篇文章之后大有收获,下面让小编带着大家一起了解一下。
一、使用背景
Linux根目录磁盘空间不够用了,当修改了虚拟机模版增加磁盘大小或者插入了一块新硬盘,但是发现系统里的大小还是没改变。
产生的原因是没有给磁盘格式化,没有增加分区。
二、操作方法
1. 查看磁盘空间大小,使用df -h 命令,发现挂载根目录节点的/dev/mapper/ubuntu14--vg-root 只有28G容量。
root@ubuntu14:/opt# df -h 文件系统 容量 已用 可用 已用% 挂载点 /dev/mapper/ubuntu14--vg-root 28G 23G 3.3G 88% / none 4.0K 0 4.0K 0% /sys/fs/cgroup udev 3.9G 4.0K 3.9G 1% /dev tmpfs 799M 384K 799M 1% /run none 5.0M 0 5.0M 0% /run/lock none 3.9G 0 3.9G 0% /run/shm none 100M 0 100M 0% /run/user /dev/vda1 236M 37M 188M 17% /boot
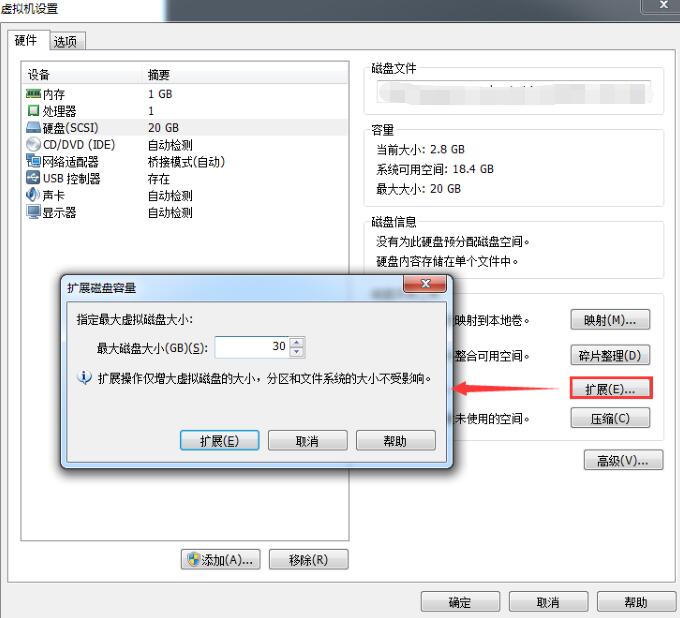
2. 增加磁盘空间,例如下图使用VM虚拟机增加的方式。
3.使用fdisk -l命令查看磁盘信息。当看到第一行Disk /dev/vda: 161.1 GB与实际df -h显示内容不符时,说明增加磁盘成功了。
root@ubuntu14:/opt# fdisk -l Disk /dev/vda: 161.1 GB, 161061273600 bytes 16 heads, 63 sectors/track, 312076 cylinders, total 314572800 sectors Units = 扇区 of 1 * 512 = 512 bytes Sector size (logical/physical): 512 bytes / 512 bytes I/O size (minimum/optimal): 512 bytes / 512 bytes Disk identifier: 0x0001a023 设备 启动 起点 终点 块数 Id 系统 /dev/vda1 * 2048 499711 248832 83 Linux /dev/vda2 501758 62912511 31205377 5 扩展 /dev/vda5 501760 62912511 31205376 8e Linux LVM Disk /dev/mapper/ubuntu14--vg-root: 29.8 GB, 29804724224 bytes 255 heads, 63 sectors/track, 3623 cylinders, total 58212352 sectors Units = 扇区 of 1 * 512 = 512 bytes Sector size (logical/physical): 512 bytes / 512 bytes I/O size (minimum/optimal): 512 bytes / 512 bytes Disk identifier: 0x00000000 Disk /dev/mapper/ubuntu14--vg-root doesn't contain a valid partition table Disk /dev/mapper/ubuntu14--vg-swap_1: 2147 MB, 2147483648 bytes 255 heads, 63 sectors/track, 261 cylinders, total 4194304 sectors Units = 扇区 of 1 * 512 = 512 bytes Sector size (logical/physical): 512 bytes / 512 bytes I/O size (minimum/optimal): 512 bytes / 512 bytes Disk identifier: 0x00000000 Disk /dev/mapper/ubuntu14--vg-swap_1 doesn't contain a valid partition table
4.使用fdisk /dev/vda, 创建新分区。
注意:不同操作系统的磁盘命名方式不同,有些是/dev/sda。具体使用方式参考第三步中fdisk -l首行显示Disk。如笔者在该系统中首行显示为Disk /dev/vda: 161.1 GB, 161061273600 bytes ,故使用命令fdisk /dev/vda)
按照下面Linux操作进行分区。
root@ubuntu14:/opt# fdisk /dev/vda 命令(输入 m 获取帮助): m 命令操作 a toggle a bootable flag b edit bsd disklabel c toggle the dos compatibility flag d delete a partition l list known partition types m print this menu n add a new partition o create a new empty DOS partition table p print the partition table q quit without saving changes s create a new empty Sun disklabel t change a partition's system id u change display/entry units v verify the partition table w write table to disk and exit x extra functionality (experts only) 命令(输入 m 获取帮助): n #new 新分区 Partition type: p primary (1 primary, 1 extended, 2 free) l logical (numbered from 5) Select (default p): p #选择主分区 分区号 (1-4,默认为 3): 3 #分区序号 起始 sector (499712-314572799,默认为 499712): #分区开始回车默认 将使用默认值 499712 Last sector, +扇区 or +size{K,M,G} (499712-501757,默认为 501757): 将使用默认值 501757 命令(输入 m 获取帮助): n #new 新分区 Partition type: p primary (2 primary, 1 extended, 1 free) l logical (numbered from 5) Select (default p): p #选择主分区 Selected partition 4 #分区序号 起始 sector (62912512-314572799,默认为 62912512): #分区开始回车默认 将使用默认值 62912512 Last sector, +扇区 or +size{K,M,G} (62912512-314572799,默认为 314572799): 将使用默认值 314572799 命令(输入 m 获取帮助): t #修改分区格式 分区号 (1-5): 4 #修改分区号 Hex code (type L to list codes): 8e #格式选择8e linux LVM Changed system type of partition 4 to 8e (Linux LVM) 命令(输入 m 获取帮助): p #显示分区信息 Disk /dev/vda: 161.1 GB, 161061273600 bytes 16 heads, 63 sectors/track, 312076 cylinders, total 314572800 sectors Units = 扇区 of 1 * 512 = 512 bytes Sector size (logical/physical): 512 bytes / 512 bytes I/O size (minimum/optimal): 512 bytes / 512 bytes Disk identifier: 0x0001a023 设备 启动 起点 终点 块数 Id 系统 /dev/vda1 * 2048 499711 248832 83 Linux /dev/vda2 501758 62912511 31205377 5 扩展 /dev/vda3 499712 501757 1023 83 Linux /dev/vda4 62912512 314572799 125830144 8e Linux LVM /dev/vda5 501760 62912511 31205376 8e Linux LVM Partition table entries are not in disk order 命令(输入 m 获取帮助): w #保存信息 The partition table has been altered! Calling ioctl() to re-read partition table. WARNING: Re-reading the partition table failed with error 16: 设备或资源忙. The kernel still uses the old table. The new table will be used at the next reboot or after you run partprobe(8) or kpartx(8) Syncing disks.5. 重启Linux操作系统,使用reboot命令。
6. 创建物理卷,使用pvcreate /dev/vda4命令。
root@ubuntu14:~# pvcreate /dev/vda4 Physical volume "/dev/vda4" successfully created
7.查看新建的物理卷和大小,使用pvdisplay命令。
root@ubuntu14:~# pvdisplay --- Physical volume --- PV Name ubuntu14-vg PV Size 29.76 GiB / not usable 2.00 MiB Allocatable yes (but full) PE Size 4.00 MiB Total PE 7618 Free PE 0 Allocated PE 7618 PV UUID XR32TY-aRQC-IQC6-oCx7-aa9X-KdJe-bHmaBd "/dev/vda4" /dev/vda5 VG Name is a new physical volume of "120.00 GiB" --- NEW Physical volume --- PV Name /dev/vda4 VG Name PV Size 120.00 GiB Allocatable NO PE Size 0 Total PE 0 Free PE 0 Allocated PE 0 PV UUID MVK0IT-LDgP-eWwZ-fzQM-tdyY-kRQ-nbk122
8. 将添加新的物理卷,加载到ubuntu14-vg卷组,使用vgextend ubuntu14-vg /dev/vda4命令。
root@ubuntu14:~# vgextend ubuntu14-vg /dev/vda4 Volume group "ubuntu14-vg" successfully extended
9. 查看卷组信息,使用vgdisplay命令。
root@ubuntu14:~# vgdisplay --- Volume group --- VG Name ubuntu14-vg System ID Format lvm2 Metadata Areas 2 Metadata Sequence No 4 VG Access read/write VG Status resizable MAX LV 0 Cur LV 2 Open LV 2 Max PV 0 Cur PV 2 Act PV 2 VG Size 149.76 GiB PE Size 4.00 MiB Total PE 38338 Alloc PE / Size 7618 / 29.76 GiB Free PE / Size 30720 / 120.00 GiB VG UUID cq2Z6G-P6j1-S2gM-mibz-d63V-NjkS-dHYe7D
10.增加ubuntu14-vg大小,增加120G。使用lvresize -L +120G /dev/mapper/ubuntu14--vg-root命令。
root@ubuntu14:~# lvresize -L +120G /dev/mapper/ubuntu14--vg-root Extending logical volume root to 147.76 GiB Logical volume root successfully resized
11. 重新识别ubuntu14-vg大小,使用resize2fs /dev/mapper/ubuntu14--vg-root命令。
root@ubuntu14:~# resize2fs /dev/mapper/ubuntu14--vg-root resize2fs 1.42.9 (4-Feb-2014) Filesystem at /dev/mapper/ubuntu14--vg-root is mounted on /; on-line resizing required old_desc_blocks = 2, new_desc_blocks = 10 The filesystem on /dev/mapper/ubuntu14--vg-root is now 38733824 blocks long.
12.查看扩容后的大小 ,使用df -h命令。
root@ubuntu14:~# df -h 文件系统 容量 已用 可用 已用% 挂载点 /dev/mapper/ubuntu14--vg-root 146G 23G 117G 17% / none 4.0K 0 4.0K 0% /sys/fs/cgroup udev 3.9G 4.0K 3.9G 1% /dev tmpfs 799M 388K 799M 1% /run none 5.0M 0 5.0M 0% /run/lock none 3.9G 0 3.9G 0% /run/shm none 100M 0 100M 0% /run/user /dev/vda1 236M 37M 188M 17% /boot
当看到/dev/mapper/ubuntu14--vg-root 已经更新到新的大小时,则表示增加成功。
感谢你能够认真阅读完这篇文章,希望小编分享的“Linux系统中如何扩容根目录磁盘空间”这篇文章对大家有帮助,同时也希望大家多多支持亿速云,关注亿速云行业资讯频道,更多相关知识等着你来学习!
免责声明:本站发布的内容(图片、视频和文字)以原创、转载和分享为主,文章观点不代表本网站立场,如果涉及侵权请联系站长邮箱:is@yisu.com进行举报,并提供相关证据,一经查实,将立刻删除涉嫌侵权内容。


