жё©йҰЁжҸҗзӨәГ—
жӮЁеҘҪпјҢзҷ»еҪ•еҗҺжүҚиғҪдёӢи®ўеҚ•е“ҰпјҒ
еҜҶз Ғзҷ»еҪ•Г—
зҷ»еҪ•жіЁеҶҢГ—
зӮ№еҮ» зҷ»еҪ•жіЁеҶҢ еҚіиЎЁзӨәеҗҢж„ҸгҖҠдәҝйҖҹдә‘з”ЁжҲ·жңҚеҠЎжқЎж¬ҫгҖӢ
з”ЁжҲ·зҷ»еҪ•Г—
жӮЁеҘҪпјҢзҷ»еҪ•еҗҺжүҚиғҪдёӢи®ўеҚ•е“ҰпјҒ
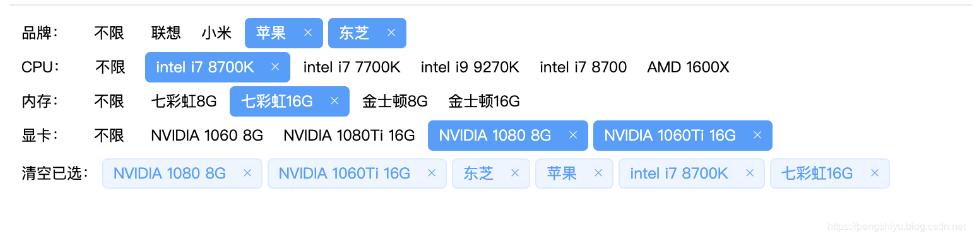
е°Ҹзј–з»ҷеӨ§е®¶еҲҶдә«дёҖдёӢVueжҖҺд№Ҳе®һзҺ°еӨҡж ҮзӯҫйҖүжӢ©еҷЁпјҢзӣёдҝЎеӨ§йғЁеҲҶдәәйғҪиҝҳдёҚжҖҺд№ҲдәҶи§ЈпјҢеӣ жӯӨеҲҶдә«иҝҷзҜҮж–Үз« з»ҷеӨ§е®¶еҸӮиҖғдёҖдёӢпјҢеёҢжңӣеӨ§е®¶йҳ…иҜ»е®ҢиҝҷзҜҮж–Үз« еҗҺеӨ§жңү收иҺ·пјҢдёӢйқўи®©жҲ‘们дёҖиө·еҺ»дәҶи§ЈдёҖдёӢеҗ§пјҒ
е®һзҺ°ж•Ҳжһң
е®һзҺ°д»Јз Ғ
<html lang="en"> <head> <title>Document</title> <!-- еј•е…Ҙжң¬ең°з»„件еә“ --> <link rel="stylesheet" href="static/element-ui/index.css" > <script src="static/element-ui/vue.js"></script> <script src="static/element-ui/index.js"></script> <!-- еј•е…ҘCDNж ·ејҸ --> <!-- <link rel="stylesheet" href="https://unpkg.com/element-ui/lib/theme-chalk/index.css" > --> <!-- <script src="https://cdn.jsdelivr.net/npm/vue/dist/vue.js"></script> --> <!-- <script src="https://unpkg.com/element-ui/lib/index.js"></script> --> <style> .not-active { display: inline-block; font-size: 12px; margin: 5px 8px; } span { margin: 0 2px; } </style> </head> <body> <div id="app"> <!-- еҫ…йҖүж Үзӯҫ --> <div v-for='(category, categoryIndex) in categories' :key="category.id"> <!-- еҲҶзұ» --> <span class="not-active">{{category.name}}пјҡ</span> <template> <span v-if="category.count"class="not-active" @click="clearCategory(category, categoryIndex)"> дёҚйҷҗ</span> <my-tag v-else>дёҚйҷҗ</my-tag> </template> <!-- ж Үзӯҫ --> <template v-for='(child, childIndex) in category.children'> <my-tag v-if="child.active" :closable='true' @click-child='clickChild(category, categoryIndex, child, childIndex)'> {{ child.name }} </my-tag> <span v-else class="not-active" @click='clickChild(category, categoryIndex, child, childIndex)'>{{ child.name }}</span> </template> </div> <!-- е·ІйҖүж Үзӯҫ --> <div v-if='conditions.length'> <span class="not-active" @click="clearCondition">жё…з©әе·ІйҖүпјҡ<span> <el-tag v-for='(condition, index) in conditions' :key="condition.id" type="primary" :closable="true" size="small" :disable-transitions="true" @close='removeCondition(condition, index)' @click='removeCondition(condition, index)'> {{condition.name}} </el-tag> </div> </div> <script src="./data.js"></script> <script> // з®ҖеҚ•е°ҒиЈ…дёҖдёӘ公用组件 Vue.component('my-tag', { template: "<el-tag v-bind='$attrs' v-on='$listeners' effect='dark' size='small' :disable-transitions='true' @click='clickChild' @close='clickChild'><slot></slot></el-tag>", methods: { clickChild() { this.$emit("click-child") } } }); var app = new Vue({ el: '#app', data() { return { categories, // еҲҶзұ»ж ҮзӯҫпјҢеҸҜд»ҺеӨ–йғЁеҠ иҪҪй…ҚзҪ® conditions: [] // е·ІйҖүжқЎд»¶ } }, watch: { // зӣ‘еҗ¬жқЎд»¶еҸҳеҢ–пјҢжҢүз…§иҜ·жұӮжҺҘеҸЈжӢјиЈ…иҜ·жұӮеҸӮж•° conditions(val){ let selectedCondition = {}; for(let categorie of this.categories){ let selected_list = []; for(let child of categorie.children){ if(child.active){ selected_list.push(child.name); } } selectedCondition[categorie.name] = selected_list.join("|") } console.log(selectedCondition); } }, methods: { // еӨ„зҗҶж ҮзӯҫзӮ№еҮ»дәӢ件пјҢжңӘйҖүдёӯеҲҷйҖүдёӯпјҢе·ІйҖүдёӯеҲҷеҸ–ж¶ҲйҖүдёӯ clickChild(category, categoryIndex, child, childIndex) { let uid = `${categoryIndex}-${childIndex}` child.uid = uid; console.log(uid) // еҸ–ж¶ҲйҖүжӢ© if (child.active === true) { category.count--; child.active = false; this.conditions.forEach((conditionChild, index) => { if (conditionChild.uid === child.uid) { this.conditions.splice(index, 1); } }); // йҖүжӢ© } else { category.count++; child.active = true; this.conditions.push(child); } }, // жё…йҷӨе·ІйҖүж•ҙдёӘзұ»еҲ«ж Үзӯҫ clearCategory(category, categoryIndex) { category.count = 0; // еҸҜйҖүеҲ—иЎЁеқҮдёәжңӘйҖүдёӯзҠ¶жҖҒ category.children.forEach(child => { child.active = false; }) // жё…з©әиҜҘзұ»е·ІйҖүе…ғзҙ for (let index = this.conditions.length - 1; index >= 0; index--) { const conditionChild = this.conditions[index]; if (conditionChild.uid.startsWith(categoryIndex)) { this.conditions.splice(index, 1); } } }, // 移йҷӨдёҖдёӘжқЎд»¶ removeCondition(condition, index) { let categoryIndex = condition.uid.split("-")[0]; this.categories[categoryIndex].count --; this.conditions.splice(index, 1) condition.active = false; }, // жё…з©әжүҖжңүжқЎд»¶ clearCondition() { for(let i = this.conditions.length-1; i >=0 ; i--){ this.removeCondition(this.conditions[i], i); } } } }); </script> </body> </html>
ж ҮзӯҫзӯӣйҖүзҡ„ж•°жҚ®ж јејҸ
data.js
var categories = [{ name: 'е“ҒзүҢ', count: 0, children: [{ name: 'иҒ”жғі', }, { name: 'е°Ҹзұі', }, { name: 'иӢ№жһң', }, { name: 'дёңиҠқ', }] }, { name: 'CPU', count: 0, children: [{ name: 'intel i7 8700K', }, { name: 'intel i7 7700K', }, { name: 'intel i9 9270K', }, { name: 'intel i7 8700', }, { name: 'AMD 1600X', }] }, { name: 'еҶ…еӯҳ', count: 0, children: [{ name: 'дёғеҪ©иҷ№8G', }, { name: 'дёғеҪ©иҷ№16G', }, { name: 'йҮ‘еЈ«йЎҝ8G', }, { name: 'йҮ‘еЈ«йЎҝ16G', }] }, { name: 'жҳҫеҚЎ', count: 0, children: [{ name: 'NVIDIA 1060 8G', }, { name: 'NVIDIA 1080Ti 16G', }, { name: 'NVIDIA 1080 8G', }, { name: 'NVIDIA 1060Ti 16G', }] }]д»ҘдёҠжҳҜвҖңVueжҖҺд№Ҳе®һзҺ°еӨҡж ҮзӯҫйҖүжӢ©еҷЁвҖқиҝҷзҜҮж–Үз« зҡ„жүҖжңүеҶ…е®№пјҢж„ҹи°ўеҗ„дҪҚзҡ„йҳ…иҜ»пјҒзӣёдҝЎеӨ§е®¶йғҪжңүдәҶдёҖе®ҡзҡ„дәҶи§ЈпјҢеёҢжңӣеҲҶдә«зҡ„еҶ…е®№еҜ№еӨ§е®¶жңүжүҖеё®еҠ©пјҢеҰӮжһңиҝҳжғіеӯҰд№ жӣҙеӨҡзҹҘиҜҶпјҢж¬ўиҝҺе…іжіЁдәҝйҖҹдә‘иЎҢдёҡиө„и®Ҝйў‘йҒ“пјҒ
е…ҚиҙЈеЈ°жҳҺпјҡжң¬з«ҷеҸ‘еёғзҡ„еҶ…е®№пјҲеӣҫзүҮгҖҒи§Ҷйў‘е’Ңж–Үеӯ—пјүд»ҘеҺҹеҲӣгҖҒиҪ¬иҪҪе’ҢеҲҶдә«дёәдё»пјҢж–Үз« и§ӮзӮ№дёҚд»ЈиЎЁжң¬зҪ‘з«ҷз«ӢеңәпјҢеҰӮжһңж¶үеҸҠдҫөжқғиҜ·иҒ”зі»з«ҷй•ҝйӮ®з®ұпјҡis@yisu.comиҝӣиЎҢдёҫжҠҘпјҢ并жҸҗдҫӣзӣёе…іиҜҒжҚ®пјҢдёҖз»ҸжҹҘе®һпјҢе°Ҷз«ӢеҲ»еҲ йҷӨж¶үе«ҢдҫөжқғеҶ…е®№гҖӮ

дәҝйҖҹдә‘е…¬дј—еҸ·

жүӢжңәзҪ‘з«ҷдәҢз»ҙз Ғ


