жё©йҰЁжҸҗзӨәГ—
жӮЁеҘҪпјҢзҷ»еҪ•еҗҺжүҚиғҪдёӢи®ўеҚ•е“ҰпјҒ
еҜҶз Ғзҷ»еҪ•Г—
зҷ»еҪ•жіЁеҶҢГ—
зӮ№еҮ» зҷ»еҪ•жіЁеҶҢ еҚіиЎЁзӨәеҗҢж„ҸгҖҠдәҝйҖҹдә‘з”ЁжҲ·жңҚеҠЎжқЎж¬ҫгҖӢ
з”ЁжҲ·зҷ»еҪ•Г—
жӮЁеҘҪпјҢзҷ»еҪ•еҗҺжүҚиғҪдёӢи®ўеҚ•е“ҰпјҒ
иҝҷзҜҮж–Үз« е°ҶдёәеӨ§е®¶иҜҰз»Ҷи®Іи§Јжңүе…іpytorchеҰӮдҪ•е®һзҺ°зәҝжҖ§жӢҹеҗҲж–№ејҸпјҢе°Ҹзј–и§үеҫ—жҢәе®һз”Ёзҡ„пјҢеӣ жӯӨеҲҶдә«з»ҷеӨ§е®¶еҒҡдёӘеҸӮиҖғпјҢеёҢжңӣеӨ§е®¶йҳ…иҜ»е®ҢиҝҷзҜҮж–Үз« еҗҺеҸҜд»ҘжңүжүҖ收иҺ·гҖӮ
дёҖз»ҙзәҝжҖ§жӢҹеҗҲ
ж•°жҚ®дёәy=4x+5еҠ дёҠеҷӘйҹі
з»“жһңпјҡ
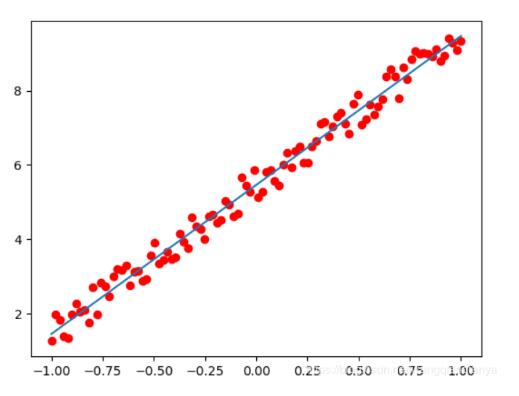
import numpy as np from mpl_toolkits.mplot3d import Axes3D from matplotlib import pyplot as plt from torch.autograd import Variable import torch from torch import nn X = torch.unsqueeze(torch.linspace(-1, 1, 100), dim=1) Y = 4*X + 5 + torch.rand(X.size()) class LinearRegression(nn.Module): def __init__(self): super(LinearRegression, self).__init__() self.linear = nn.Linear(1, 1) # иҫ“е…Ҙе’Ңиҫ“еҮәзҡ„з»ҙеәҰйғҪжҳҜ1 def forward(self, X): out = self.linear(X) return out model = LinearRegression() criterion = nn.MSELoss() optimizer = torch.optim.SGD(model.parameters(), lr=1e-2) num_epochs = 1000 for epoch in range(num_epochs): inputs = Variable(X) target = Variable(Y) # еҗ‘еүҚдј ж’ӯ out = model(inputs) loss = criterion(out, target) # еҗ‘еҗҺдј ж’ӯ optimizer.zero_grad() # жіЁж„ҸжҜҸж¬Ўиҝӯд»ЈйғҪйңҖиҰҒжё…йӣ¶ loss.backward() optimizer.step() if (epoch + 1) % 20 == 0: print('Epoch[{}/{}], loss:{:.6f}'.format(epoch + 1, num_epochs, loss.item())) model.eval() predict = model(Variable(X)) predict = predict.data.numpy() plt.plot(X.numpy(), Y.numpy(), 'ro', label='Original Data') plt.plot(X.numpy(), predict, label='Fitting Line') plt.show()еӨҡз»ҙпјҡ
from itertools import count import torch import torch.autograd import torch.nn.functional as F POLY_DEGREE = 3 def make_features(x): """Builds features i.e. a matrix with columns [x, x^2, x^3].""" x = x.unsqueeze(1) return torch.cat([x ** i for i in range(1, POLY_DEGREE+1)], 1) W_target = torch.randn(POLY_DEGREE, 1) b_target = torch.randn(1) def f(x): return x.mm(W_target) + b_target.item() def get_batch(batch_size=32): random = torch.randn(batch_size) x = make_features(random) y = f(x) return x, y # Define model fc = torch.nn.Linear(W_target.size(0), 1) batch_x, batch_y = get_batch() print(batch_x,batch_y) for batch_idx in count(1): # Get data # Reset gradients fc.zero_grad() # Forward pass output = F.smooth_l1_loss(fc(batch_x), batch_y) loss = output.item() # Backward pass output.backward() # Apply gradients for param in fc.parameters(): param.data.add_(-0.1 * param.grad.data) # Stop criterion if loss < 1e-3: break def poly_desc(W, b): """Creates a string description of a polynomial.""" result = 'y = ' for i, w in enumerate(W): result += '{:+.2f} x^{} '.format(w, len(W) - i) result += '{:+.2f}'.format(b[0]) return result print('Loss: {:.6f} after {} batches'.format(loss, batch_idx)) print('==> Learned function:\t' + poly_desc(fc.weight.view(-1), fc.bias)) print('==> Actual function:\t' + poly_desc(W_target.view(-1), b_target))е…ідәҺвҖңpytorchеҰӮдҪ•е®һзҺ°зәҝжҖ§жӢҹеҗҲж–№ејҸвҖқиҝҷзҜҮж–Үз« е°ұеҲҶдә«еҲ°иҝҷйҮҢдәҶпјҢеёҢжңӣд»ҘдёҠеҶ…е®№еҸҜд»ҘеҜ№еӨ§е®¶жңүдёҖе®ҡзҡ„её®еҠ©пјҢдҪҝеҗ„дҪҚеҸҜд»ҘеӯҰеҲ°жӣҙеӨҡзҹҘиҜҶпјҢеҰӮжһңи§үеҫ—ж–Үз« дёҚй”ҷпјҢиҜ·жҠҠе®ғеҲҶдә«еҮәеҺ»и®©жӣҙеӨҡзҡ„дәәзңӢеҲ°гҖӮ
е…ҚиҙЈеЈ°жҳҺпјҡжң¬з«ҷеҸ‘еёғзҡ„еҶ…е®№пјҲеӣҫзүҮгҖҒи§Ҷйў‘е’Ңж–Үеӯ—пјүд»ҘеҺҹеҲӣгҖҒиҪ¬иҪҪе’ҢеҲҶдә«дёәдё»пјҢж–Үз« и§ӮзӮ№дёҚд»ЈиЎЁжң¬зҪ‘з«ҷз«ӢеңәпјҢеҰӮжһңж¶үеҸҠдҫөжқғиҜ·иҒ”зі»з«ҷй•ҝйӮ®з®ұпјҡis@yisu.comиҝӣиЎҢдёҫжҠҘпјҢ并жҸҗдҫӣзӣёе…іиҜҒжҚ®пјҢдёҖз»ҸжҹҘе®һпјҢе°Ҷз«ӢеҲ»еҲ йҷӨж¶үе«ҢдҫөжқғеҶ…е®№гҖӮ

дәҝйҖҹдә‘е…¬дј—еҸ·

жүӢжңәзҪ‘з«ҷдәҢз»ҙз Ғ


