本篇文章为大家展示了怎么在wxPython中修改文本框颜色,内容简明扼要并且容易理解,绝对能使你眼前一亮,通过这篇文章的详细介绍希望你能有所收获。
具体思路如下:
1、 去除现有wxpython 的wx.TextCtrl控件的边框,再使用wx.StaticText给wx.TextCtrl做一个边框。(要相信,界面上看到的东西,只是开发人想让你看到的)
2、 这个边框需要使用两个wx.StaticText控件,为啥要用两个?
a) 模拟边框是需要色差的,由于色差存在,所以看得像一个边框。
b) 先使用一个wx.StaticText控件,设置一个黑色背景色,再在这个wx.StaticText控件上添加一个白色背景,并且长宽小于父亲2px的wx.StaticText控,这个界面上就能1px的黑色线条。这就是我们需要的边框,并且这个边框可以边框颜色和大小。(只需要改父亲控件的背景设,和子wx.StaticText的大小就行)
c) 再同理,来把无边框的wx.TextCtrl放入这个边框中,设置位置,就得到了自定义的可以改变边框颜色和文本垂直居中的文本框
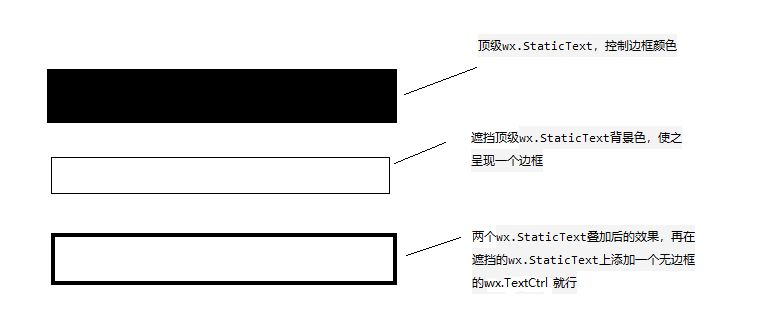
3. 合成示意图
自定义控件代码:
import wx class MyText: """自定义文本框""" def __init__(self,parent,pos,size=(80,36),readOnly= False): self.defaultFontSize= 10 #默认字体大小 self.TextCtrlColor = 'white' #文本框的背景色 self.defaultBorderColoe = '#EAEAEA' #默认边框颜色 self.textCtrl, self.border,self.bg = self.__CreateTextCtrl(parent,pos,size,self.defaultBorderColoe,readOnly) def __CreateTextCtrl(self,parent,pos,size,borderColor,readOnly=True, borderSize=1): """创建文本框""" border = wx.StaticText(parent, -1, '', size=size, pos=pos) #创建边框 border.SetBackgroundColour(borderColor) #设置边框要展现的颜色 bg = wx.StaticText(border, -1, '', size=((size[0]-borderSize*2), (size[1]-borderSize*2)) , pos=(borderSize,borderSize)) if readOnly: #设置文本框是否只读,还有去自带的边框 style = wx.TE_READONLY|wx.NO_BORDER else: style = wx.NO_BORDER textCtrl = wx.TextCtrl(bg, -1, size=((size[0]-10),self.defaultFontSize*2) , pos=(5,(size[1]-2*self.defaultFontSize-borderSize*2)/2),style =style) font = wx.Font(self.defaultFontSize,wx.DEFAULT,wx.NORMAL,wx.NORMAL,False,'微软雅黑') textCtrl.SetFont(font) if readOnly: bg.SetBackgroundColour('rgb(240,240,240)') self.TextCtrlColor = 'rgb(240,240,240)' else: bg.SetBackgroundColour(textCtrl.GetBackgroundColour()) self.TextCtrlColor = textCtrl.GetBackgroundColour() bg.Bind(wx.EVT_LEFT_UP,self.__ClickEvent) return textCtrl,border,bg def __ClickEvent(self,evt): """点击时焦点设置在文本框上""" self.textCtrl.SetFocus() def SetValue(self,value): if not value: value = '' self.textCtrl.SetValue(value) def GetValue(self): return self.textCtrl.GetValue() def SetBorderColor(self,color): self.border.SetBackgroundColour(color) self.border.Refresh() def SetFontColor(self,color): self.textCtrl.SetForegroundColour(color) self.textCtrl.SetBackgroundColour(self.TextCtrlColor) def SetFont(self,font): self.textCtrl.SetFont(font) def SetBackgroundColour(self,color): self.bg.SetBackgroundColour(color) self.textCtrl.SetBackgroundColour(color) self.textCtrl.Refresh()测试代码:
# coding:utf-8 import wx from wxpython import Mywxpython app = wx.App() frame = wx.Frame(None, title="Gui Test Editor", pos=(1000, 200), size=(500, 400)) panel = wx.Panel(frame) path_text = wx.TextCtrl(panel, size=(260, 36)) my_text = Mywxpython.MyText(panel,pos=(10, 50),size=(260,36)) my_text1 = Mywxpython.MyText(panel,pos=(10, 100),size=(260,36),readOnly=True) my_text.SetBorderColor('red') frame.Show() app.MainLoop()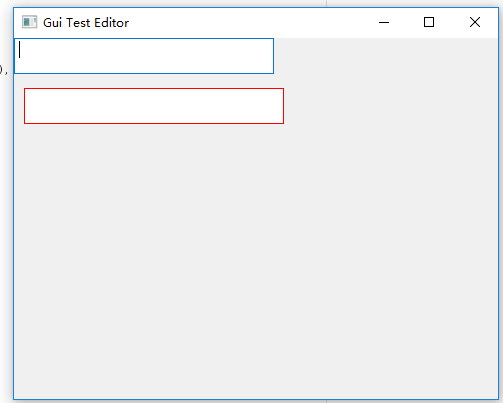
上述内容就是怎么在wxPython中修改文本框颜色,你们学到知识或技能了吗?如果还想学到更多技能或者丰富自己的知识储备,欢迎关注亿速云行业资讯频道。
免责声明:本站发布的内容(图片、视频和文字)以原创、转载和分享为主,文章观点不代表本网站立场,如果涉及侵权请联系站长邮箱:is@yisu.com进行举报,并提供相关证据,一经查实,将立刻删除涉嫌侵权内容。


