这篇文章主要讲解了“Centos7怎么搭建GlusterFS分布式文件系统群集”,文中的讲解内容简单清晰,易于学习与理解,下面请大家跟着小编的思路慢慢深入,一起来研究和学习“Centos7怎么搭建GlusterFS分布式文件系统群集”吧!
此案例相关软件包请访问:https://pan.baidu.com/s/1xazQAkR2Lm31njwu88Z9qA
提取码:qdiy
环境如下: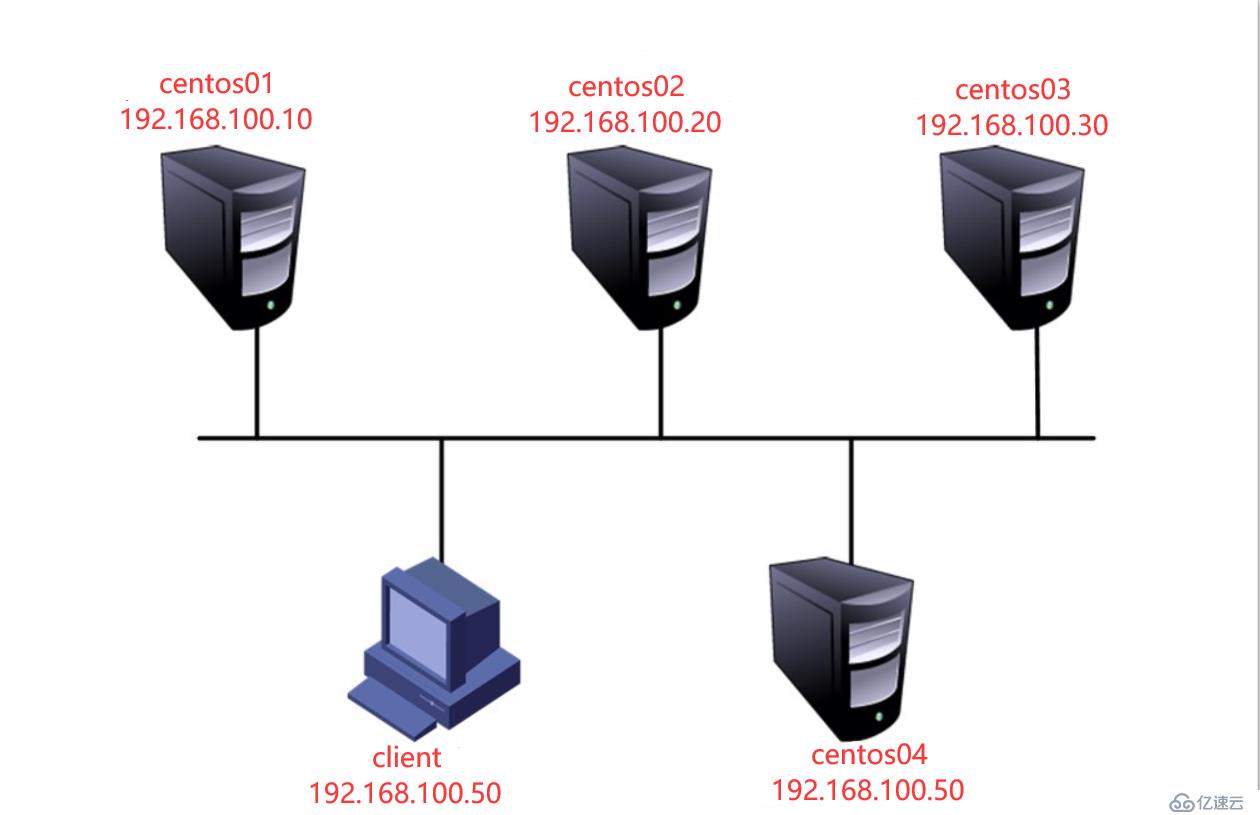
服务器相关信息: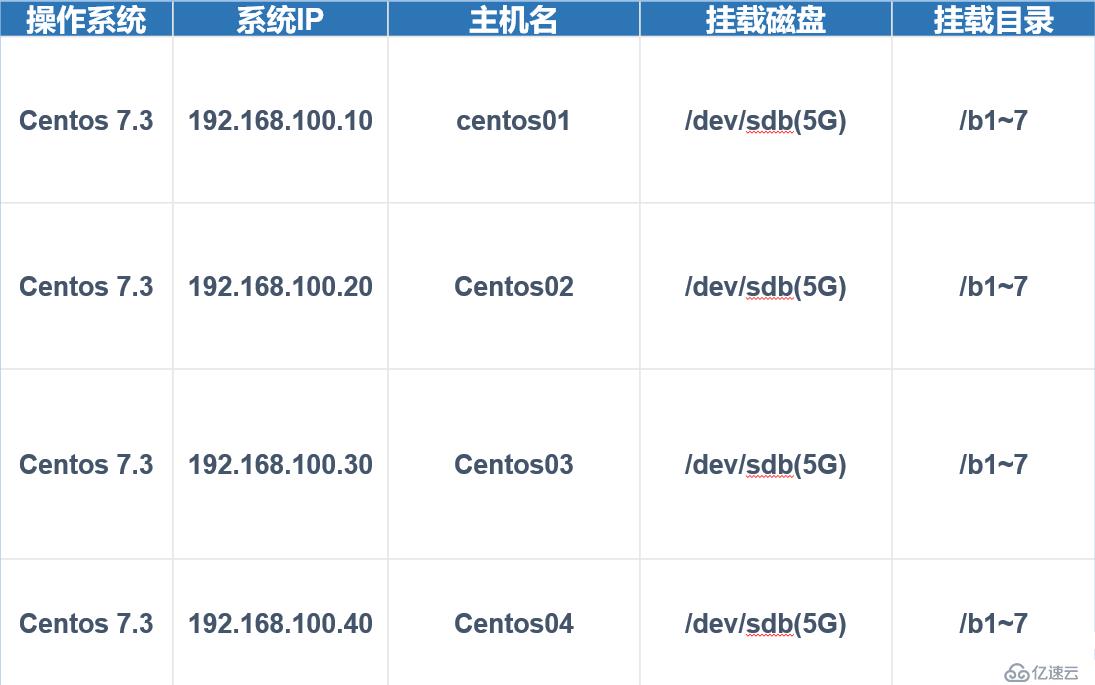
磁盘相关信息:
部署前准备工作:
在所有节点上执行以下操作,添加30G新硬盘,通过fdisk分区、mkfs格式化,创建相应的挂载目录,并将格式化的磁盘挂载到相应的目录中。最后根据实际情况,可以选择修改/etc/fstab配合文件,使其永久生效。具体配置可以参考博文:centos7磁盘文件系统管理(一)
[root@centos01 ~]# fdisk /dev/sdb <!--新添加硬盘分区--> 命令(输入 m 获取帮助):n <!--创建分区类型--> Partition type: p primary (0 primary, 0 extended, 4 free) e extended Select (default p): p <!--主分区--> 分区号 (1-4,默认 1): 起始 扇区 (2048-62914559,默认为 2048): 将使用默认值 2048 Last 扇区, +扇区 or +size{K,M,G} (2048-62914559,默认为 62914559):+5G <!--5GB--> 分区 1 已设置为 Linux 类型,大小设为 5 GiB 命令(输入 m 获取帮助):n Partition type: p primary (1 primary, 0 extended, 3 free) e extended Select (default p): p 分区号 (2-4,默认 2): 起始 扇区 (10487808-62914559,默认为 10487808): 将使用默认值 10487808 Last 扇区, +扇区 or +size{K,M,G} (10487808-62914559,默认为 62914559):+5G 分区 2 已设置为 Linux 类型,大小设为 5 GiB 命令(输入 m 获取帮助):n Partition type: p primary (2 primary, 0 extended, 2 free) e extended Select (default p): p 分区号 (3,4,默认 3): 起始 扇区 (20973568-62914559,默认为 20973568): 将使用默认值 20973568 Last 扇区, +扇区 or +size{K,M,G} (20973568-62914559,默认为 62914559):+5G 分区 3 已设置为 Linux 类型,大小设为 5 GiB 命令(输入 m 获取帮助):n Partition type: p primary (3 primary, 0 extended, 1 free) e extended Select (default e): e <!--扩展分区--> 已选择分区 4 起始 扇区 (31459328-62914559,默认为 31459328): 将使用默认值 31459328 Last 扇区, +扇区 or +size{K,M,G} (31459328-62914559,默认为 62914559): 将使用默认值 62914559 分区 4 已设置为 Extended 类型,大小设为 15 GiB 命令(输入 m 获取帮助):n <!--创建分区类型--> All primary partitions are in use 添加逻辑分区 5 起始 扇区 (31461376-62914559,默认为 31461376): 将使用默认值 31461376 Last 扇区, +扇区 or +size{K,M,G} (31461376-62914559,默认为 62914559):+5G<!--5GB--> 分区 5 已设置为 Linux 类型,大小设为 5 GiB 命令(输入 m 获取帮助):n All primary partitions are in use 添加逻辑分区 6 起始 扇区 (41949184-62914559,默认为 41949184): 将使用默认值 41949184 Last 扇区, +扇区 or +size{K,M,G} (41949184-62914559,默认为 62914559):+5G 分区 6 已设置为 Linux 类型,大小设为 5 GiB 命令(输入 m 获取帮助):n All primary partitions are in use 添加逻辑分区 7 起始 扇区 (52436992-62914559,默认为 52436992): 将使用默认值 52436992 Last 扇区, +扇区 or +size{K,M,G} (52436992-62914559,默认为 62914559): 将使用默认值 62914559 分区 7 已设置为 Linux 类型,大小设为 5 GiB 命令(输入 m 获取帮助):p <!--显示磁盘信息--> 磁盘 /dev/sdb:32.2 GB, 32212254720 字节,62914560 个扇区 Units = 扇区 of 1 * 512 = 512 bytes 扇区大小(逻辑/物理):512 字节 / 512 字节 I/O 大小(最小/最佳):512 字节 / 512 字节 磁盘标签类型:dos 磁盘标识符:0x0d5bf394 设备 Boot Start End Blocks Id System /dev/sdb1 2048 10487807 5242880 83 Linux /dev/sdb2 10487808 20973567 5242880 83 Linux /dev/sdb3 20973568 31459327 5242880 83 Linux /dev/sdb4 31459328 62914559 15727616 5 Extended /dev/sdb5 31461376 41947135 5242880 83 Linux /dev/sdb6 41949184 52434943 5242880 83 Linux /dev/sdb7 52436992 62914559 5238784 83 Linux 命令(输入 m 获取帮助):w <!--保存并退出--> The partition table has been altered! Calling ioctl() to re-read partition table. 正在同步磁盘。 [root@centos01 ~]# fdisk -l <!--查看磁盘分区信息--> 磁盘 /dev/sda:85.9 GB, 85899345920 字节,167772160 个扇区 Units = 扇区 of 1 * 512 = 512 bytes 扇区大小(逻辑/物理):512 字节 / 512 字节 I/O 大小(最小/最佳):512 字节 / 512 字节 磁盘标签类型:dos 磁盘标识符:0x000ab7bb 设备 Boot Start End Blocks Id System /dev/sda1 * 2048 411647 204800 83 Linux /dev/sda2 411648 8800255 4194304 82 Linux swap / Solaris /dev/sda3 8800256 167772159 79485952 83 Linux 磁盘 /dev/sdb:32.2 GB, 32212254720 字节,62914560 个扇区 Units = 扇区 of 1 * 512 = 512 bytes 扇区大小(逻辑/物理):512 字节 / 512 字节 I/O 大小(最小/最佳):512 字节 / 512 字节 磁盘标签类型:dos 磁盘标识符:0x0d5bf394 设备 Boot Start End Blocks Id System /dev/sdb1 2048 10487807 5242880 83 Linux /dev/sdb2 10487808 20973567 5242880 83 Linux /dev/sdb3 20973568 31459327 5242880 83 Linux /dev/sdb4 31459328 62914559 15727616 5 Extended /dev/sdb5 31461376 41947135 5242880 83 Linux /dev/sdb6 41949184 52434943 5242880 83 Linux /dev/sdb7 52436992 62914559 5238784 83 Linux [root@centos01 ~]# mkfs.xfs /dev/sdb1 <!--初始化新建分区--> [root@centos01 ~]# mkfs.xfs /dev/sdb2 <!--初始化新建分区--> [root@centos01 ~]# mkfs.xfs /dev/sdb3 <!--初始化新建分区--> [root@centos01 ~]# mkfs.xfs /dev/sdb5 <!--初始化新建分区--> [root@centos01 ~]# mkfs.xfs /dev/sdb6 <!--初始化新建分区--> [root@centos01 ~]# mkfs.xfs /dev/sdb7 <!--初始化新建分区--> [root@centos01 ~]# mkdir /sdb{1..7} <!--创建挂载点在根目录--> [root@centos01 ~]# echo "/dev/sdb1 /sdb1 xfs defaults 0 0" >> /etc/fstab <!--设置自动挂载挂载新创建的分区--> [root@centos01 ~]# echo "/dev/sdb2 /sdb2 xfs defaults 0 0" >> /etc/fstab <!--设置自动挂载挂载新创建的分区--> [root@centos01 ~]# echo "/dev/sdb3 /sdb3 xfs defaults 0 0" >> /etc/fstab <!--设置自动挂载挂载新创建的分区--> [root@centos01 ~]# echo "/dev/sdb5 /sdb5 xfs defaults 0 0" >> /etc/fstab <!--设置自动挂载挂载新创建的分区--> [root@centos01 ~]# echo "/dev/sdb6 /sdb6 xfs defaults 0 0" >> /etc/fstab <!--设置自动挂载挂载新创建的分区--> [root@centos01 ~]# echo "/dev/sdb7 /sdb7 xfs defaults 0 0" >> /etc/fstab <!--设置自动挂载挂载新创建的分区--> <!--以上配置将自行在其他三个节点自行做相同配置--> [root@centos01 ~]# scp /etc/fstab root@192.168.100.20:/etc/ <!--将 /etc/fstab目录远程复制到第二节点上--> [root@centos01 ~]# scp /etc/fstab root@192.168.100.30:/etc/ <!--将 /etc/fstab目录远程复制到第三节点上--> [root@centos01 ~]# scp /etc/fstab root@192.168.100.40:/etc/ <!--将 /etc/fstab目录远程复制到第四节点上--> [root@centos01 ~]# vim /etc/hosts <!--修改hosts文件解析所有节点--> 127.0.0.1 localhost localhost.localdomain localhost4 localhost4.localdomain4 ::1 localhost localhost.localdomain localhost6 localhost6.localdomain6 192.168.100.10 centos01 192.168.100.20 centos02 192.168.100.30 centos03 192.168.100.40 centos04 [root@centos01 ~]# scp /etc/hosts root@192.168.100.20:/etc/<!--远程复制到第二个节点--> [root@centos01 ~]# scp /etc/hosts root@192.168.100.30:/etc/<!--远程复制到第三个节点--> [root@centos01 ~]# scp /etc/hosts root@192.168.100.40:/etc/<!--远程复制到第四个节点--> [root@centos01 ~]# scp /etc/hosts root@192.168.100.50:/etc/<!--远程复制到第五个节点--> [root@centos01 ~]# df -Th <!--将所有节点服务器重启,查看磁盘分区是否挂载成功--> 文件系统 类型 容量 已用 可用 已用% 挂载点 /dev/sda3 xfs 76G 3.6G 73G 5% / devtmpfs devtmpfs 474M 0 474M 0% /dev tmpfs tmpfs 489M 0 489M 0% /dev/shm tmpfs tmpfs 489M 7.0M 482M 2% /run tmpfs tmpfs 489M 0 489M 0% /sys/fs/cgroup /dev/sdb7 xfs 5.0G 33M 5.0G 1% /sdb7 /dev/sdb2 xfs 5.0G 33M 5.0G 1% /sdb2 /dev/sdb5 xfs 5.0G 33M 5.0G 1% /sdb5 /dev/sdb6 xfs 5.0G 33M 5.0G 1% /sdb6 /dev/sdb1 xfs 5.0G 33M 5.0G 1% /sdb1 /dev/sdb3 xfs 5.0G 33M 5.0G 1% /sdb3 /dev/sda1 xfs 197M 136M 61M 70% /boot tmpfs tmpfs 98M 0 98M 0% /run/user/0[root@centos01 ~]# mount /dev/cdrom /mnt/ <!--挂载Glusterfs光盘--> mount: /dev/sr0 写保护,将以只读方式挂载 [root@centos01 ~]# rm -rf /etc/yum.repos.d/CentOS-* <!--删除系统自带yum源--> [root@centos01 ~]# cd /mnt/ <!--进入mnt目录--> [root@centos01 mnt]# ls <!--查看当前目录下文件--> gfsrepo [root@centos01 mnt]# vim /etc/yum.repos.d/local.repo <!--修改yum配置文件的挂载点--> [local] name=centos baseurl=file:///mnt/gfsrepo <!--修改为///mnt/gfsrepo --> enabled=1 gpgcheck=0 [root@centos01 ~]# yum -y install glusterfs glusterfs-server glusterfs-fuse glusterfs-rdma <!--安装gluster服务器端和客户端--> [root@centos01 ~]# systemctl start glusterd <!--启动服务--> [root@centos01 ~]# systemctl enable glusterd <!--设置服务开机自动启动--> <!--以下将yum配置文件远程复制到其他四台服务器--> [root@centos01 ~]# scp /etc/yum.repos.d/local.repo root@192.168.100.20:/etc/yum.repos.d/ [root@centos01 ~]# scp /etc/yum.repos.d/local.repo root@192.168.100.30:/etc/yum.repos.d/ [root@centos01 ~]# scp /etc/yum.repos.d/local.repo root@192.168.100.40:/etc/yum.repos.d/ [root@centos01 ~]# scp /etc/yum.repos.d/local.repo root@192.168.100.50:/etc/yum.repos.d/ <!---->
至此,centos01配置完成了,centos02~04重复centos01的配置即可,自行配置。centos05只需要按照客户端依赖程序即可
(接下来的所有配置,在任意一台节点上执行即可,我这里在centos01上执行)
[root@centos01 ~]# gluster peer probe centos02 <!--创建GlusterFS节点2--> [root@centos01 ~]# gluster peer probe centos03 <!--创建GlusterFS节点3--> [root@centos01 ~]# gluster peer probe centos04 <!--创建GlusterFS节点4--> [root@centos01 ~]# gluster peer status <!--查看群集节点--> Number of Peers: 3 Hostname: centos02 Uuid: 4cc7469c-9d8b-4fce-9d5c-f0132f4faab9 State: Peer in Cluster (Connected) Hostname: centos03 Uuid: 200c060d-9ad6-4e61-9065-2637599f3865 State: Peer in Cluster (Connected) Hostname: centos04 Uuid: e548bbe0-5796-4ef2-a990-017379f96e08 State: Peer in Cluster (Connected)
[root@centos01 ~]# gluster volume create FBS-Volume centos01:/sdb1 centos02:/sdb1 force <!--创建分布式卷,其中“FBS-Volume”为卷名,没有指定类型,默认创建的是分布式卷--> [root@centos01 ~]# gluster volume info FBS-Volume <!--查看分布式卷的状态--> Volume Name: FBS-Volume Type: Distribute <!--卷类型为分布式卷--> Volume ID: e57ab3d2-ab2a-43fe-b035-1a5b0e290db2 Status: Created Snapshot Count: 0 Number of Bricks: 2 Transport-type: tcp Bricks: Brick1: centos01:/sdb1 Brick2: centos02:/sdb1 Options Reconfigured: transport.address-family: inet nfs.disable: on [root@centos01 ~]# gluster volume start FBS-Volume <!--启动分布式卷--> [root@centos05 ~]# mkdir /FBS-Volume <!--客户端创建挂载目录--> [root@centos05 ~]# mount -t glusterfs 192.168.100.10:FBS-Volume /FBS-Volume <!--客户端挂载分布式卷--> [root@centos05 ~]# df -Th <!--客户端验证是否挂载成功--> 文件系统 类型 容量 已用 可用 已用% 挂载点 192.168.100.10:FBS-Volume fuse.glusterfs 10G 65M 10G 1% /FBS-Volume
[root@centos01 ~]# gluster volume create TD-Volume stripe 2 centos01:/sdb2 centos02:/sdb2 force <!--创建条带卷,指定条带卷的个数为2个。“TD-Volume”为卷名--> [root@centos01 ~]# gluster volume info TD-Volume <!--查看条带卷状态--> Volume Name: TD-Volume Type: Stripe <!--卷类型为条带--> Volume ID: c39cb0ee-ae37-4e87-9847-e331cdac2b14 Status: Created Snapshot Count: 0 Number of Bricks: 1 x 2 = 2 Transport-type: tcp Bricks: Brick1: centos01:/sdb2 Brick2: centos02:/sdb2 Options Reconfigured: transport.address-family: inet nfs.disable: on [root@centos01 ~]# gluster volume start TD-Volume <!--启动条带卷--> [root@centos05 ~]# mkdir /TD-Volume <!--客户端创建挂载目录--> [root@centos05 ~]# mount -t glusterfs 192.168.100.10:TD-Volume /TD-Volume <!--客户端挂载条带卷--> [root@centos05 ~]# df -Th <!--客户端验证是否挂载成功--> 文件系统 类型 容量 已用 可用 已用% 挂载点 192.168.100.10:FBS-Volume fuse.glusterfs 10G 65M 10G 1% /FBS-Volume 192.168.100.10:TD-Volume fuse.glusterfs 10G 65M 10G 1% /TD-Volume
[root@centos01 ~]# gluster volume create FZ-Volume replica 2 centos01:/sdb3 centos02:/sdb3 force <!--指定类型为“replica”,数值为“2”,而且后面跟了两个brick server,所以创建的是复制卷--> [root@centos01 ~]# gluster volume info FZ-Volume <!--查看复制卷状态--> Volume Name: FZ-Volume Type: Replicate <!--卷类型为复制卷--> Volume ID: bd1059ef-8822-428e-9e00-1da97f54411a Status: Created Snapshot Count: 0 Number of Bricks: 1 x 2 = 2 Transport-type: tcp Bricks: Brick1: centos01:/sdb3 Brick2: centos02:/sdb3 Options Reconfigured: transport.address-family: inet nfs.disable: on [root@centos01 ~]# gluster volume start FZ-Volume <!--启动复制卷--> [root@centos05 ~]# mkdir /FZ-Volume <!--客户端创建挂载目录--> [root@centos05 ~]# mount -t glusterfs 192.168.100.10:FZ-Volume /FZ-Volume <!--客户端挂载复制卷--> [root@centos05 ~]# df -Th <!--客户端验证是否挂载成功--> 文件系统 类型 容量 已用 可用 已用% 挂载点 192.168.100.10:FBS-Volume fuse.glusterfs 10G 65M 10G 1% /FBS-Volume 192.168.100.10:TD-Volume fuse.glusterfs 10G 65M 10G 1% /TD-Volume 192.168.100.10:FZ-Volume fuse.glusterfs 5.0G 33M 5.0G 1% /FZ-Volume
[root@centos01 ~]# gluster volume create FBSTD-Volume stripe 2 transport tcp centos01:/sdb5 centos02:/sdb05 centos01:/sdb6 centos02:/sdb6 force <!--指定类型为stripe,数值为2,而且后面跟了4个brick server,所以创建的是分布式条带卷--> [root@centos01 ~]# gluster volume info FBSTD-Volume <!--查看分布式条带卷状态--> Volume Name: FBSTD-Volume Type: Distributed-Stripe <!--卷类型为分布式条带卷--> Volume ID: c6fd3205-bc95-4d22-bfab-15442b367587 Status: Created Snapshot Count: 0 Number of Bricks: 2 x 2 = 4 Transport-type: tcp Bricks: Brick1: centos01:/sdb5 Brick2: centos02:/sdb05 Brick3: centos01:/sdb6 Brick4: centos02:/sdb6 Options Reconfigured: transport.address-family: inet nfs.disable: on [root@centos01 ~]# gluster volume start FBSTD-Volume <!--启动分布式条带卷--> [root@centos05 ~]# mkdir /FBSTD-Volume <!--客户端创建挂载目录--> [root@centos05 ~]# mount -t glusterfs 192.168.100.10:FBSTD-Volume /FBSTD-Volume/ <!--客户端挂载分布式条带卷--> [root@centos05 ~]# df -Th <!--客户端验证是否挂载成功--> 文件系统 类型 容量 已用 可用 已用% 挂载点 192.168.100.10:FBS-Volume fuse.glusterfs 10G 65M 10G 1% /FBS-Volume 192.168.100.10:TD-Volume fuse.glusterfs 10G 65M 10G 1% /TD-Volume 192.168.100.10:FZ-Volume fuse.glusterfs 5.0G 33M 5.0G 1% /FZ-Volume 192.168.100.10:FBSTD-Volume fuse.glusterfs 91G 3.7G 88G 5% /FBSTD-Volume
[root@centos01 ~]# gluster volume create FBSFZ-Volume replica 2 transport tcp centos01:/sdb7 centos02:/sdb7 centos03:/sdb1 centos04:/sdb1 force <!--指定类型为replica,数值为2,而且后面跟了4个brick server,是2的两倍, 所以创建的是分布式复制卷--> [root@centos01 ~]# gluster volume info FBSFZ-Volume <!--查看分布式复制卷状态--> Volume Name: FBSFZ-Volume Type: Distributed-Replicate <!--卷类型为分布式复制卷--> Volume ID: 4be9bc3a-e91b-46ae-b2c8-f80251b8a001 Status: Created Snapshot Count: 0 Number of Bricks: 2 x 2 = 4 Transport-type: tcp Bricks: Brick1: centos01:/sdb7 Brick2: centos02:/sdb7 Brick3: centos03:/sdb1 Brick4: centos04:/sdb1 Options Reconfigured: transport.address-family: inet nfs.disable: on [root@centos01 ~]# gluster volume start FBSFZ-Volume <!--启动分布式复制卷--> [root@centos05 ~]# mkdir /FBSFZ-Volume <!--客户端创建挂载目录--> [root@centos05 ~]# mount -t glusterfs 192.168.100.10:FBSFZ-Volume /FBSFZ-Volume <!--客户端挂载分布式复制卷--> [root@centos05 ~]# df -Th <!--客户端验证是否挂载成功--> 文件系统 类型 容量 已用 可用 已用% 挂载点 192.168.100.10:FBS-Volume fuse.glusterfs 10G 65M 10G 1% /FBS-Volume 192.168.100.10:TD-Volume fuse.glusterfs 10G 65M 10G 1% /TD-Volume 192.168.100.10:FZ-Volume fuse.glusterfs 5.0G 33M 5.0G 1% /FZ-Volume 192.168.100.10:FBSTD-Volume fuse.glusterfs 91G 3.7G 88G 5% /FBSTD-Volume 192.168.100.10:FBSFZ-Volume fuse.glusterfs 10G 65M 10G 1% /FBSFZ-Volume
[root@centos05 ~]# vim /etc/fstab <!--设置自动挂载glusterFS文件系统--> 192.168.100.10:FBS-Volume /FBS-Volume glusterfs defaults,_netdev 0 0 192.168.100.10:TD-Volume /TD-Volume glusterfs defaults,_netdev 0 0 192.168.100.10:FZ-Volume /FZ-Volume glusterfs defaults,_netdev 0 0 192.168.100.10:FBSTD-Volume /FBSTD-Volume glusterfs defaults,_netdev 0 0 192.168.100.10:FBSFZ-Volume /FBSFZ-Volume glusterfs defaults,_netdev 0 0 [root@centos05 ~]# df -Th <!--重启客户端查看是否自动挂载--> 文件系统 类型 容量 已用 可用 已用% 挂载点 192.168.100.10:FZ-Volume fuse.glusterfs 5.0G 33M 5.0G 1% /FZ-Volume 192.168.100.10:FBS-Volume fuse.glusterfs 10G 65M 10G 1% /FBS-Volume 192.168.100.10:FBSTD-Volume fuse.glusterfs 91G 3.7G 88G 5% /FBSTD-Volume 192.168.100.10:TD-Volume fuse.glusterfs 10G 65M 10G 1% /TD-Volume 192.168.100.10:FBSFZ-Volume fuse.glusterfs 10G 65M 10G 1% /FBSFZ-Volume
[root@centos01 ~]# gluster volume list <!--查看创建glusterfs卷--> FBS-Volume FBSFZ-Volume FBSTD-Volume FZ-Volume TD-Volume [root@centos01 ~]# gluster volume status <!--查看卷的状态--> Status of volume: FBS-Volume Gluster process TCP Port RDMA Port Online Pid ------------------------------------------------------------------------------ Brick centos01:/sdb1 49152 0 Y 2413 Brick centos02:/sdb1 49152 0 Y 2231 Task Status of Volume FBS-Volume ------------------------------------------------------------------------------ There are no active volume tasks Status of volume: FBSFZ-Volume Gluster process TCP Port RDMA Port Online Pid ------------------------------------------------------------------------------ Brick centos01:/sdb7 49157 0 Y 3585 Brick centos02:/sdb7 49157 0 Y 3119 Brick centos03:/sdb1 49152 0 Y 2877 Brick centos04:/sdb1 49152 0 Y 2746 Self-heal Daemon on localhost N/A N/A Y 3605 Self-heal Daemon on centos03 N/A N/A Y 2897 Self-heal Daemon on centos02 N/A N/A Y 3139 Self-heal Daemon on centos04 N/A N/A Y 2766 Task Status of Volume FBSFZ-Volume ------------------------------------------------------------------------------ There are no active volume tasks Status of volume: FBSTD-Volume Gluster process TCP Port RDMA Port Online Pid ------------------------------------------------------------------------------ Brick centos01:/sdb5 49155 0 Y 3393 Brick centos02:/sdb05 49155 0 Y 2889 Brick centos01:/sdb6 49156 0 Y 3412 Brick centos02:/sdb6 49156 0 Y 2908 Task Status of Volume FBSTD-Volume ------------------------------------------------------------------------------ There are no active volume tasks Status of volume: FZ-Volume Gluster process TCP Port RDMA Port Online Pid ------------------------------------------------------------------------------ Brick centos01:/sdb3 49154 0 Y 3214 Brick centos02:/sdb3 49154 0 Y 2787 Self-heal Daemon on localhost N/A N/A Y 3605 Self-heal Daemon on centos03 N/A N/A Y 2897 Self-heal Daemon on centos02 N/A N/A Y 3139 Self-heal Daemon on centos04 N/A N/A Y 2766 Task Status of Volume FZ-Volume ------------------------------------------------------------------------------ There are no active volume tasks Status of volume: TD-Volume Gluster process TCP Port RDMA Port Online Pid ------------------------------------------------------------------------------ Brick centos01:/sdb2 49153 0 Y 3003 Brick centos02:/sdb2 49153 0 Y 2667 Task Status of Volume TD-Volume ------------------------------------------------------------------------------ There are no active volume tasks [root@centos01 ~]# gluster volume info <!--查看所有卷的信息--> Volume Name: FBS-Volume Type: Distribute Volume ID: e57ab3d2-ab2a-43fe-b035-1a5b0e290db2 Status: Started Snapshot Count: 0 Number of Bricks: 2 Transport-type: tcp Bricks: Brick1: centos01:/sdb1 Brick2: centos02:/sdb1 Options Reconfigured: transport.address-family: inet nfs.disable: on Volume Name: FBSTD-Volume Type: Distributed-Stripe Volume ID: c6fd3205-bc95-4d22-bfab-15442b367587 Status: Started Snapshot Count: 0 Number of Bricks: 2 x 2 = 4 Transport-type: tcp Bricks: Brick1: centos01:/sdb5 Brick2: centos02:/sdb05 Brick3: centos01:/sdb6 Brick4: centos02:/sdb6 Options Reconfigured: transport.address-family: inet nfs.disable: on Volume Name: FZ-Volume Type: Replicate Volume ID: bd1059ef-8822-428e-9e00-1da97f54411a Status: Started Snapshot Count: 0 Number of Bricks: 1 x 2 = 2 Transport-type: tcp Bricks: Brick1: centos01:/sdb3 Brick2: centos02:/sdb3 Options Reconfigured: transport.address-family: inet nfs.disable: on Volume Name: TD-Volume Type: Stripe Volume ID: c39cb0ee-ae37-4e87-9847-e331cdac2b14 Status: Started Snapshot Count: 0 Number of Bricks: 1 x 2 = 2 Transport-type: tcp Bricks: Brick1: centos01:/sdb2 Brick2: centos02:/sdb2 Options Reconfigured: auth.allow: 192.168.100.10,192.168.100.20,192.168.100.50 transport.address-family: inet nfs.disable: on [root@centos01 ~]# gluster volume stop FBSFZ-Volume <!--删除FBSFZ-Volume卷前停止此卷--> [root@centos01 ~]# gluster volume delete FBSFZ-Volume <!--删除FBSFZ-Volume卷--> [root@centos01 ~]# gluster volume set TD-Volume auth.allow 192.168.100.10,192.168.100.20,192.168.100.50 <!--针对条带卷设置访问控制列表(允许100.10、100.20、100.50挂载,其他拒绝挂载)--> [root@centos05 ~]# mount -t glusterfs 192.168.100.10:TD-Volume /TD-Volume <!--客户端挂载条带卷--> [root@centos05 ~]# df -Th <!--查看是否挂载成功--> 文件系统 类型 容量 已用 可用 已用% 挂载点 192.168.100.10:FZ-Volume fuse.glusterfs 5.0G 33M 5.0G 1% /FZ-Volume 192.168.100.10:FBS-Volume fuse.glusterfs 10G 65M 10G 1% /FBS-Volume 192.168.100.10:FBSTD-Volume fuse.glusterfs 91G 3.7G 88G 5% /FBSTD-Volume 192.168.100.10:FBSFZ-Volume fuse.glusterfs 10G 65M 10G 1% /FBSFZ-Volume tmpfs tmpfs 98M 0 98M 0% /run/user/0 192.168.100.10:TD-Volume fuse.glusterfs 10G 65M 10G 1% /TD-Volume
感谢各位的阅读,以上就是“Centos7怎么搭建GlusterFS分布式文件系统群集”的内容了,经过本文的学习后,相信大家对Centos7怎么搭建GlusterFS分布式文件系统群集这一问题有了更深刻的体会,具体使用情况还需要大家实践验证。这里是亿速云,小编将为大家推送更多相关知识点的文章,欢迎关注!
免责声明:本站发布的内容(图片、视频和文字)以原创、转载和分享为主,文章观点不代表本网站立场,如果涉及侵权请联系站长邮箱:is@yisu.com进行举报,并提供相关证据,一经查实,将立刻删除涉嫌侵权内容。


