
 Data Structure
 Networking
 RDBMS
RDBMS Operating System
 Java
Java MS Excel
 iOS
iOS HTML
HTML CSS
CSS Android
 Python
 C Programming
 C++
C++ C#
C# MongoDB
 MySQL
MySQL Javascript
 PHP
PHP
- Selected Reading
- UPSC IAS Exams Notes
- Developer's Best Practices
- Questions and Answers
- Effective Resume Writing
- HR Interview Questions
- Computer Glossary
- Who is Who
Client side image zooming and rotating in Django
Sometimes, we may need to rotate an image or zoom it. In such cases, a client-side image zooming library is used to add jquery feature of zooming-rotating on html file. We just needed to load jquery js and css in html file.
Create a Django project and an app. Setup urls and do some basic stuff like adding app in INSTALLED_APPS.
Install the django-client-side-image-cropping library
pip install django-client-side-image-cropping
Now in settings.py, add the following line −
INSTALLED_APPS+=['client_side_image_cropping']
Here, we have done a simple setting of adding a module as an app.
Example
In models.py, add the following lines −
from django.db import models # Create your models here. class Data(models.Model): image=models.ImageField(upload_to ='myimages/')
Here, we setup our model which have an image field.
Setup media root in settings.py.
In urls.py, add the following lines −
from django.urls import path from . import views from django.conf import settings from django.conf.urls.static import static urlpatterns = [ path('', views.home,name="home"), ] urlpatterns += static(settings.MEDIA_URL, document_root=settings.MEDIA_RO OT) Here, we have done a basic media url setting which you surely know.
Now in views.py, add the following −
from django.shortcuts import render from django import forms from .models import Data from client_side_image_cropping import ClientsideCroppingWidget # Create your views here. class DataForm(forms.ModelForm): class Meta: model=Data fields="__all__" widgets = { 'image': ClientsideCroppingWidget( width=400, height=600, preview_width=100, preview_height=150, ) } def home(request): if request.method =="POST": form=DataForm(request.POST,request.FILES) if form.is_valid(): form.save() form=DataForm() return render(request,'home.html',{"form":form}) Here, we created a simple form. It is a model form, so on its image field, we have added a cropping widget.
In home.html, add the following −
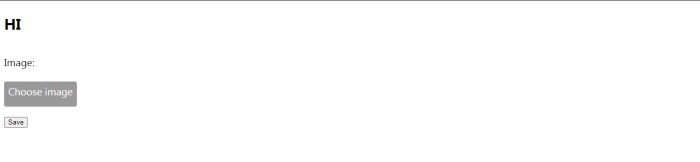
{% load static %} {% load cropping %} {% load thumbnail %} <!DOCTYPE html> <html> <head> <title> TUT </title> <link rel="stylesheet" href="{% static "client_side_i mage_cropping/cropping.css" %}"></script> <link rel="stylesheet" href="{% static "client_side_i mage_cropping/cropping_widget.css" %}"></script> <script src="https://ajax.googleapis.com/ajax/libs/jq uery/1.12.4/jquery.min.js"></script> <script src="{% static "client_side_image_cropping/cr oppie.min.js" %}"></script> <script src="{% static "client_side_image_cropping/cr opping_widget.js" %}"></script> </head> <body> <h2>HI</h2> {% csrf_token %} <form method="post" enctype="multipart/formdata"> {% csrf_token %} {{ form.as_p }} <input type="submit" value="Save"/> </form> </body> </html> At the frontend, we loaded some jQueries and some styles, and render the form which will take the input.
Now all is done. Let's check the output.
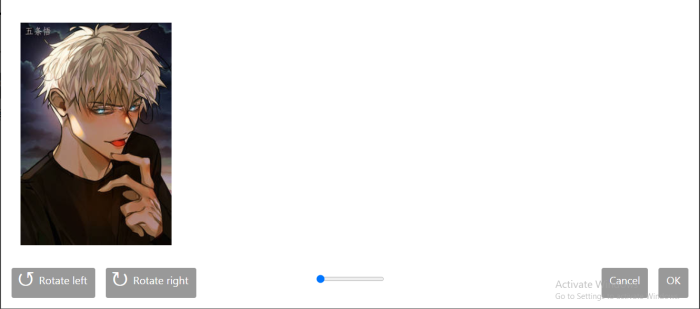
Output
You will get an interface like this, on which you can rotate and zoom the photo. It is not a very good looking interface, however you can modify it by using CSS.
Note that the image uploaded might look displaced, so use rotate to set it right. That displacement maybe caused due to browser problems.

660 Views
