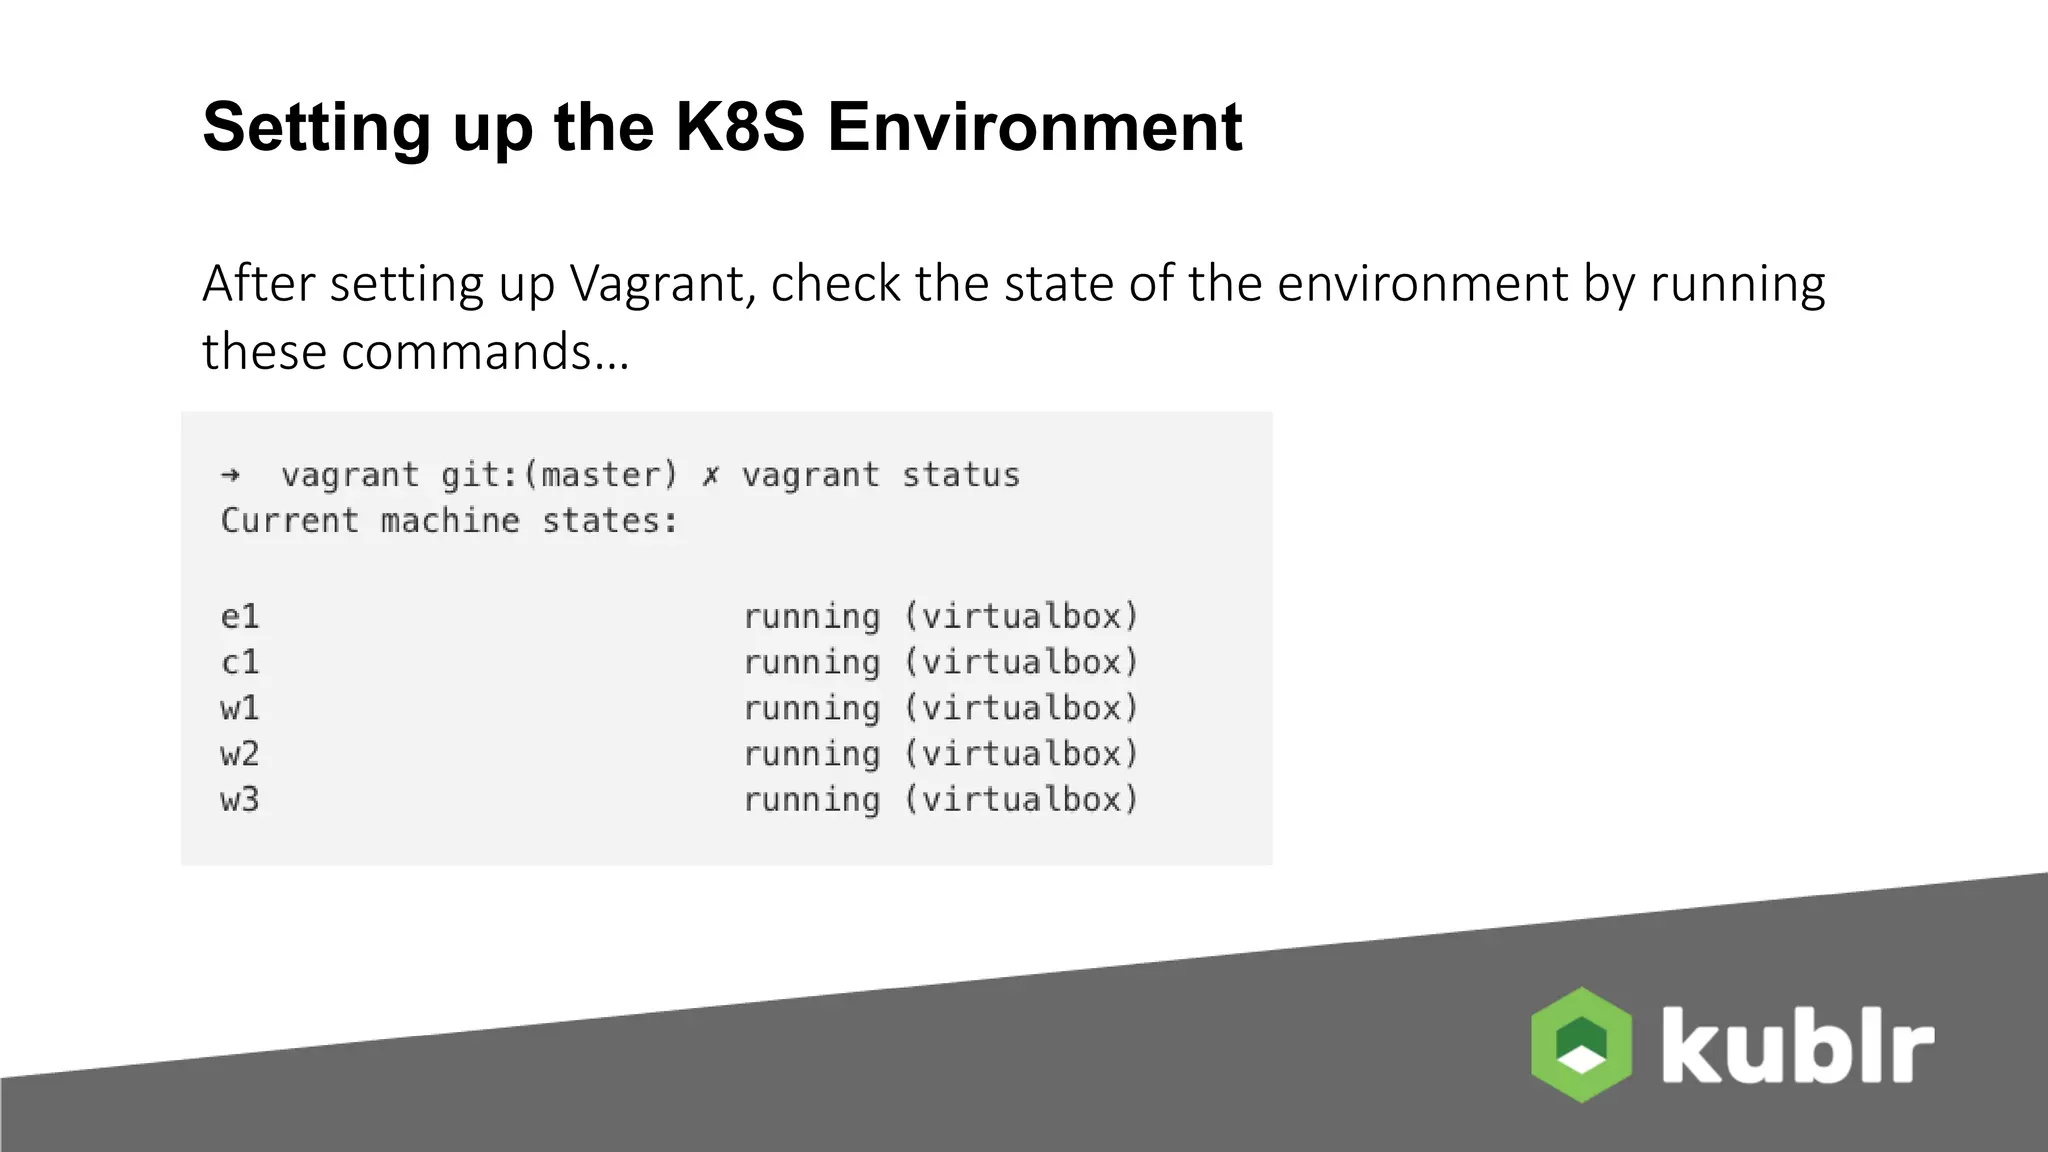
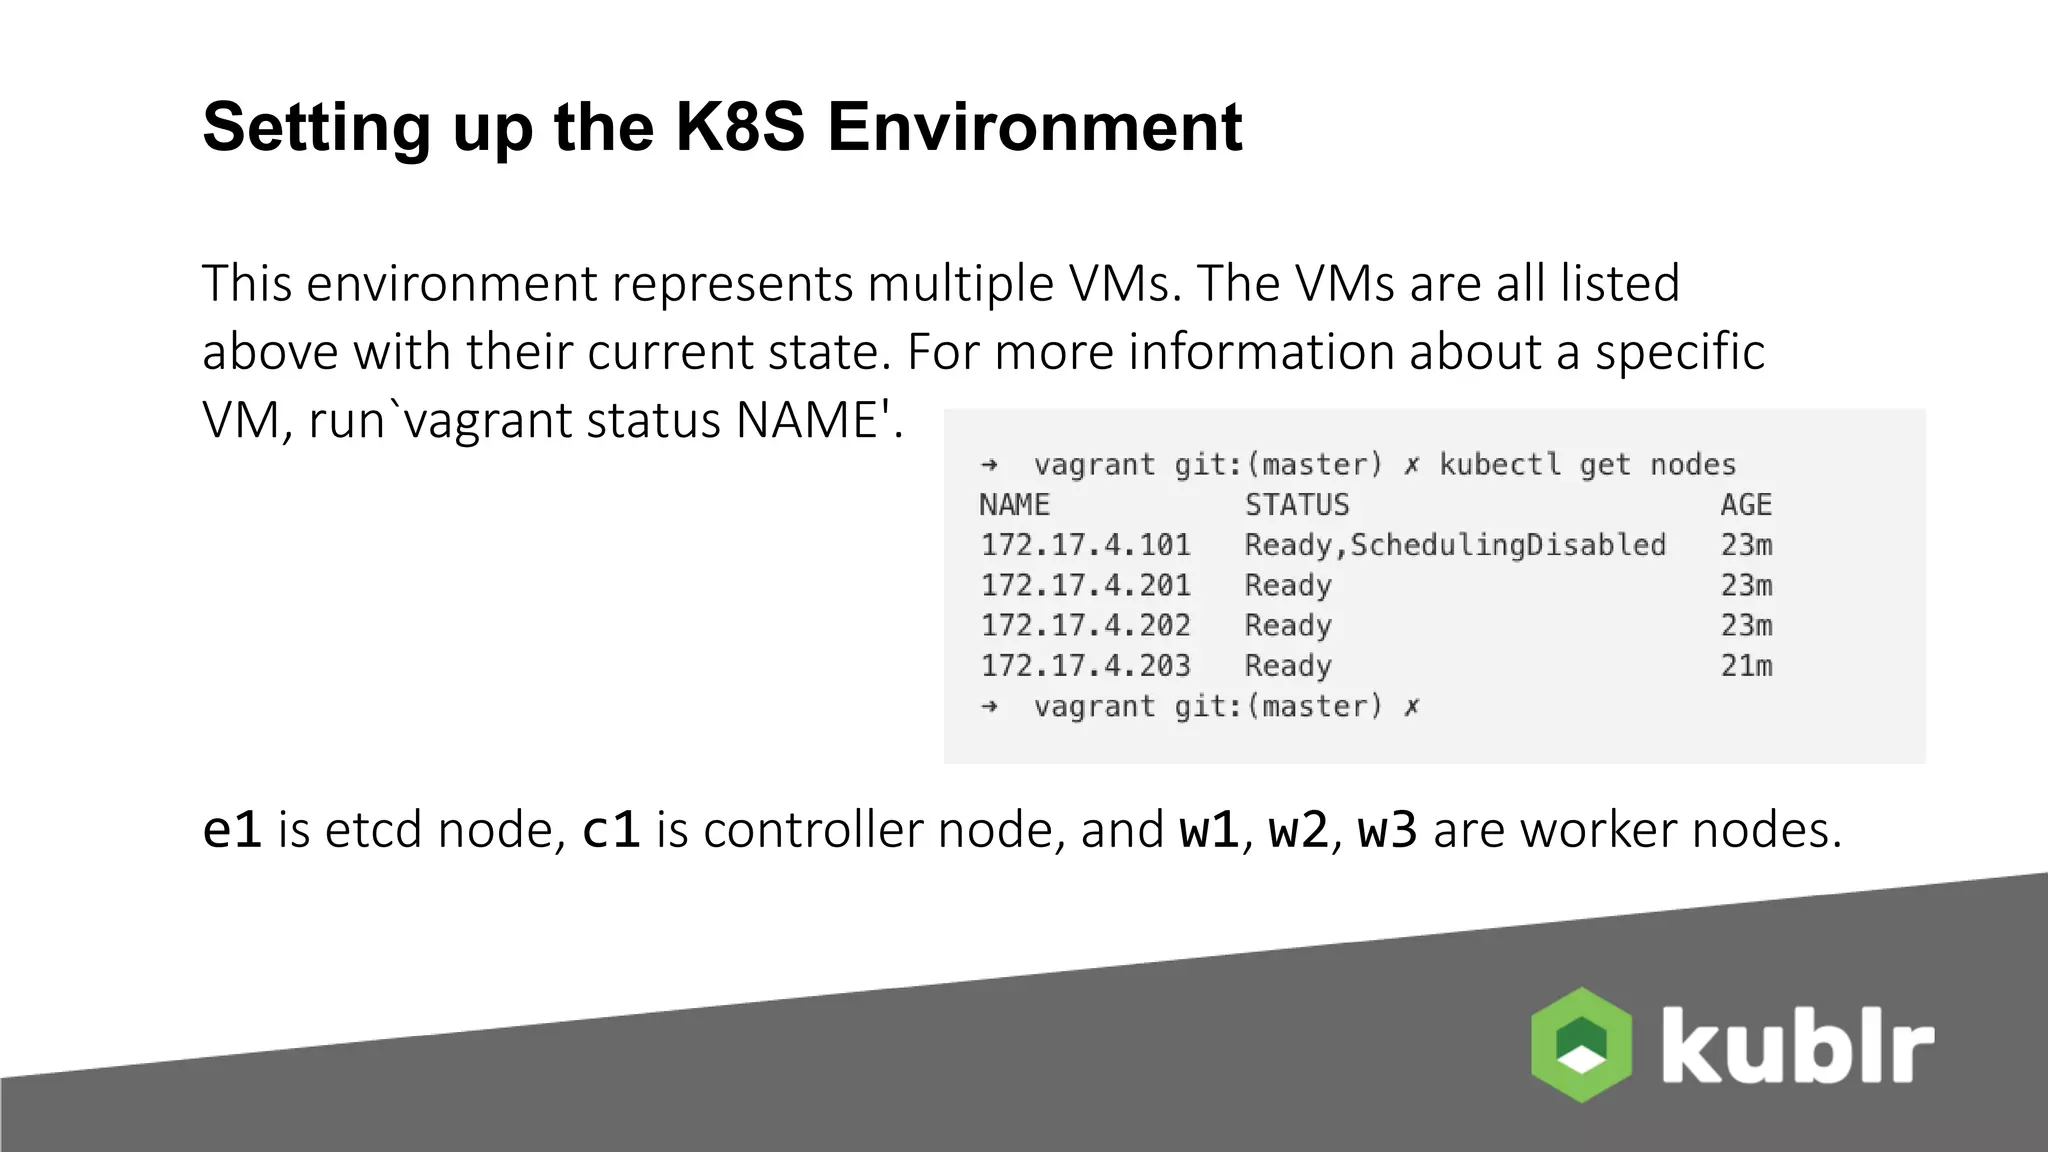
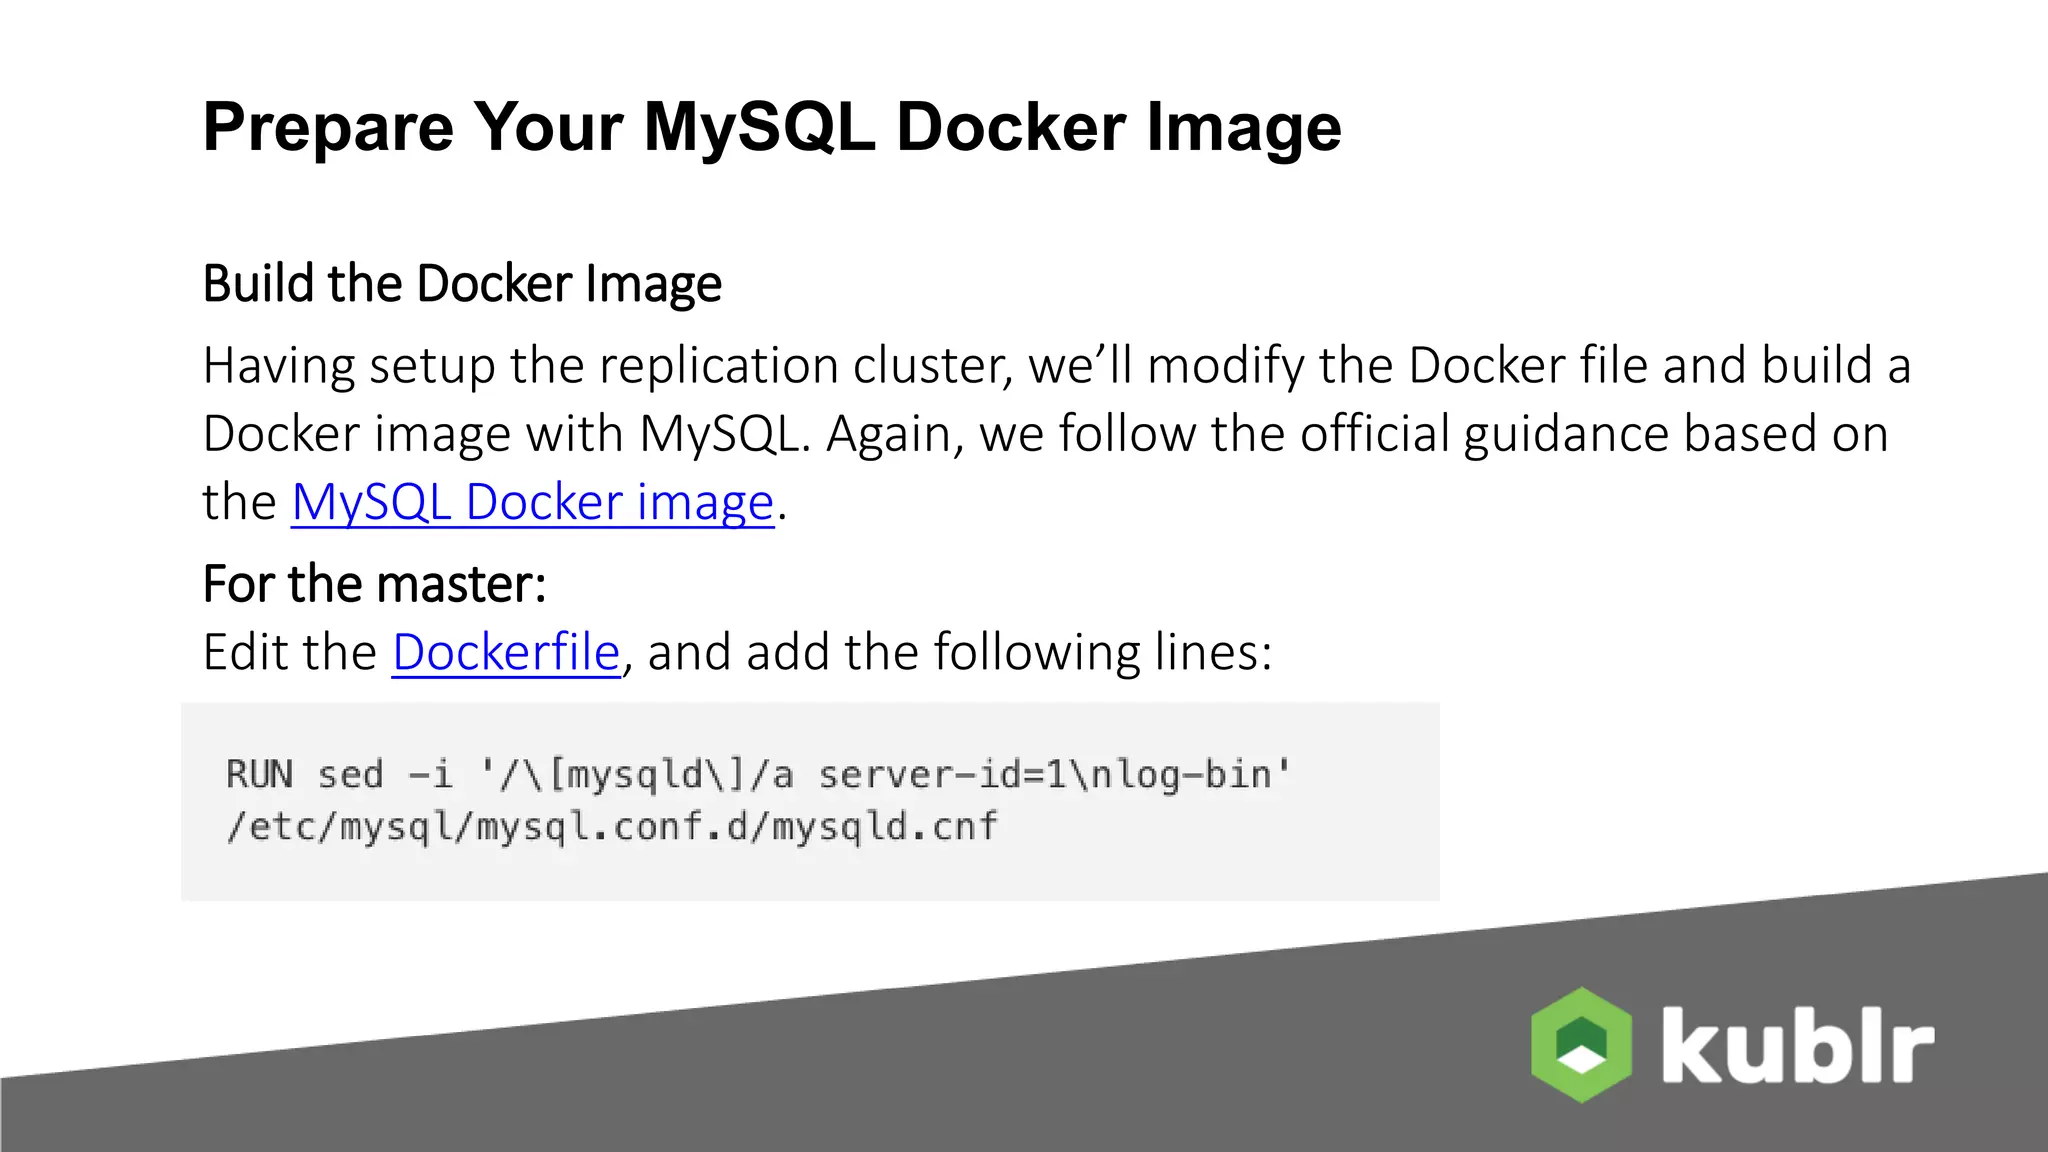
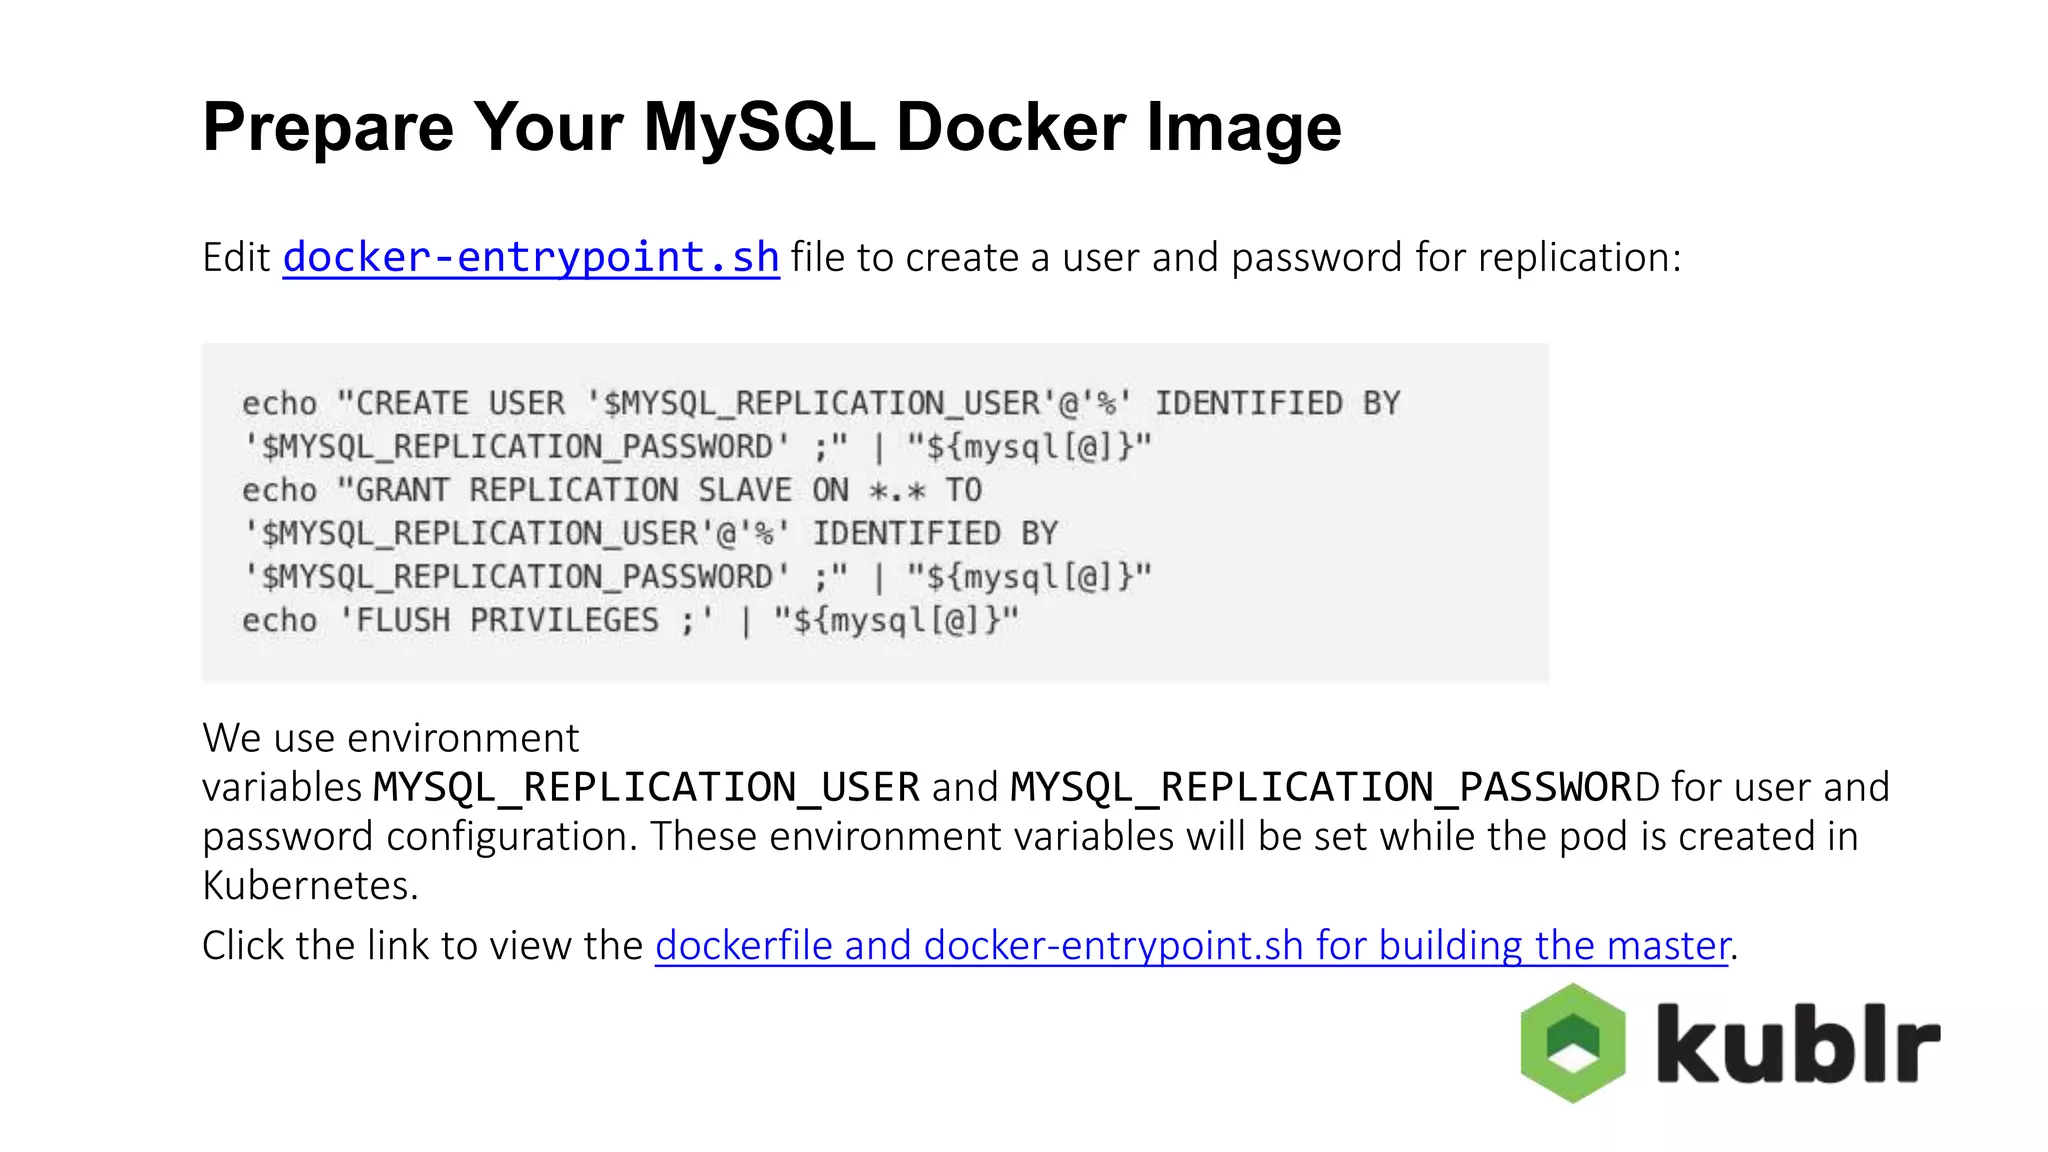
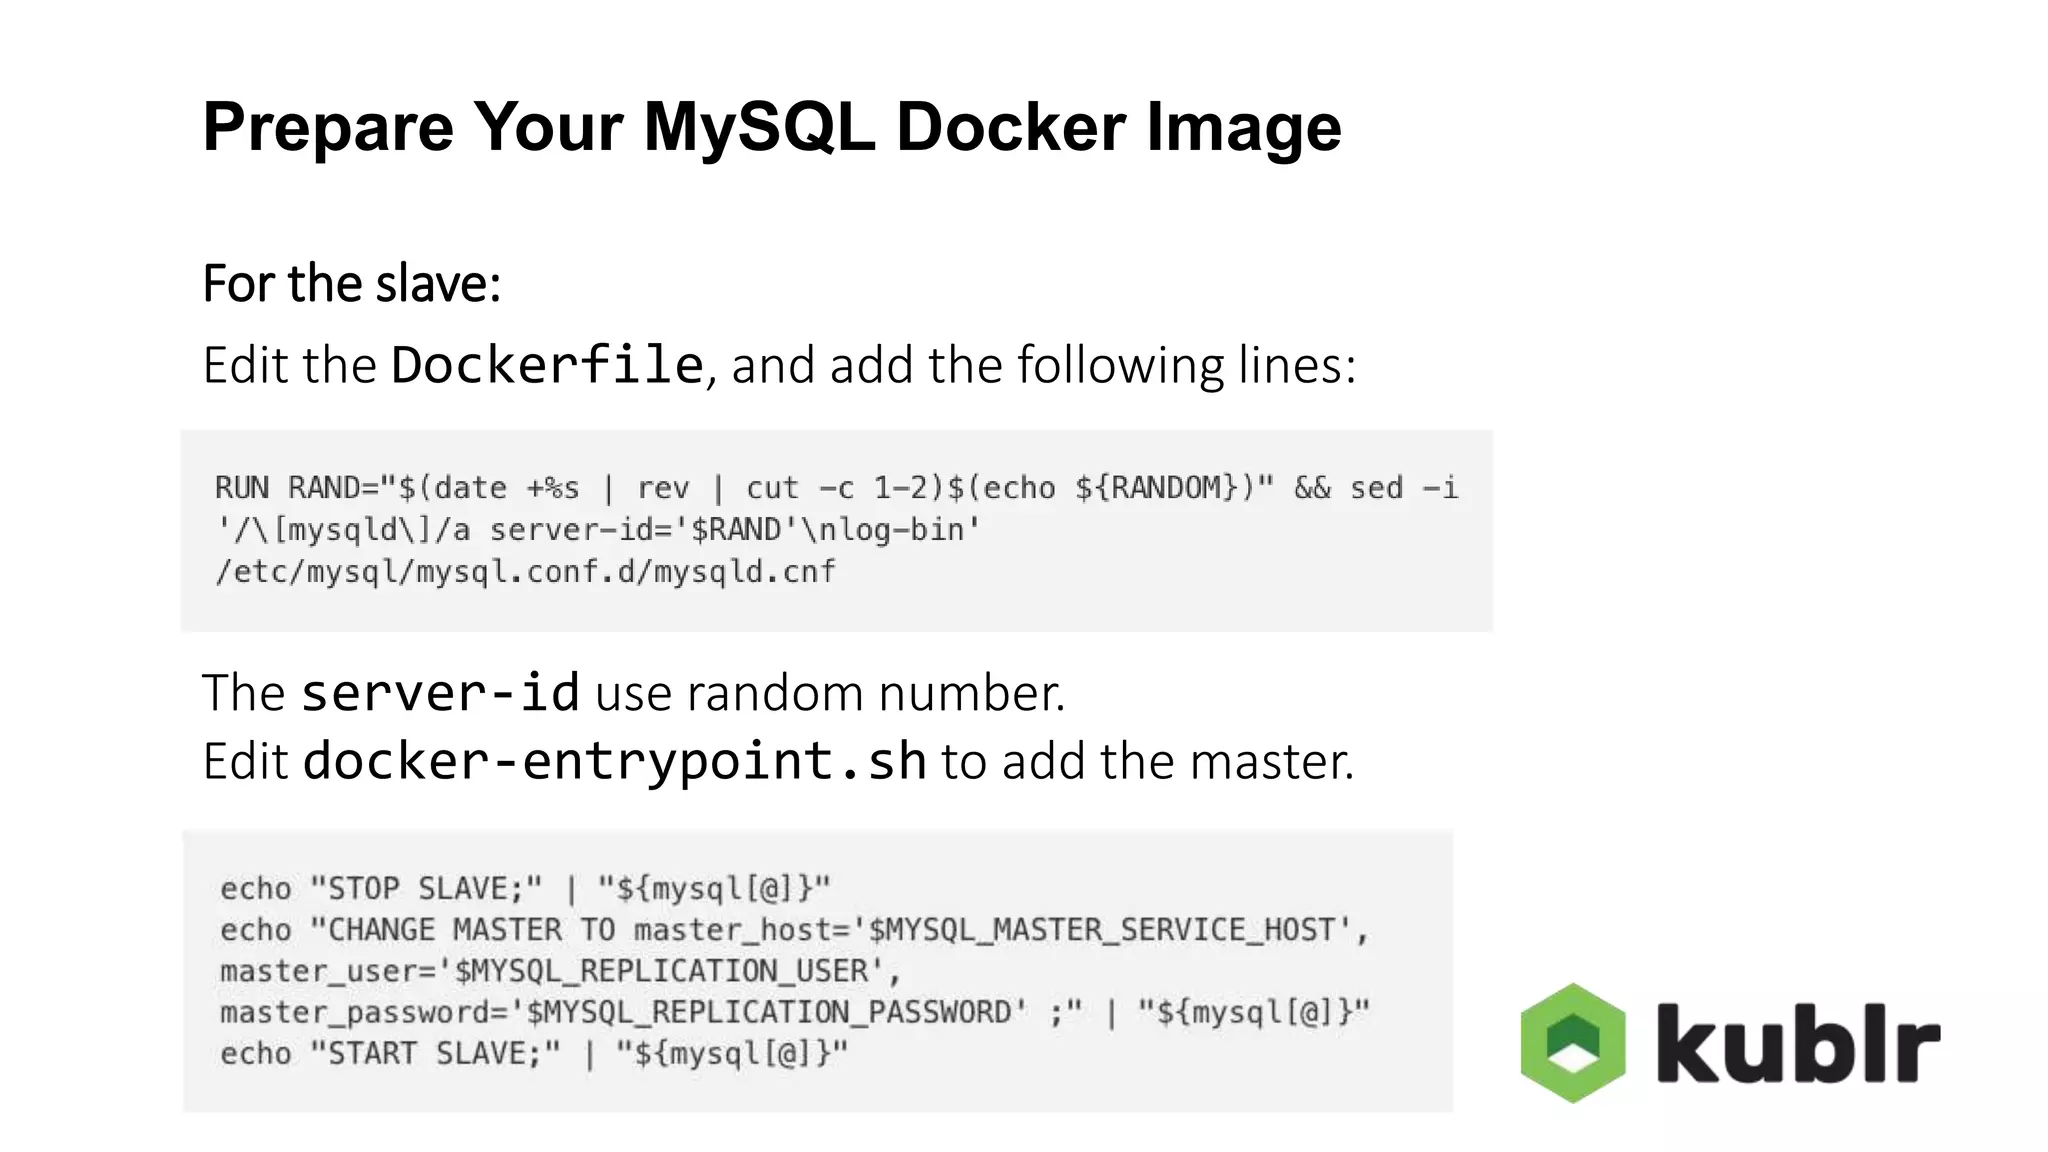
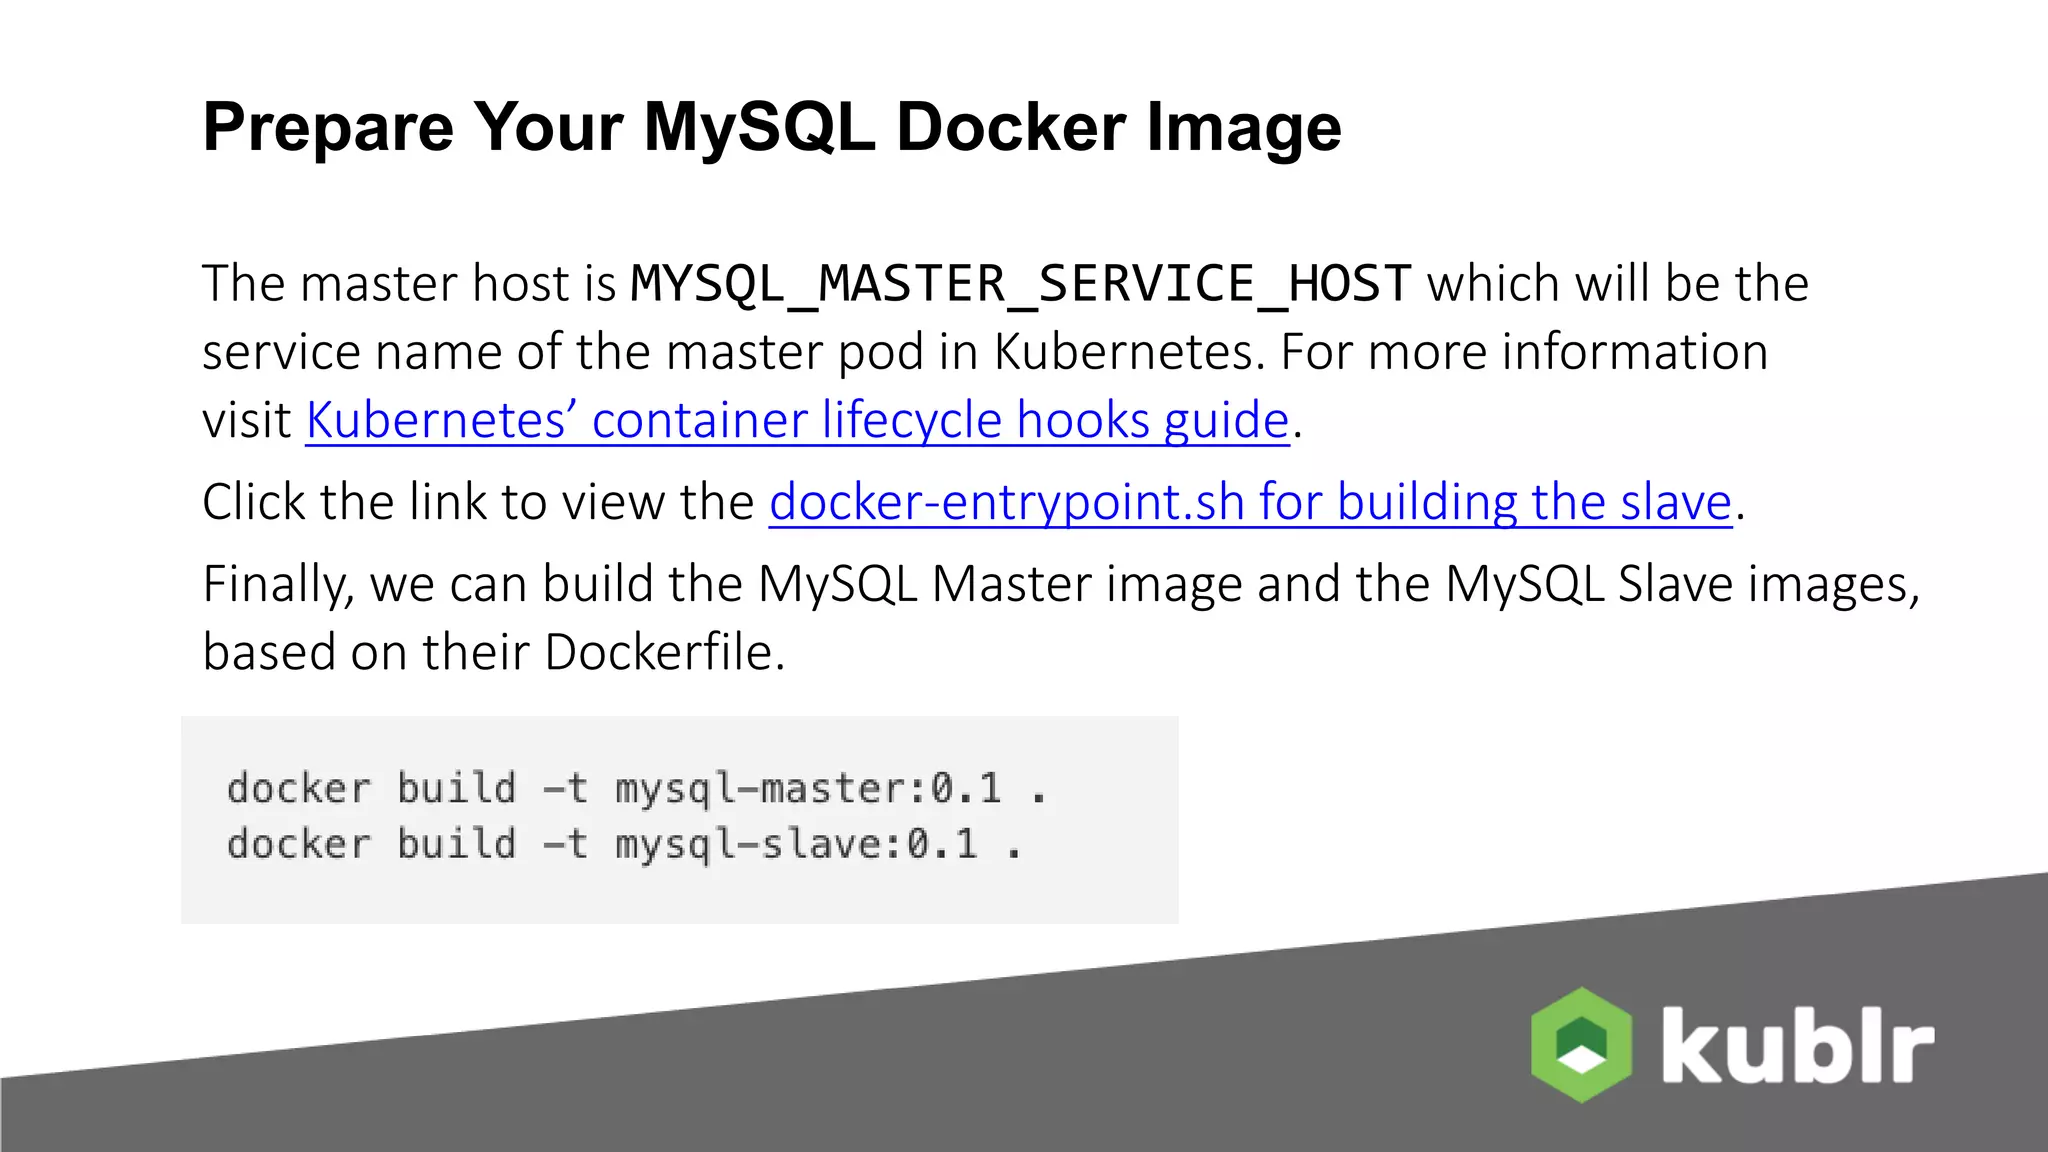
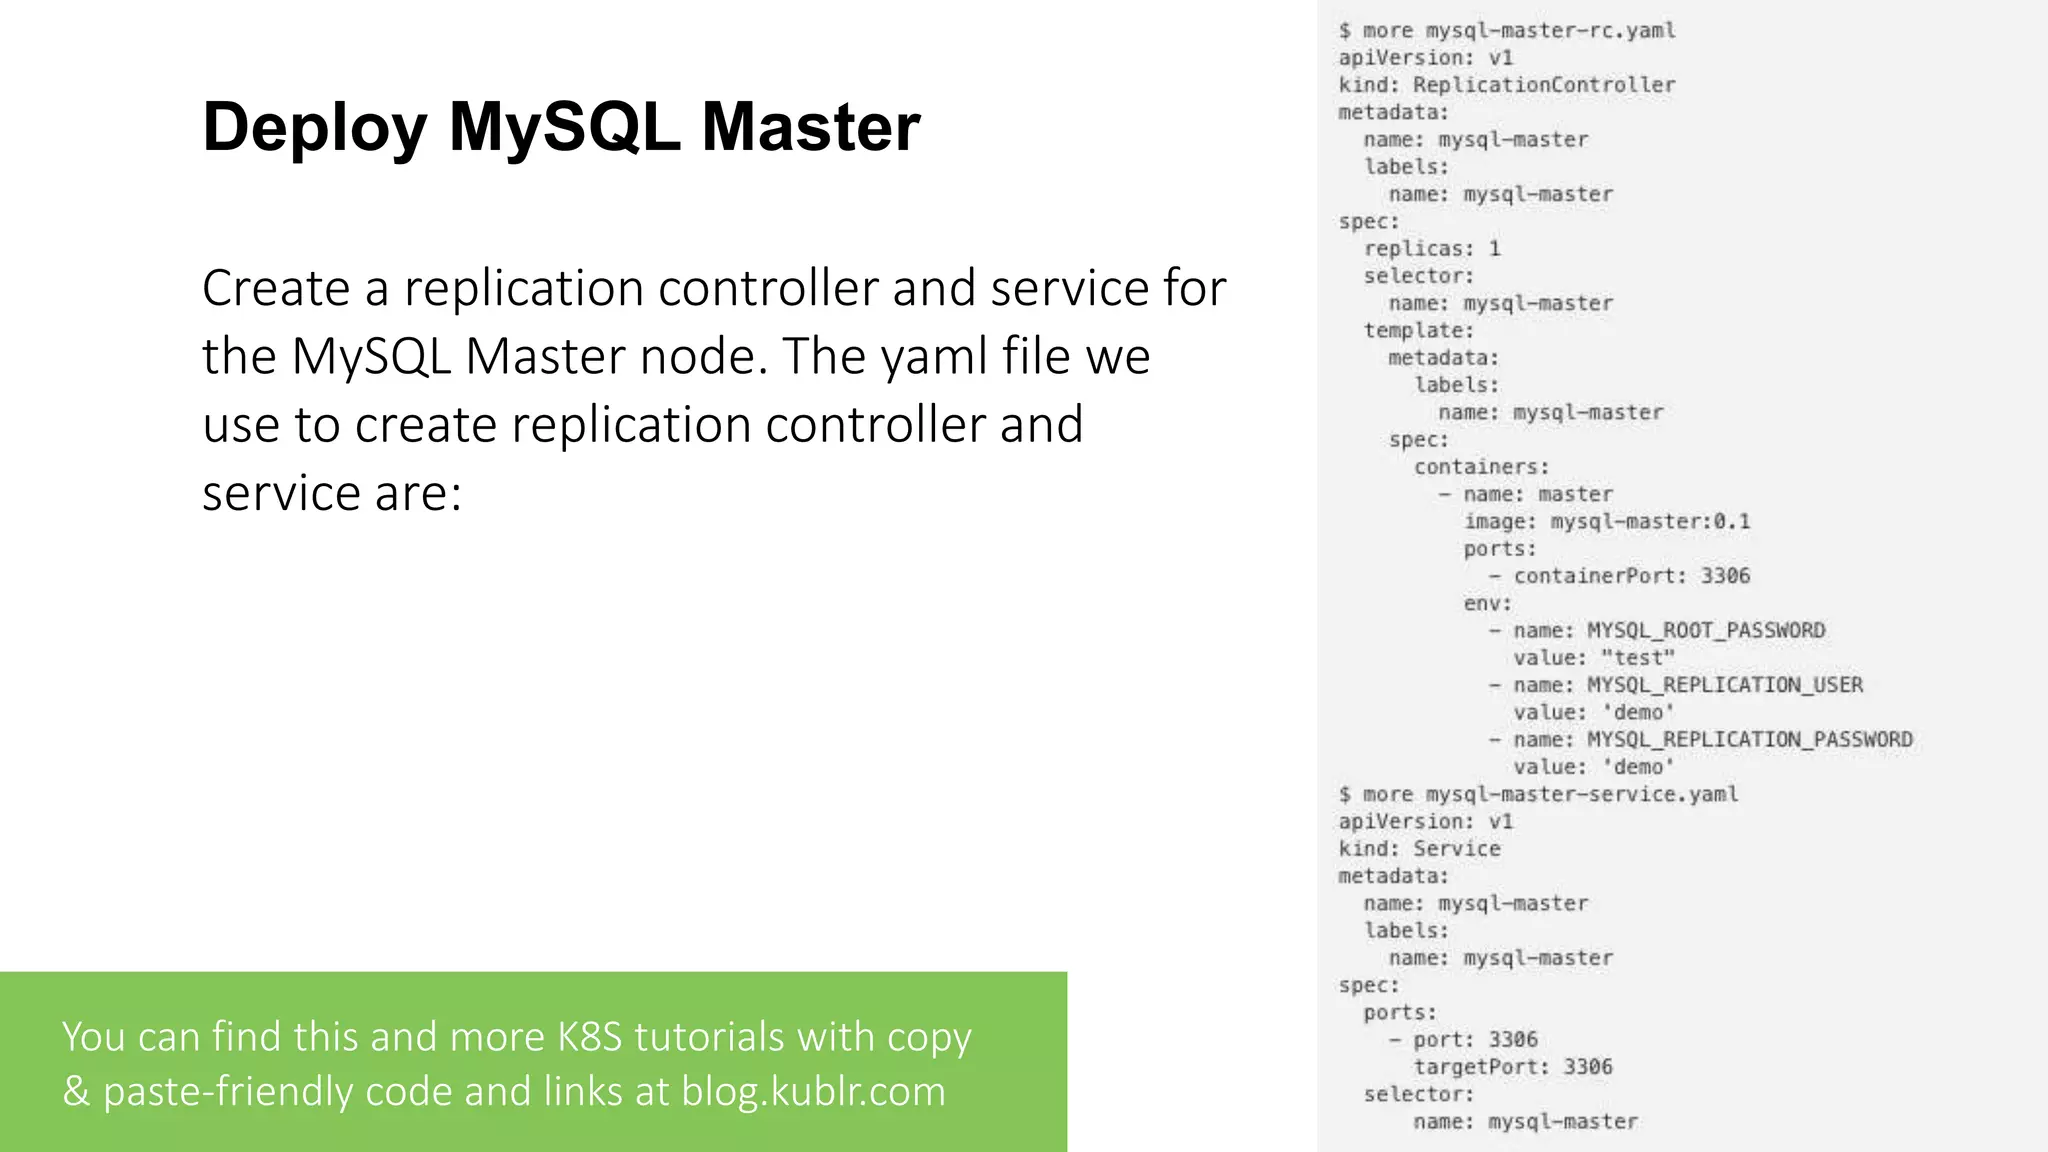
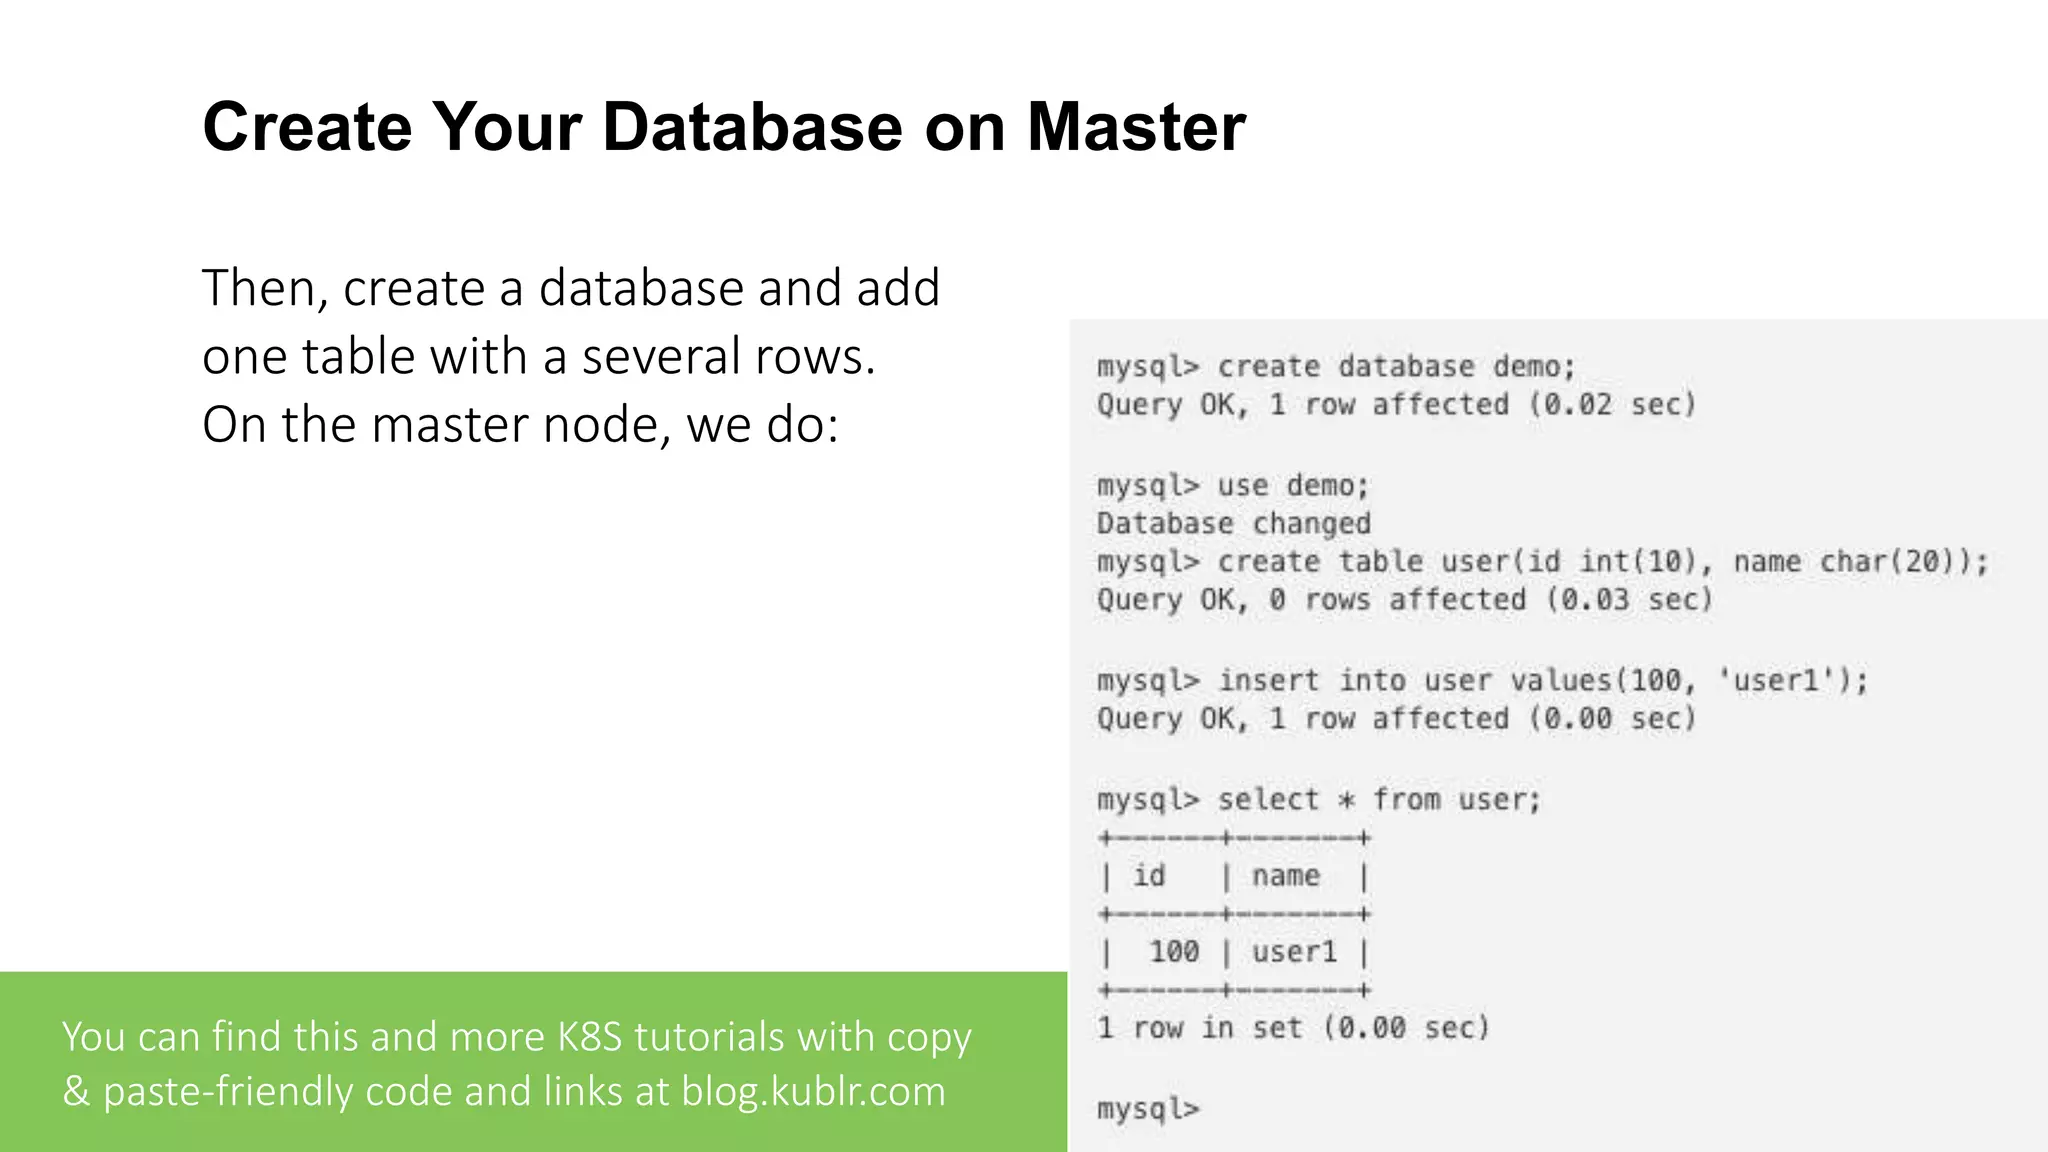
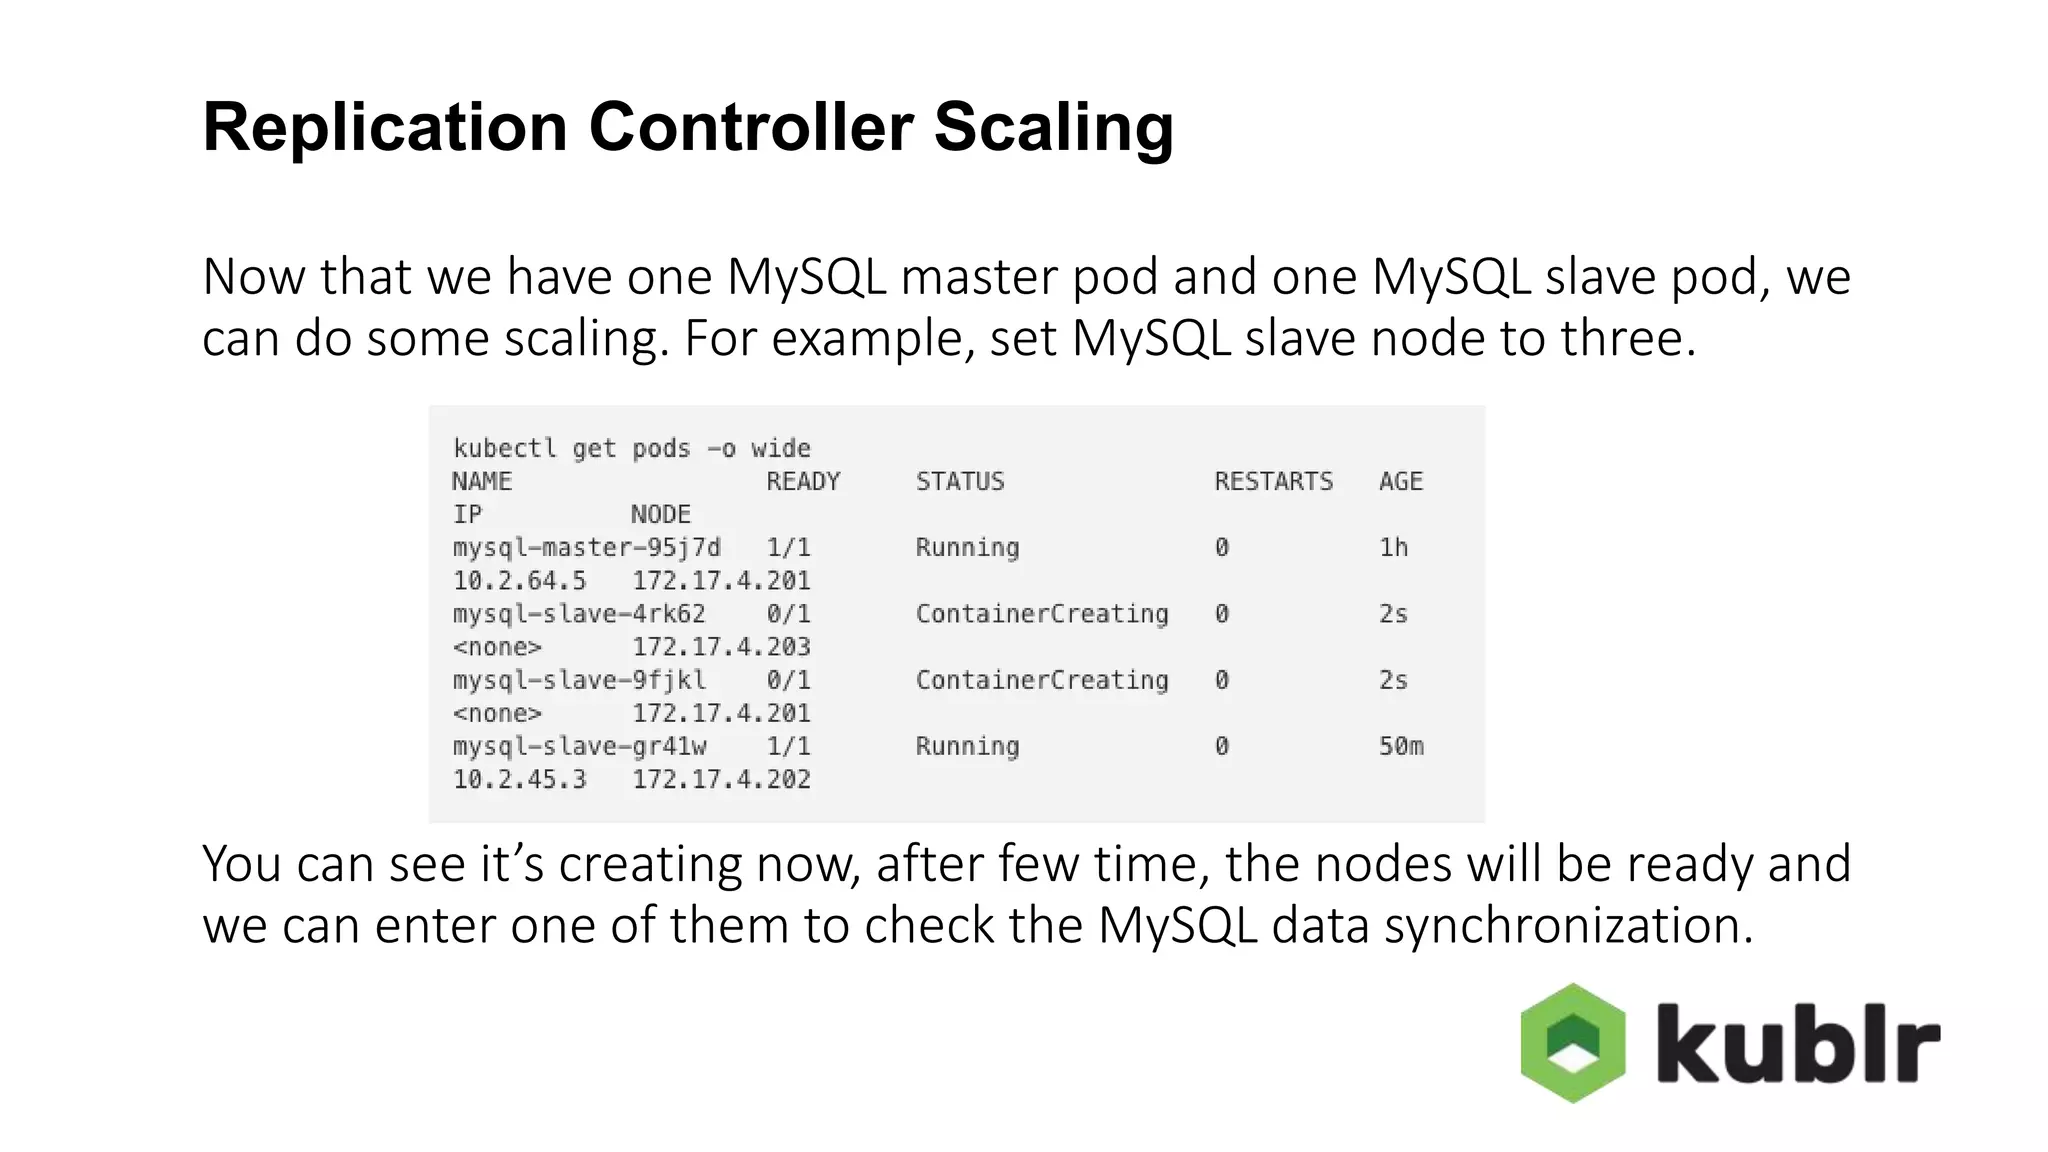
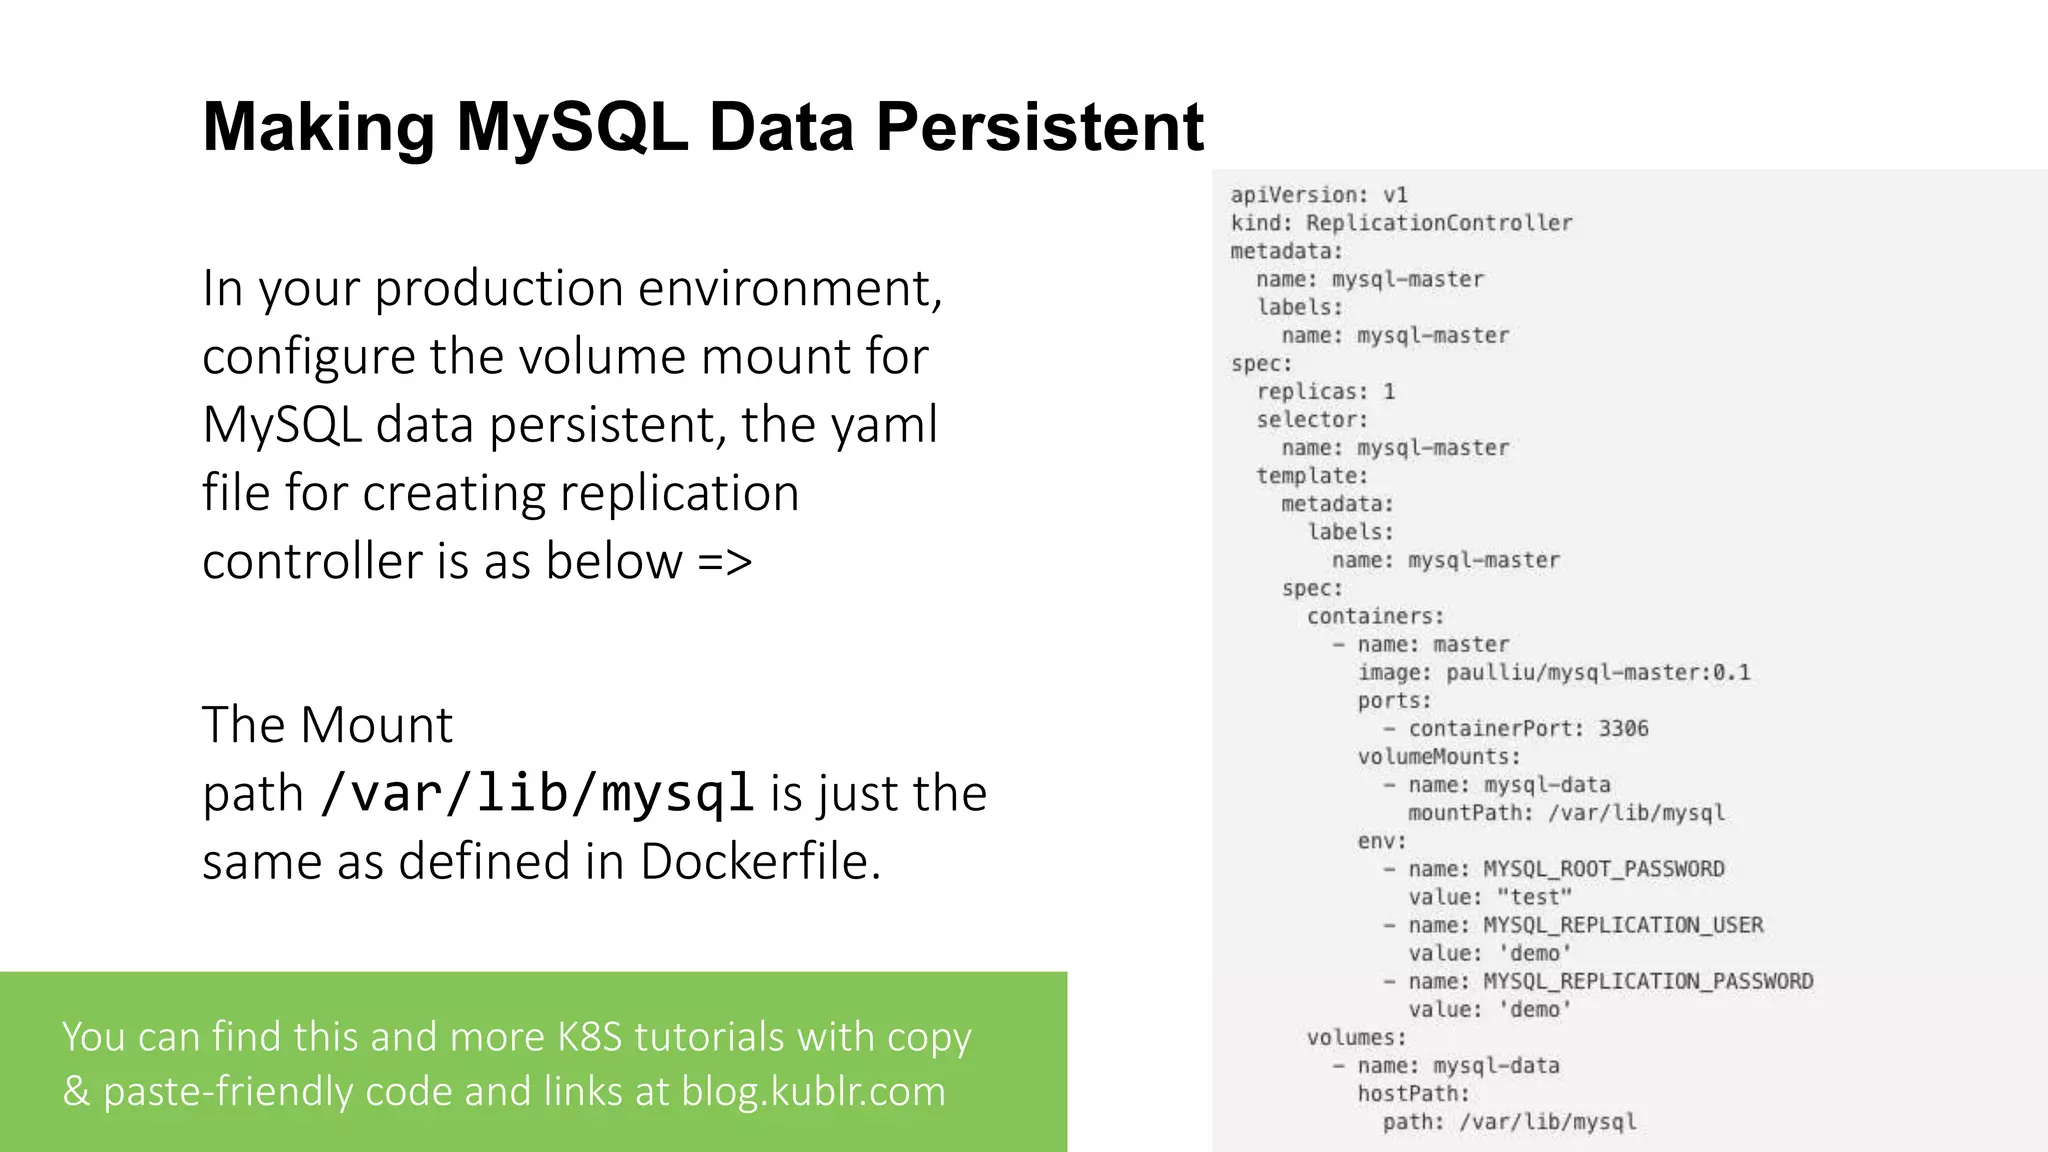
Setting up MySQL Replication Clusters in KUBERNETES
How to Setup your MySQL Replication Cluster We will use a traditional slave/master set up with asynchronous replication, configurable replication, depending on user configuration, and no requirement for a constant connection. For the official line on MySQL and more information plus technical details around replication, check out the MySQL documentation. You can find this and more K8S tutorials with copy & paste-friendly code and links at blog.kublr.com
Install Vagrant on your Host Machine In this example, we are using Vagrant as a configuration manager on Mac OS X to create the Kubernetes environment. To follow this guide, please install Vagrant on your host machine. You will also need a virtualization tool, for example Oracle’s Virtual Box or VMware Fusion. You can find this and more K8S tutorials with copy & paste-friendly code and links at blog.kublr.com
Setting up the K8S Environment With a variety of ways to configure and setup your Kubernetes cluster, your existing system may vary. In this instance, we are using Vagrant (the Vagrantfile is provided by the CoreOS setup guide), to set up the environment, making use of a single controller node and a set of three worker (slave) nodes. You can find this and more K8S tutorials with copy & paste-friendly code and links at blog.kublr.com
Setting up the K8S Environment After setting up Vagrant, check the state of the environment by running these commands…
Setting up the K8S Environment This environment represents multiple VMs. The VMs are all listed above with their current state. For more information about a specific VM, run`vagrant status NAME'. e1 is etcd node, c1 is controller node, and w1, w2, w3 are worker nodes.
Prepare Your MySQL Docker Image Build the Docker Image Having setup the replication cluster, we’ll modify the Docker file and build a Docker image with MySQL. Again, we follow the official guidance based on the MySQL Docker image. For the master: Edit the Dockerfile, and add the following lines:
Prepare Your MySQL Docker Image Edit docker-entrypoint.sh file to create a user and password for replication: We use environment variables MYSQL_REPLICATION_USER and MYSQL_REPLICATION_PASSWORD for user and password configuration. These environment variables will be set while the pod is created in Kubernetes. Click the link to view the dockerfile and docker-entrypoint.sh for building the master.
Prepare Your MySQL Docker Image For the slave: Edit the Dockerfile, and add the following lines: The server-id use random number. Edit docker-entrypoint.sh to add the master.
Prepare Your MySQL Docker Image The master host is MYSQL_MASTER_SERVICE_HOST which will be the service name of the master pod in Kubernetes. For more information visit Kubernetes’ container lifecycle hooks guide. Click the link to view the docker-entrypoint.sh for building the slave. Finally, we can build the MySQL Master image and the MySQL Slave images, based on their Dockerfile.
Deploy to Kubernetes We now deploy the MySQL replication cluster to kubernetes using the kubectl command.
Deploy MySQL Master Create a replication controller and service for the MySQL Master node. The yaml file we use to create replication controller and service are: You can find this and more K8S tutorials with copy & paste-friendly code and links at blog.kublr.com
Deploy MySQL Master Now, we will use kubectl to ar the controller and service: It will take some time to create the pod because it needs to download the docker image.
Deploy MySQL Slave As with the master node, we will use two yaml files to create the replication controller and service for the MySQL slave. You can find this and more K8S tutorials with copy & paste-friendly code and links at blog.kublr.com
Deploy MySQL Slave Now, we will use kubectl to add the controller and service: After these tasks have been performed, we should check the status through kubectl. You can find this and more K8S tutorials with copy & paste-friendly code and links at blog.kublr.com
Test your Setup
Create Your Database on Master First, we will check the MySQL status both on master and slave. Go to the master pod and execute the following commands to check the MySQL status (follow the same steps for the slave node). => Note mysql-master-95j7d is the name of master pod and the root password of MySQL is test. You can find this and more K8S tutorials with copy & paste-friendly code and links at blog.kublr.com
Create Your Database on Master Then, create a database and add one table with a several rows. On the master node, we do: You can find this and more K8S tutorials with copy & paste-friendly code and links at blog.kublr.com
Check Synchronization on Slave Go to the slave node kubectl exec -it mysql-slave-gr41w /bin/bash and ensure the table has been replicated => All data should now be synchronized. You can find this and more K8S tutorials with copy & paste-friendly code and links at blog.kublr.com
Replication Controller Scaling Now that we have one MySQL master pod and one MySQL slave pod, we can do some scaling. For example, set MySQL slave node to three. You can see it’s creating now, after few time, the nodes will be ready and we can enter one of them to check the MySQL data synchronization.
Making MySQL Data Persistent In your production environment, configure the volume mount for MySQL data persistent, the yaml file for creating replication controller is as below => The Mount path /var/lib/mysql is just the same as defined in Dockerfile. You can find this and more K8S tutorials with copy & paste-friendly code and links at blog.kublr.com
THANK YOU! Kublr (kublr.com) is a production-ready cluster and application platform that speeds and simplifies the set up and management of Kubernetes for your applications. For more Kubernetest tutorials, visit our blog at blog.kublr.com. Want to learn more about Kublr? Contact us at contact@kublr.com

Setting up MySQL Replication Cluster in Kubernetes

  • 1.
    Setting up MySQLReplication Clusters in KUBERNETES
  • 2.
    How to Setupyour MySQL Replication Cluster We will use a traditional slave/master set up with asynchronous replication, configurable replication, depending on user configuration, and no requirement for a constant connection. For the official line on MySQL and more information plus technical details around replication, check out the MySQL documentation. You can find this and more K8S tutorials with copy & paste-friendly code and links at blog.kublr.com
  • 3.
    Install Vagrant onyour Host Machine In this example, we are using Vagrant as a configuration manager on Mac OS X to create the Kubernetes environment. To follow this guide, please install Vagrant on your host machine. You will also need a virtualization tool, for example Oracle’s Virtual Box or VMware Fusion. You can find this and more K8S tutorials with copy & paste-friendly code and links at blog.kublr.com
  • 4.
    Setting up theK8S Environment With a variety of ways to configure and setup your Kubernetes cluster, your existing system may vary. In this instance, we are using Vagrant (the Vagrantfile is provided by the CoreOS setup guide), to set up the environment, making use of a single controller node and a set of three worker (slave) nodes. You can find this and more K8S tutorials with copy & paste-friendly code and links at blog.kublr.com
  • 5.
    Setting up theK8S Environment After setting up Vagrant, check the state of the environment by running these commands…
  • 6.
    Setting up theK8S Environment This environment represents multiple VMs. The VMs are all listed above with their current state. For more information about a specific VM, run`vagrant status NAME'. e1 is etcd node, c1 is controller node, and w1, w2, w3 are worker nodes.
  • 7.
    Prepare Your MySQLDocker Image Build the Docker Image Having setup the replication cluster, we’ll modify the Docker file and build a Docker image with MySQL. Again, we follow the official guidance based on the MySQL Docker image. For the master: Edit the Dockerfile, and add the following lines:
  • 8.
    Prepare Your MySQLDocker Image Edit docker-entrypoint.sh file to create a user and password for replication: We use environment variables MYSQL_REPLICATION_USER and MYSQL_REPLICATION_PASSWORD for user and password configuration. These environment variables will be set while the pod is created in Kubernetes. Click the link to view the dockerfile and docker-entrypoint.sh for building the master.
  • 9.
    Prepare Your MySQLDocker Image For the slave: Edit the Dockerfile, and add the following lines: The server-id use random number. Edit docker-entrypoint.sh to add the master.
  • 10.
    Prepare Your MySQLDocker Image The master host is MYSQL_MASTER_SERVICE_HOST which will be the service name of the master pod in Kubernetes. For more information visit Kubernetes’ container lifecycle hooks guide. Click the link to view the docker-entrypoint.sh for building the slave. Finally, we can build the MySQL Master image and the MySQL Slave images, based on their Dockerfile.
  • 11.
    Deploy to Kubernetes Wenow deploy the MySQL replication cluster to kubernetes using the kubectl command.
  • 12.
    Deploy MySQL Master Createa replication controller and service for the MySQL Master node. The yaml file we use to create replication controller and service are: You can find this and more K8S tutorials with copy & paste-friendly code and links at blog.kublr.com
  • 13.
    Deploy MySQL Master Now,we will use kubectl to ar the controller and service: It will take some time to create the pod because it needs to download the docker image.
  • 14.
    Deploy MySQL Slave Aswith the master node, we will use two yaml files to create the replication controller and service for the MySQL slave. You can find this and more K8S tutorials with copy & paste-friendly code and links at blog.kublr.com
  • 15.
    Deploy MySQL Slave Now,we will use kubectl to add the controller and service: After these tasks have been performed, we should check the status through kubectl. You can find this and more K8S tutorials with copy & paste-friendly code and links at blog.kublr.com
  • 16.
  • 17.
    Create Your Databaseon Master First, we will check the MySQL status both on master and slave. Go to the master pod and execute the following commands to check the MySQL status (follow the same steps for the slave node). => Note mysql-master-95j7d is the name of master pod and the root password of MySQL is test. You can find this and more K8S tutorials with copy & paste-friendly code and links at blog.kublr.com
  • 18.
    Create Your Databaseon Master Then, create a database and add one table with a several rows. On the master node, we do: You can find this and more K8S tutorials with copy & paste-friendly code and links at blog.kublr.com
  • 19.
    Check Synchronization onSlave Go to the slave node kubectl exec -it mysql-slave-gr41w /bin/bash and ensure the table has been replicated => All data should now be synchronized. You can find this and more K8S tutorials with copy & paste-friendly code and links at blog.kublr.com
  • 20.
    Replication Controller Scaling Nowthat we have one MySQL master pod and one MySQL slave pod, we can do some scaling. For example, set MySQL slave node to three. You can see it’s creating now, after few time, the nodes will be ready and we can enter one of them to check the MySQL data synchronization.
  • 21.
    Making MySQL DataPersistent In your production environment, configure the volume mount for MySQL data persistent, the yaml file for creating replication controller is as below => The Mount path /var/lib/mysql is just the same as defined in Dockerfile. You can find this and more K8S tutorials with copy & paste-friendly code and links at blog.kublr.com
  • 22.
    THANK YOU! Kublr (kublr.com)is a production-ready cluster and application platform that speeds and simplifies the set up and management of Kubernetes for your applications. For more Kubernetest tutorials, visit our blog at blog.kublr.com. Want to learn more about Kublr? Contact us at contact@kublr.com