Downloaded 359 times
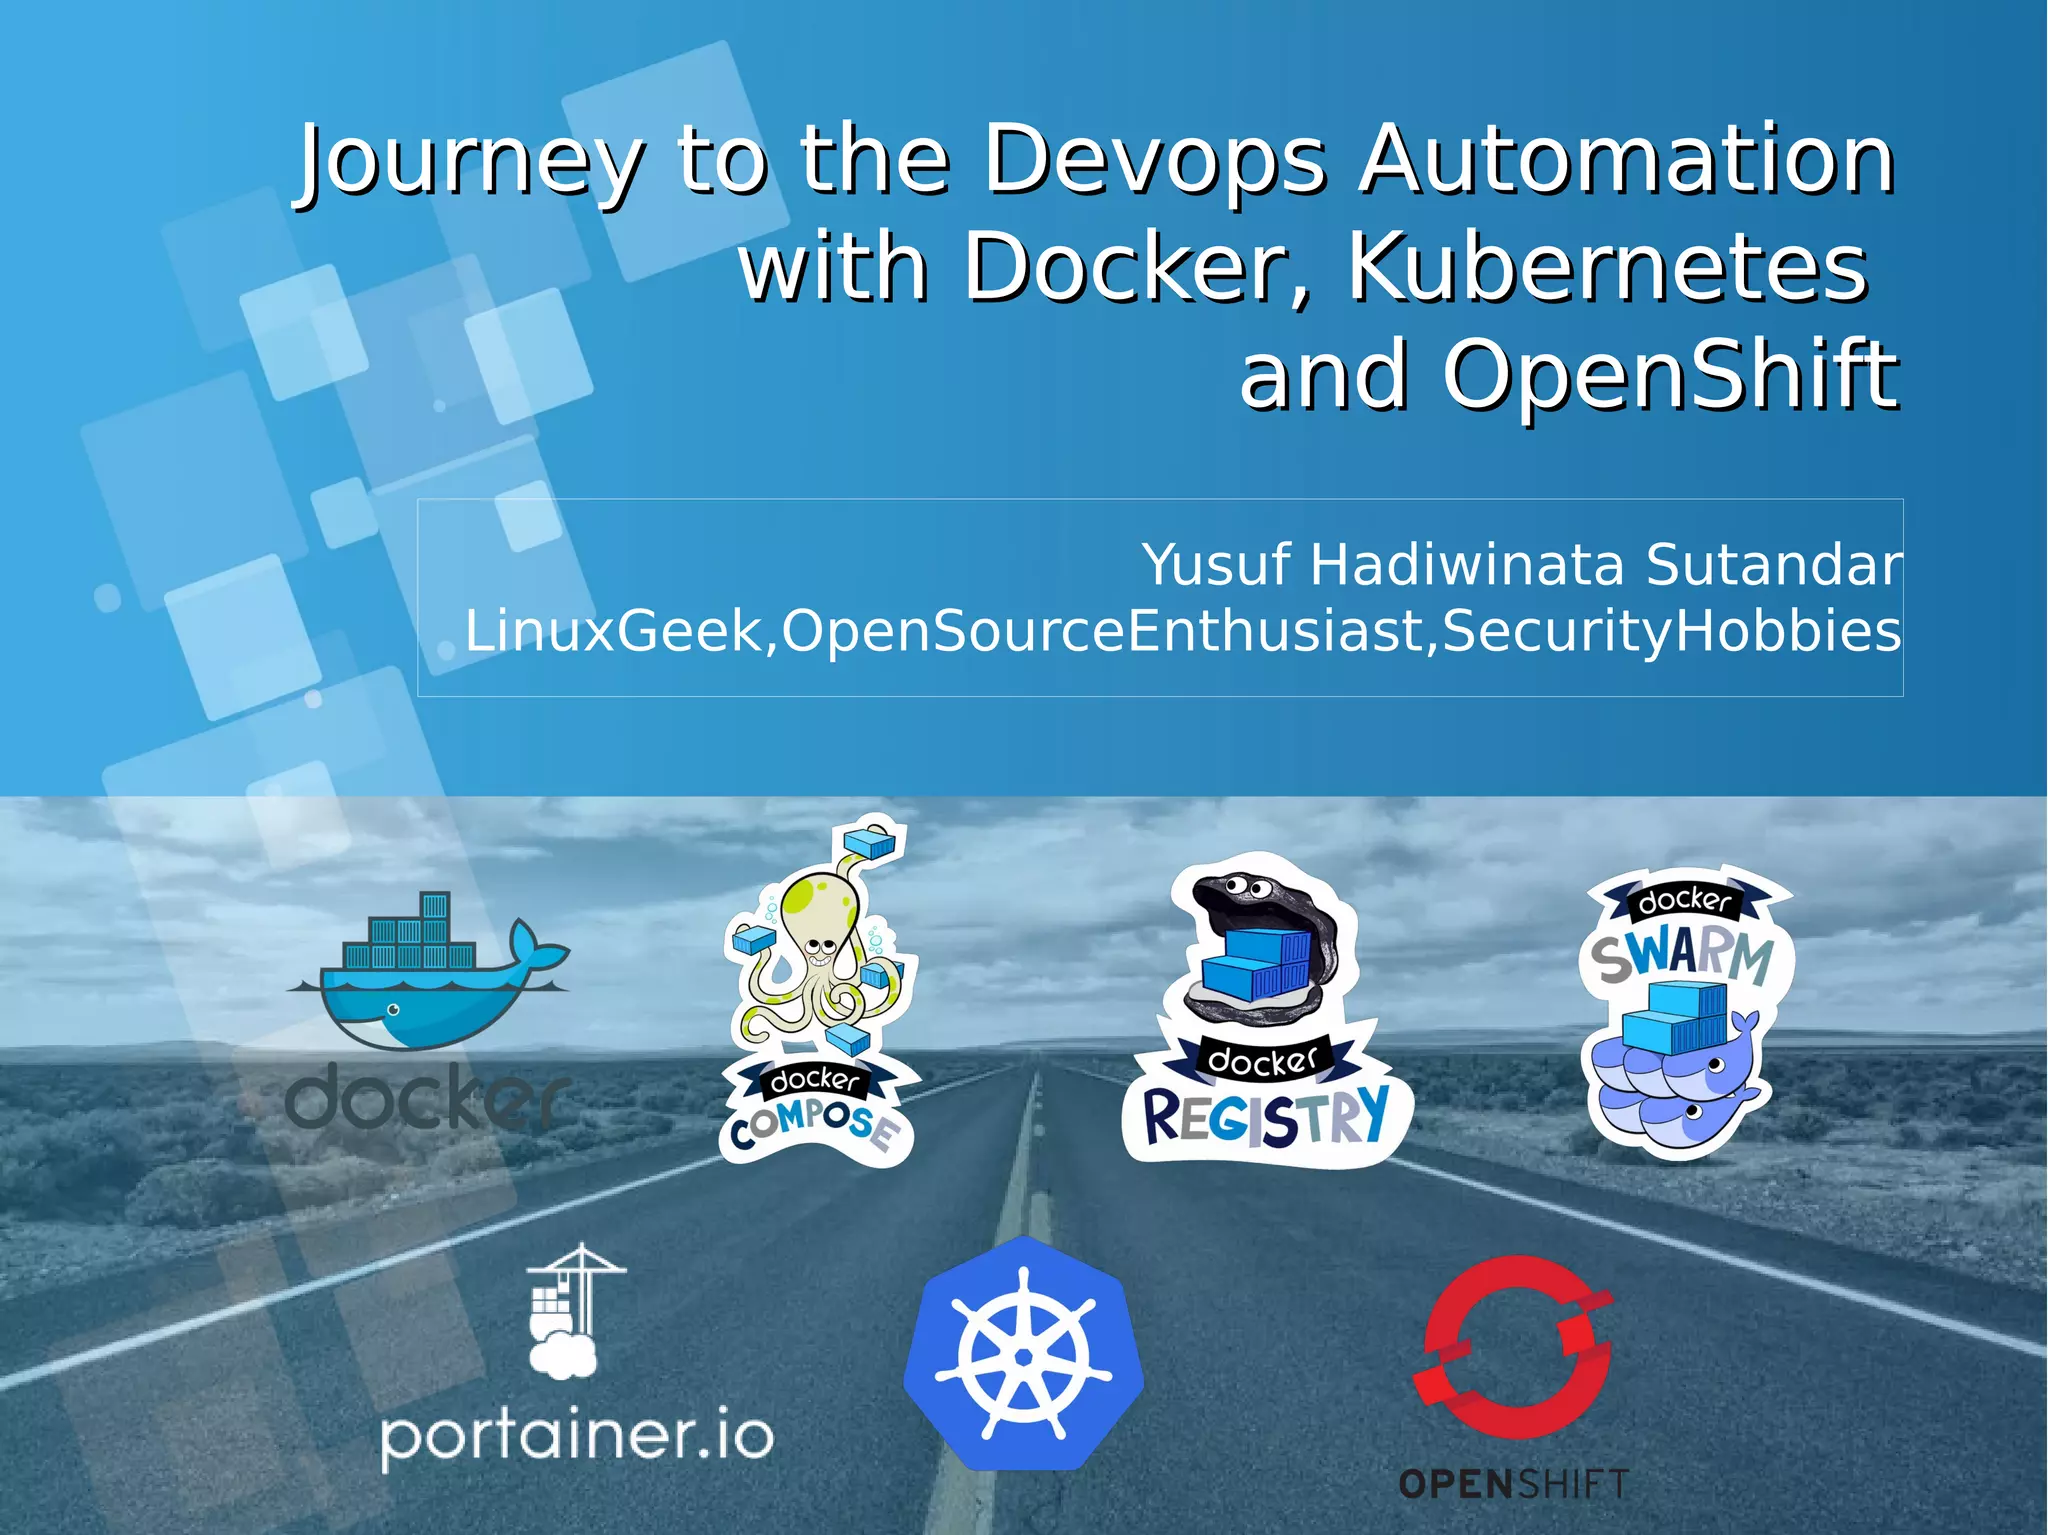


![Lab: Installing Docker - PreSetupLab: Installing Docker - PreSetup ● Setting hostname at /etc/hosts file and server: [root@docker-host ~]# cat /etc/hosts | grep docker-host 192.168.0.6 docker-host [root@docker-host ~]# hostnamectl set-hostname docker-host [root@docker-host ~]# hostname docker-host ● Install needed packages and Latest Docker [root@docker-host ~]# yum install wget git net-tools bind-utils iptables-services bridge-utils bash-completion [root@docker-host ~]# curl -fsSL https://get.docker.com/ | sh ● Edit /etc/sysconfig/docker file and add --insecure-registry 172.30.0.0/16 to the OPTIONS parameter (installing docker from repo only) [root@docker-host ~]# sed -i '/OPTIONS=.*/cOPTIONS="--selinux-enabled --insecure- registry 172.30.0.0/16"' /etc/sysconfig/docker [root@docker-host ~]# systemctl is-active docker ; systemctl enable docker ; systemctl start docker Pulling your 1st container from internet [root@docker-host ~]# docker container run -ti ubuntu bash](https://image.slidesharecdn.com/journey-to-the-devops-automation-with-dockerkubernetesandopenshift-180325021200/75/Journey-to-the-devops-automation-with-docker-kubernetes-and-openshift-38-2048.jpg)
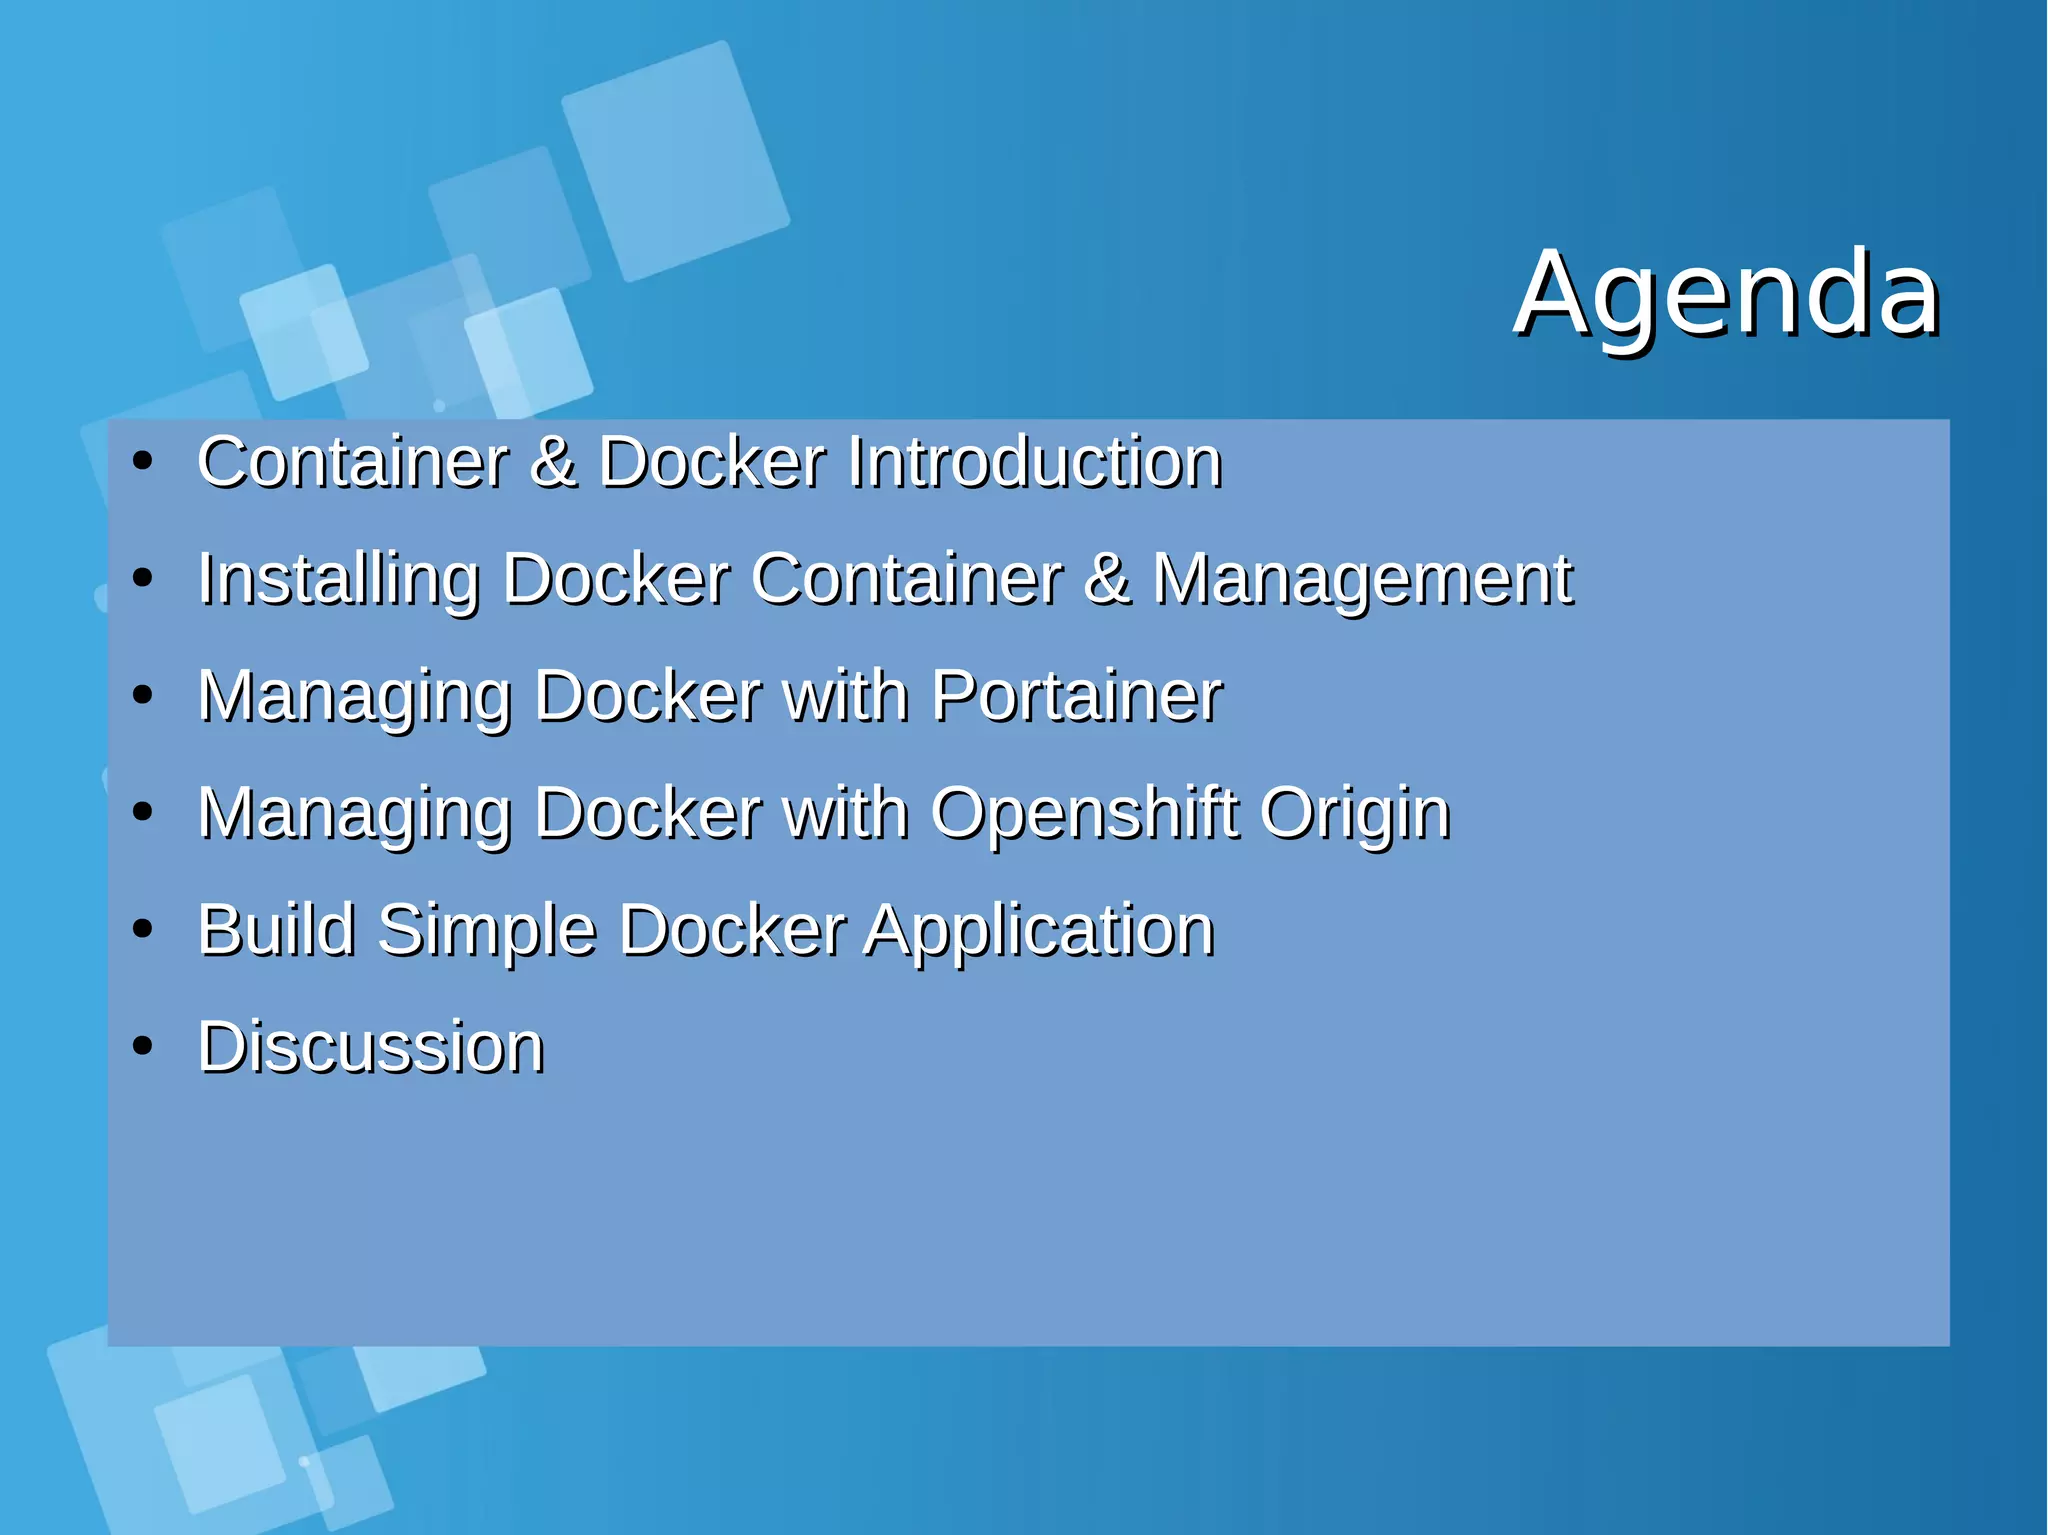
![Lab: Installing Docker - PreSetupLab: Installing Docker - PreSetup ● When you use Latest version docker, please configure this [root@docker-host ~]# vim /usr/lib/systemd/system/docker.service Edit ExecStart=/usr/bin/dockerd to ExecStart=/usr/bin/dockerd --insecure-registry 172.30.0.0/16 --insecure-registry 192.168.1.0/24 [root@docker-host ~]# systemctl daemon-reload ; systemctl restart docker ● Optional Configuration for private registry [root@docker-host ~]# vim /etc/docker/daemon.json Add { "insecure-registries" : ["docker-registry:5000"] } [root@docker-host ~]# systemctl restart docker Pulling your 1st container from private registry [root@docker-host ~]# docker container run -ti docker-registry:5000/ubuntu bash](https://image.slidesharecdn.com/journey-to-the-devops-automation-with-dockerkubernetesandopenshift-180325021200/75/Journey-to-the-devops-automation-with-docker-kubernetes-and-openshift-39-2048.jpg)
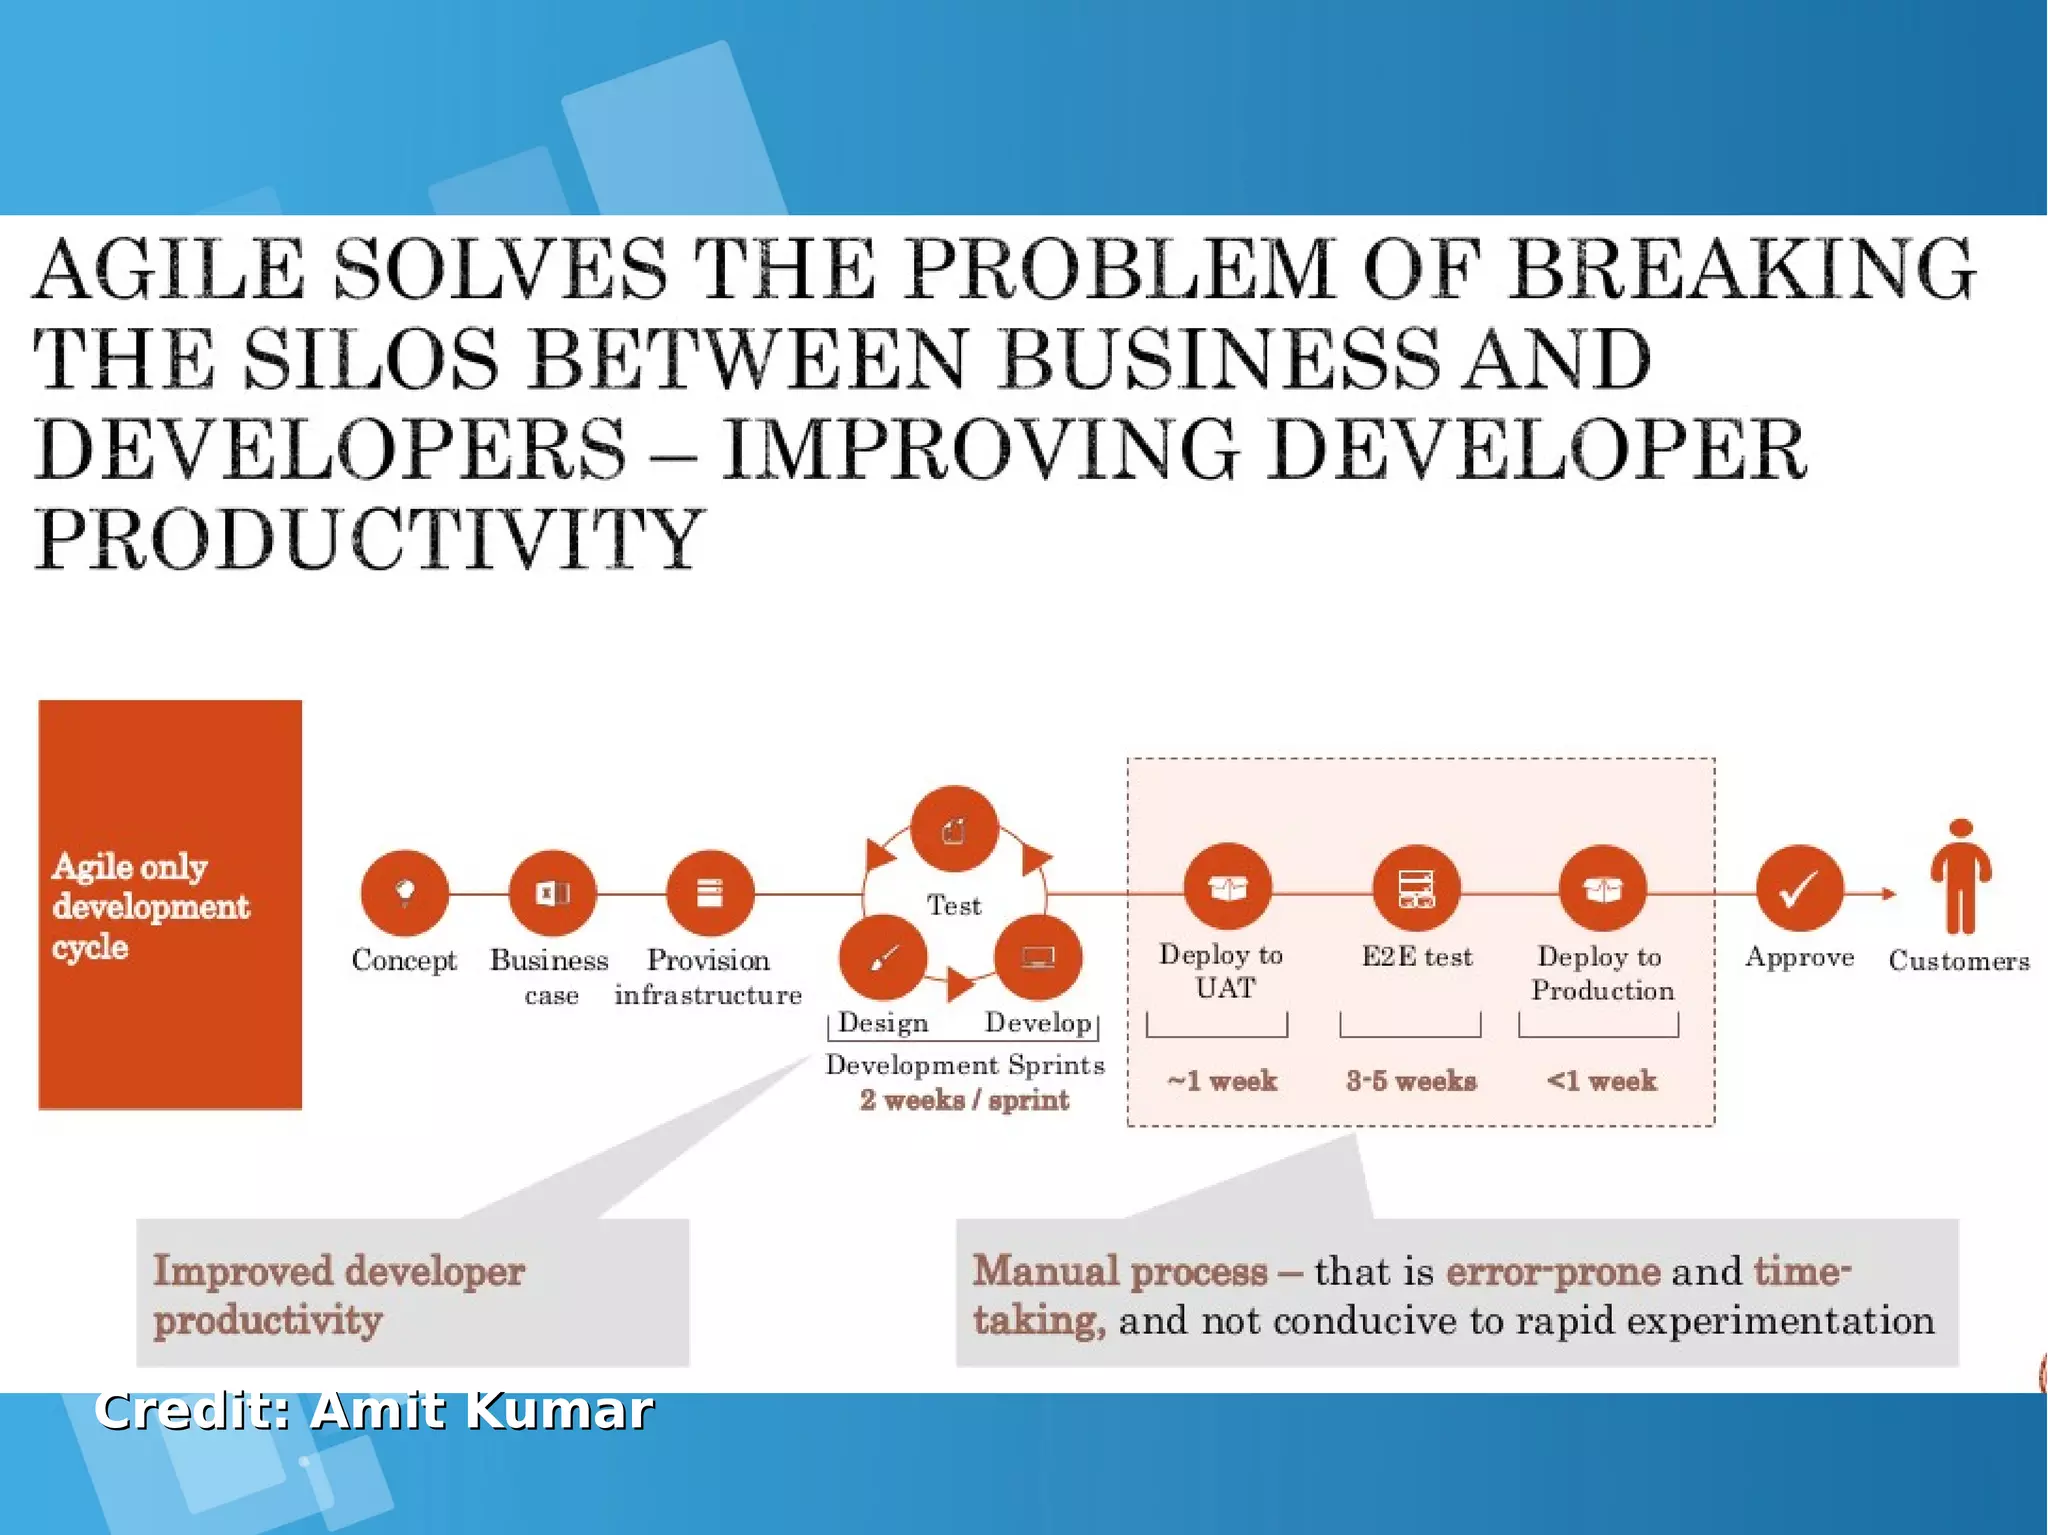
![Installing Docker – Setting Docker StorageInstalling Docker – Setting Docker Storage ● Setting up a volume group and LVM thin pool on user specified block device [root@docker-host ~]# echo DEVS=/dev/sdb >> /etc/sysconfig/docker-storage-setup [root@docker-host ~]# systemctl restart docker ● By default, docker-storage-setup looks for free space in the root volume group and creates an LVM thin pool. Hence you can leave free space during system installation in the root volume group and starting docker will automatically set up a thin pool and use it. ● LVM thin pool in a user specified volume group [root@docker-host ~]# echo VG=docker-vg >> /etc/sysconfig/docker-storage-setup [root@docker-host ~]# systemctl restart docker ● https://access.redhat.com/documentation/en- us/red_hat_enterprise_linux_atomic_host/7/html/managing_containers/managing_storage_ with_docker_formatted_containers ● Setting up a volume group and LVM thin pool on user specified block device for docker version 1.12](https://image.slidesharecdn.com/journey-to-the-devops-automation-with-dockerkubernetesandopenshift-180325021200/75/Journey-to-the-devops-automation-with-docker-kubernetes-and-openshift-40-2048.jpg)
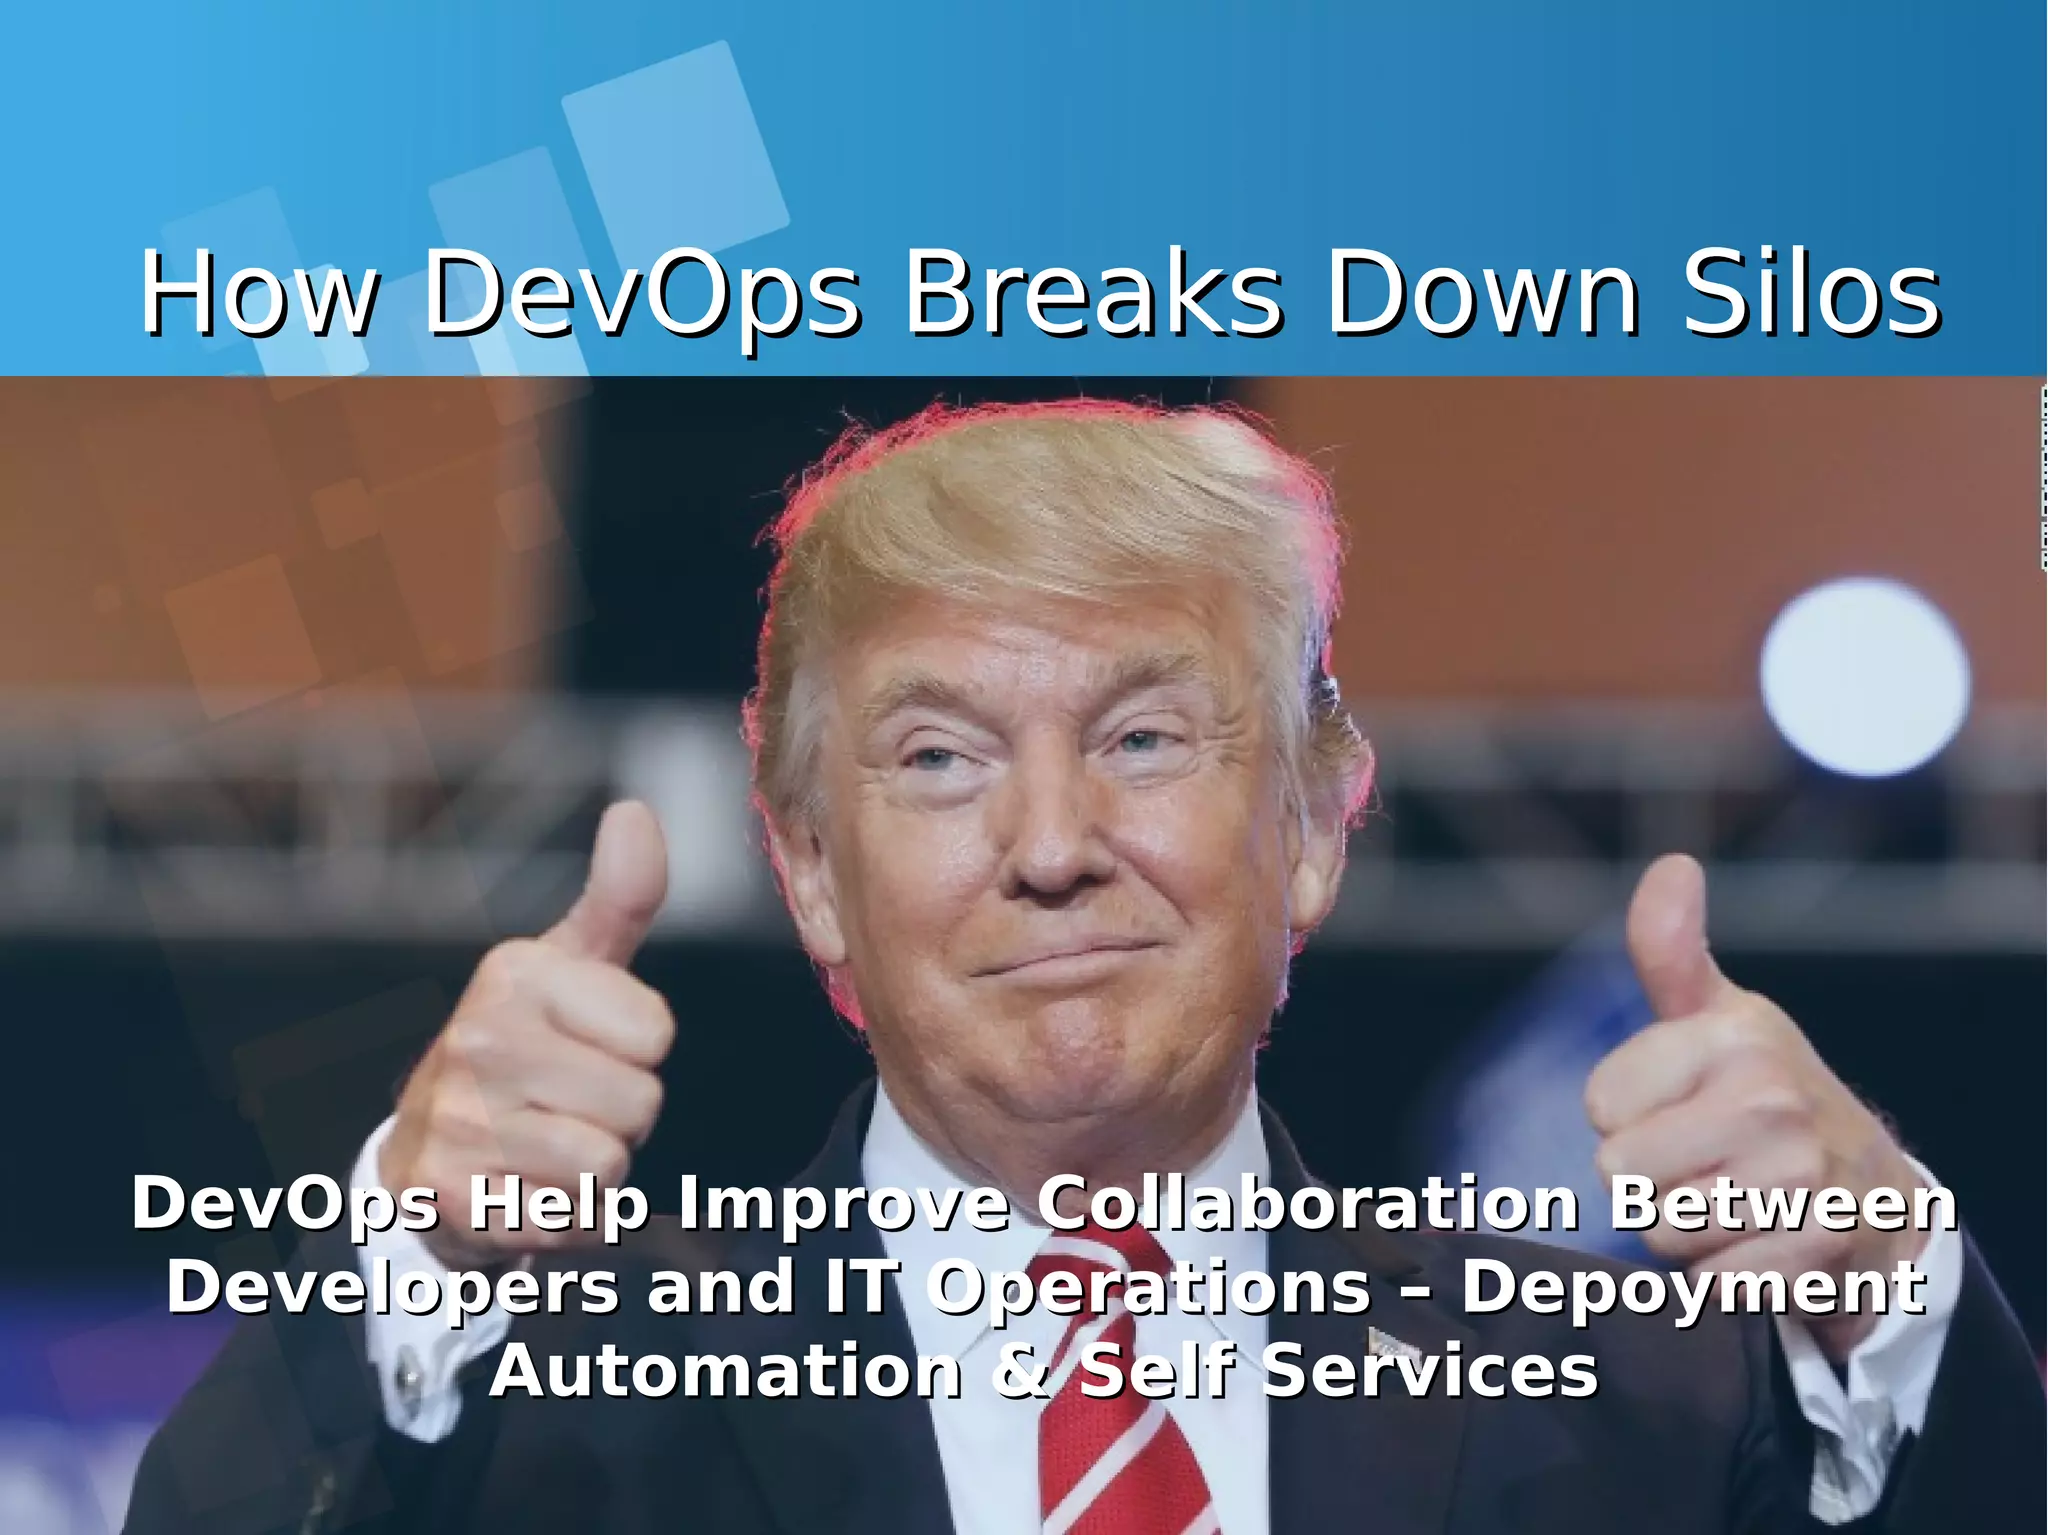
![Lab: 1Lab: 1stst time Playing w/ Dockertime Playing w/ Docker [root@docker-host ~]# docker ps CONTAINER ID IMAGE COMMAND CREATED STATUS PORTS NAMES [root@docker-host ~]# docker run -t centos bash Unable to find image 'centos:latest' locally Trying to pull repository docker.io/library/centos ... sha256:aebf12af704307dfa0079b3babdca8d7e8ff6564696882bcb5d11f1d461f9ee9: Pulling from docker.io/library/centos d5e46245fe40: Pull complete Digest: sha256:aebf12af704307dfa0079b3babdca8d7e8ff6564696882bcb5d11f1d461f9ee9 Status: Downloaded newer image for docker.io/centos:latest [root@docker-host ~]# docker images --all REPOSITORY TAG IMAGE ID CREATED SIZE docker.io/centos latest 3bee3060bfc8 46 hours ago 192.5 MB [root@docker-host ~]# docker exec -it 60fec4b9a9bf bash [root@60fec4b9a9bf /]# ps ax PID TTY STAT TIME COMMAND 1 ? Ss+ 0:00 bash 29 ? Ss 0:00 bash 42 ? R+ 0:00 ps ax](https://image.slidesharecdn.com/journey-to-the-devops-automation-with-dockerkubernetesandopenshift-180325021200/75/Journey-to-the-devops-automation-with-docker-kubernetes-and-openshift-41-2048.jpg)
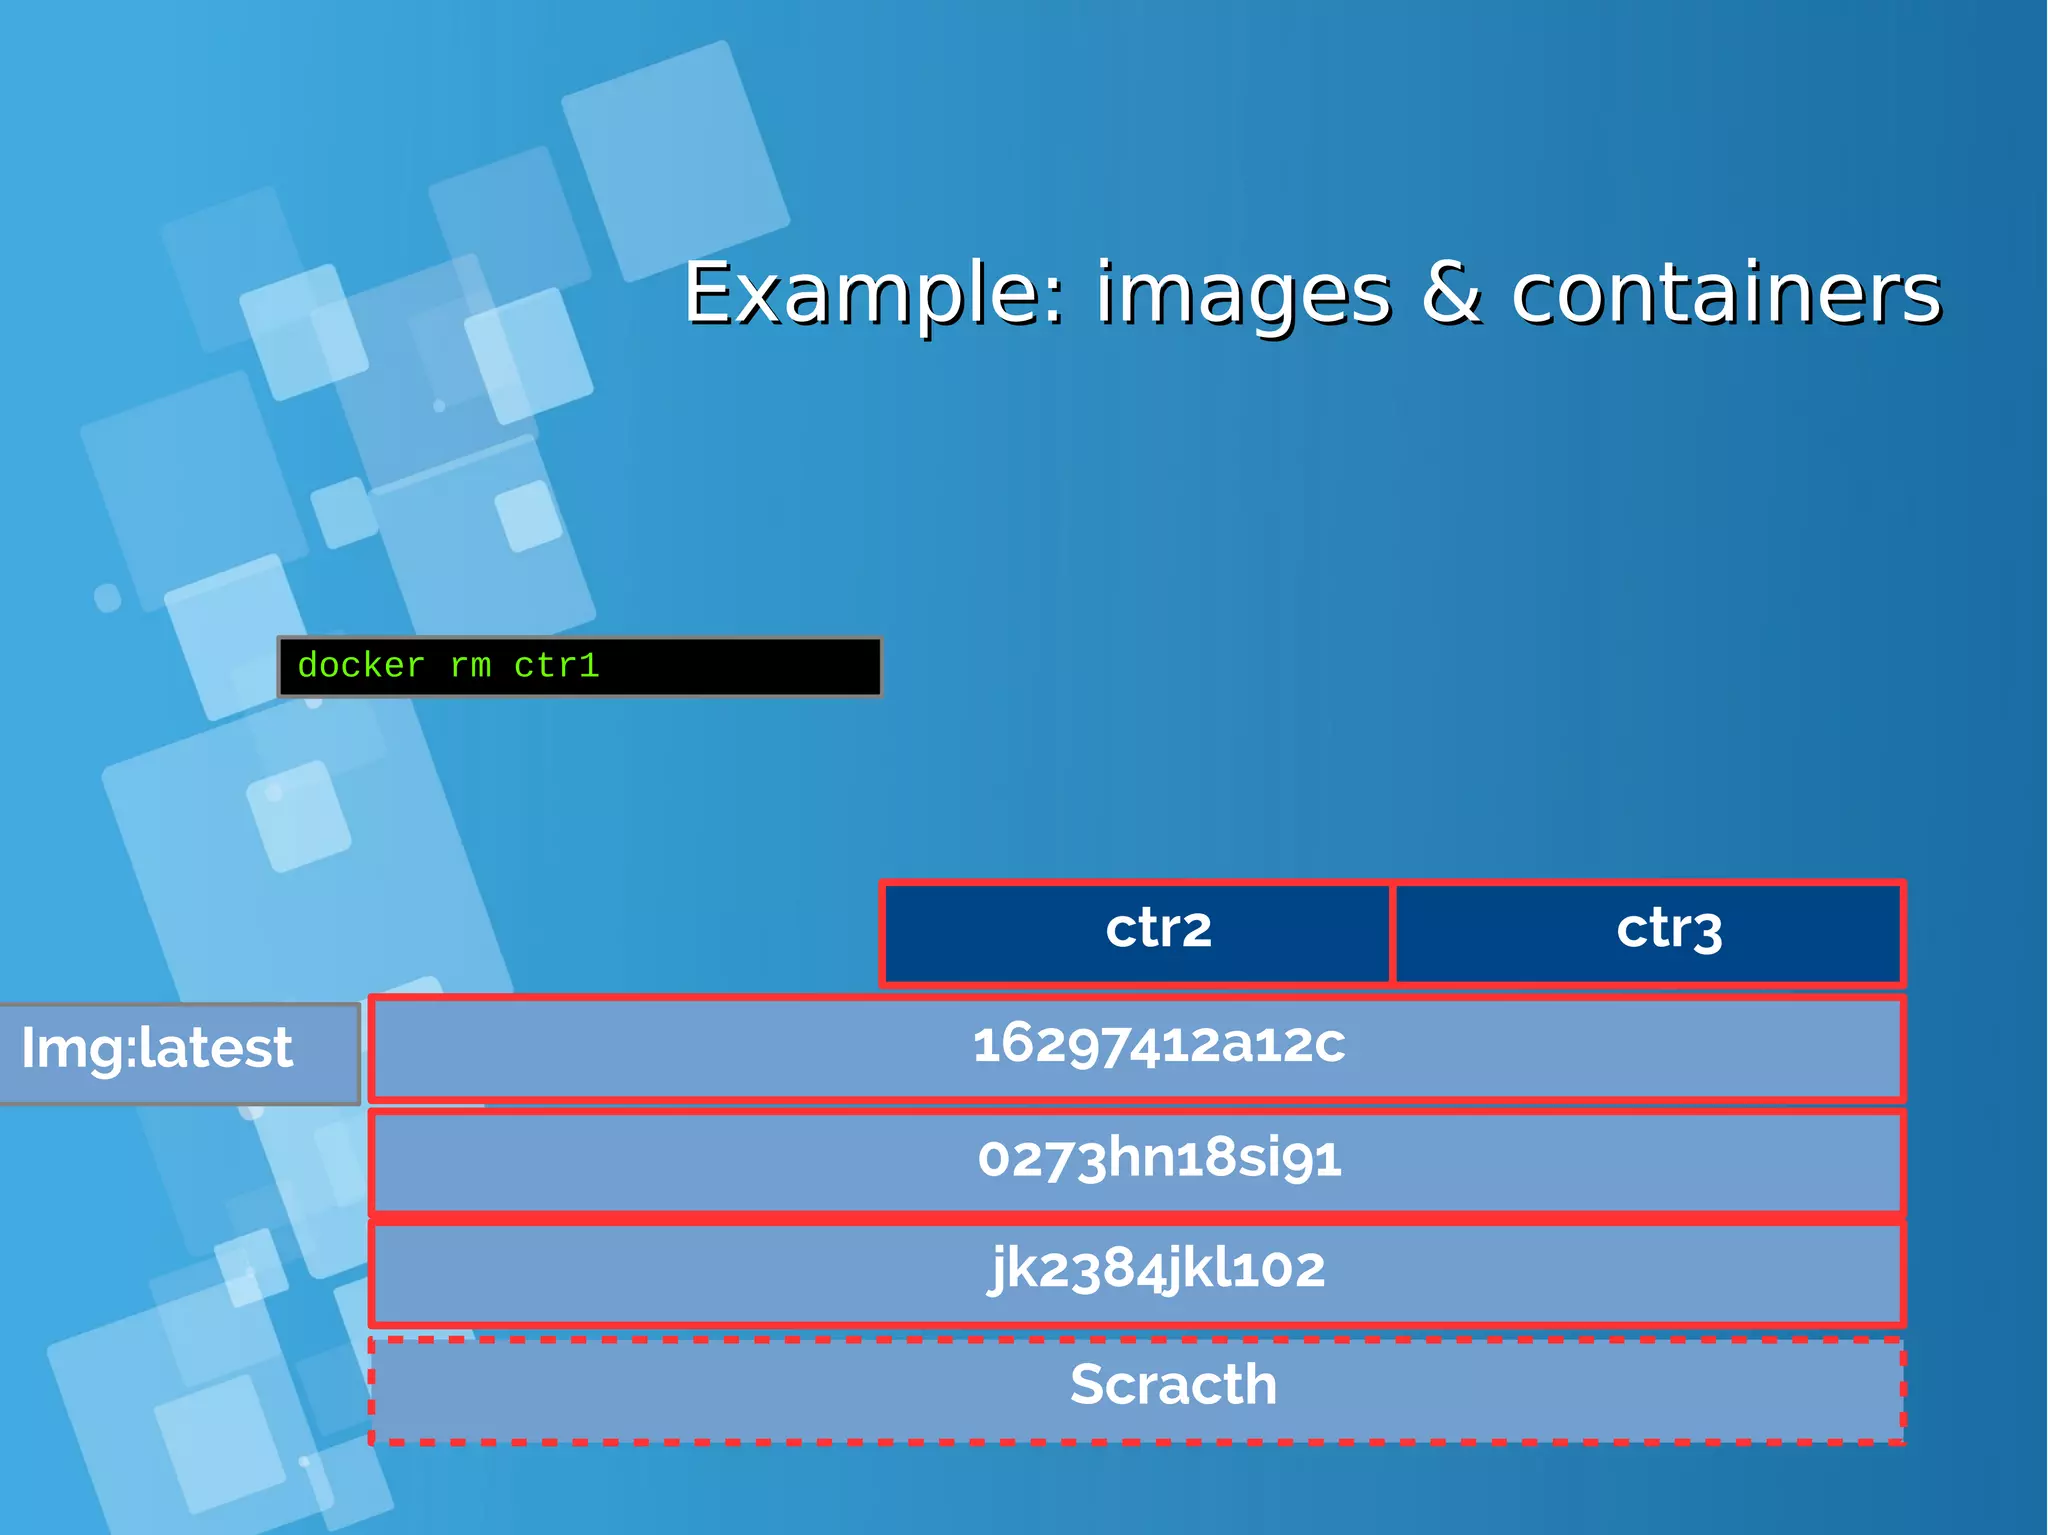
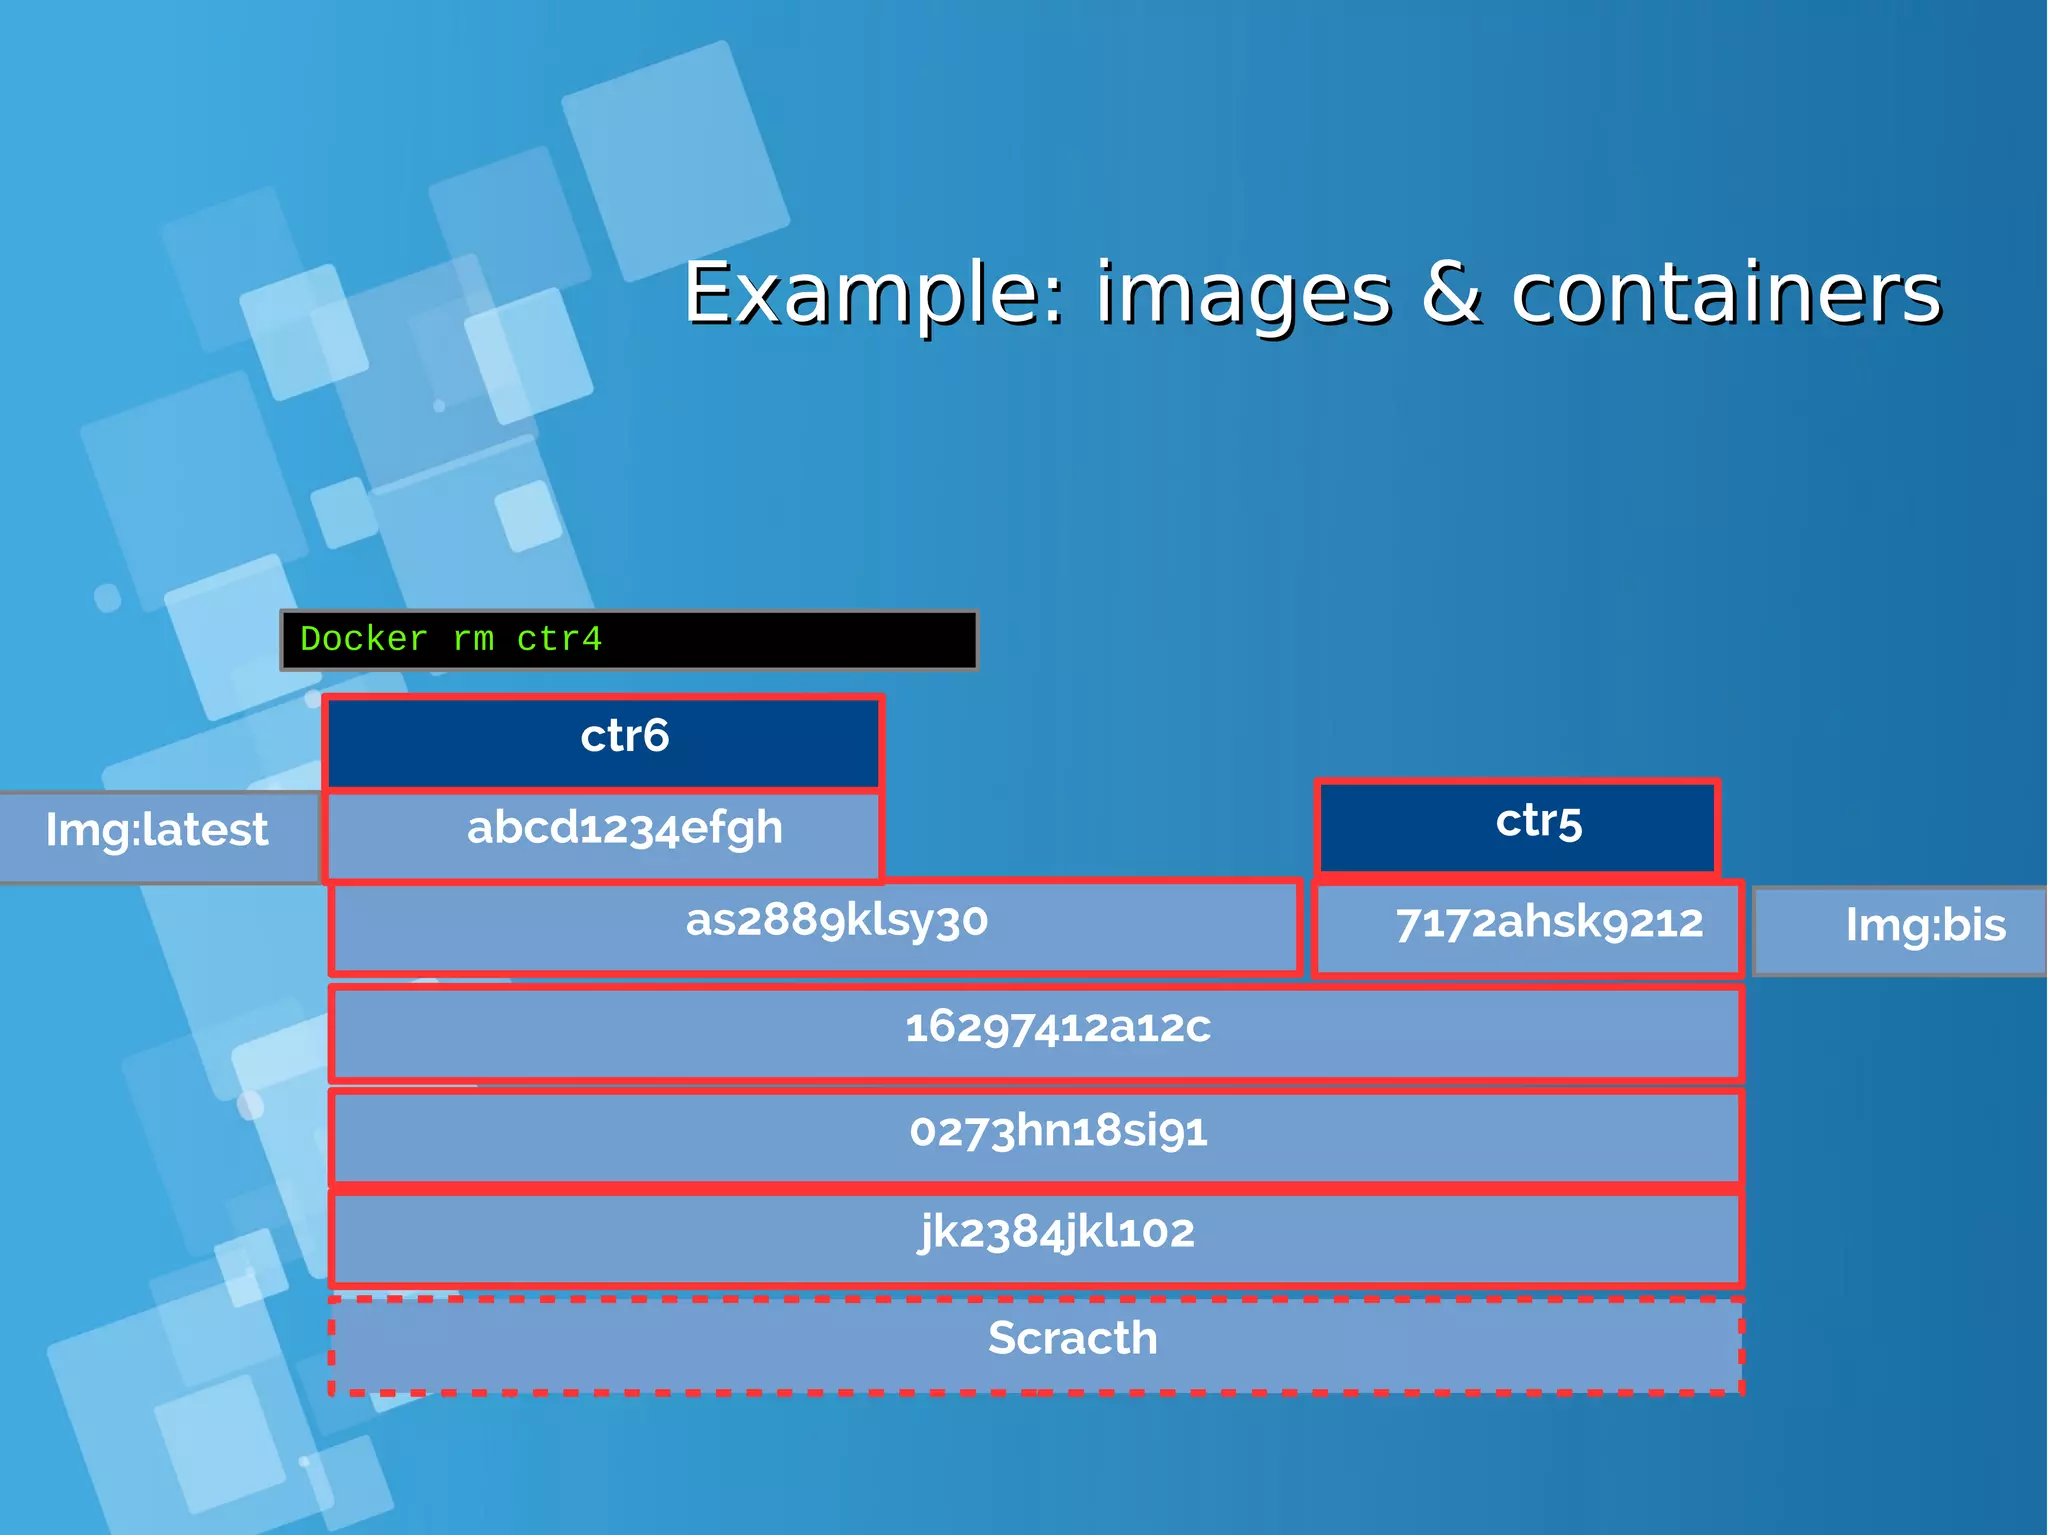
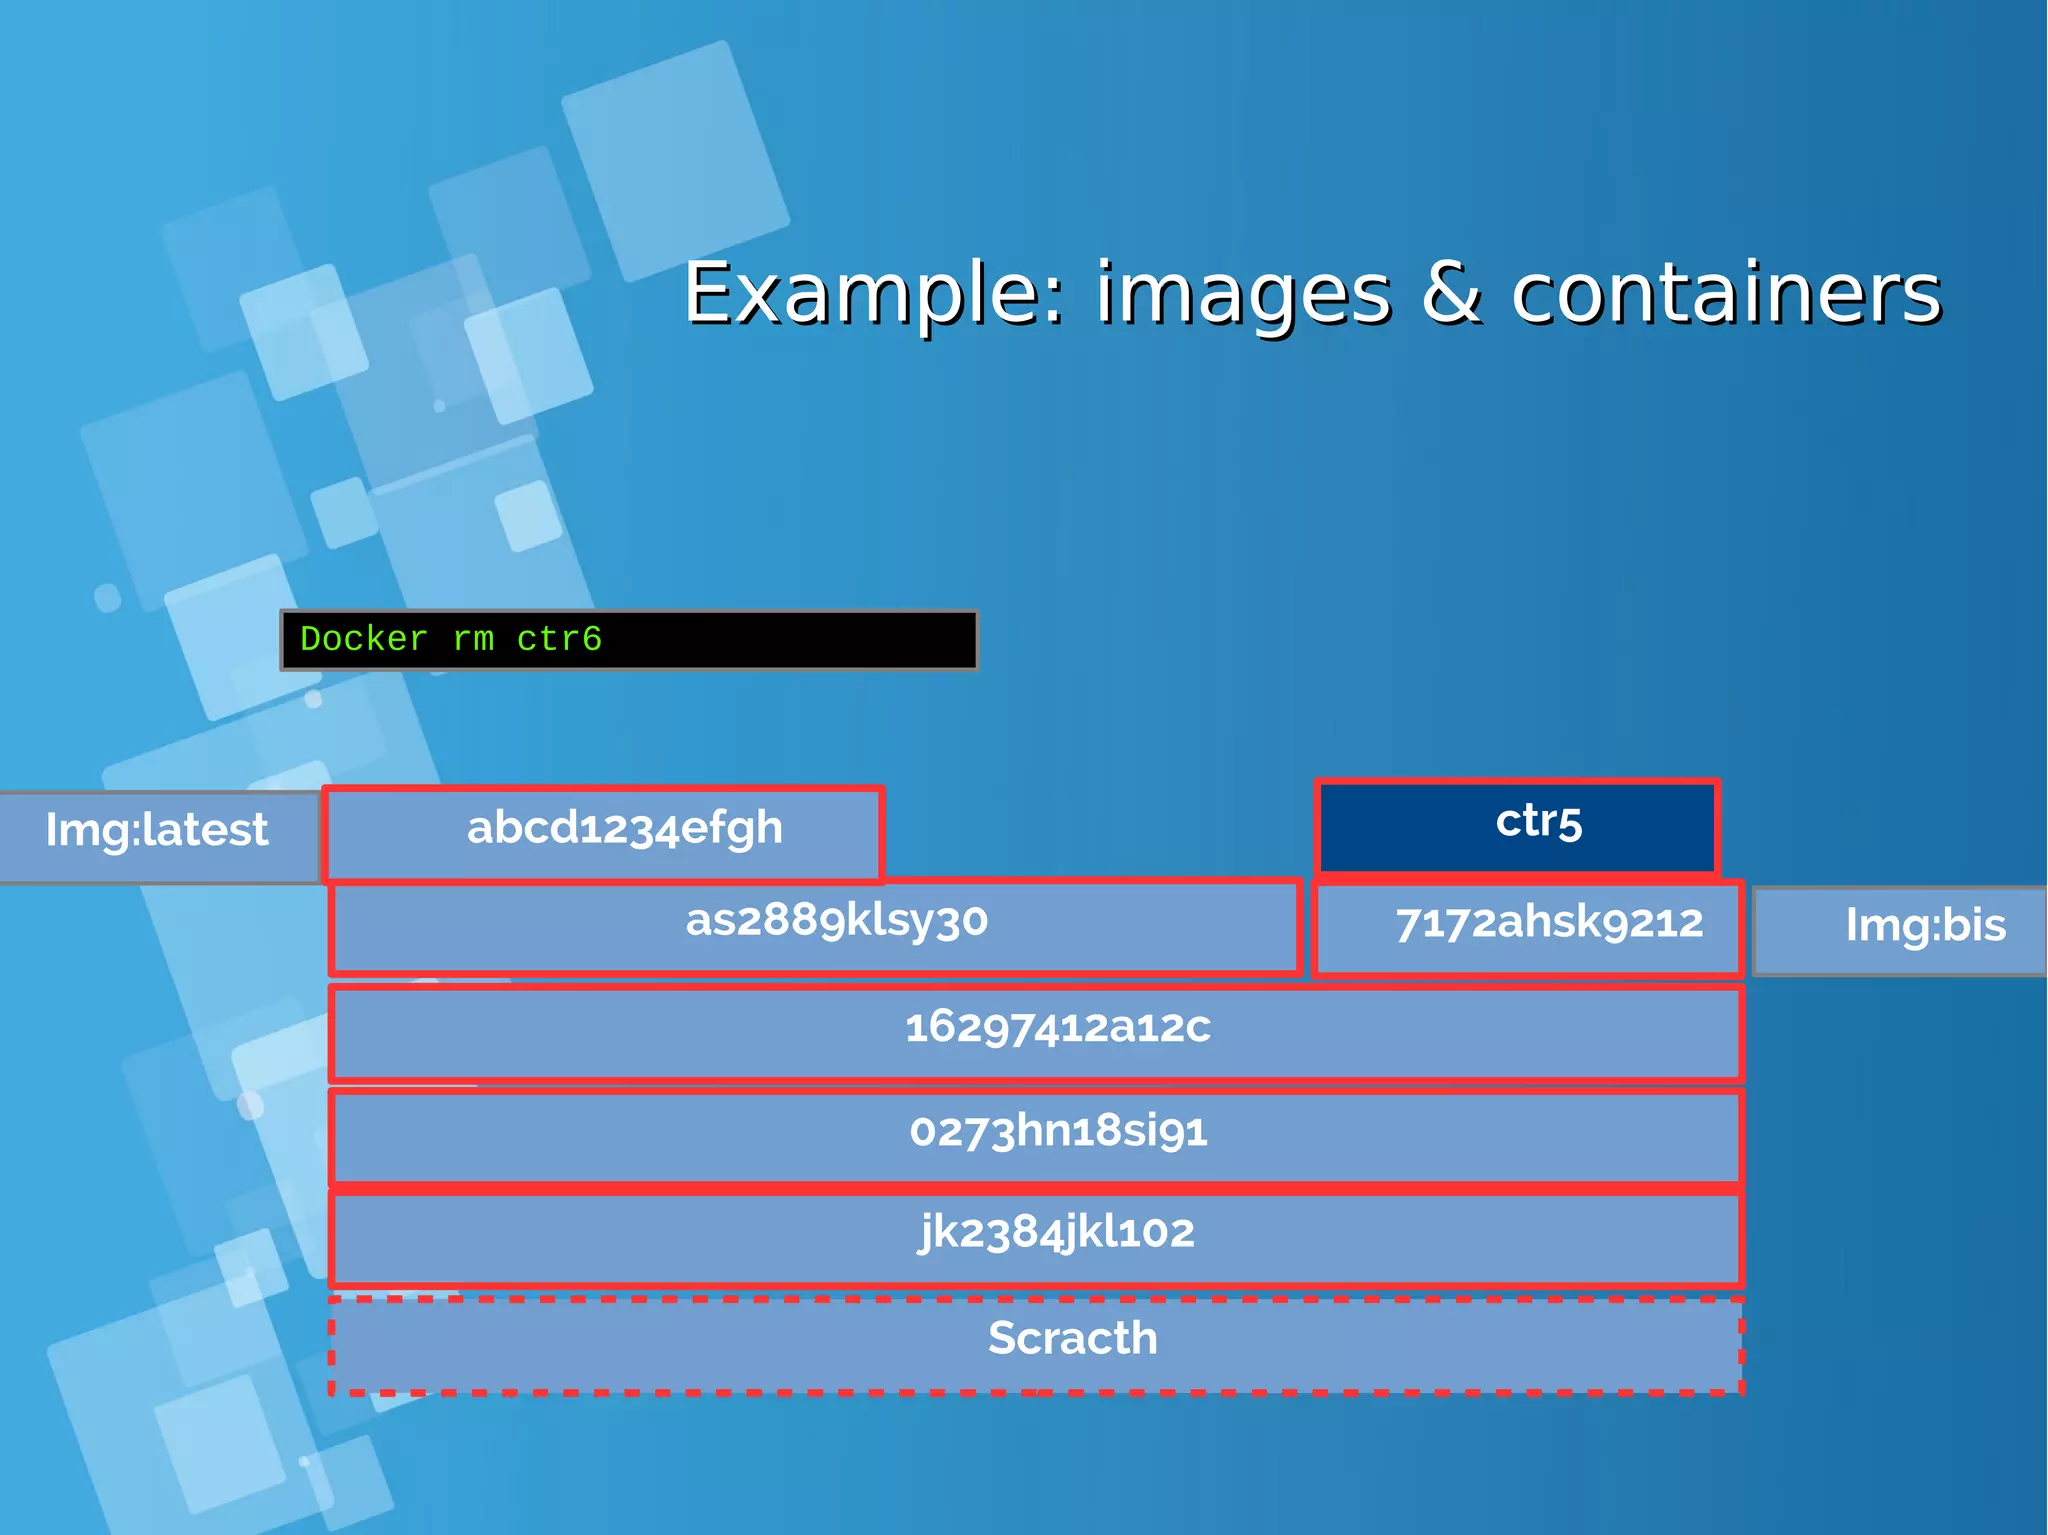
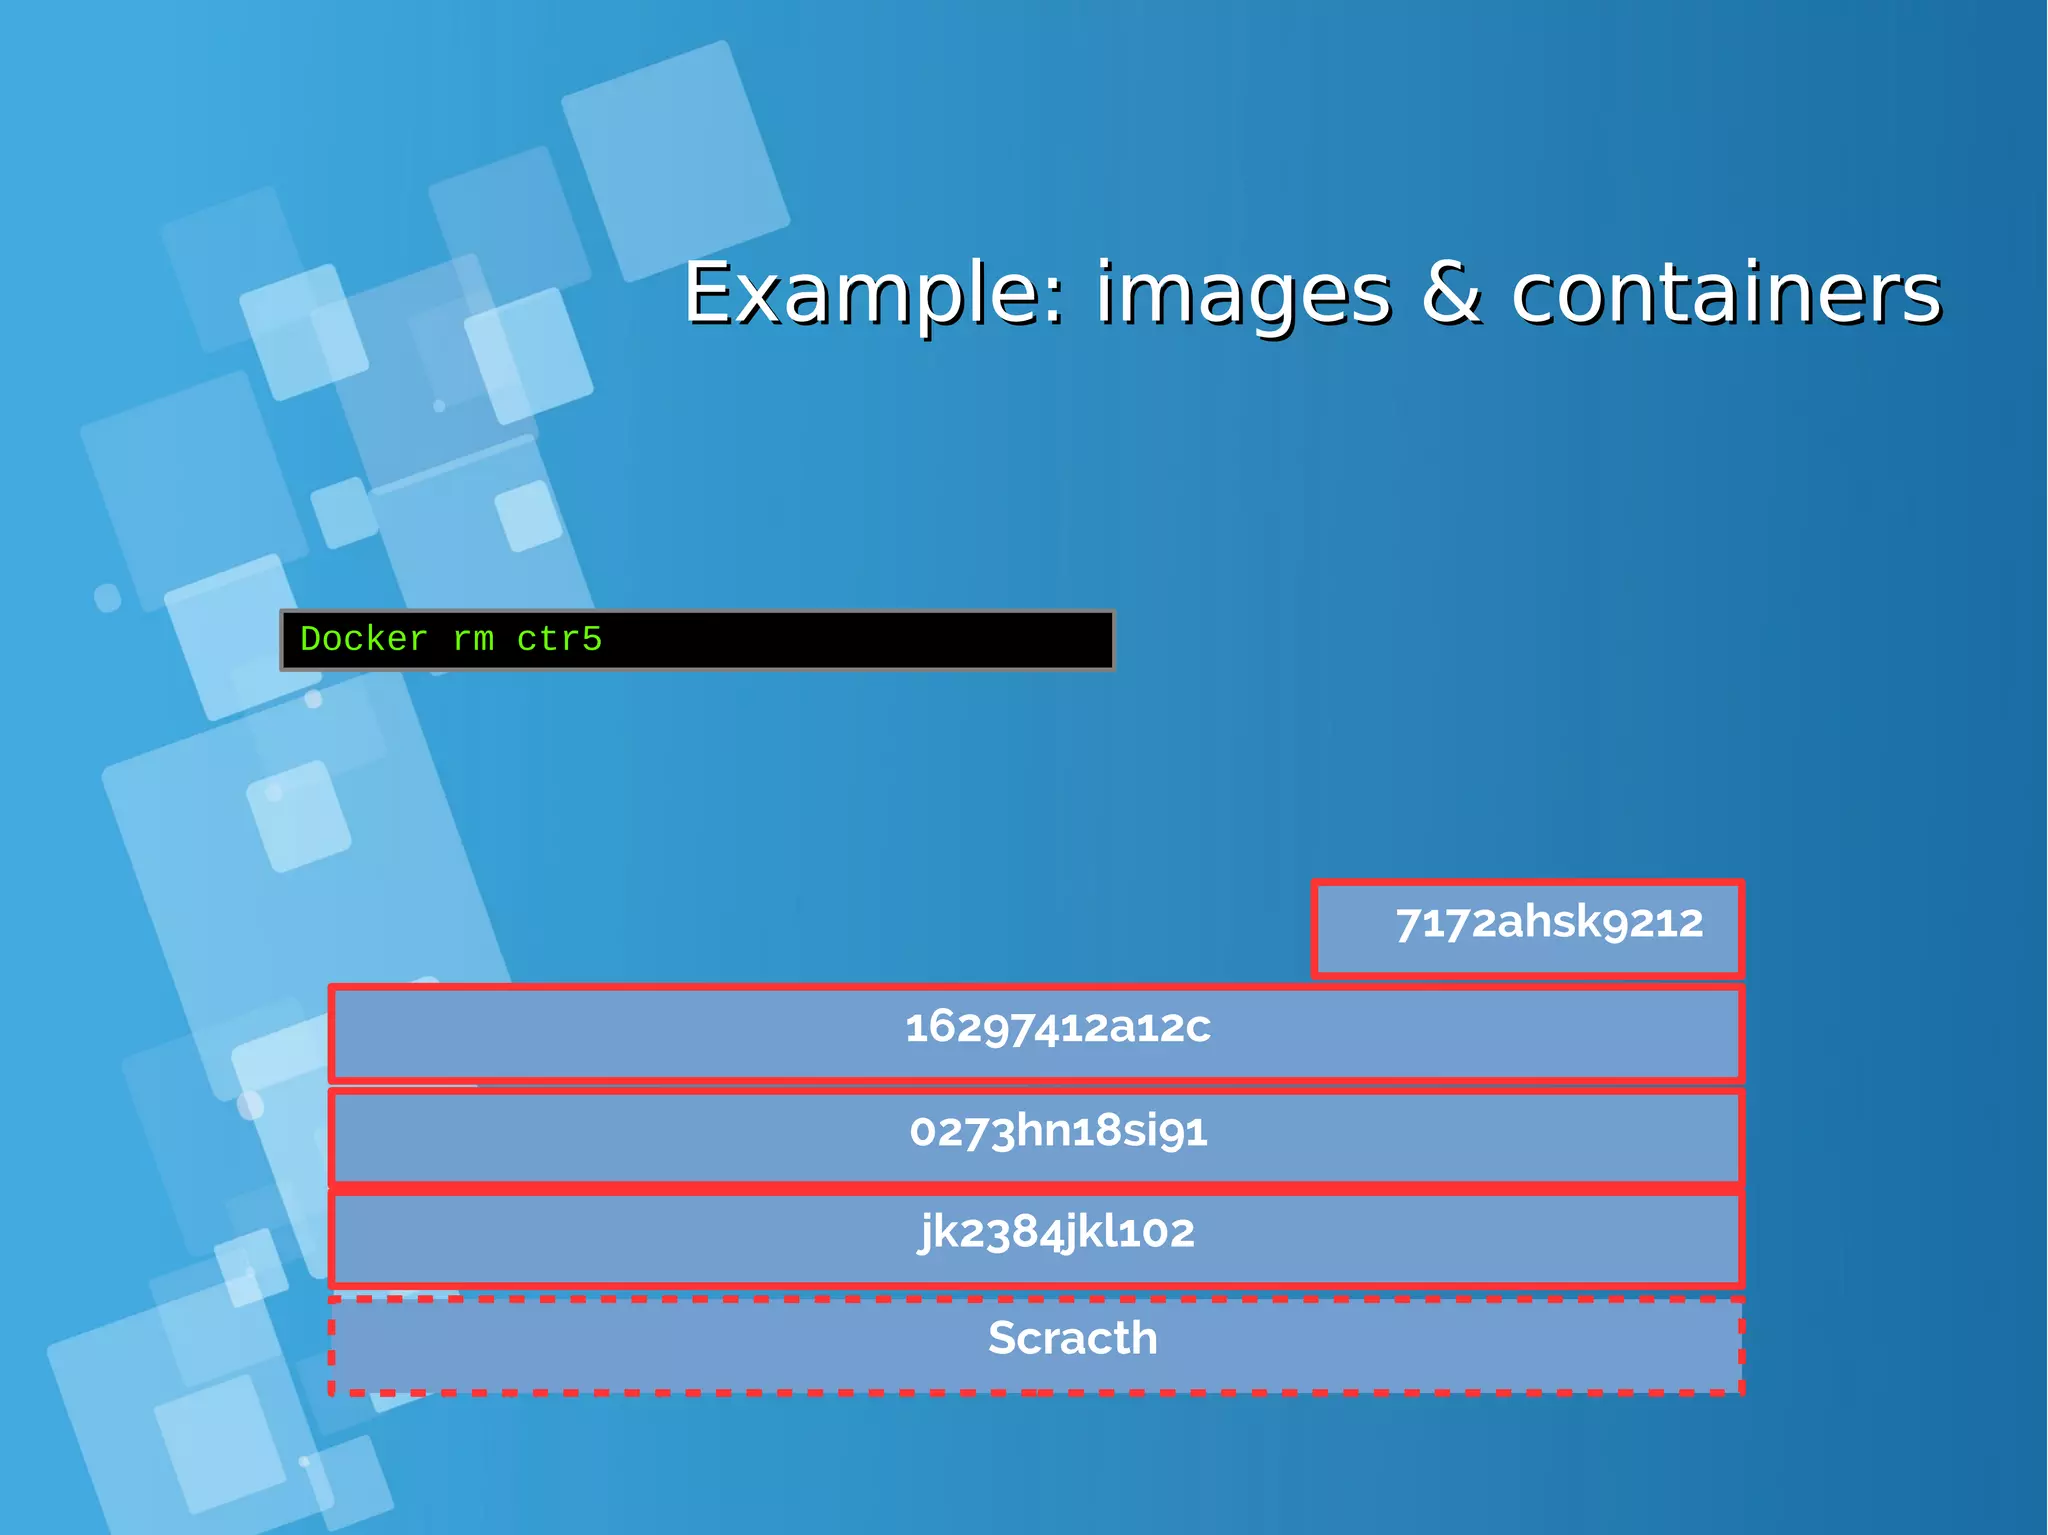
![Docker Management CommandsDocker Management Commands Command Description docker create image [ command ] docker run image [ command ] create the container = create + start docker start container. . . docker stop container. . . docker kill container. . . docker restart container. . . start the container graceful 2 stop kill (SIGKILL) the container = stop + start docker pause container. . . docker unpause container. . . suspend the container resume the container docker rm [ -f 3 ] container. . . destroy the container](https://image.slidesharecdn.com/journey-to-the-devops-automation-with-dockerkubernetesandopenshift-180325021200/75/Journey-to-the-devops-automation-with-docker-kubernetes-and-openshift-42-2048.jpg)
![docker run - Run a containerdocker run - Run a container ● create a container and start it ● the container filesystem is initialised from image image ● arg0..argN is the command run inside the container (as PID 1) docker run [ options ] image [ arg0 arg1...] [root@docker-host ~]# docker run centos /bin/hostname f0d0720bd373 [root@docker-host ~]# docker run centos date +%H:%M:%S 17:10:13 [root@docker-host ~]# docker run centos true ; echo $? 0 [root@docker-host ~]# docker run centos false ; echo $? 1](https://image.slidesharecdn.com/journey-to-the-devops-automation-with-dockerkubernetesandopenshift-180325021200/75/Journey-to-the-devops-automation-with-docker-kubernetes-and-openshift-43-2048.jpg)
![docker run - Foreground mode vs. Detacheddocker run - Foreground mode vs. Detached modemode ● Foreground mode is the default ● stdout and stderr are redirected to the terminal ● docker run propagates the exit code of the main process ● With -d, the container is run in detached mode: ● displays the ID of the container ● returns immediately [root@docker-host ~]# docker run centos date Wed Jun 7 15:35:48 UTC 2017 [root@docker-host ~]# docker run -d centos date 48b66ad5fc30c468ca0b28ff83dfec0d6e001a2f53e3d168bca754ea76d2bc04 [root@docker-host ~]# docker logs 48b66a Tue Jan 20 17:32:16 UTC 2015](https://image.slidesharecdn.com/journey-to-the-devops-automation-with-dockerkubernetesandopenshift-180325021200/75/Journey-to-the-devops-automation-with-docker-kubernetes-and-openshift-44-2048.jpg)
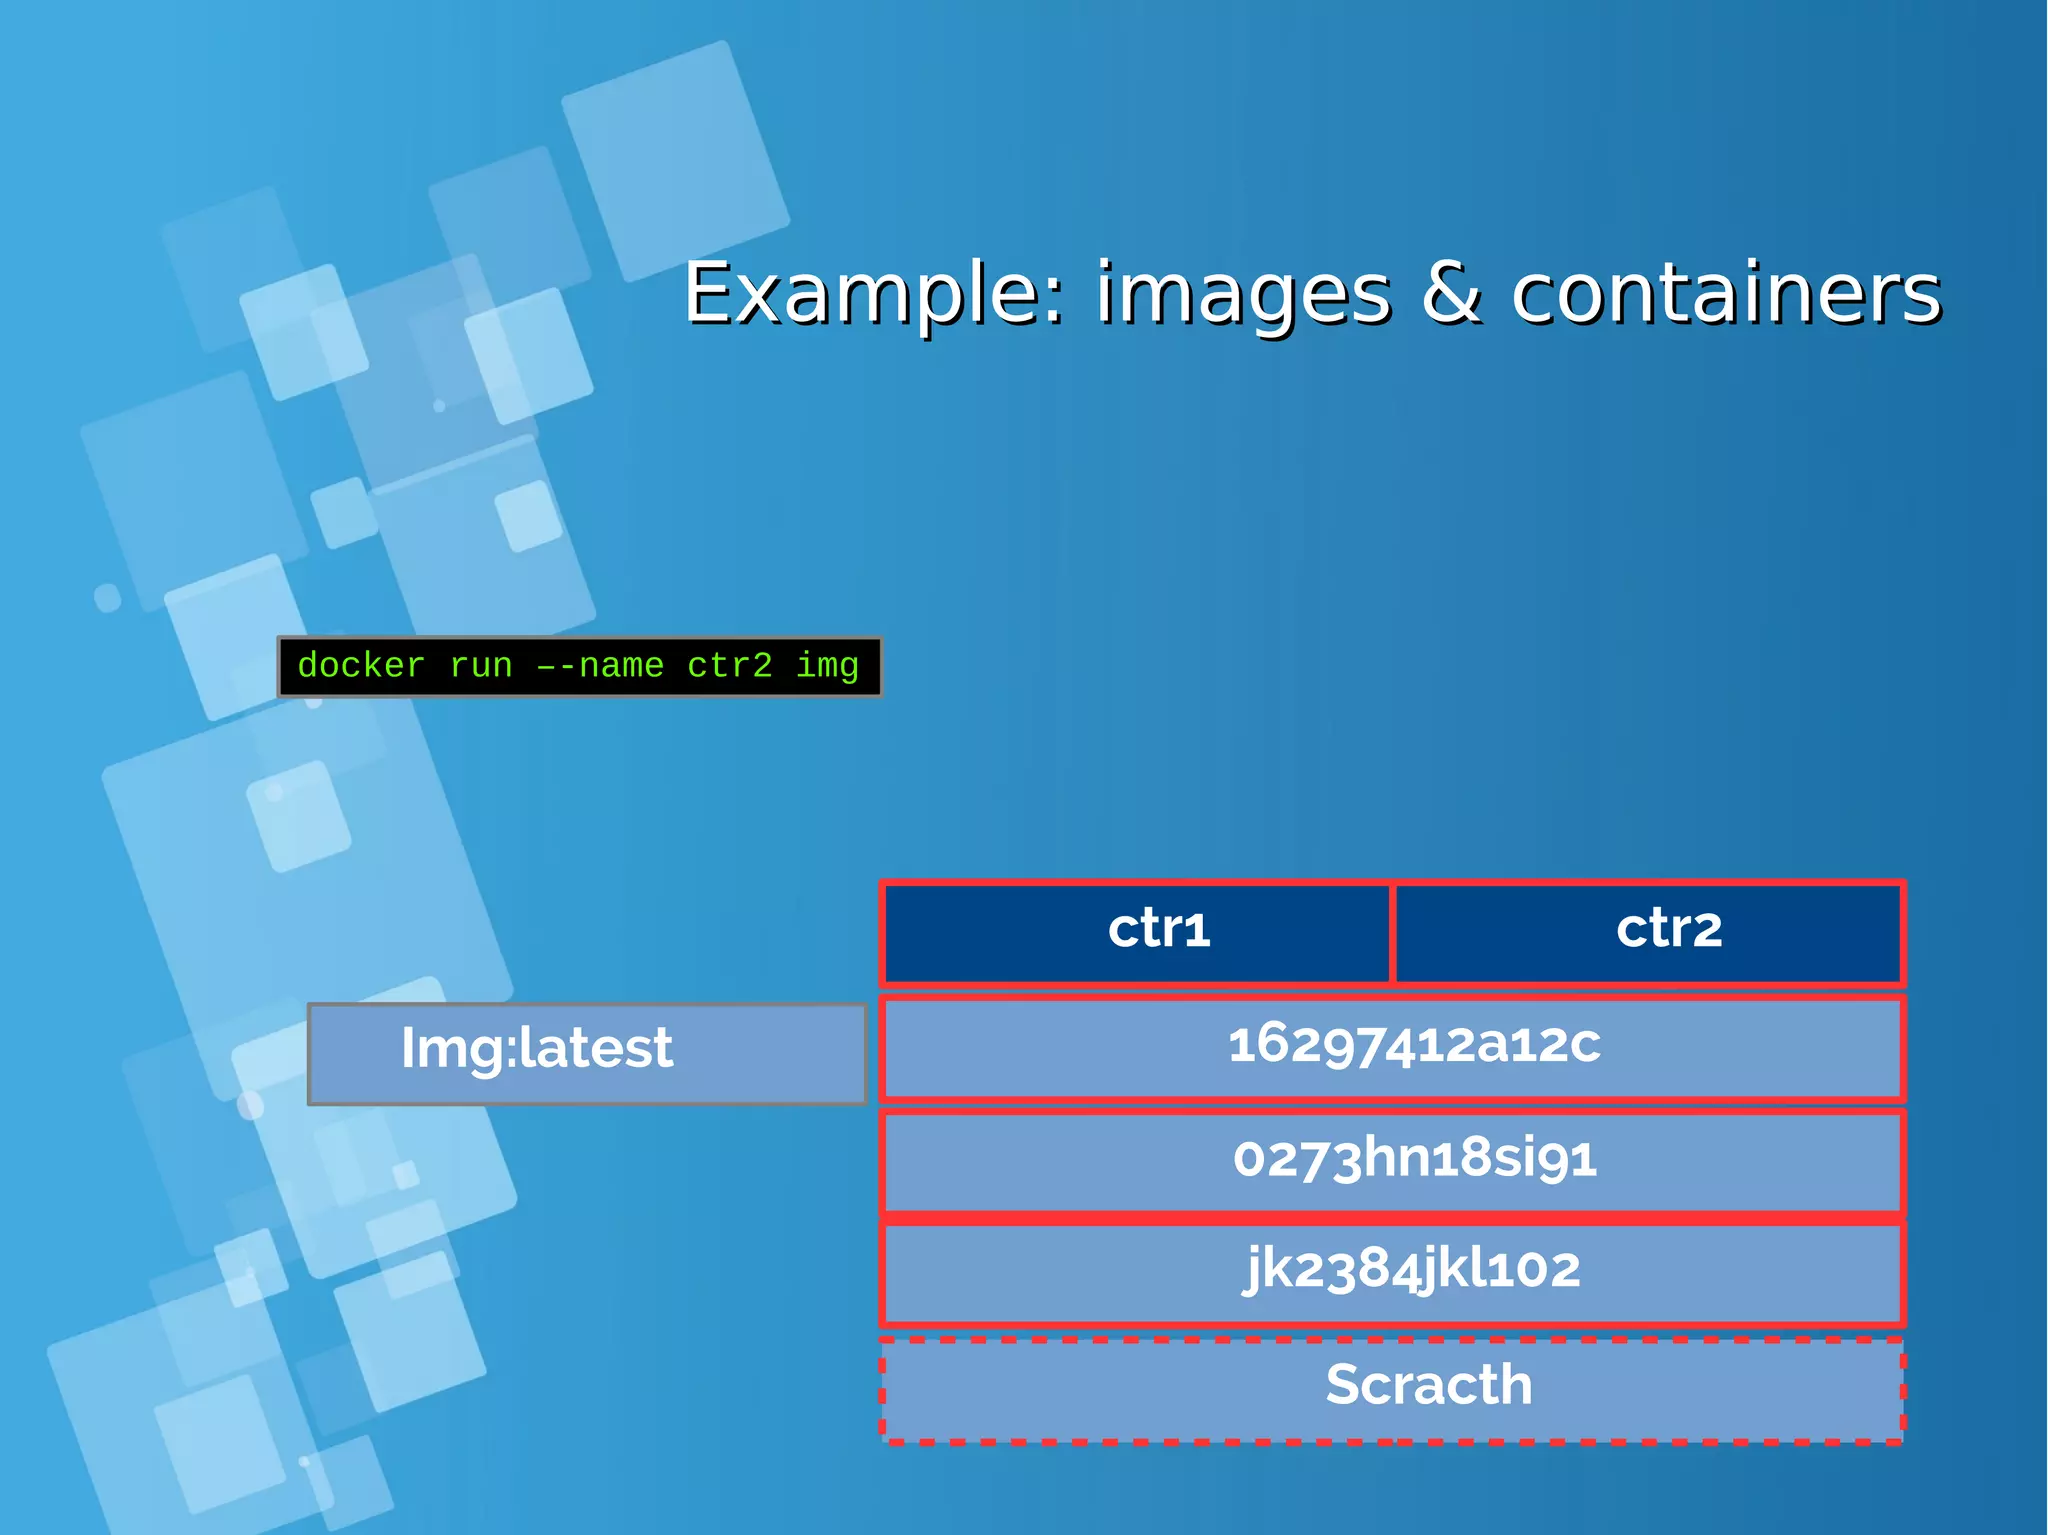
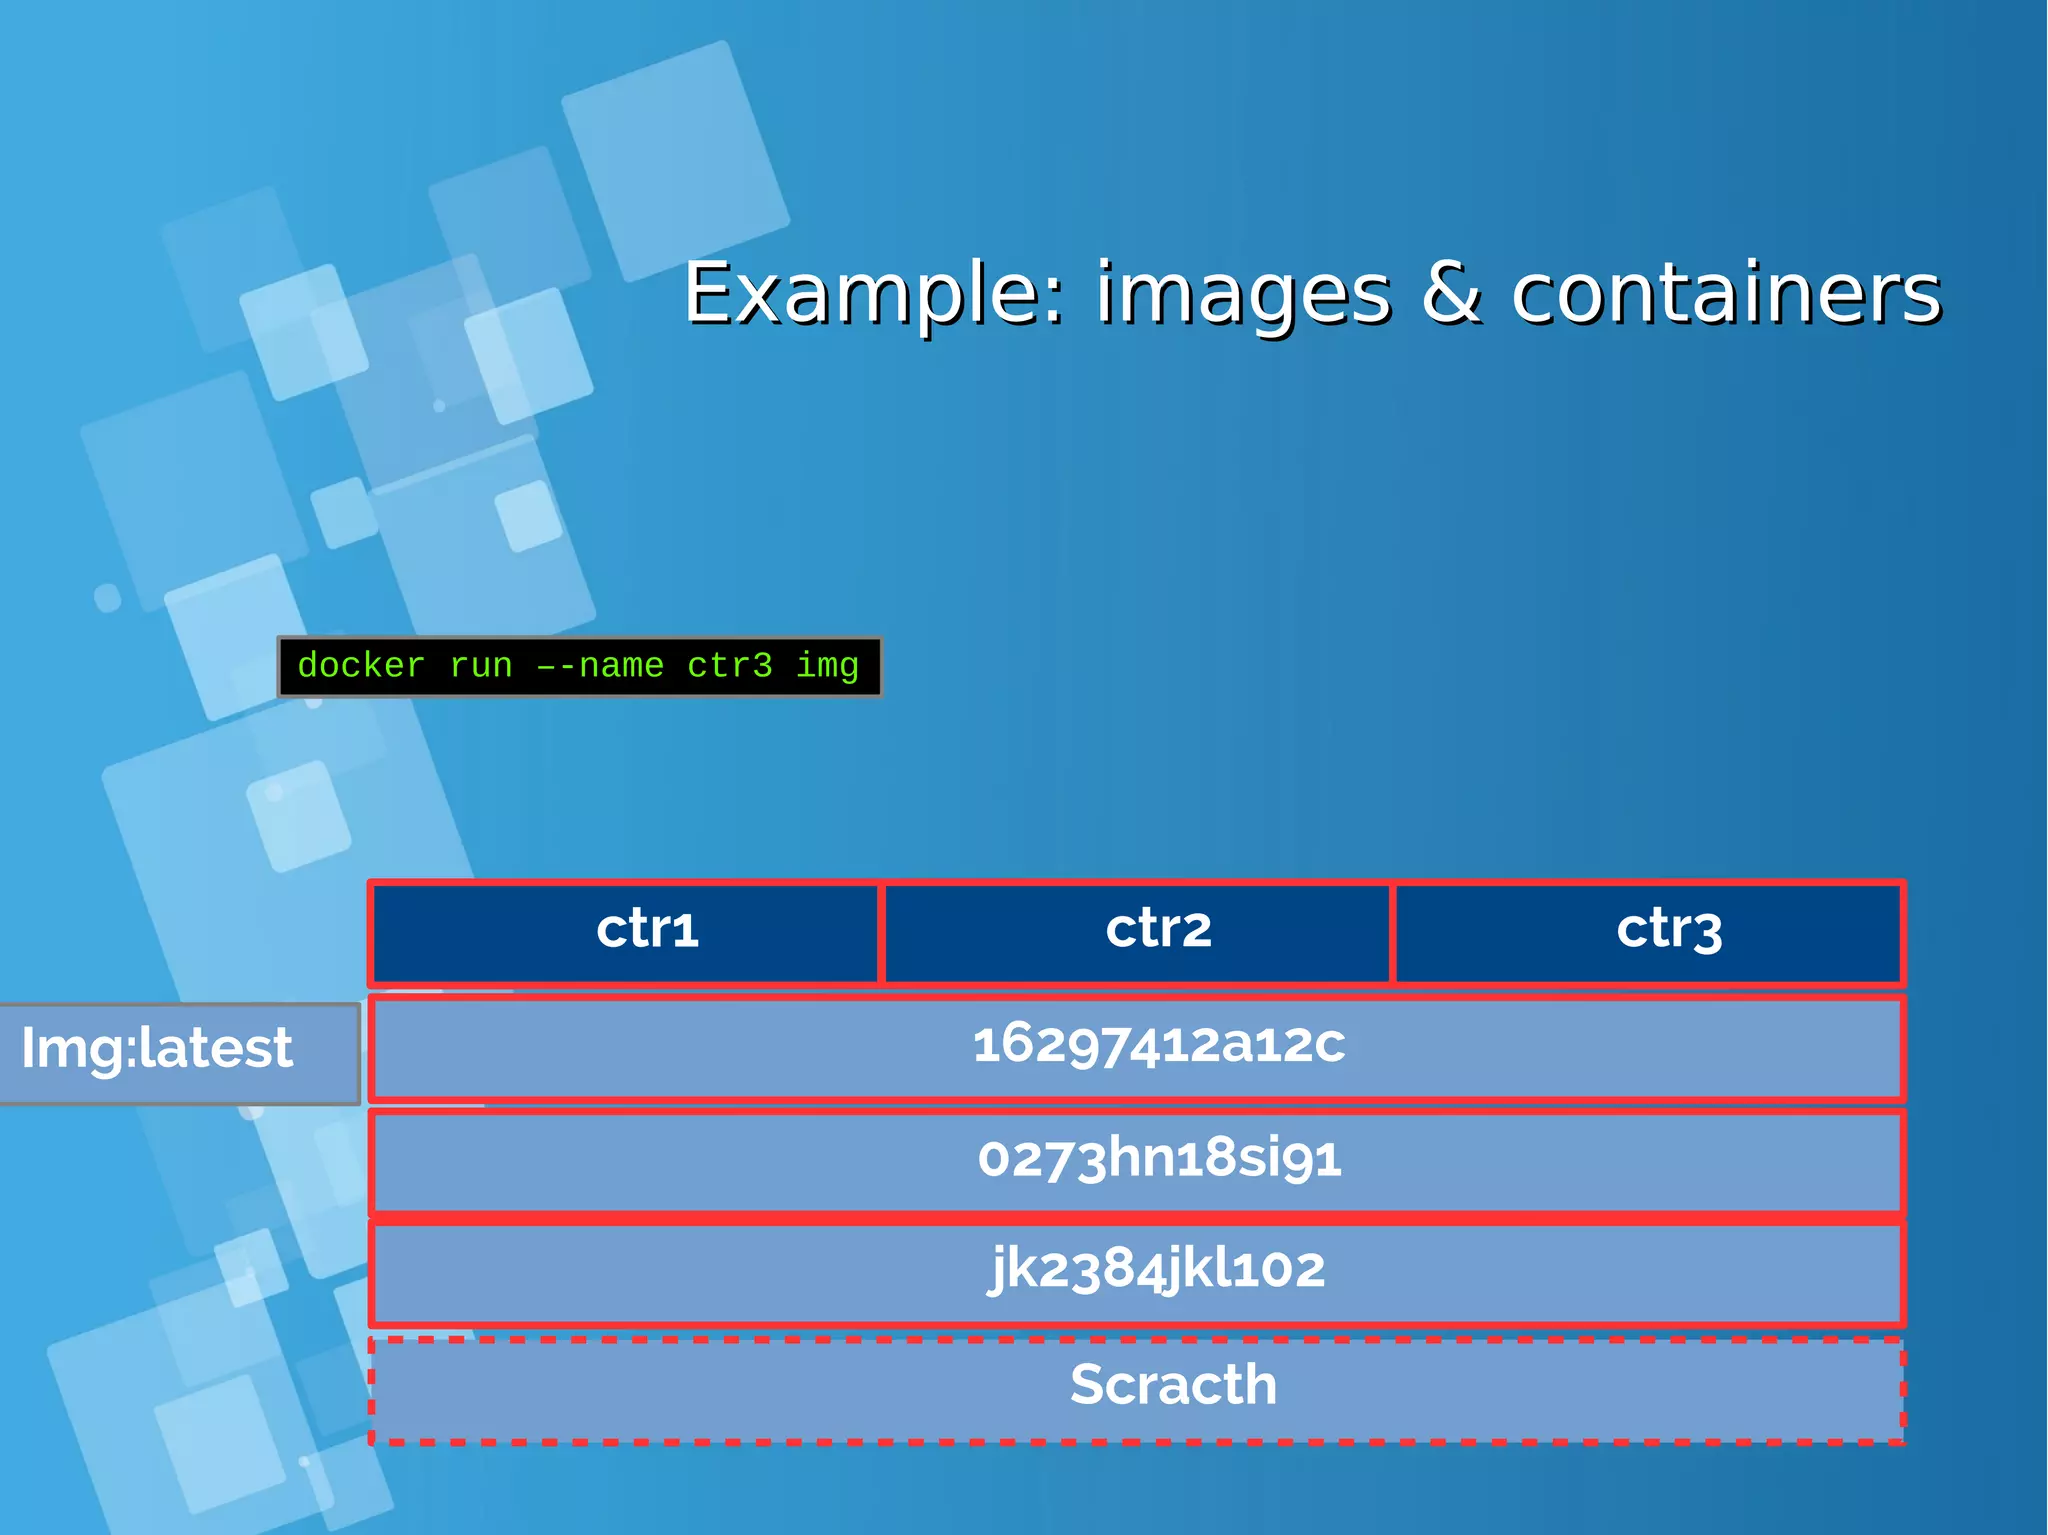
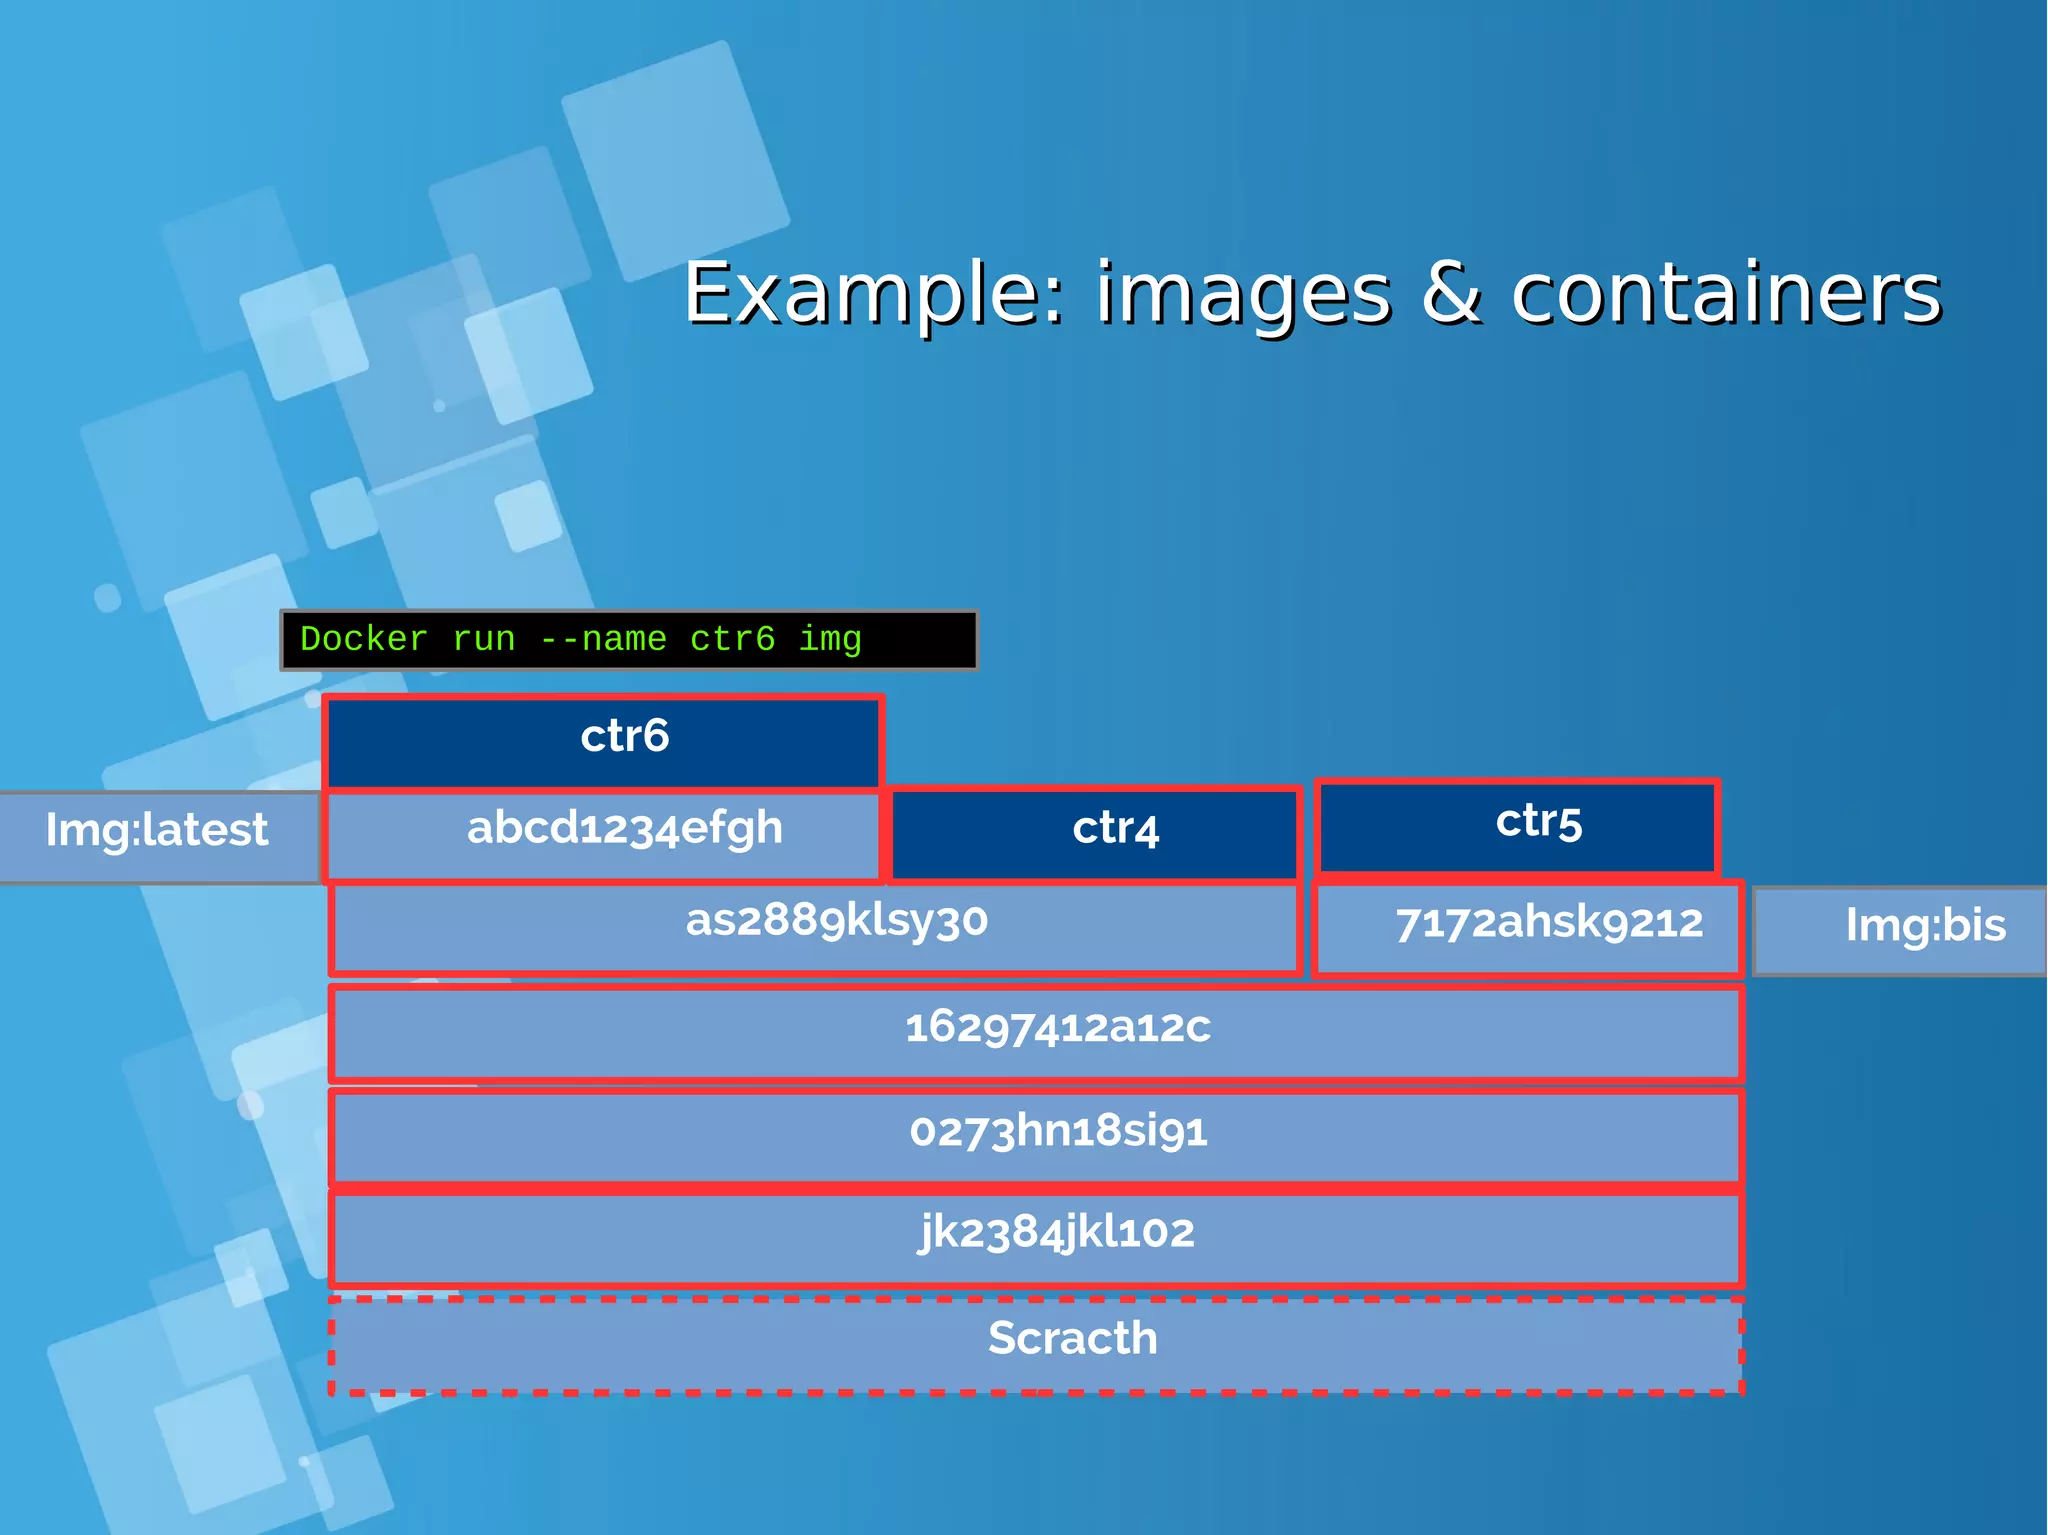
![docker run - Set the container namedocker run - Set the container name ● --name option, assigns a name for the container (by default a random name is generated adjective name)→ [root@docker-host ~]# docker run -d -t debian da005df0d3aca345323e373e1239216434c05d01699b048c5ff277dd691ad535 [root@docker-host ~]# docker run -d -t --name blahblah debian 0bd3cb464ff68eaf9fc43f0241911eb207fefd9c1341a0850e8804b7445ccd21 [root@docker-host ~]# docker ps CONTAINER ID IMAGE COMMAND CREATED .. NAMES 0bd3cb464ff6 debian:7.5 "/bin/bash" 6 seconds ago blahblah Da005df0d3ac debian:7.5 "/bin/bash" About a minute ago focused_raman [root@docker-host ~]# docker stop blahblah focused_raman ● Note: Names must be unique [root@docker-host ~]# docker run --name blahblah debian true 2015/01/20 19:31:21 Error response from daemon: Conflict, The name blahblah is already assigned to 0bd3cb464ff6. You have to delete (or rename) that container to be able to assign blahblah to a container again.](https://image.slidesharecdn.com/journey-to-the-devops-automation-with-dockerkubernetesandopenshift-180325021200/75/Journey-to-the-devops-automation-with-docker-kubernetes-and-openshift-46-2048.jpg)
![Inspecting the containerInspecting the container Command Description docker ps list running containers docker ps -a list all containers docker logs [ -f 6 ] container show the container output (stdout+stderr) docker top container [ ps options ] list the processes running inside the containers docker diff container show the differences with the image (modified files) docker inspect container. . show low-level infos (in json format)](https://image.slidesharecdn.com/journey-to-the-devops-automation-with-dockerkubernetesandopenshift-180325021200/75/Journey-to-the-devops-automation-with-docker-kubernetes-and-openshift-47-2048.jpg)
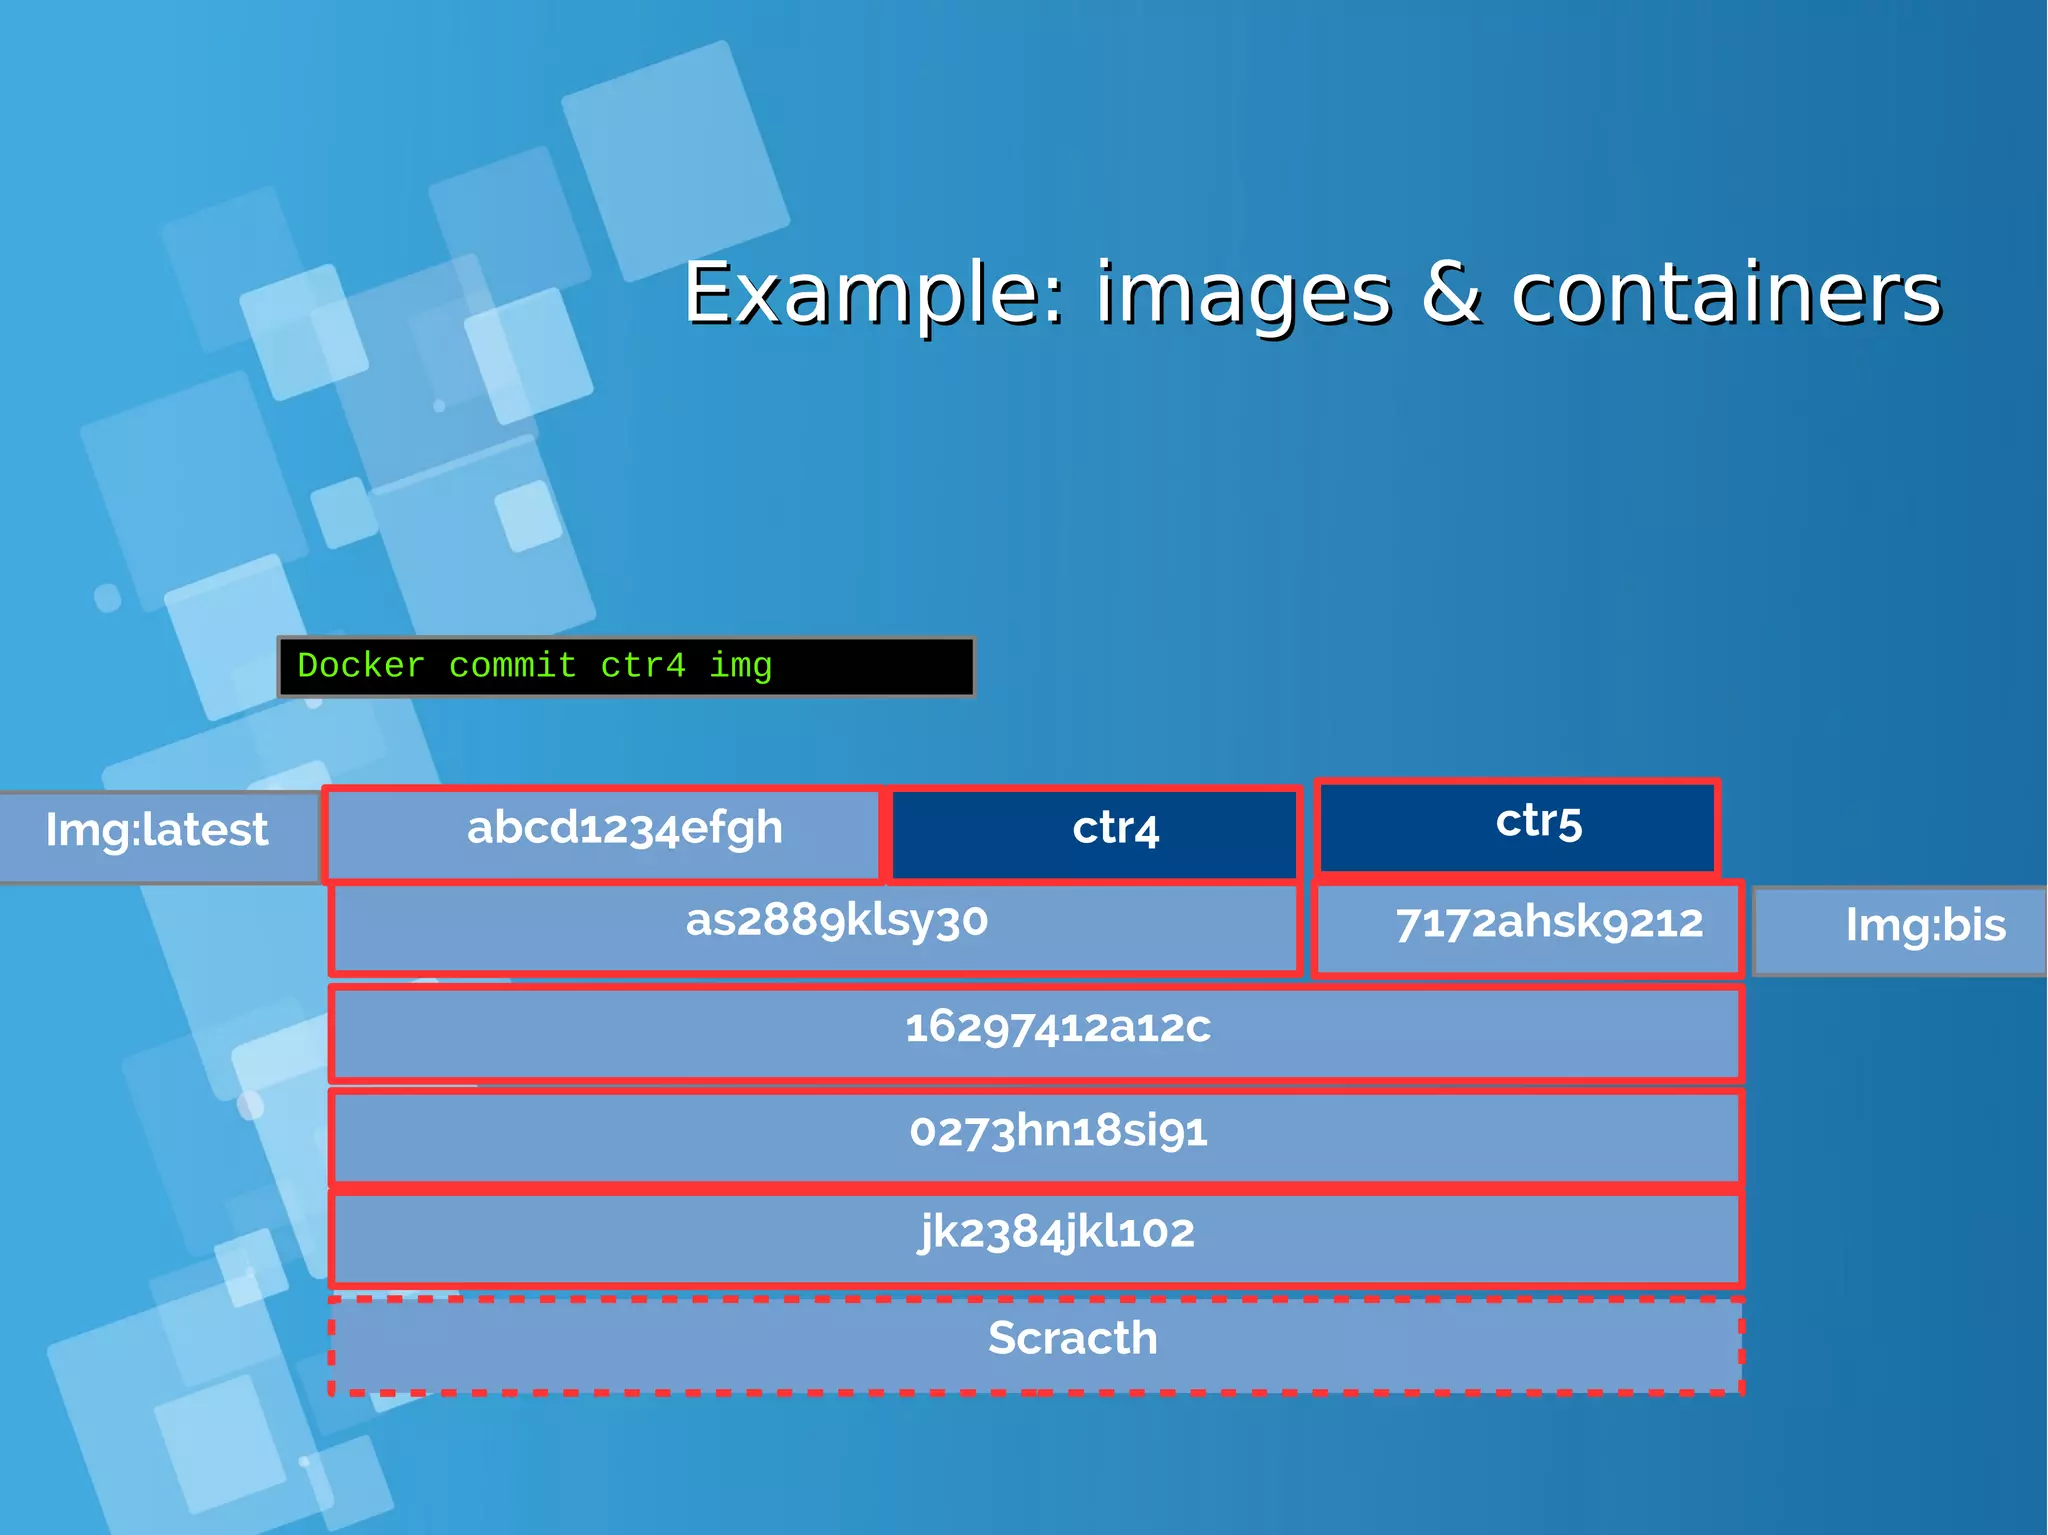
![[root@docker-host ~]# docker run --name my-container -t -i debian root@3b397d383faf:/# cat >> /etc/bash.bashrc <<EOF > echo 'hello!' > EOF root@3b397d383faf:/# exit [root@docker-host ~]# docker start --attach my-container my-container hello! root@3b397d383faf:/# exit [root@docker-host ~]# docker diff my-container C /etc C /etc/bash.bashrc A /.bash_history C /tmp [root@docker-host ~]# docker commit my-container hello a57e91bc3b0f5f72641f19cab85a7f3f860a1e5e9629439007c39fd76f37c5dd [root@docker-host ~]# docker stop my-container; docker rm my-container my-container [root@docker-host ~]# docker run --rm -t -i hello hello! root@386ed3934b44:/# exit [root@docker-host ~]# docker images --all REPOSITORY TAG IMAGE ID CREATED SIZE debian latest a25c1eed1c6f Less than a second ago 123MB hello latest 52442a43a78b 59 seconds ago 123MB centos latest 3bee3060bfc8 46 hours ago 193MB ubuntu latest 7b9b13f7b9c0 4 days ago 118MB Lab: Docker commit exampleLab: Docker commit example](https://image.slidesharecdn.com/journey-to-the-devops-automation-with-dockerkubernetesandopenshift-180325021200/75/Journey-to-the-devops-automation-with-docker-kubernetes-and-openshift-49-2048.jpg)
![docker run - Mount external volumesdocker run - Mount external volumes ● -v mounts the location /hostpath from the host filesystem at the ● location /containerpath inside the container ● With the “:ro” suffix, the mount is read-only ● Purposes: ● store persistent data outside the container ● provide inputs: data, config files, . . . (read-only mode) ● inter-process communicattion (unix sockets, named pipes) docker run -v /hostpath:/containerpath[:ro] ...](https://image.slidesharecdn.com/journey-to-the-devops-automation-with-dockerkubernetesandopenshift-180325021200/75/Journey-to-the-devops-automation-with-docker-kubernetes-and-openshift-51-2048.jpg)
![Lab: Mount examplesLab: Mount examples ● Persistent data [root@docker-host ~]# docker run --rm -t -i -v /tmp/persistent:/persistent debian root@0aeedfeb7bf9:/# echo "blahblah" >/persistent/foo root@0aeedfeb7bf9:/# exit [root@docker-host ~]# cat /tmp/persistent/foo blahblah [root@docker-host ~]# docker run --rm -t -i -v /tmp/persistent:/persistent debian root@6c8ed008c041:/# cat /persistent/foo blahblah [root@docker-host ~]# mkdir /tmp/inputs [root@docker-host ~]# echo hello > /tmp/inputs/bar [root@docker-host ~]# docker run --rm -t -i -v /tmp/inputs:/inputs:ro debian root@05168a0eb322:/# cat /inputs/bar hello root@05168a0eb322:/# touch /inputs/foo touch: cannot touch `/inputs/foo': Read-only file system ● Inputs (read-only volume)](https://image.slidesharecdn.com/journey-to-the-devops-automation-with-dockerkubernetesandopenshift-180325021200/75/Journey-to-the-devops-automation-with-docker-kubernetes-and-openshift-52-2048.jpg)
![Lab: Mount examples continue ...Lab: Mount examples continue ... ● Named pipe [root@docker-host ~]# mkfifo /tmp/fifo [root@docker-host ~]# docker run -d -v /tmp/fifo:/fifo debian sh -c 'echo blah blah> /fifo' ff0e44c25e10d516ce947eae9168060ee25c2a906f62d63d9c26a154b6415939 [root@docker-host ~]# cat /tmp/fifo blah blah [root@docker-host ~]# docker run --rm -t -i -v /dev/log:/dev/log debian root@56ec518d3d4e:/# logger blah blah blah root@56ec518d3d4e:/# exit [root@docker-host ~]# cat /var/log/messages | grep blah Oct 17 15:39:39 docker-host root: blah blah blah ● Unix socket](https://image.slidesharecdn.com/journey-to-the-devops-automation-with-dockerkubernetesandopenshift-180325021200/75/Journey-to-the-devops-automation-with-docker-kubernetes-and-openshift-53-2048.jpg)
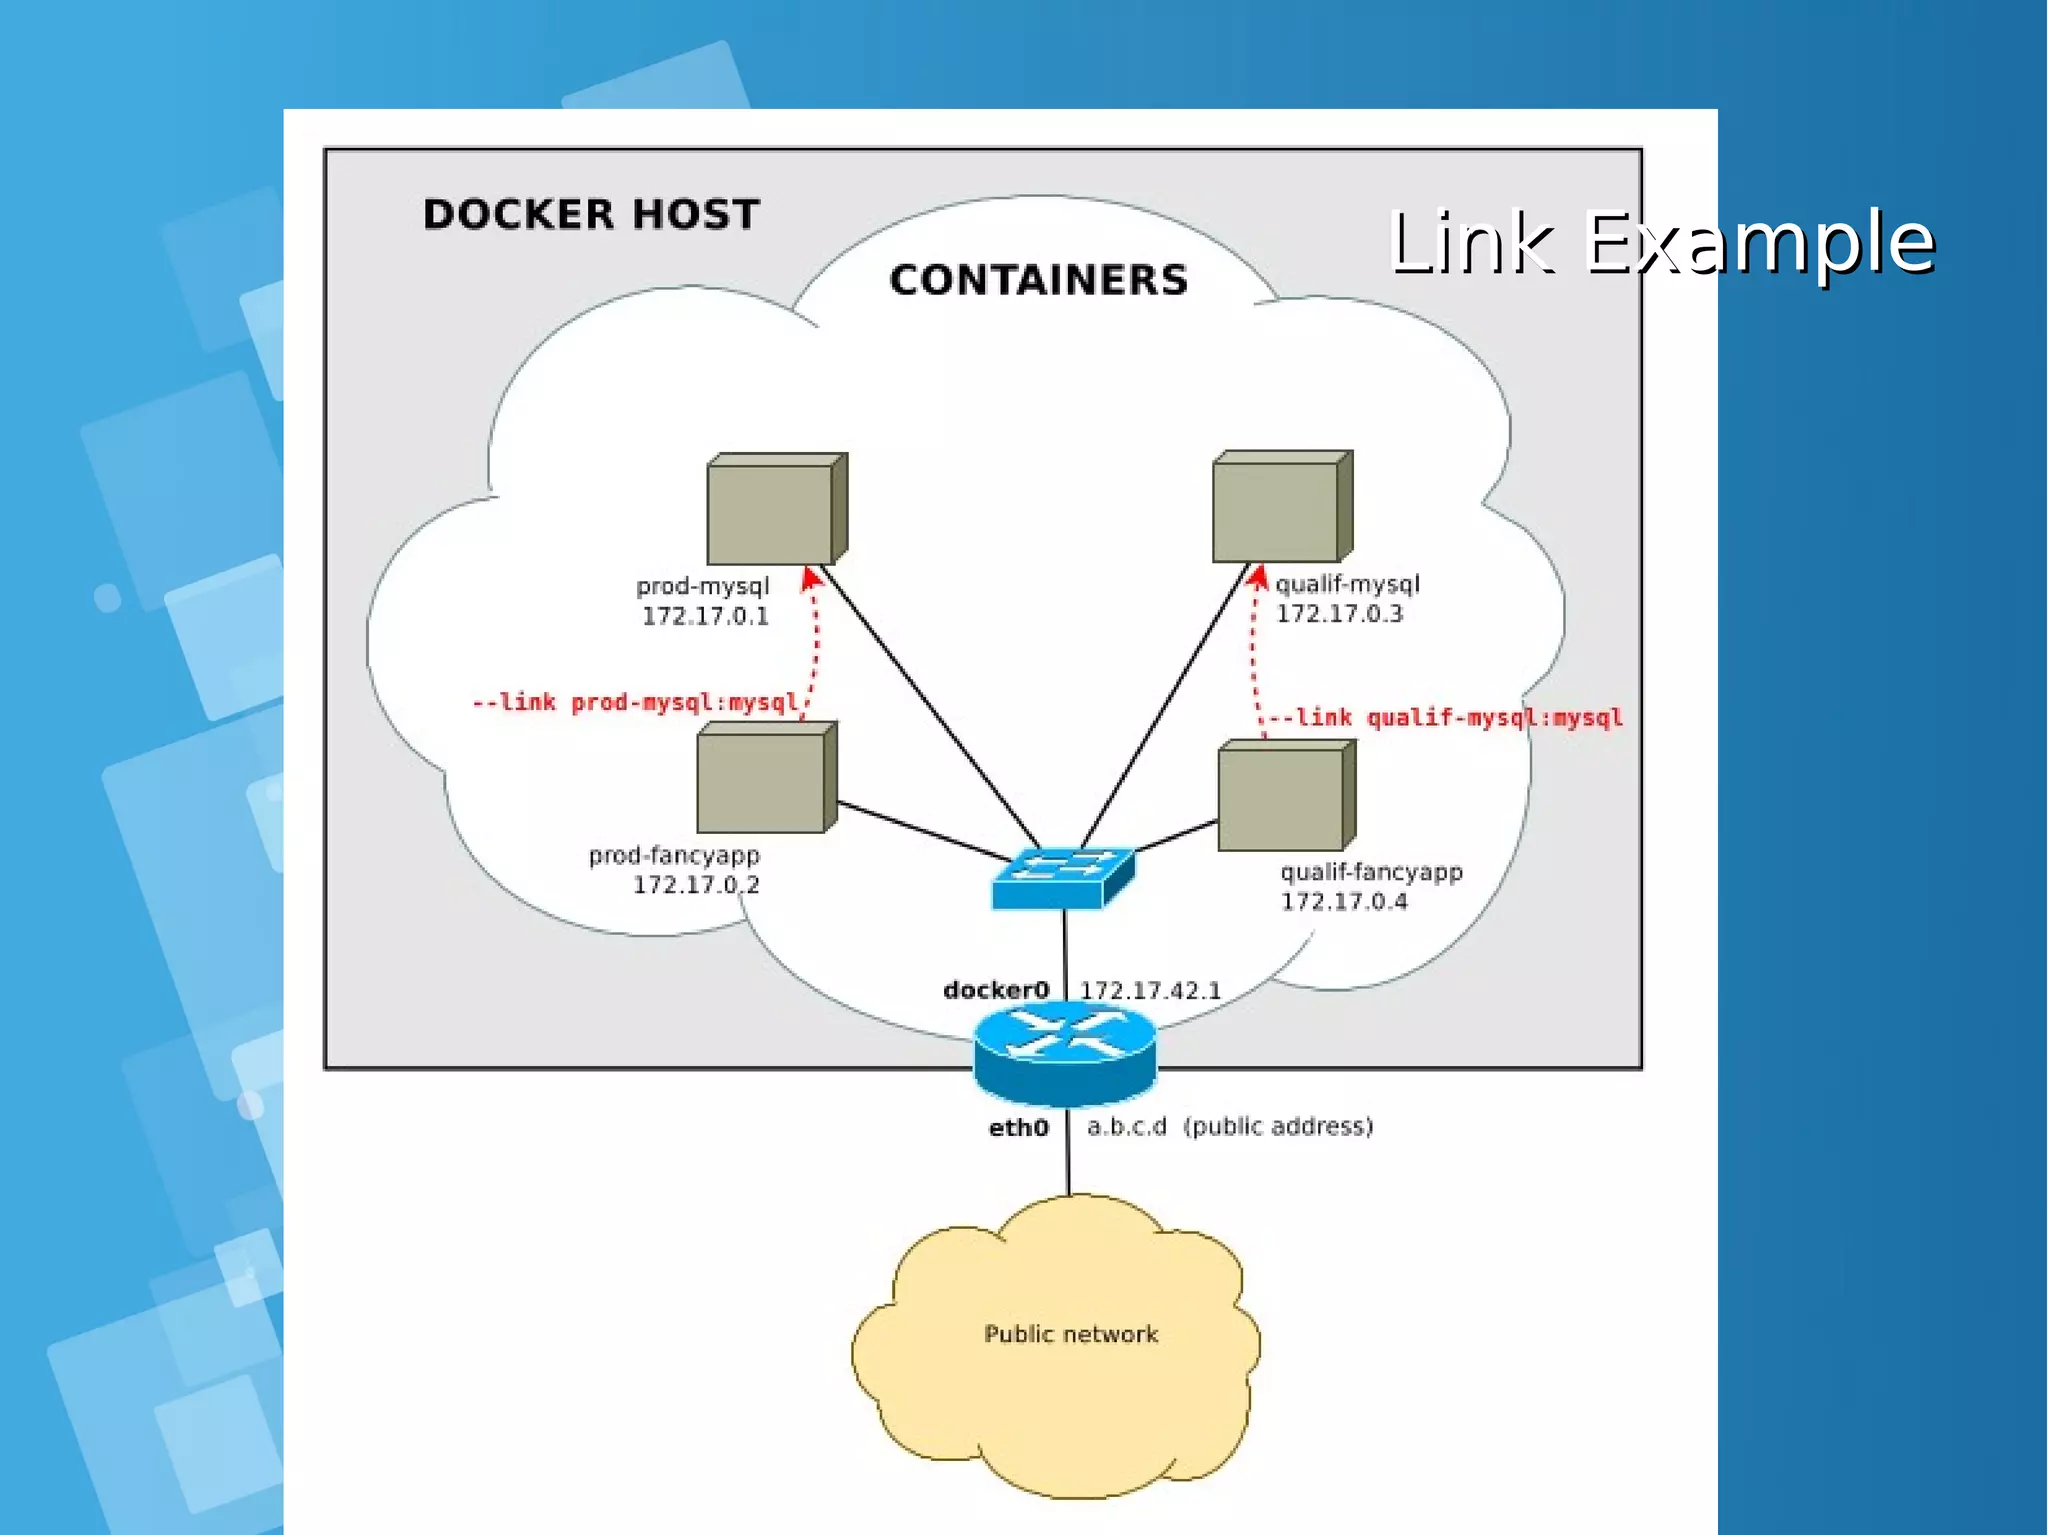
![docker run-inter-container links (legacy links )docker run-inter-container links (legacy links ) ● Containers cannot be assigned a static IP address (by design) → service discovery is a must Docker “links” are the most basic way to discover a service docker run --link ctr:alias . . . ● → container ctr will be known as alias inside the new container [root@docker-host ~]# docker run --name my-server debian sh -c 'hostname -i && sleep 500' & 172.17.0.4 [root@docker-host ~]# docker run --rm -t -i --link my-server:srv debian root@d752180421cc:/# ping srv PING srv (172.17.0.4): 56 data bytes 64 bytes from 172.17.0.4: icmp_seq=0 ttl=64 time=0.195 ms](https://image.slidesharecdn.com/journey-to-the-devops-automation-with-dockerkubernetesandopenshift-180325021200/75/Journey-to-the-devops-automation-with-docker-kubernetes-and-openshift-54-2048.jpg)
![docker run - Publish a TCP portdocker run - Publish a TCP port ● Containers are deployed in a private network, they are not ● reachable from the outside (unless a redirection is set up) docker run -p [ipaddr:]hostport:containerport docker run -t -p 9000:9000 debian ● → redirect incoming connections to the TCP port hostport of the host to the TCP port containerport of the container ● The listening socket binds to 0.0.0.0 (all interfaces) by default or to ipaddr if given](https://image.slidesharecdn.com/journey-to-the-devops-automation-with-dockerkubernetesandopenshift-180325021200/75/Journey-to-the-devops-automation-with-docker-kubernetes-and-openshift-57-2048.jpg)
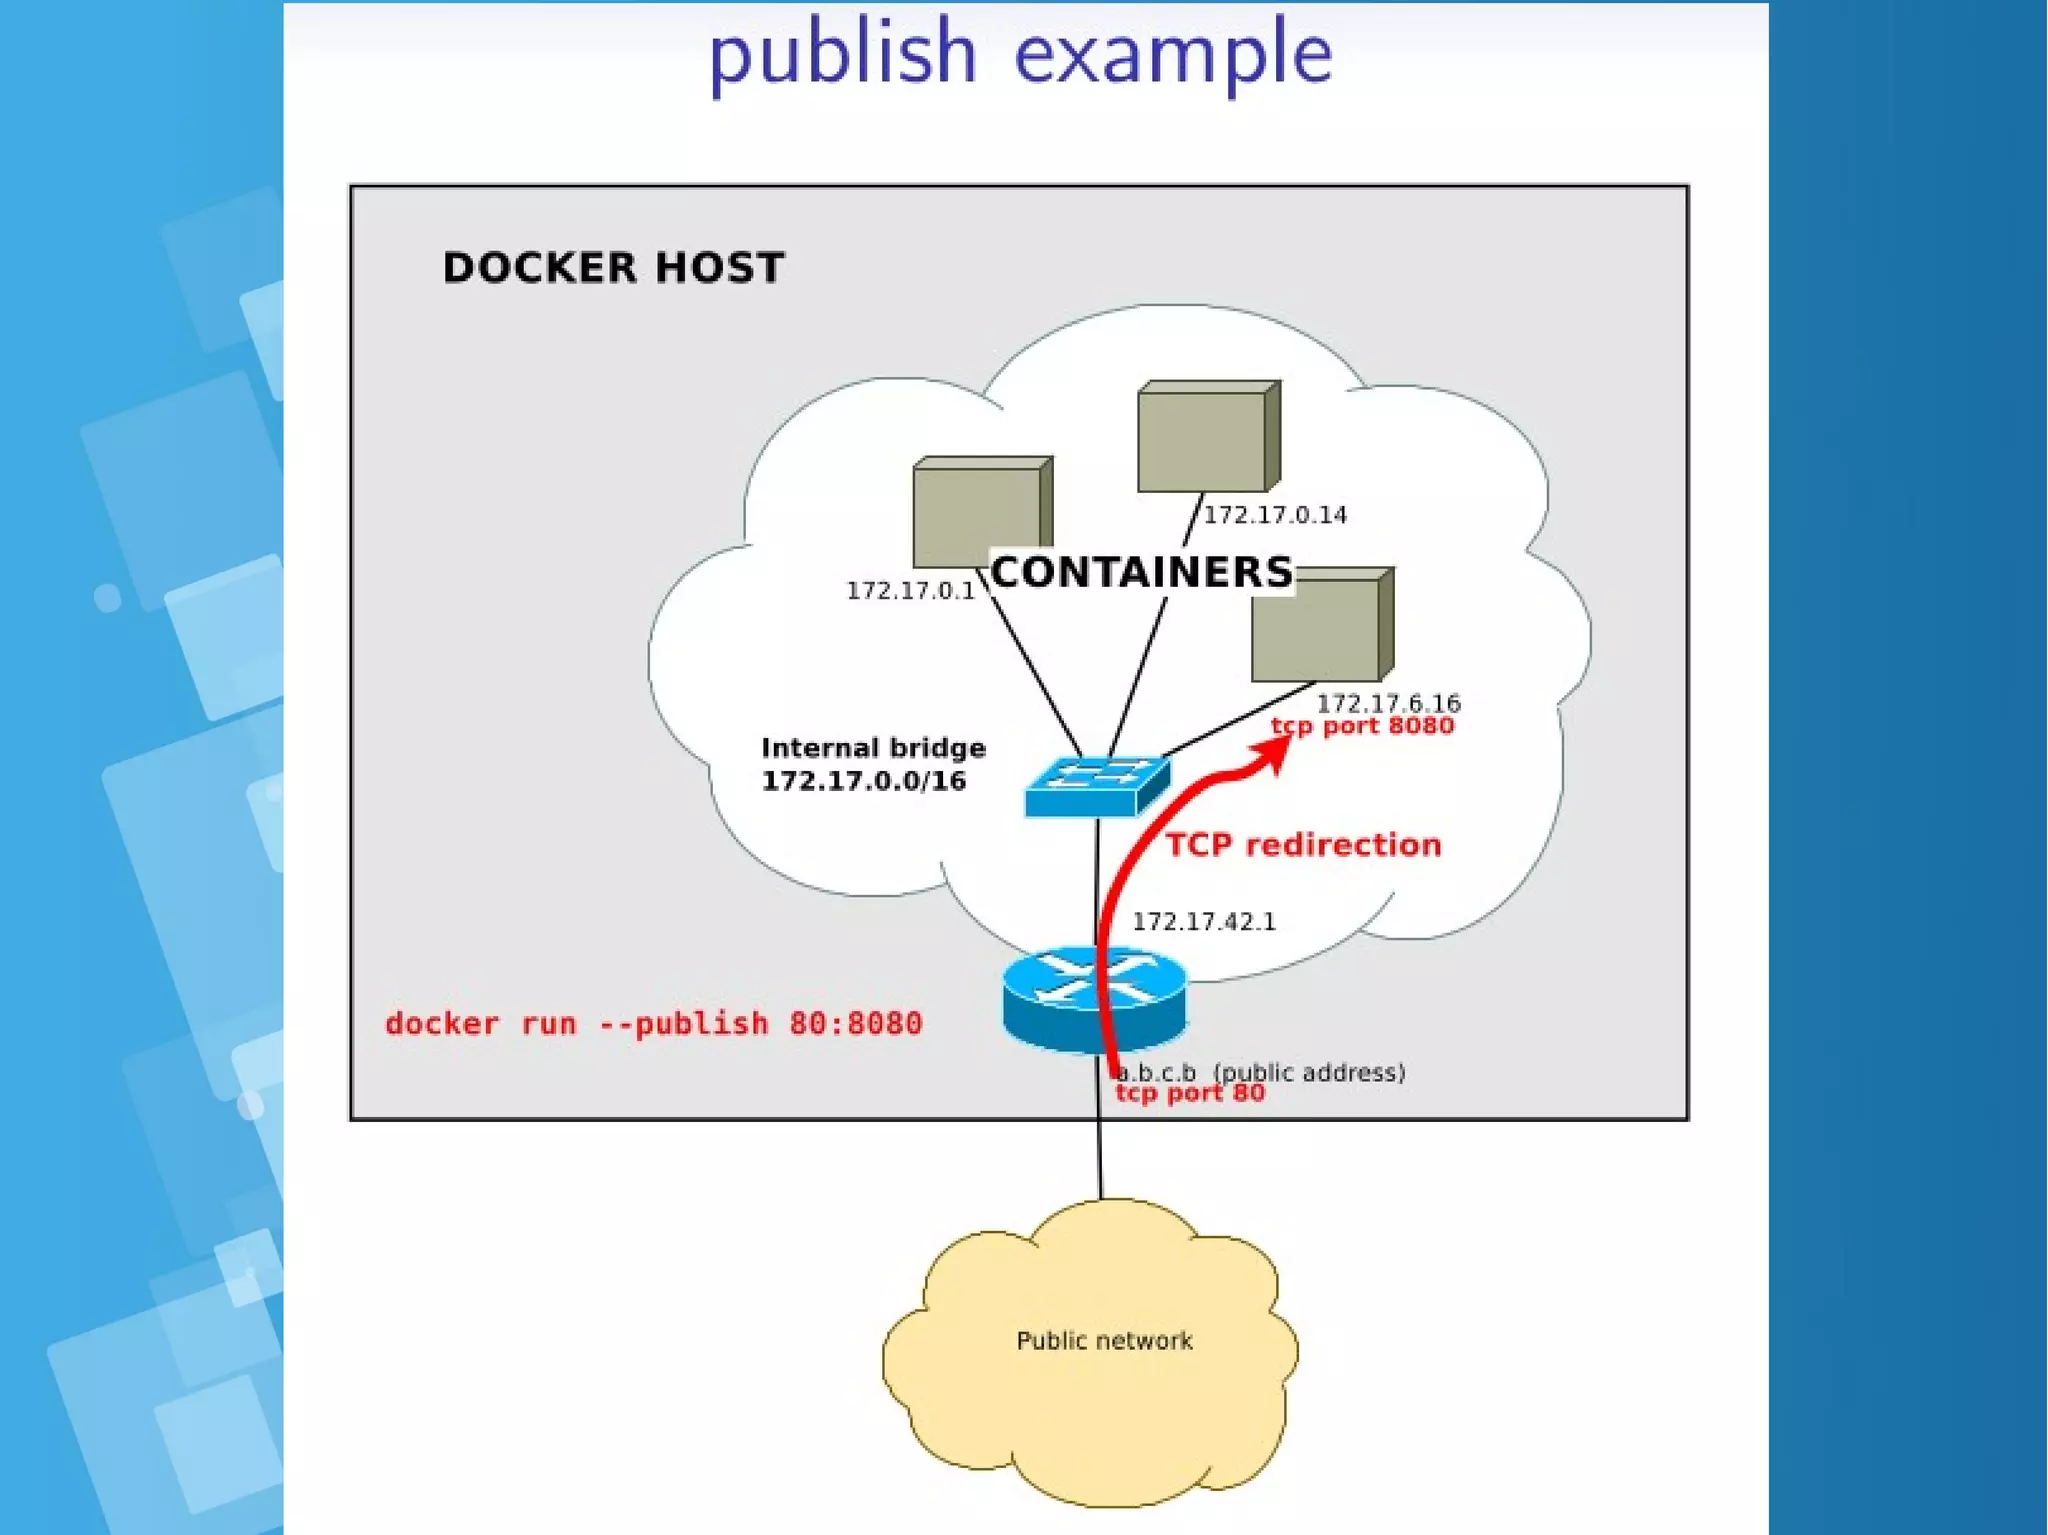
![Publish examplePublish example ● bind to all host addresses [root@docker-host ~]# docker run -d -p 80:80 nginx 52c9105e1520980d49ed00ecf5f0ca694d177d77ac9d003b9c0b840db9a70d62 [root@docker-host ~]# docker inspect 6174f6951f19 | grep IPAddress [root@docker-host ~]# wget -nv http://localhost/ 2016-01-12 18:32:52 URL:http://localhost/ [612/612] -> "index.html" [1] [root@docker-host ~]# wget -nv http://172.17.0.2/ 2016-01-12 18:33:14 URL:http://172.17.0.2/ [612/612] -> "index.html" [1] [root@docker-host ~]# docker run -d -p 127.0.0.1:80:80 nginx 4541b43313b51d50c4dc2722e741df6364c5ff50ab81b828456ca55c829e732c [root@docker-host ~]# wget -nv http://localhost/ 2016-01-12 18:37:10 URL:http://localhost/ [612/612] -> "index.html.1" [1] [root@docker-host ~]# wget http://172.17.0.2/ --2016-01-12 18:38:32-- http://172.17.0.2/ Connecting to 172.17.42.1:80... failed: Connection refused. ● bind to 127.0.0.1](https://image.slidesharecdn.com/journey-to-the-devops-automation-with-dockerkubernetesandopenshift-180325021200/75/Journey-to-the-devops-automation-with-docker-kubernetes-and-openshift-59-2048.jpg)
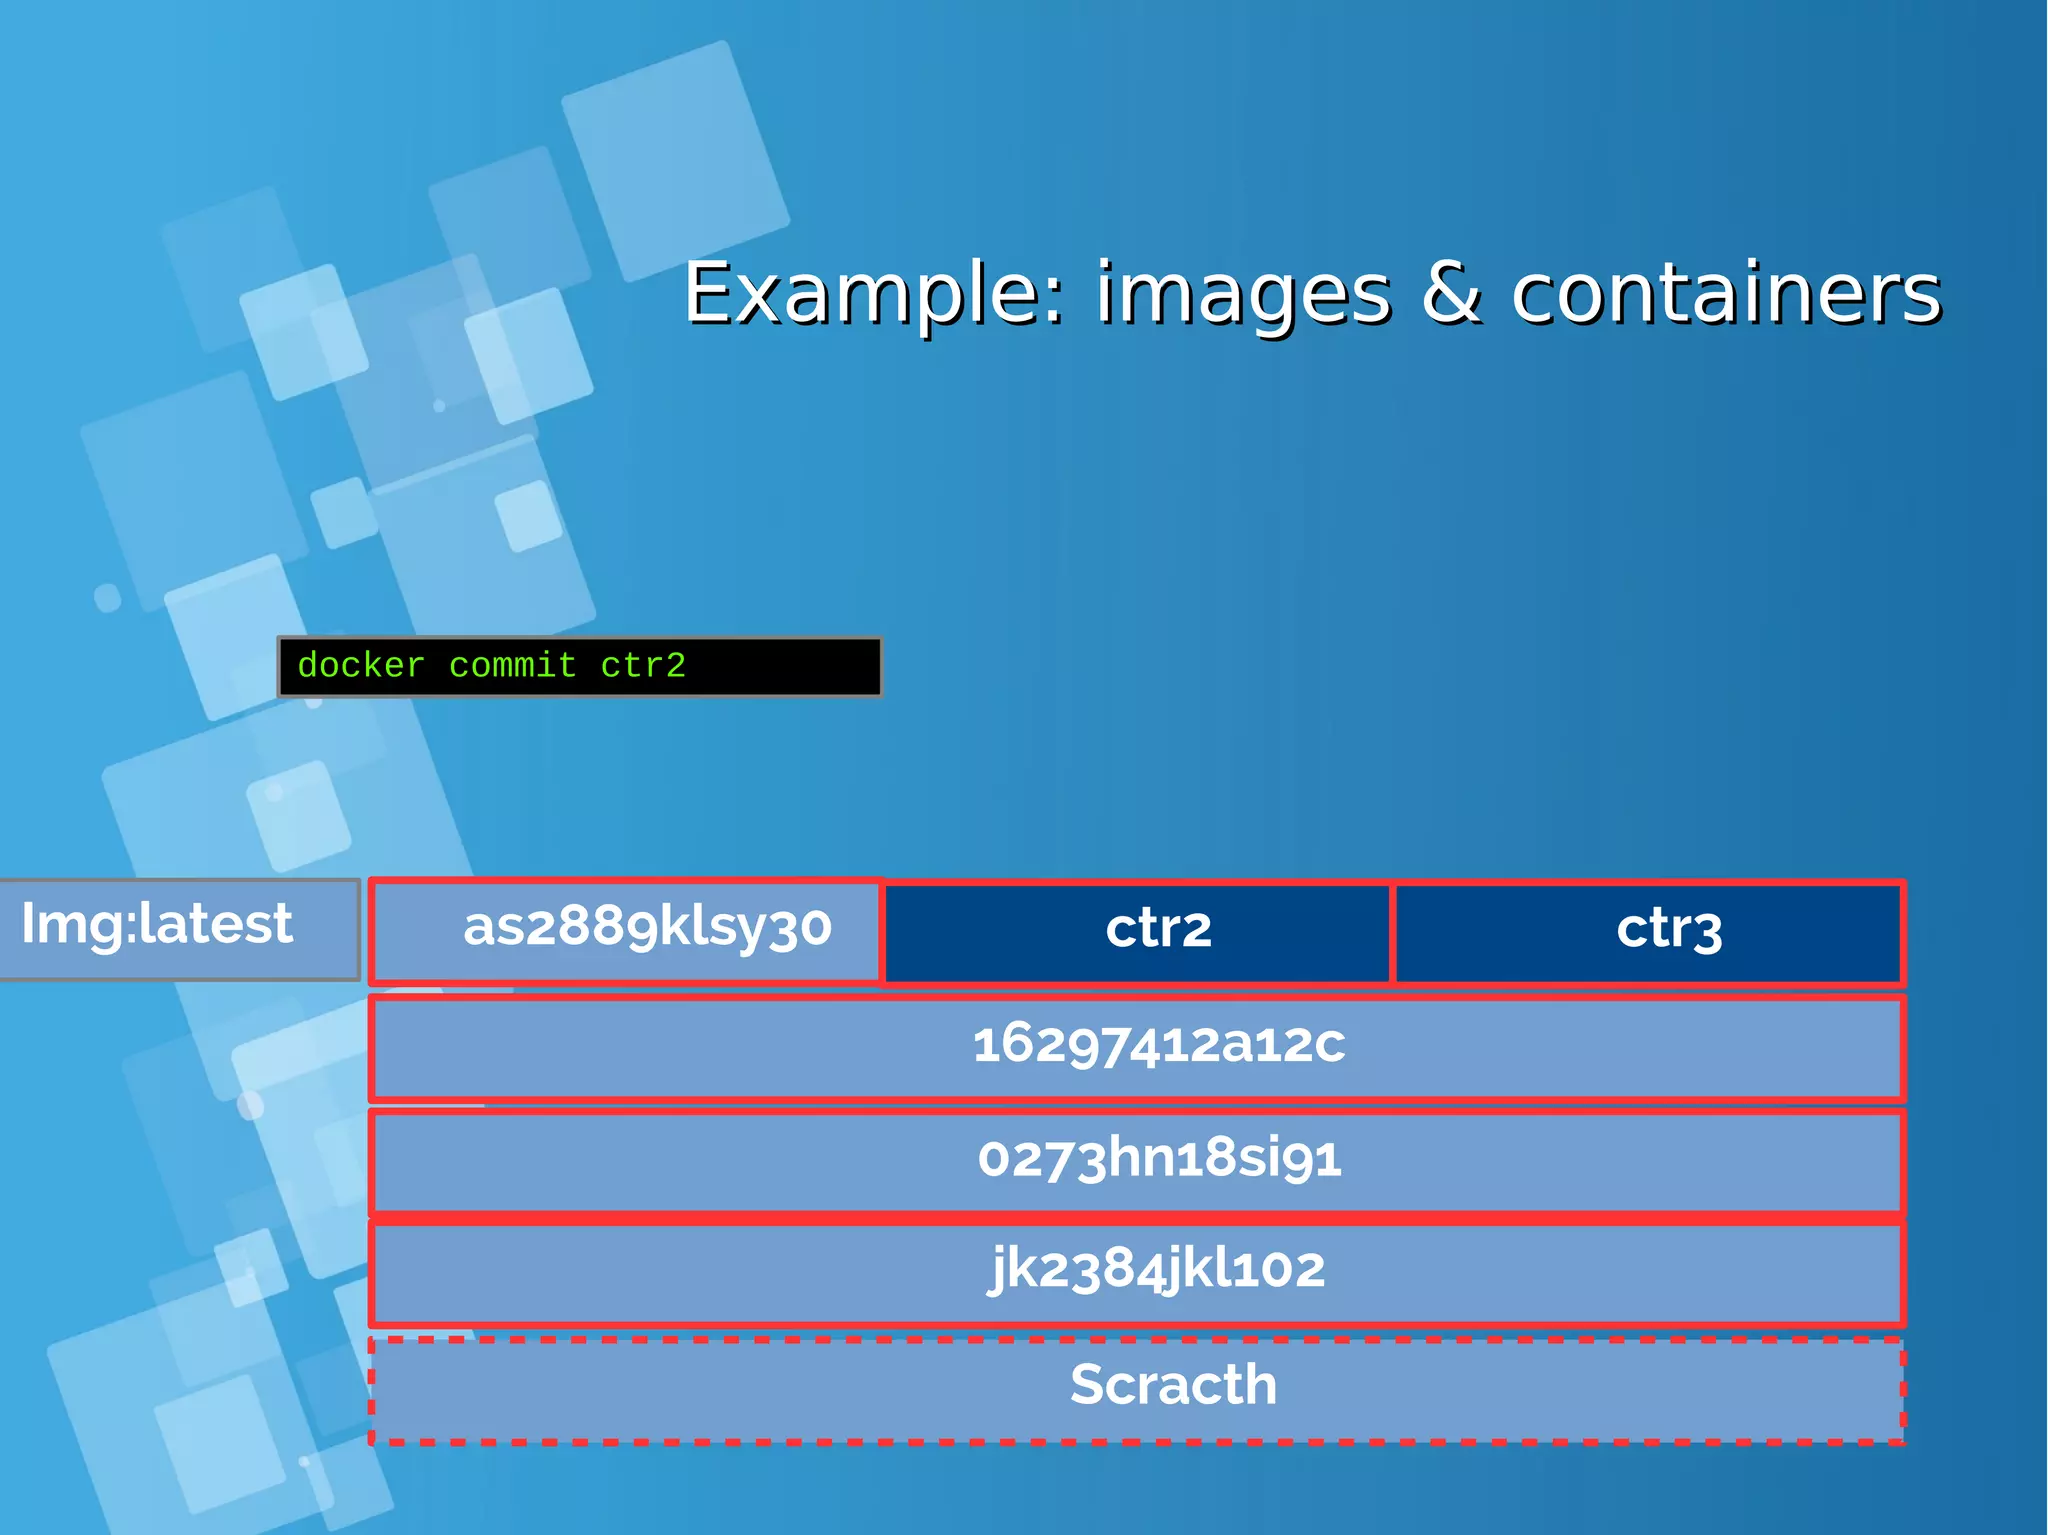
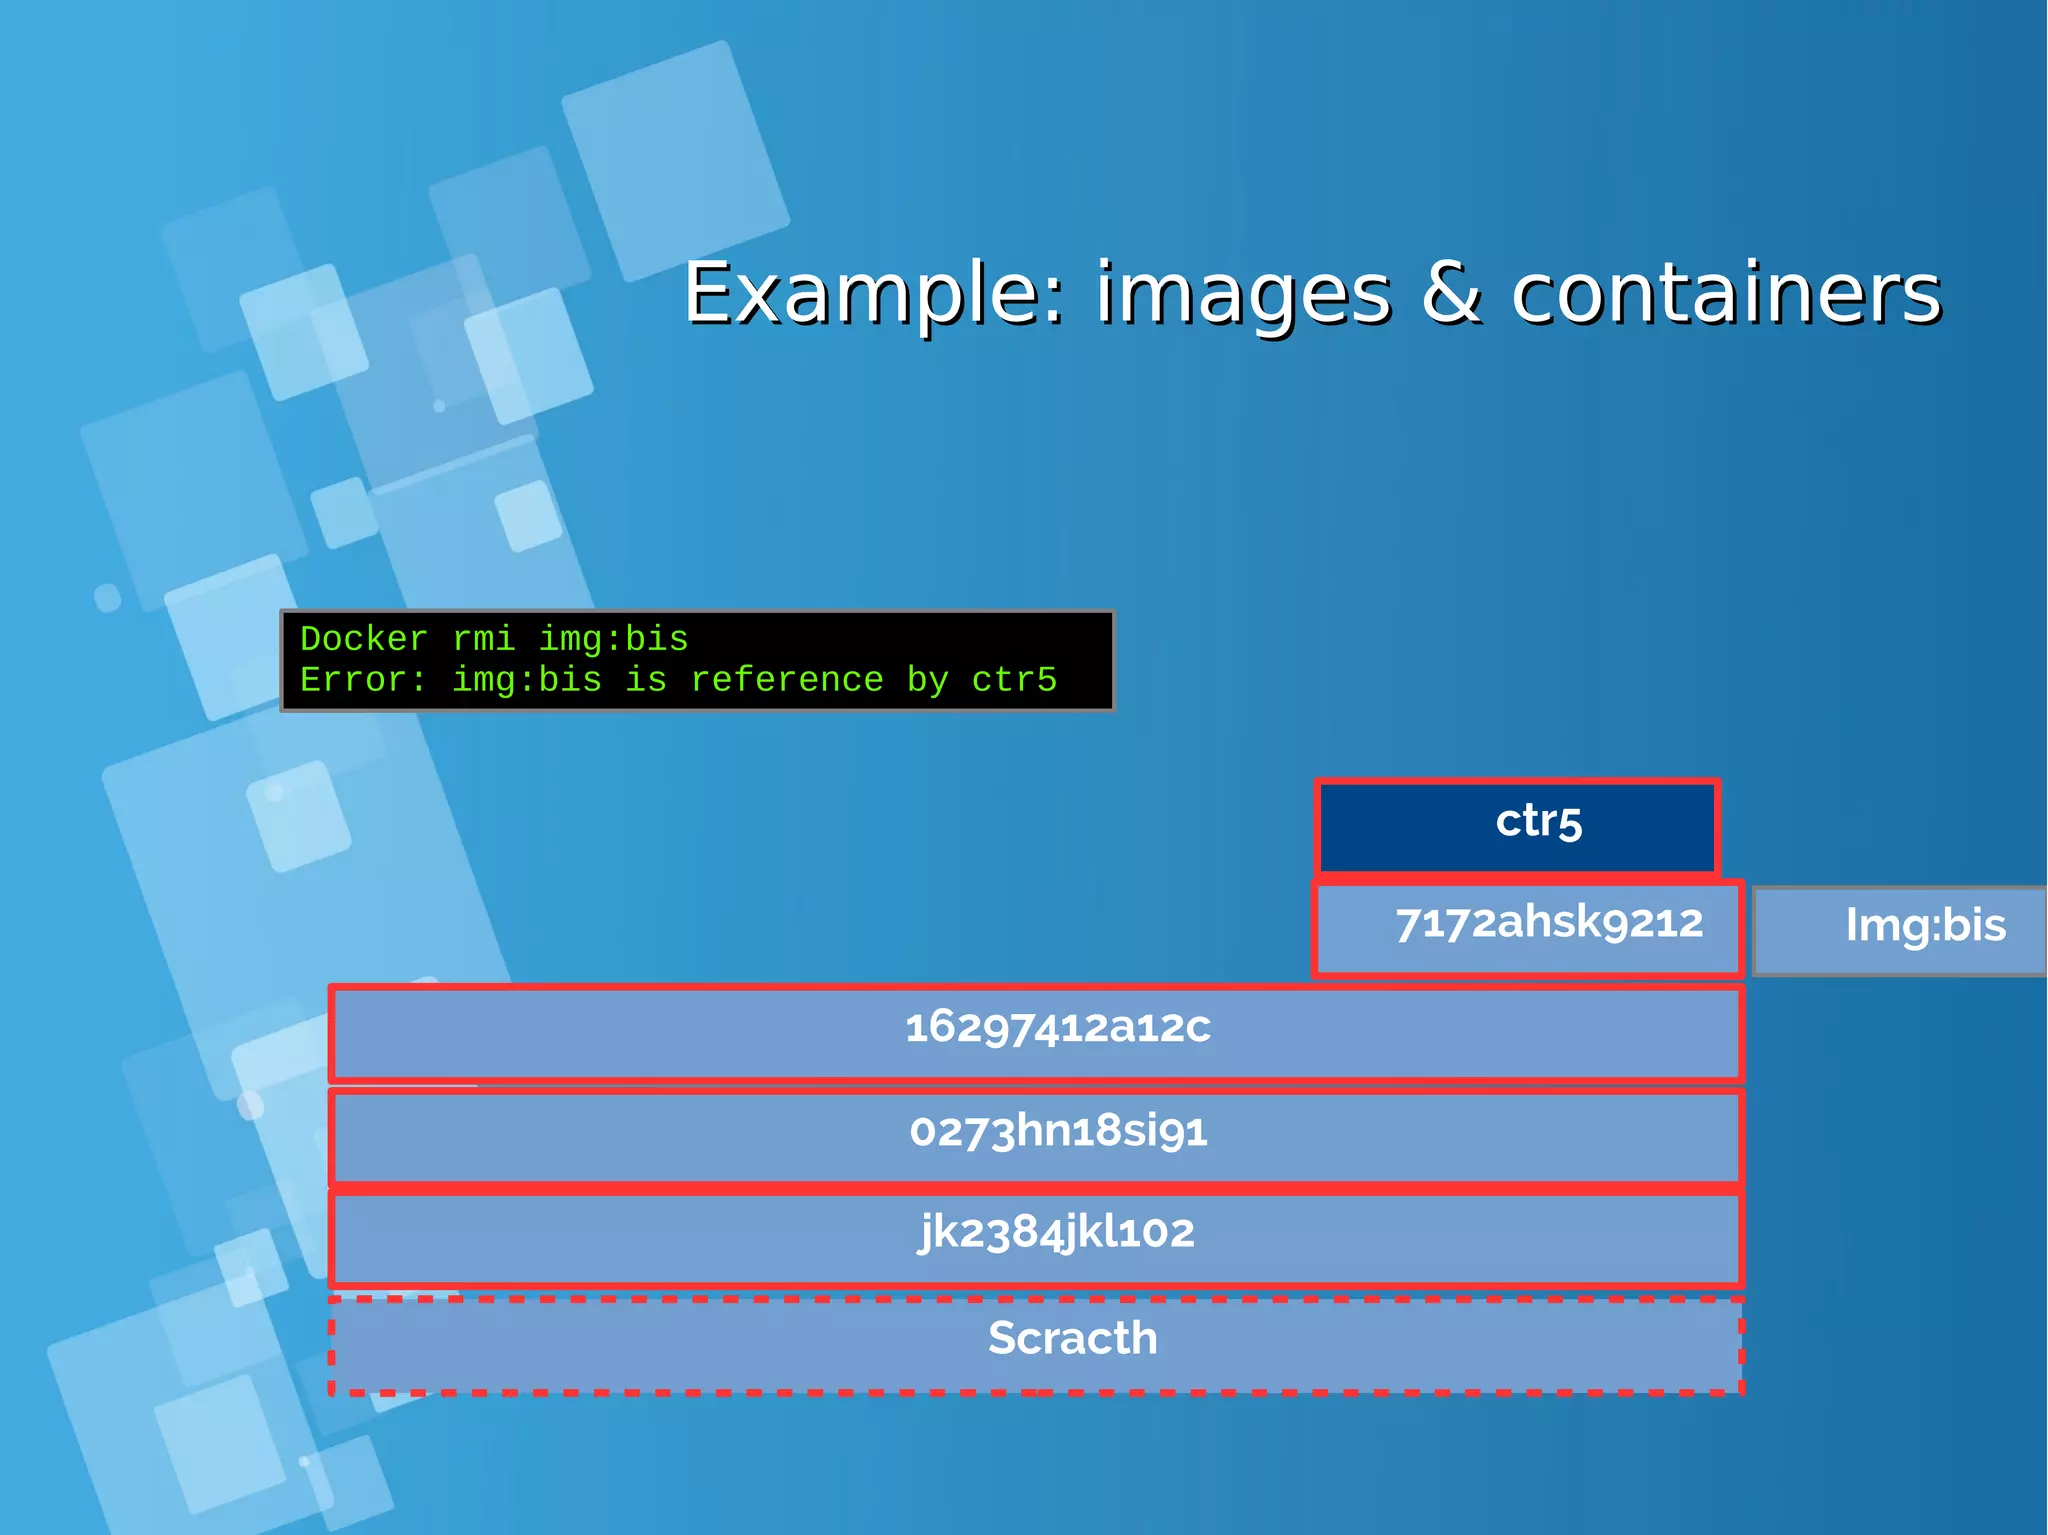
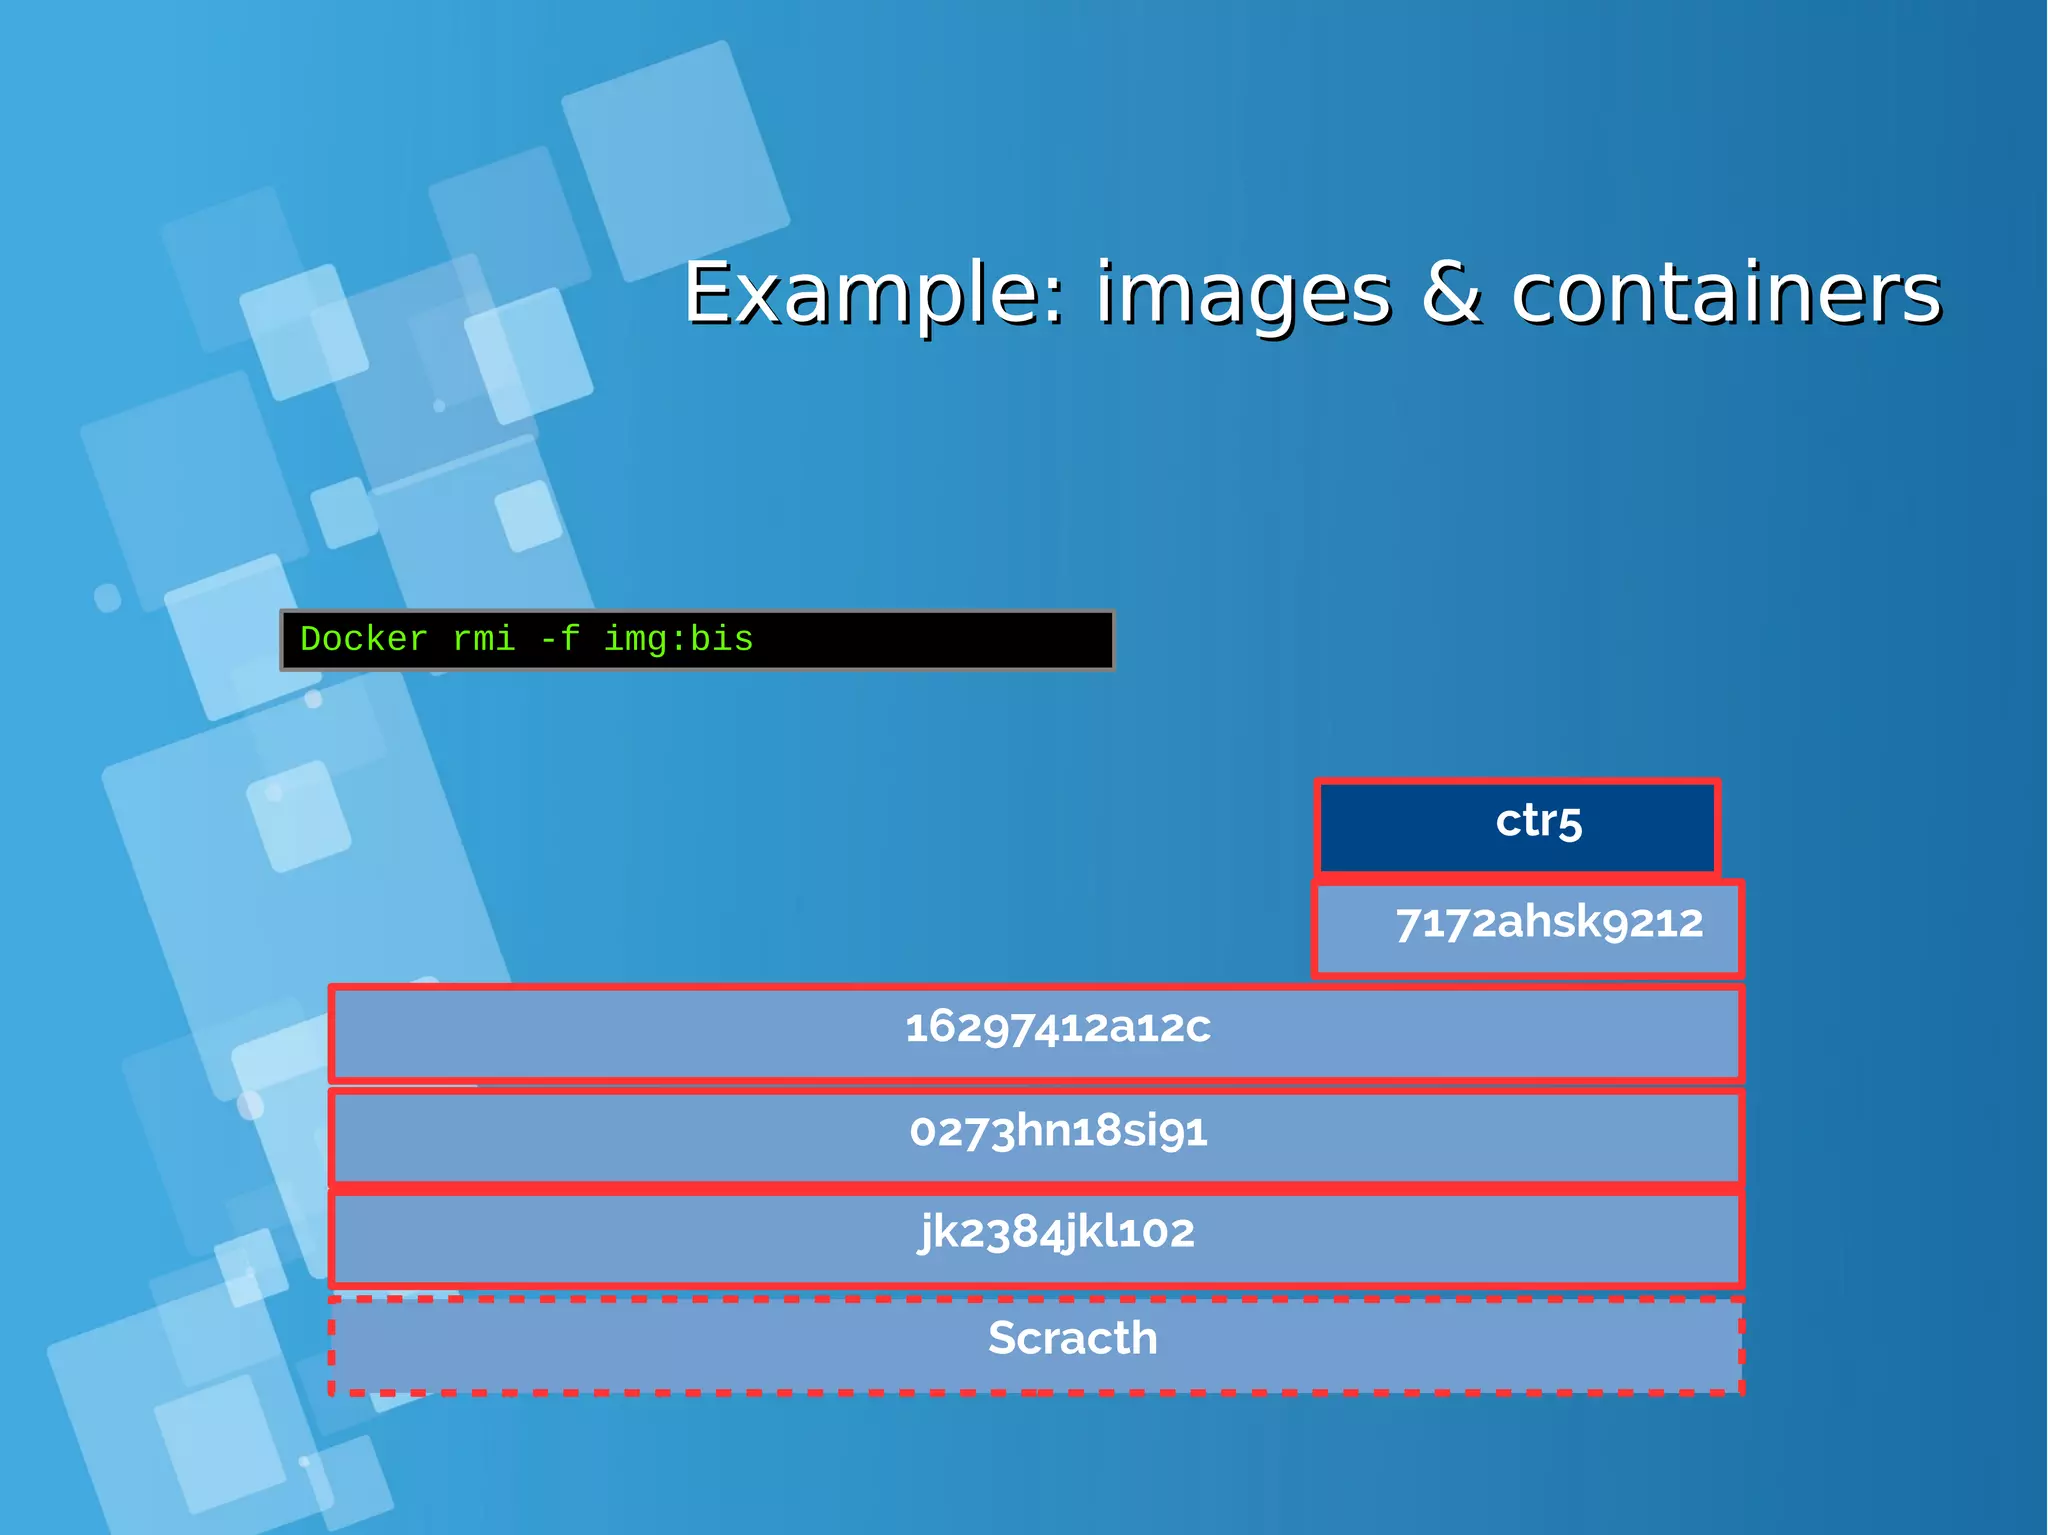
![Image management commandsImage management commands Command Description docker images docker history image docker inspect image. . . list all local images show the image history (list of ancestors) show low-level infos (in json format) docker tag image tag tag an image docker commit container image docker import url|- [tag] create an image (from a container) create an image (from a tarball) docker rmi image. . . delete images](https://image.slidesharecdn.com/journey-to-the-devops-automation-with-dockerkubernetesandopenshift-180325021200/75/Journey-to-the-devops-automation-with-docker-kubernetes-and-openshift-62-2048.jpg)


![Images tagsImages tags ● A docker tag is made of two parts: “REPOSITORY:TAG” ● The TAG part identifies the version of the image. If not provided, the default is “:latest” [root@docker-host ~]# docker images REPOSITORY TAG IMAGE ID CREATED SIZE debian latest a25c1eed1c6f Less than a second ago 123MB hello latest 52442a43a78b 13 minutes ago 123MB centos latest 3bee3060bfc8 46 hours ago 193MB ubuntu latest 7b9b13f7b9c0 5 days ago 118MB nginx latest 958a7ae9e569 7 days ago 109MB](https://image.slidesharecdn.com/journey-to-the-devops-automation-with-dockerkubernetesandopenshift-180325021200/75/Journey-to-the-devops-automation-with-docker-kubernetes-and-openshift-81-2048.jpg)
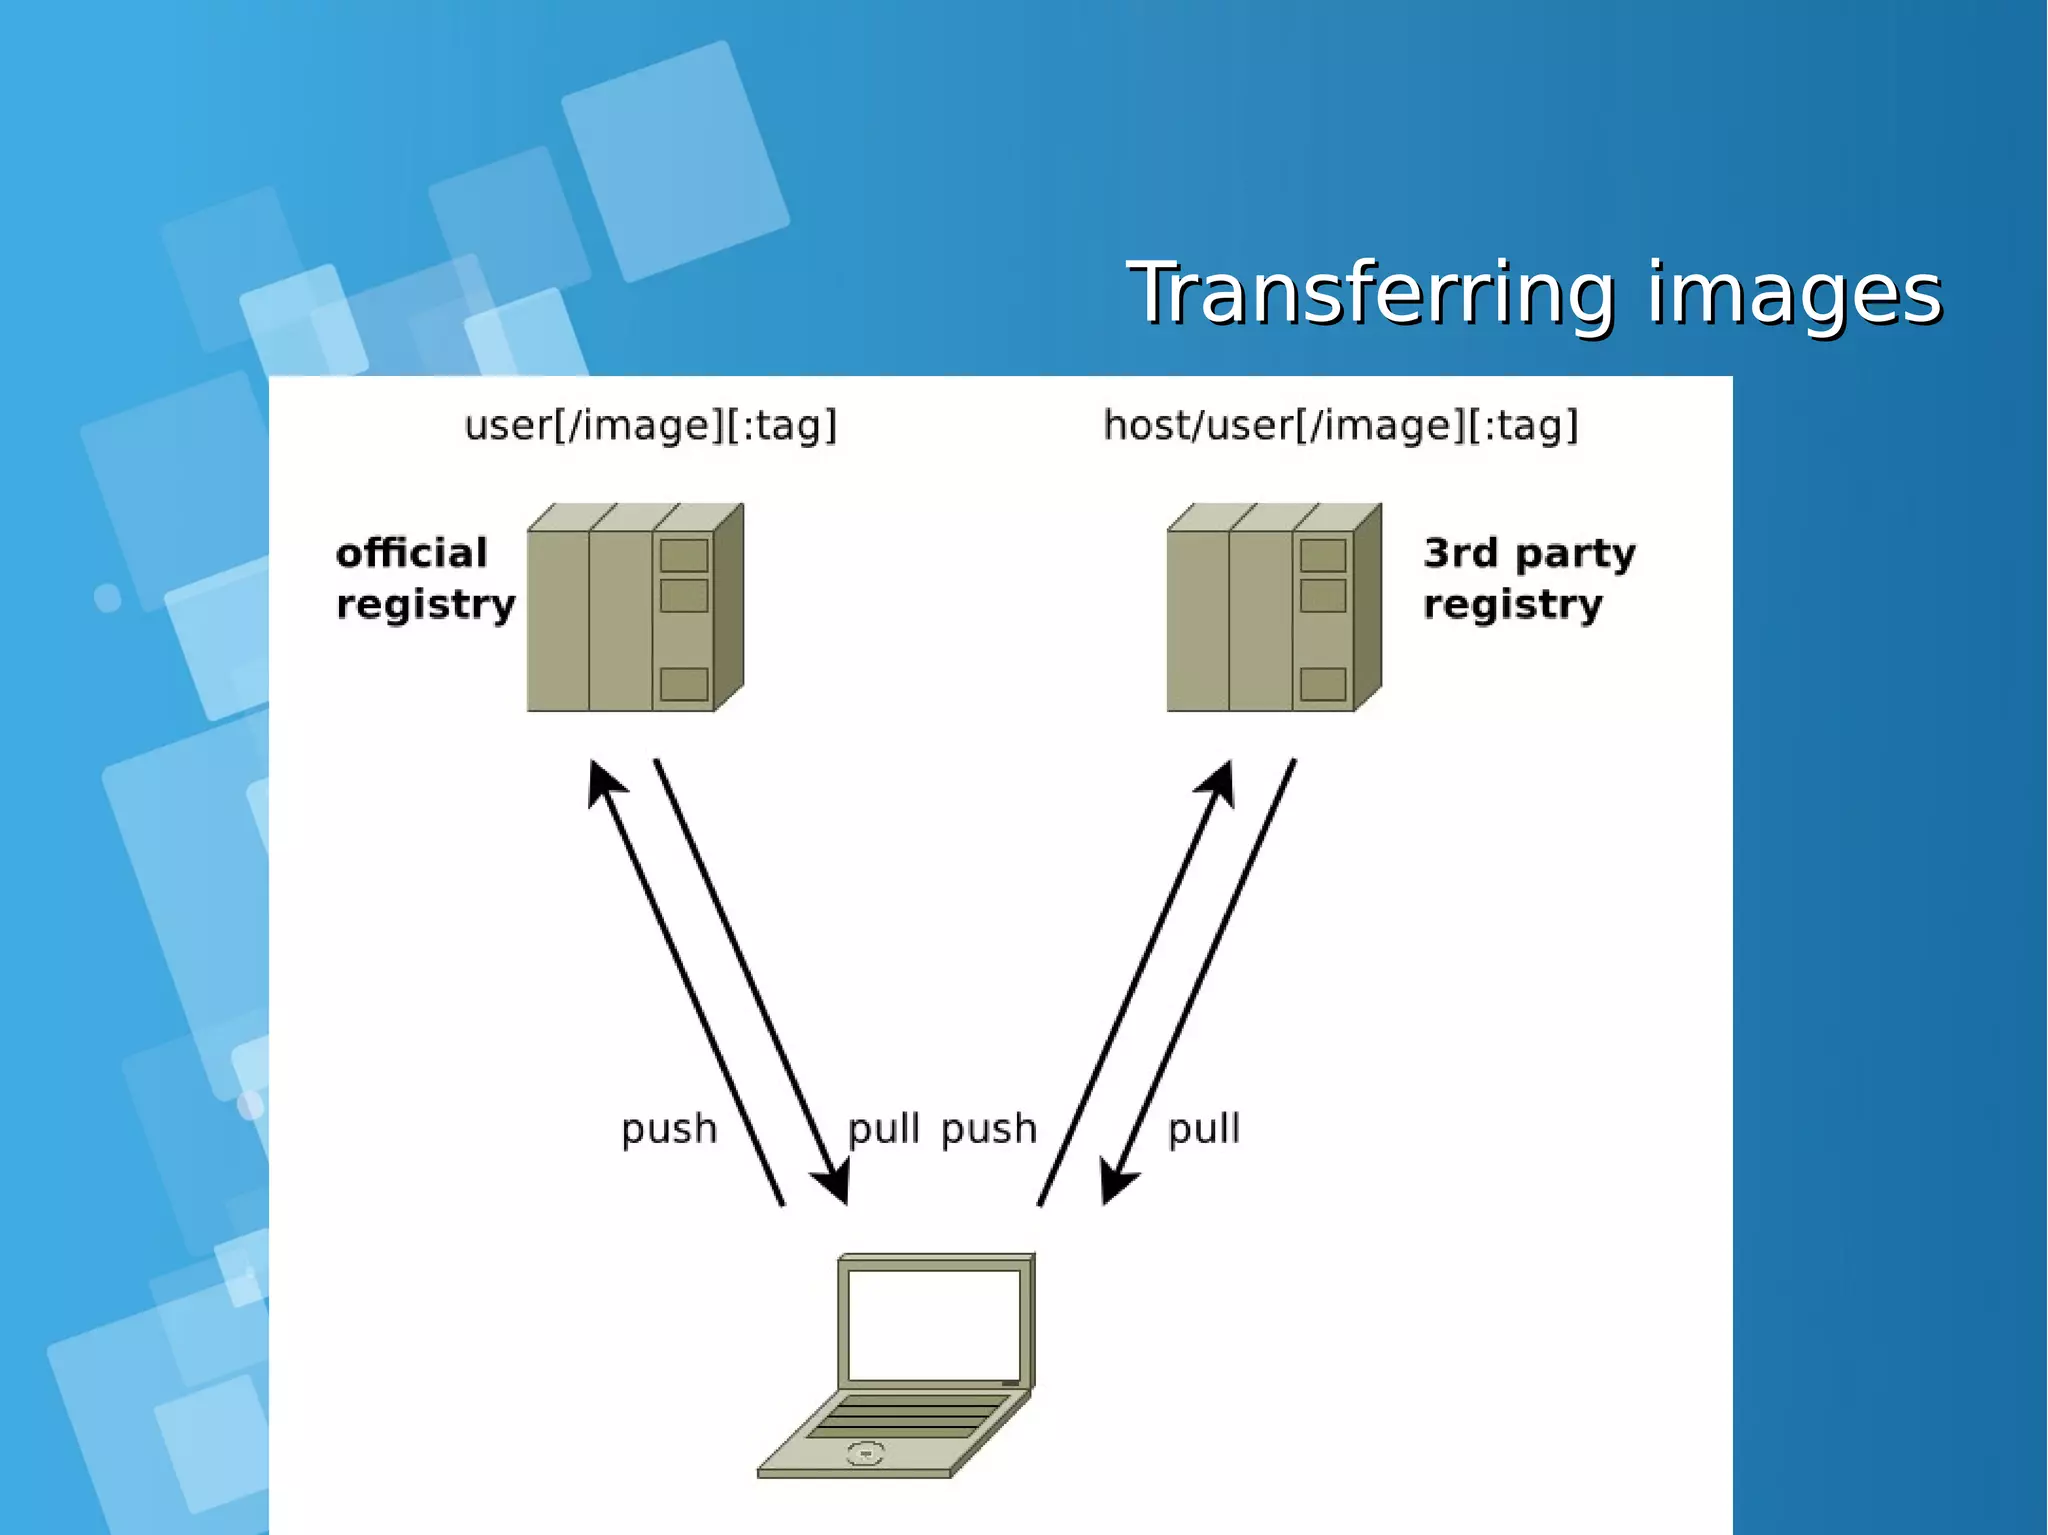
![Image transfer commandsImage transfer commands Using the registry API docker pull repo[:tag]. . . docker push repo[:tag]. . . docker search text pull an image/repo from a registry push an image/repo from a registry search an image on the official registry docker login . . . docker logout . . . login to a registry logout from a registry Manual transfer docker save repo[:tag]. . . docker load export an image/repo as a tarbal load images from a tarball docker-ssh . . . proposed script to transfer images between two daemons over ssh](https://image.slidesharecdn.com/journey-to-the-devops-automation-with-dockerkubernetesandopenshift-180325021200/75/Journey-to-the-devops-automation-with-docker-kubernetes-and-openshift-82-2048.jpg)
![Lab: Image creation from a containerLab: Image creation from a container Let’s start by running an interactive shell in a ubuntu container. [root@docker-host]# curl -fsSL https://get.docker.com/ | sh [root@docker-host]# systemctl start docker [root@docker-host]# systemctl status docker [root@docker-host]# systemctl enable docker [root@docker-host ~]# docker run -ti ubuntu bash Install the figlet package in this container root@880998ce4c0f:/# apt-get update -y ; apt-get install figlet root@880998ce4c0f:/# exit Get the ID of this container using the ls command (do not forget the -a option as the non running container are not returned by the ls command). [root@docker-host]# docker ps -a Run the following command, using the ID retreived, in order to commit the container and create an image out of it. [root@docker-host ~]# docker commit 880998ce4c0f sha256:1a769da2b98b04876844f96594a92bd708ca27ee5a8868d43c0aeb5985671161](https://image.slidesharecdn.com/journey-to-the-devops-automation-with-dockerkubernetesandopenshift-180325021200/75/Journey-to-the-devops-automation-with-docker-kubernetes-and-openshift-84-2048.jpg)
![Lab: Image creation from a containerLab: Image creation from a container Once it has been commited, we can see the newly created image in the list of available images. [root@docker-host ~]# docker image ls REPOSITORY TAG IMAGE ID CREATED SIZE <none> <none> 1a769da2b98b 59 seconds ago 158MB ubuntu latest 7b9b13f7b9c0 6 days ago 118MB From the previous command, get the ID of the newly created image and tag it so it’s named intra-tag. [root@docker-host ~]# docker image tag 1a769da2b98b tag-intra [root@docker-host ~]# docker image ls REPOSITORY TAG IMAGE ID CREATED SIZE tag-intra latest 1a769da2b98b 3 minutes ago 158MB ubuntu latest 7b9b13f7b9c0 6 days ago 118MB As figlet is present in our tag-intra image, the command ran returns the following output. [root@docker-host ~]# docker container run tag-intra figlet hello _ _ _ | |__ ___| | | ___ | '_ / _ | |/ _ | | | | __/ | | (_) | |_| |_|___|_|_|___/](https://image.slidesharecdn.com/journey-to-the-devops-automation-with-dockerkubernetesandopenshift-180325021200/75/Journey-to-the-devops-automation-with-docker-kubernetes-and-openshift-85-2048.jpg)
![Build an imageBuild an image ● build an image from the context located at path and optionally tag it as tag docker build [ -t tag ] path ● The command: 1. makes a tarball from the content 10 of path 2. uploads the tarball to the docker daemon which will: 2.1 execute the content of Dockerfile, committing an intermediate image after each command 2.2 (if requested) tag the final image as tag](https://image.slidesharecdn.com/journey-to-the-devops-automation-with-dockerkubernetesandopenshift-180325021200/75/Journey-to-the-devops-automation-with-docker-kubernetes-and-openshift-89-2048.jpg)
![Dockerfile Commands (Instructions)Dockerfile Commands (Instructions) ● ADD ● The ADD command gets two arguments: a source and a destination. It basically copies the files from the source on the host into the container's own filesystem at the set destination. If, however, the source is a URL (e.g. http://github.com/user/file/), then the contents of the URL are downloaded and placed at the destination. ● Example # Usage: ADD [source directory or URL] [destination directory] ADD /my_app_folder /my_app_folder](https://image.slidesharecdn.com/journey-to-the-devops-automation-with-dockerkubernetesandopenshift-180325021200/75/Journey-to-the-devops-automation-with-docker-kubernetes-and-openshift-91-2048.jpg)

![Dockerfile Commands (Instructions)Dockerfile Commands (Instructions) ● ENV ● The ENV command is used to set the environment variables (one or more). These variables consist of “key = value” pairs which can be accessed within the container by scripts and applications alike. This functionality of docker offers an enormous amount of flexibility for running programs. ● Example: # Usage: ENV key value ENV SERVER_WORKS 4 ● EXPOSE ● The EXPOSE command is used to associate a specified port to enable networking between the running process inside the container and the outside world (i.e. the host). ● Example: # Usage: EXPOSE [port] EXPOSE 8080](https://image.slidesharecdn.com/journey-to-the-devops-automation-with-dockerkubernetesandopenshift-180325021200/75/Journey-to-the-devops-automation-with-docker-kubernetes-and-openshift-94-2048.jpg)
![Dockerfile Commands (Instructions)Dockerfile Commands (Instructions) ● FROM ● FROM directive is probably the most crucial amongst all others for Dockerfiles. It defines the base image to use to start the build process. It can be any image, including the ones you have created previously. If a FROM image is not found on the host, docker will try to find it (and download) from the docker image index. It needs to be the first command declared inside a Dockerfile. ● Example: # Usage: FROM [image name] FROM ubuntu](https://image.slidesharecdn.com/journey-to-the-devops-automation-with-dockerkubernetesandopenshift-180325021200/75/Journey-to-the-devops-automation-with-docker-kubernetes-and-openshift-95-2048.jpg)
![Dockerfile Commands (Instructions)Dockerfile Commands (Instructions) ● MAINTAINER ● One of the commands that can be set anywhere in the file - although it would be better if it was declared on top - is MAINTAINER. This non- executing command declares the author, hence setting the author field of the images. It should come nonetheless after FROM. ● Example: # Usage: MAINTAINER [name] MAINTAINER authors_name ● RUN ● The RUN command is the central executing directive for Dockerfiles. It takes a command as its argument and runs it to form the image. Unlike CMD, it actually is used to build the image (forming another layer on top of the previous one which is committed). ● Example # Usage: RUN [command] RUN aptitude install -y riak](https://image.slidesharecdn.com/journey-to-the-devops-automation-with-dockerkubernetesandopenshift-180325021200/75/Journey-to-the-devops-automation-with-docker-kubernetes-and-openshift-96-2048.jpg)
![Dockerfile Commands (Instructions)Dockerfile Commands (Instructions) ● USER ● The USER directive is used to set the UID (or username) which is to run the container based on the image being built. ● Example: # Usage: USER [UID] USER 751 ● VOLUME ● The VOLUME command is used to enable access from your container to a directory on the host machine (i.e. mounting it). ● Example: # Usage: VOLUME ["/dir_1", "/dir_2" ..] VOLUME ["/my_files"] ● WORKDIR ● The WORKDIR directive is used to set where the command defined with CMD is to be executed. ● Example: # Usage: WORKDIR /path WORKDIR ~/](https://image.slidesharecdn.com/journey-to-the-devops-automation-with-dockerkubernetesandopenshift-180325021200/75/Journey-to-the-devops-automation-with-docker-kubernetes-and-openshift-97-2048.jpg)
![Dockerfile exampleDockerfile example ● How to Use Dockerfiles ● Using the Dockerfiles is as simple as having the docker daemon run one. The output after executing the script will be the ID of the new docker image. ● Usage: # Build an image using the Dockerfile at current location # Example: sudo docker build -t [name] . [root@docker-host ~]# docker build -t nginx_yusuf .](https://image.slidesharecdn.com/journey-to-the-devops-automation-with-dockerkubernetesandopenshift-180325021200/75/Journey-to-the-devops-automation-with-docker-kubernetes-and-openshift-99-2048.jpg)
![Lab: Dockerfile exampleLab: Dockerfile example ● build an image from the context located at path and optionally tag it as tag ############################################################ # Dockerfile to build nginx container images # Based on debian latest version ############################################################ # base image: last debian release FROM debian:latest # name of the maintainer of this image MAINTAINER yusuf.hadiwinata@gmail.com # install the latest upgrades RUN apt-get update && apt-get -y dist-upgrade && echo yusuf-test > /tmp/test # install nginx RUN apt-get -y install nginx # set the default container command # −> run nginx in the foreground CMD ["nginx", "-g", "daemon off;"] # Tell the docker engine that there will be somenthing listening on the tcp port 80 EXPOSE 80](https://image.slidesharecdn.com/journey-to-the-devops-automation-with-dockerkubernetesandopenshift-180325021200/75/Journey-to-the-devops-automation-with-docker-kubernetes-and-openshift-100-2048.jpg)
![Lab: Build & Run Dockerfile exampleLab: Build & Run Dockerfile example [root@docker-host nginx_yusuf]# docker build -t nginx_yusuf . Sending build context to Docker daemon 2.56kB Step 1/6 : FROM debian:latest ---> a25c1eed1c6f Step 2/6 : MAINTAINER yusuf.hadiwinata@gmail.com ---> Running in 94409ebe59ac ---> eaefc54975b7 Removing intermediate container 94409ebe59ac Step 3/6 : RUN apt-get update && apt-get -y dist-upgrade ---> Running in 425285dbf037 Get:1 http://security.debian.org jessie/updates InRelease [63.1 kB] Ign http://deb.debian.org jessie InRelease Get:2 http://deb.debian.org jessie-updates InRelease [145 kB] Get:3 http://deb.debian.org jessie Release.gpg [2373 B] Get:4 http://deb.debian.org jessie-updates/main amd64 Packages [17.6 kB] Get:5 http://security.debian.org jessie/updates/main amd64 Packages [521 kB] Get:6 http://deb.debian.org jessie Release [148 kB] Get:7 http://deb.debian.org jessie/main amd64 Packages [9065 kB] ------------------- DIPOTONG ------------------------- Processing triggers for sgml-base (1.26+nmu4) ... ---> 88795938427f Removing intermediate container 431ae6bc8e0a Step 5/6 : CMD nginx -g daemon off; ---> Running in 374ff461f187 ---> 08e1433ccd68 Removing intermediate container 374ff461f187 Step 6/6 : EXPOSE 80 ---> Running in bac435c454a8 ---> fa8de9e81136 Removing intermediate container bac435c454a8 Successfully built fa8de9e81136 Successfully tagged nginx_yusuf:latest](https://image.slidesharecdn.com/journey-to-the-devops-automation-with-dockerkubernetesandopenshift-180325021200/75/Journey-to-the-devops-automation-with-docker-kubernetes-and-openshift-101-2048.jpg)
![Lab: Dockerfile exampleLab: Dockerfile example ● Using the image we have build, we can now proceed to the final step: creating a container running a nginx instance inside, using a name of our choice (if desired with -name [name]). ● Note: If a name is not set, we will need to deal with complex, alphanumeric IDs which can be obtained by listing all the containers using sudo docker ps -l. [root@docker-host nginx_yusuf]# docker run --name my_first_nginx_instance -i -t nginx_yusuf bash root@4b90e5d6dda8:/# root@4b90e5d6dda8:/# root@4b90e5d6dda8:/# cat /tmp/test yusuf-test](https://image.slidesharecdn.com/journey-to-the-devops-automation-with-dockerkubernetesandopenshift-180325021200/75/Journey-to-the-devops-automation-with-docker-kubernetes-and-openshift-102-2048.jpg)
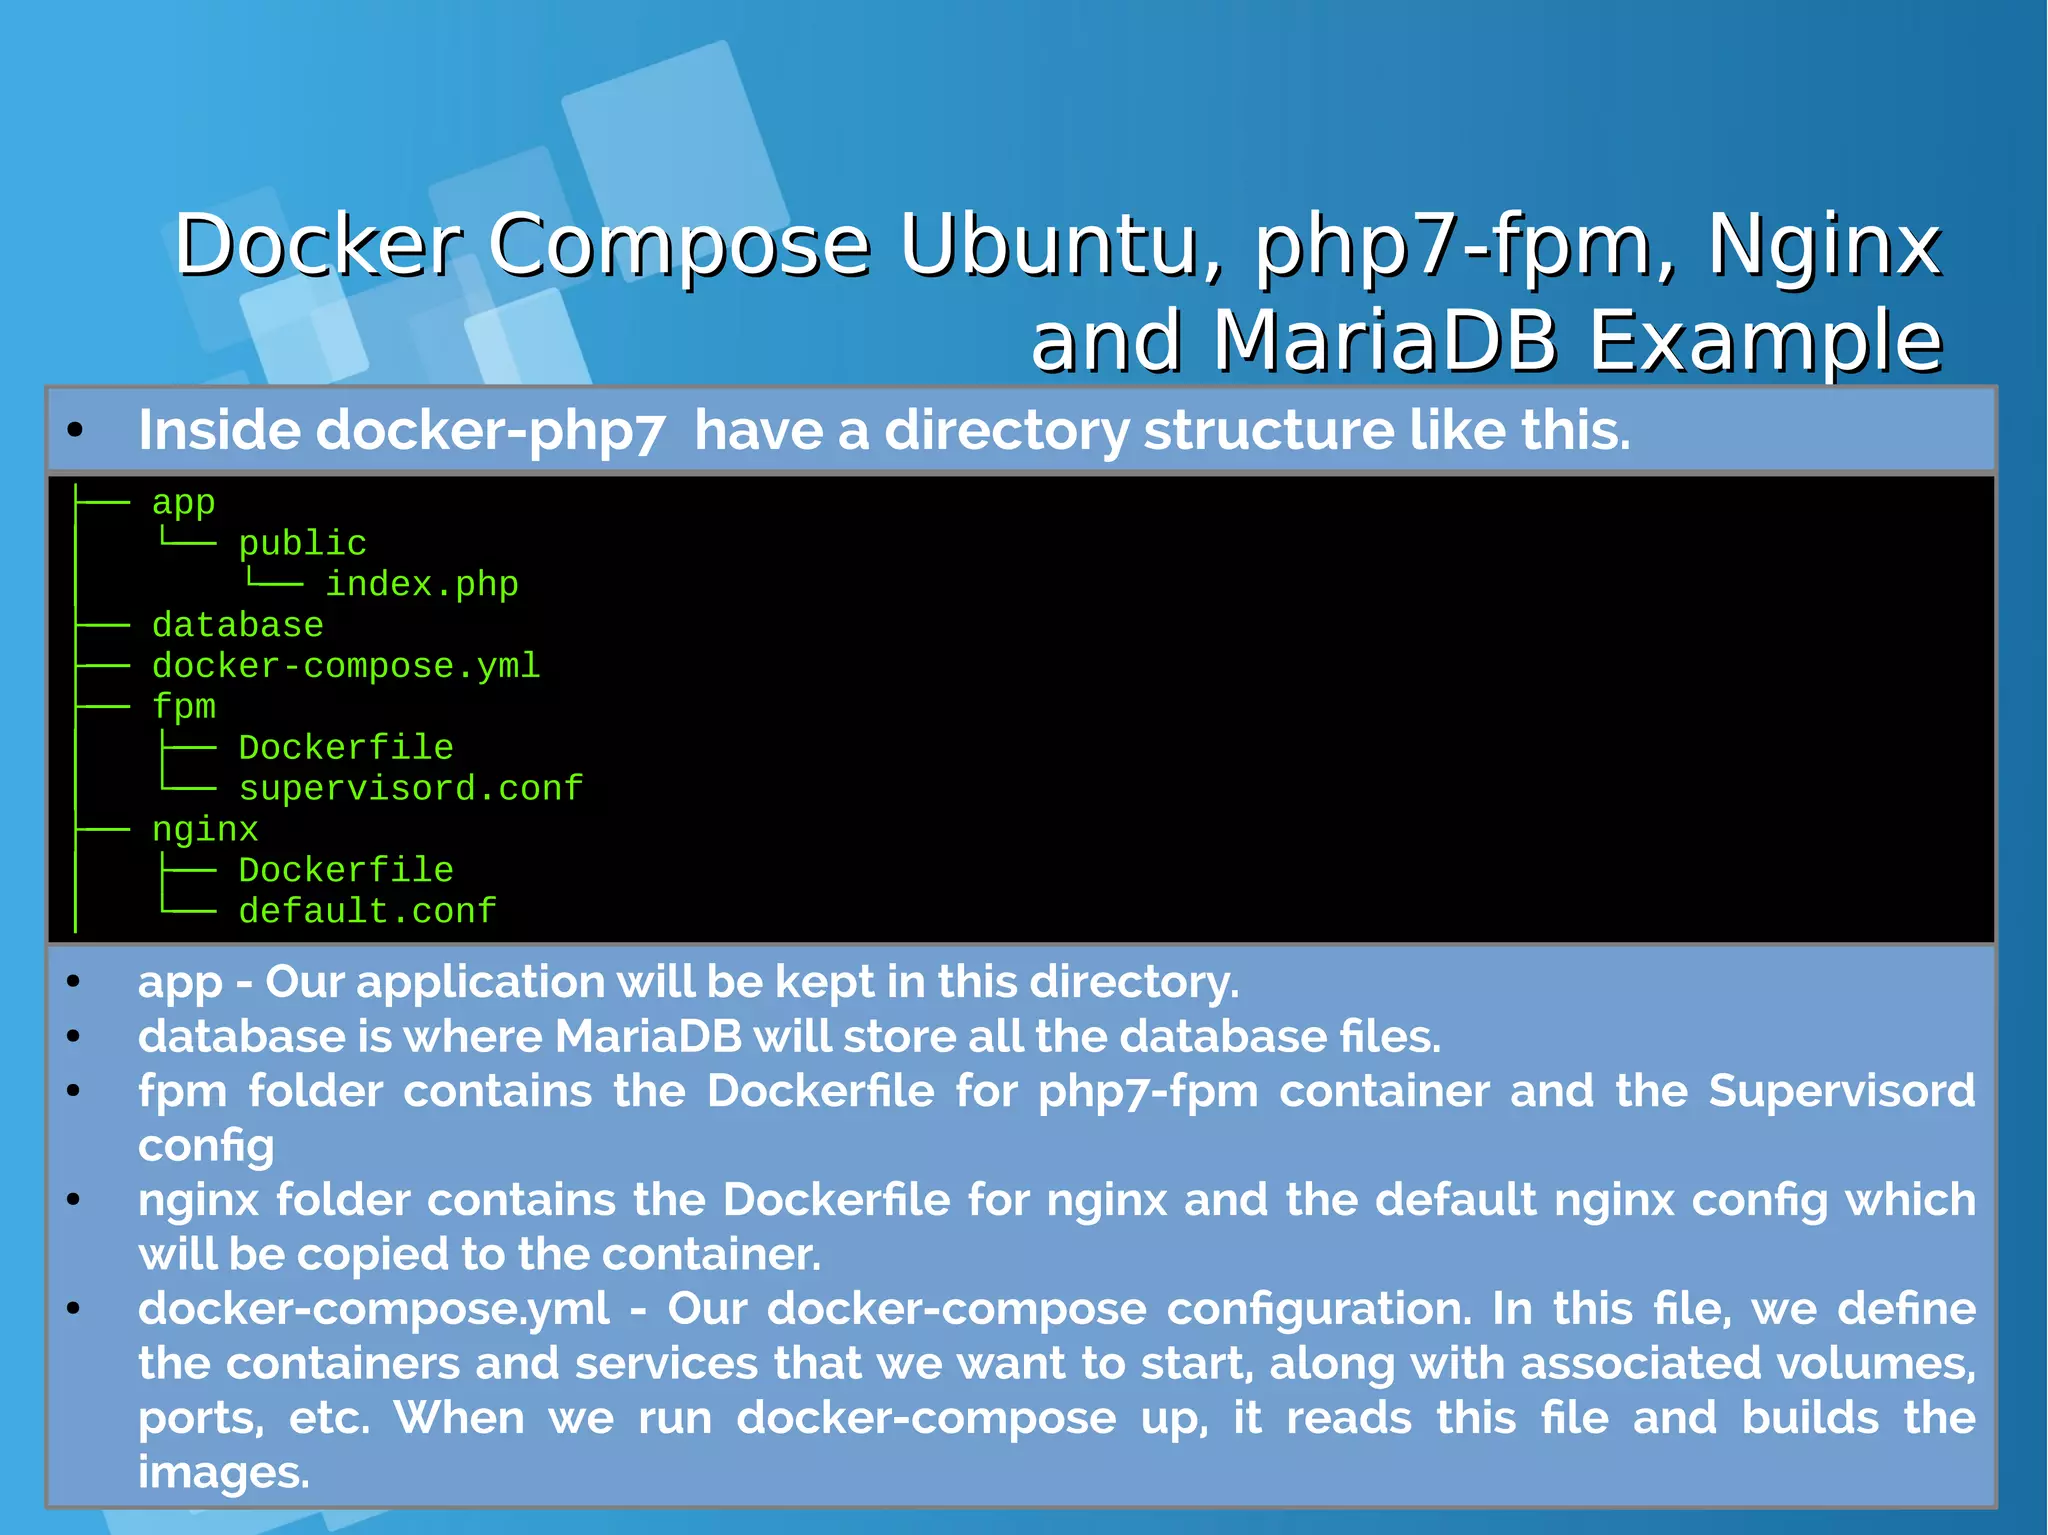
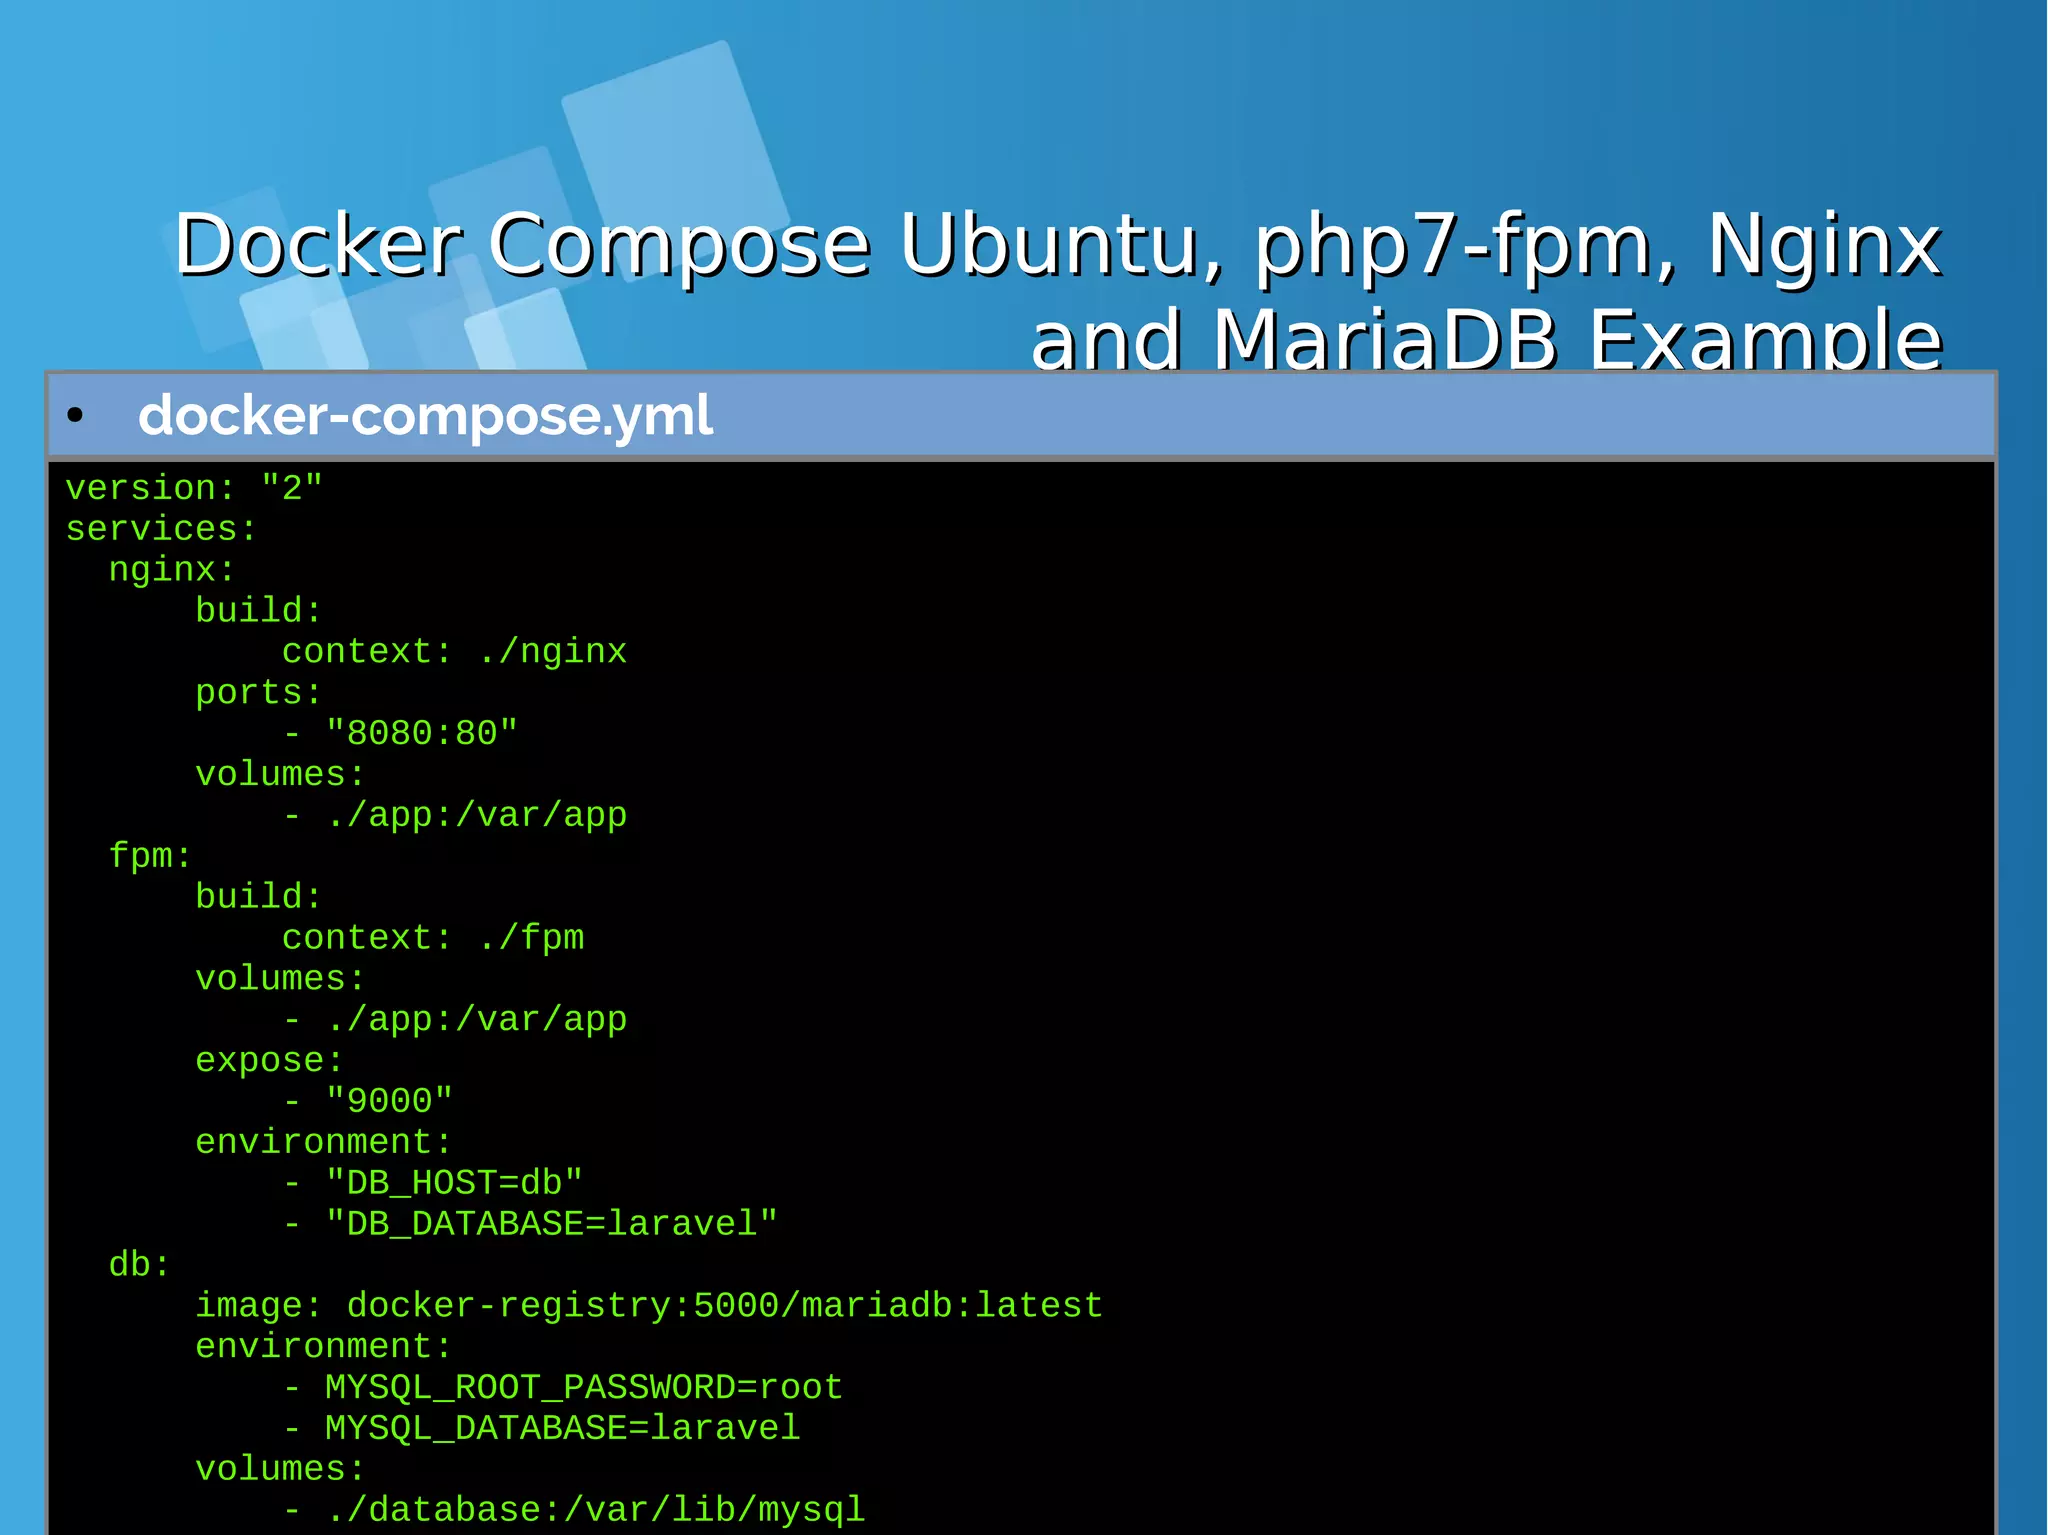
![Lab: Docker Compose Ubuntu, php7-fpm,Lab: Docker Compose Ubuntu, php7-fpm, Nginx and MariaDB ExampleNginx and MariaDB Example ● Clone or download the sample project from Github. [root@docker-host ~]# git clone https://github.com/isnuryusuf/docker-php7.git Cloning into 'docker-php7'... remote: Counting objects: 62, done. remote: Total 62 (delta 0), reused 0 (delta 0), pack-reused 62 Unpacking objects: 100% (62/62), done. 960 B [root@docker-host ~]# cd docker-php7 [root@docker-host ~]# yum -y install epel-release [root@docker-host ~]# yum install -y python-pip [root@docker-host ~]# pip install docker-compose [root@docker-host docker-php7]# docker-compose up This lab will setup PHP application using Docker and docker- compose. This will setup a developement environment with PHP7- fpm, MariaDB and Nginx.](https://image.slidesharecdn.com/journey-to-the-devops-automation-with-dockerkubernetesandopenshift-180325021200/75/Journey-to-the-devops-automation-with-docker-kubernetes-and-openshift-105-2048.jpg)
![Docker Compose Ubuntu, php7-fpm, NginxDocker Compose Ubuntu, php7-fpm, Nginx and MariaDB Exampleand MariaDB Example ● Docker compose up output command [root@docker-host docker-php7]# docker-compose up Creating network "dockerphp7_default" with the default driver Building fpm Step 1 : FROM ubuntu:latest Trying to pull repository docker.io/library/ubuntu ... sha256:ea1d854d38be82f54d39efe2c67000bed1b03348bcc2f3dc094f260855dff368: Pulling from docker.io/library/ubuntu bd97b43c27e3: Pull complete 6960dc1aba18: Pull complete 2b61829b0db5: Pull complete 1f88dc826b14: Pull complete 73b3859b1e43: Pull complete Digest: sha256:ea1d854d38be82f54d39efe2c67000bed1b03348bcc2f3dc094f260855dff368 Status: Downloaded newer image for docker.io/ubuntu:latest ---> 7b9b13f7b9c0 Step 2 : RUN apt-get update && apt-get install -y software-properties-common language- pack-en-base && LC_ALL=en_US.UTF-8 add-apt-repository -y ppa:ondrej/php && apt- get update && apt-get install -y php7.0 php7.0-fpm php7.0-mysql mcrypt php7.0-gd curl php7.0-curl php-redis php7.0-mbstring sendmail supervisor && mkdir /run/php && apt-get clean && rm -rf /var/lib/apt/lists/* /tmp/* /var/tmp/* ---> Running in 812423cbbeac](https://image.slidesharecdn.com/journey-to-the-devops-automation-with-dockerkubernetesandopenshift-180325021200/75/Journey-to-the-devops-automation-with-docker-kubernetes-and-openshift-108-2048.jpg)


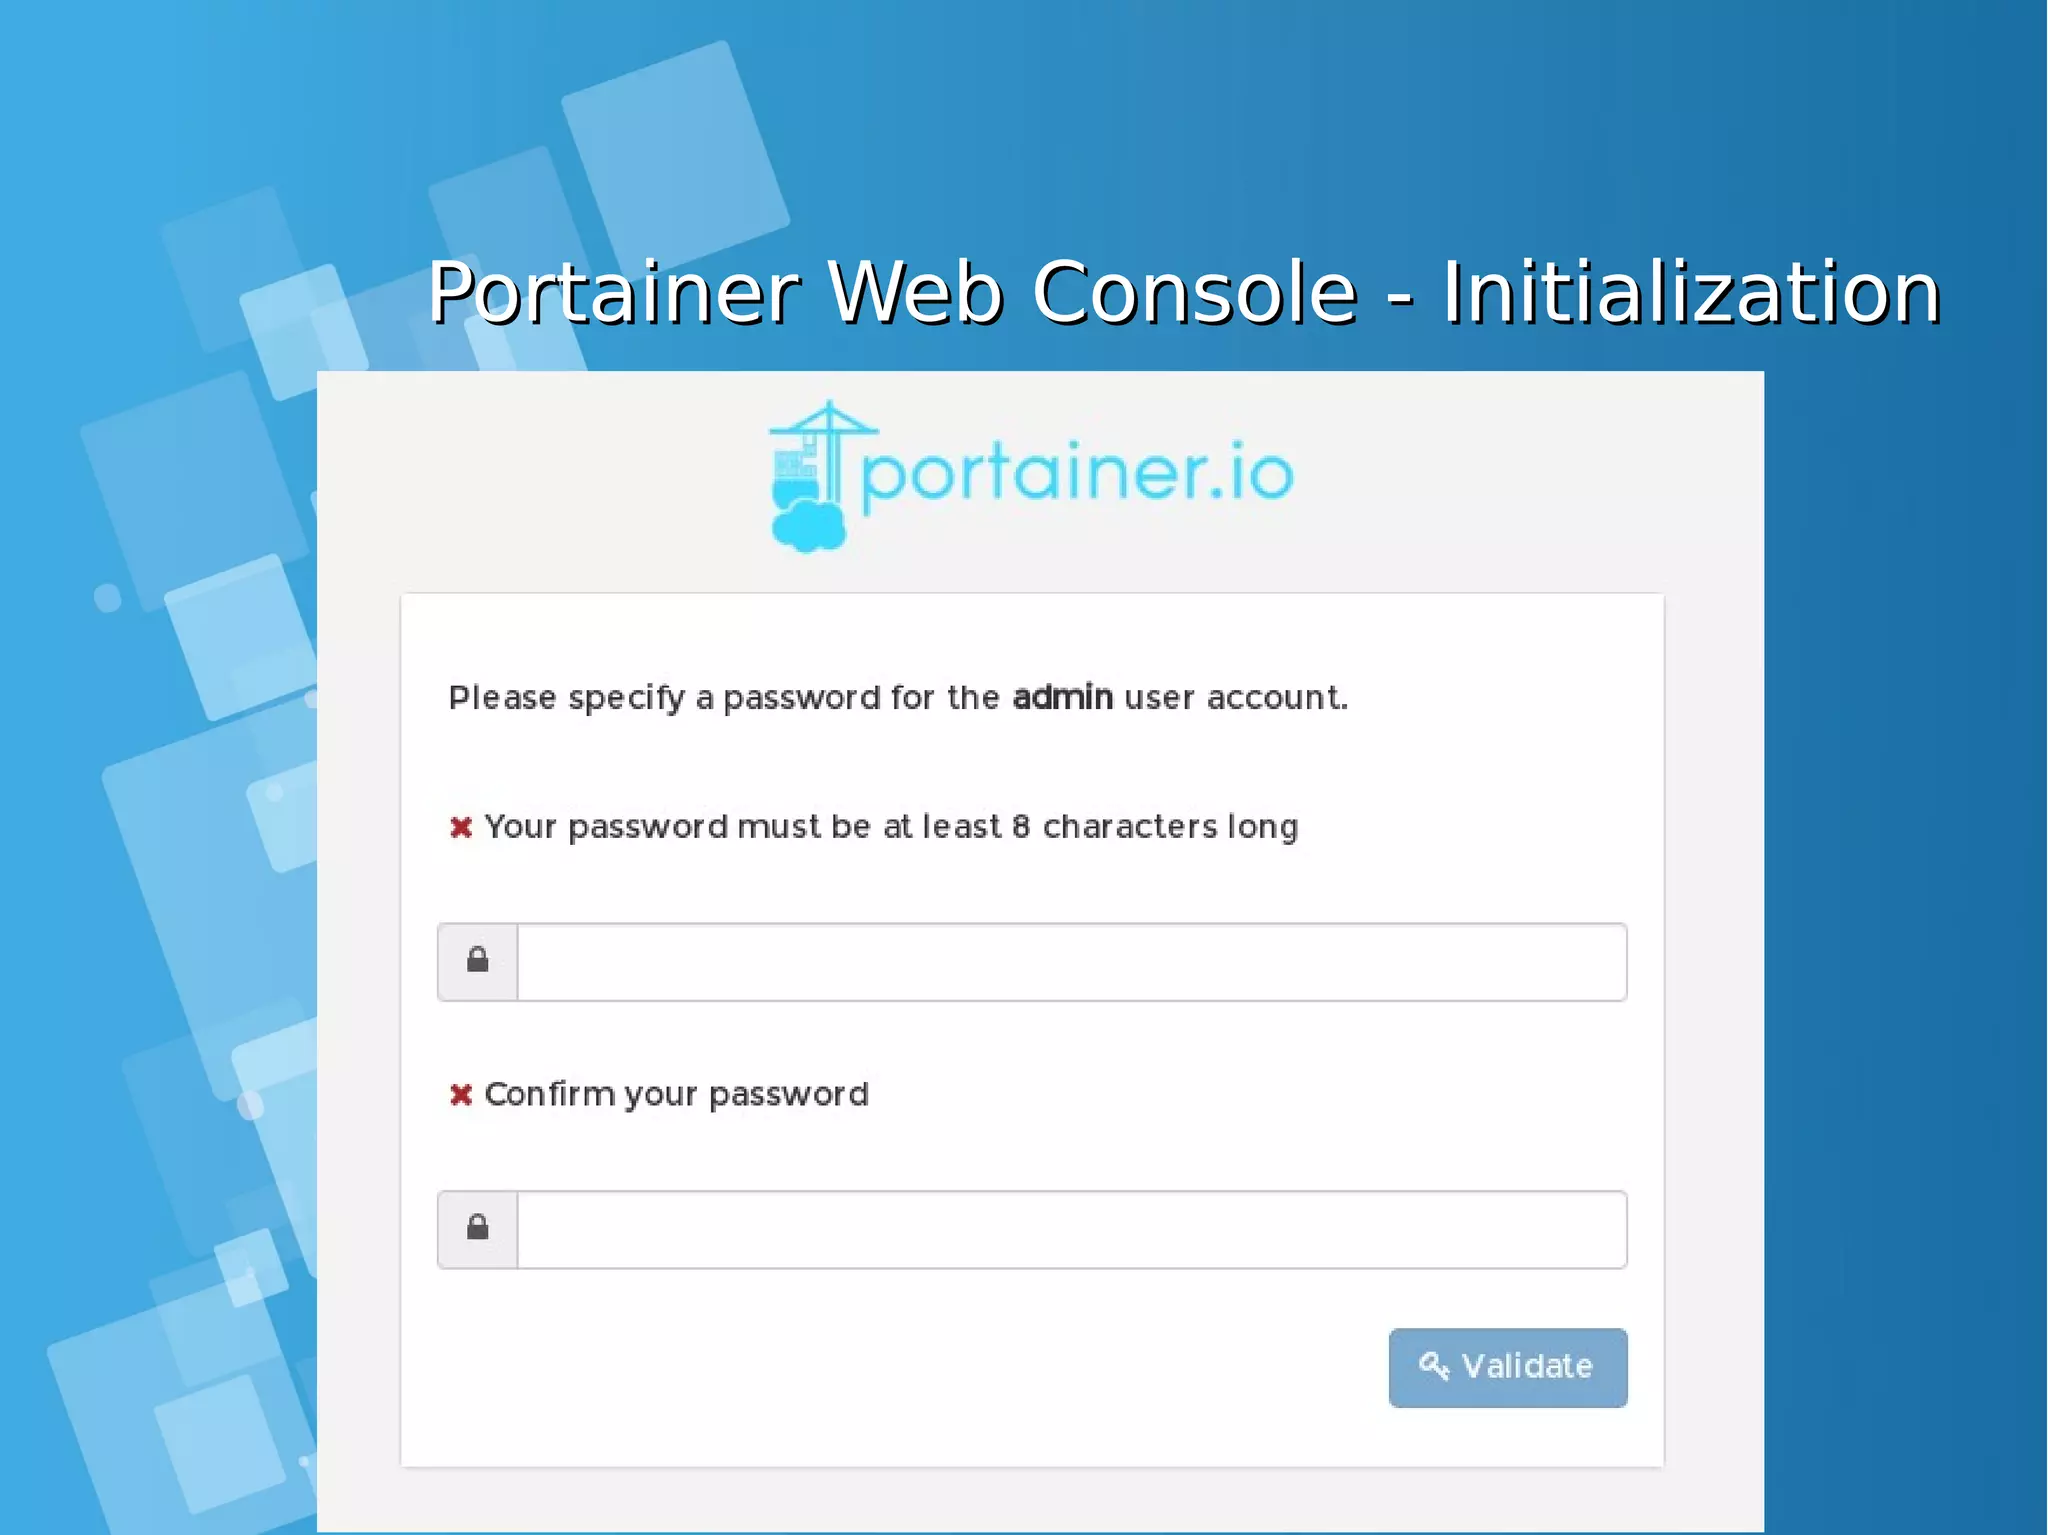
![Installing Portainer.ioInstalling Portainer.io ● Portainer runs as a lightweight Docker container (the Docker image weights less than 4MB) on a Docker engine or Swarm cluster. Therefore, you are one command away from running container on any machine using Docker. ● Use the following Docker command to run Portainer: [root@docker-host ~]# docker volume create portainer_data [root@docker-host ~]# docker run -d -p 9000:9000 -v /var/run/docker.sock:/var/run/docker.sock -v portainer_data:/data docker- registry:5000/portainer/portainer:latest ● you can now access Portainer by pointing your web browser at http://DOCKER_HOST:9000 Ensure you replace DOCKER_HOST with address of your Docker host where Portainer is running.](https://image.slidesharecdn.com/journey-to-the-devops-automation-with-dockerkubernetesandopenshift-180325021200/75/Journey-to-the-devops-automation-with-docker-kubernetes-and-openshift-116-2048.jpg)
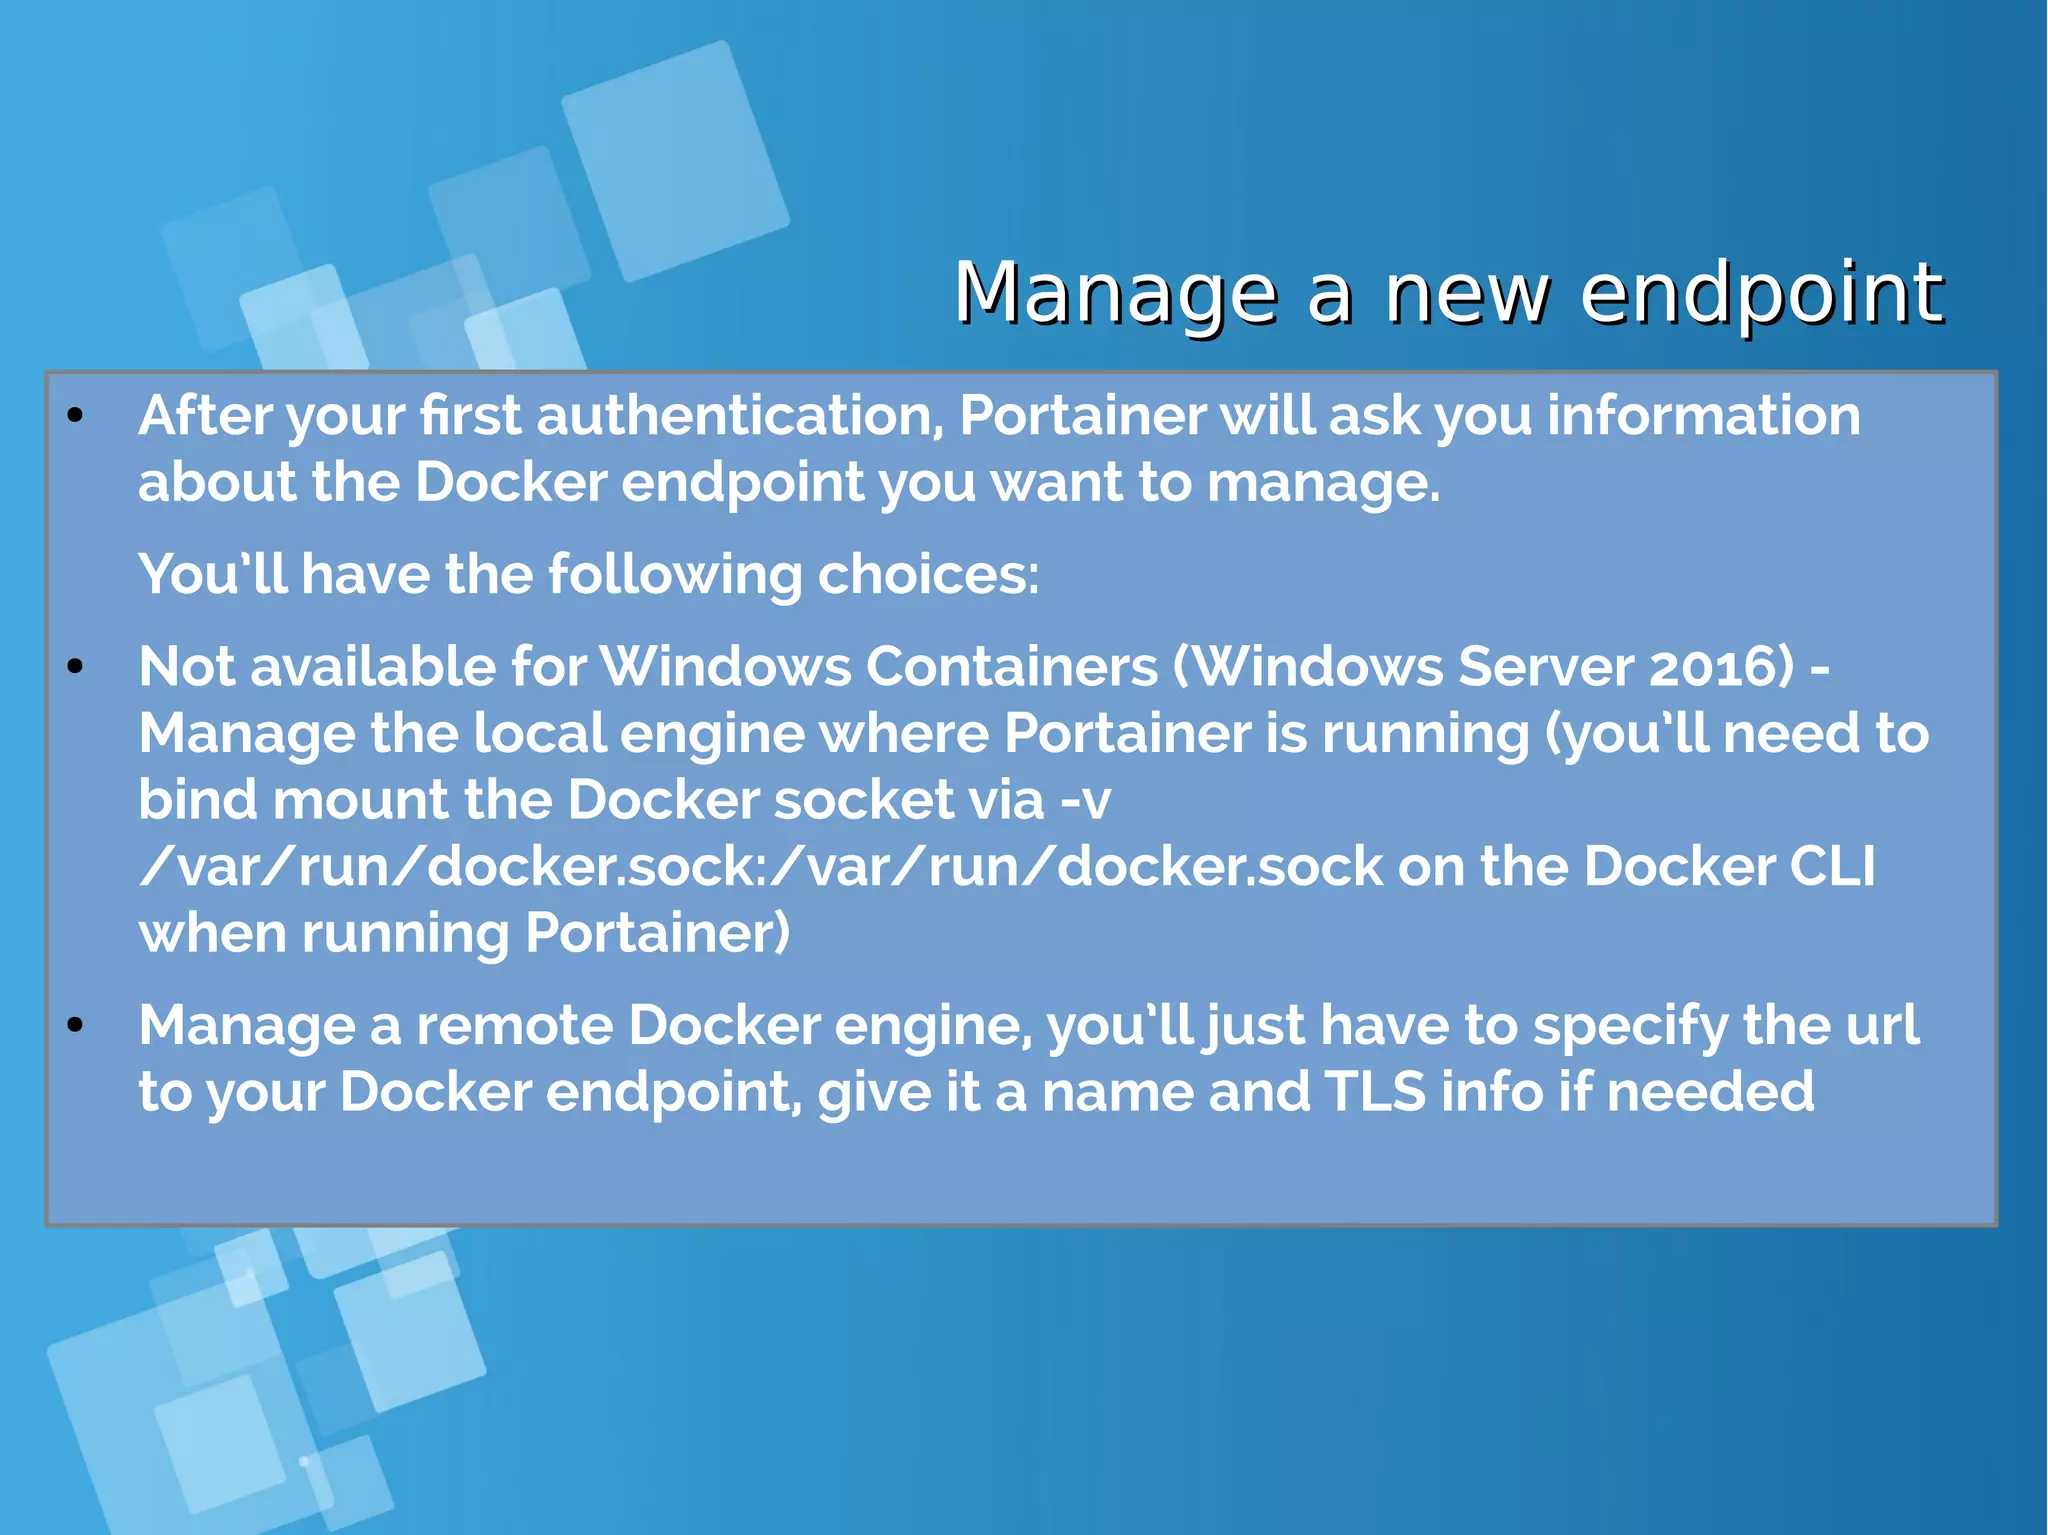
![Declare initial endpoint via CLIDeclare initial endpoint via CLI ● You can specify the initial endpoint you want Portainer to manage via the CLI, use the -H flag and the tcp:// protocol to connect to a remote Docker endpoint: [root@docker-host ~]# docker run -d -p 9000:9000 portainer/portainer -H tcp://<REMOTE_HOST>:<REMOTE_PORT> ● Ensure you replace REMOTE_HOST and REMOTE_PORT with the address/port of the Docker engine you want to manage. ● You can also bind mount the Docker socket to manage a local Docker engine (not available for Windows Containers (Windows Server 2016)): [root@docker-host ~]# docker run -d -p 9000:9000 -v /var/run/docker.sock:/var/run/docker.sock portainer/portainer ● Note: If your host is using SELinux, you’ll need to pass the --privileged flag to the Docker run command:](https://image.slidesharecdn.com/journey-to-the-devops-automation-with-dockerkubernetesandopenshift-180325021200/75/Journey-to-the-devops-automation-with-docker-kubernetes-and-openshift-118-2048.jpg)
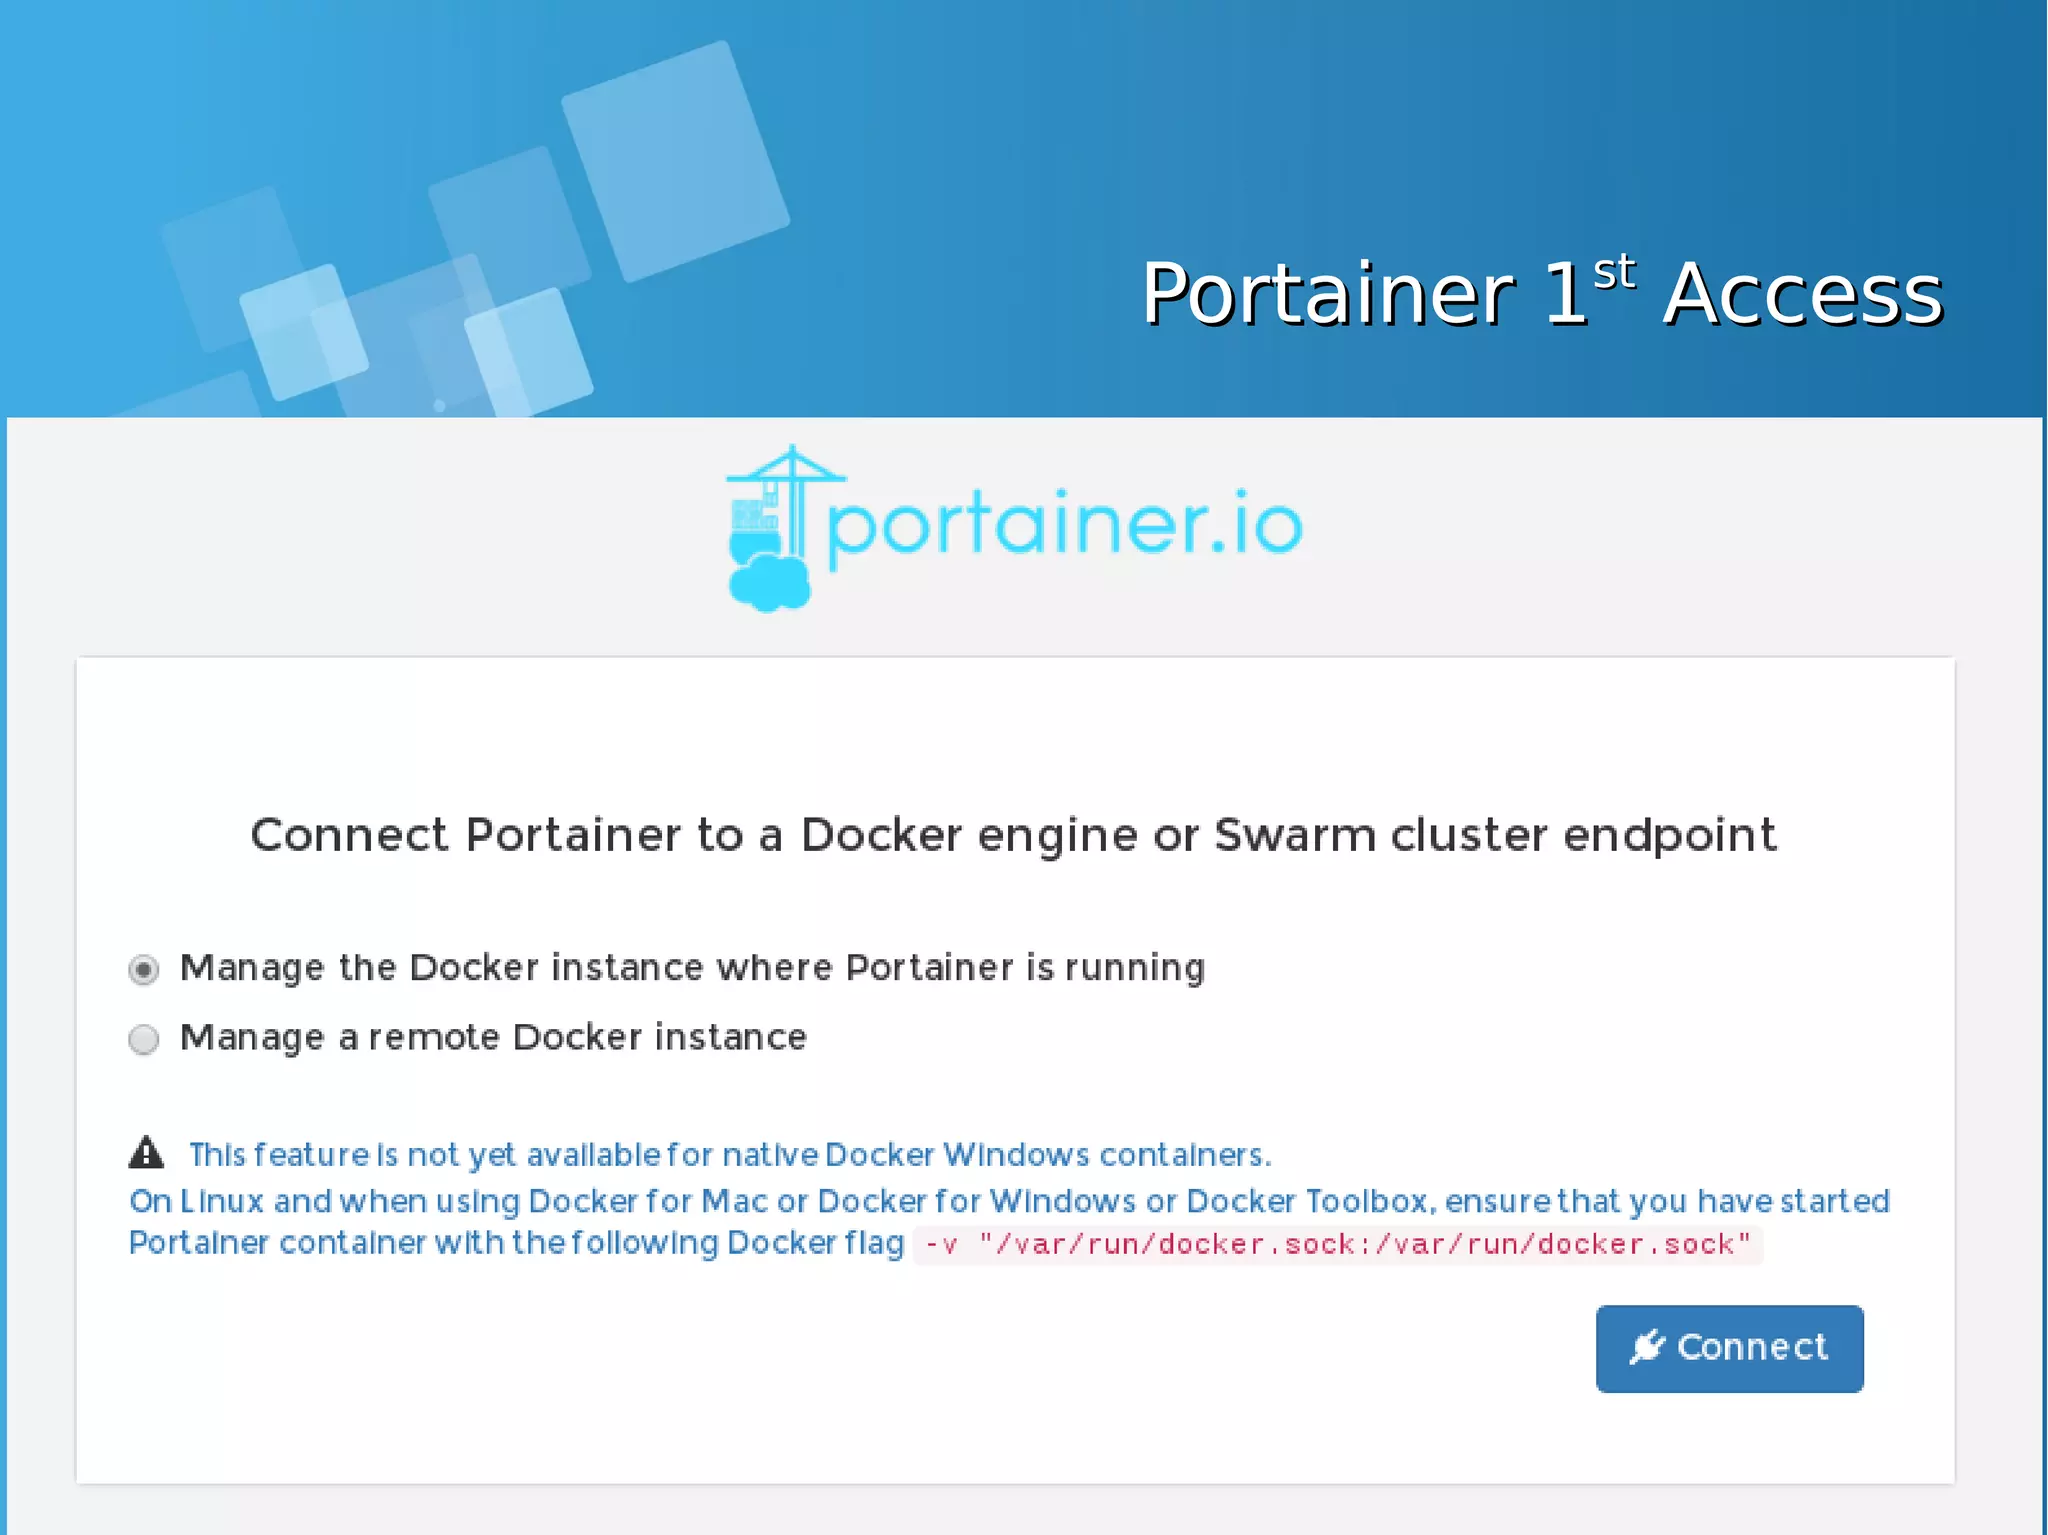
![Portainer.io Manage LocallyPortainer.io Manage Locally ● Ensure that you have started Portainer container with the following Docker flag -v "/var/run/docker.sock:/var/run/docker.sock" [root@docker-host ~]# docker ps CONTAINER ID IMAGE COMMAND CREATED STATUS PORTS NAMES afd62e28aee5 portainer/portainer "/portainer" 5 minutes ago Up 5 minutes 0.0.0.0:9000->9000/tcp adoring_brown 60fec4b9a9bf centos "bash" 21 minutes ago Up 21 minutes high_kare [root@docker-host ~]# docker stop afd62e28aee5 afd62e28aee5 [root@docker-host ~]# docker run -v "/var/run/docker.sock:/var/run/docker.sock" -d -p 9000:9000 portainer/portainer db232db974fa6c5a232f0c2ddfc0404dfac6bd34c087934c4c51b0208ececf0f](https://image.slidesharecdn.com/journey-to-the-devops-automation-with-dockerkubernetesandopenshift-180325021200/75/Journey-to-the-devops-automation-with-docker-kubernetes-and-openshift-121-2048.jpg)


![[root@docker-host]# curl -fsSL https://get.docker.com/ | sh [root@docker-host]# systemctl start docker [root@docker-host]# systemctl status docker [root@docker-host]# systemctl enable docker [root@docker-host]# docker swarm init Swarm initialized: current node (73yn8s77g2xz3277f137hye41) is now a manager. To add a worker to this swarm, run the following command: docker swarm join --token SWMTKN-1-0xg56f2v9tvy0lg9d4j7xbf7cf1mg8ylm7d19f39gqvc41d1yk- 0trhxa6skixvif1o6pultvcp3 10.7.60.26:2377 To add a manager to this swarm, run 'docker swarm join-token manager' and follow the instructions. ● Create a Docker Swarm first [root@docker-host ~]# docker node ls ID HOSTNAME STATUS AVAILABILITY MANAGER STATUS 73yn8s77g2xz3277f137hye41 * docker-host Ready Active Leader ● Show members of swarm From the first terminal, check the number of nodes in the swarm (running this command from the second terminal worker will fail as swarm related commands need to be issued against a swarm manager). Docker Swarm Lab - Init yourDocker Swarm Lab - Init your swarmswarm](https://image.slidesharecdn.com/journey-to-the-devops-automation-with-dockerkubernetesandopenshift-180325021200/75/Journey-to-the-devops-automation-with-docker-kubernetes-and-openshift-131-2048.jpg)
![Docker Swarm - Clone theDocker Swarm - Clone the voting-appvoting-app [root@docker-host ~]# git clone https://github.com/docker/example-voting-app Cloning into 'example-voting-app'... remote: Counting objects: 374, done. remote: Total 374 (delta 0), reused 0 (delta 0), pack-reused 374 Receiving objects: 100% (374/374), 204.32 KiB | 156.00 KiB/s, done. Resolving deltas: 100% (131/131), done. [root@docker-host ~]# cd example-voting-app ● Let’s retrieve the voting app code from Github and go into the application folder. ● Ensure you are in the first terminal and do the below:](https://image.slidesharecdn.com/journey-to-the-devops-automation-with-dockerkubernetesandopenshift-180325021200/75/Journey-to-the-devops-automation-with-docker-kubernetes-and-openshift-132-2048.jpg)
![Docker Swarm - Deploy a stackDocker Swarm - Deploy a stack [root@docker-host]# curl -fsSL https://get.docker.com/ | sh [root@docker-host]# systemctl start docker [root@docker-host]# systemctl status docker [root@docker-host]# systemctl enable docker [root@docker-host]# docker stack deploy --compose-file=docker-stack.yml voting_stack ● A stack is a group of service that are deployed together. The docker- stack.yml in the current folder will be used to deploy the voting app as a stack. ● Ensure you are in the first terminal and do the below: [root@docker-host ~]# docker stack ls NAME SERVICES voting_stack 6 ● Check the stack deployed from the first terminal](https://image.slidesharecdn.com/journey-to-the-devops-automation-with-dockerkubernetesandopenshift-180325021200/75/Journey-to-the-devops-automation-with-docker-kubernetes-and-openshift-133-2048.jpg)
![Docker Swarm - Deploy a stackDocker Swarm - Deploy a stack [root@docker-host ~]# docker stack services voting_stack ID NAME MODE REPLICAS IMAGE 10rt1wczotze voting_stack_visualizer replicated 1/1 dockersample s/visualizer:stable 8lqj31k3q5ek voting_stack_redis replicated 2/2 redis:alpine nhb4igkkyg4y voting_stack_result replicated 2/2 dockersample s/examplevotingapp_result:before nv8d2z2qhlx4 voting_stack_db replicated 1/1 postgres:9.4 ou47zdyf6cd0 voting_stack_vote replicated 2/2 dockersample s/examplevotingapp_vote:before rpnxwmoipagq voting_stack_worker replicated 1/1 dockersample s/examplevotingapp_worker:latest ● Check the service within the stack [root@docker-host ~]# docker service ps voting_stack_vote ID NAME IMAGE NODE DESIRED STATE CURRENT STATE ERROR PORTS my7jqgze7pgg voting_stack_vote.1 dockersamples/examplevotingapp_vote:be fore node1 Running Running 56 seconds ago 3jzgk39dyr6d voting_stack_vote.2 dockersamples/examplevotingapp_vote:be fore node2 Running Running 58 seconds ago ● Check the service within the stack](https://image.slidesharecdn.com/journey-to-the-devops-automation-with-dockerkubernetesandopenshift-180325021200/75/Journey-to-the-devops-automation-with-docker-kubernetes-and-openshift-134-2048.jpg)
![Docker Swarm - CreatingDocker Swarm - Creating servicesservices [root@docker-host ~]# docker service create -p 80:80 --name web nginx:latest [root@docker-host example-voting-app]# docker service ls | grep nginx 24jakxhfl06l web replicated 1/1 nginx:latest *:80->80/tcp ● The next step is to create a service and list out the services. This creates a single service called web that runs the latest nginx, type the below commands in the first terminal: [root@docker-host ~]# docker service inspect web [root@docker-host ~]# docker service scale web=15 web scaled to 15 [root@docker-host ~]# docker service ls | grep nginx 24jakxhfl06l web replicated 15/15 nginx:latest *:80->80/tcp ● Scaling Up Application](https://image.slidesharecdn.com/journey-to-the-devops-automation-with-dockerkubernetesandopenshift-180325021200/75/Journey-to-the-devops-automation-with-docker-kubernetes-and-openshift-135-2048.jpg)
![Docker Swarm - CreatingDocker Swarm - Creating servicesservices [root@docker-host ~]# docker service scale web=10 web scaled to 10 [root@docker-host ~]# docker service ps web ID NAME IMAGE NODE DESIRED STATE CURRENT STATE ERROR PORTS jrgkmkvm4idf web.2 nginx:latest docker-host Running Running about a minute ago dmreadcm745k web.4 nginx:latest docker-host Running Running about a minute ago 5iik87rbsfc2 web.6 nginx:latest docker-host Running Running about a minute ago 7cuzpz79q2hp web.7 nginx:latest docker-host Running Running about a minute ago ql7g7k3dlbqw web.8 nginx:latest docker-host Running Running about a minute ago k0bzk7m51cln web.9 nginx:latest docker-host Running Running about a minute ago 0teod07eihns web.10 nginx:latest docker-host Running Running about a minute ago sqxfaqlnkpab web.11 nginx:latest docker-host Running Running about a minute ago mkrsmwgti606 web.12 nginx:latest docker-host Running Running about a minute ago ucomtg454jlk web.15 nginx:latest docker-host Running Running about a minute ago ● Scaling Down Application](https://image.slidesharecdn.com/journey-to-the-devops-automation-with-dockerkubernetesandopenshift-180325021200/75/Journey-to-the-devops-automation-with-docker-kubernetes-and-openshift-136-2048.jpg)

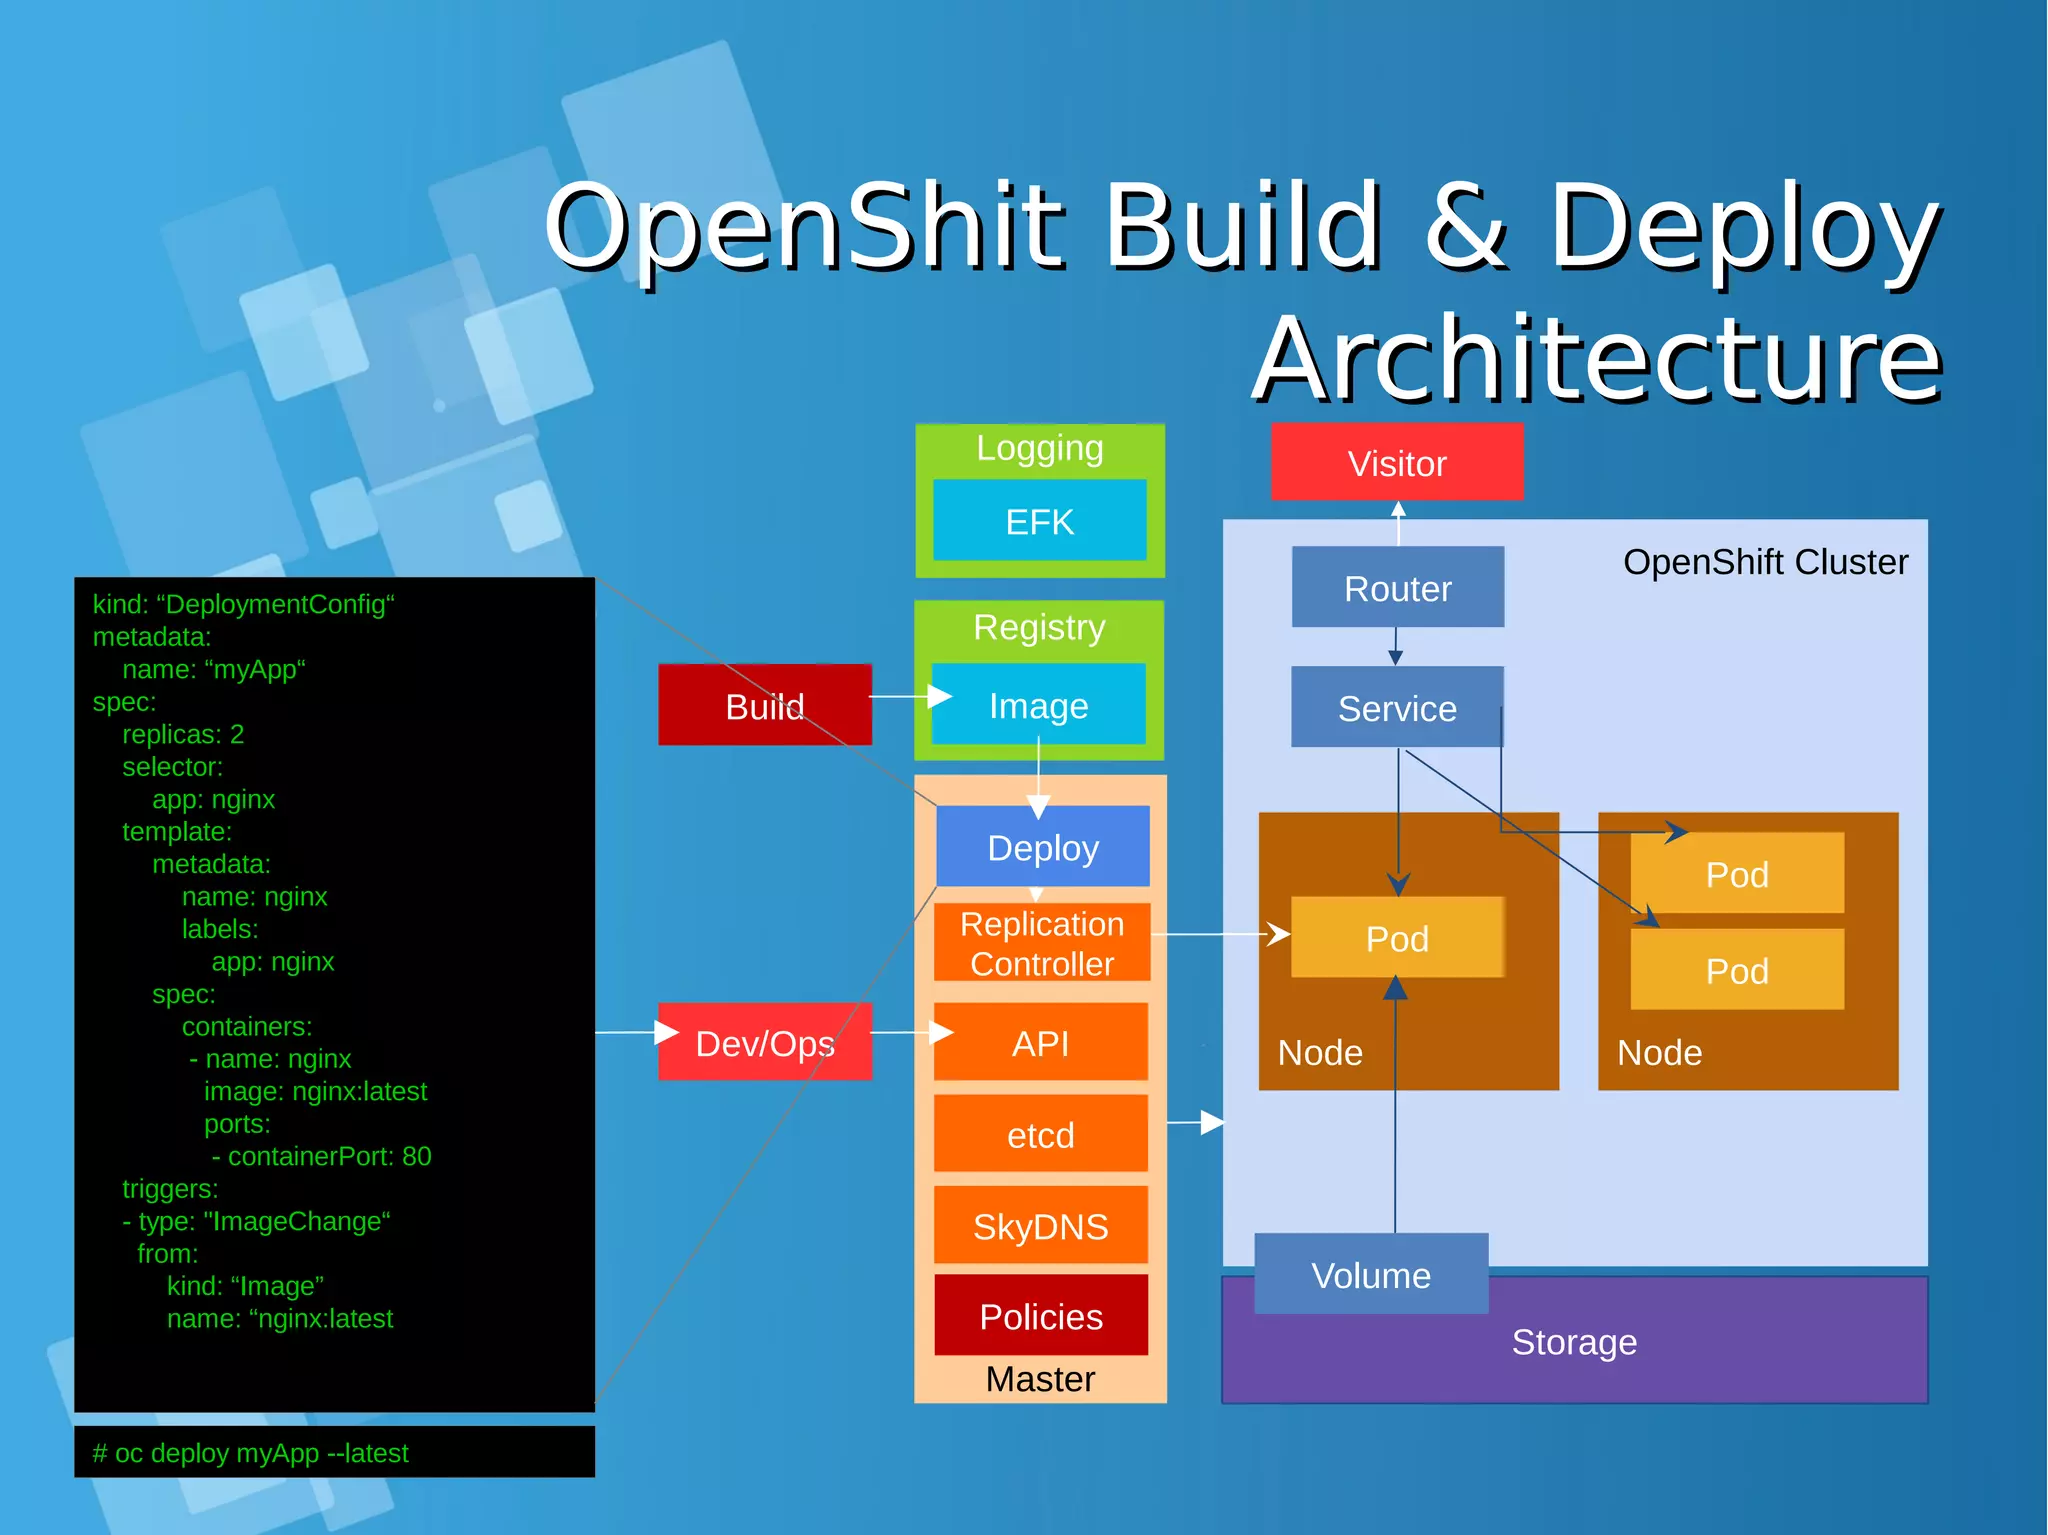
![Kubernetes: Building PodKubernetes: Building Pod { "apiVersion": "v1", "kind": "Pod", "metadata": { "name": "hello‐openshift" }, "spec": { "containers": [ { "name": "hello‐openshift", "image": "openshift/hello‐openshift", "ports": [ { "containerPort": 8080 } ] } ] } } # kubectl create –f hello-openshift.yaml # oc create –f hello-openshift.yaml ● OpenShift/Kubernetes runs containers inside Kubernetes pods, and to create a pod from a container image, Kubernetes needs a pod resource definition. This can be provided either as a JSON or YAML text file, or can be generated from defaults by oc new-app or the web console. ● This JSON object is a pod resource definition because it has attribute "kind" with value "Pod". It contains a single "container" whose name is "hello- openshift" and that references the "image" named "openshift/hello- openshift". The container also contains a single "ports", which listens to TCP port 8080.](https://image.slidesharecdn.com/journey-to-the-devops-automation-with-dockerkubernetesandopenshift-180325021200/75/Journey-to-the-devops-automation-with-docker-kubernetes-and-openshift-143-2048.jpg)
![Kubernetes: List PodKubernetes: List Pod [root@centos-16gb-sgp1-01 ~]# oc get pod NAME READY STATUS RESTARTS AGE bgdemo-1-build 0/1 Completed 0 16d bgdemo-1-x0wlq 1/1 Running 0 16d dc-gitlab-runner-service-3-wgn8q 1/1 Running 0 8d dc-minio-service-1-n0614 1/1 Running 5 23d frontend-1-build 0/1 Completed 0 24d frontend-prod-1-gmcrw 1/1 Running 2 23d gitlab-ce-7-kq0jp 1/1 Running 2 24d hello-openshift 1/1 Running 2 24d jenkins-3-8grrq 1/1 Running 12 21d os-example-aspnet-2-build 0/1 Completed 0 22d os-example-aspnet-3-6qncw 1/1 Running 0 21d os-sample-java-web-1-build 0/1 Completed 0 22d os-sample-java-web-2-build 0/1 Completed 0 22d os-sample-java-web-3-build 0/1 Completed 0 22d os-sample-java-web-3-sqf41 1/1 Running 0 22d os-sample-python-1-build 0/1 Completed 0 22d os-sample-python-1-p5b73 1/1 Running 0 22d](https://image.slidesharecdn.com/journey-to-the-devops-automation-with-dockerkubernetesandopenshift-180325021200/75/Journey-to-the-devops-automation-with-docker-kubernetes-and-openshift-144-2048.jpg)

![Kubernetes: Router DetailKubernetes: Router Detail [root@centos-16gb-sgp1-01 ~]# oc env pod router-1-b97bv --list # pods router-1-b97bv, container router DEFAULT_CERTIFICATE_DIR=/etc/pki/tls/private ROUTER_EXTERNAL_HOST_HOSTNAME= ROUTER_EXTERNAL_HOST_HTTPS_VSERVER= ROUTER_EXTERNAL_HOST_HTTP_VSERVER= ROUTER_EXTERNAL_HOST_INSECURE=false ROUTER_EXTERNAL_HOST_INTERNAL_ADDRESS= ROUTER_EXTERNAL_HOST_PARTITION_PATH= ROUTER_EXTERNAL_HOST_PASSWORD= ROUTER_EXTERNAL_HOST_PRIVKEY=/etc/secret-volume/router.pem ROUTER_EXTERNAL_HOST_USERNAME= ROUTER_EXTERNAL_HOST_VXLAN_GW_CIDR= ROUTER_SERVICE_HTTPS_PORT=443 ROUTER_SERVICE_HTTP_PORT=80 ROUTER_SERVICE_NAME=router ROUTER_SERVICE_NAMESPACE=default ROUTER_SUBDOMAIN= STATS_PASSWORD=XXXXXX STATS_PORT=1936 STATS_USERNAME=admin ● Check the router environment variables to find connection parameters for the HAProxy process running inside the pod](https://image.slidesharecdn.com/journey-to-the-devops-automation-with-dockerkubernetesandopenshift-180325021200/75/Journey-to-the-devops-automation-with-docker-kubernetes-and-openshift-150-2048.jpg)


![Installing Openshift OriginInstalling Openshift Origin OpenShift: Make sure Docker installed and configuredOpenShift: Make sure Docker installed and configured Skip this step, if all requirment already matchSkip this step, if all requirment already match [root@docker-host ~]# yum install docker [root@docker-host ~]# sed -i '/OPTIONS=.*/cOPTIONS="--selinux-enabled --insecure- registry 172.30.0.0/16"' /etc/sysconfig/docker [root@docker-host ~]# systemctl is-active docker [root@docker-host ~]# systemctl enable docker [root@docker-host ~]# systemctl start docker ● When you use Latest version docker, please configure this [root@docker-host ~]# vim /usr/lib/systemd/system/docker.service Edit ExecStart=/usr/bin/dockerd to ExecStart=/usr/bin/dockerd --insecure-registry 172.30.0.0/16 --insecure-registry 192.168.1.0/24 [root@docker-host ~]# systemctl daemon-reload ; systemctl restart docker ● Command installing docker from Centos Distribution (not latest)](https://image.slidesharecdn.com/journey-to-the-devops-automation-with-dockerkubernetesandopenshift-180325021200/75/Journey-to-the-devops-automation-with-docker-kubernetes-and-openshift-184-2048.jpg)
![Installing Openshift OriginInstalling Openshift Origin ● Setting hostname at /etc/hosts file, for example: ip-address domain-name.tld [root@docker-host ~]# cat /etc/hosts | grep docker 10.7.60.26 docker-host ● Enable Centos Openshift origin repo [root@docker-host ~]# yum install centos-release-openshift-origin ● Installing Openshift Origin and Origin client [root@docker-host ~]# yum install wget git net-tools bind-utils iptables-services bridge-utils bash-completion origin-clients origin Skip all step above, if all requirment already matchSkip all step above, if all requirment already match](https://image.slidesharecdn.com/journey-to-the-devops-automation-with-dockerkubernetesandopenshift-180325021200/75/Journey-to-the-devops-automation-with-docker-kubernetes-and-openshift-185-2048.jpg)
![Installing OpenShift – oc clusterInstalling OpenShift – oc cluster upup[root@docker-host ~]# oc cluster up --public-hostname=192.168.1.178 -- Checking OpenShift client ... OK -- Checking Docker client ... OK -- Checking Docker version ... OK -- Checking for existing OpenShift container ... OK -- Checking for openshift/origin:v1.5.1 image ... Pulling image openshift/origin:v1.5.1 Pulled 0/3 layers, 3% complete Pulled 0/3 layers, 19% complete Pulled 0/3 layers, 35% complete Pulled 0/3 layers, 52% complete Pulled 1/3 layers, 60% complete Pulled 1/3 layers, 75% complete Pulled 1/3 layers, 90% complete Pulled 2/3 layers, 97% complete Pulled 3/3 layers, 100% complete Extracting Image pull complete -- Checking Docker daemon configuration ... OK -- Checking for available ports ... OK -- Checking type of volume mount ... Using nsenter mounter for OpenShift volumes -- Creating host directories ... OK -- Finding server IP ... Using 10.7.60.26 as the server IP -- Starting OpenShift container ... Creating initial OpenShift configuration Starting OpenShift using container 'origin' Waiting for API server to start listening OpenShift server started -- Adding default OAuthClient redirect URIs ... OK -- Installing registry ... OK -- Installing router ... OK -- Importing image streams ... OK -- Importing templates ... OK -- Login to server ... OK -- Creating initial project "myproject" ... OK -- Removing temporary directory ... OK](https://image.slidesharecdn.com/journey-to-the-devops-automation-with-dockerkubernetesandopenshift-180325021200/75/Journey-to-the-devops-automation-with-docker-kubernetes-and-openshift-187-2048.jpg)
![Installing OpenShift – firewallInstalling OpenShift – firewall " ... OK -- Removing temporary directory ... OK-- Checking container networking ... FAIL Error: containers cannot communicate with the OpenShift master Details: The cluster was started. However, the container networking test failed. Solution: Ensure that access to ports tcp/8443 and udp/53 is allowed on 10.7.60.26. You may need to open these ports on your machine's firewall. Caused By: Error: Docker run error rc=1 Details: Image: openshift/origin:v1.5.1 Entrypoint: [/bin/bash] Command: [-c echo 'Testing connectivity to master API' && curl -s -S -k https://10.7.60.26:8443 && echo 'Testing connectivity to master DNS server' && for i in {1..10}; do if curl -s -S -k https://kubernetes.default.svc.cluster.local; then exit 0; fi; sleep 1; done; exit 1] Output: Testing connectivity to master API Error Output: curl: (7) Failed connect to 10.7.60.26:8443; No route to host ● If you got error when running oc cluster up [root@docker-host ~]# oc cluster down [root@docker-host ~]# iptables -I INPUT 1 -p tcp --dport 8443 -j ACCEPT [root@docker-host ~]# iptables -I INPUT 1 -p udp --dport 53 -j ACCEPT [root@docker-host ~]# iptables -I INPUT 1 -p tcp --dport 53 -j ACCEPT [root@docker-host ~]# iptables -I INPUT 1 -p tcp --dport 443 -j ACCEPT [root@docker-host ~]# iptables -I INPUT 1 -p tcp --dport 80 -j ACCEPT [root@docker-host ~]# oc cluster up ● Running following command](https://image.slidesharecdn.com/journey-to-the-devops-automation-with-dockerkubernetesandopenshift-180325021200/75/Journey-to-the-devops-automation-with-docker-kubernetes-and-openshift-188-2048.jpg)
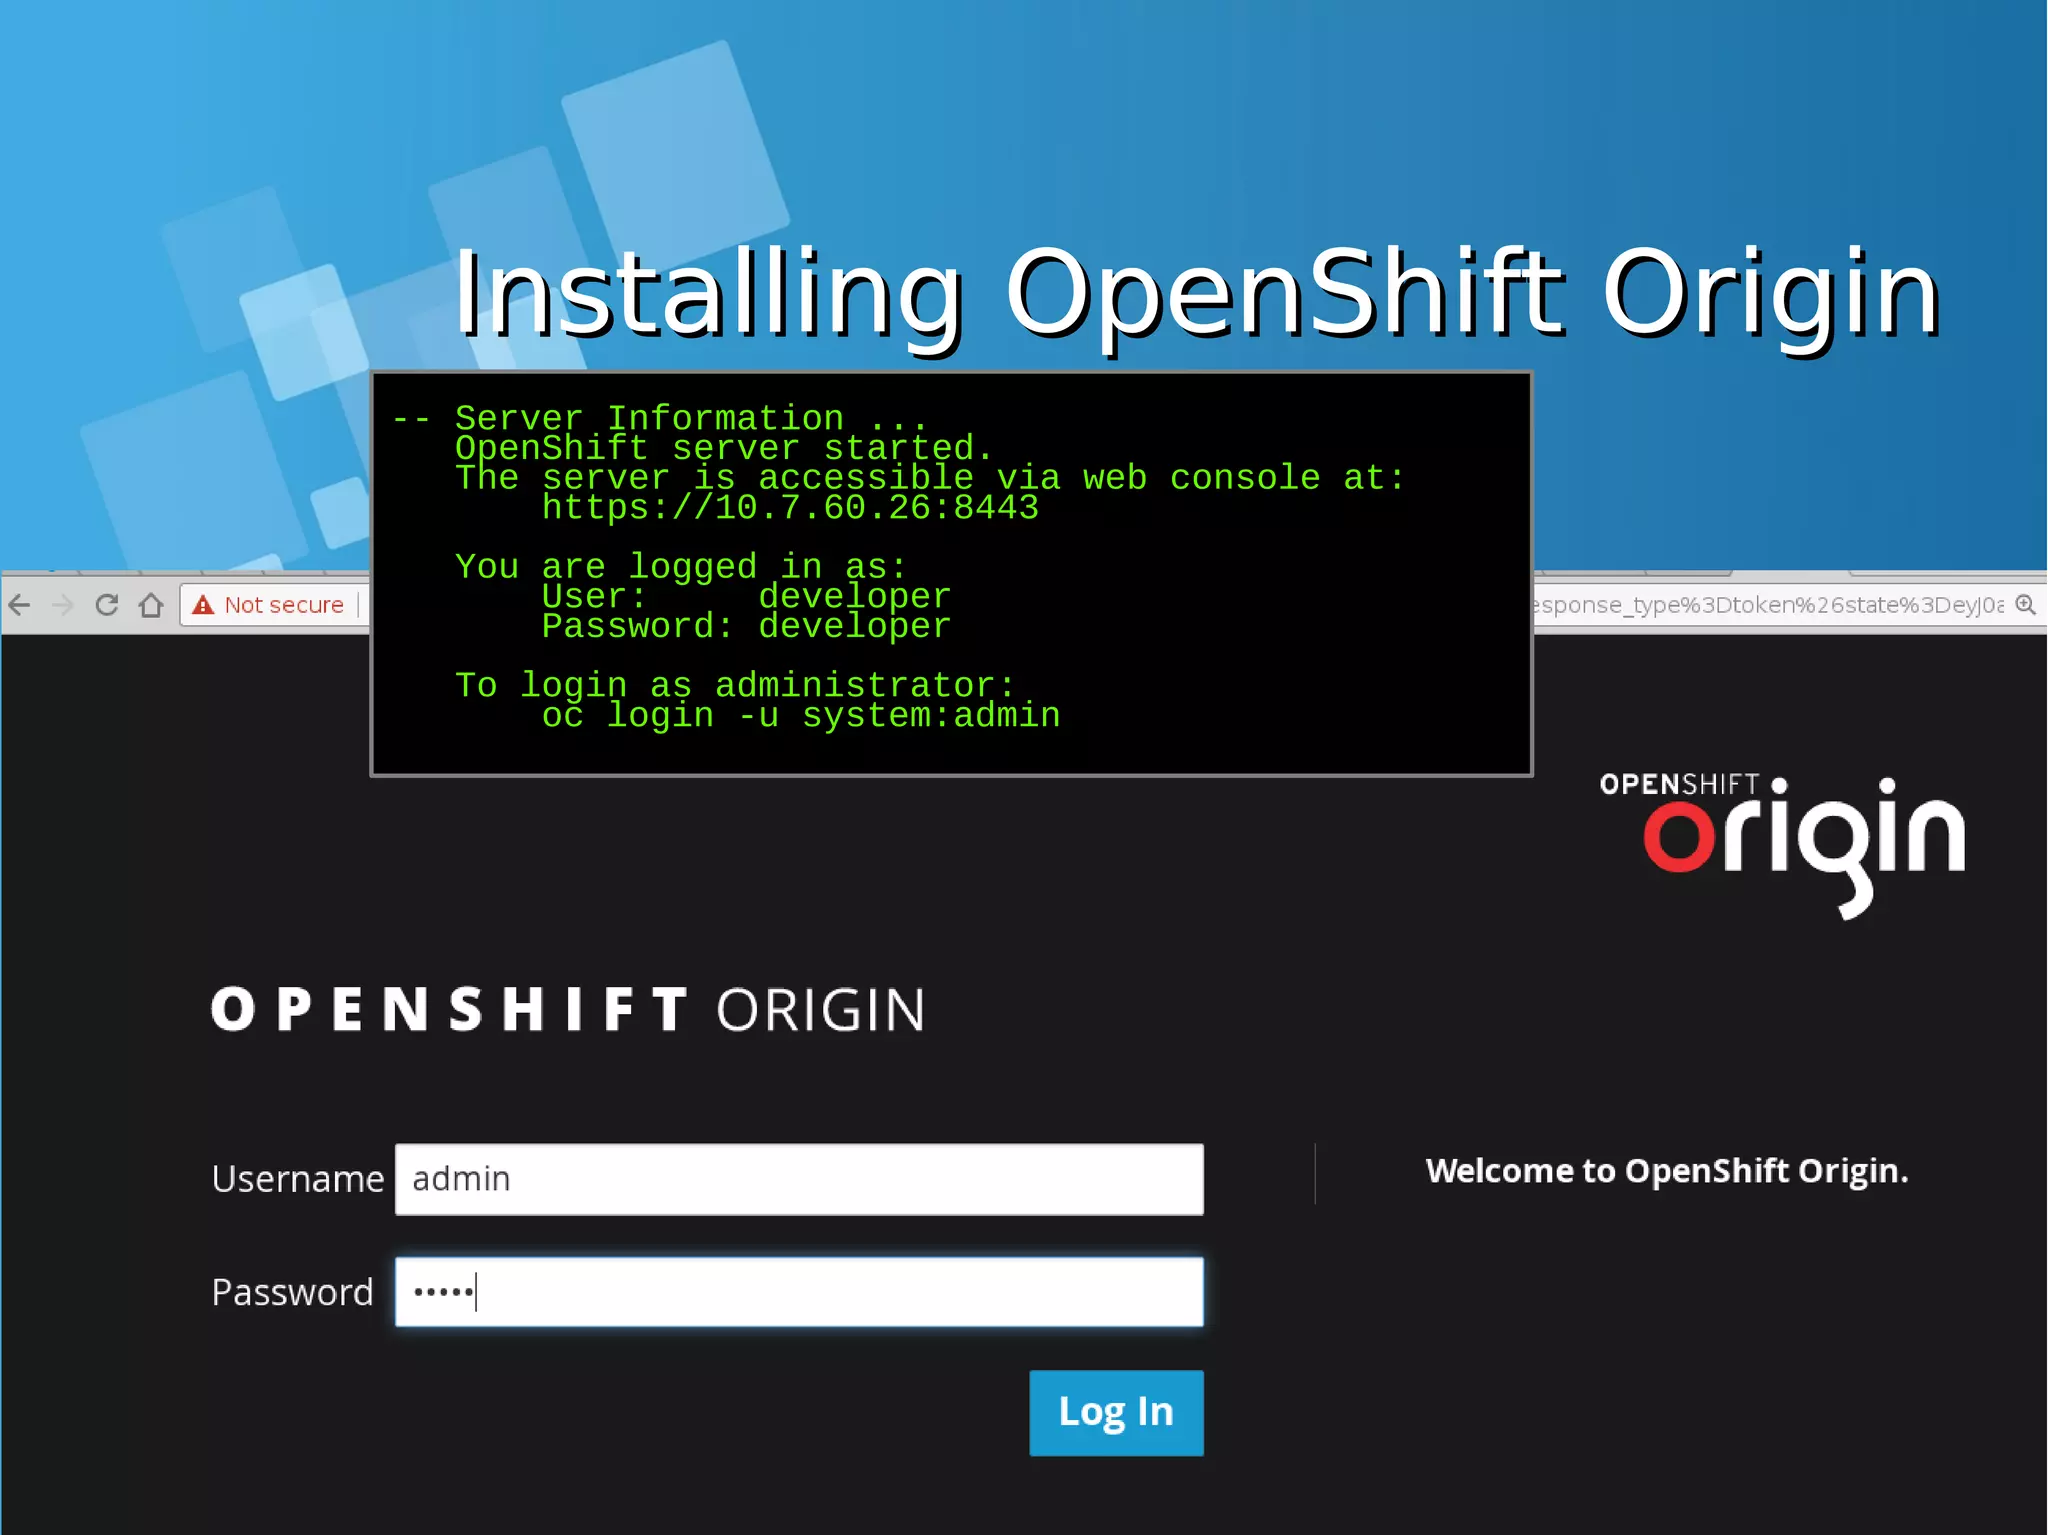
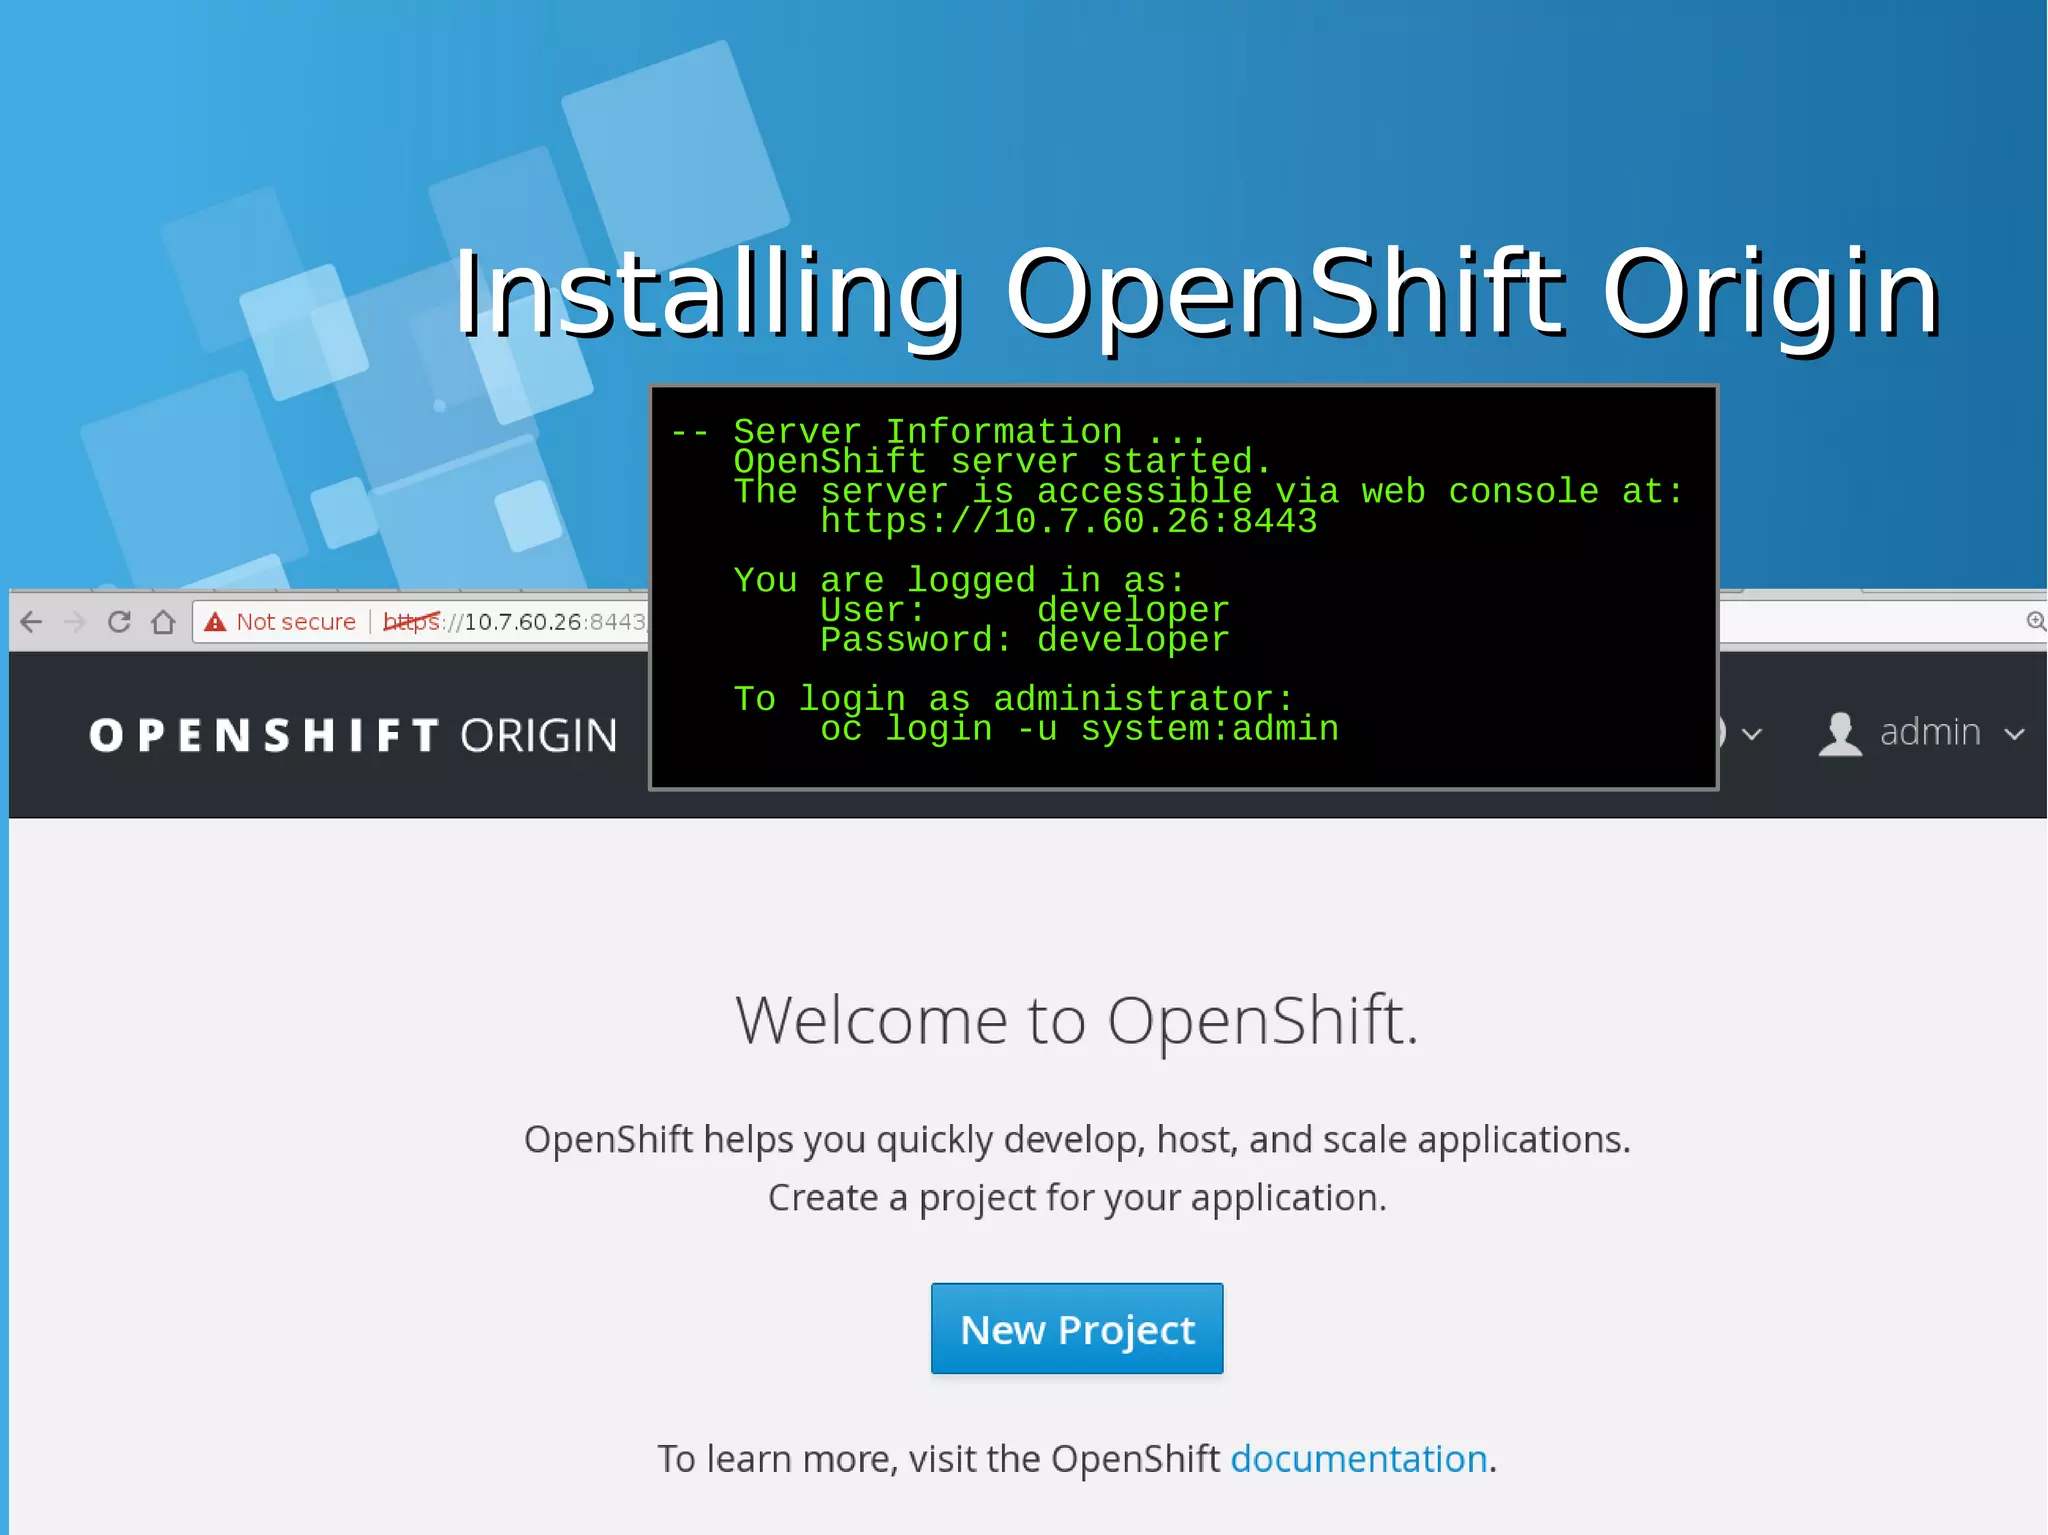
![Installing OpenShift OriginInstalling OpenShift Origin -- Server Information ... OpenShift server started. The server is accessible via web console at: https://10.7.60.26:8443 You are logged in as: User: developer Password: developer To login as administrator: oc login -u system:admin ● Installation is success, take note on Server URL [root@docker-host ~]# oc login -u system:admin Logged into "https://10.7.60.26:8443" as "system:admin" using existing credentials. You have access to the following projects and can switch between them with 'oc project <projectname>': default kube-system * myproject openshift openshift-infra Using project "myproject". ● Test login from Command line using oc command](https://image.slidesharecdn.com/journey-to-the-devops-automation-with-dockerkubernetesandopenshift-180325021200/75/Journey-to-the-devops-automation-with-docker-kubernetes-and-openshift-189-2048.jpg)
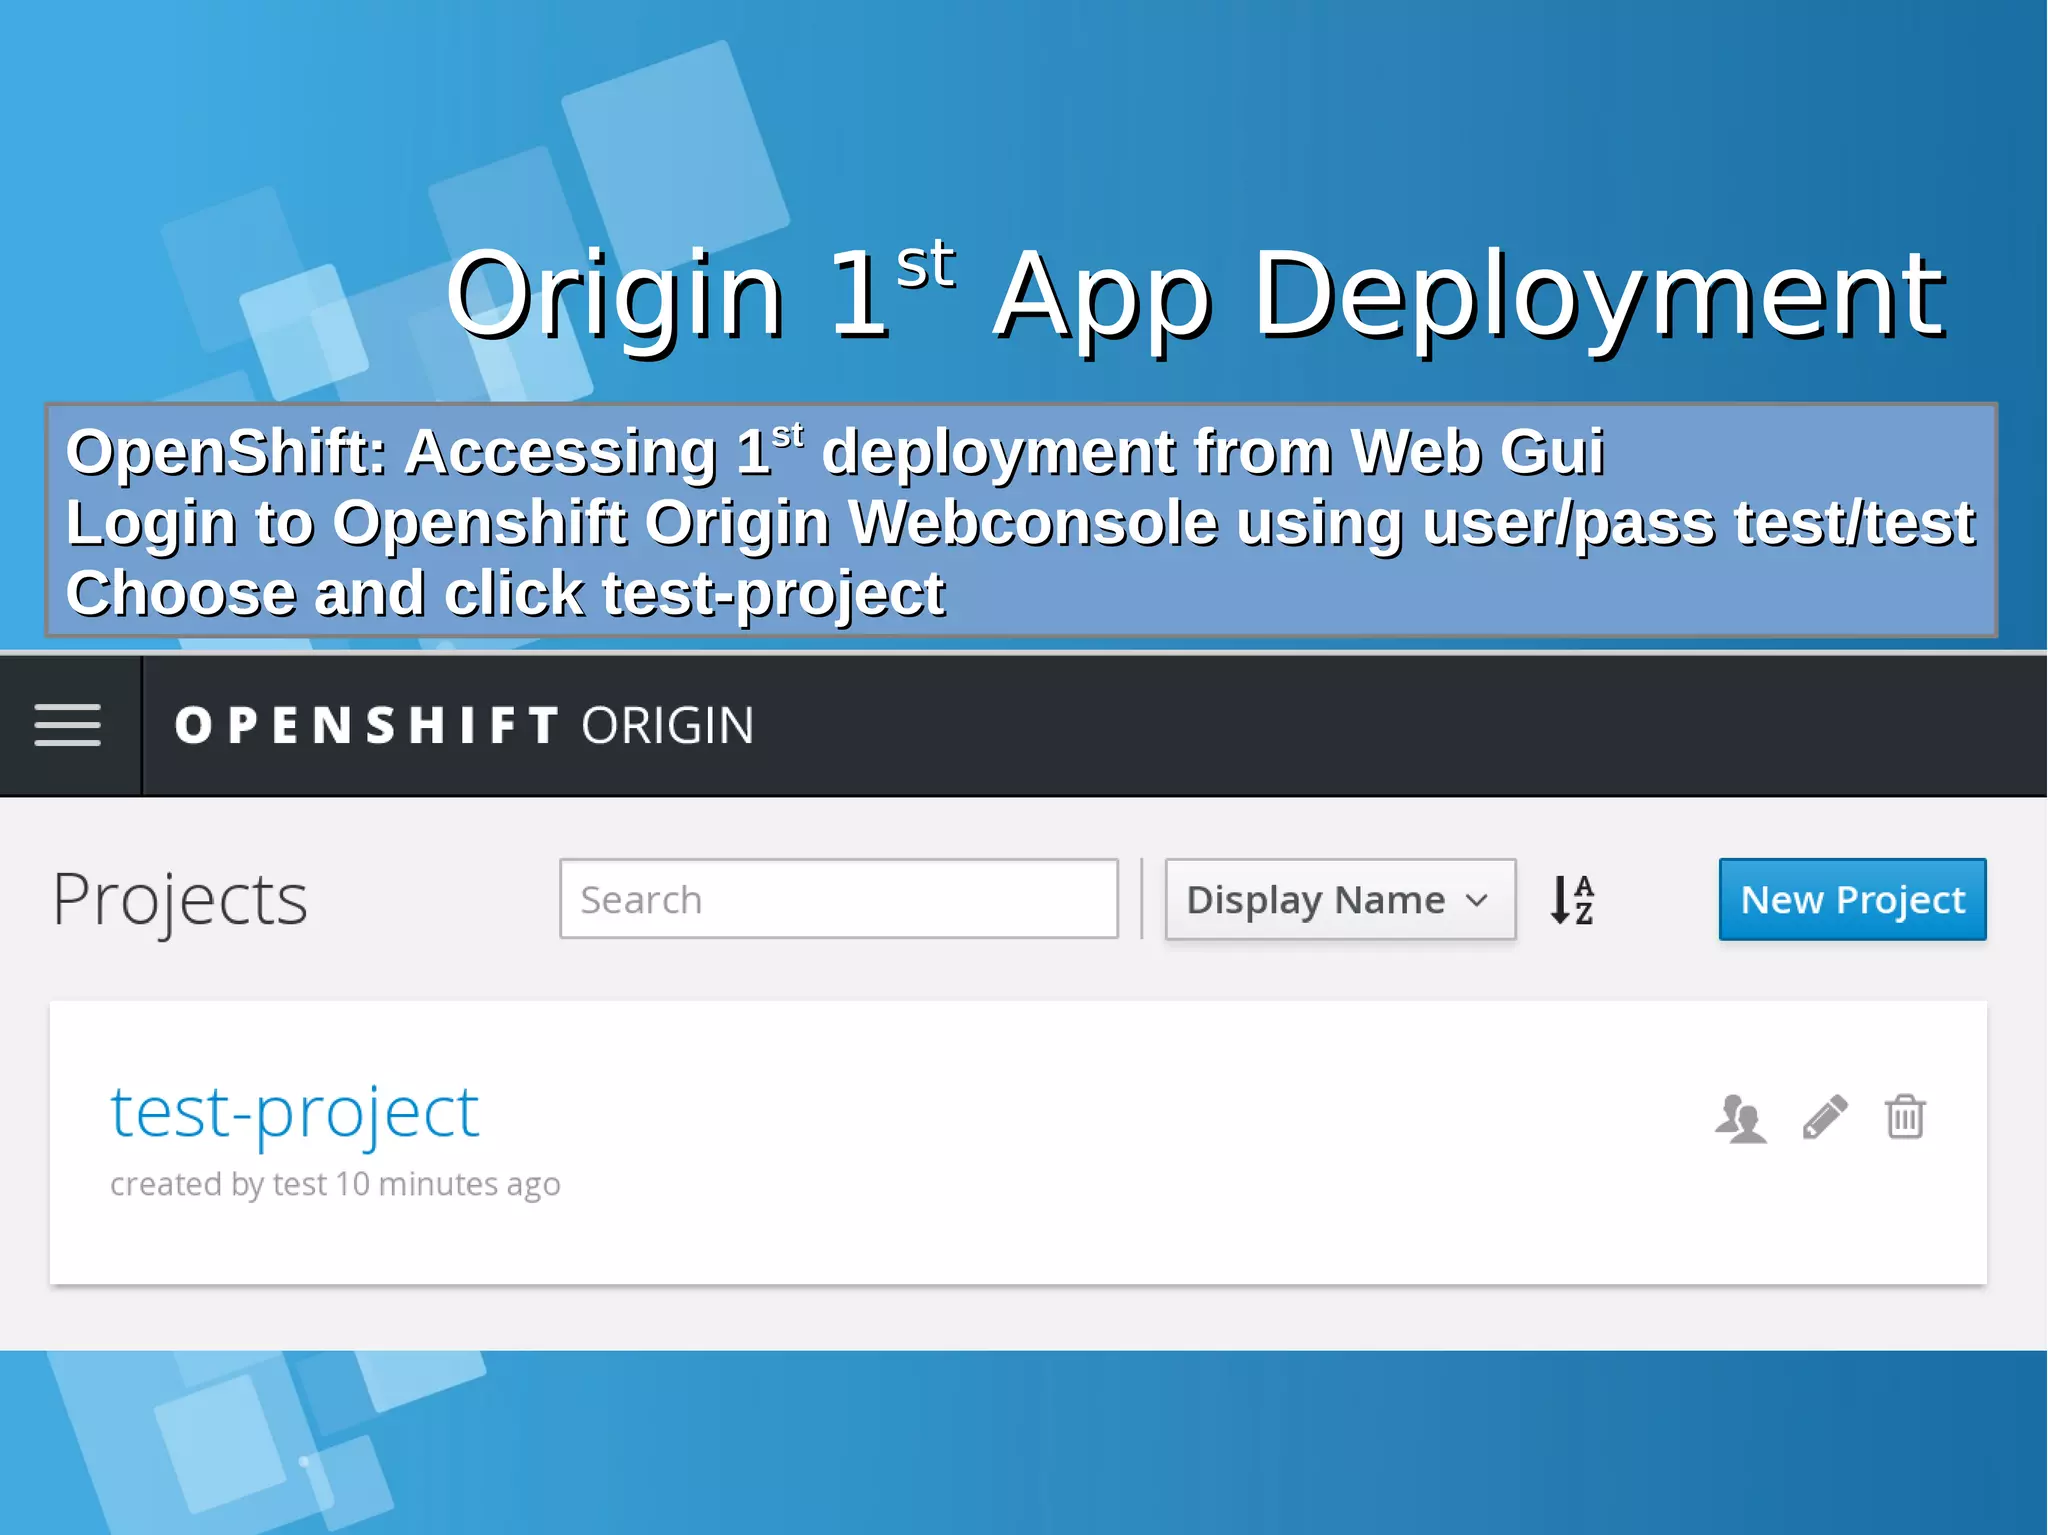
![Creating projectCreating project OpenShift: Test create new user and projectOpenShift: Test create new user and project [root@docker-host ~]# oc login Authentication required for https://10.7.60.26:8443 (openshift) Username: test Password: test Login successful. You don't have any projects. You can try to create a new project, by running oc new-project <projectname> [root@docker-host ~]# oc new-project test-project Now using project "test-project" on server "https://10.7.60.26:8443". You can add applications to this project with the 'new-app' command. For example, try: oc new-app centos/ruby-22-centos7~https://github.com/openshift/ruby-ex.git to build a new example application in Ruby.](https://image.slidesharecdn.com/journey-to-the-devops-automation-with-dockerkubernetesandopenshift-180325021200/75/Journey-to-the-devops-automation-with-docker-kubernetes-and-openshift-192-2048.jpg)
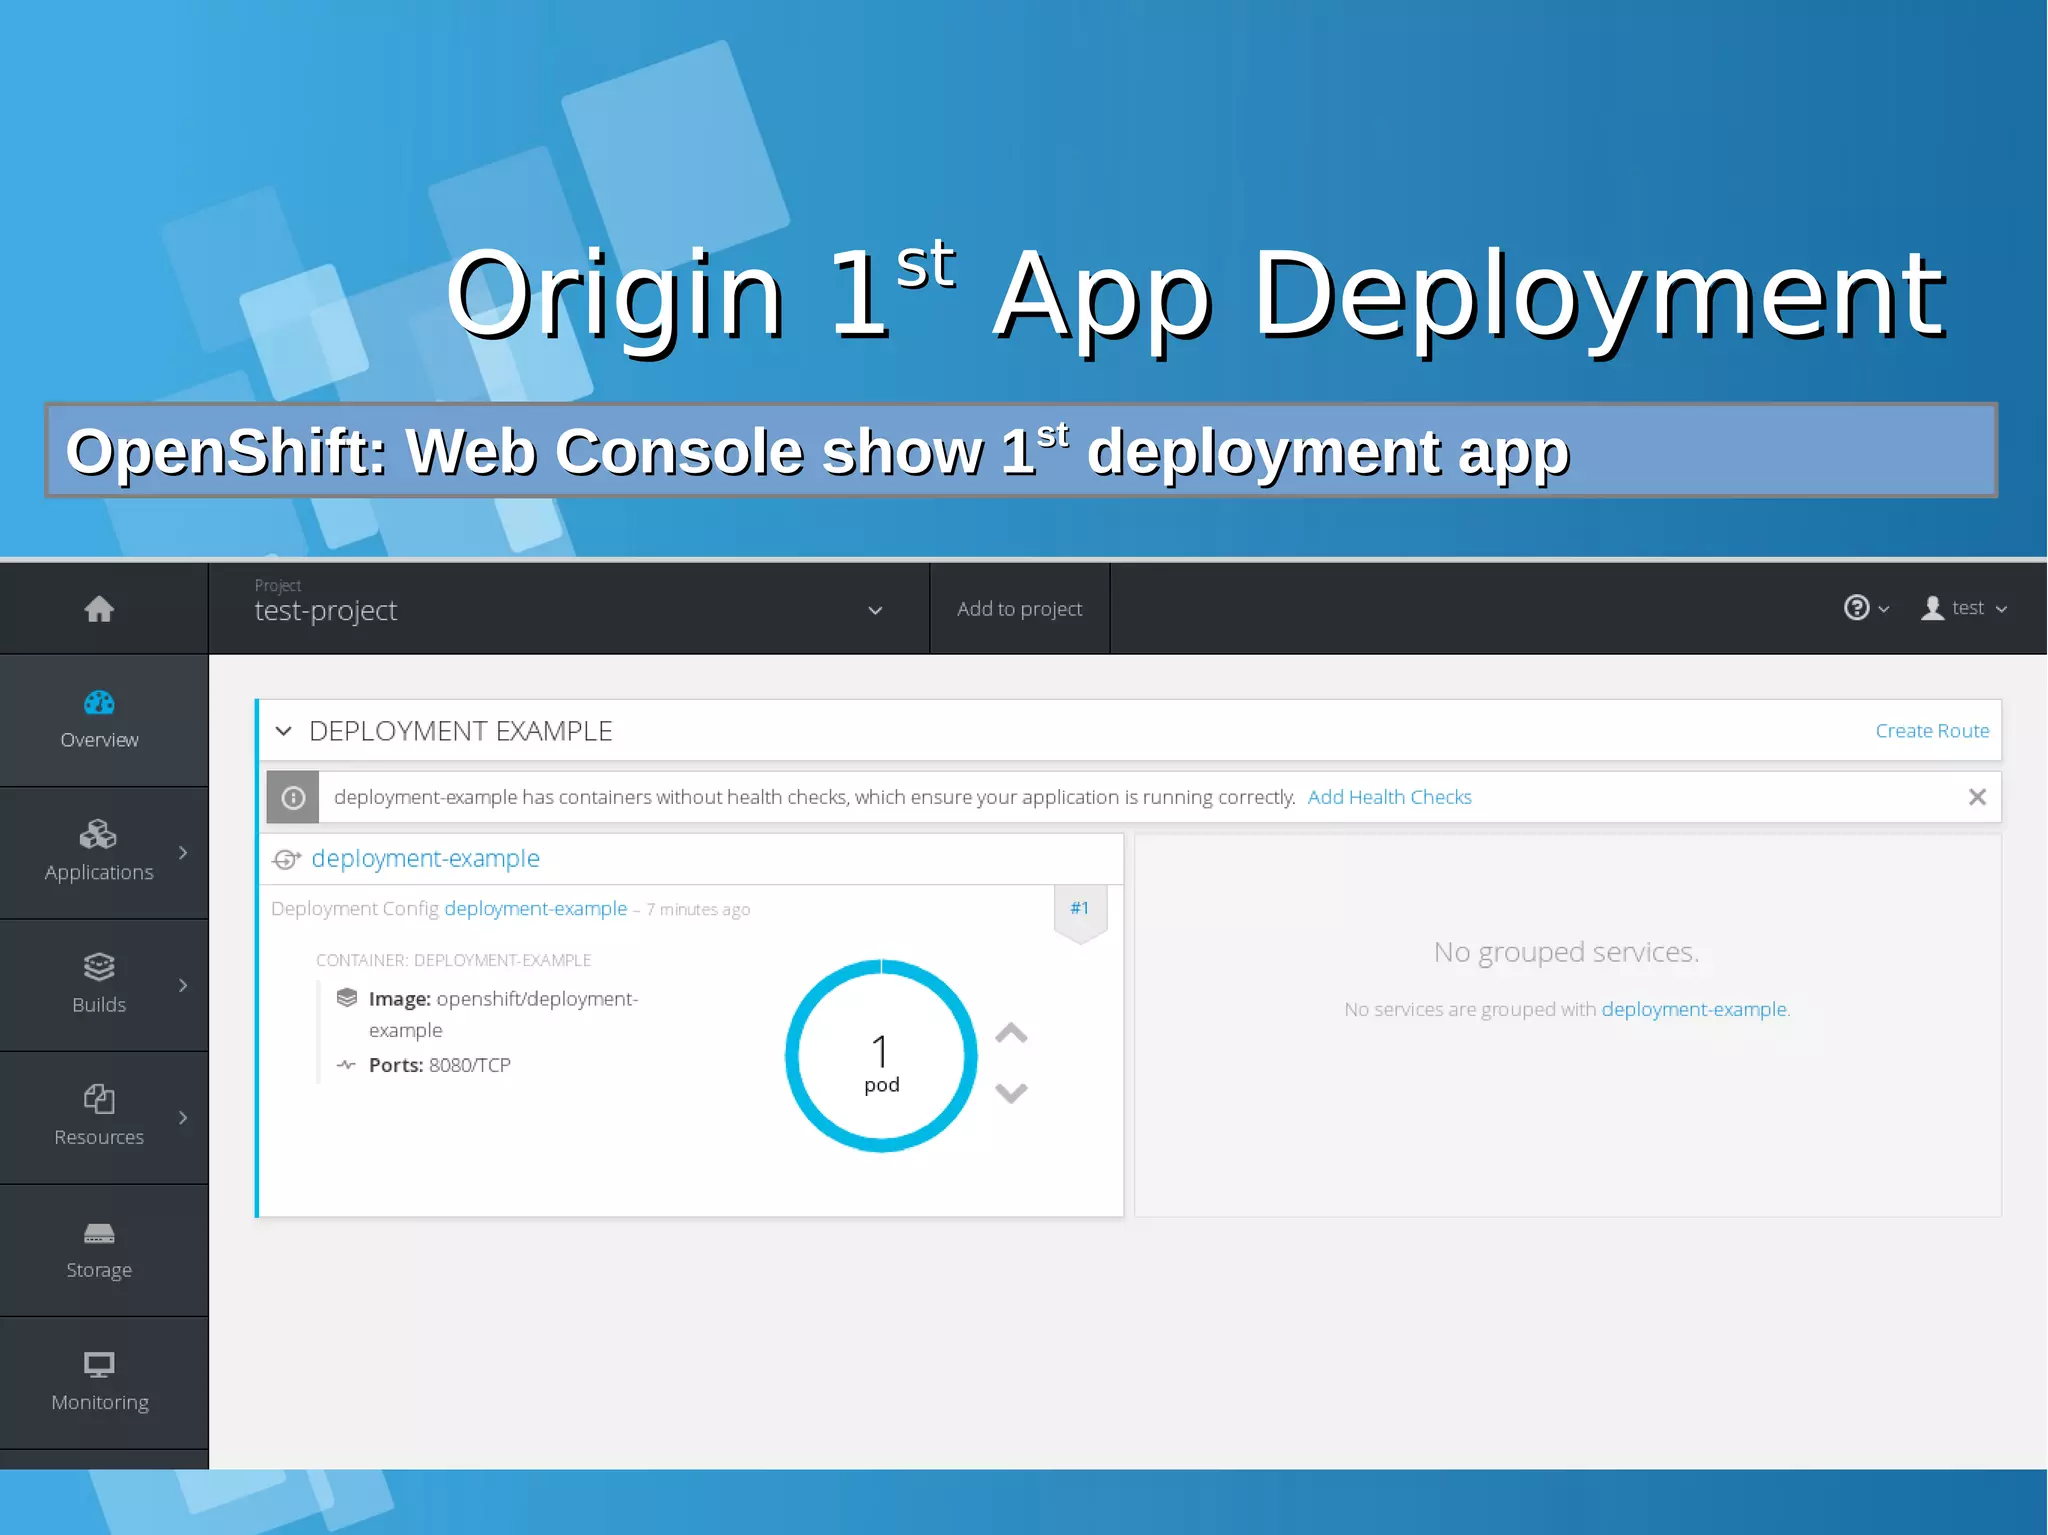
![Origin 1Origin 1stst App DeploymentApp Deployment OpenShift: Test create new app deploymentOpenShift: Test create new app deployment [root@docker-host ~]# oc new-app openshift/deployment-example --> Found Docker image 1c839d8 (23 months old) from Docker Hub for "openshift/deployment-example" * An image stream will be created as "deployment-example:latest" that will track this image * This image will be deployed in deployment config "deployment-example" * Port 8080/tcp will be load balanced by service "deployment-example" * Other containers can access this service through the hostname "deployment- example" * WARNING: Image "openshift/deployment-example" runs as the 'root' user which may not be permitted by your cluster administrator --> Creating resources ... imagestream "deployment-example" created deploymentconfig "deployment-example" created service "deployment-example" created --> Success Run 'oc status' to view your app. OpenShift: Monitor you deploymentOpenShift: Monitor you deployment [root@docker-host ~]# oc status In project test-project on server https://10.7.60.26:8443 svc/deployment-example - 172.30.96.17:8080 dc/deployment-example deploys istag/deployment-example:latest deployment #1 deployed about a minute ago - 1 pod View details with 'oc describe <resource>/<name>' or list everything with 'oc get all'.](https://image.slidesharecdn.com/journey-to-the-devops-automation-with-dockerkubernetesandopenshift-180325021200/75/Journey-to-the-devops-automation-with-docker-kubernetes-and-openshift-193-2048.jpg)
![Origin 1Origin 1stst App DeploymentApp Deployment OpenShift: List all resources from 1OpenShift: List all resources from 1stst deploymentdeployment [root@docker-host ~]# oc get all NAME DOCKER REPO TAGS UPDATED is/deployment-example 172.30.1.1:5000/test-project/deployment-example latest 2 minutes ago NAME REVISION DESIRED CURRENT TRIGGERED BY dc/deployment-example 1 1 1 config,image(deployment- example:latest) NAME DESIRED CURRENT READY AGE rc/deployment-example-1 1 1 1 2m NAME CLUSTER-IP EXTERNAL-IP PORT(S) AGE svc/deployment-example 172.30.96.17 <none> 8080/TCP 2m NAME READY STATUS RESTARTS AGE po/deployment-example-1-jxctr 1/1 Running 0 2m [root@docker-host ~]# oc get pod NAME READY STATUS RESTARTS AGE deployment-example-1-jxctr 1/1 Running 0 3m [root@docker-host ~]# oc get svc NAME CLUSTER-IP EXTERNAL-IP PORT(S) AGE deployment-example 172.30.96.17 <none> 8080/TCP 3m](https://image.slidesharecdn.com/journey-to-the-devops-automation-with-dockerkubernetesandopenshift-180325021200/75/Journey-to-the-devops-automation-with-docker-kubernetes-and-openshift-194-2048.jpg)
![Origin 1Origin 1stst App DeploymentApp Deployment OpenShift: from docker ps output, you can see the new dockerOpenShift: from docker ps output, you can see the new docker container is runningcontainer is running [root@docker-host ~]# docker ps | grep deployment-example be02326a13be openshift/deployment-example@sha256:ea913--dipotong--ecf421f99 "/deployment v1" 15 minutes ago Up 15 minutes k8s_deployment-example.92c6c479_deployment-example-1-jxctr_test-project_d2549bbf-4c6d- 11e7-9946-080027b2e552_6eb2de05 9989834d0c74 openshift/origin-pod:v1.5.1 "/pod" 15 minutes ago Up 15 minutes k8s_POD.bc05fe90_deployment-example-1-jxctr_test- project_d2549bbf-4c6d-11e7-9946-080027b2e552_55ba483b](https://image.slidesharecdn.com/journey-to-the-devops-automation-with-dockerkubernetesandopenshift-180325021200/75/Journey-to-the-devops-automation-with-docker-kubernetes-and-openshift-197-2048.jpg)
![Origin 1Origin 1stst App DeploymentApp Deployment OpenShift: Test your 1OpenShift: Test your 1stst App using curl and from insideApp using curl and from inside container hostcontainer host [root@docker-host ~]# oc status In project test-project on server https://10.7.60.26:8443 svc/deployment-example - 172.30.96.17:8080 dc/deployment-example deploys istag/deployment-example:latest deployment #1 deployed 23 minutes ago - 1 pod View details with 'oc describe <resource>/<name>' or list everything with 'oc get all'. [root@docker-host ~]# curl 172.30.96.17:8080 <!DOCTYPE html> <html lang="en"> <head> <meta charset="utf-8"> <title>Deployment Demonstration</title> <meta name="viewport" content="width=device-width, initial-scale=1.0"> <style> HTML{height:100%;} BODY{font-family:Helvetica,Arial;display:flex;display:-webkit-flex;align- items:center;justify-content:center;-webkit-align-items:center;-webkit-box- align:center;-webkit-justify-content:center;height:100%;} .box{background:#006e9c;color:white;text-align:center;border- radius:10px;display:inline-block;} H1{font-size:10em;line-height:1.5em;margin:0 0.5em;} H2{margin-top:0;} </style> </head> <body> <div class="box"><h1>v1</h1><h2></h2></div> </body>](https://image.slidesharecdn.com/journey-to-the-devops-automation-with-dockerkubernetesandopenshift-180325021200/75/Journey-to-the-devops-automation-with-docker-kubernetes-and-openshift-198-2048.jpg)
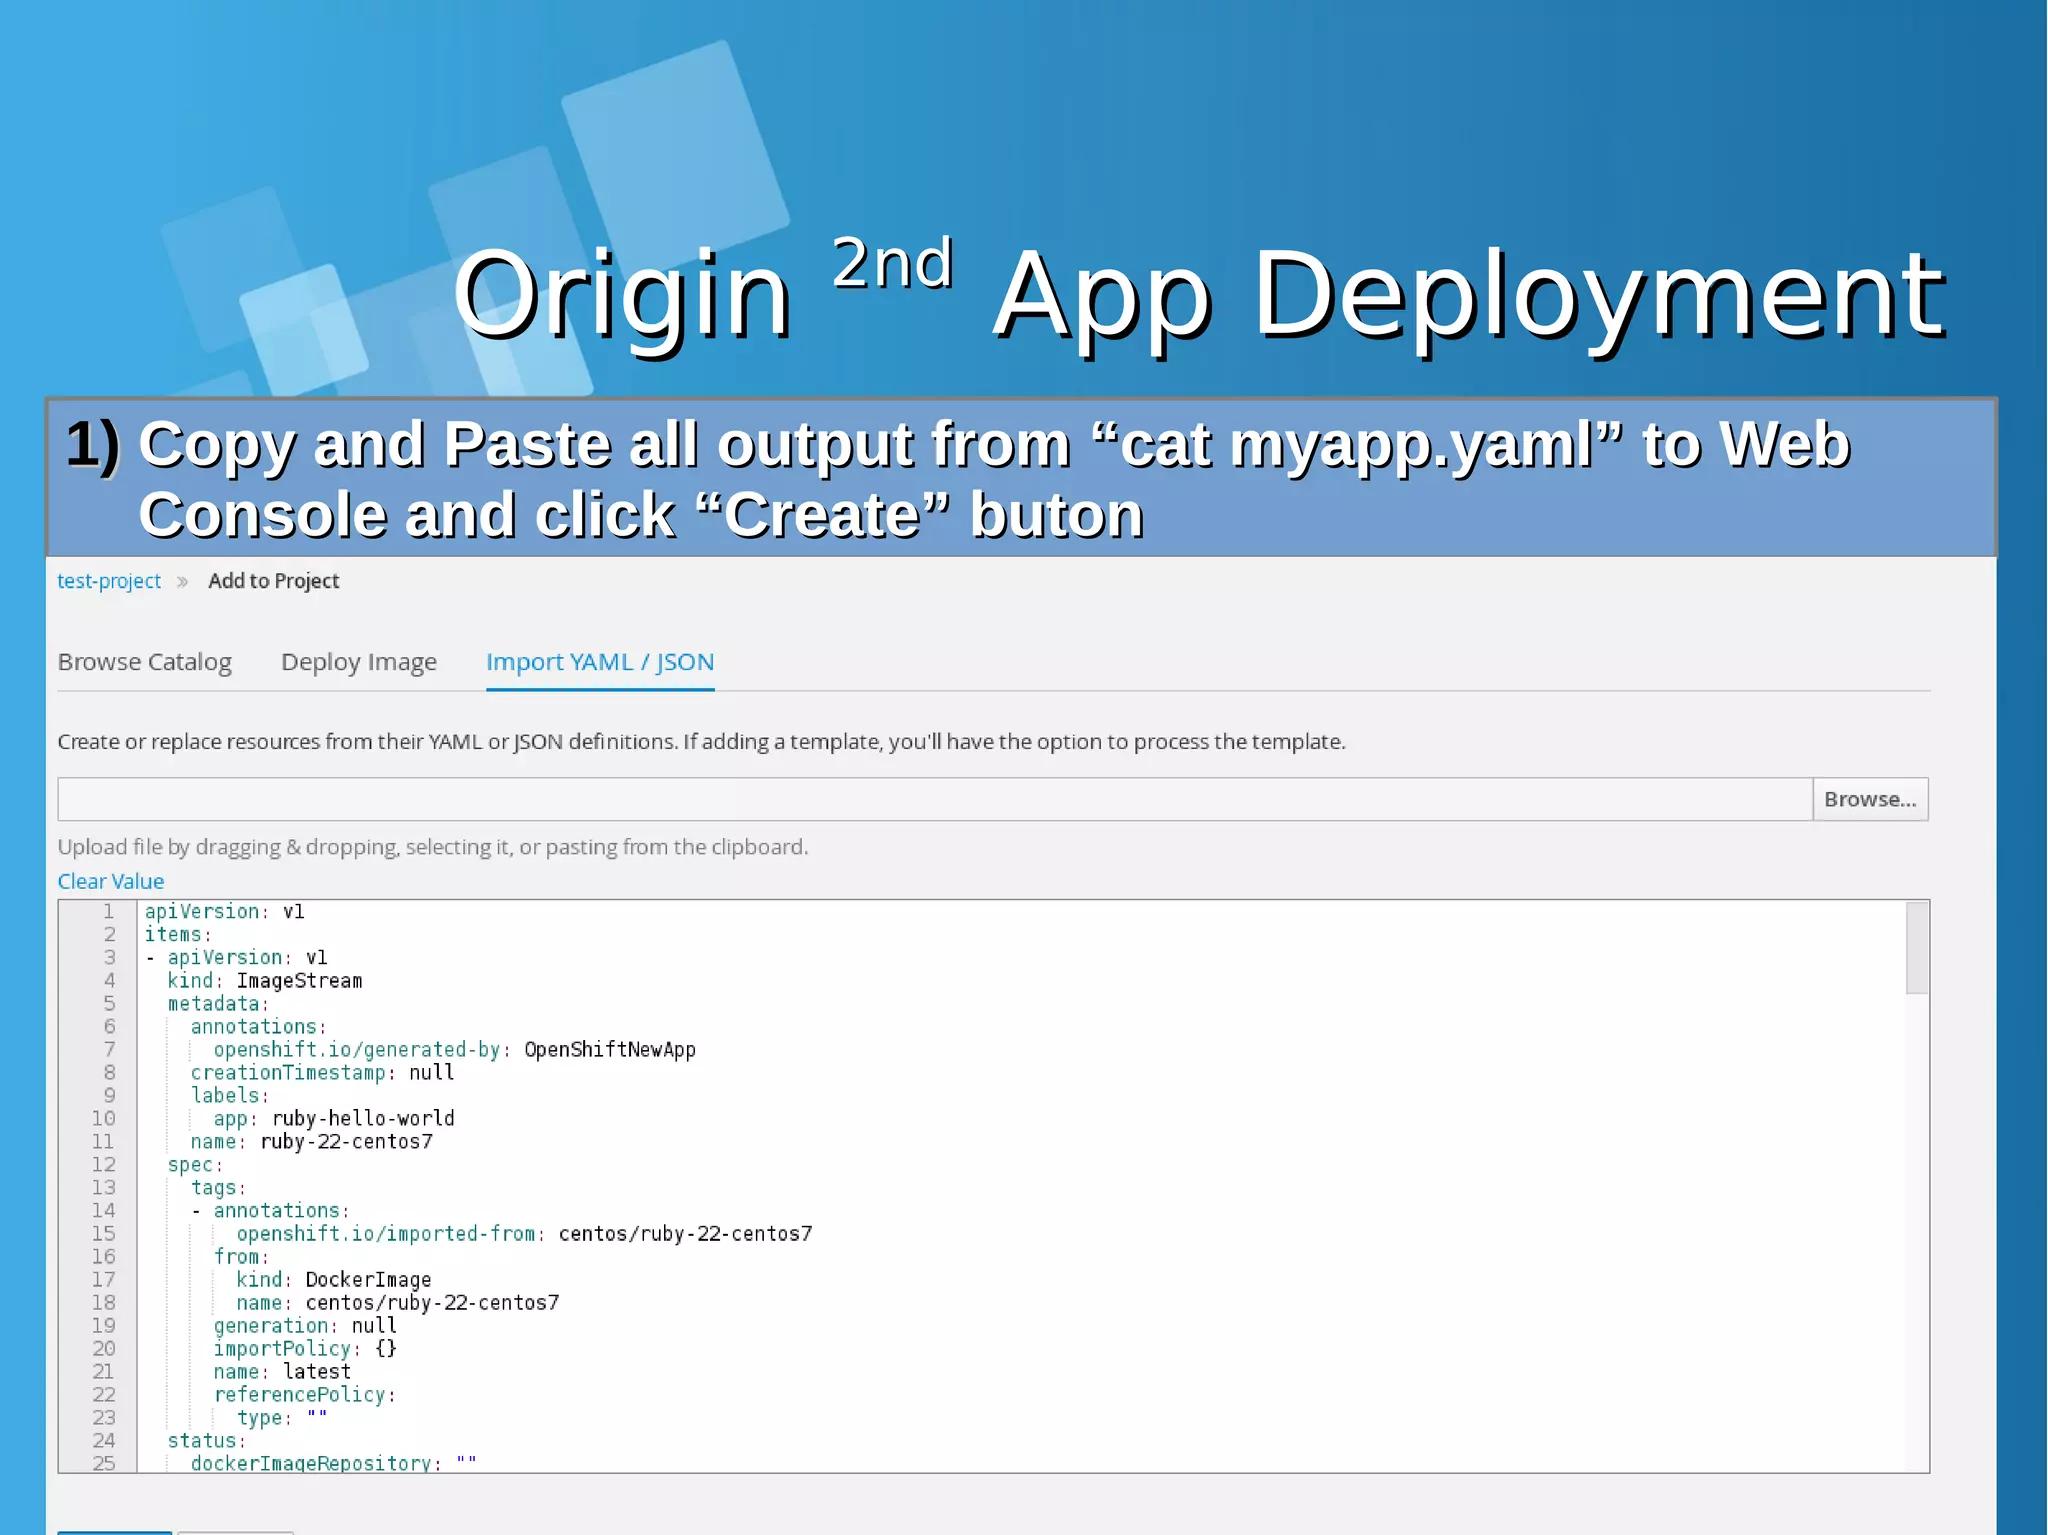
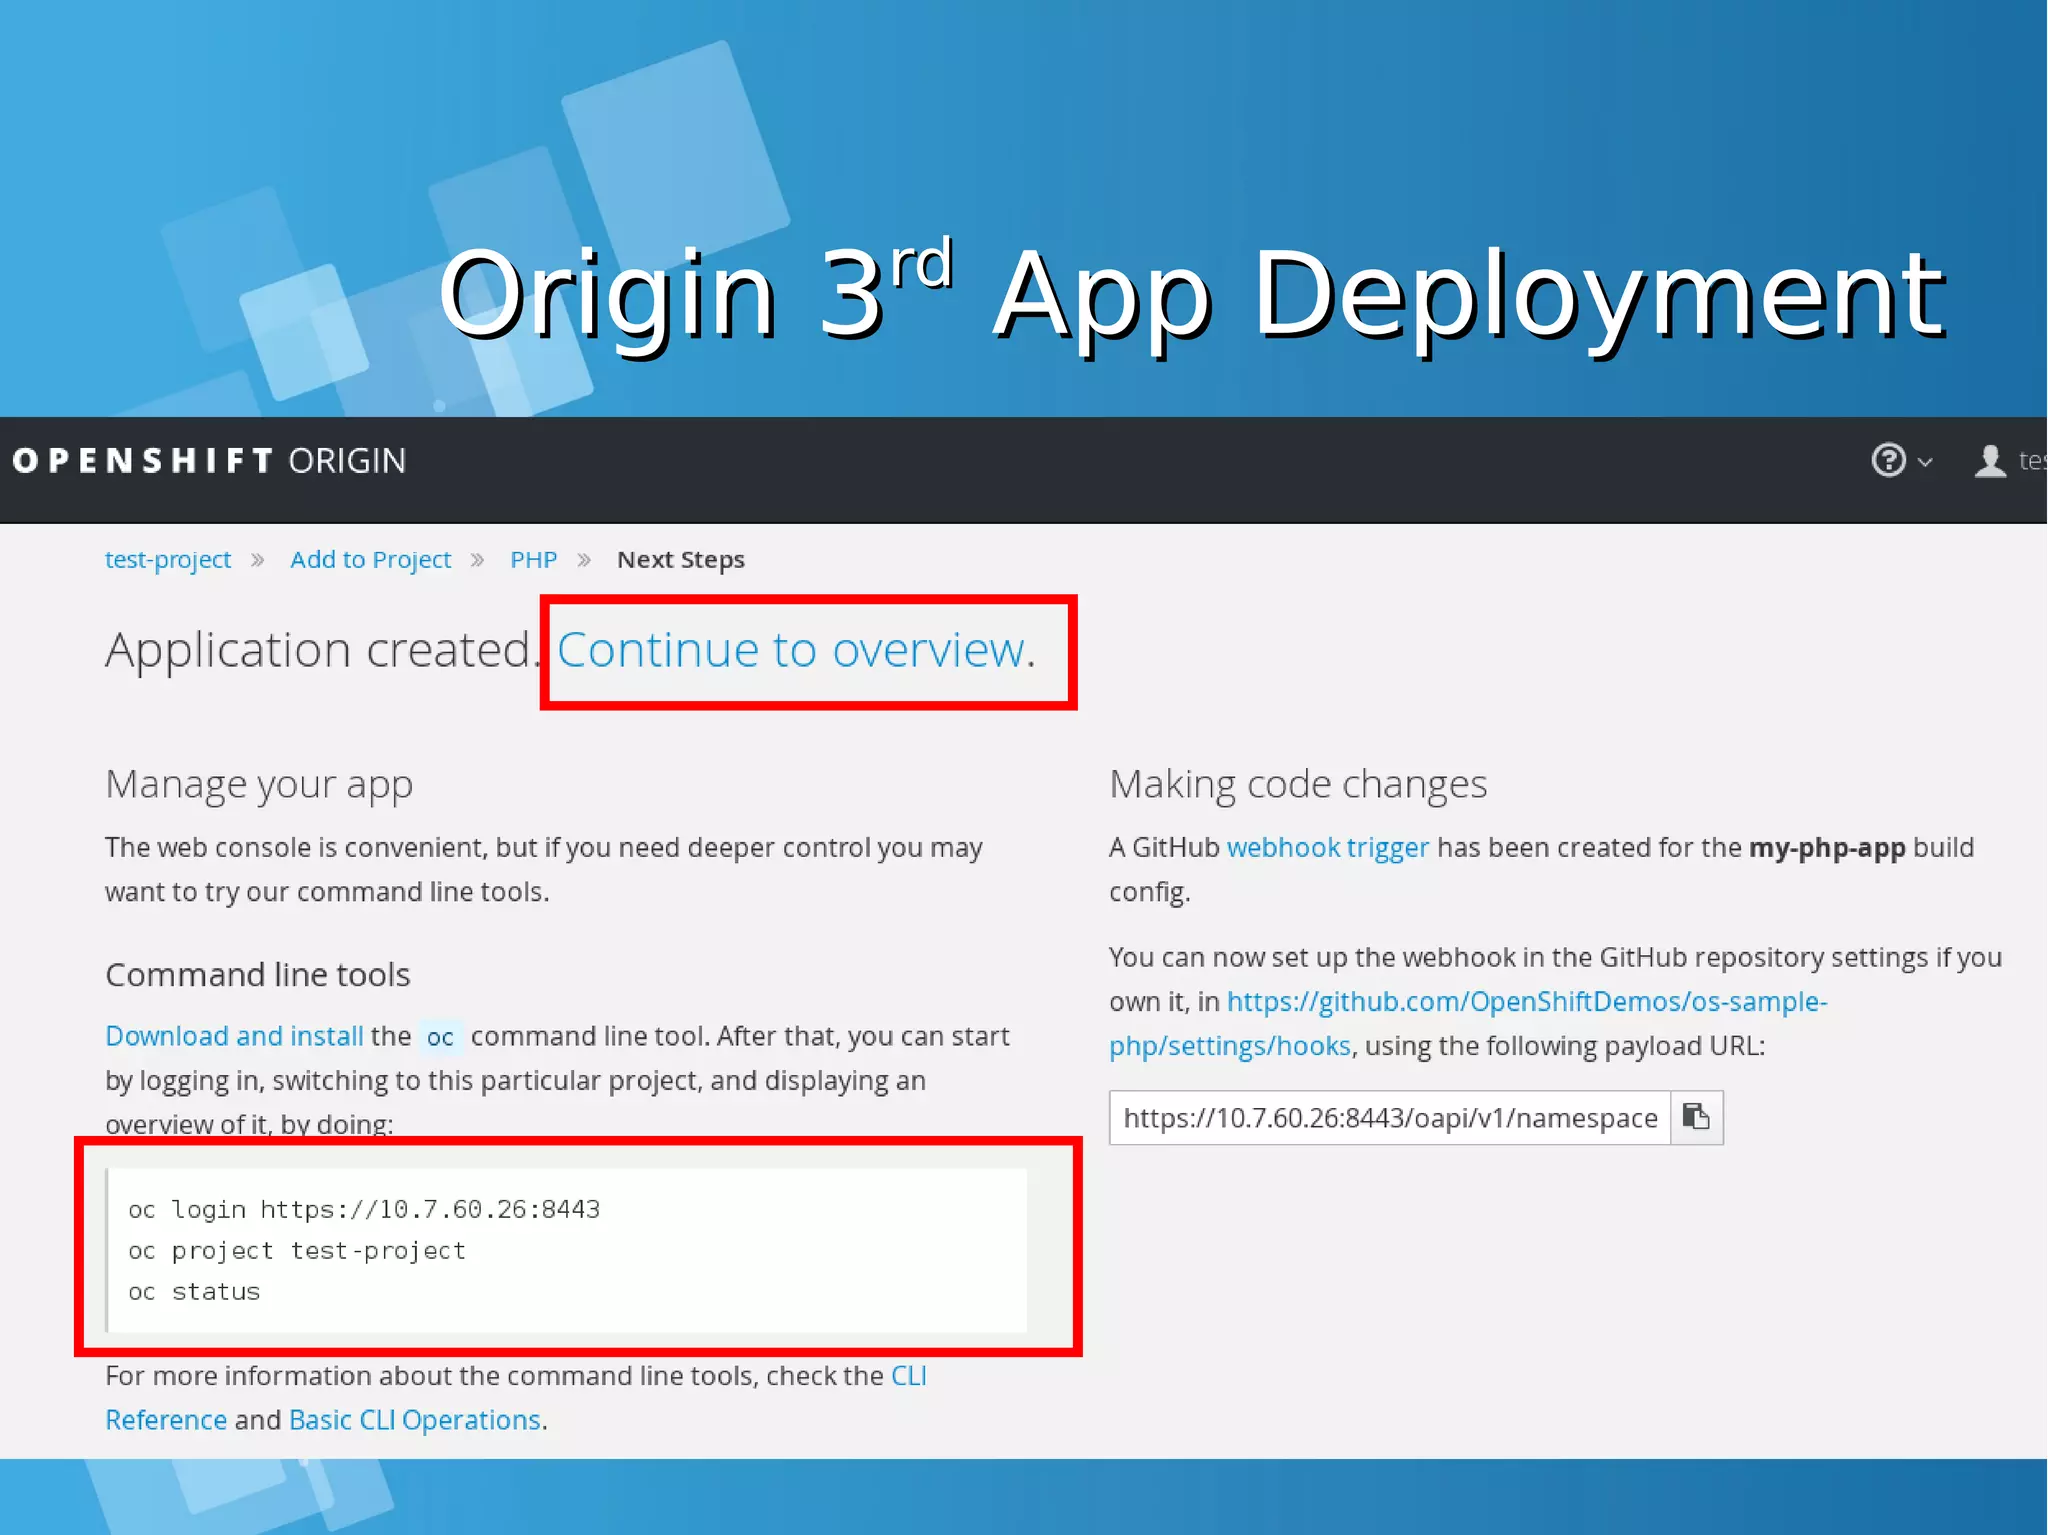
![OriginOrigin 2nd2nd App DeploymentApp Deployment Lets continue to 2Lets continue to 2ndnd App deployment, but for now, we usingApp deployment, but for now, we using Web ConsoleWeb Console 1)1) Klik “Add to Project” on Web ConsoleKlik “Add to Project” on Web Console 2)2) Choose “Import YAML / JSON”Choose “Import YAML / JSON” 3)3) Run following command:Run following command: [root@docker-host ~]# oc new-app https://github.com/openshift/ruby-hello-world -o yaml > myapp.yaml [root@docker-host ~]# cat myapp.yaml apiVersion: v1 items: - apiVersion: v1 kind: ImageStream metadata: annotations: openshift.io/generated-by: OpenShiftNewApp creationTimestamp: null labels: app: ruby-hello-world name: ruby-22-centos7 -------DIPOTONG-------------](https://image.slidesharecdn.com/journey-to-the-devops-automation-with-dockerkubernetesandopenshift-180325021200/75/Journey-to-the-devops-automation-with-docker-kubernetes-and-openshift-199-2048.jpg)
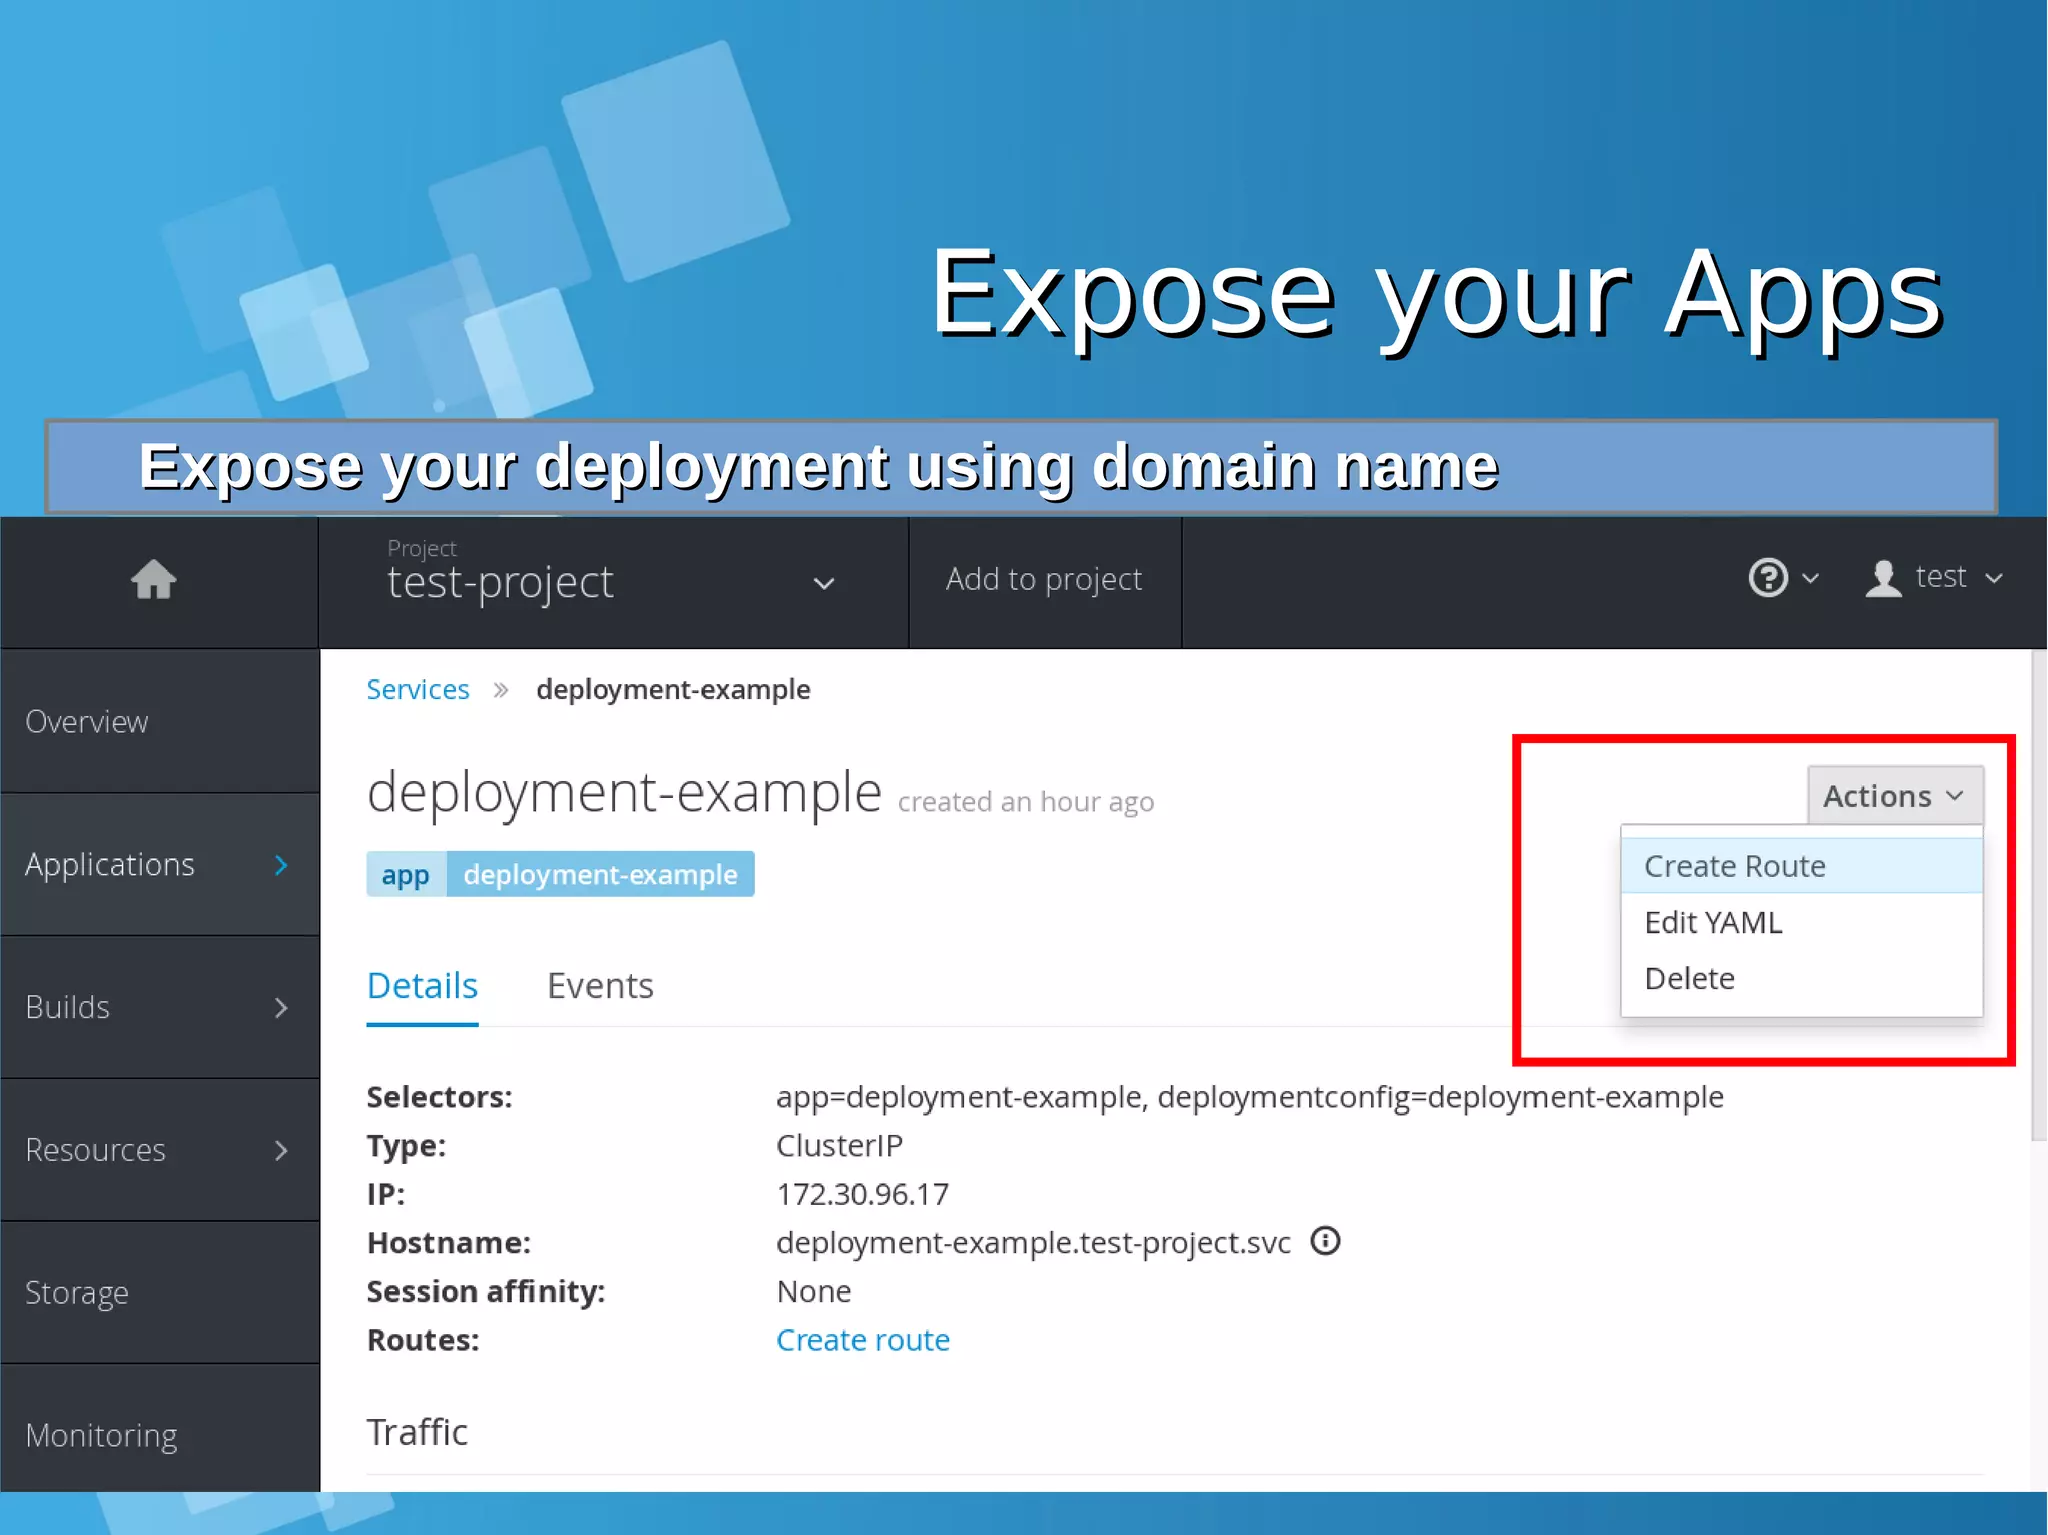
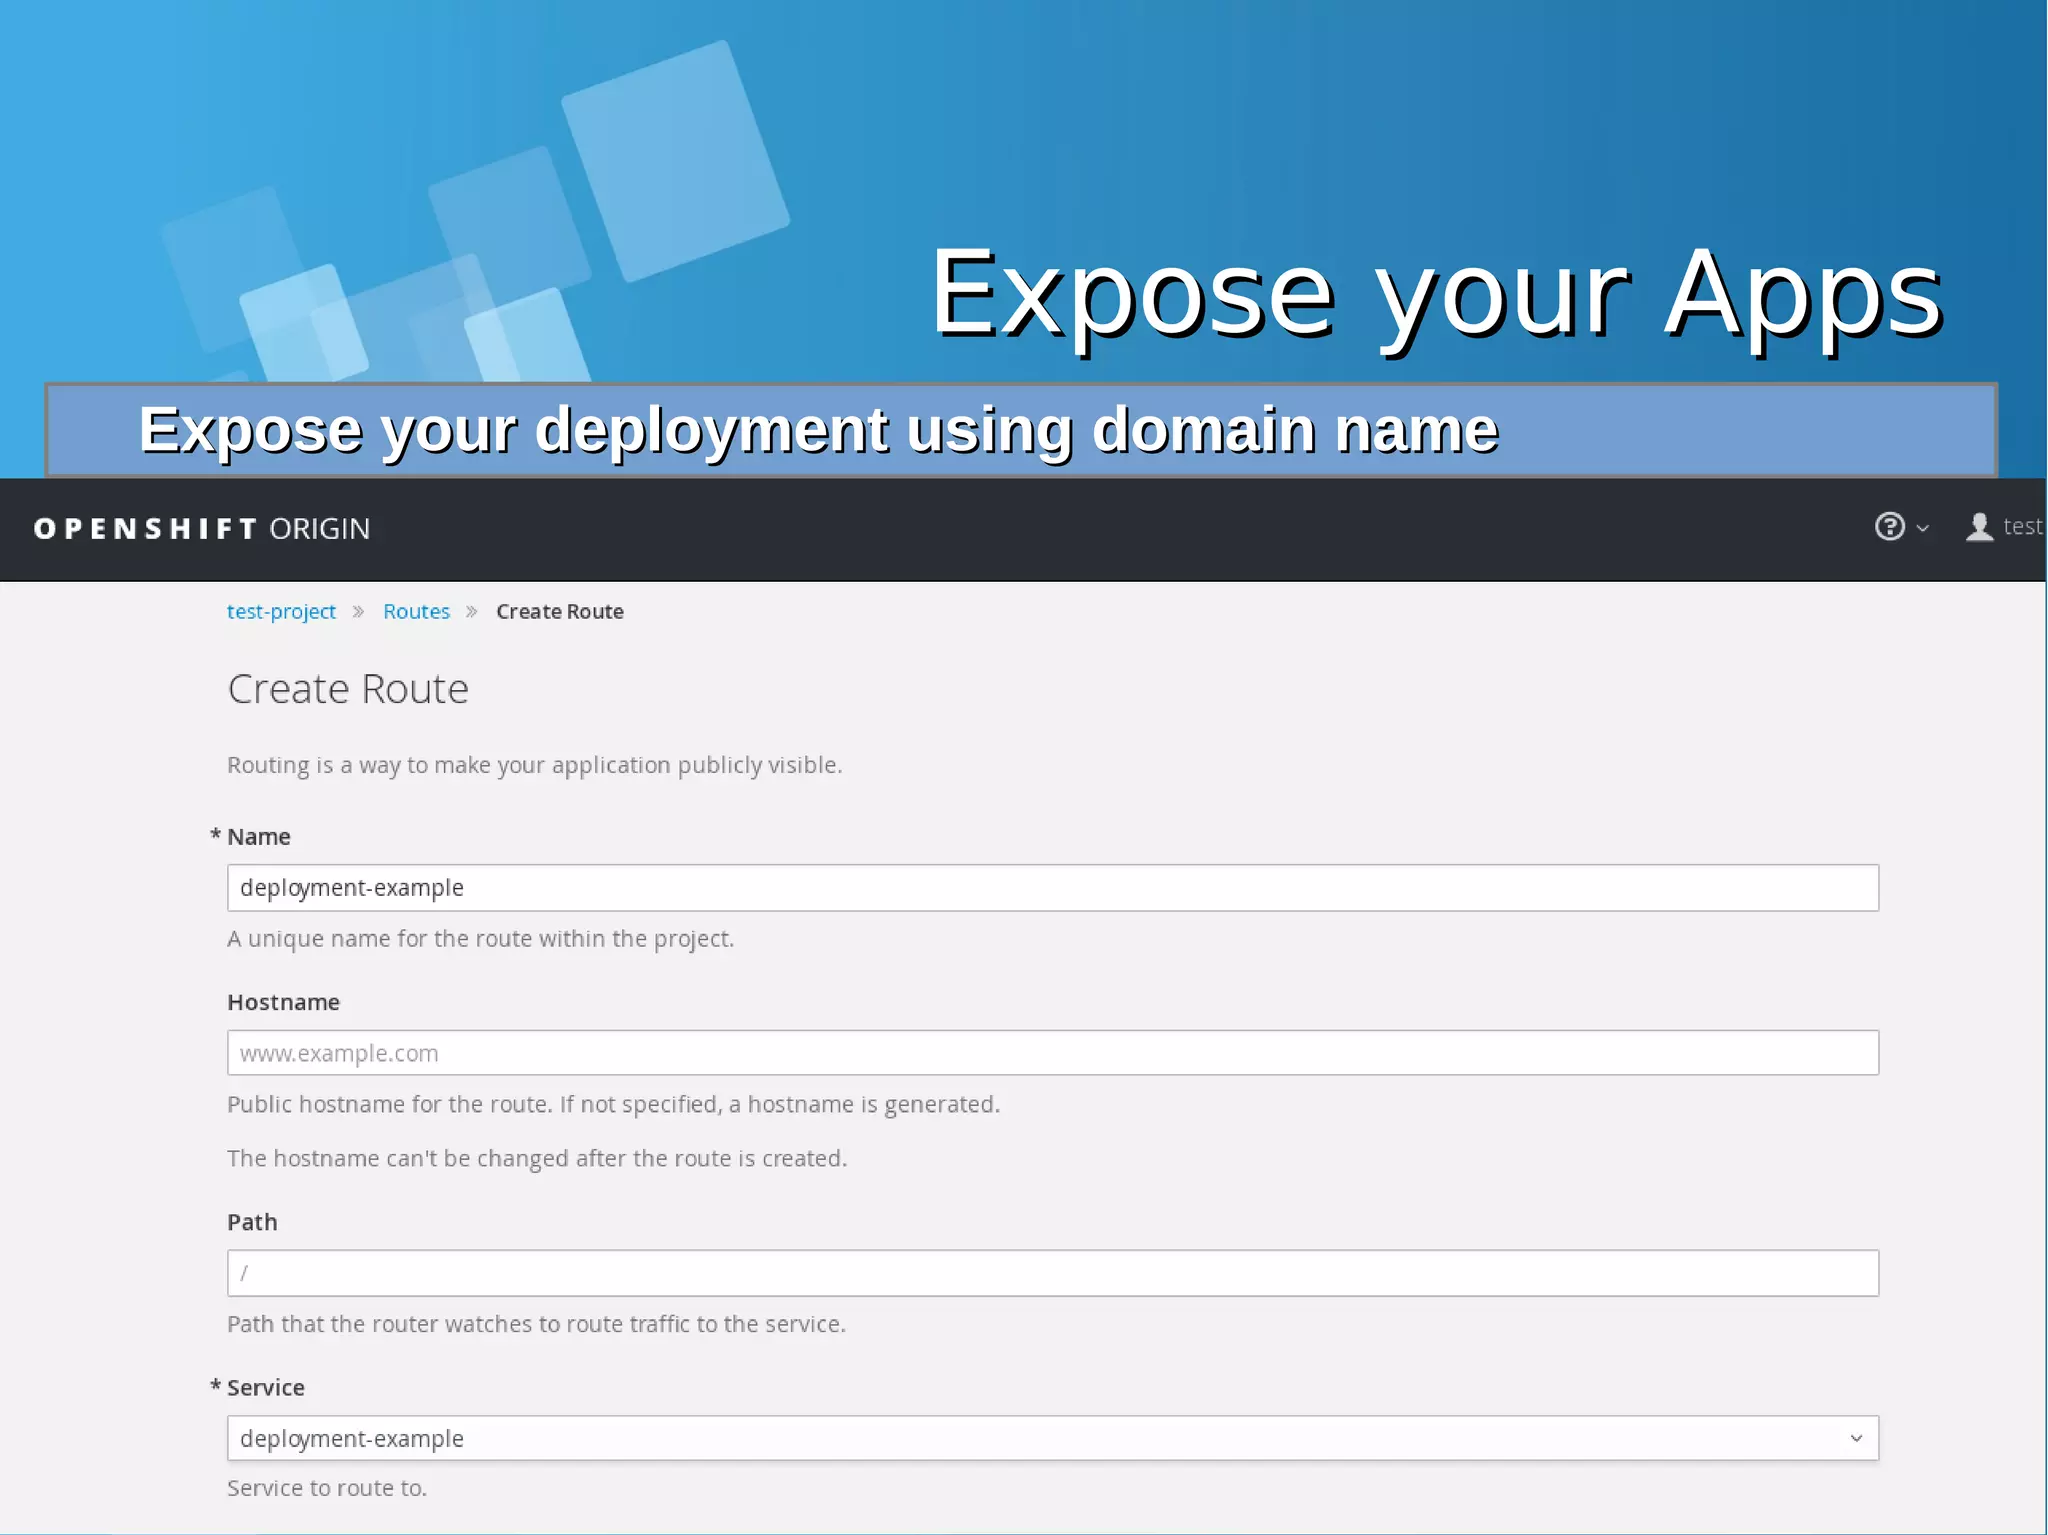

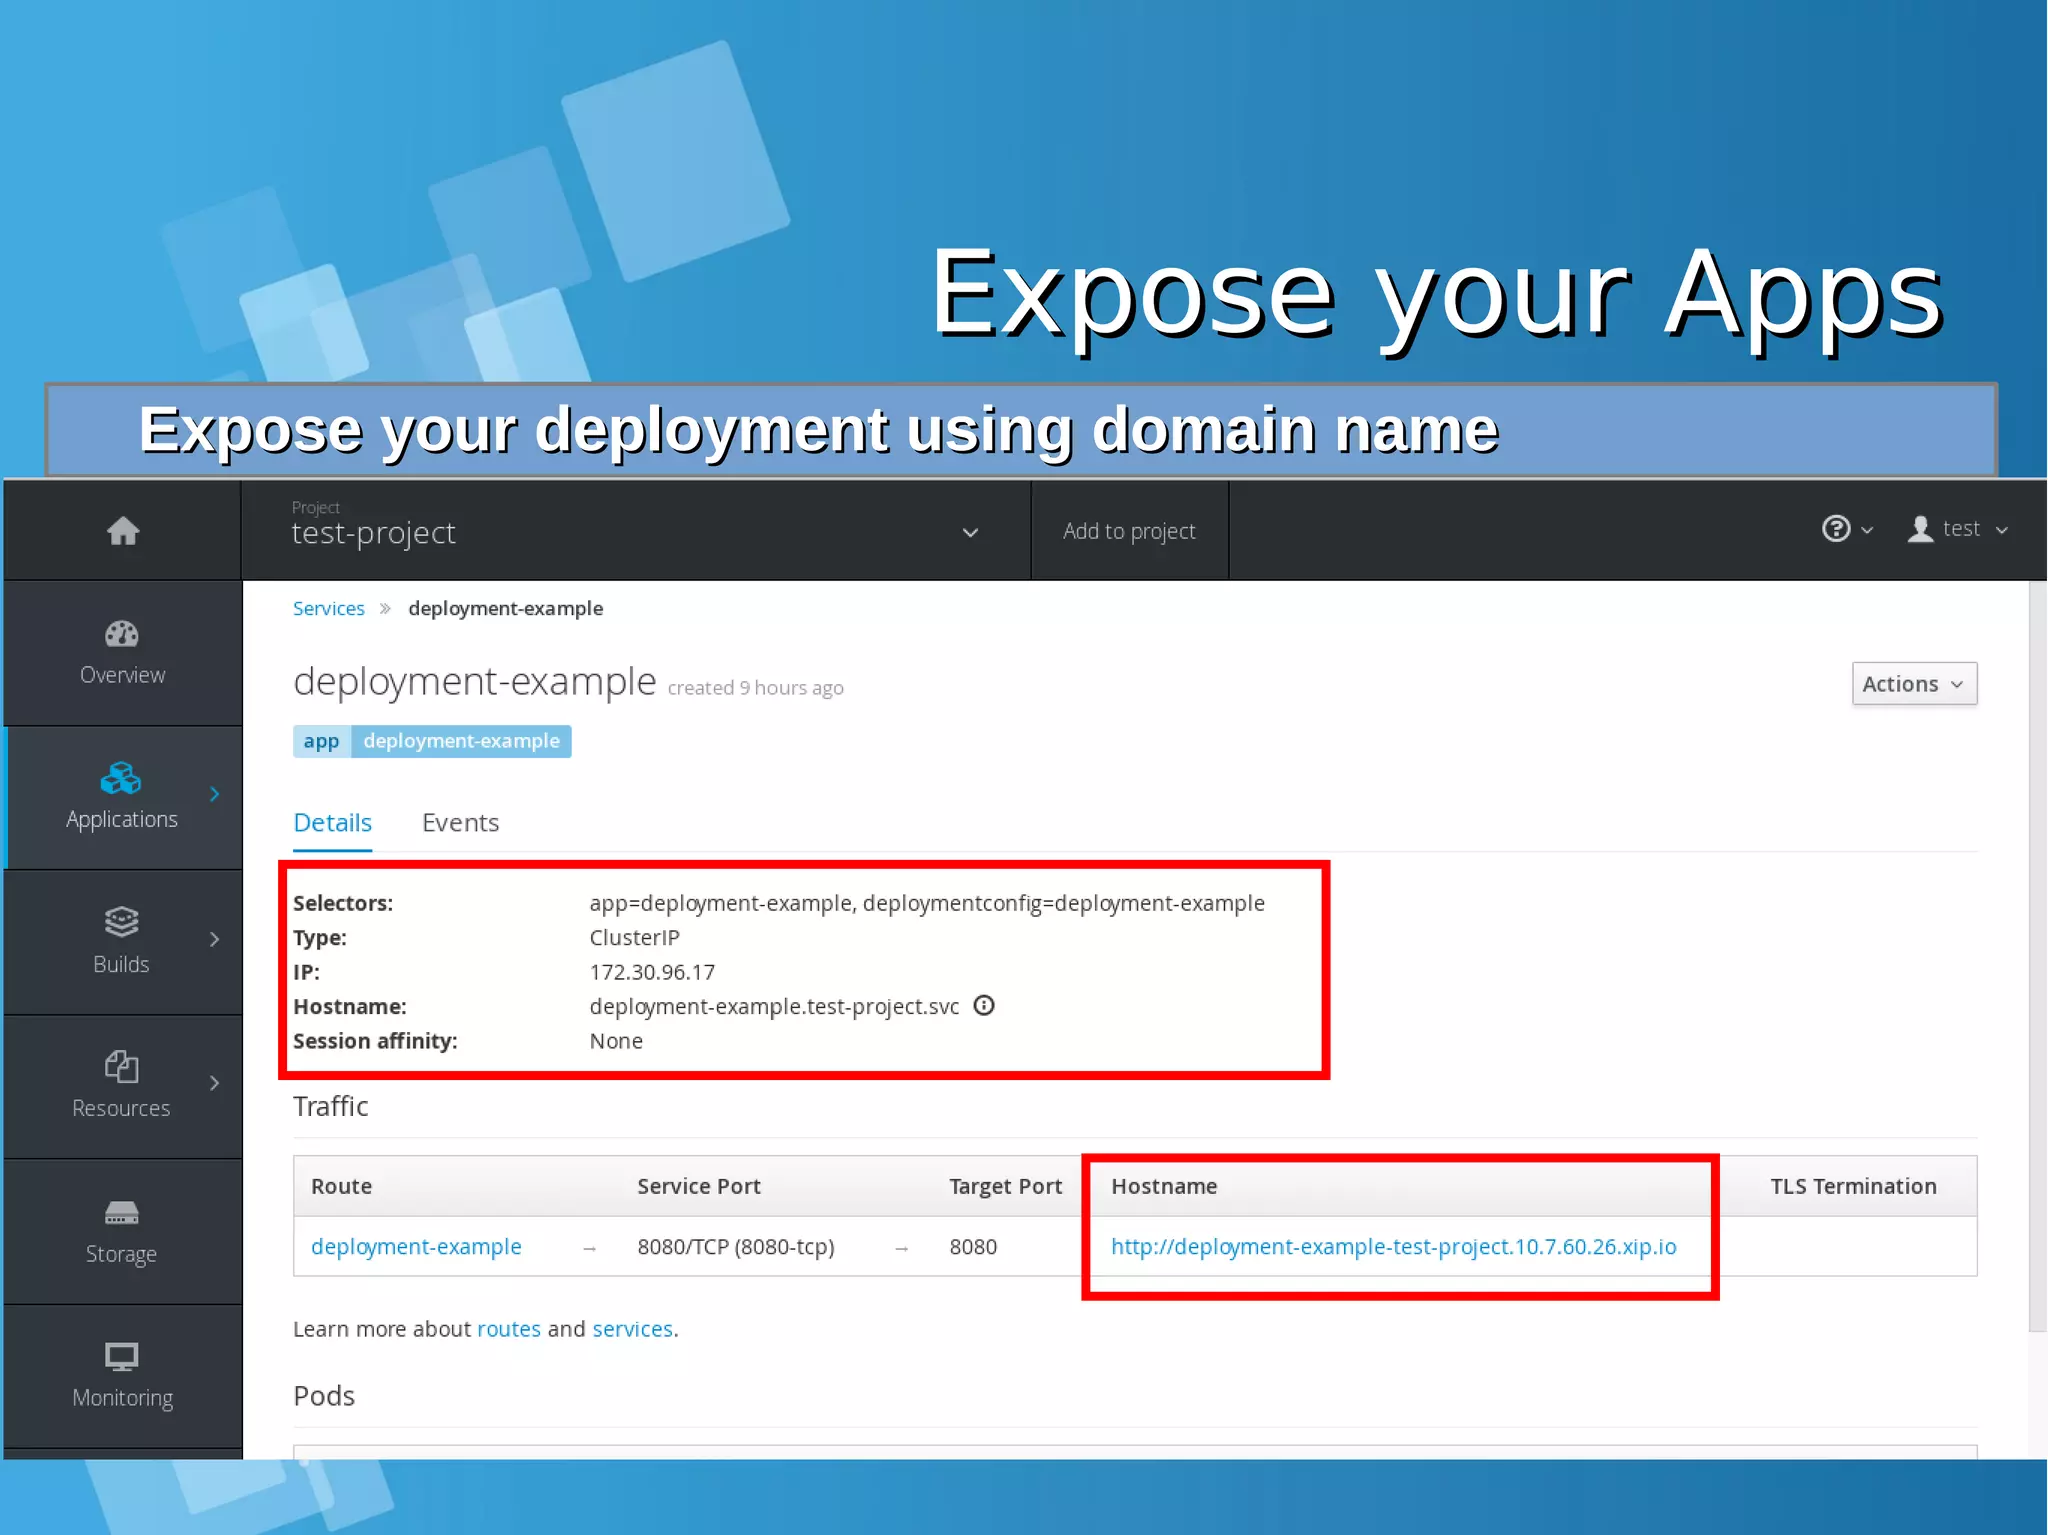
![Expose your AppsExpose your Apps Configure static DNS file /etc/hosts on you Laptop and allowConfigure static DNS file /etc/hosts on you Laptop and allow port 80, 443 from docker-host firewallport 80, 443 from docker-host firewall root@nobody:/media/yusuf/OS/KSEI# cat /etc/hosts | grep xip.io 10.7.60.26 deployment-example-test-project.10.7.60.26.xip.io [root@docker-host ~]# iptables -I INPUT 1 -p tcp --dport 80 -j ACCEPT [root@docker-host ~]# iptables -I INPUT 1 -p tcp --dport 443 -j ACCEPT Accessing your application from Browser LaptopAccessing your application from Browser Laptop http://deployment-example-test-project.10.7.60.26.xip.io/http://deployment-example-test-project.10.7.60.26.xip.io/](https://image.slidesharecdn.com/journey-to-the-devops-automation-with-dockerkubernetesandopenshift-180325021200/75/Journey-to-the-devops-automation-with-docker-kubernetes-and-openshift-208-2048.jpg)
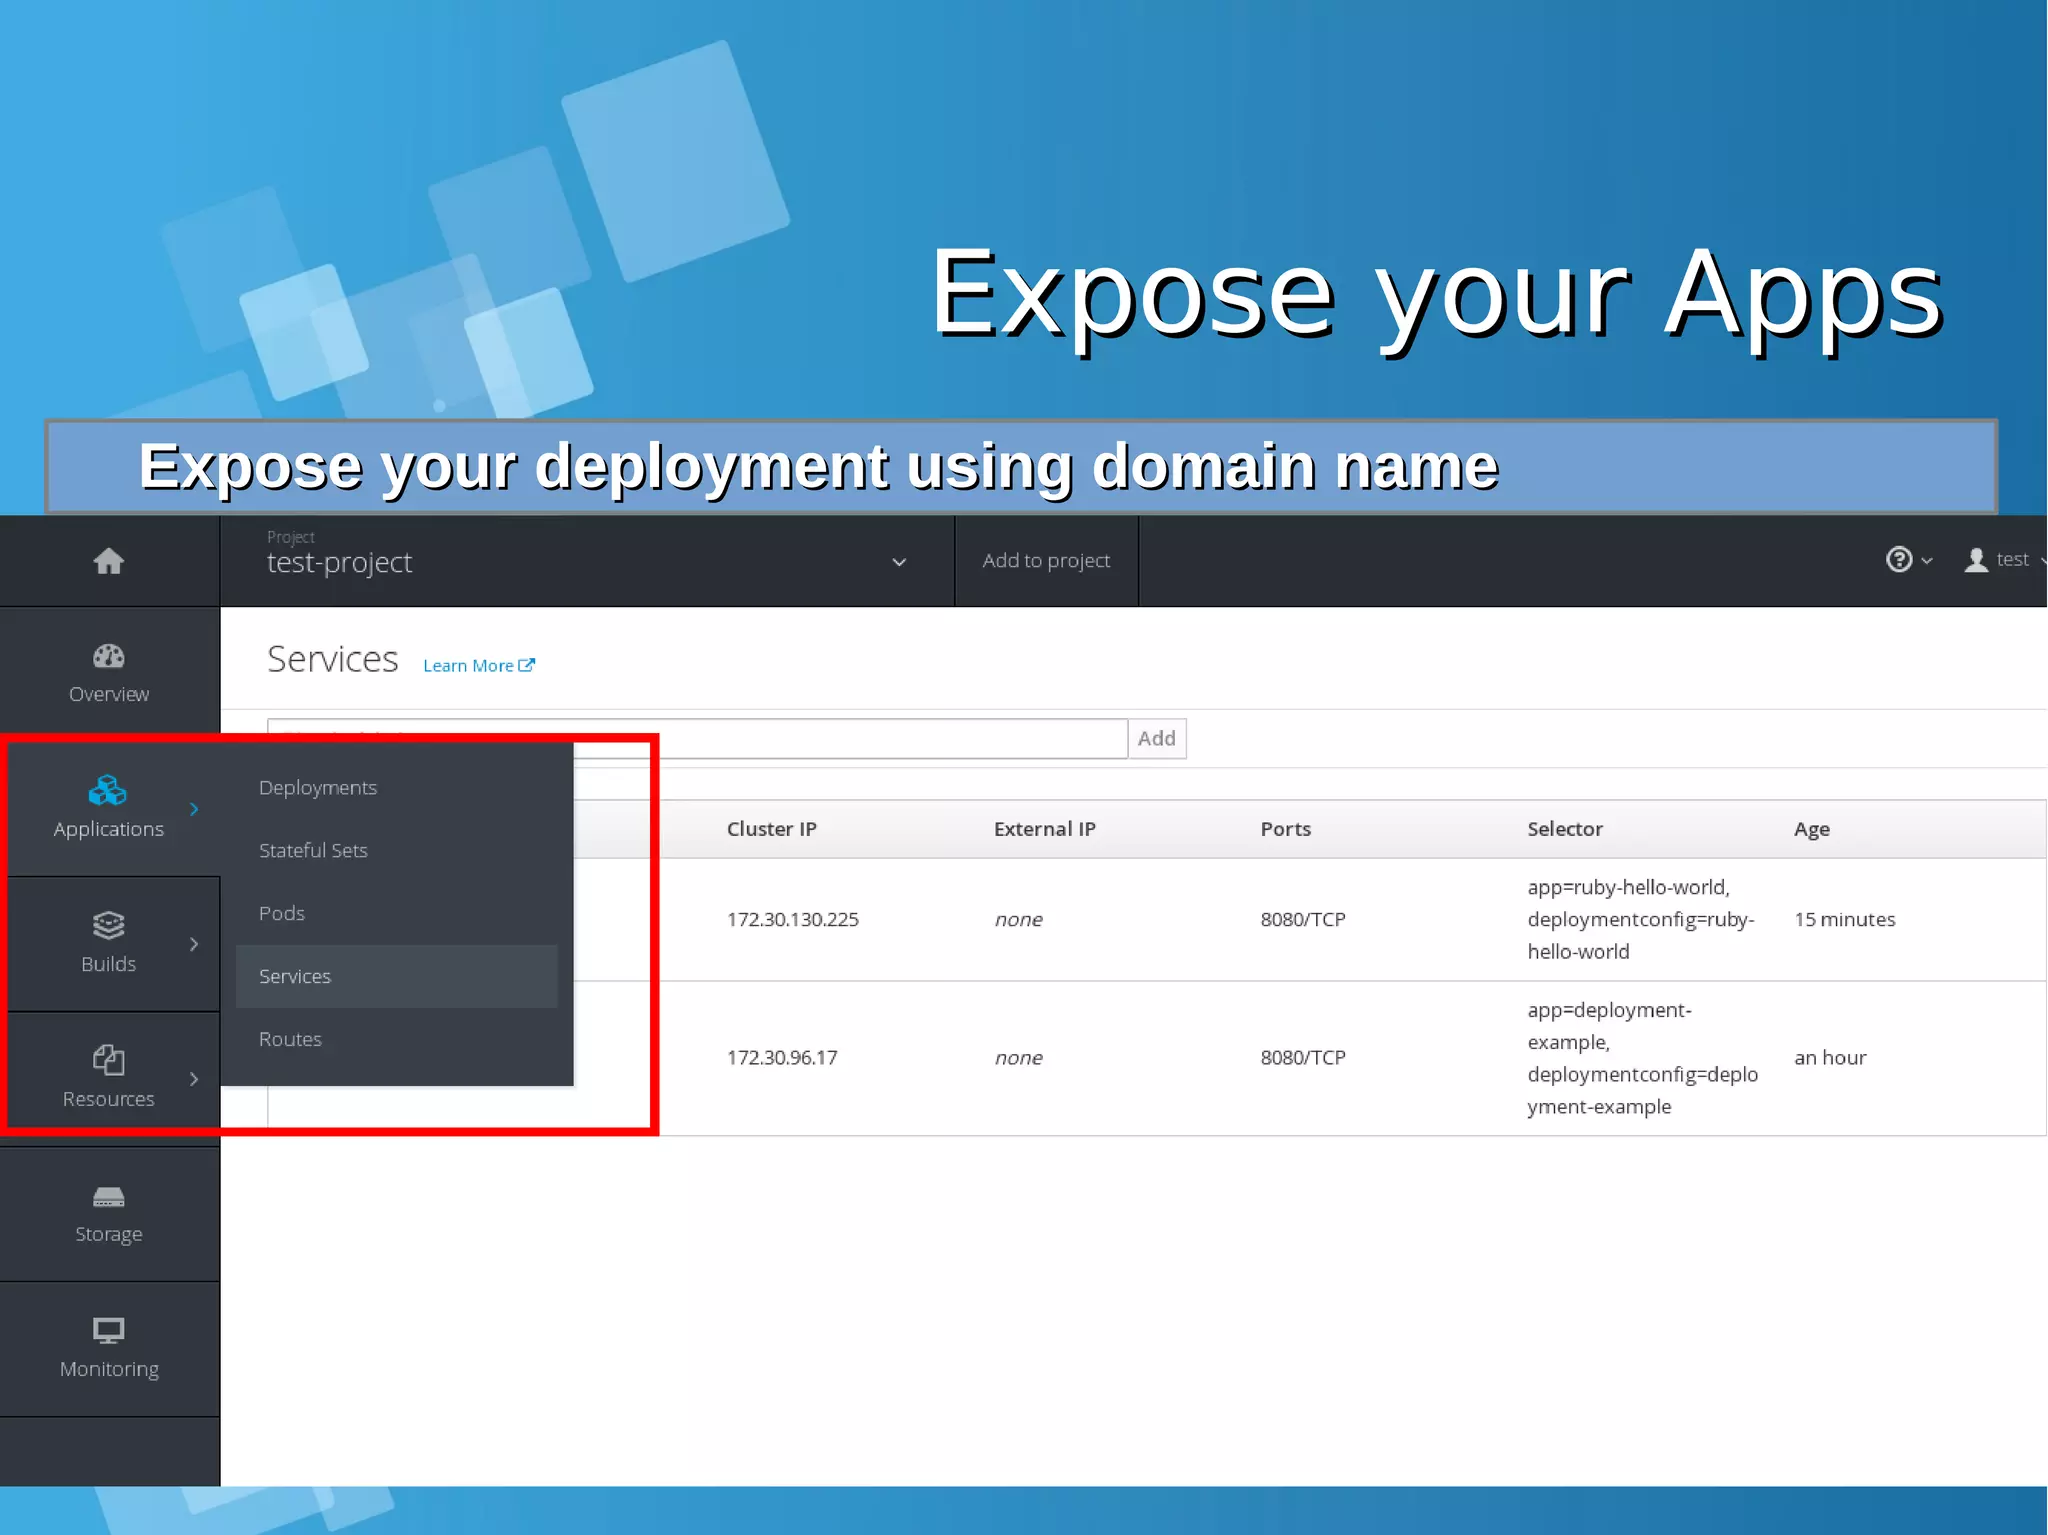
![Expose your AppsExpose your Apps Expose your second Apps using command lineExpose your second Apps using command line [root@docker-host ~]# oc expose service ruby-hello-world route "ruby-hello-world" exposed [root@docker-host ~]# oc get routes | grep ruby ruby-hello-world ruby-hello-world-test-project.10.7.60.26.xip.io ruby- hello-world 8080-tcp None](https://image.slidesharecdn.com/journey-to-the-devops-automation-with-dockerkubernetesandopenshift-180325021200/75/Journey-to-the-devops-automation-with-docker-kubernetes-and-openshift-209-2048.jpg)


![Install the default image-Install the default image- streamsstreamsEnabling Image stream using ansibleEnabling Image stream using ansible [root@docker-host]# mkdir /SOURCE ; cd /SOURCE [root@docker-host SOURCE]# git clone https://github.com/openshift/openshift-ansible.git Cloning into 'openshift-ansible'... remote: Counting objects: 53839, done. remote: Compressing objects: 100% (47/47), done. remote: Total 53839 (delta 26), reused 43 (delta 11), pack-reused 53775 Receiving objects: 100% (53839/53839), 14.12 MiB | 930.00 KiB/s, done. Resolving deltas: 100% (32741/32741), done. [root@docker-host SOURCE]# cd openshift- ansible/roles/openshift_examples/files/examples/latest/ [root@docker-host latest]# oc login -u system:admin -n default [root@docker-host latest]# oadm policy add-cluster-role-to-user cluster-admin admin [root@docker-host latest]# for f in image-streams/image-streams-centos7.json; do cat $f | oc create -n openshift -f -; done [root@docker-host latest]# for f in db-templates/*.json; do cat $f | oc create -n openshift -f -; done [root@docker-host latest]# for f in quickstart-templates/*.json; do cat $f | oc create -n openshift -f -; done](https://image.slidesharecdn.com/journey-to-the-devops-automation-with-dockerkubernetesandopenshift-180325021200/75/Journey-to-the-devops-automation-with-docker-kubernetes-and-openshift-216-2048.jpg)


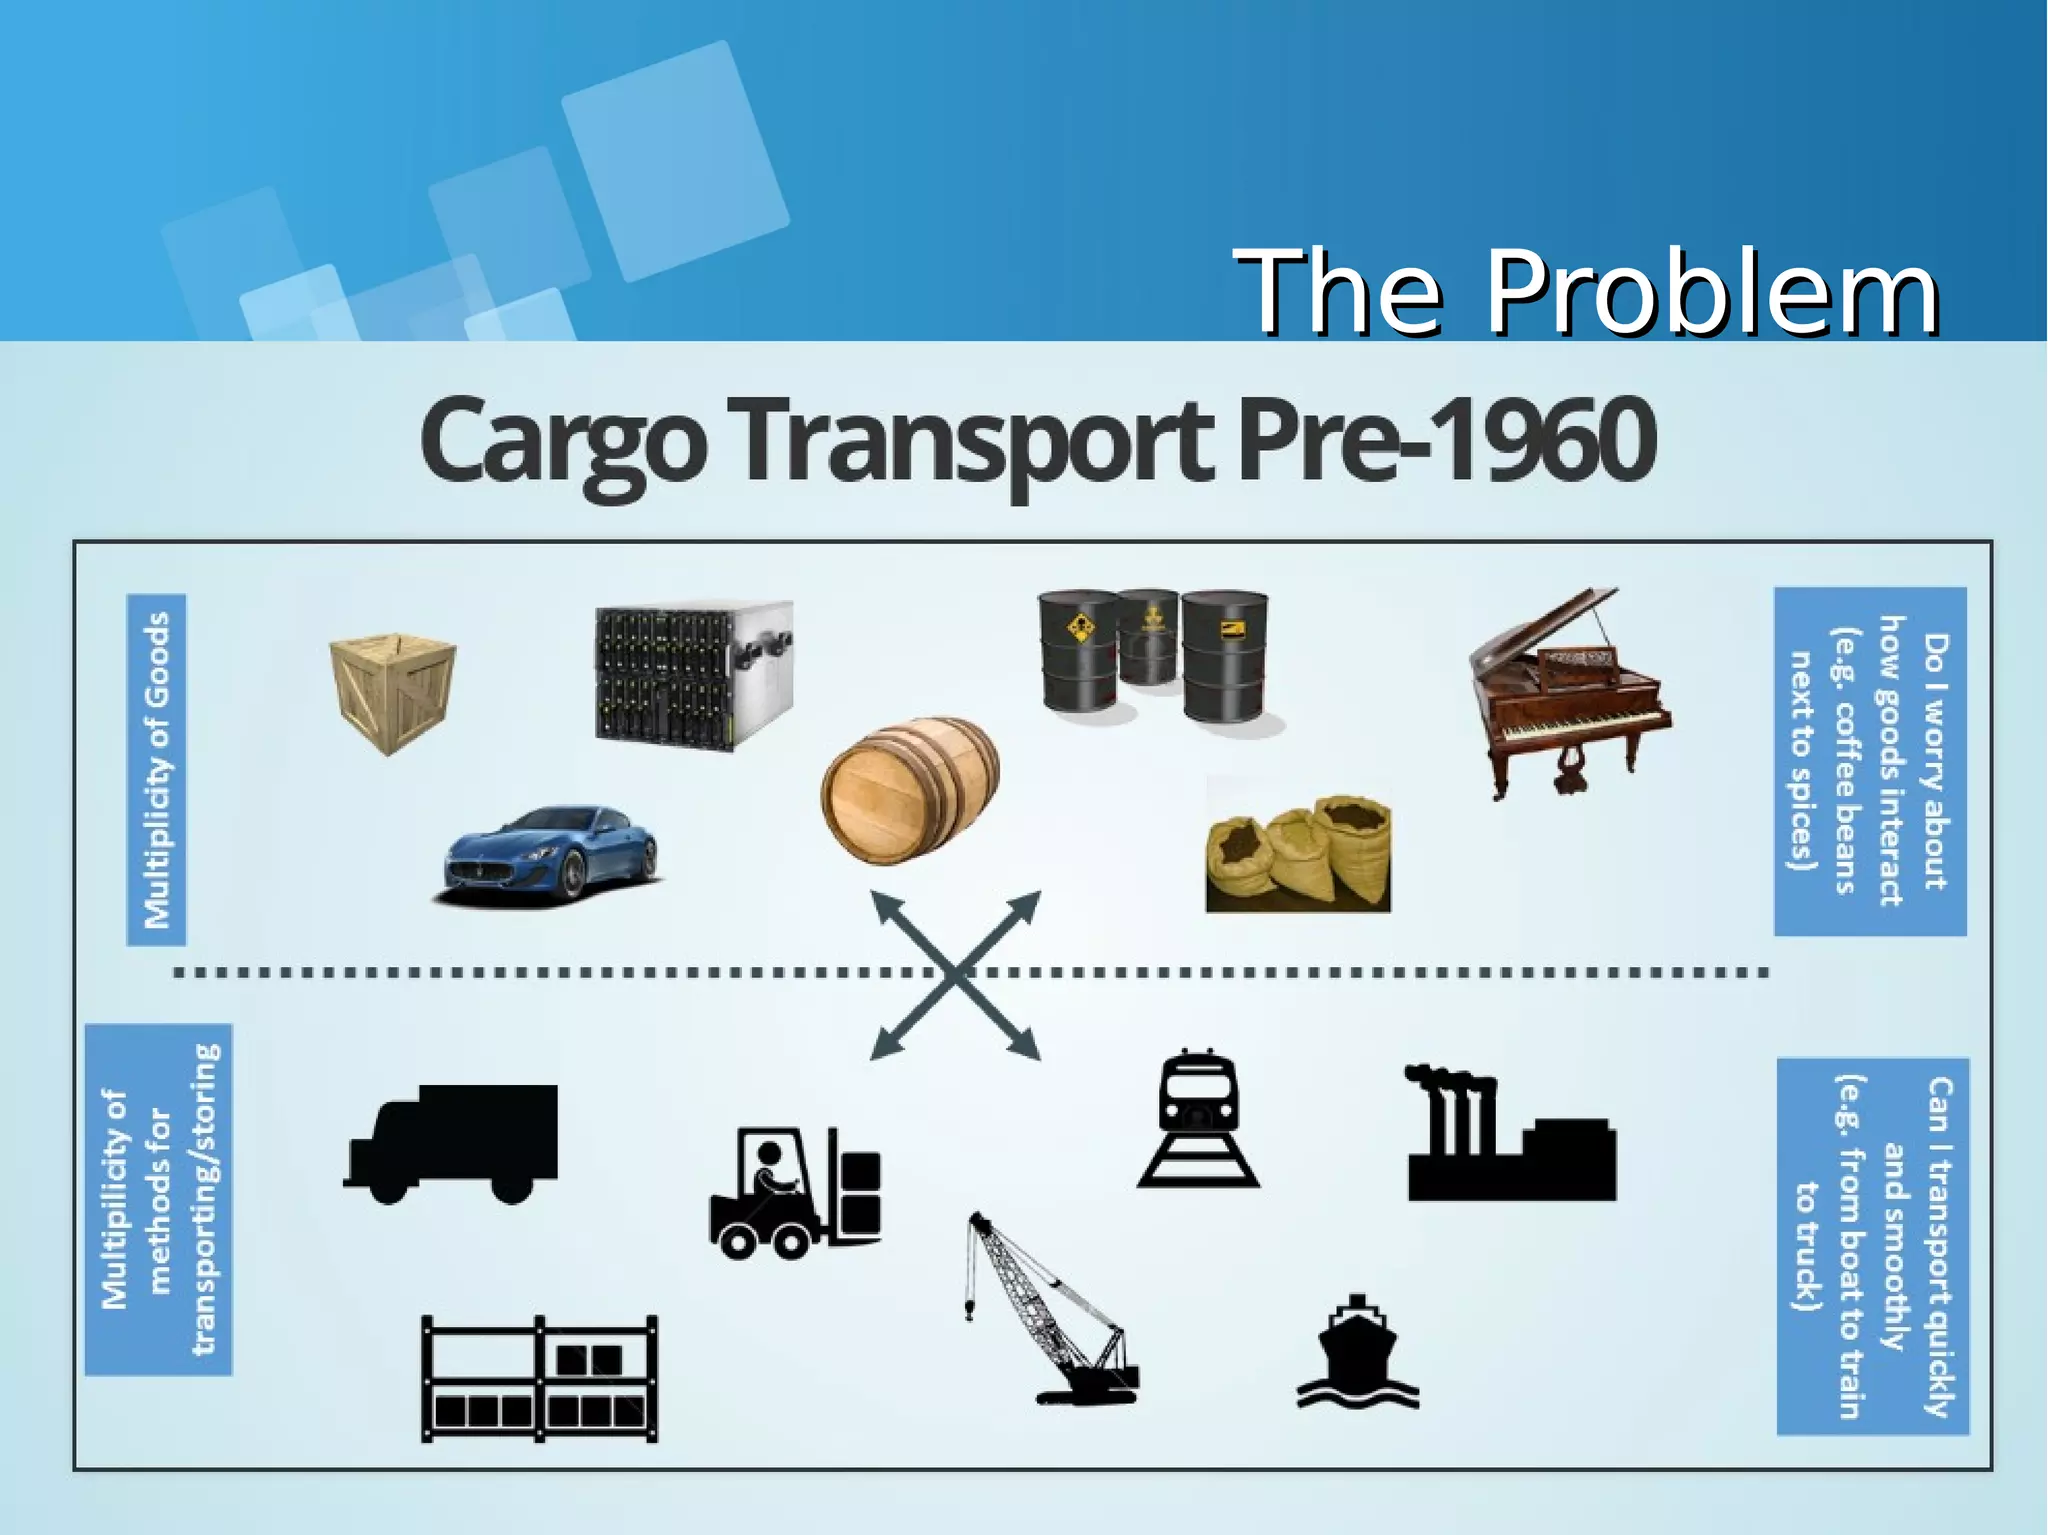
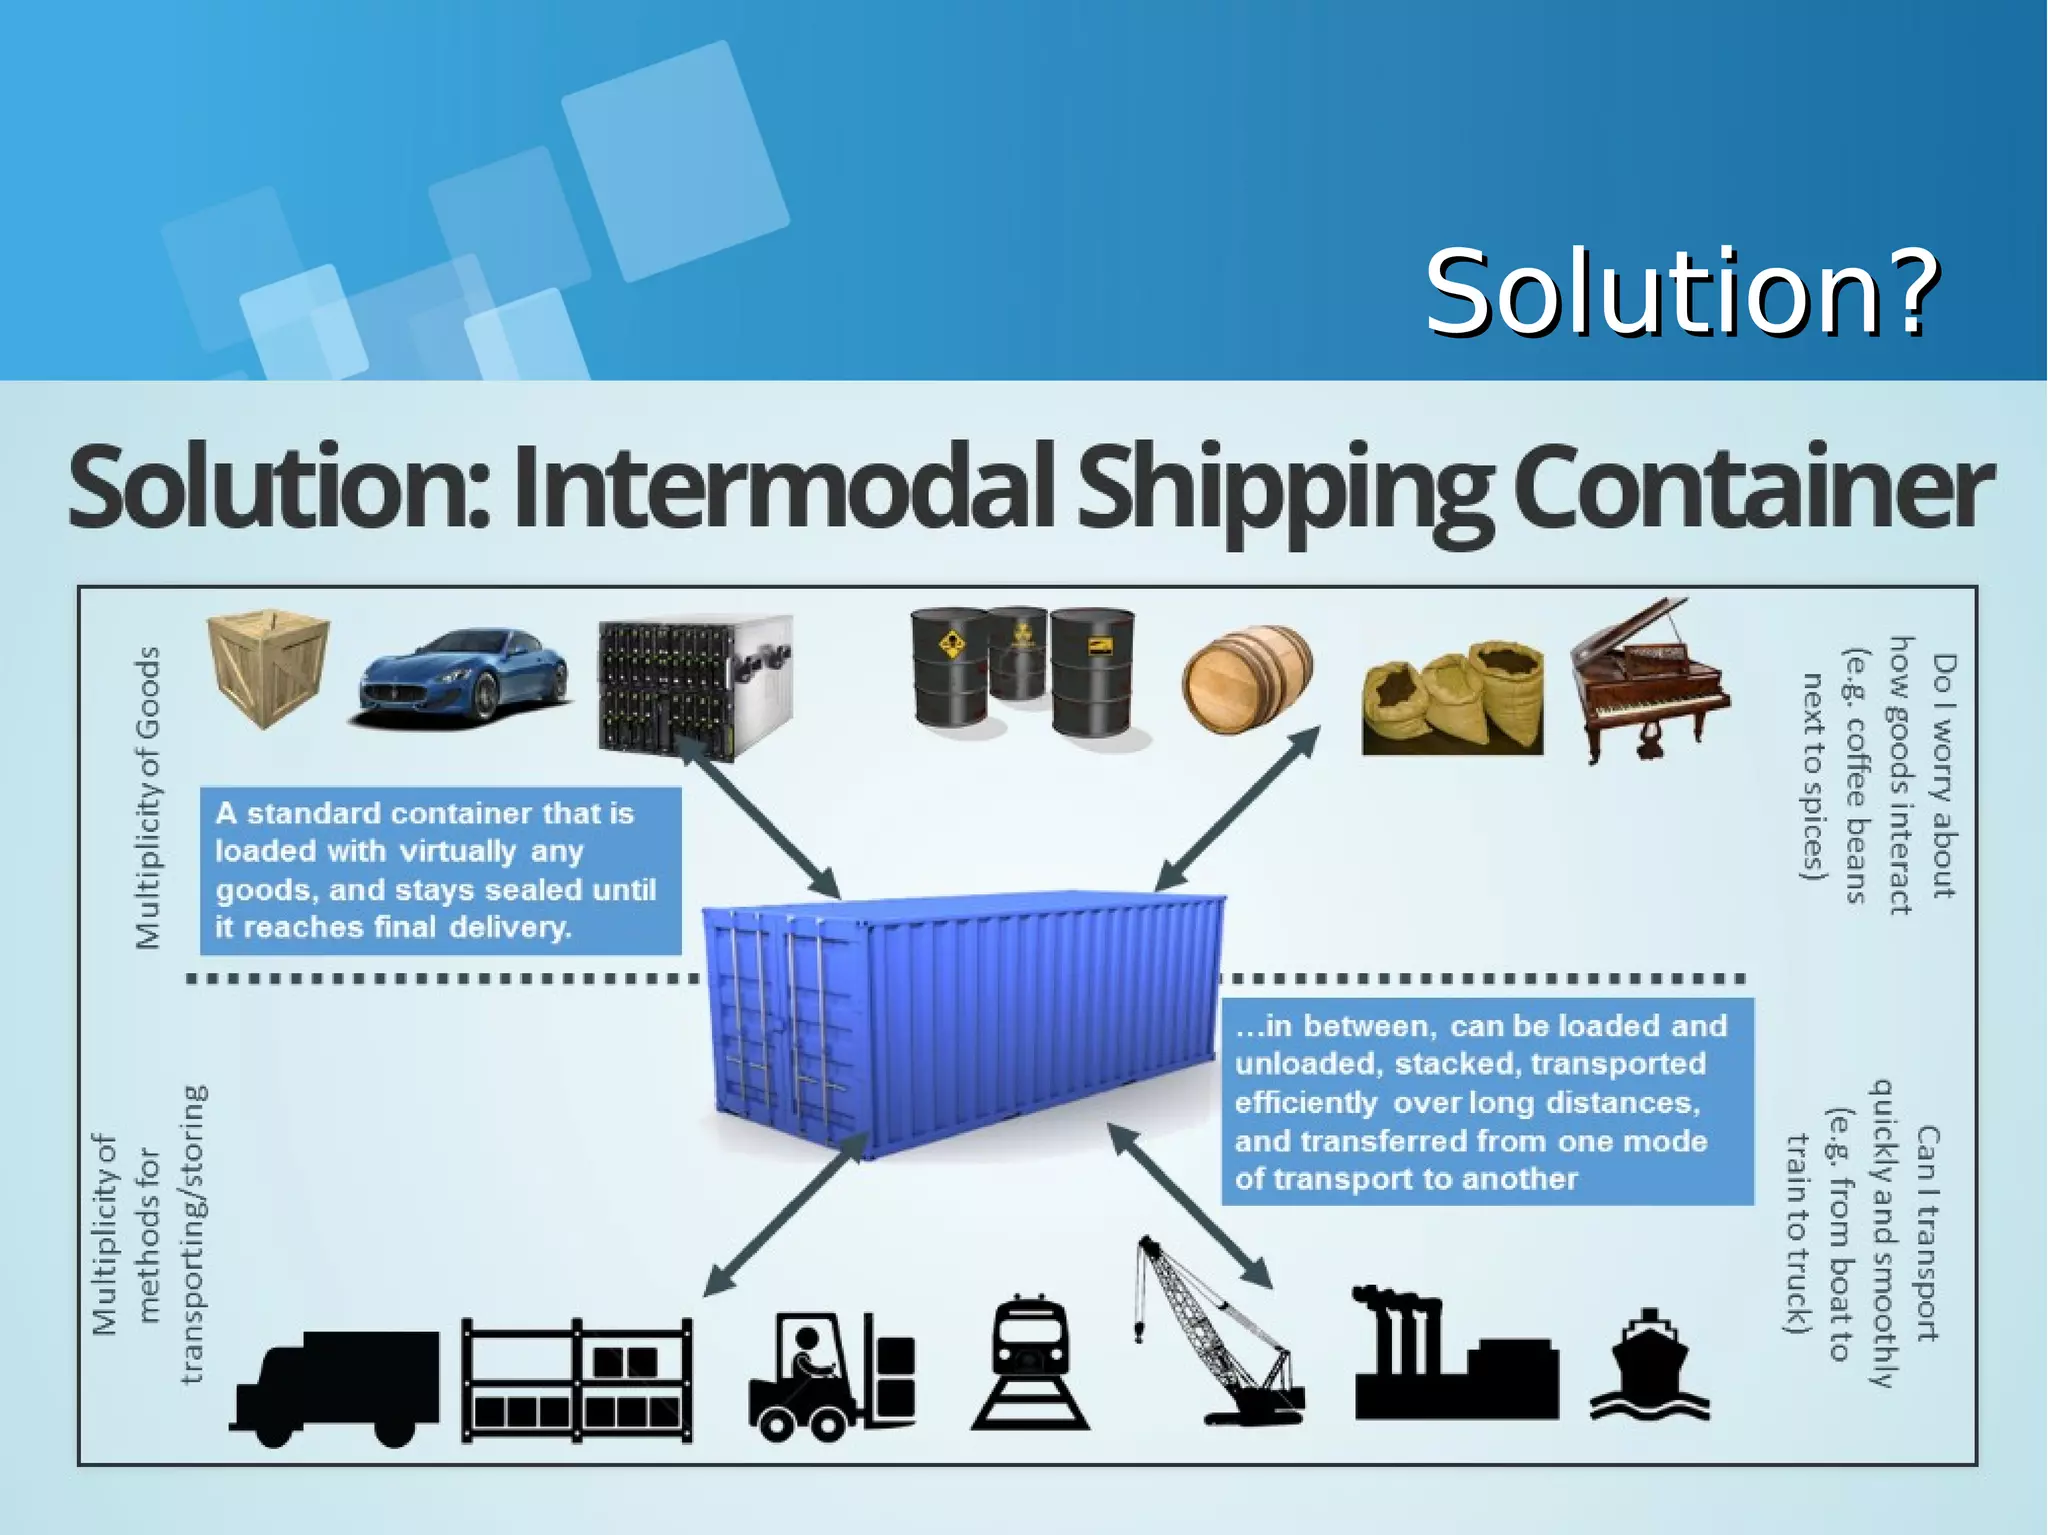
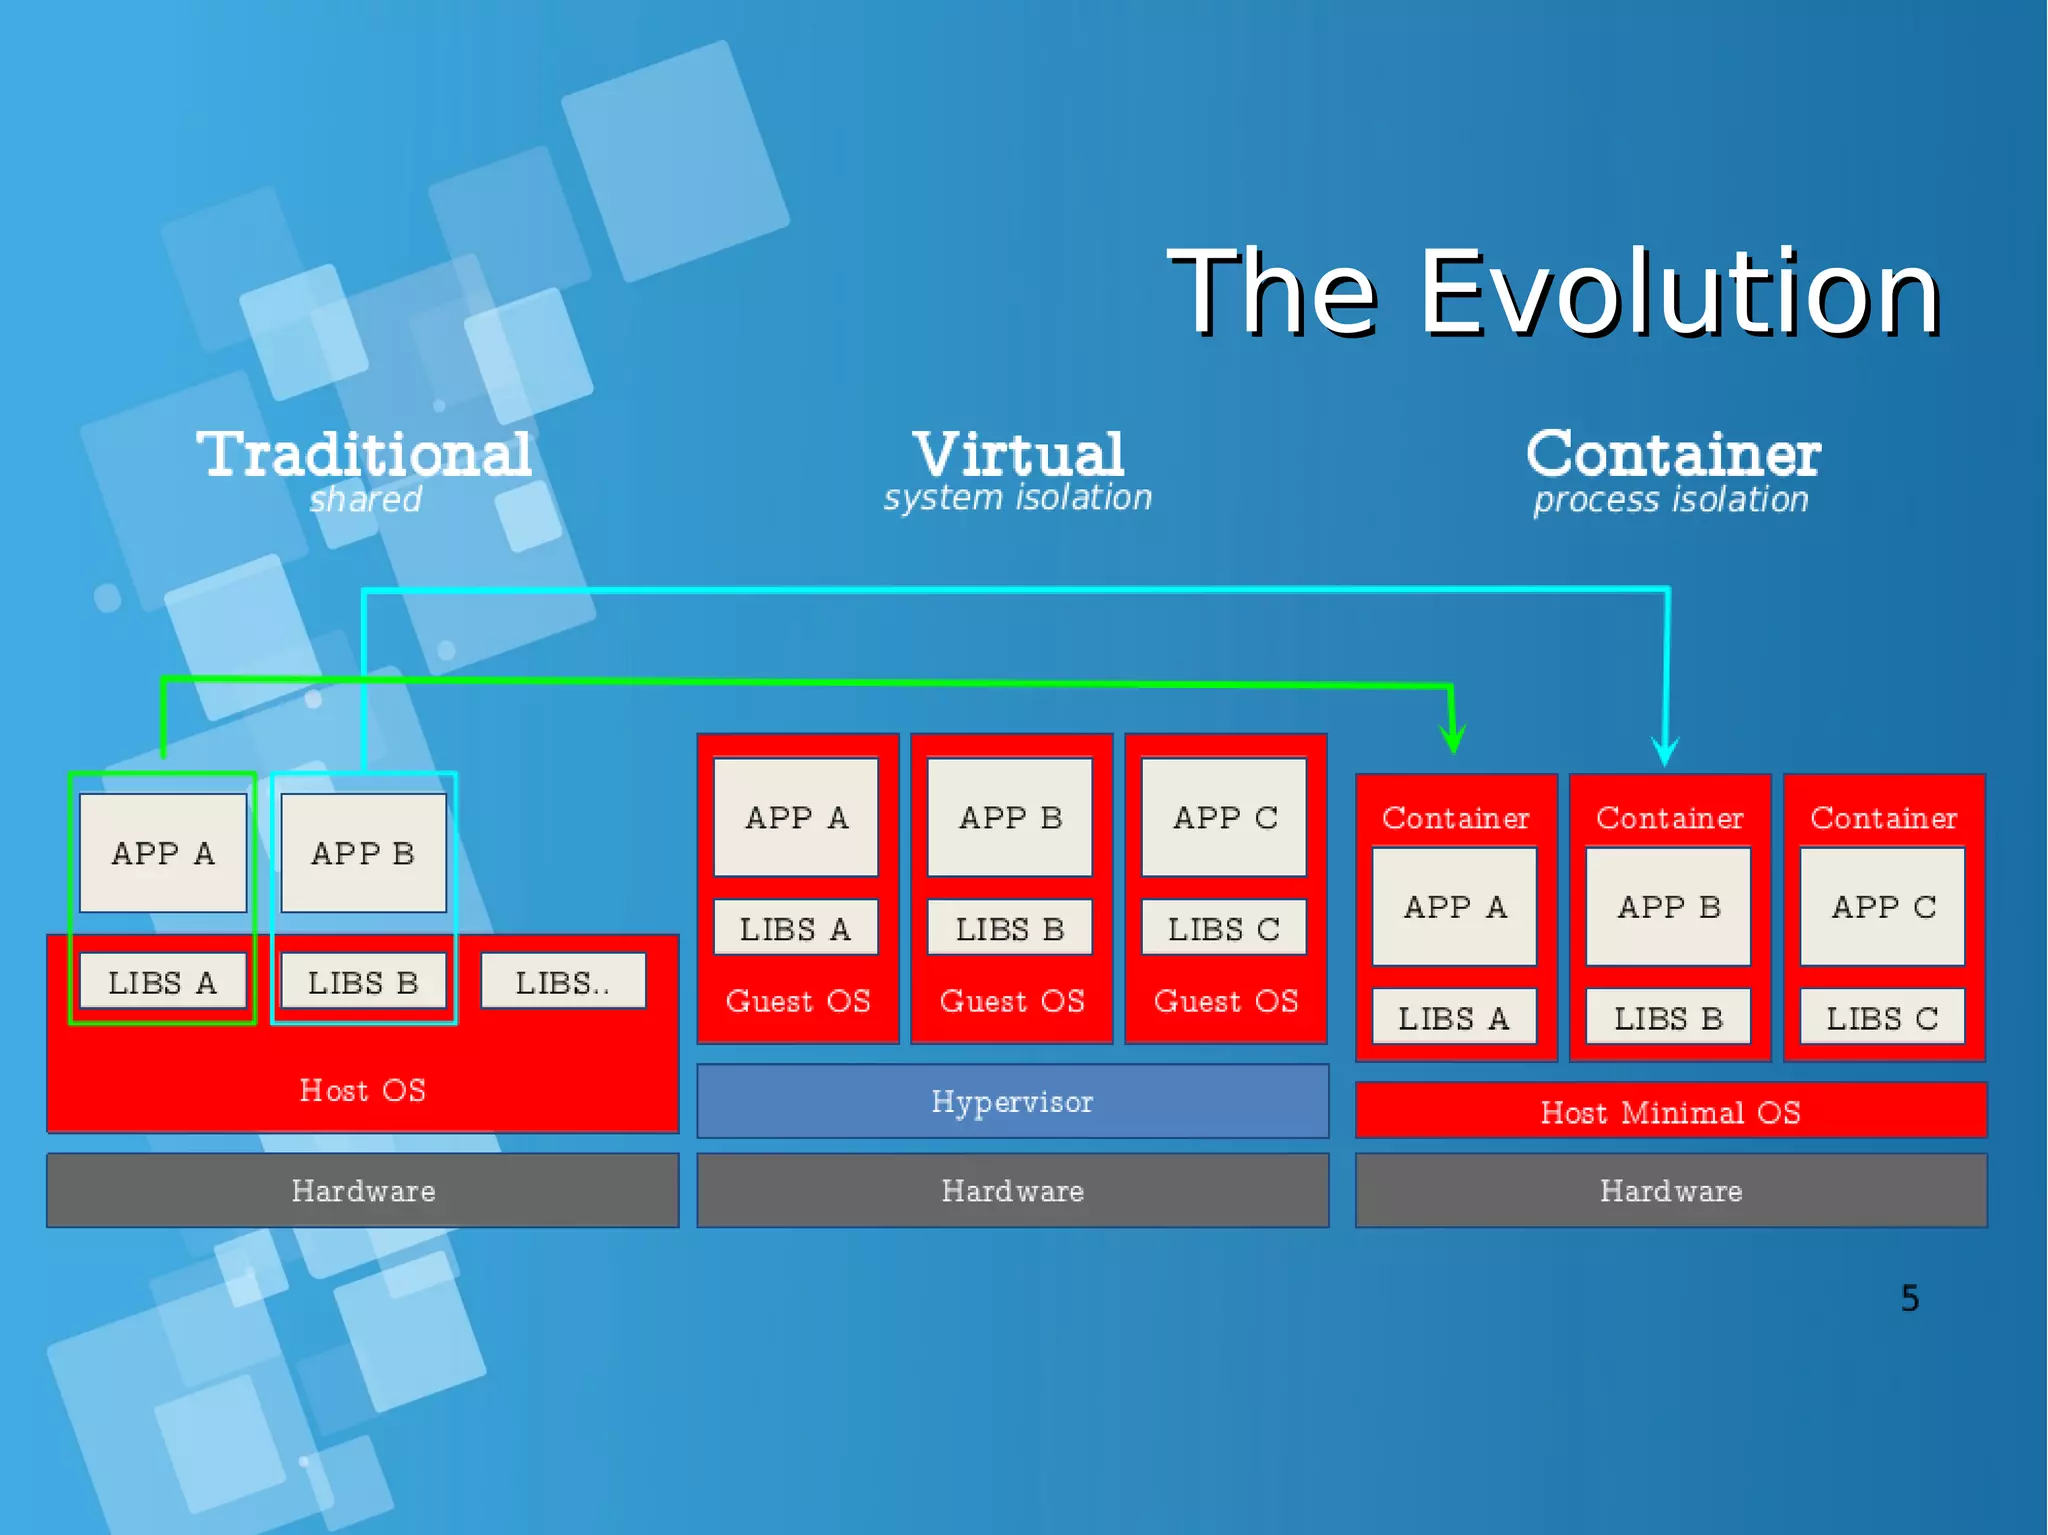
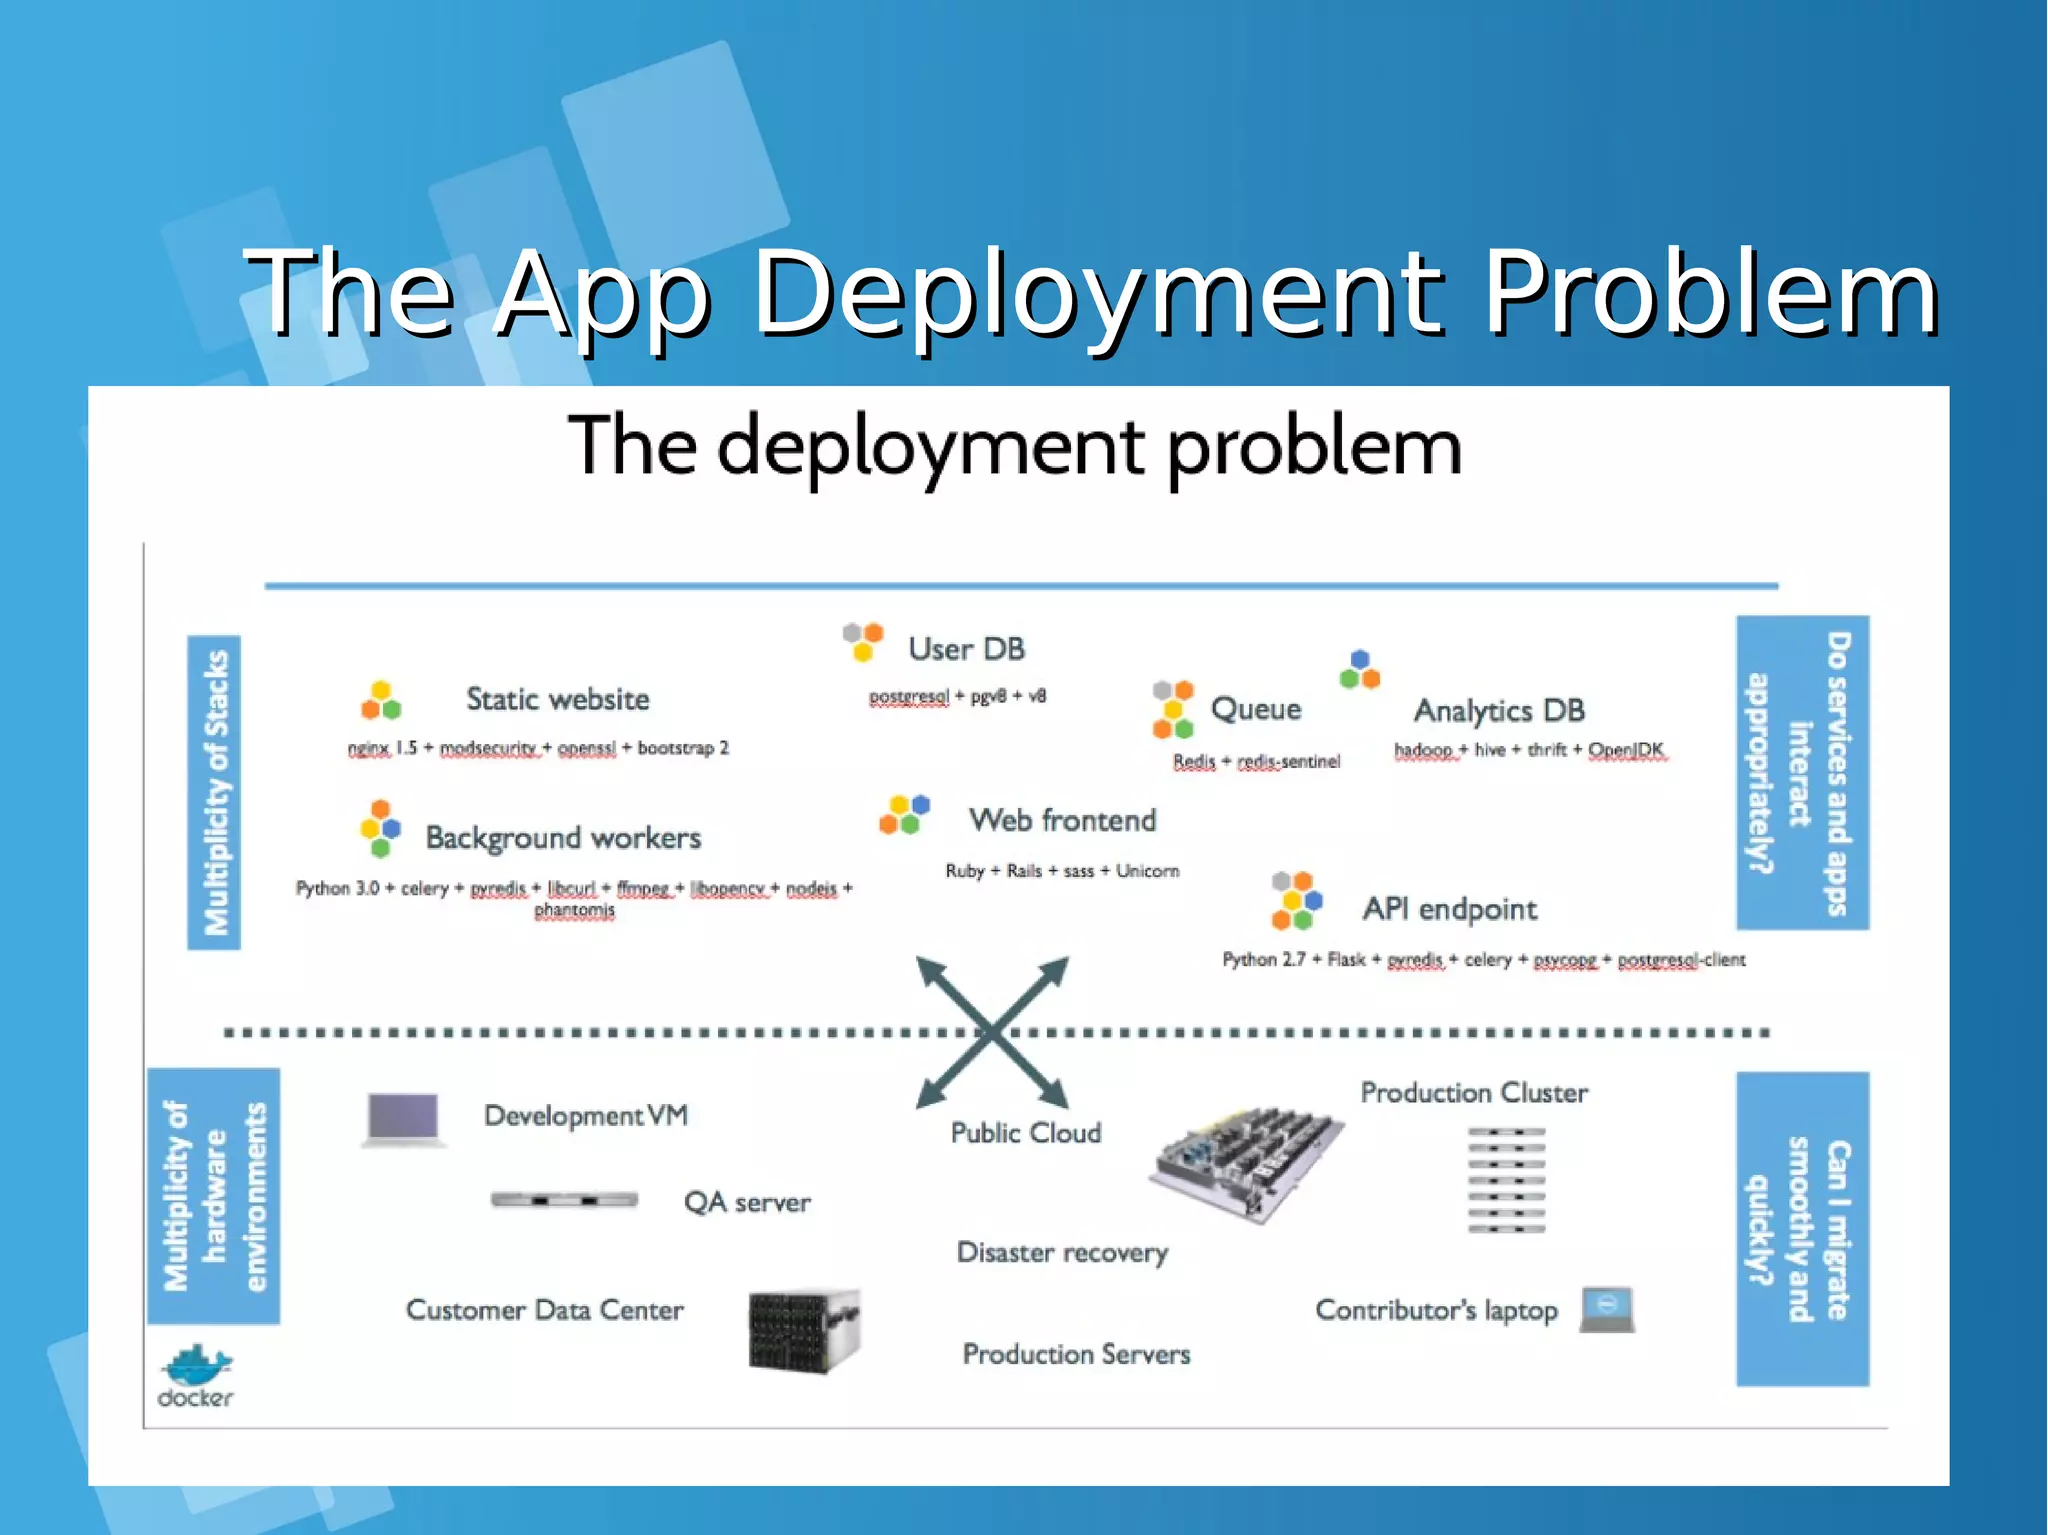
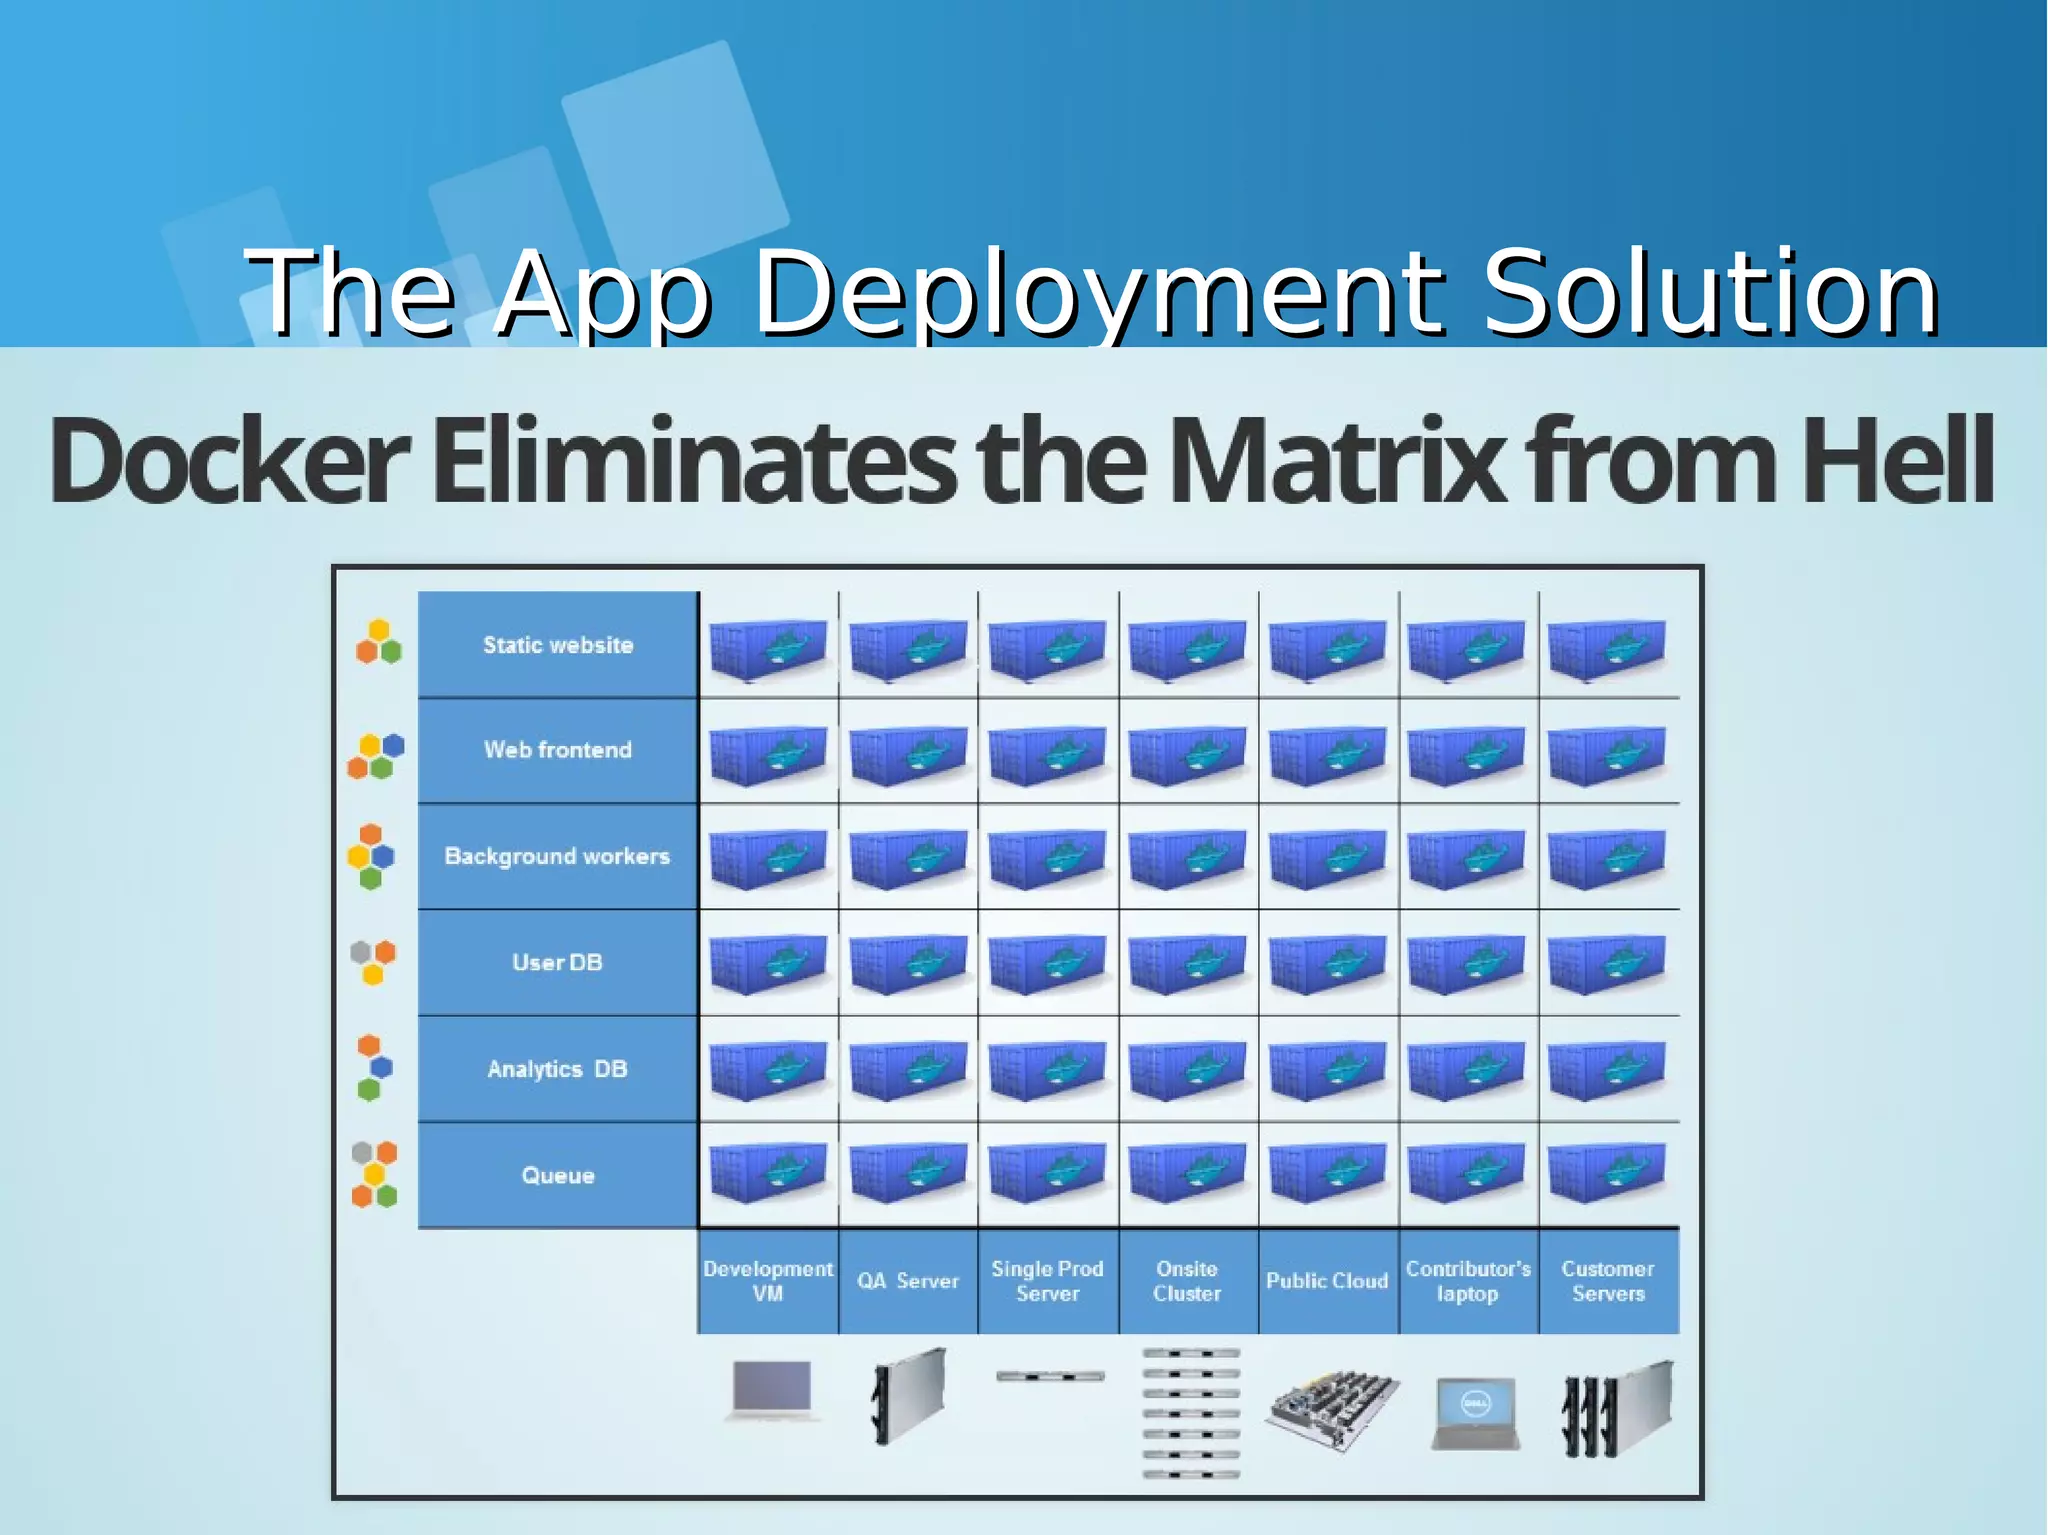
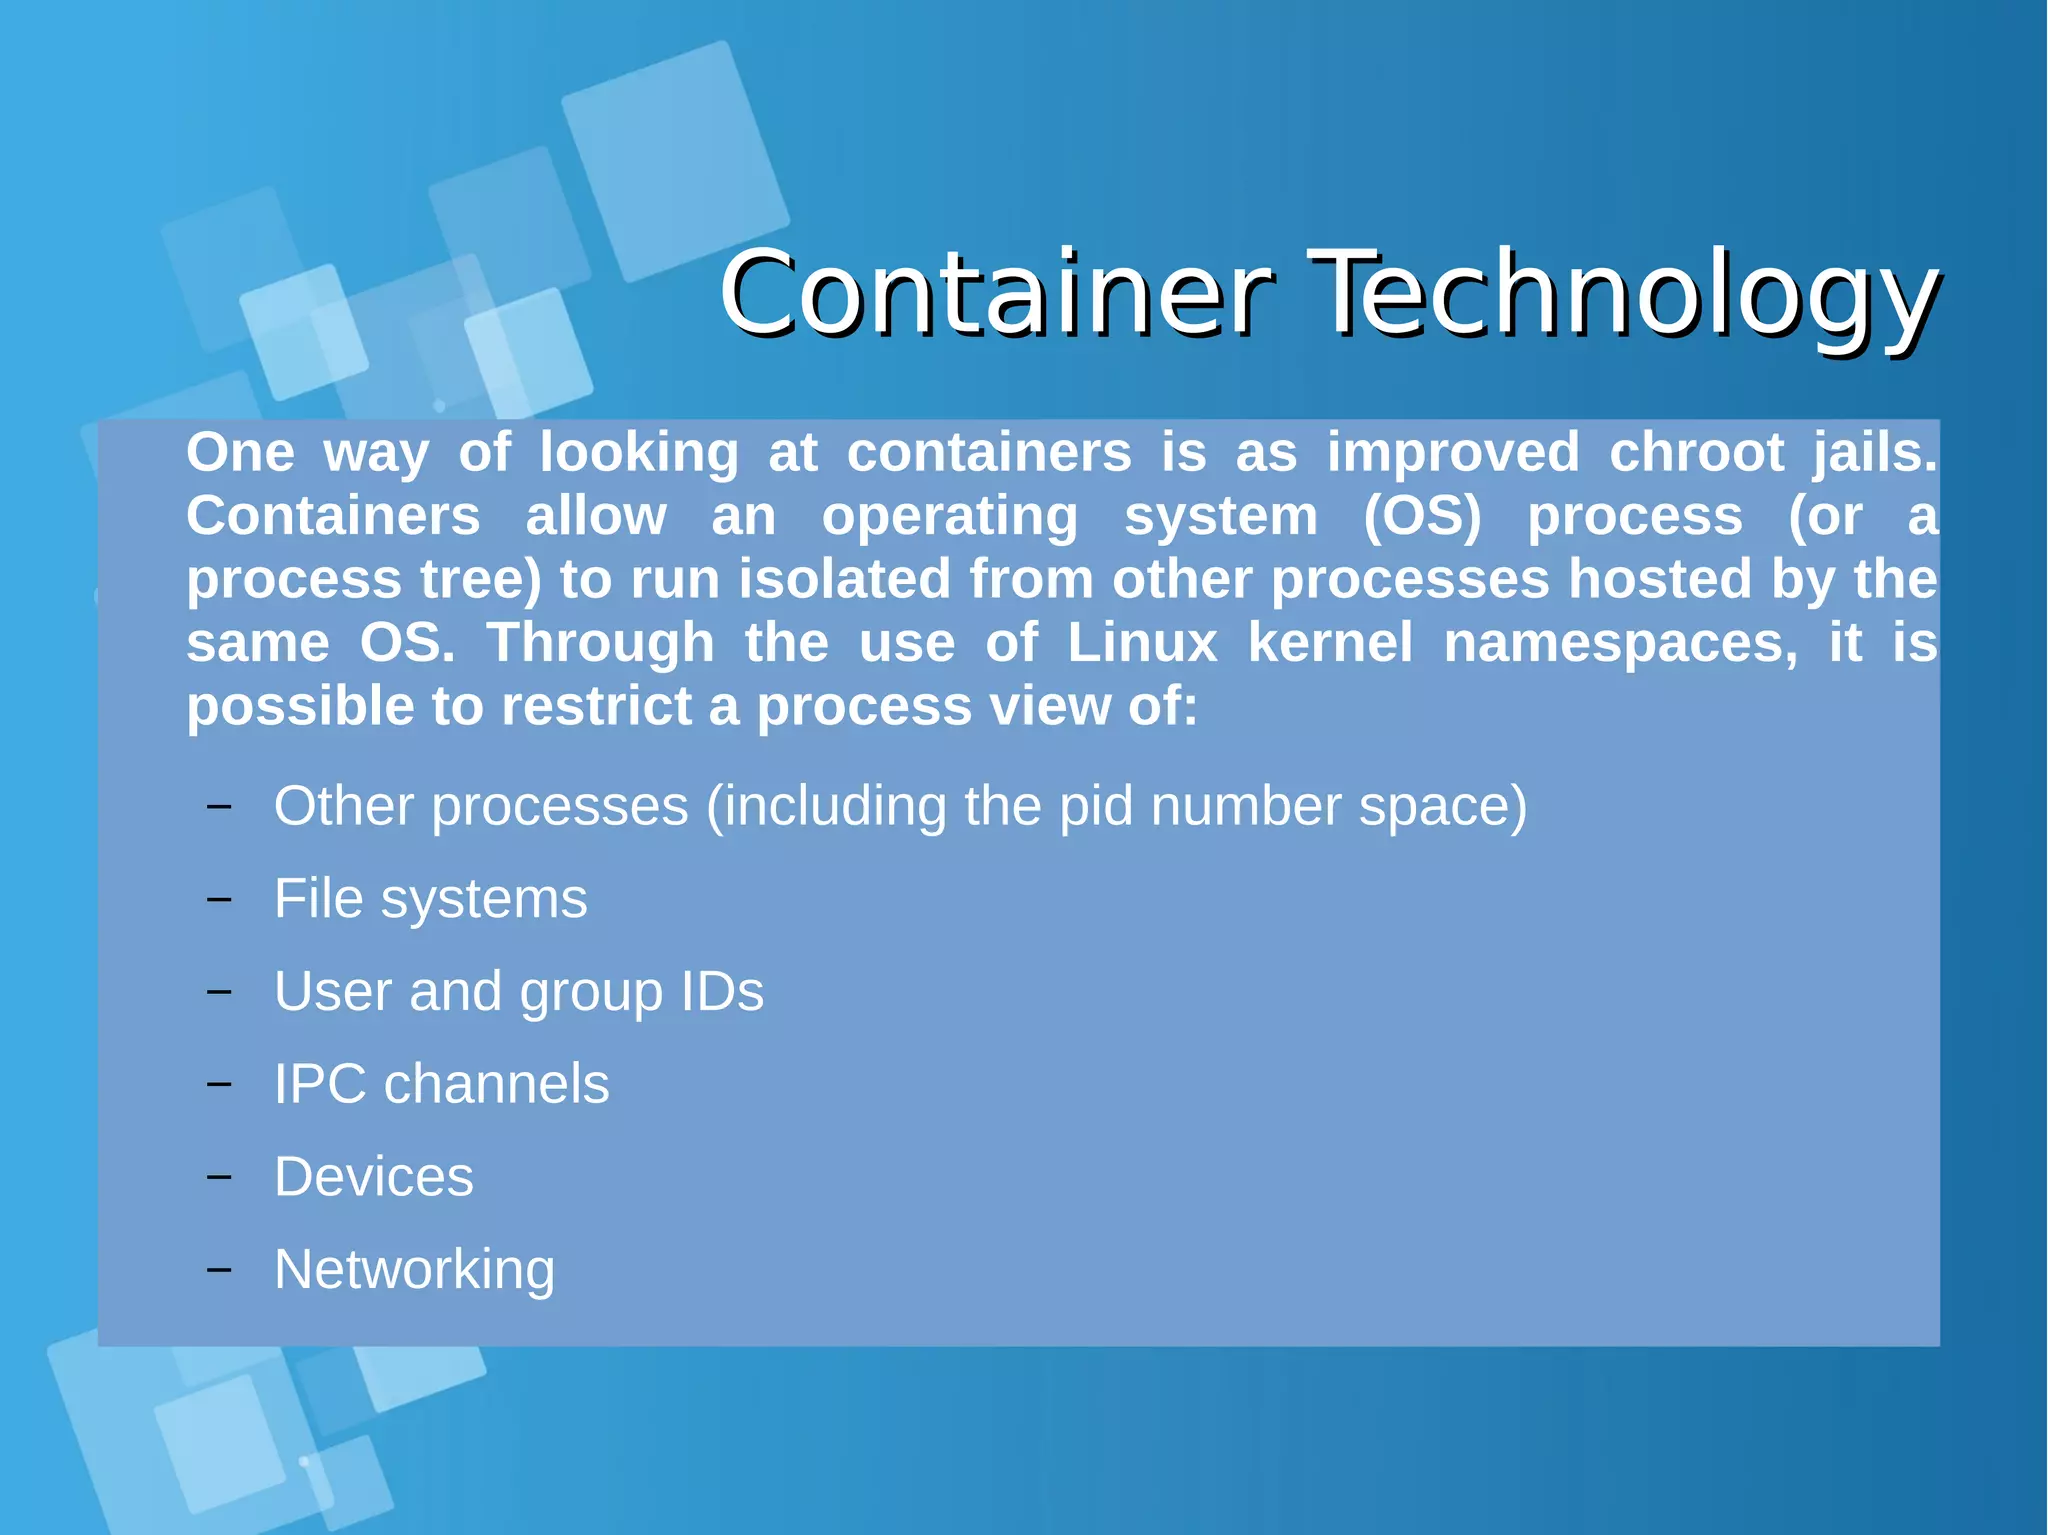
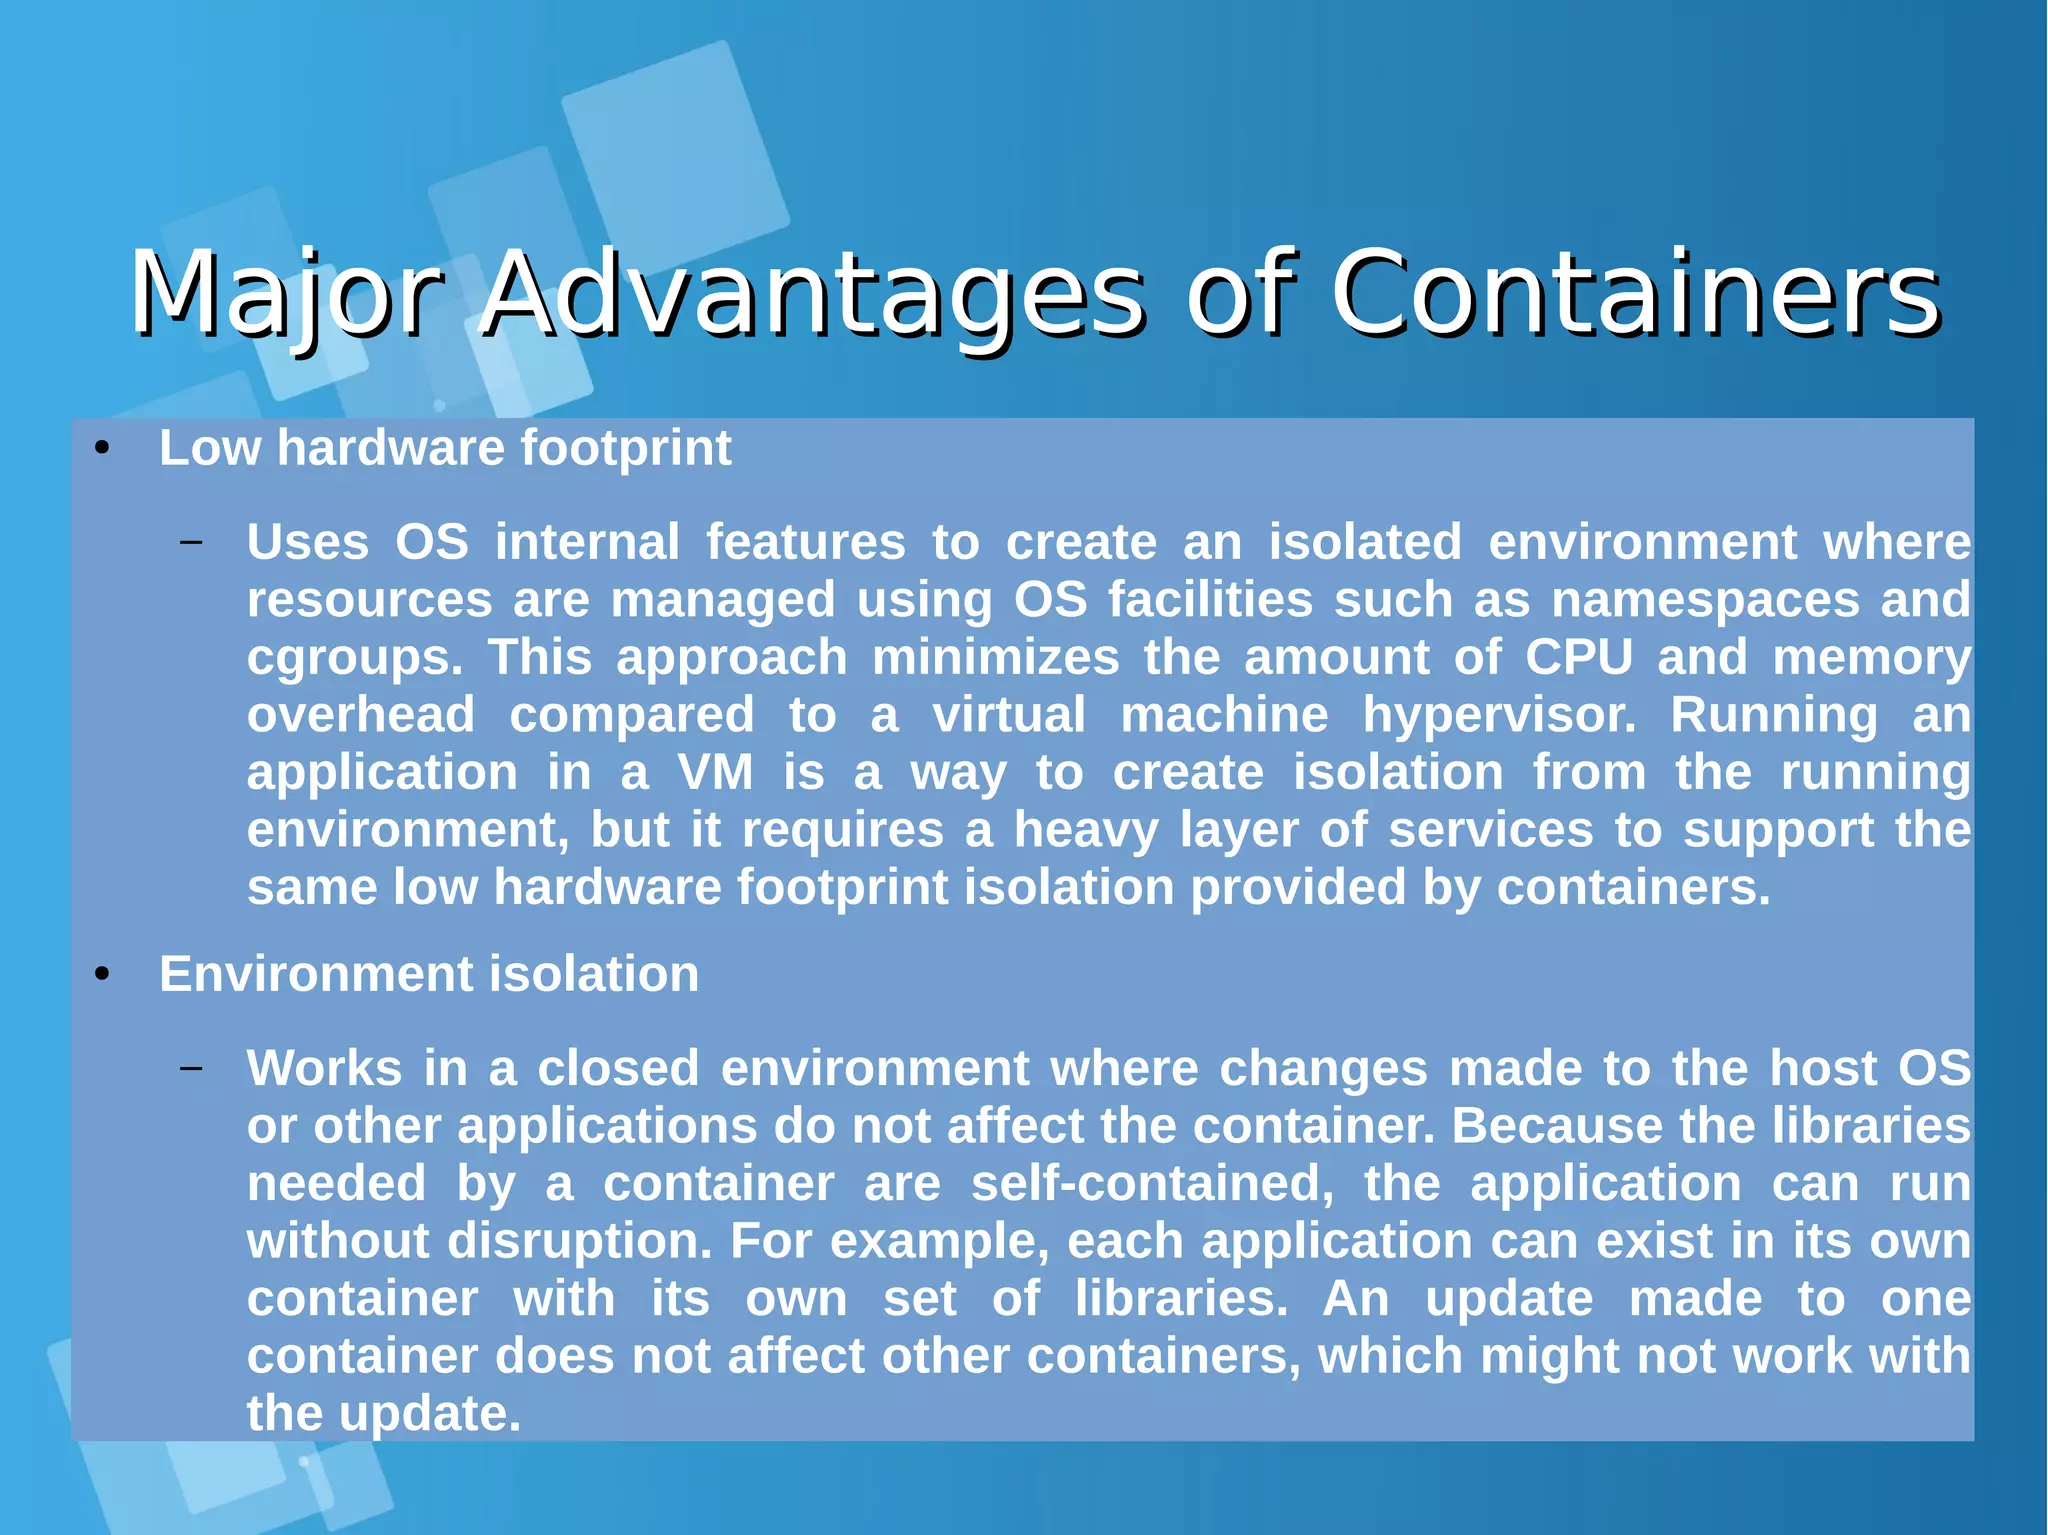
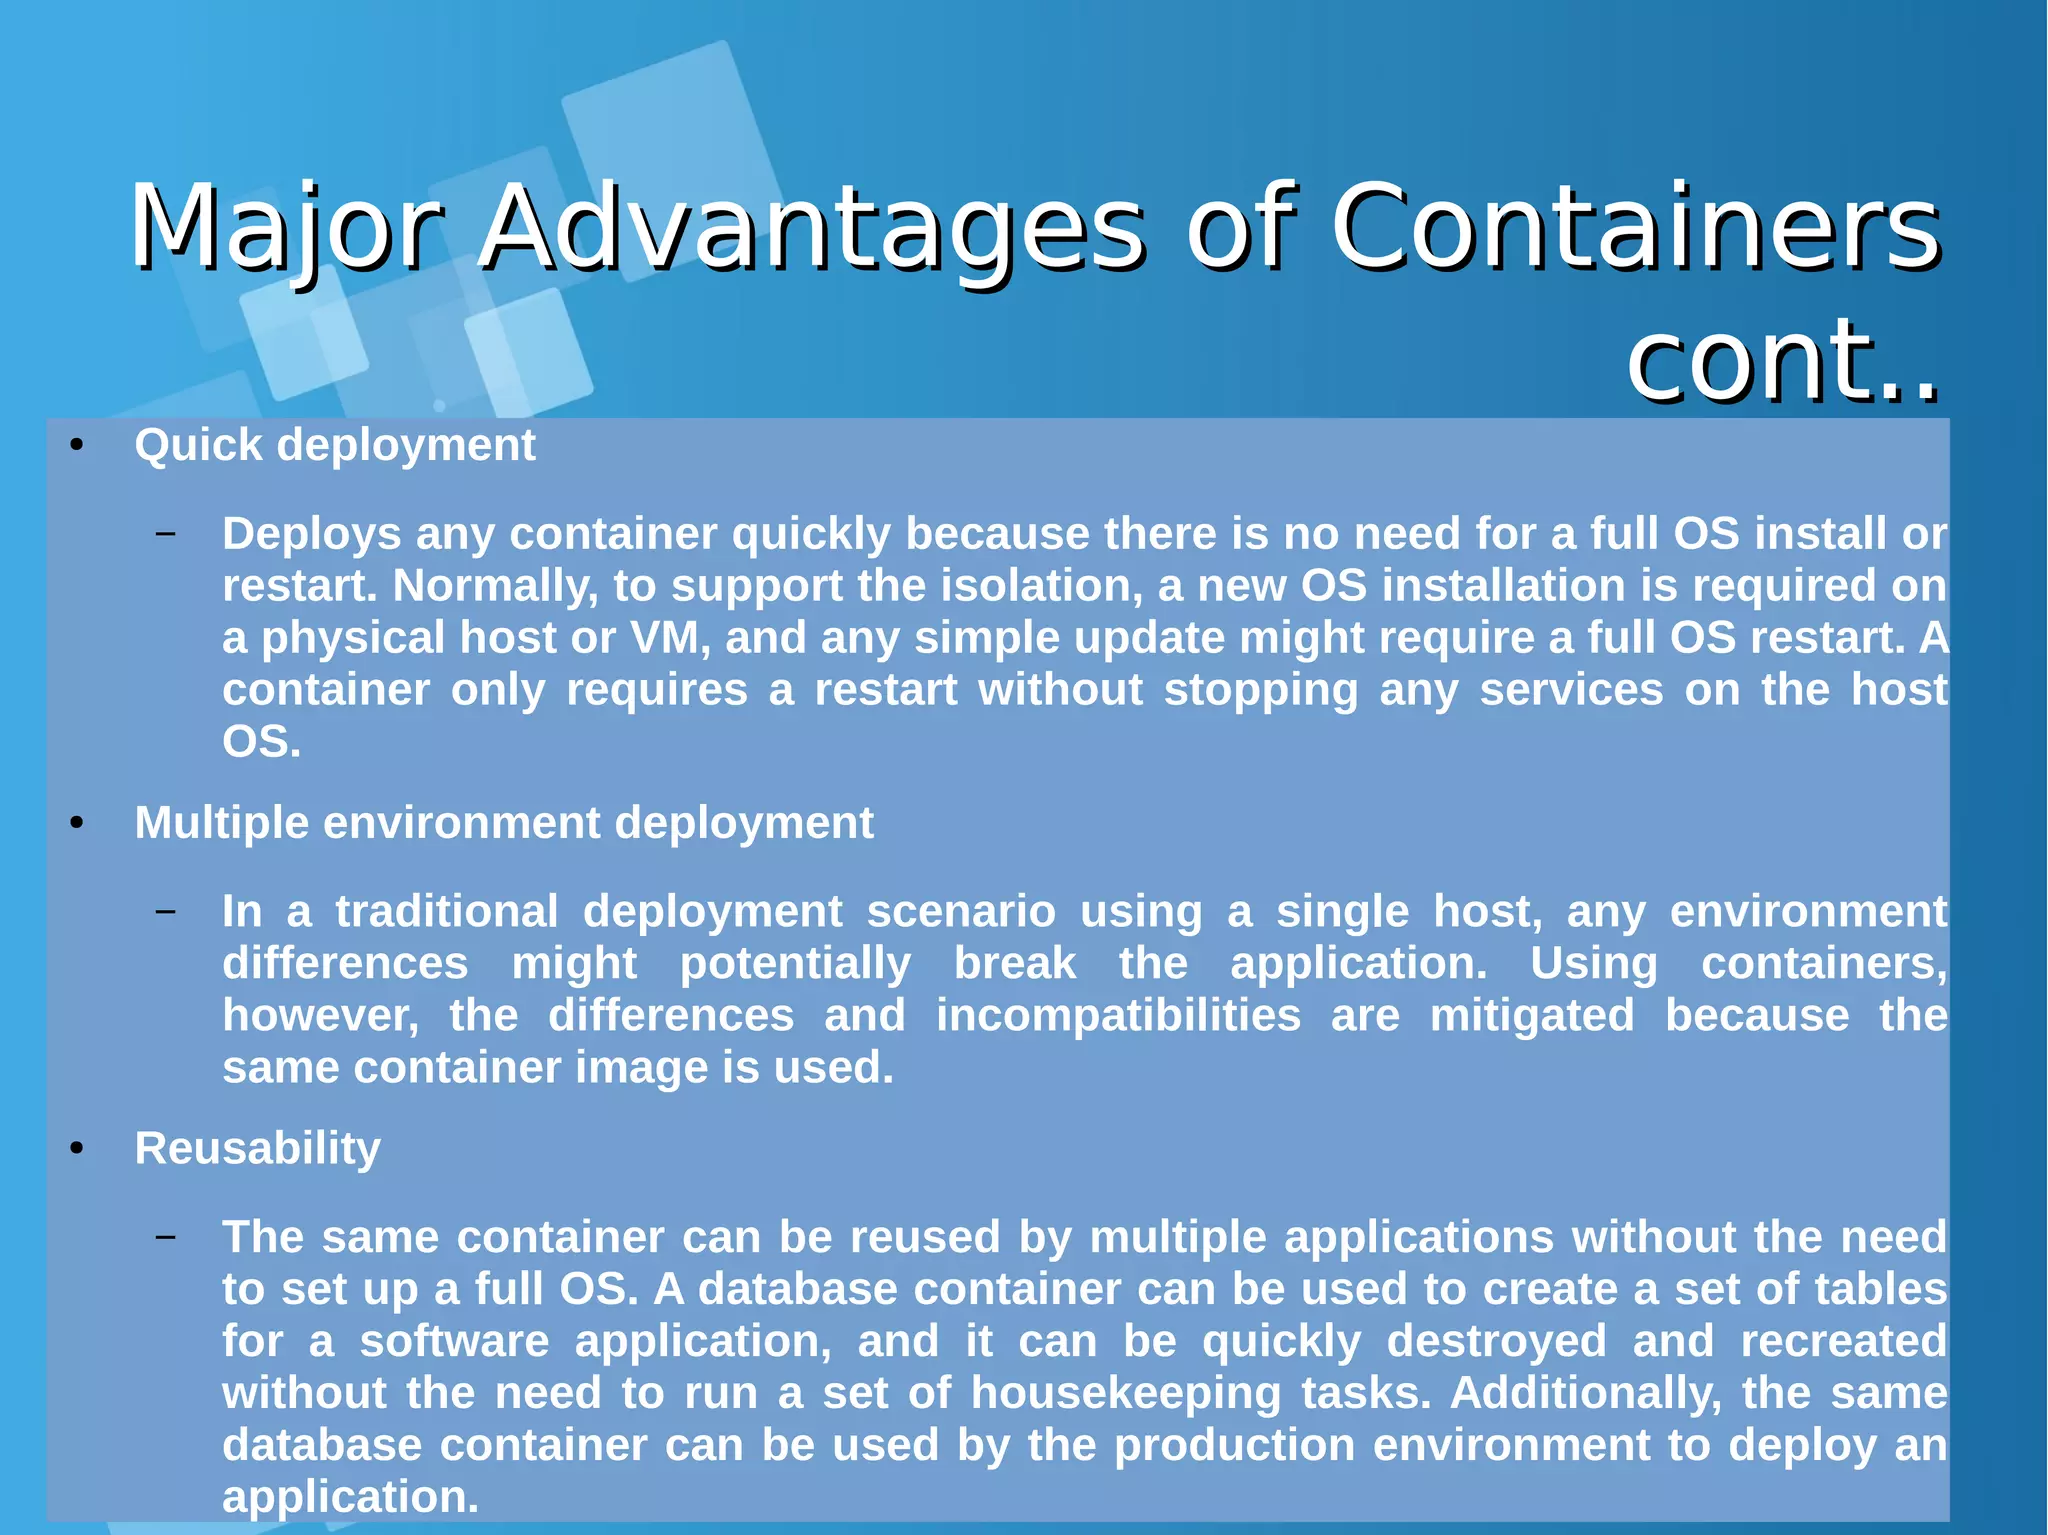
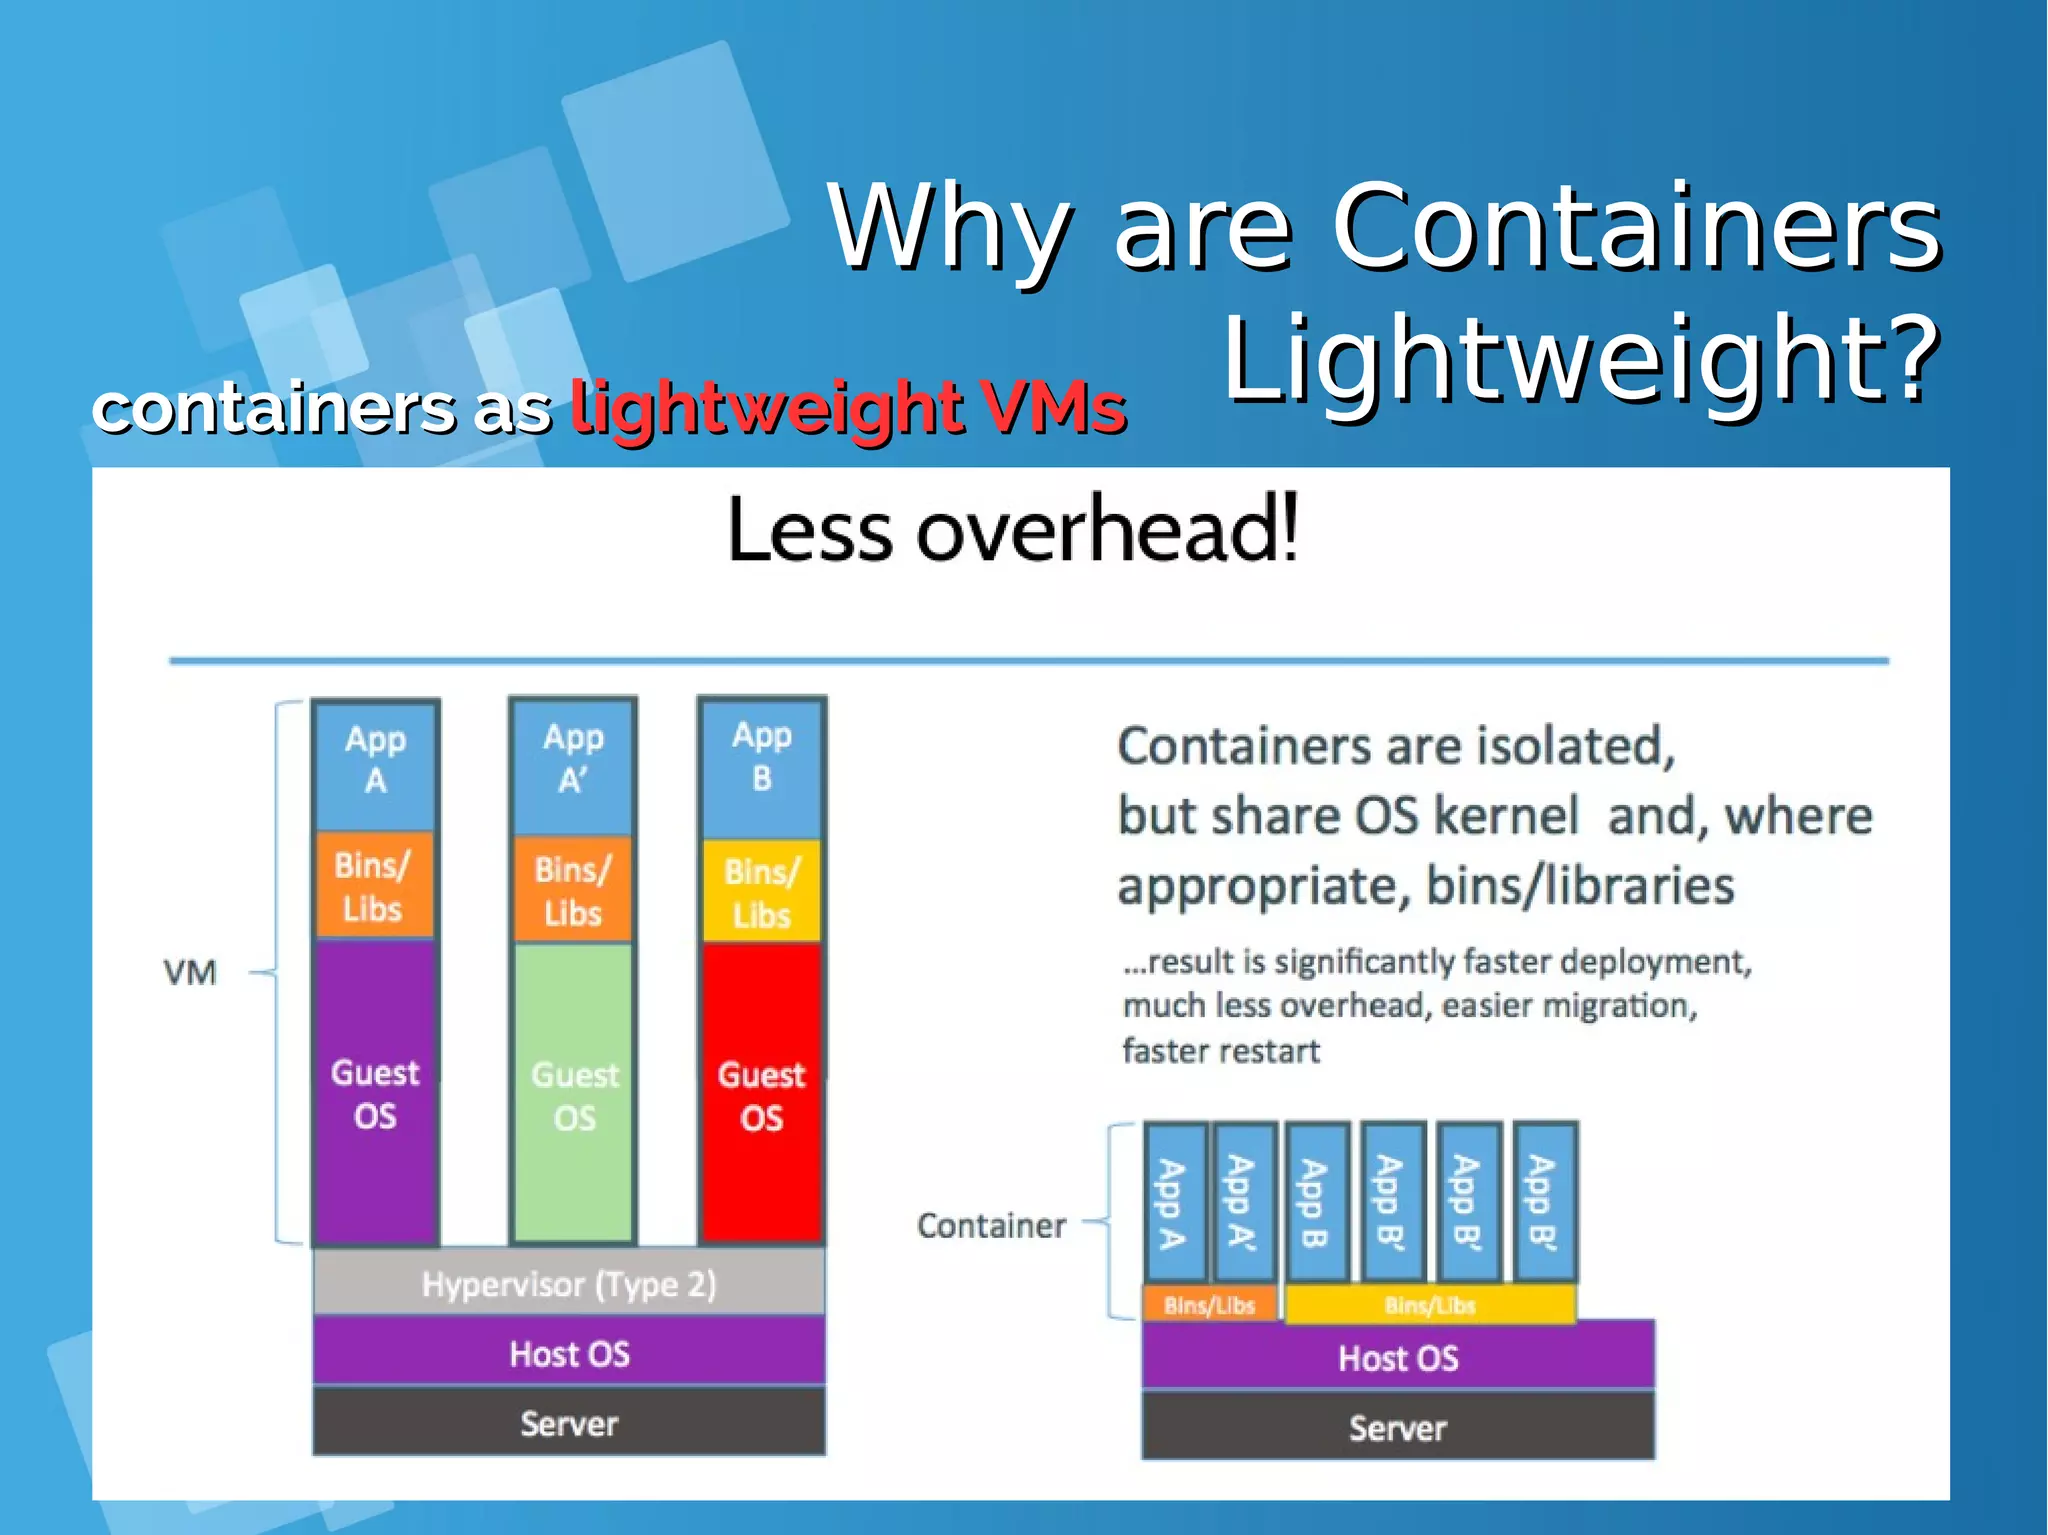
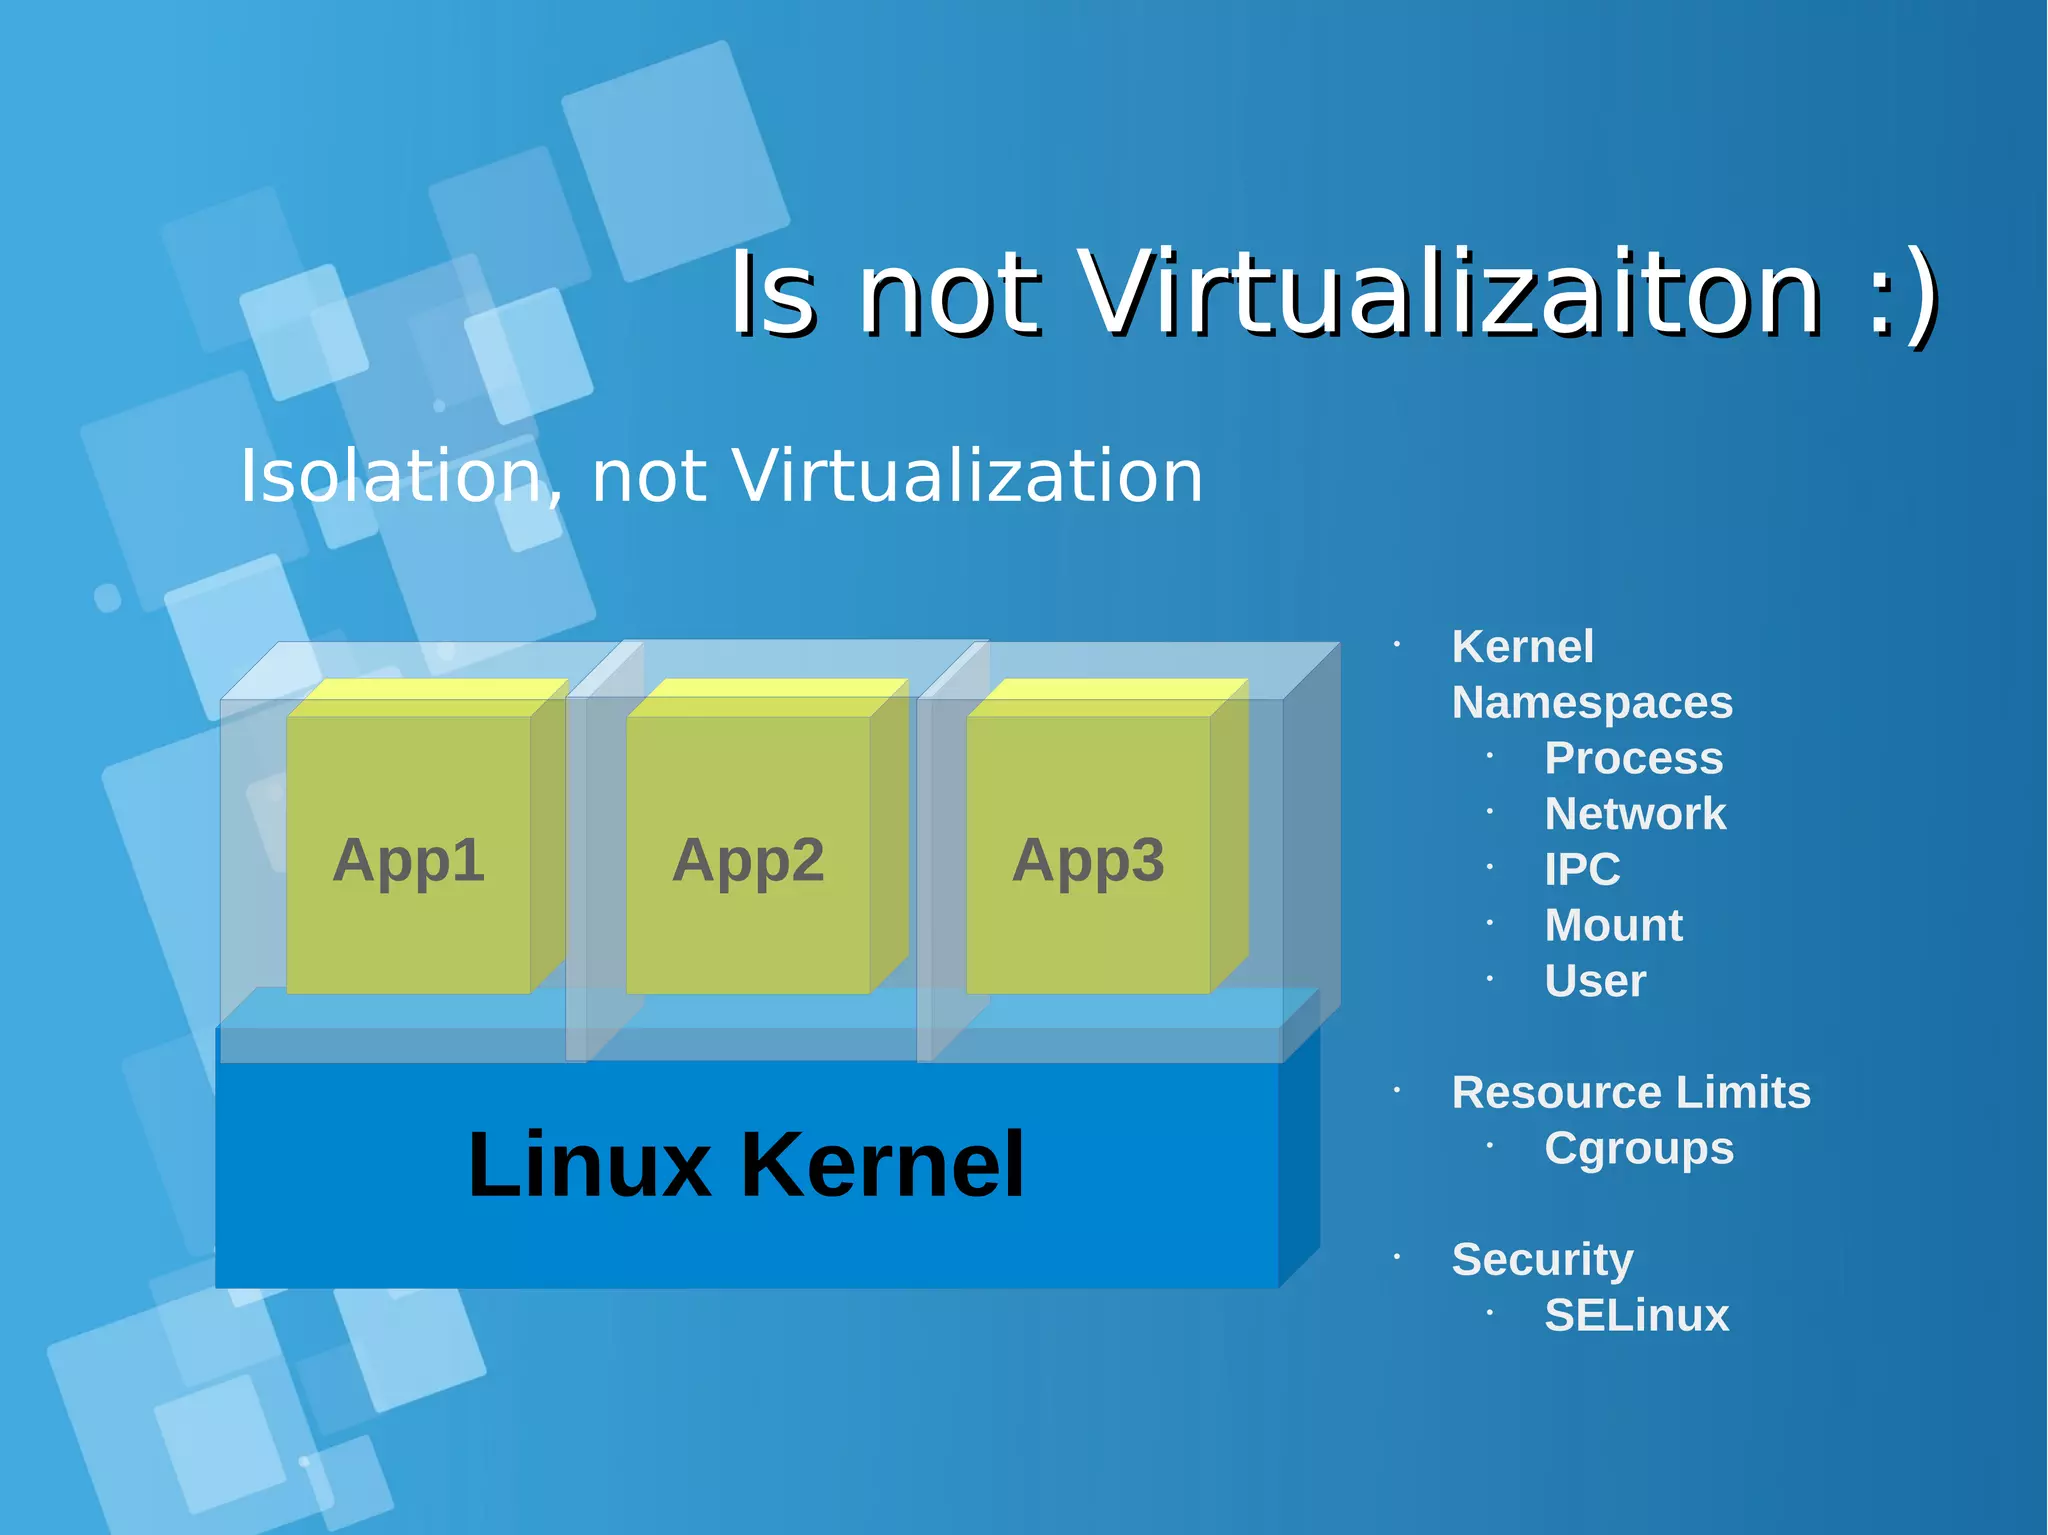
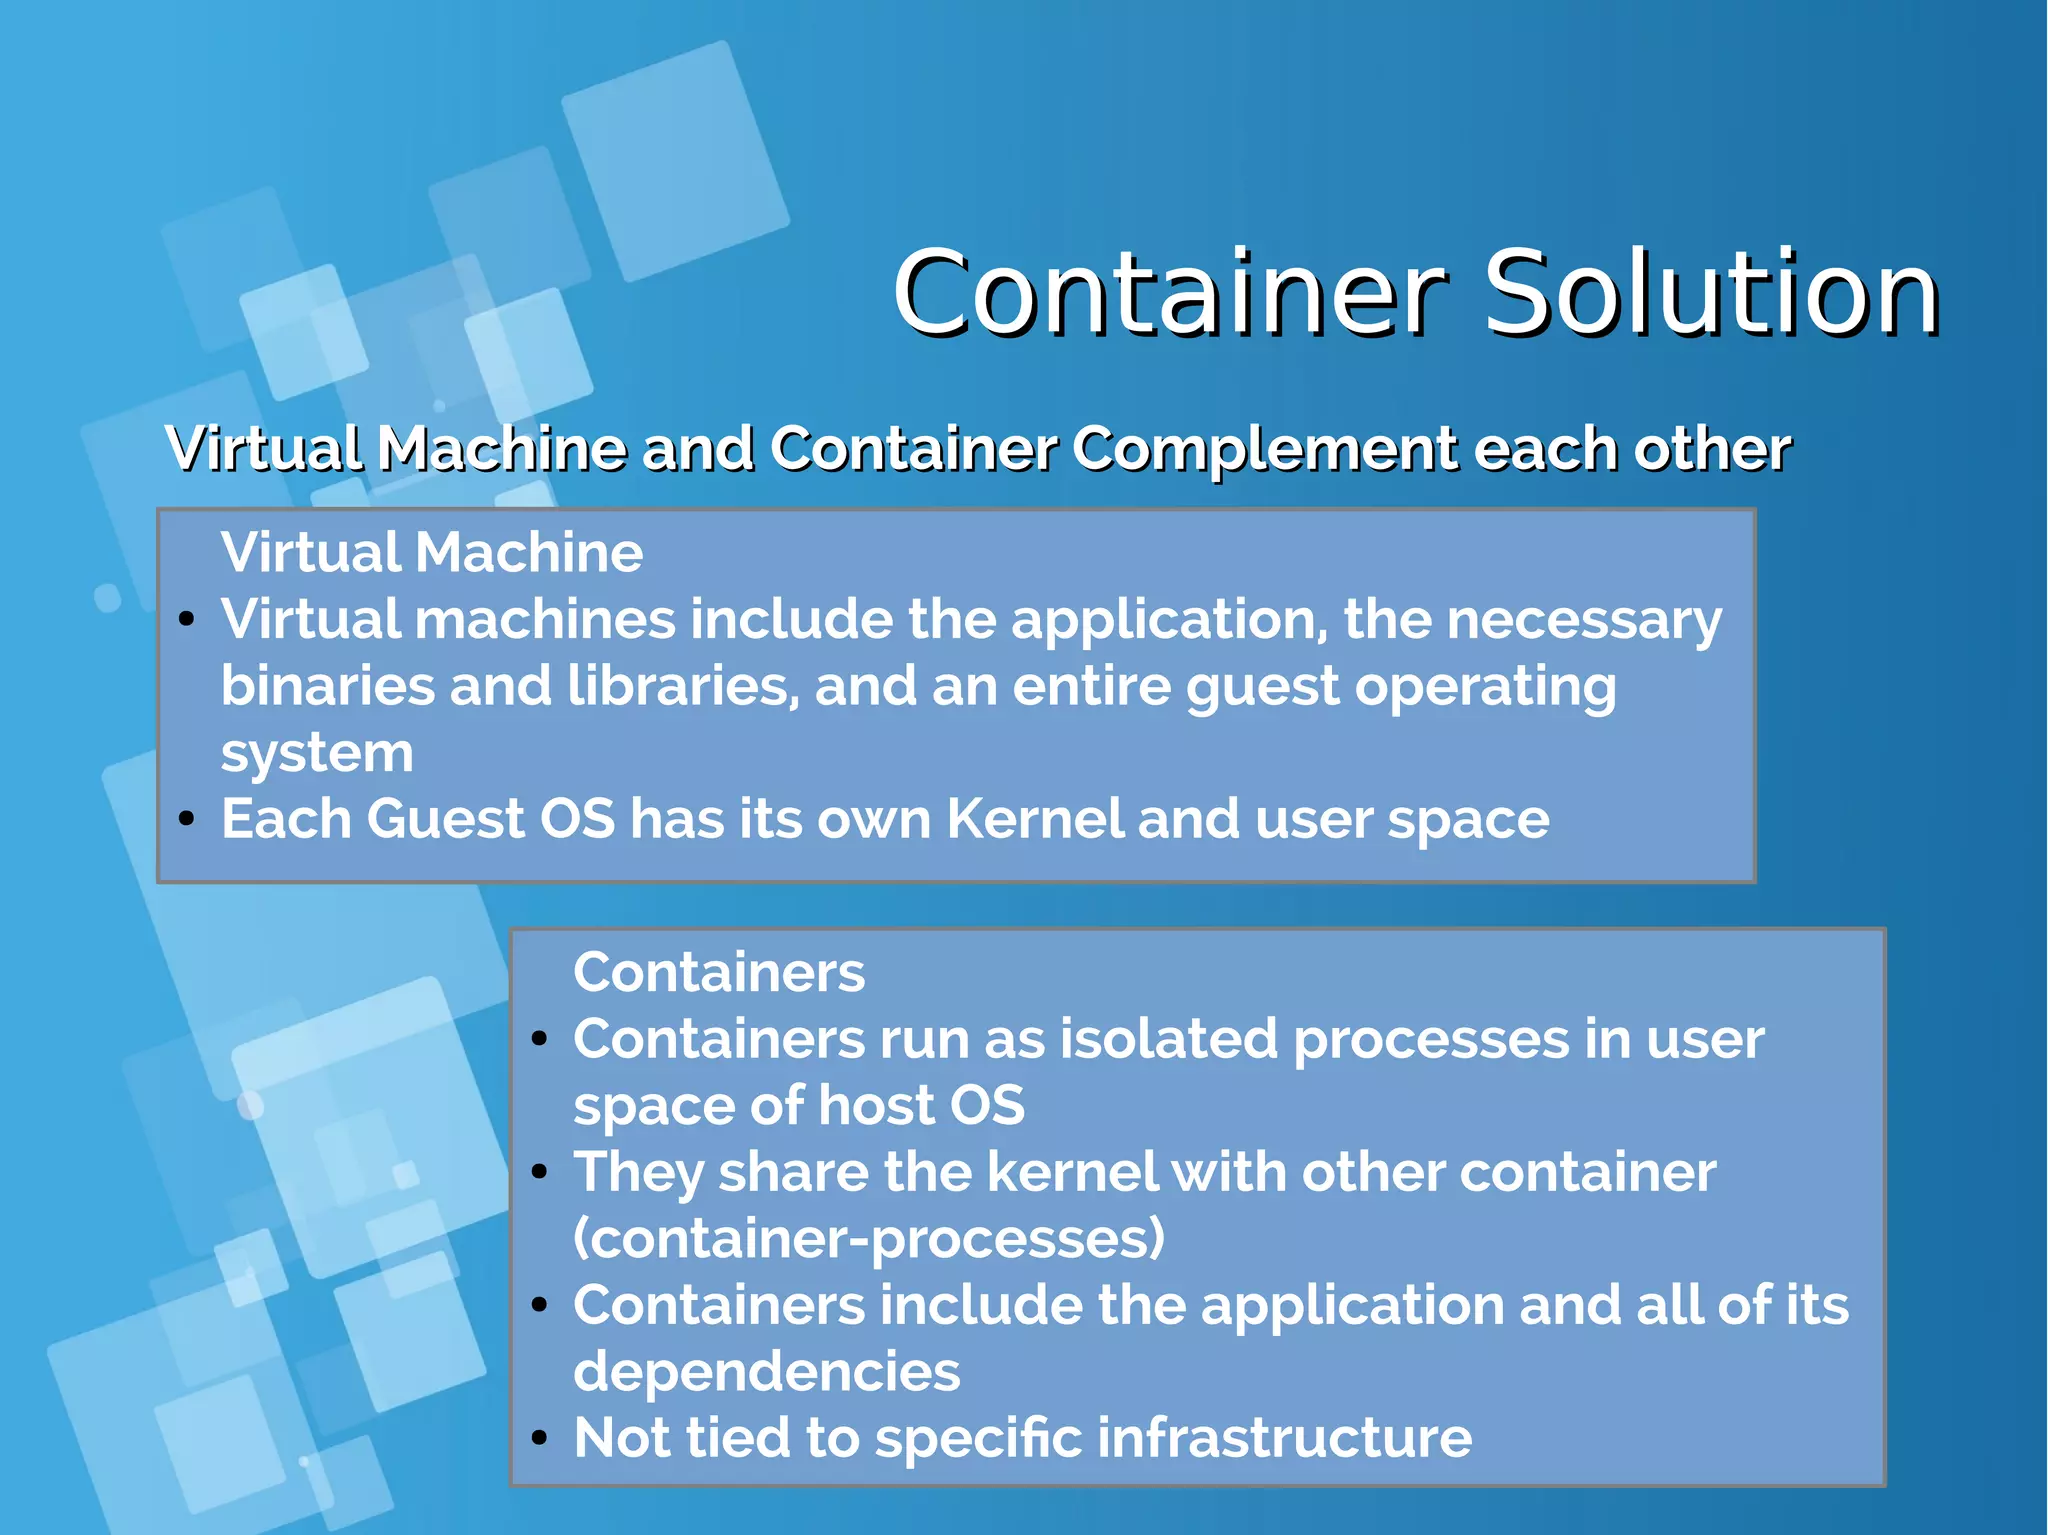
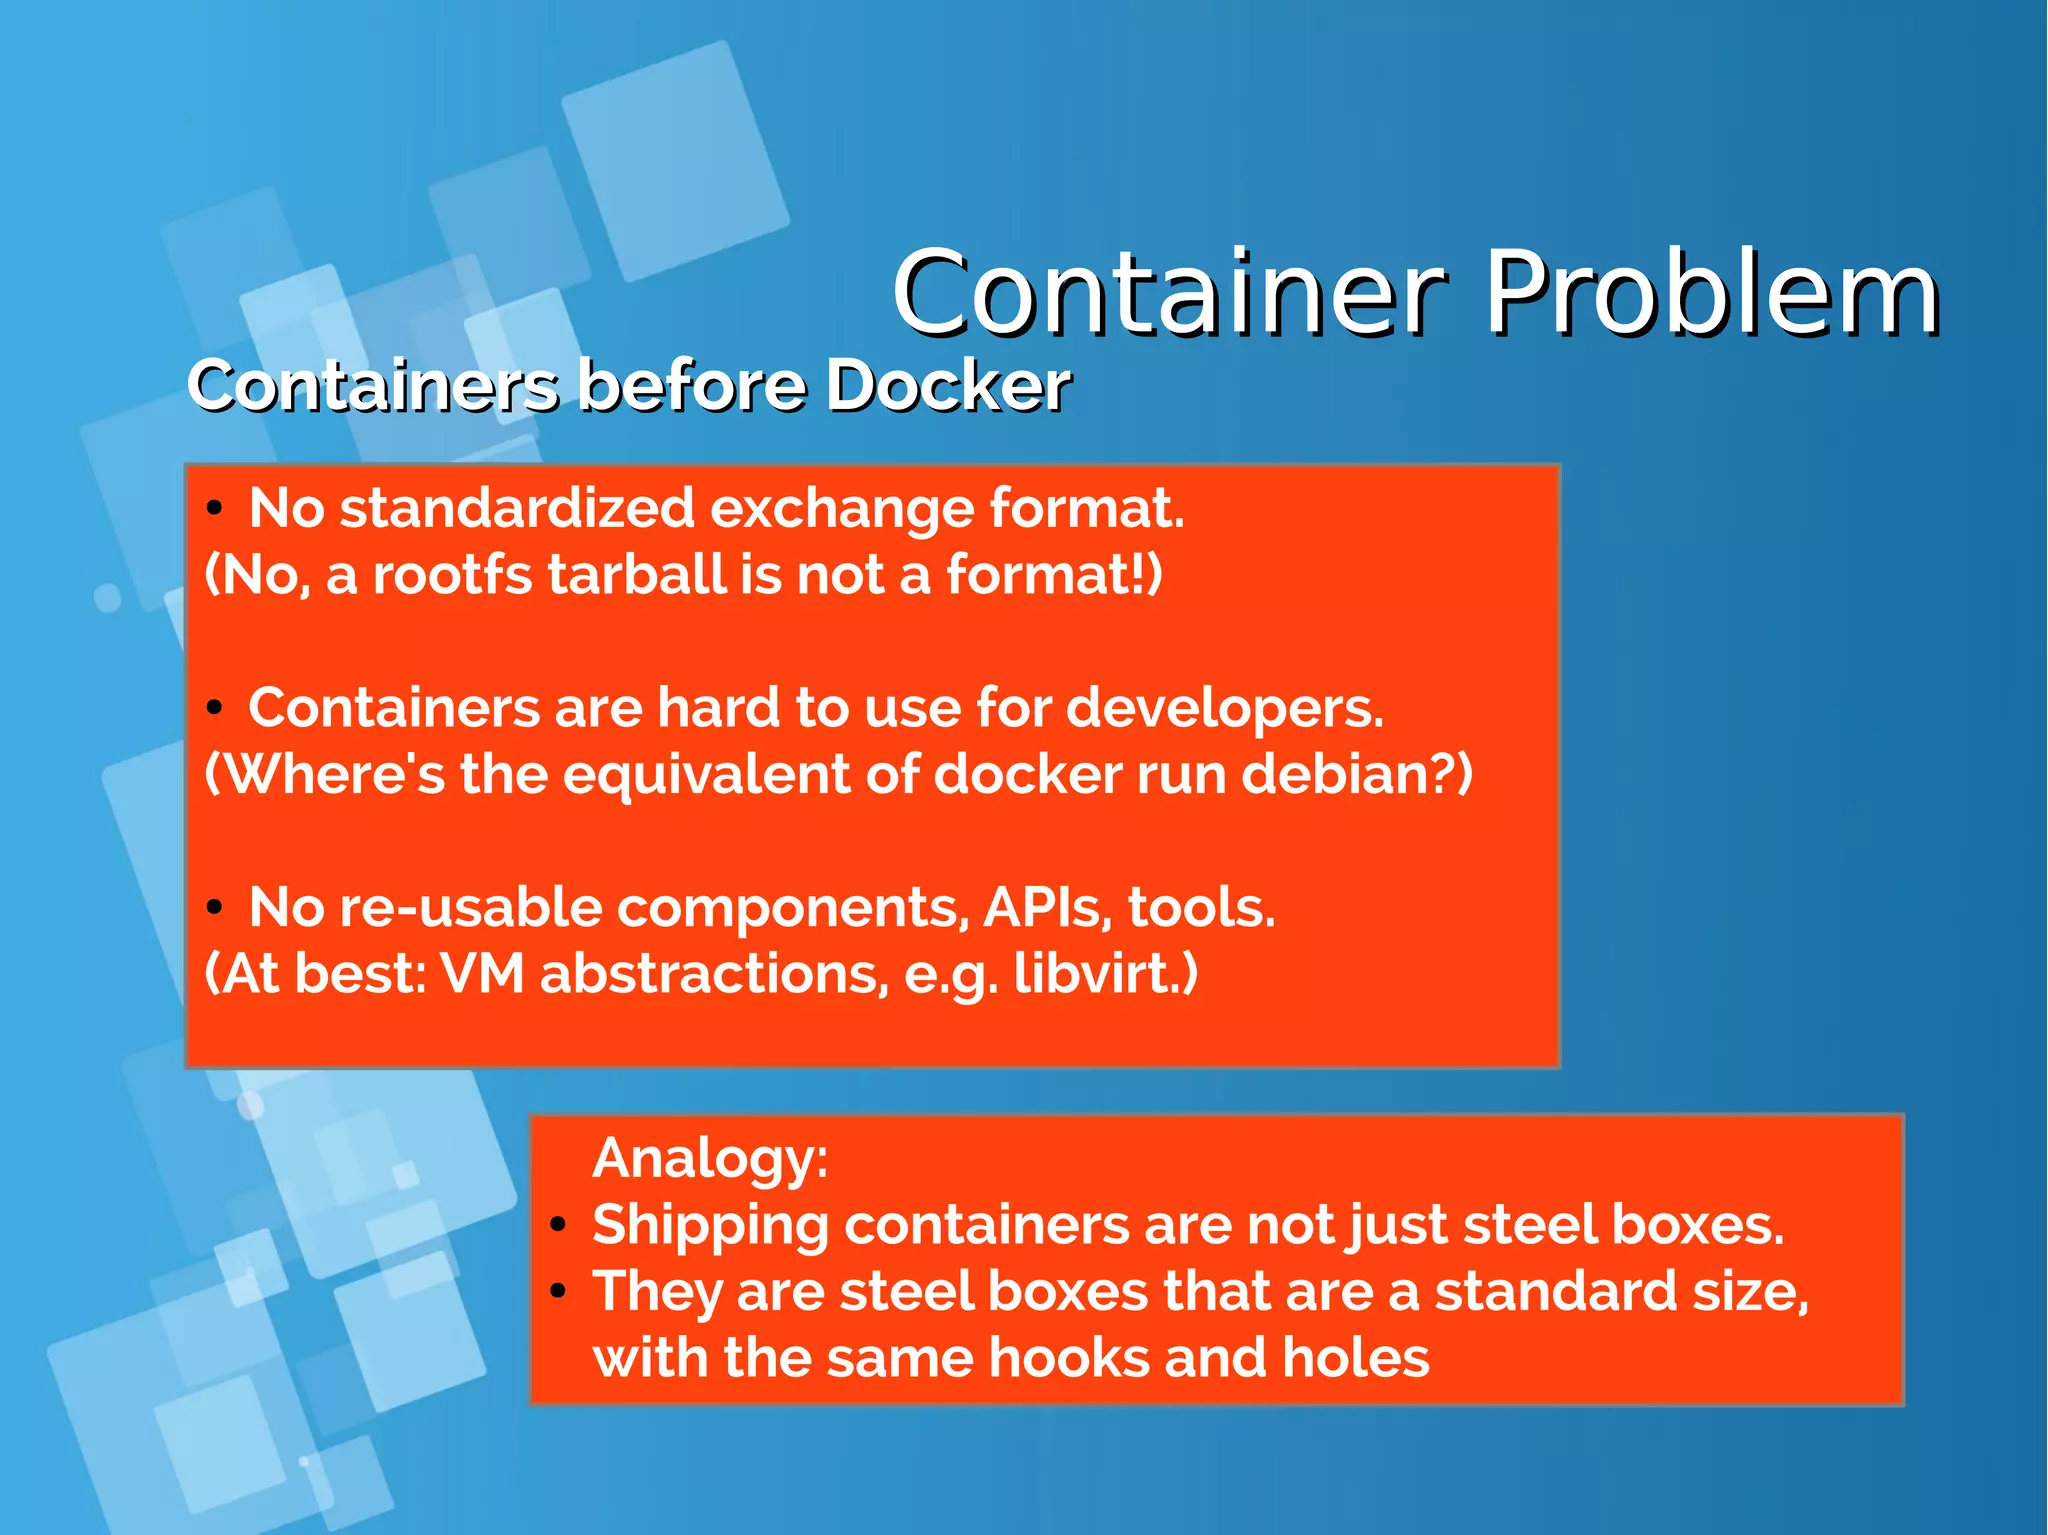
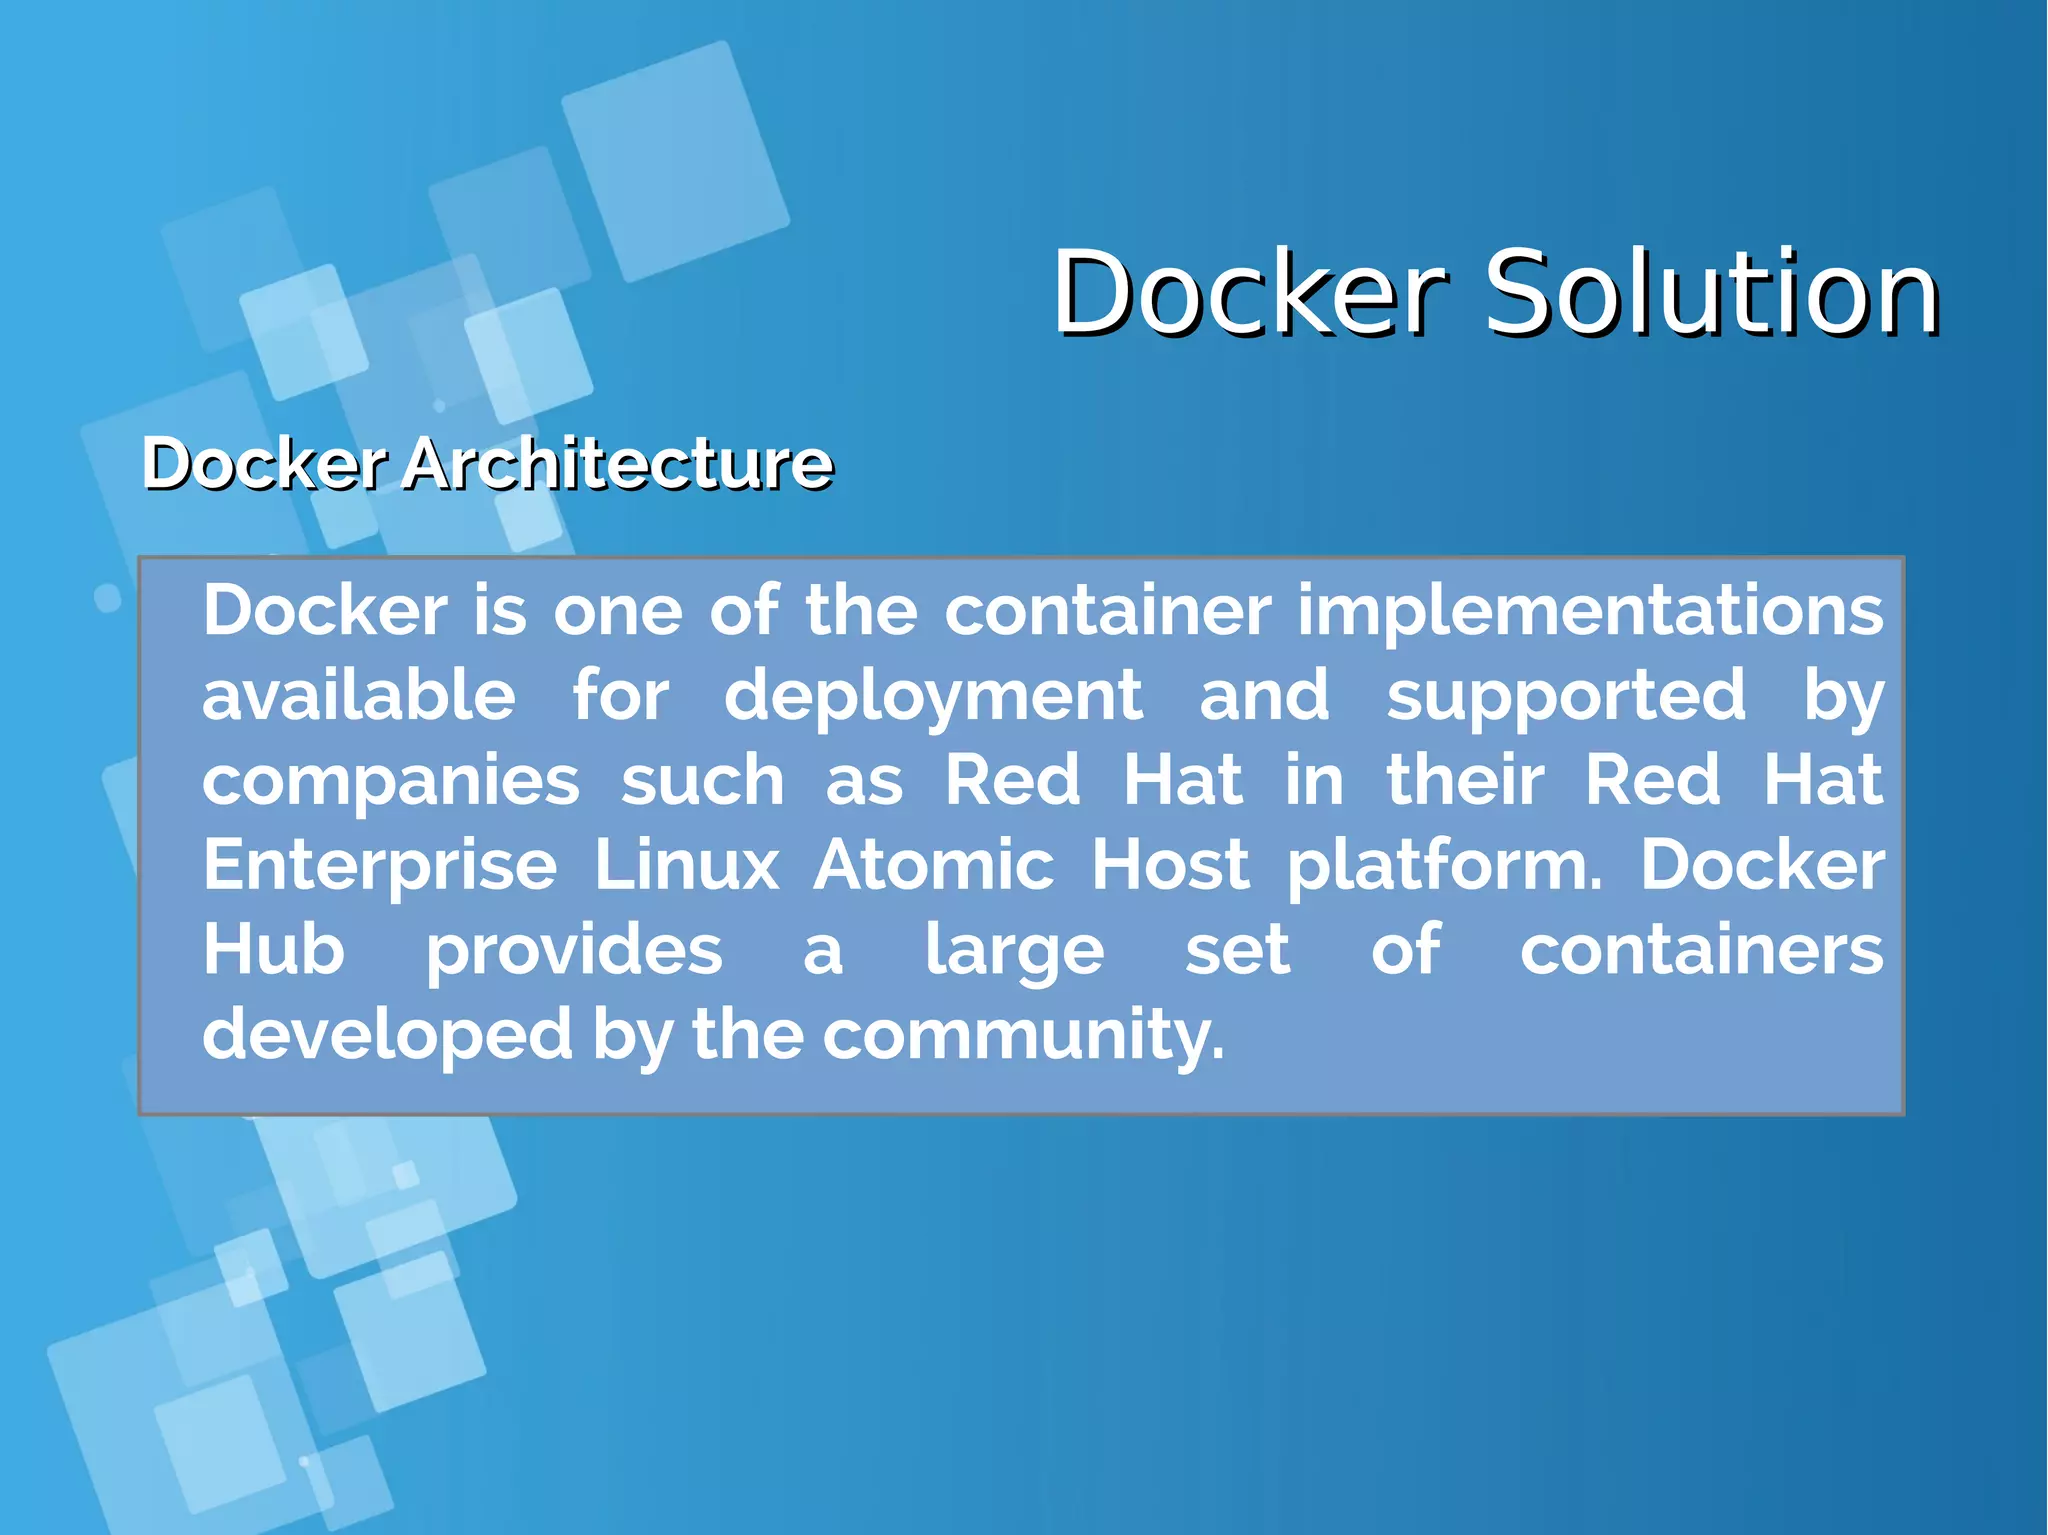
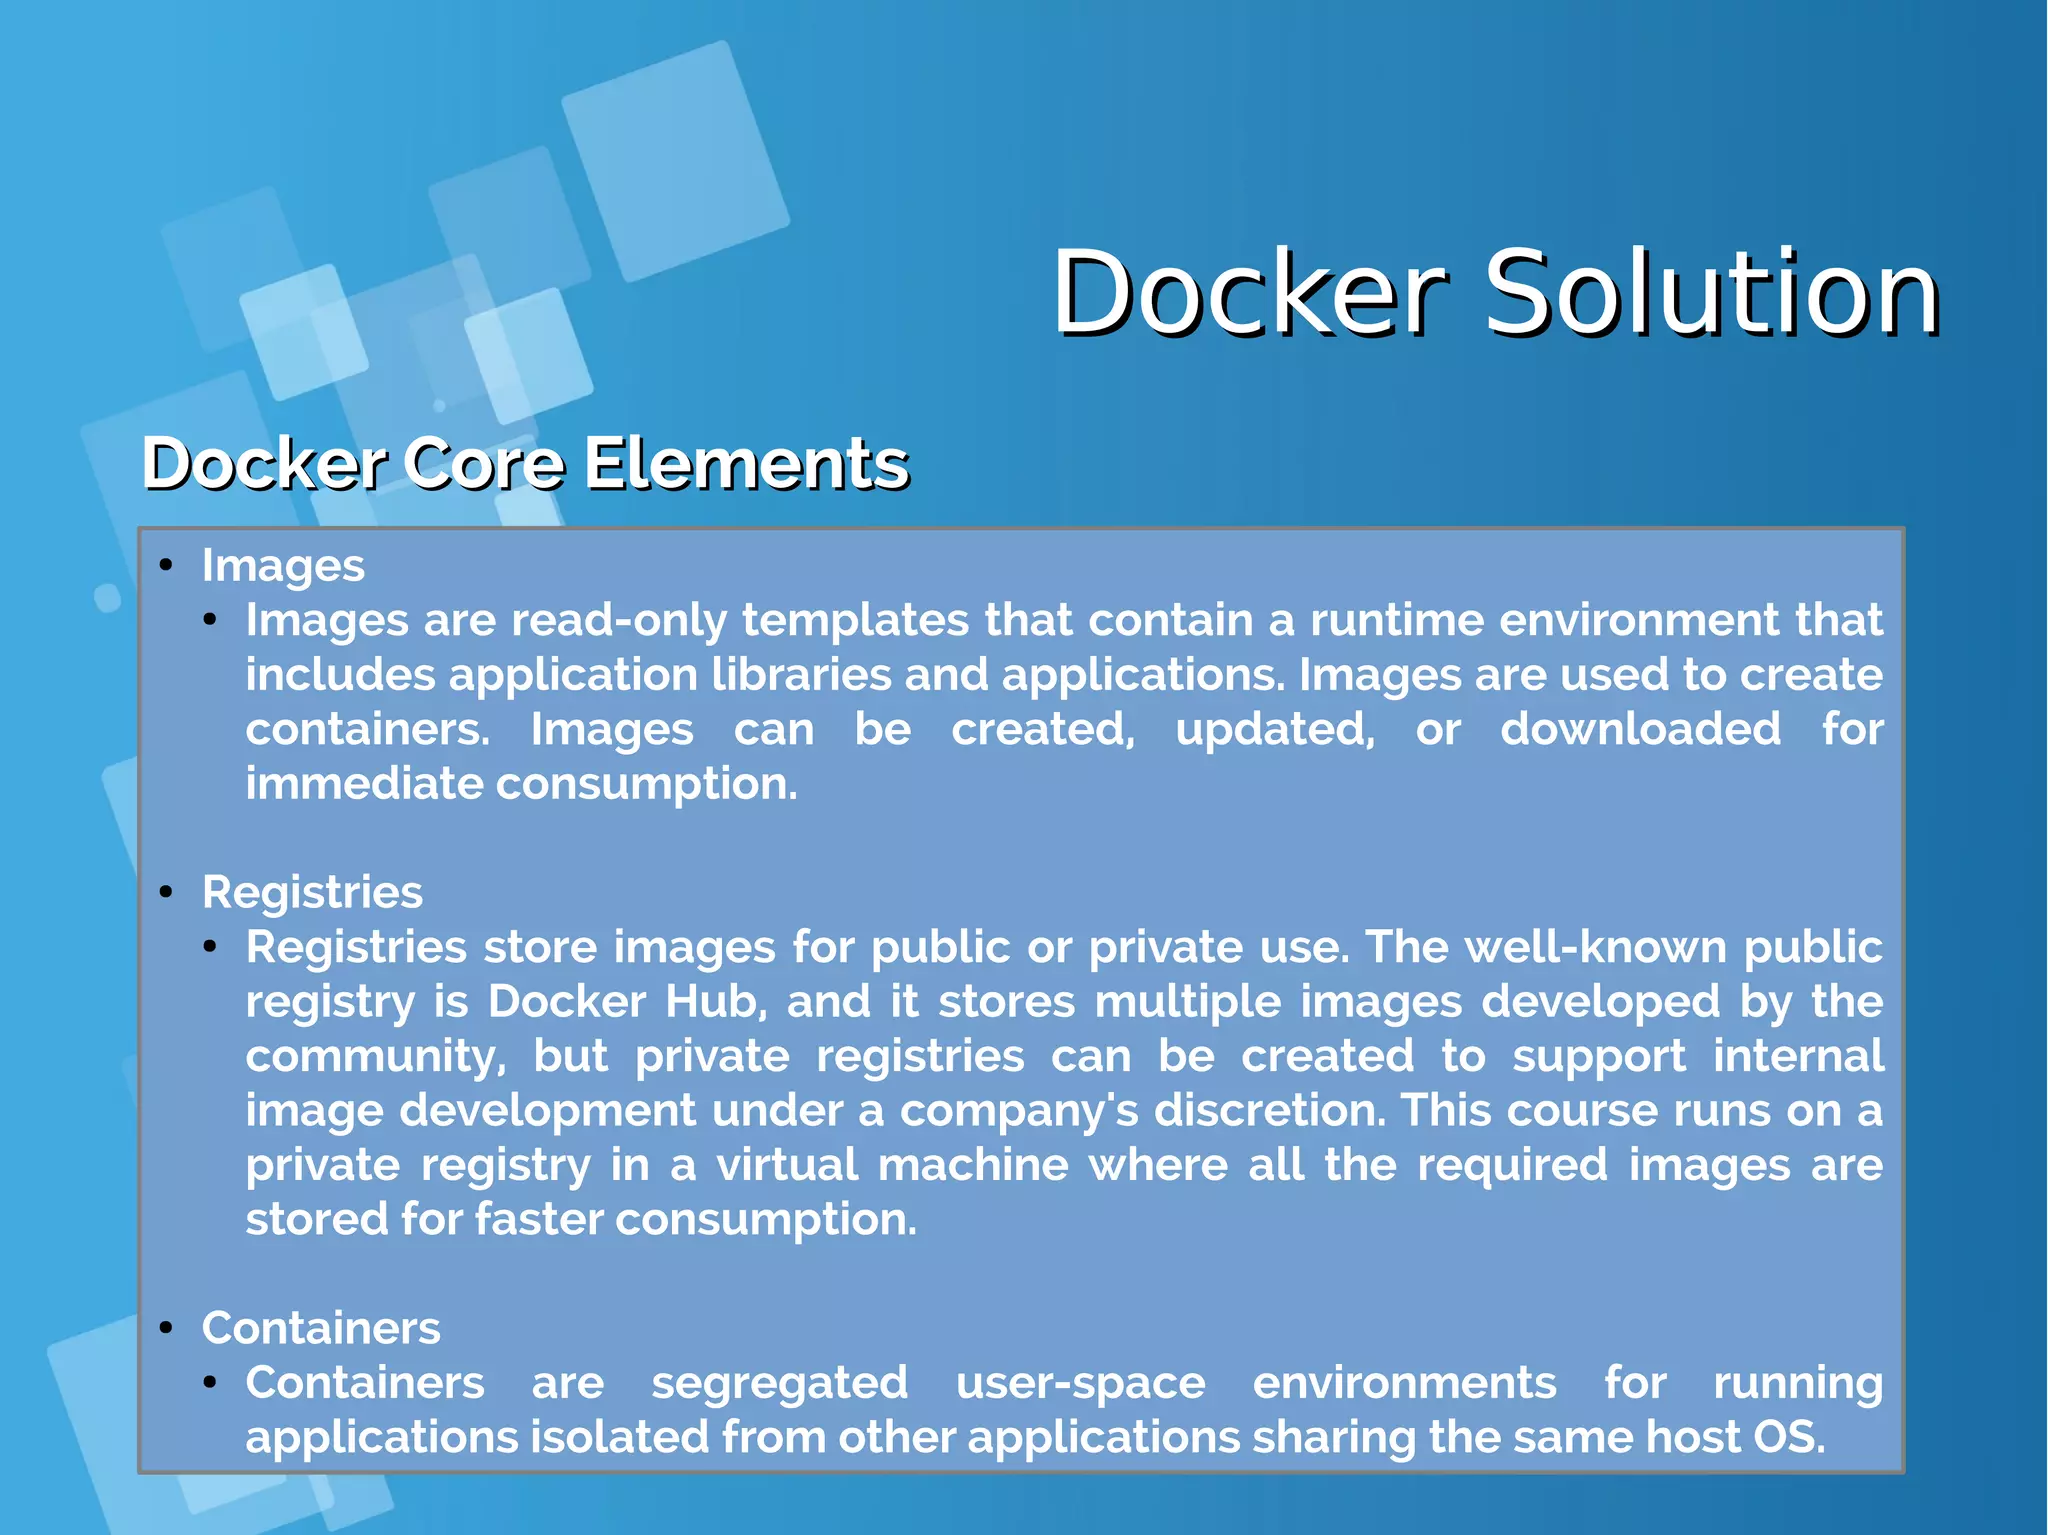
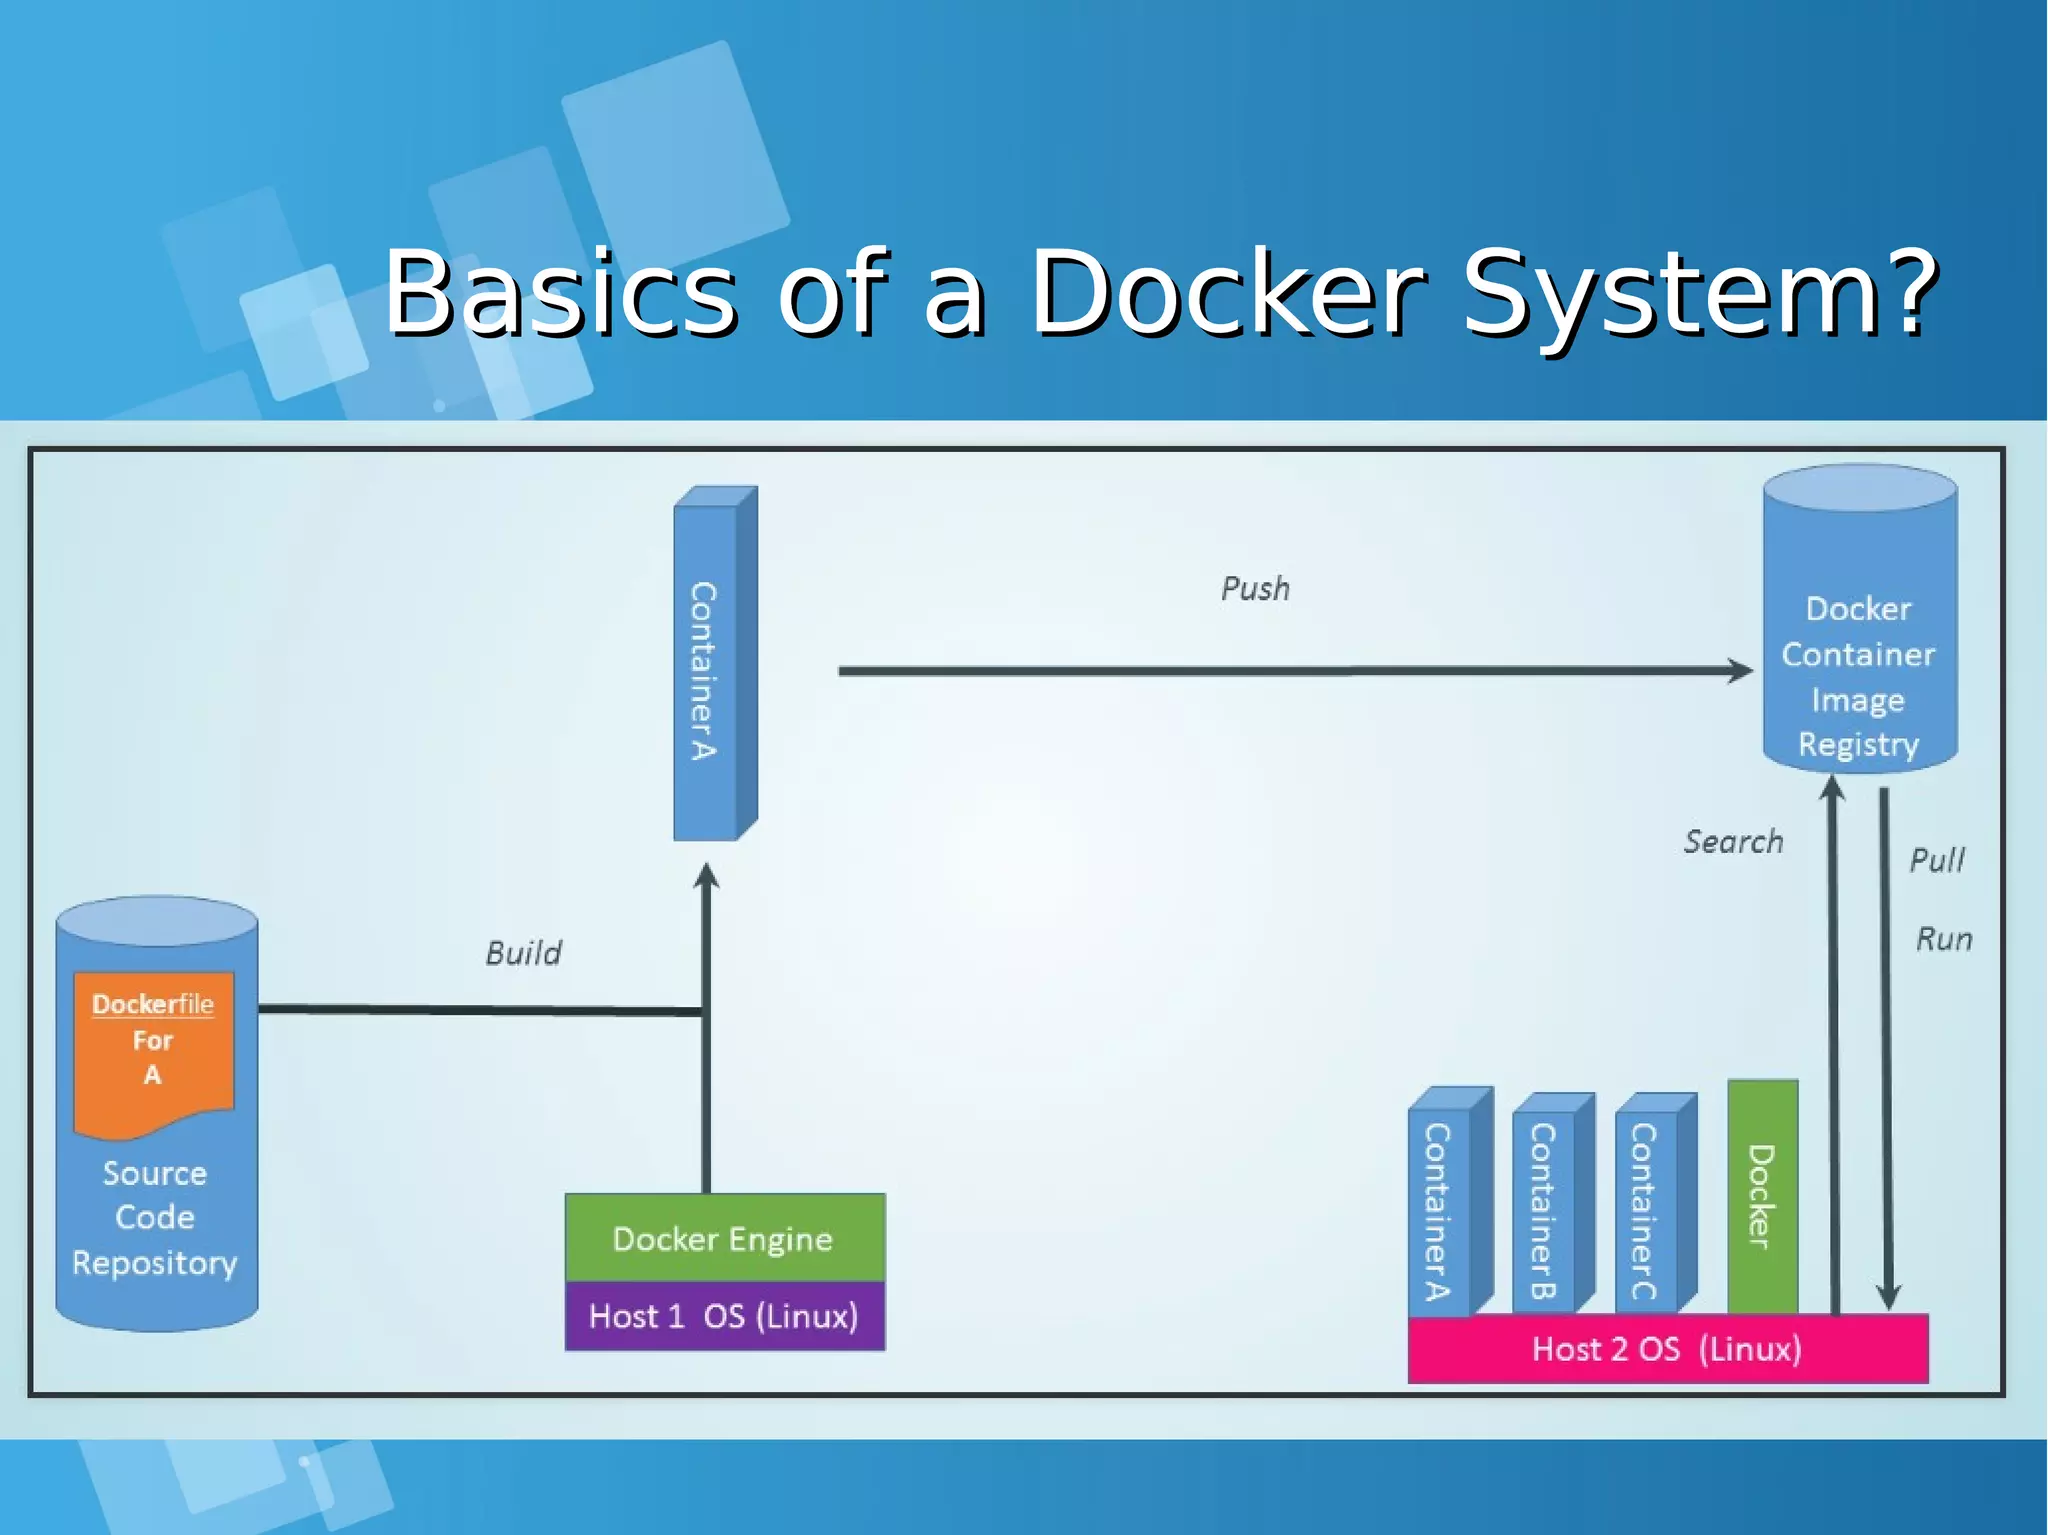
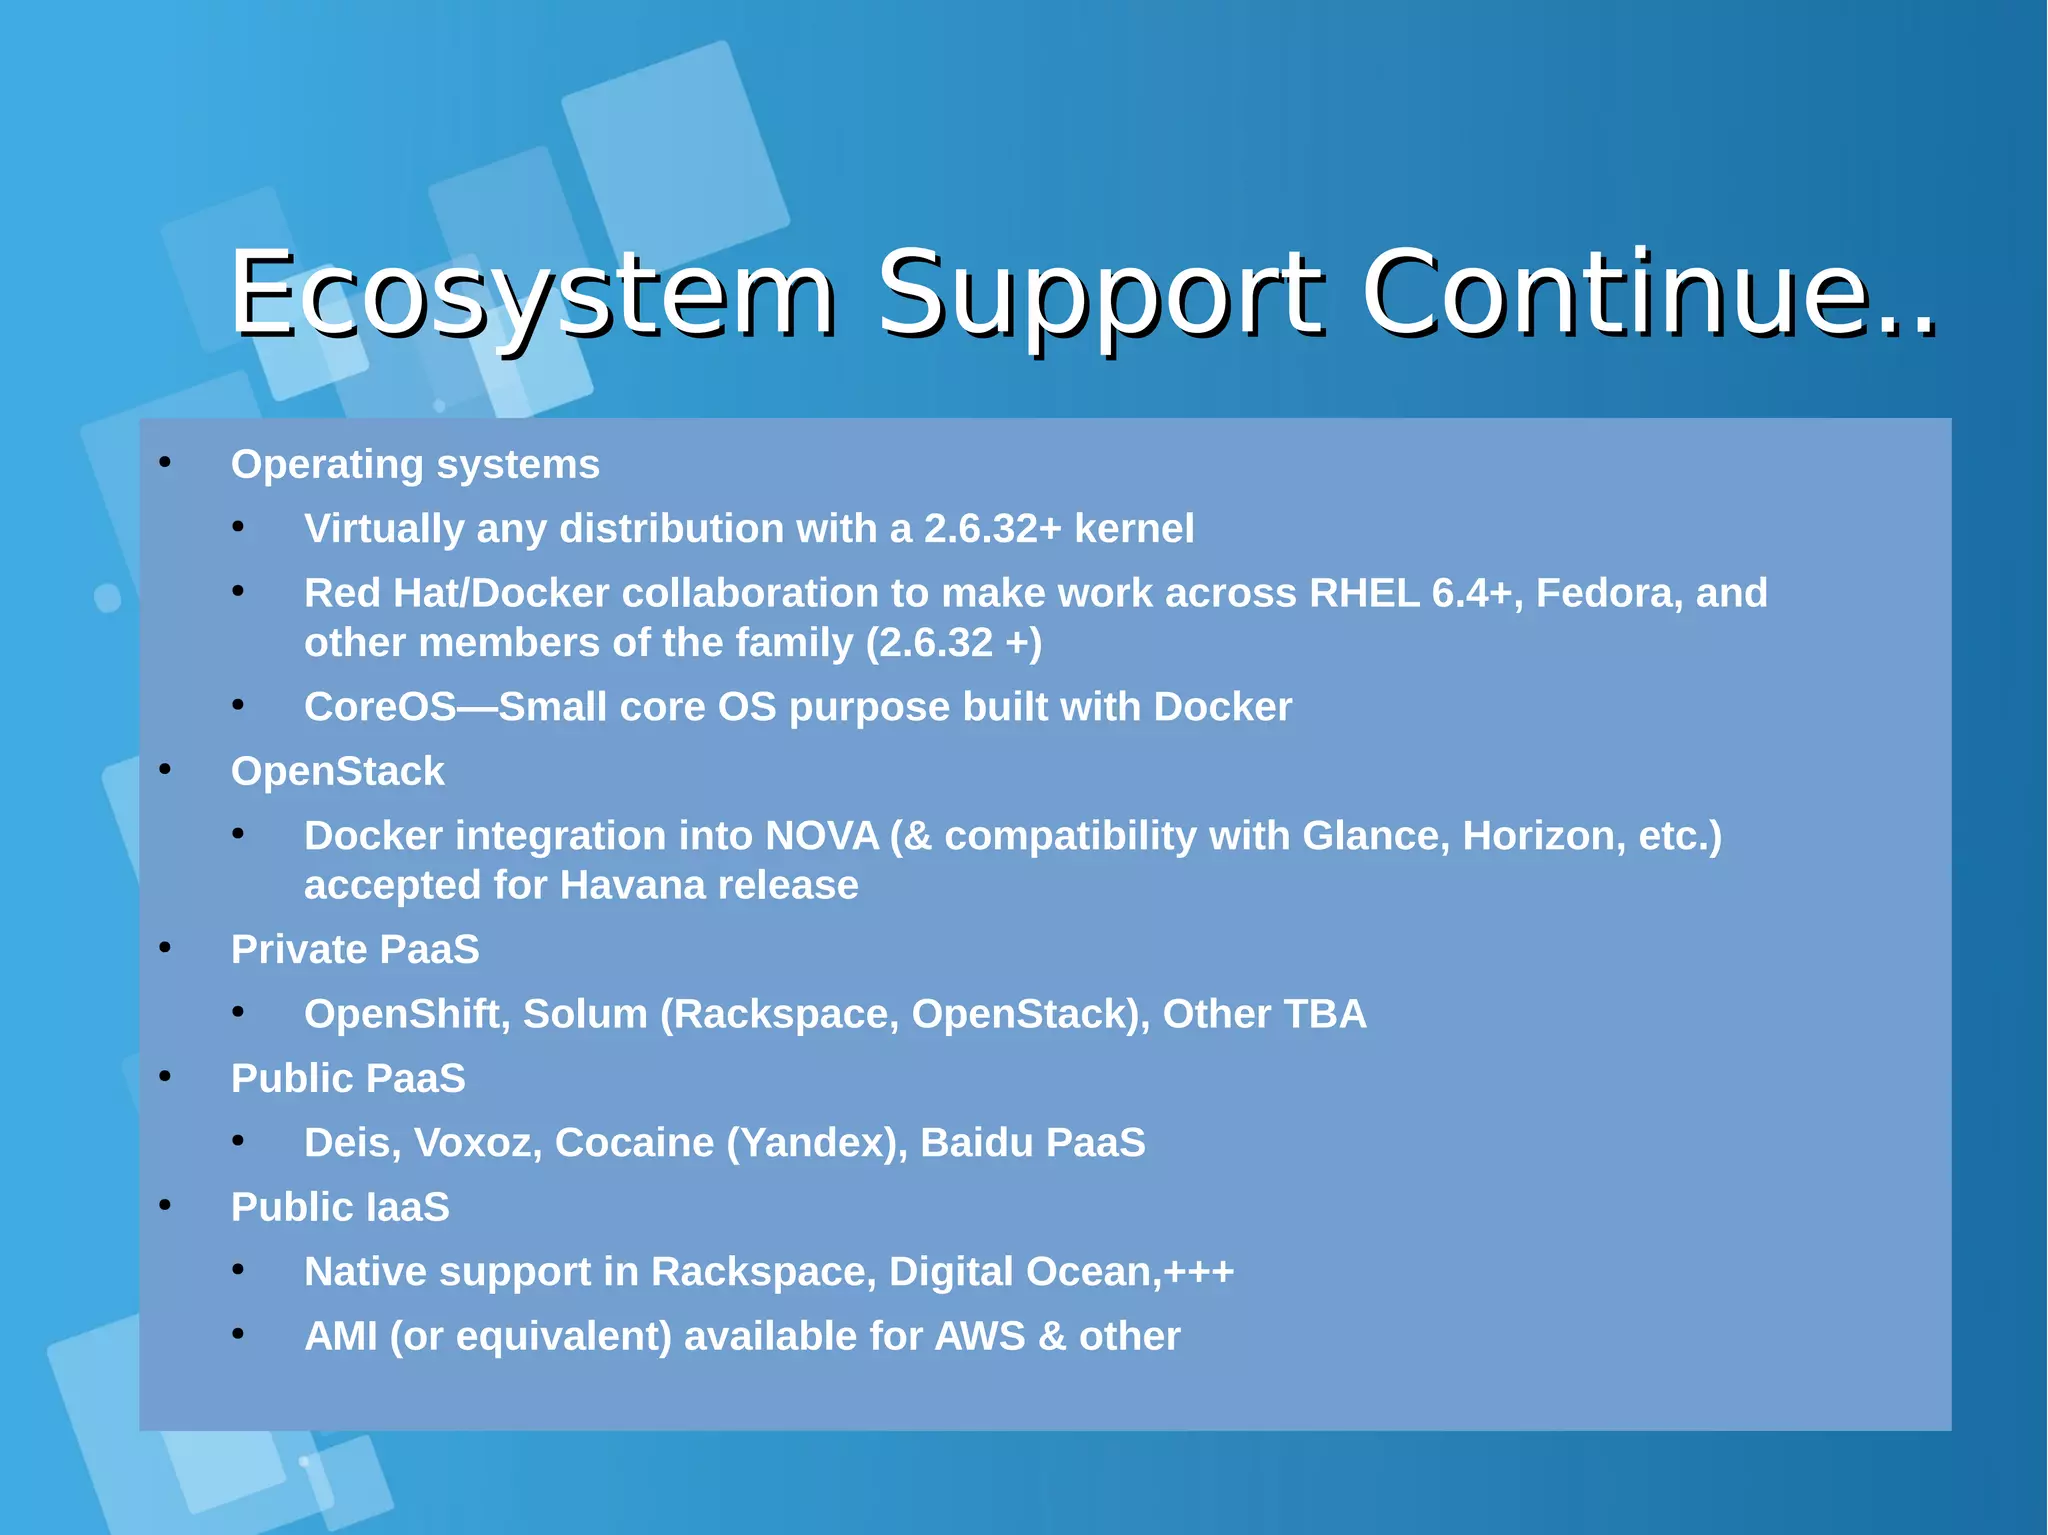
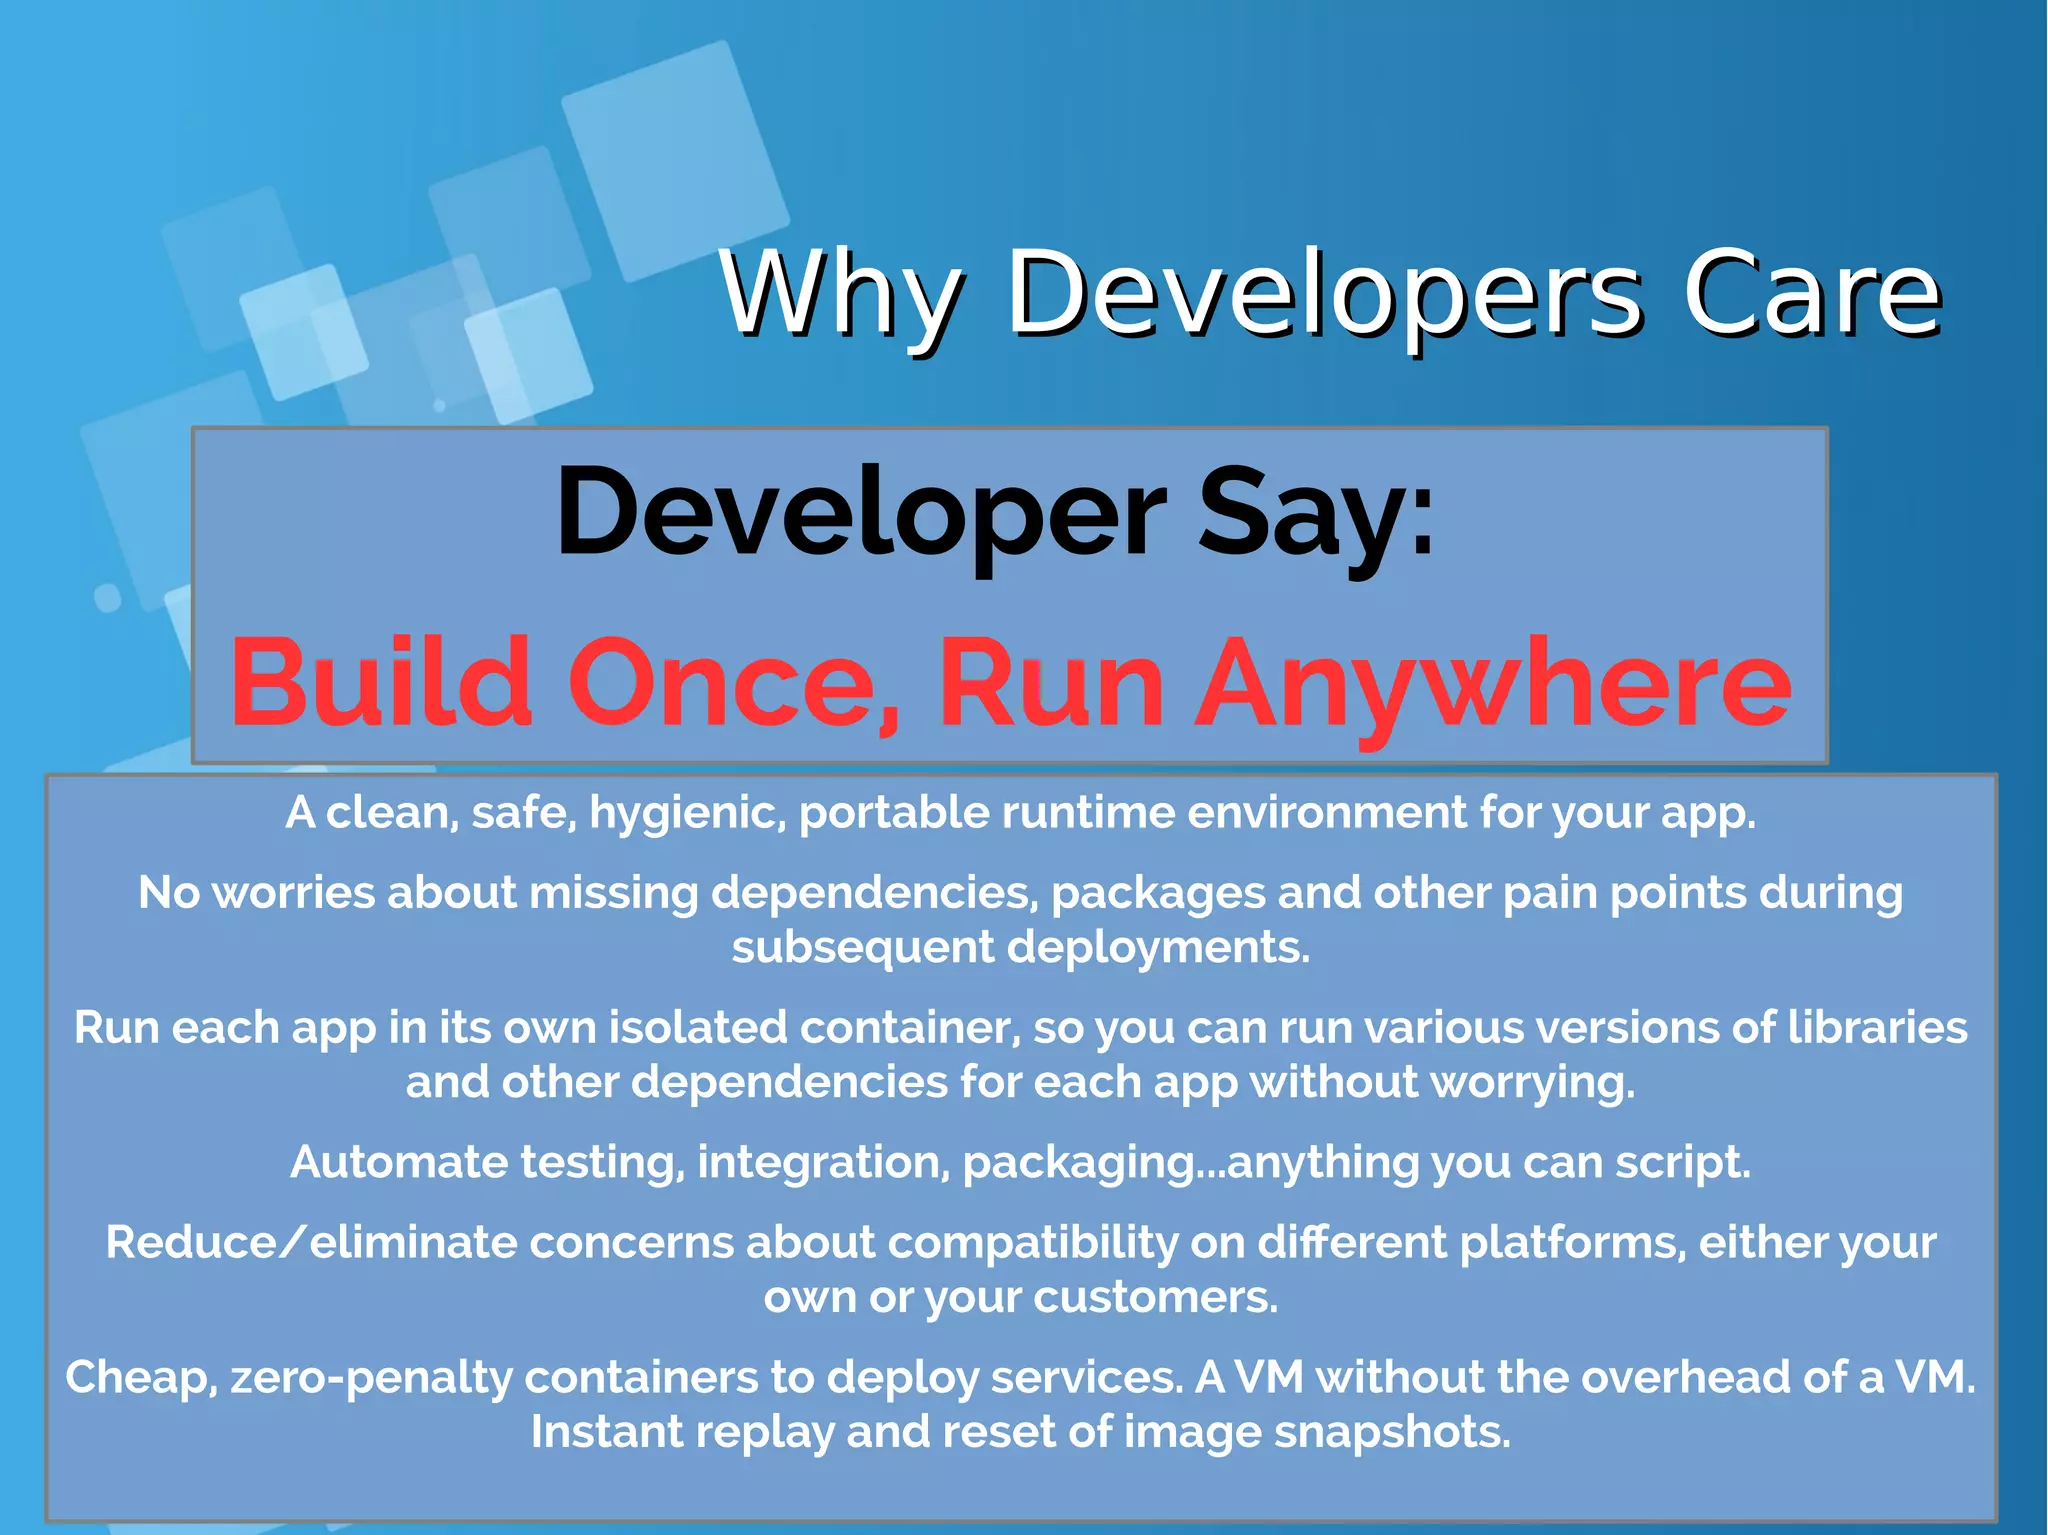
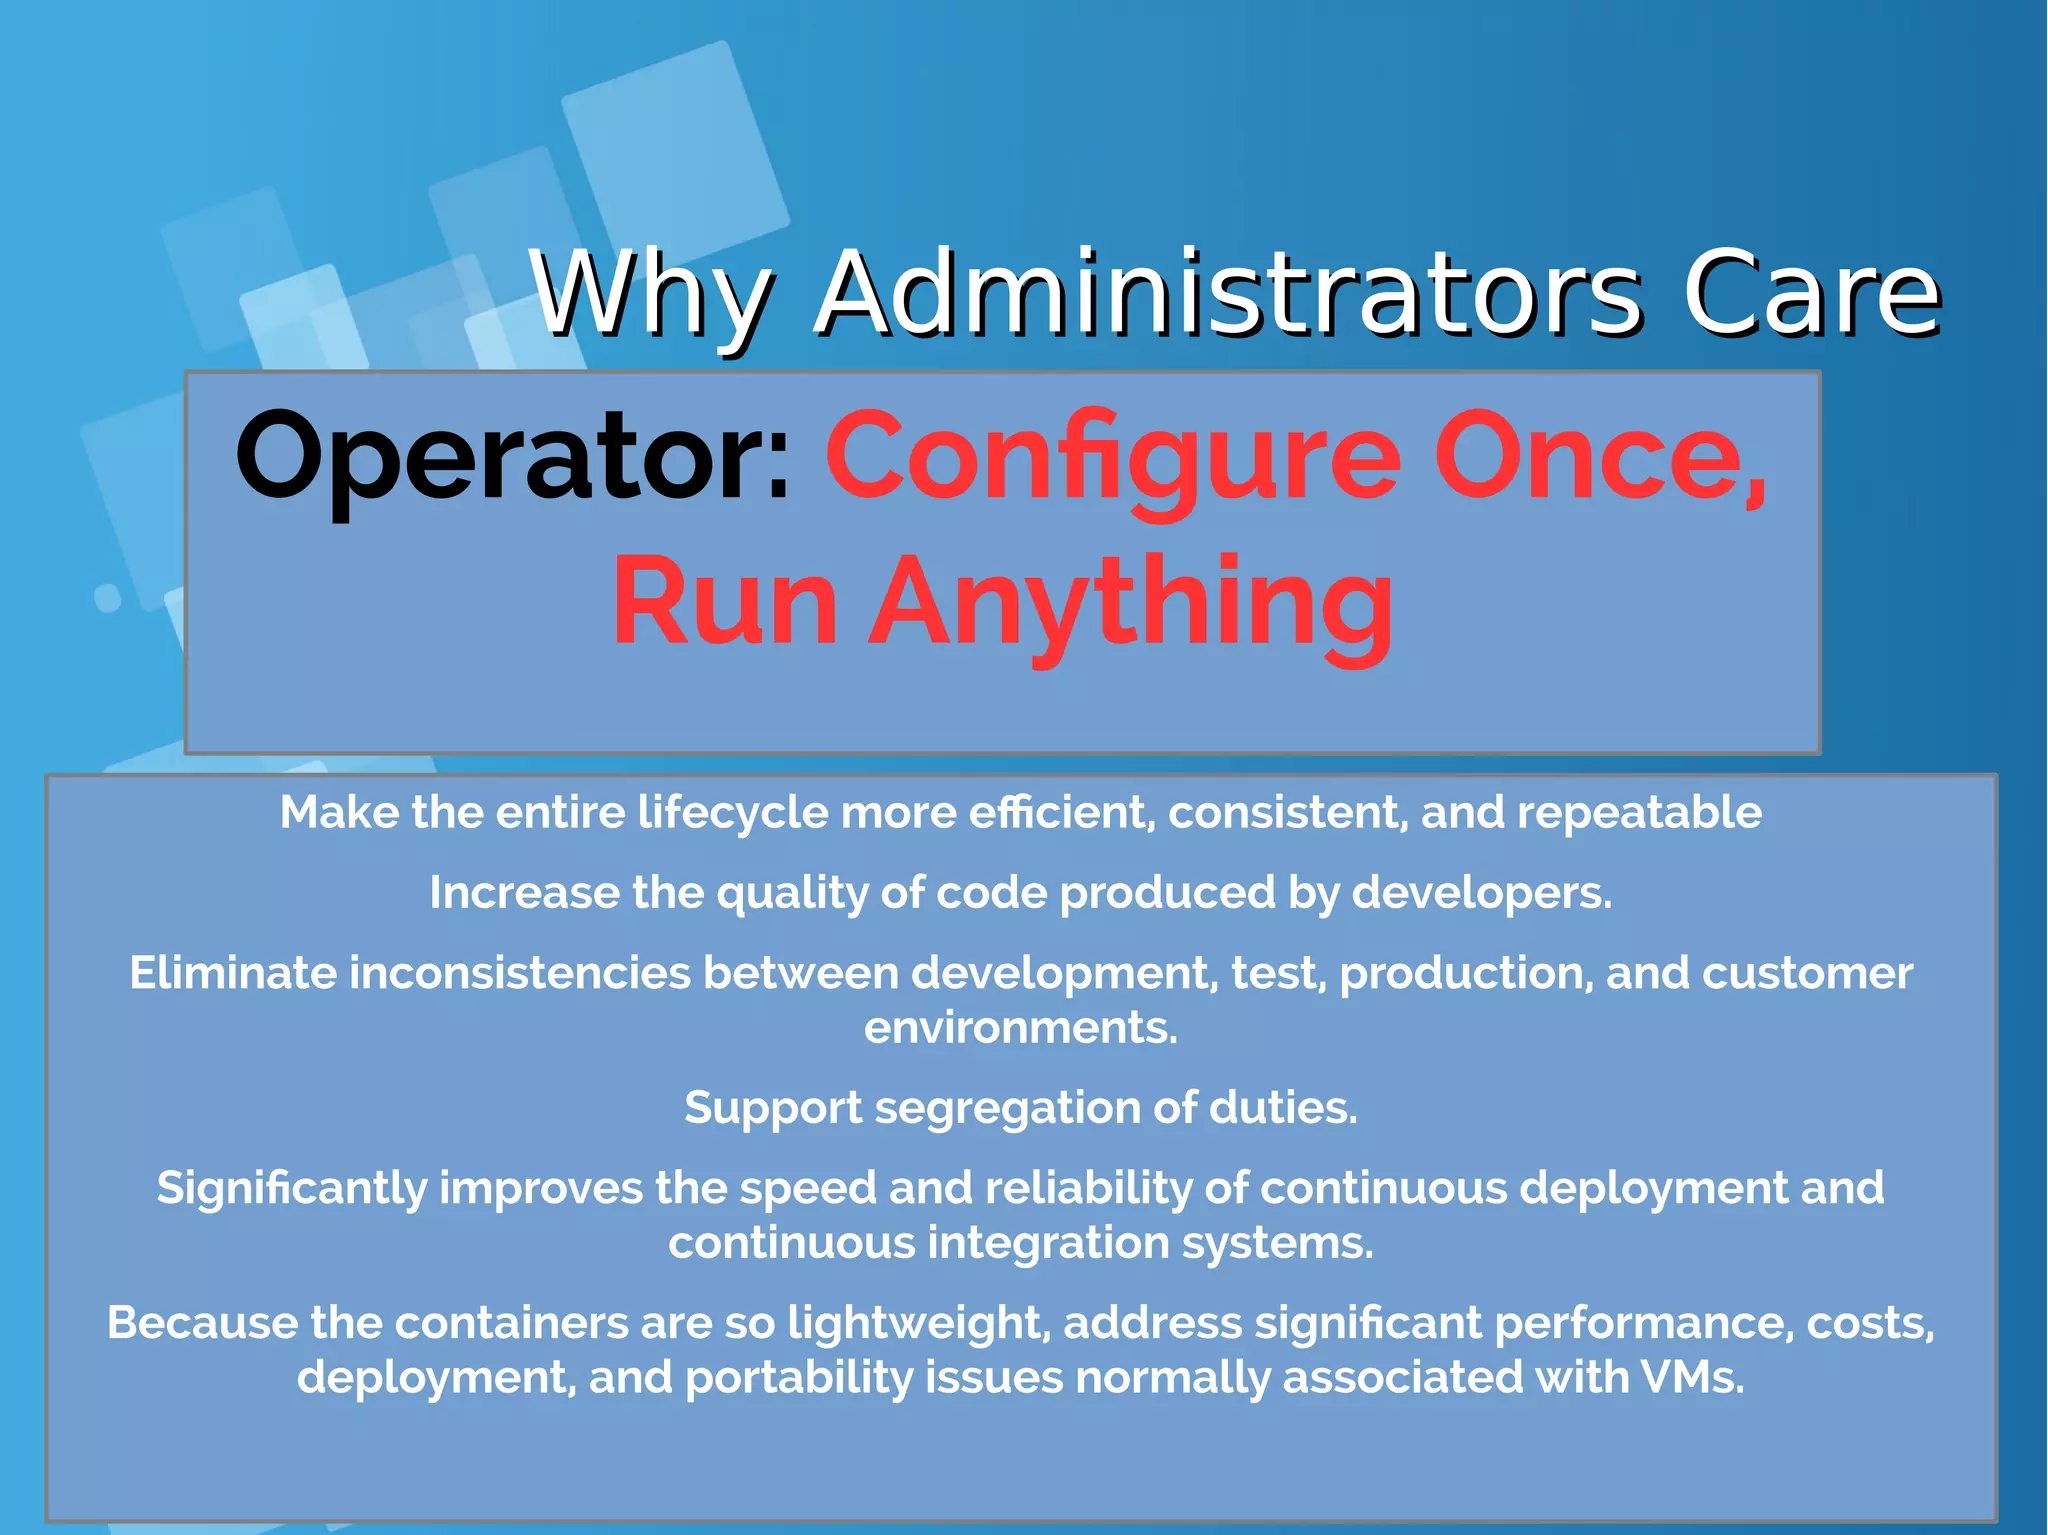
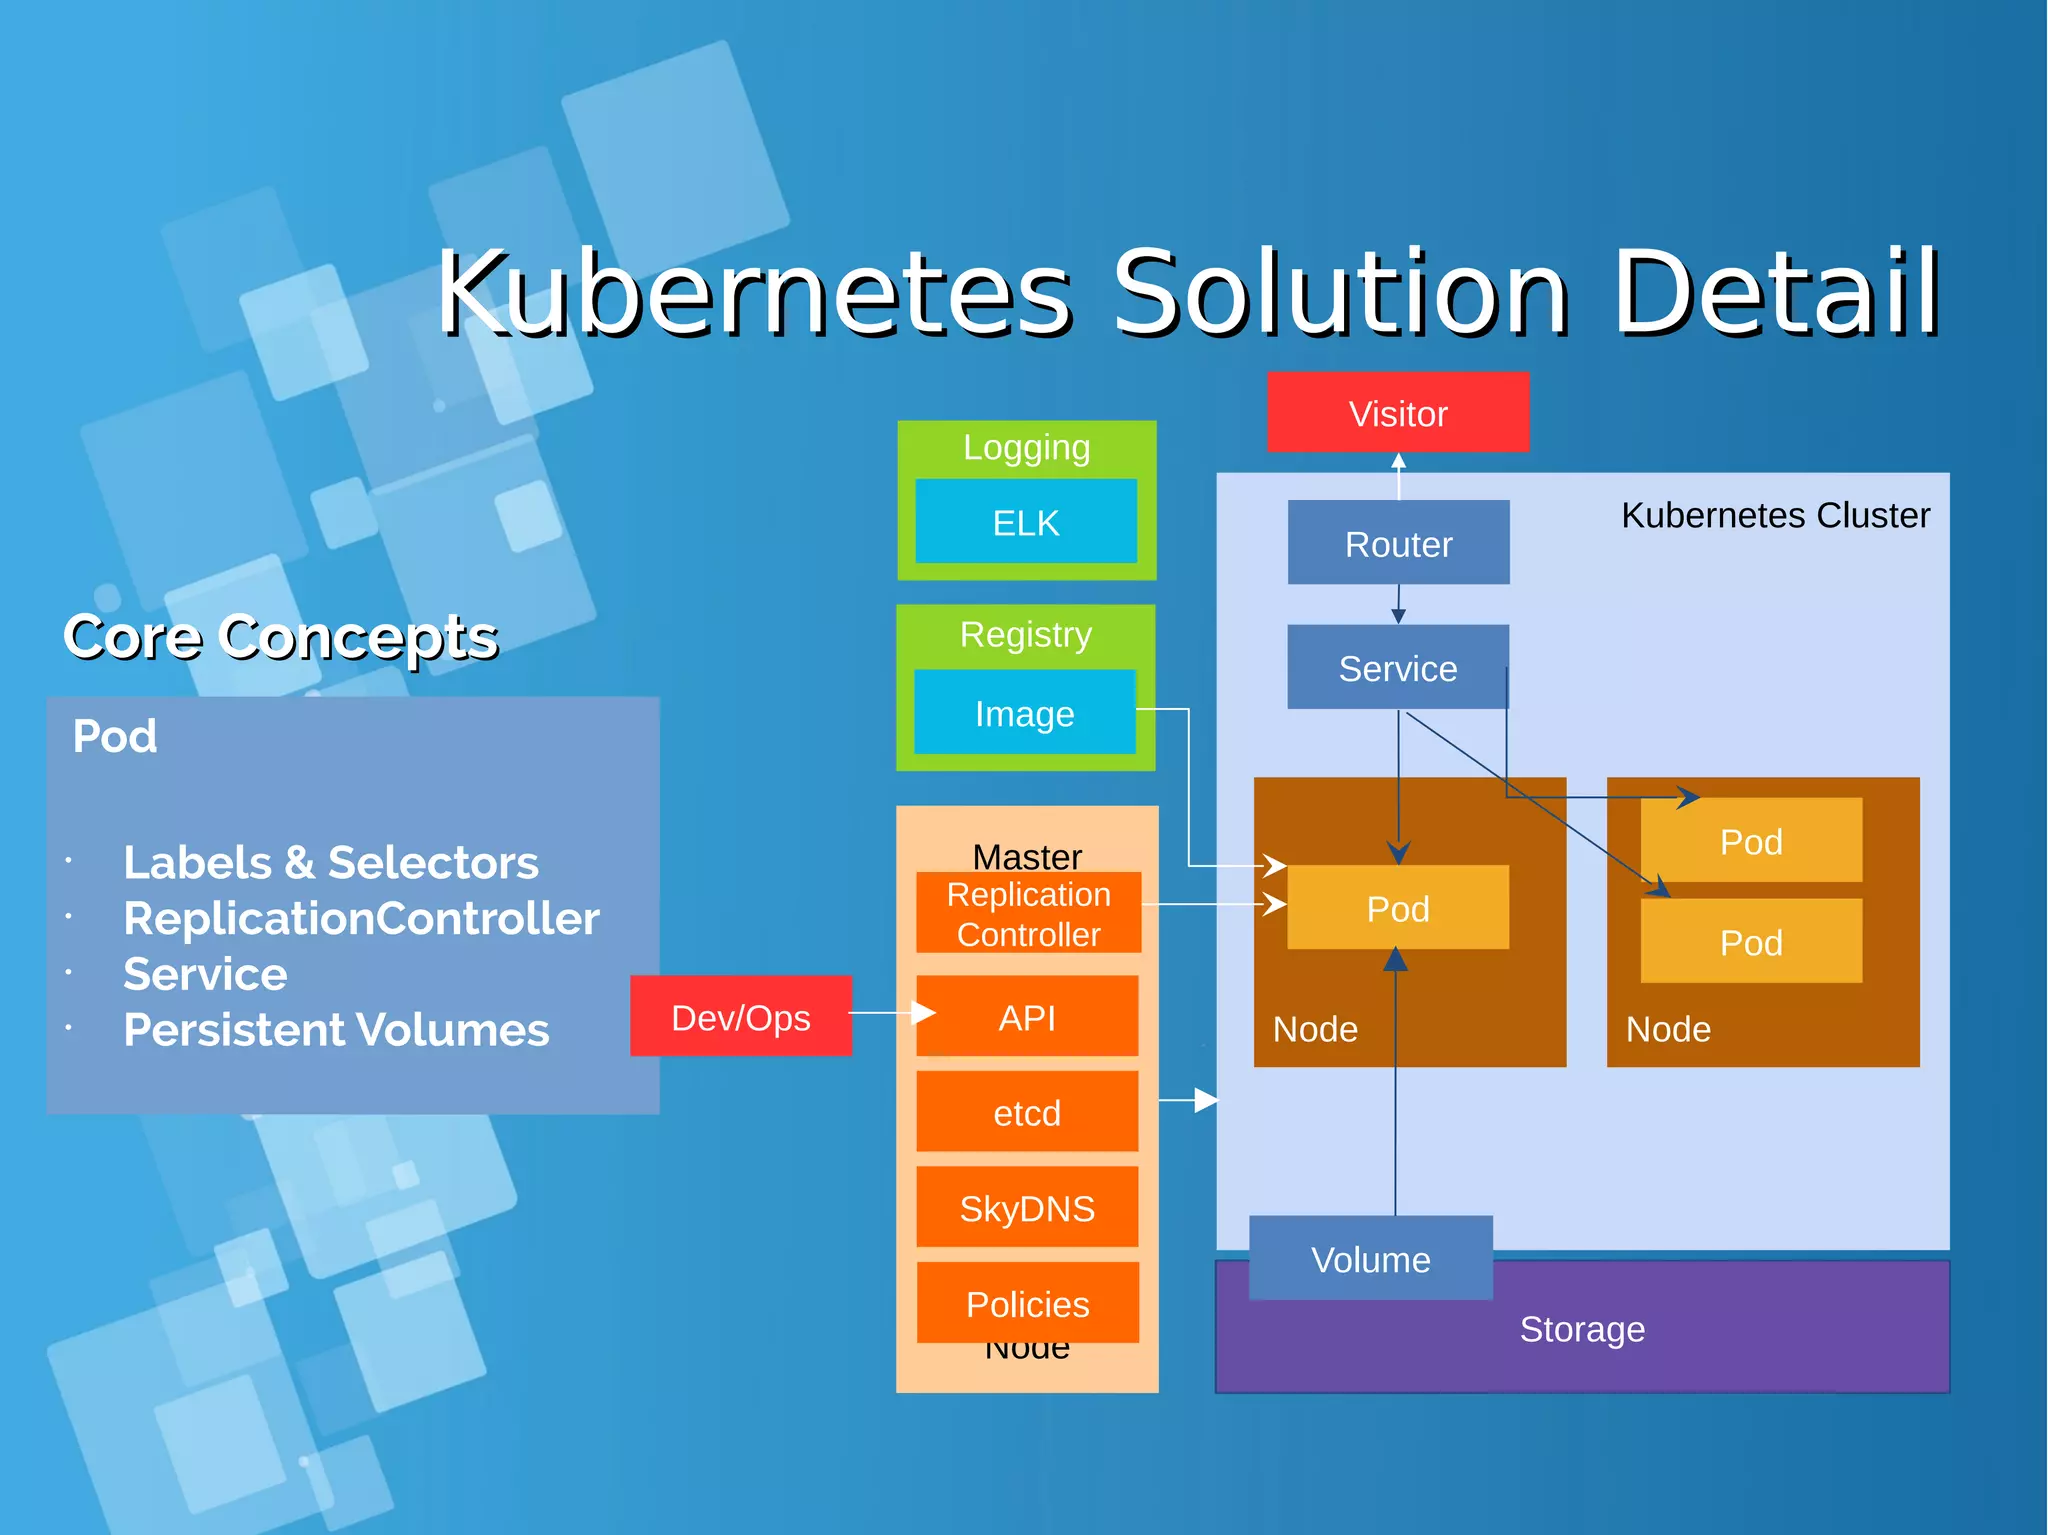
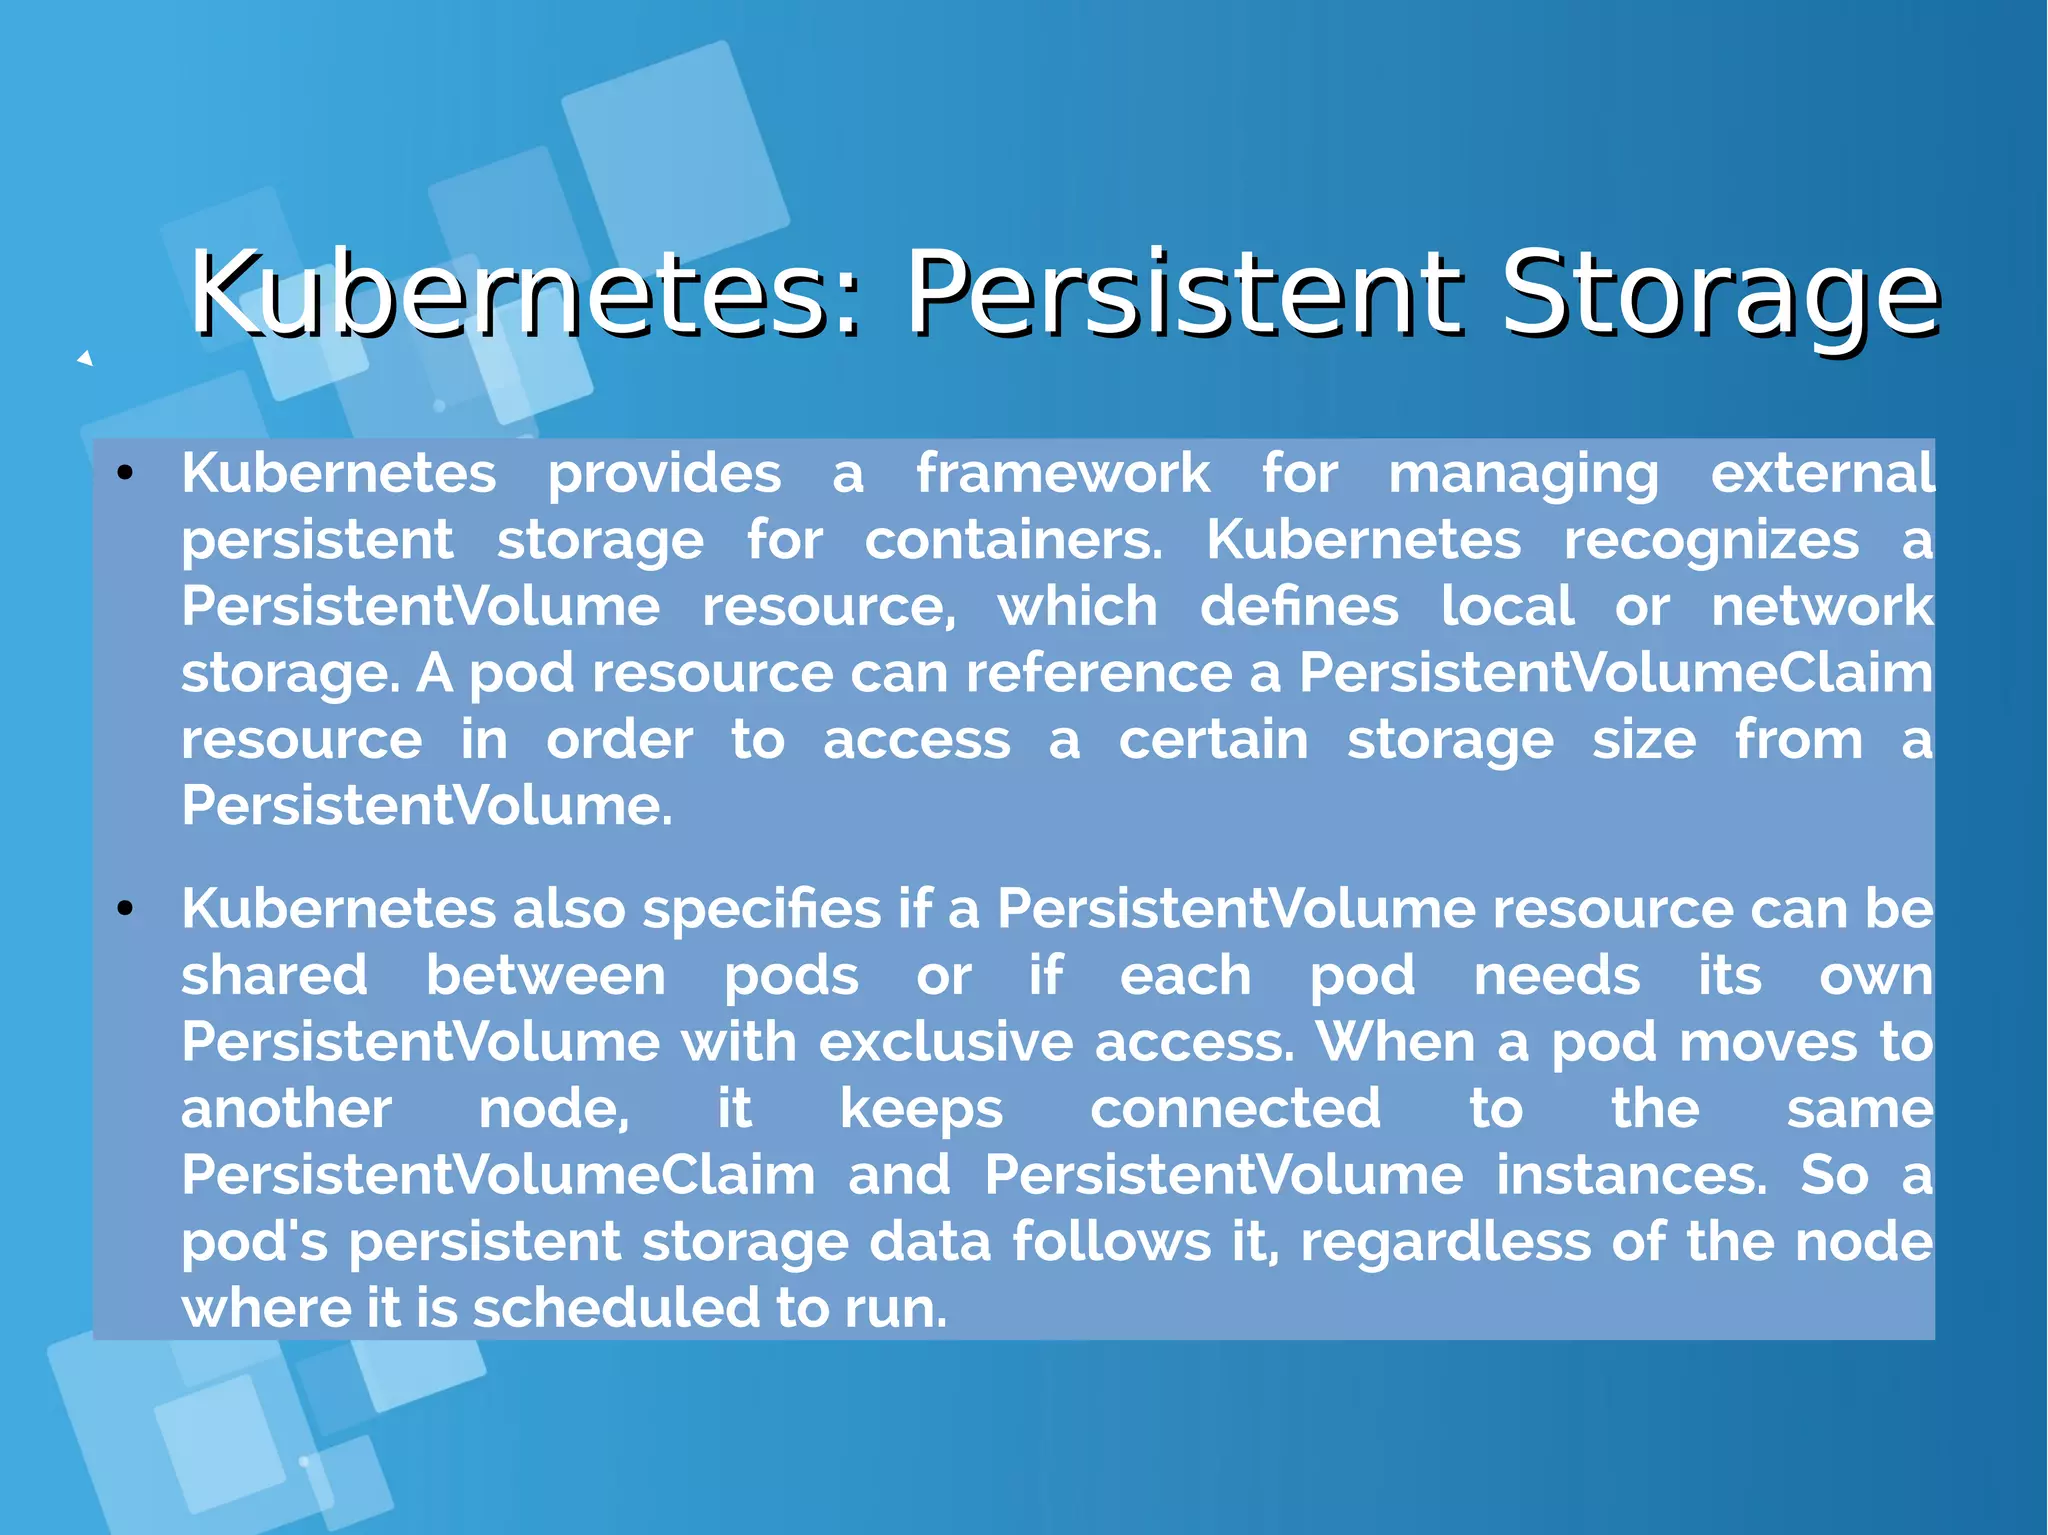
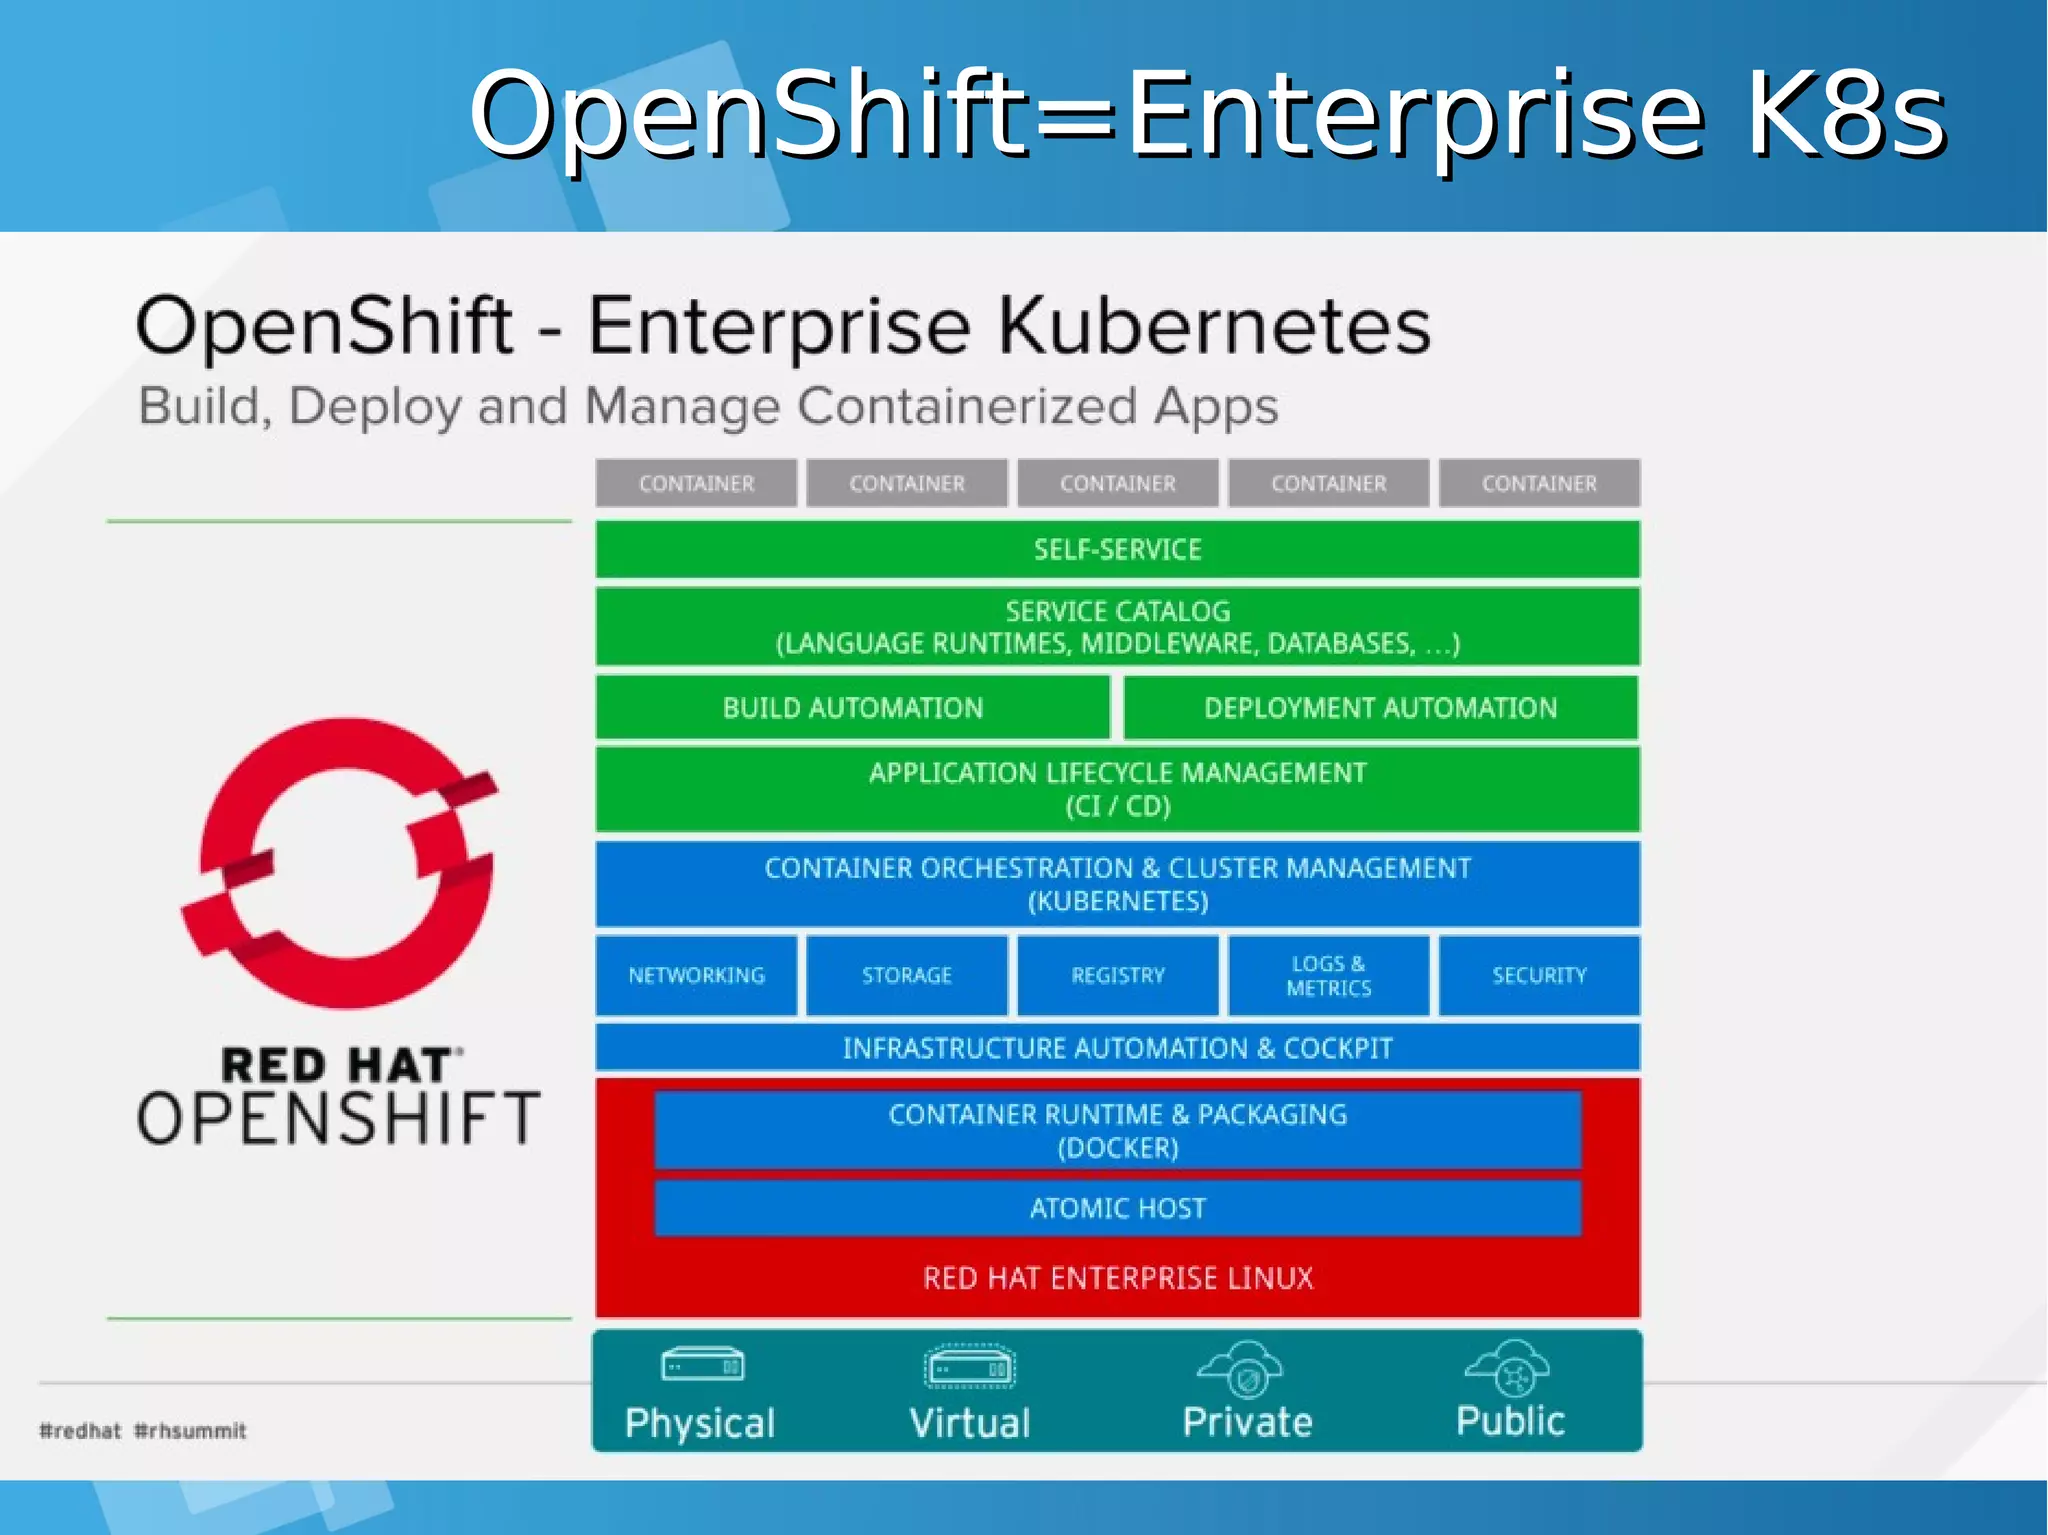
This document provides an overview of containers and Docker for automating DevOps processes. It begins with an introduction to containers and Docker, explaining how containers help break down silos between development and operations teams. It then covers Docker concepts like images, containers, and registries. The document discusses advantages of containers like low overhead, environment isolation, quick deployment, and reusability. It explains how containers leverage kernel features like namespaces and cgroups to provide lightweight isolation compared to virtual machines. Finally, it briefly mentions Docker ecosystem tools that integrate with DevOps processes like configuration management and continuous integration/delivery.