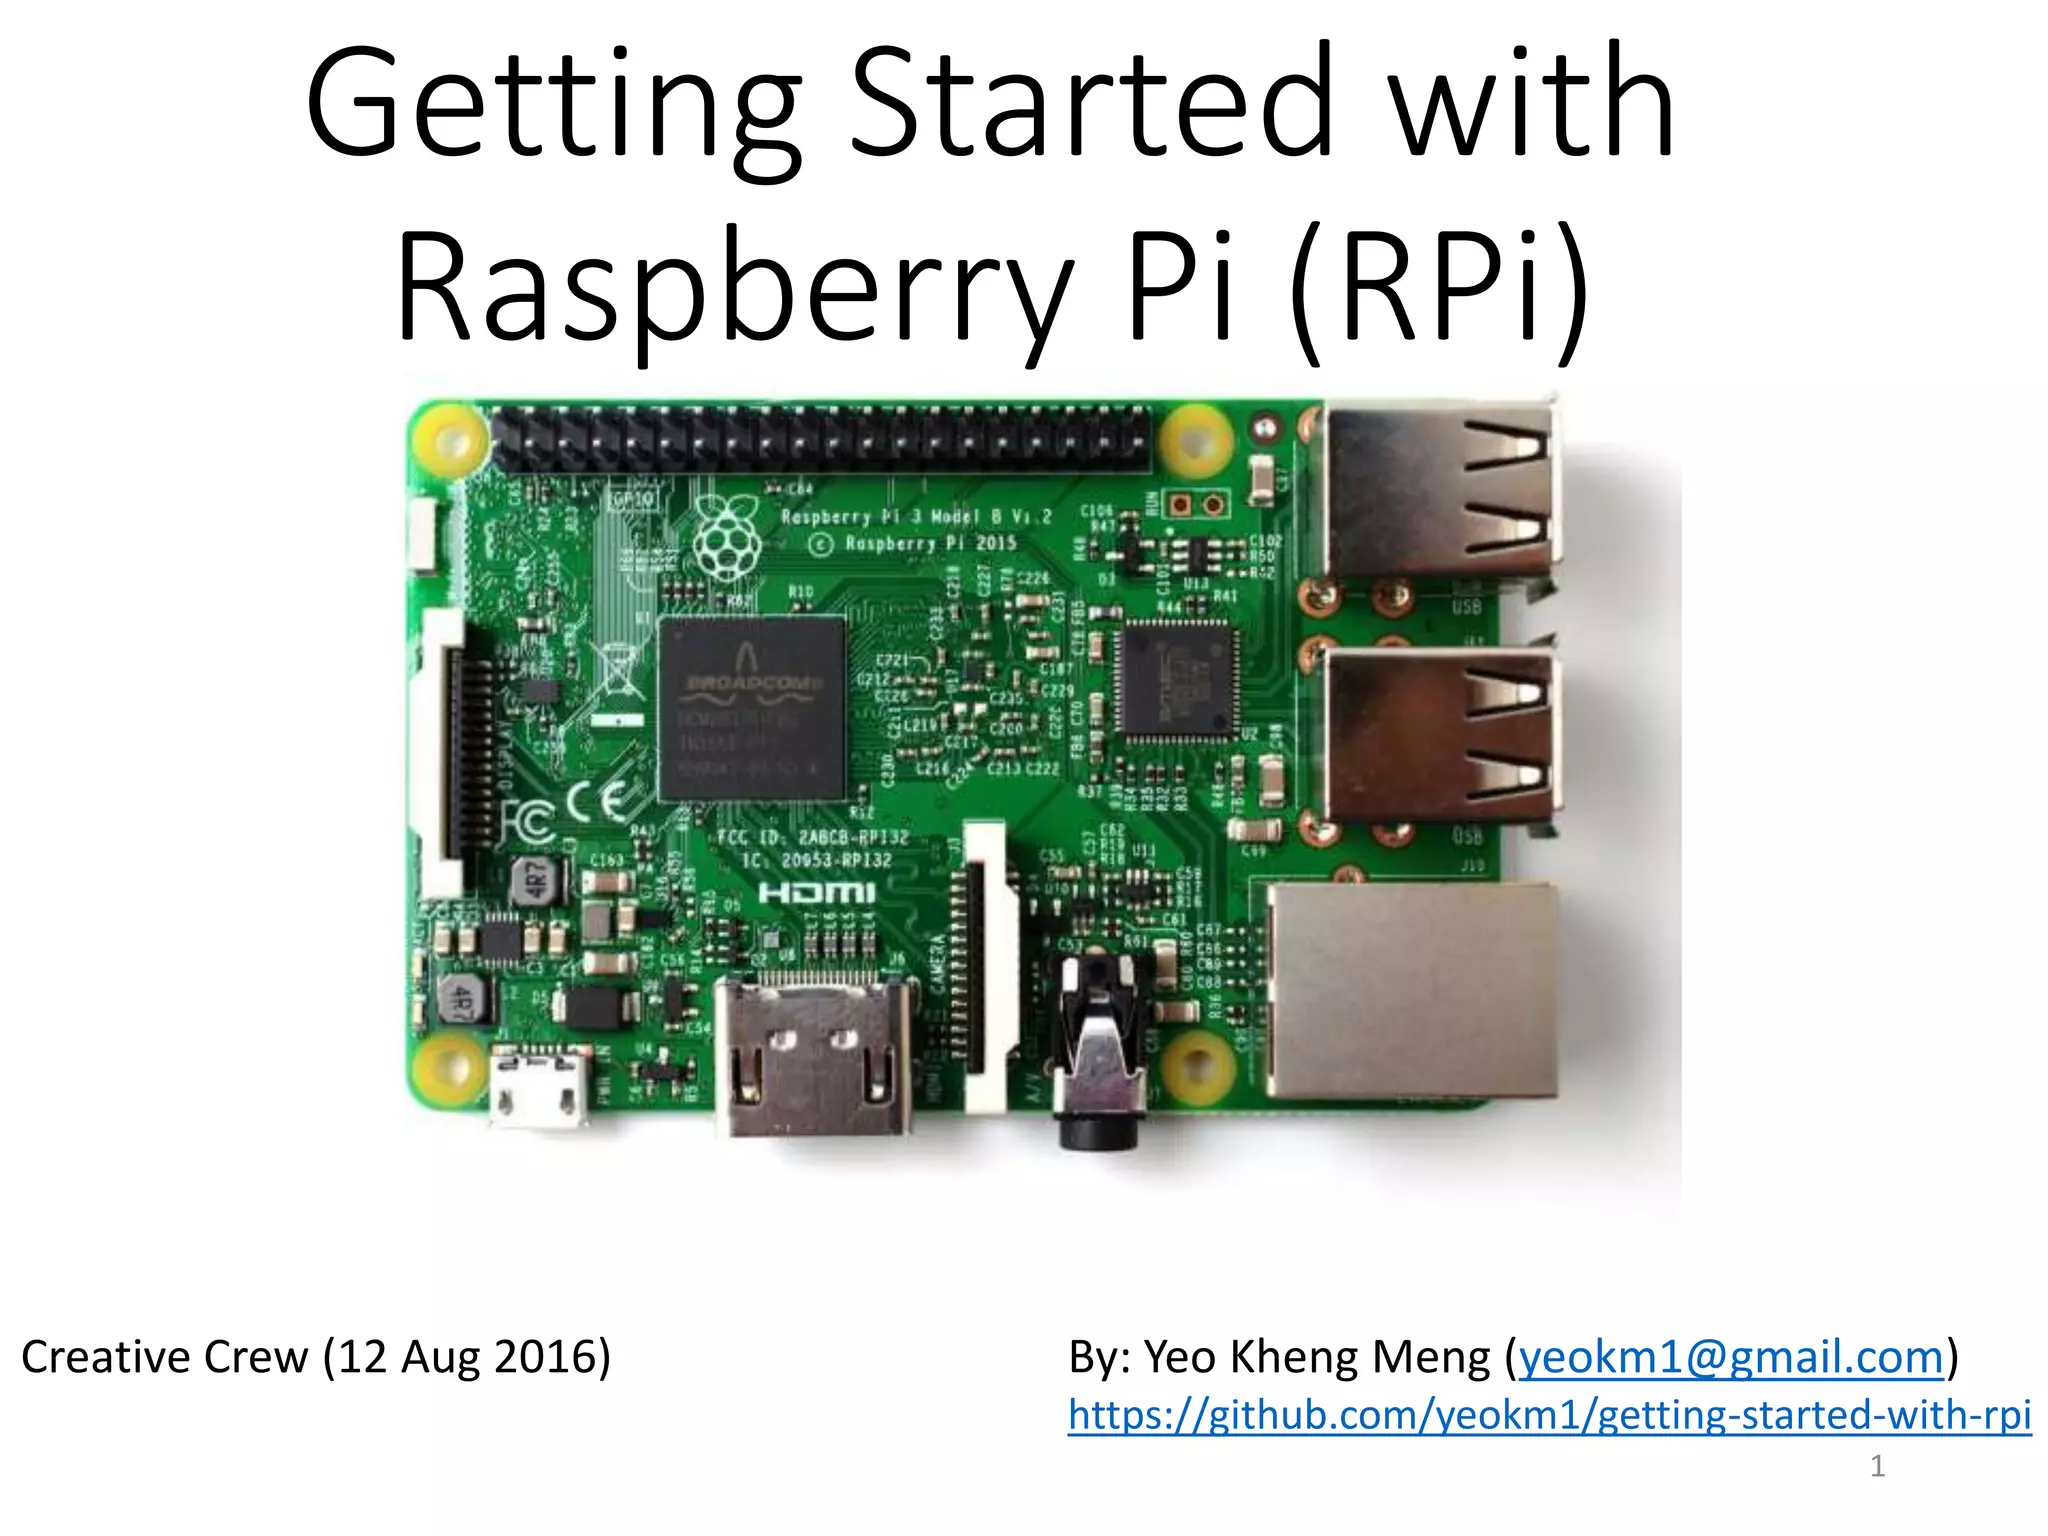
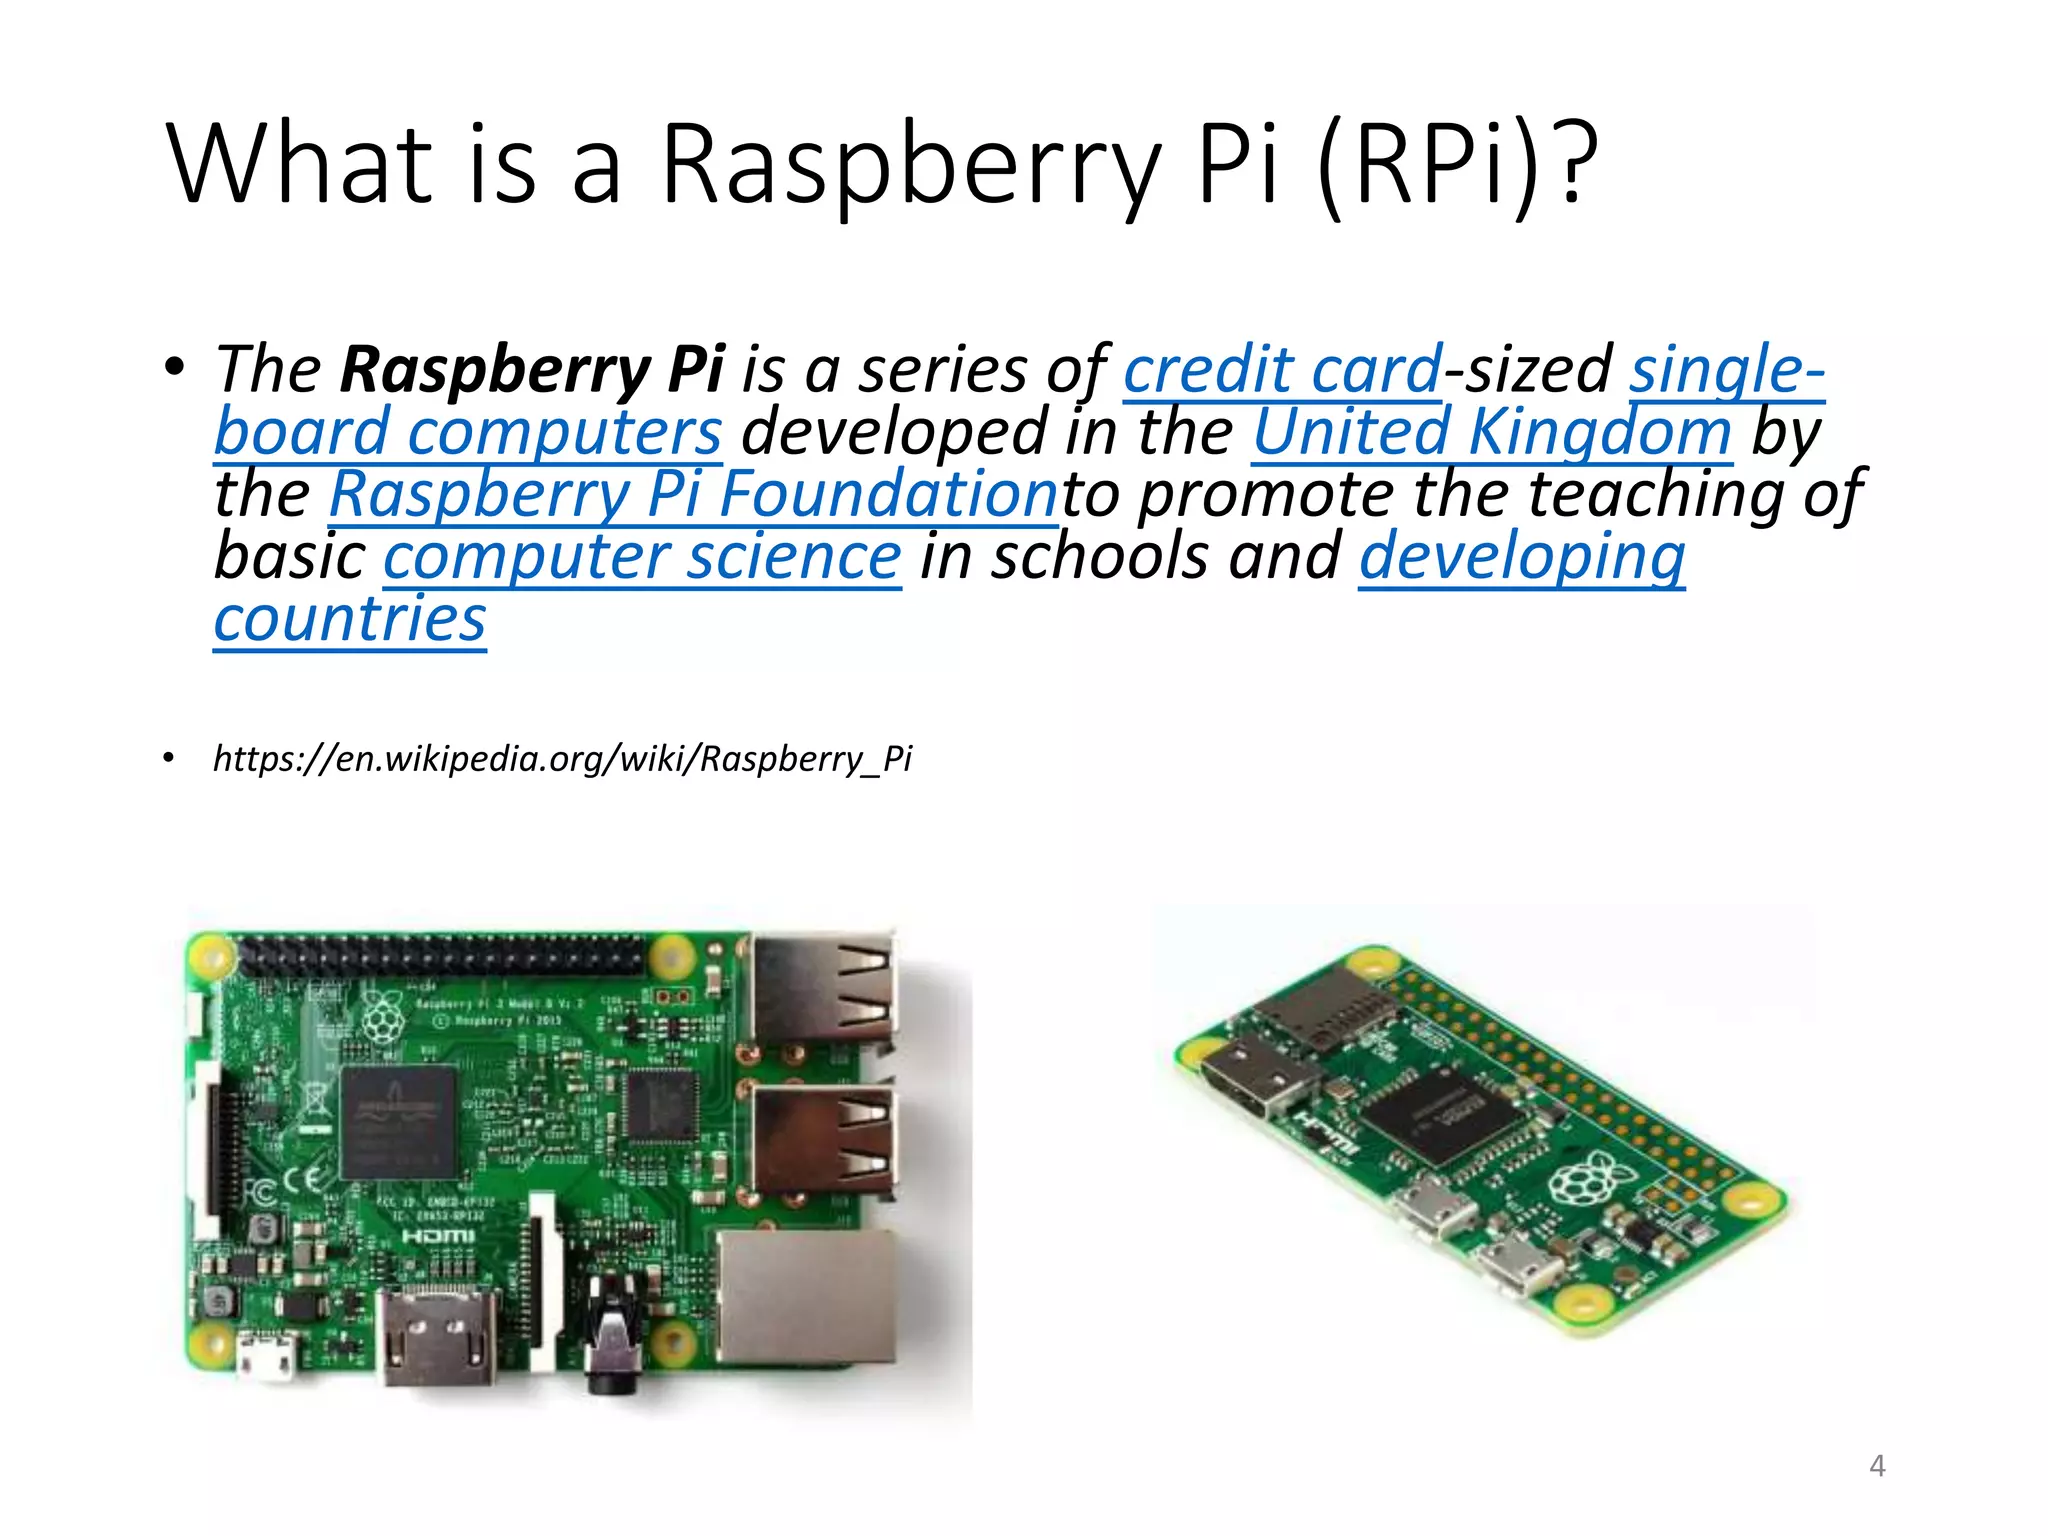
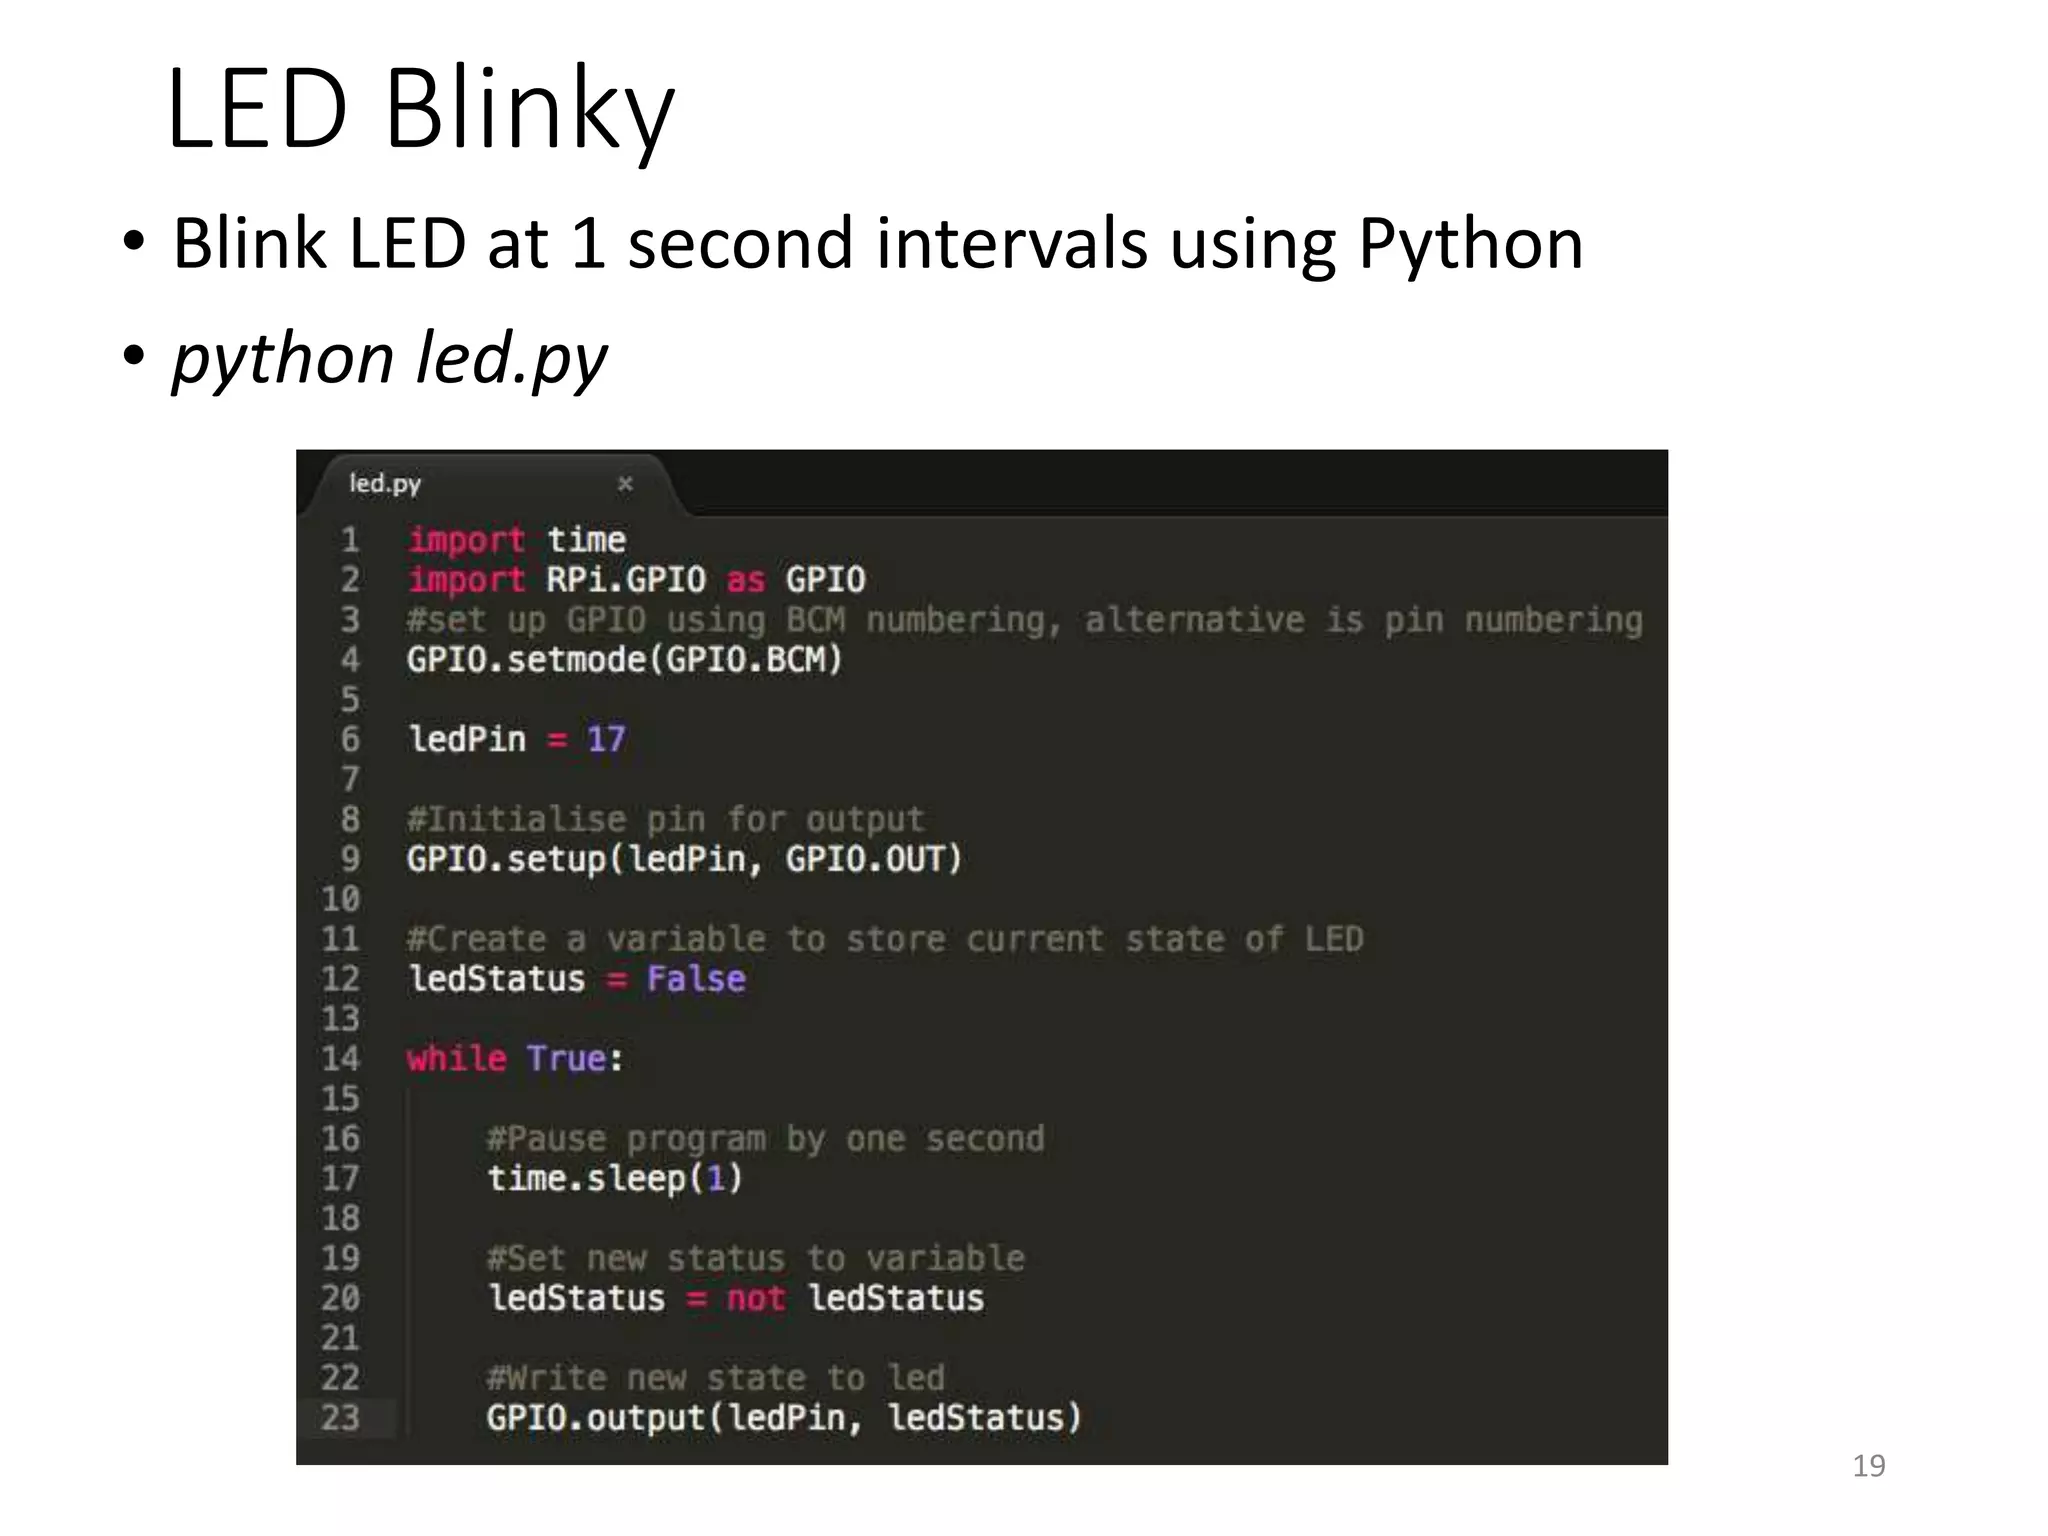
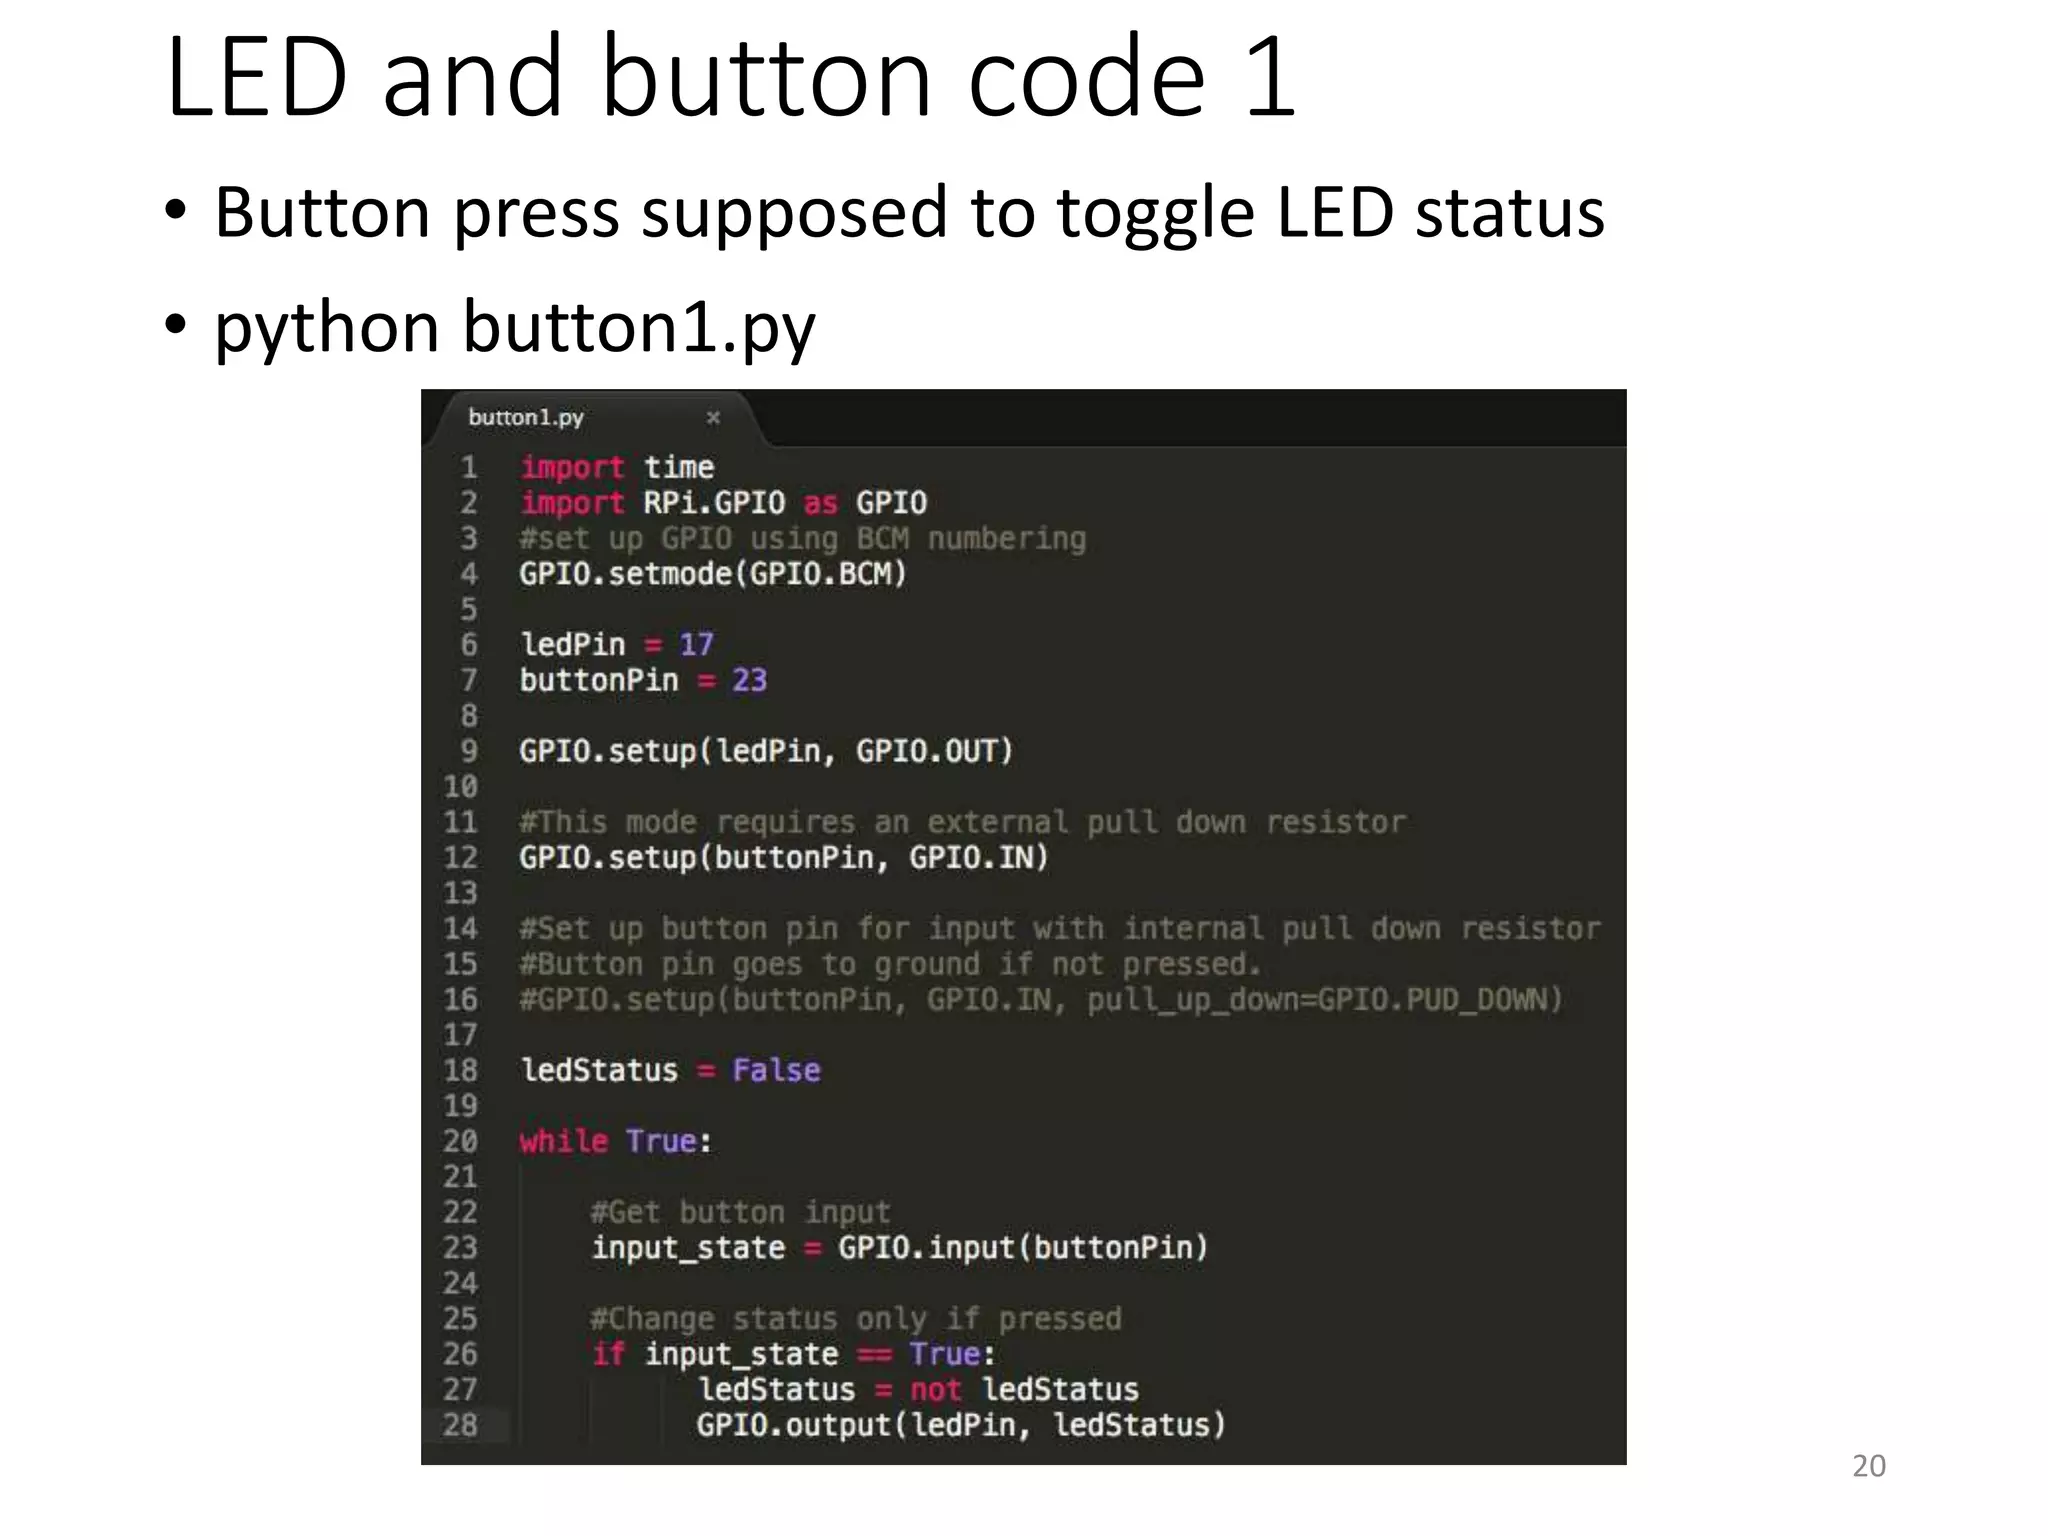
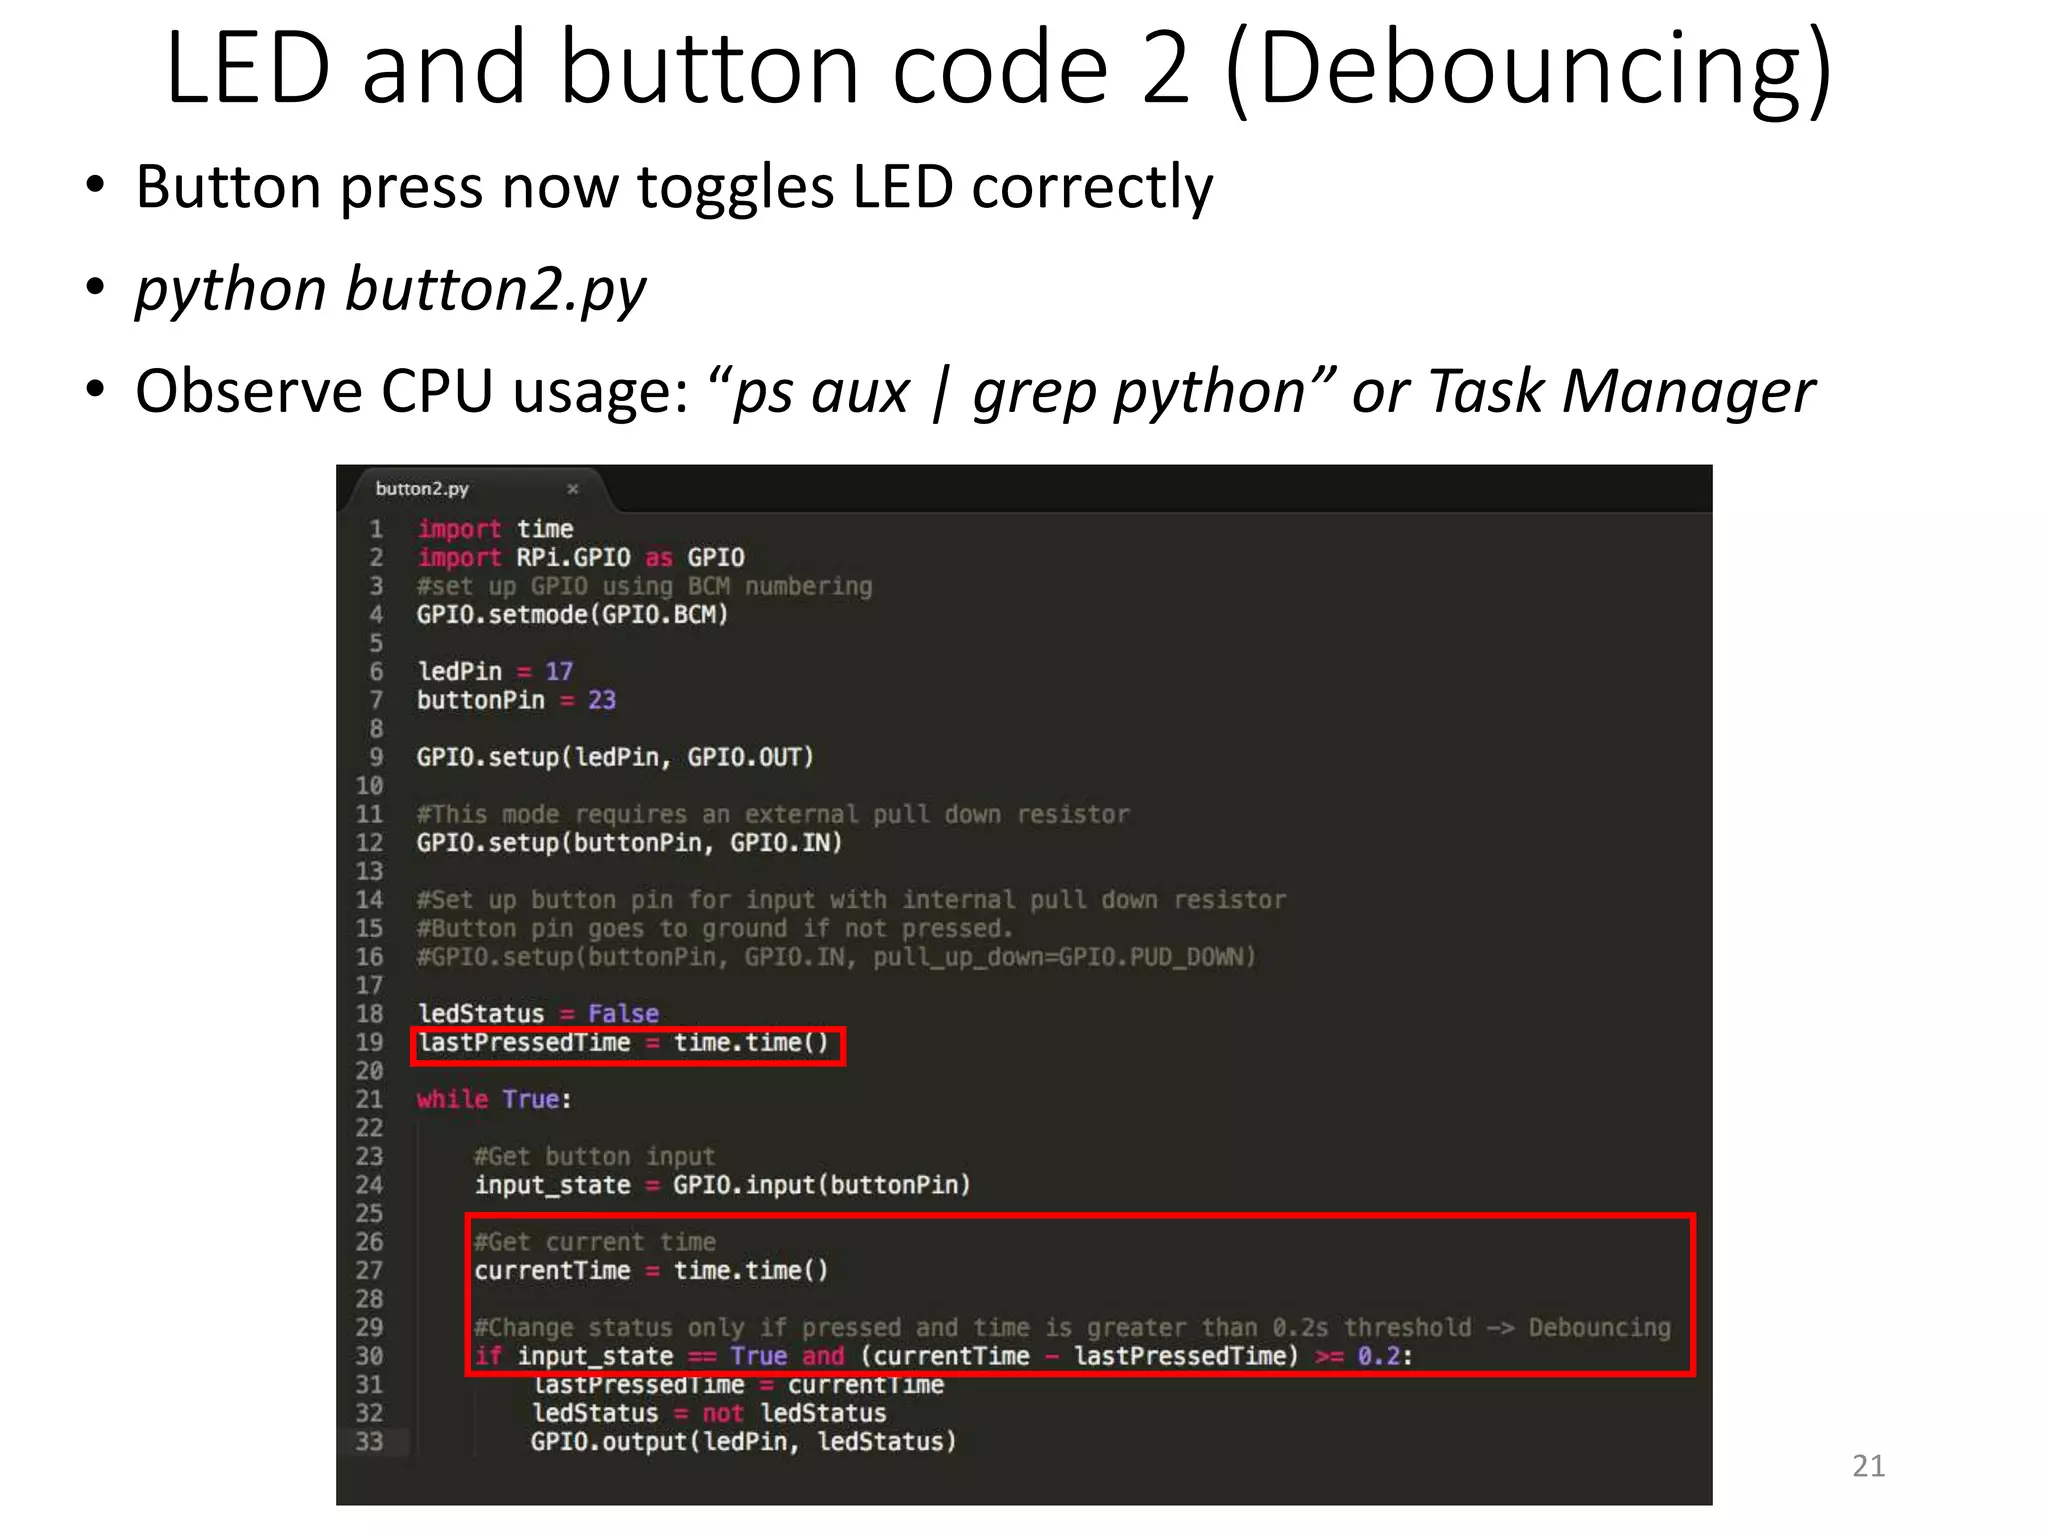
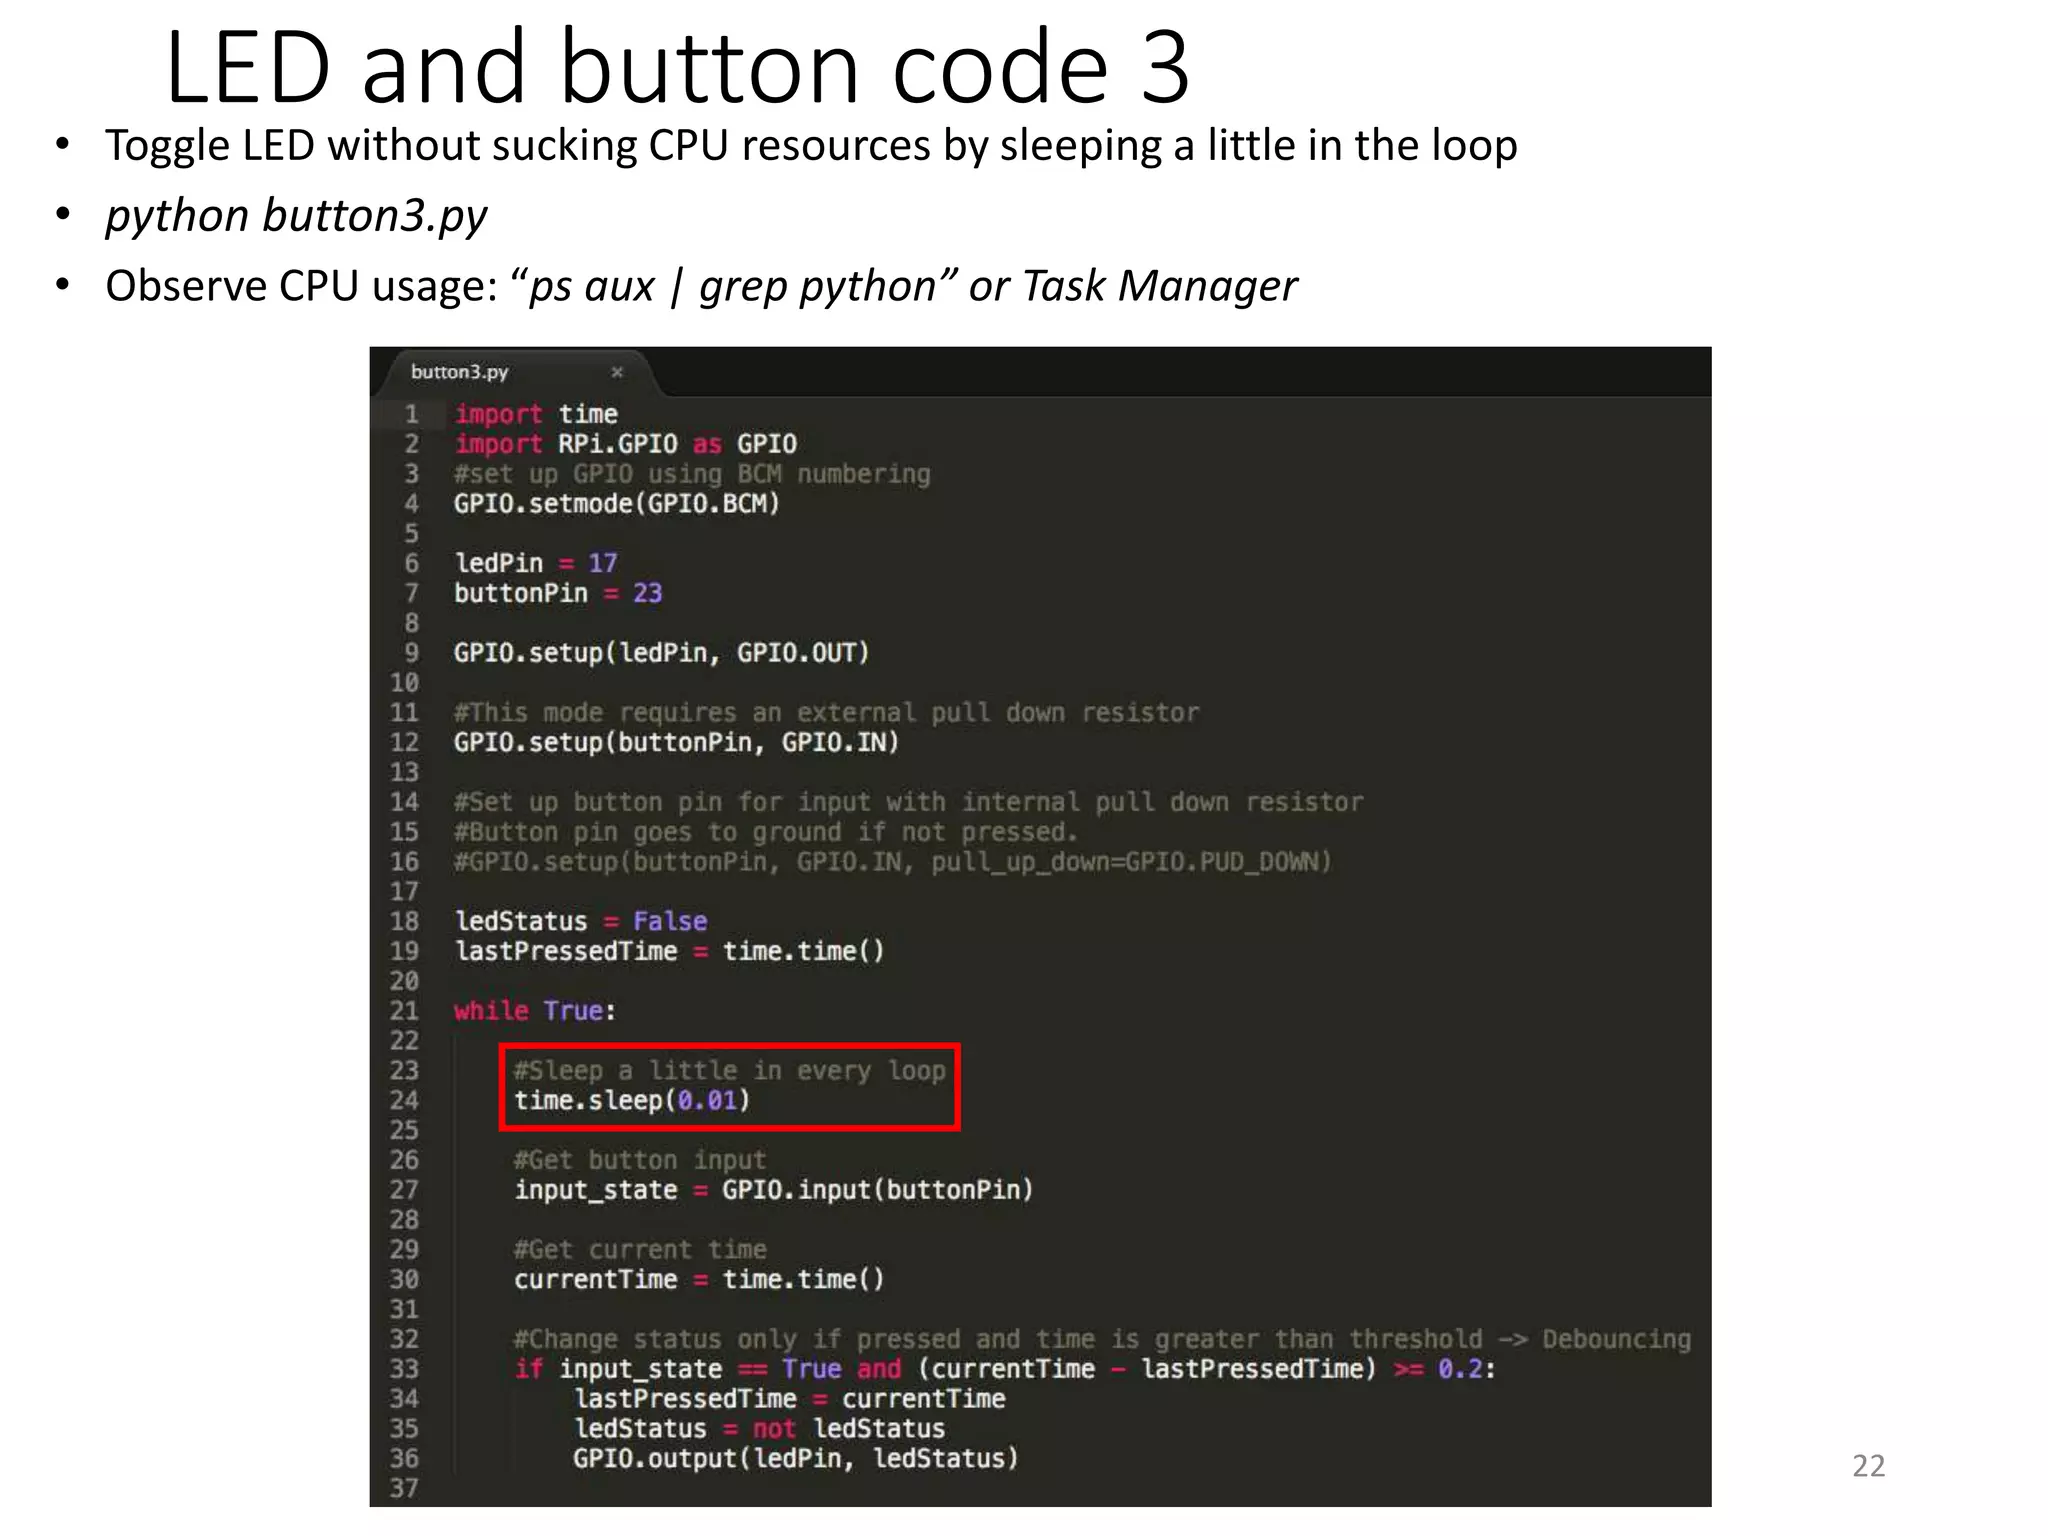
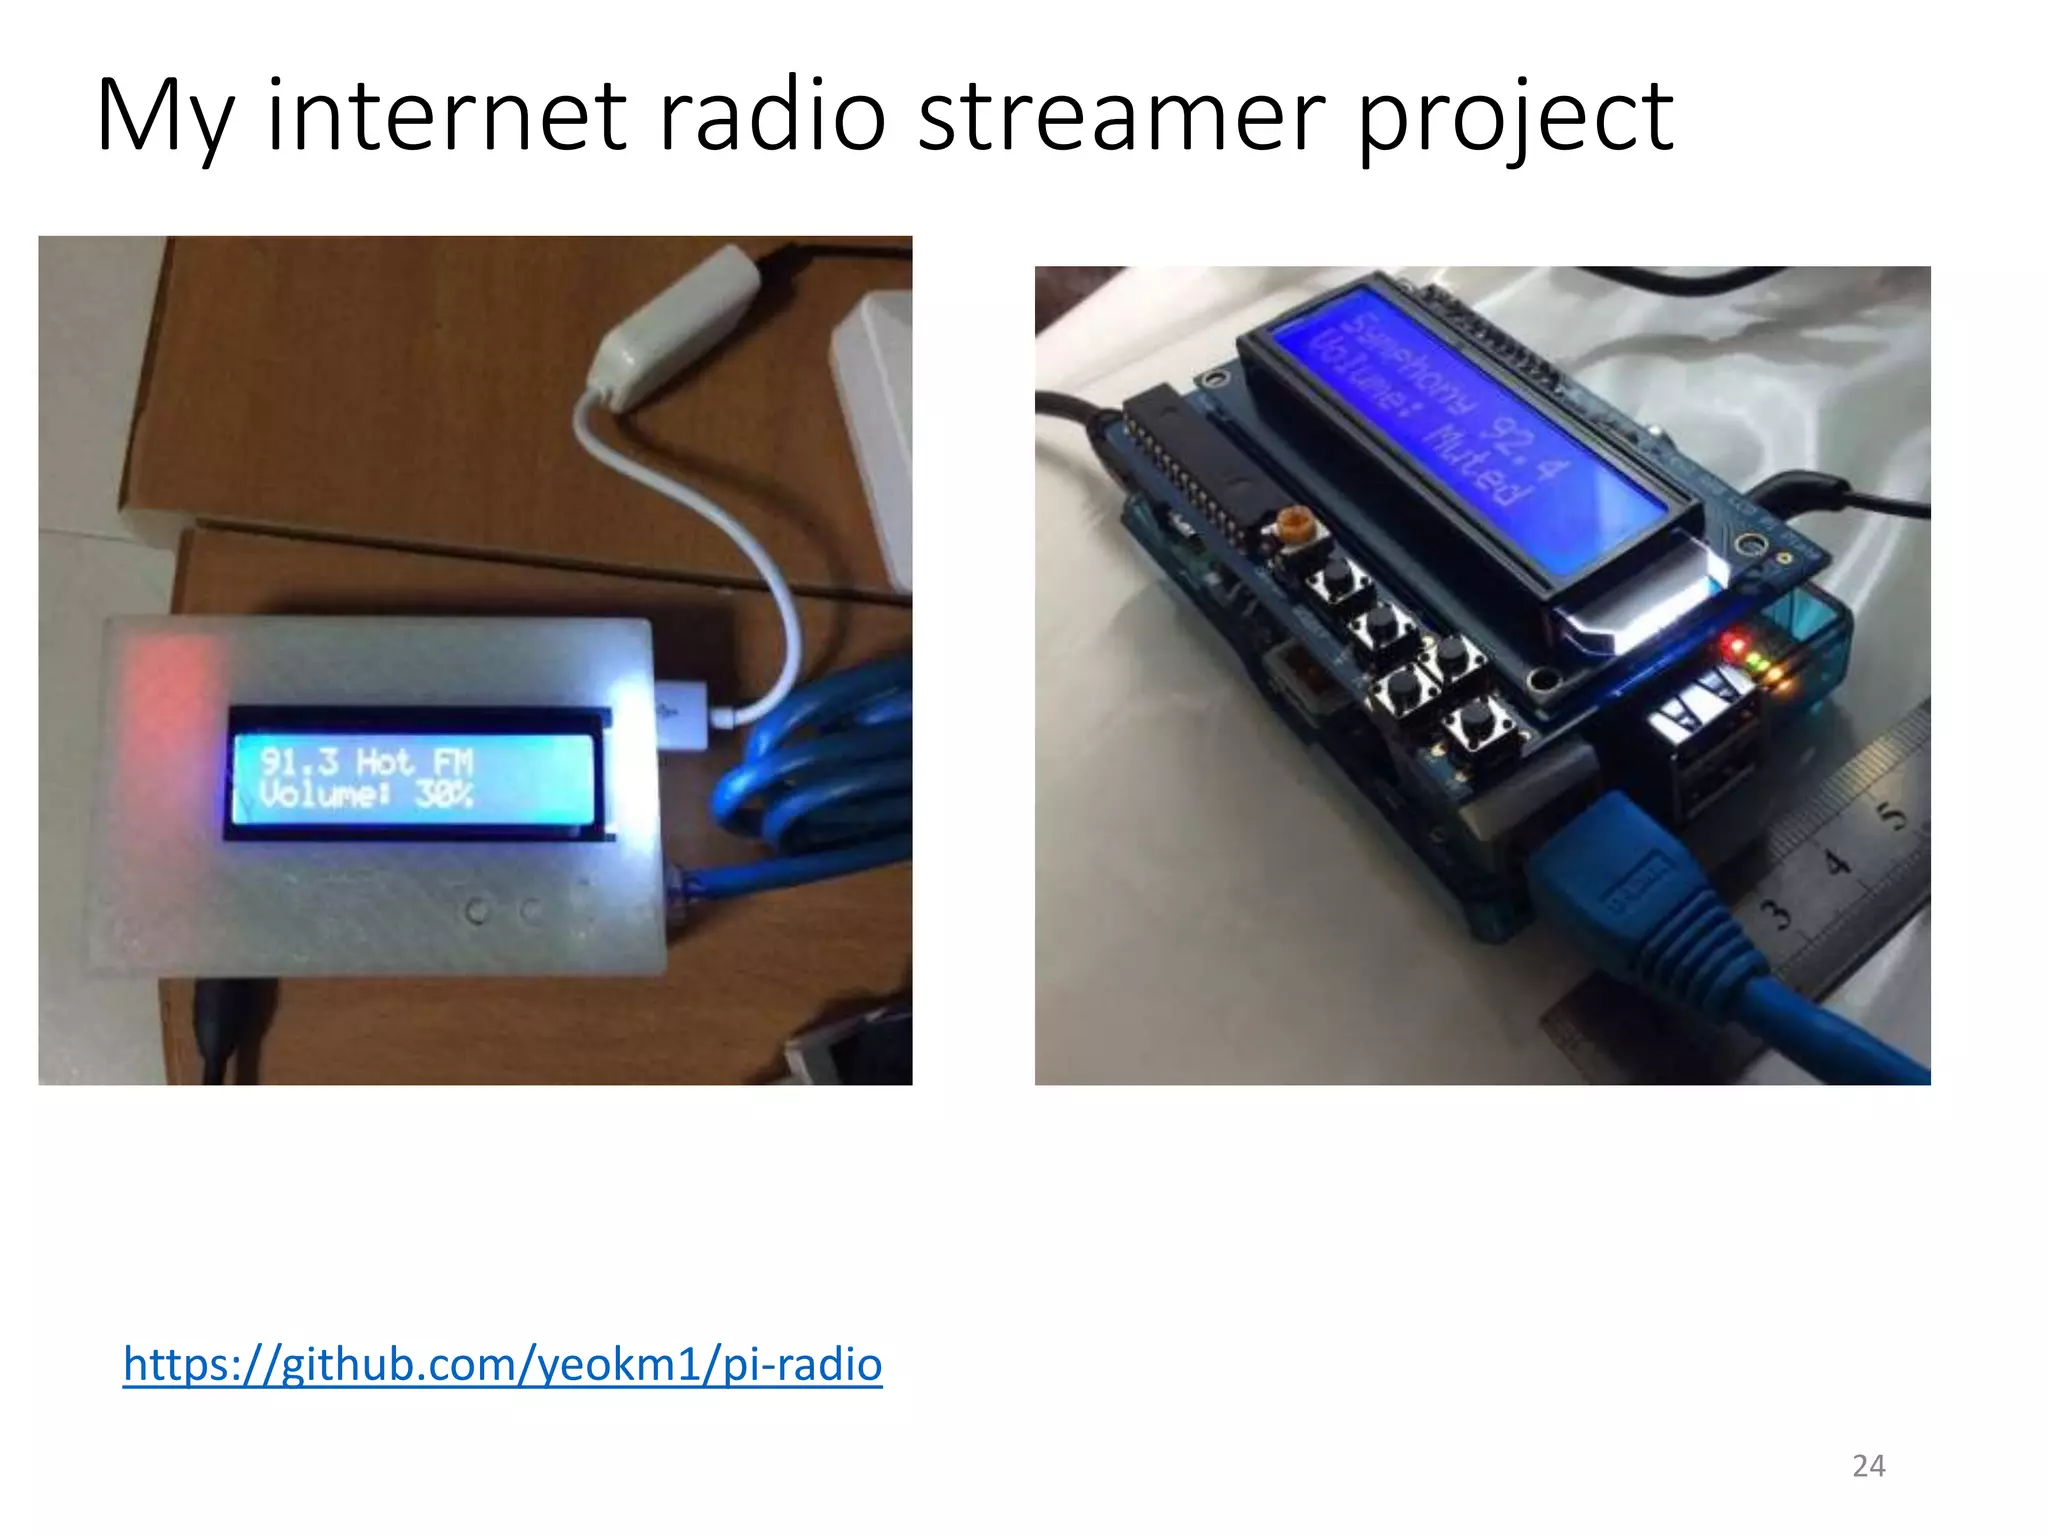
Getting Started with Raspberry Pi (RPi) By: Yeo Kheng Meng (yeokm1@gmail.com) https://github.com/yeokm1/getting-started-with-rpi Creative Crew (12 Aug 2016) 1
About me • Hardware Engineer at Algo Access • My Hardware projects with Arduino and Raspberry Pi 2
Who is this talk for? • Beginners to the world of hardware • People with Arduino experience 3
What is a Raspberry Pi (RPi)? • The Raspberry Pi is a series of credit card-sized single- board computers developed in the United Kingdom by the Raspberry Pi Foundationto promote the teaching of basic computer science in schools and developing countries • https://en.wikipedia.org/wiki/Raspberry_Pi 4
Types of Raspberry Pi Model B+ (2014) 2 Model B (2015) Model A+ (2014) 700Mhz single-core ARMv6 256MB Ram 1 USB port No Ethernet port 700Mhz single-core ARMv6 512MB RAM 4 USB ports Ethernet port 900Mhz quad-core ARMv7 1024MB Ram 4 USB ports Ethernet port 5 3 Model B (2016) 1.2Ghz quad-core ARMv8 1024MB RAM 4 USB ports Ethernet port, Wifi, Bluetooth Zero (2015) 1Ghz single-core ARMv6 512MB RAM 1 USB OTG port Micro-HDMI Compute Module (2014) 700Mhz single-core ARMv6 512MB RAM 4GB onboard flash SODIMM connector Model B (2012) 700Mhz single-core ARMv6 256MB RAM 2 USB ports Ethernet port Obsolete (Do not purchase unless you have special reasons) Special Mention
Arduino vs Raspberry Pi Specs Arduino Uno Raspberry Pi 3 Model B CPU type Microcontroller Microprocessor Operating System None Linux (usually Raspbian) or Win 10 Speed 16 Mhz 1.2Ghz RAM 2KB 1GB GPU/Display None VideoCore IV GPU Disk 32KB Depends on SD card GPIO pins 14 digital pins (includes 6 analog) 26 digital pins Other connectivity None USB, Ethernet, HDMI, audio Power consumption 0.25W 6W 6
Minimum to get started • Raspberry Pi 3 • HDMI monitor • USB Keyboard • USB Mouse • 2.5 Amp USB Power Adapter • Micro-USB cable • 8GB Micro-SD card • Computer to load initial card image 7
Step 1: Download SD card image • Download *.img files from • https://www.raspberrypi.org/downloads/ • https://www.raspberrypi.org/downloads/raspbian/ • Beginners should pick Raspbian Jessie 8
Step 2: Write image to SD card • Windows computer • https://sourceforge.net/projects/win32diskimager/ • Mac and Linux computer • Get drive number of SD card • sudo fdisk –l • Write disk image to drive number N • sudo dd if=path_of_your_image.img of=/dev/rdiskN bs=1m 9
Step 3: Boot Raspberry Pi from SD card • Might take a few minutes for the first time 10
Step 4: Initial Configuration • Set locale to Singapore • Set keyboard layout to English (US) • Configure locale and time zone 11
Step 5: Do a system update • Connect to the Internet • Open the terminal • Look for new system updates • sudo apt-get update • Download and install latest updates • sudo apt-get upgrade • Recommend to reboot after that 12
Available Applications • Web Browser: Epiphany • Office Applications: Libreoffice • Media Player: VLC • Run: sudo apt-get install vlc 13
Raspbian default username/password • Username: pi • Password: raspberry 14
File System Directory layout • /home/pi or “~” • Your “Home” directory • Removable Drives at • /media/pi/…. 15
Header pins • 26 Digital-only General Purpose Input Output pins • 3.3V logic levels • Arduino uses 5V 16
Using the GPIO pins • Python programming language • LED • Button 17
LED and Button Connection 18 Parts • Breadboard • Button • 1x 10K ohm pull-down resistor • Button • 1x 220 ohm resistor
LED Blinky • Blink LED at 1 second intervals using Python • python led.py 19
LED and button code 1 • Button press supposed to toggle LED status • python button1.py 20
LED and button code 2 (Debouncing) • Button press now toggles LED correctly • python button2.py • Observe CPU usage: “ps aux | grep python” or Task Manager 21
LED and button code 3 • Toggle LED without sucking CPU resources by sleeping a little in the loop • python button3.py • Observe CPU usage: “ps aux | grep python” or Task Manager 22
Some warnings • RPi does not keep time on poweroff • No onboard battery and Real-Time-Clock (RTC) chip • It can sync time when connected to network • Do not connect current-heavy USB devices • 600mA for all USB ports default. Can increase to 1.2A • In: /boot/config.txt Add: max_usb_current=1 • 2.5A resettable polyfuse • Use powered USB-hub if needed 23
My internet radio streamer project 24 https://github.com/yeokm1/pi-radio
Q&A 25

Getting Started with Raspberry Pi

  • 1.
    Getting Started with RaspberryPi (RPi) By: Yeo Kheng Meng (yeokm1@gmail.com) https://github.com/yeokm1/getting-started-with-rpi Creative Crew (12 Aug 2016) 1
  • 2.
    About me • HardwareEngineer at Algo Access • My Hardware projects with Arduino and Raspberry Pi 2
  • 3.
    Who is thistalk for? • Beginners to the world of hardware • People with Arduino experience 3
  • 4.
    What is aRaspberry Pi (RPi)? • The Raspberry Pi is a series of credit card-sized single- board computers developed in the United Kingdom by the Raspberry Pi Foundationto promote the teaching of basic computer science in schools and developing countries • https://en.wikipedia.org/wiki/Raspberry_Pi 4
  • 5.
    Types of RaspberryPi Model B+ (2014) 2 Model B (2015) Model A+ (2014) 700Mhz single-core ARMv6 256MB Ram 1 USB port No Ethernet port 700Mhz single-core ARMv6 512MB RAM 4 USB ports Ethernet port 900Mhz quad-core ARMv7 1024MB Ram 4 USB ports Ethernet port 5 3 Model B (2016) 1.2Ghz quad-core ARMv8 1024MB RAM 4 USB ports Ethernet port, Wifi, Bluetooth Zero (2015) 1Ghz single-core ARMv6 512MB RAM 1 USB OTG port Micro-HDMI Compute Module (2014) 700Mhz single-core ARMv6 512MB RAM 4GB onboard flash SODIMM connector Model B (2012) 700Mhz single-core ARMv6 256MB RAM 2 USB ports Ethernet port Obsolete (Do not purchase unless you have special reasons) Special Mention
  • 6.
    Arduino vs RaspberryPi Specs Arduino Uno Raspberry Pi 3 Model B CPU type Microcontroller Microprocessor Operating System None Linux (usually Raspbian) or Win 10 Speed 16 Mhz 1.2Ghz RAM 2KB 1GB GPU/Display None VideoCore IV GPU Disk 32KB Depends on SD card GPIO pins 14 digital pins (includes 6 analog) 26 digital pins Other connectivity None USB, Ethernet, HDMI, audio Power consumption 0.25W 6W 6
  • 7.
    Minimum to getstarted • Raspberry Pi 3 • HDMI monitor • USB Keyboard • USB Mouse • 2.5 Amp USB Power Adapter • Micro-USB cable • 8GB Micro-SD card • Computer to load initial card image 7
  • 8.
    Step 1: DownloadSD card image • Download *.img files from • https://www.raspberrypi.org/downloads/ • https://www.raspberrypi.org/downloads/raspbian/ • Beginners should pick Raspbian Jessie 8
  • 9.
    Step 2: Writeimage to SD card • Windows computer • https://sourceforge.net/projects/win32diskimager/ • Mac and Linux computer • Get drive number of SD card • sudo fdisk –l • Write disk image to drive number N • sudo dd if=path_of_your_image.img of=/dev/rdiskN bs=1m 9
  • 10.
    Step 3: BootRaspberry Pi from SD card • Might take a few minutes for the first time 10
  • 11.
    Step 4: InitialConfiguration • Set locale to Singapore • Set keyboard layout to English (US) • Configure locale and time zone 11
  • 12.
    Step 5: Doa system update • Connect to the Internet • Open the terminal • Look for new system updates • sudo apt-get update • Download and install latest updates • sudo apt-get upgrade • Recommend to reboot after that 12
  • 13.
    Available Applications • WebBrowser: Epiphany • Office Applications: Libreoffice • Media Player: VLC • Run: sudo apt-get install vlc 13
  • 14.
    Raspbian default username/password •Username: pi • Password: raspberry 14
  • 15.
    File System Directorylayout • /home/pi or “~” • Your “Home” directory • Removable Drives at • /media/pi/…. 15
  • 16.
    Header pins • 26Digital-only General Purpose Input Output pins • 3.3V logic levels • Arduino uses 5V 16
  • 17.
    Using the GPIOpins • Python programming language • LED • Button 17
  • 18.
    LED and ButtonConnection 18 Parts • Breadboard • Button • 1x 10K ohm pull-down resistor • Button • 1x 220 ohm resistor
  • 19.
    LED Blinky • BlinkLED at 1 second intervals using Python • python led.py 19
  • 20.
    LED and buttoncode 1 • Button press supposed to toggle LED status • python button1.py 20
  • 21.
    LED and buttoncode 2 (Debouncing) • Button press now toggles LED correctly • python button2.py • Observe CPU usage: “ps aux | grep python” or Task Manager 21
  • 22.
    LED and buttoncode 3 • Toggle LED without sucking CPU resources by sleeping a little in the loop • python button3.py • Observe CPU usage: “ps aux | grep python” or Task Manager 22
  • 23.
    Some warnings • RPidoes not keep time on poweroff • No onboard battery and Real-Time-Clock (RTC) chip • It can sync time when connected to network • Do not connect current-heavy USB devices • 600mA for all USB ports default. Can increase to 1.2A • In: /boot/config.txt Add: max_usb_current=1 • 2.5A resettable polyfuse • Use powered USB-hub if needed 23
  • 24.
    My internet radiostreamer project 24 https://github.com/yeokm1/pi-radio
  • 25.