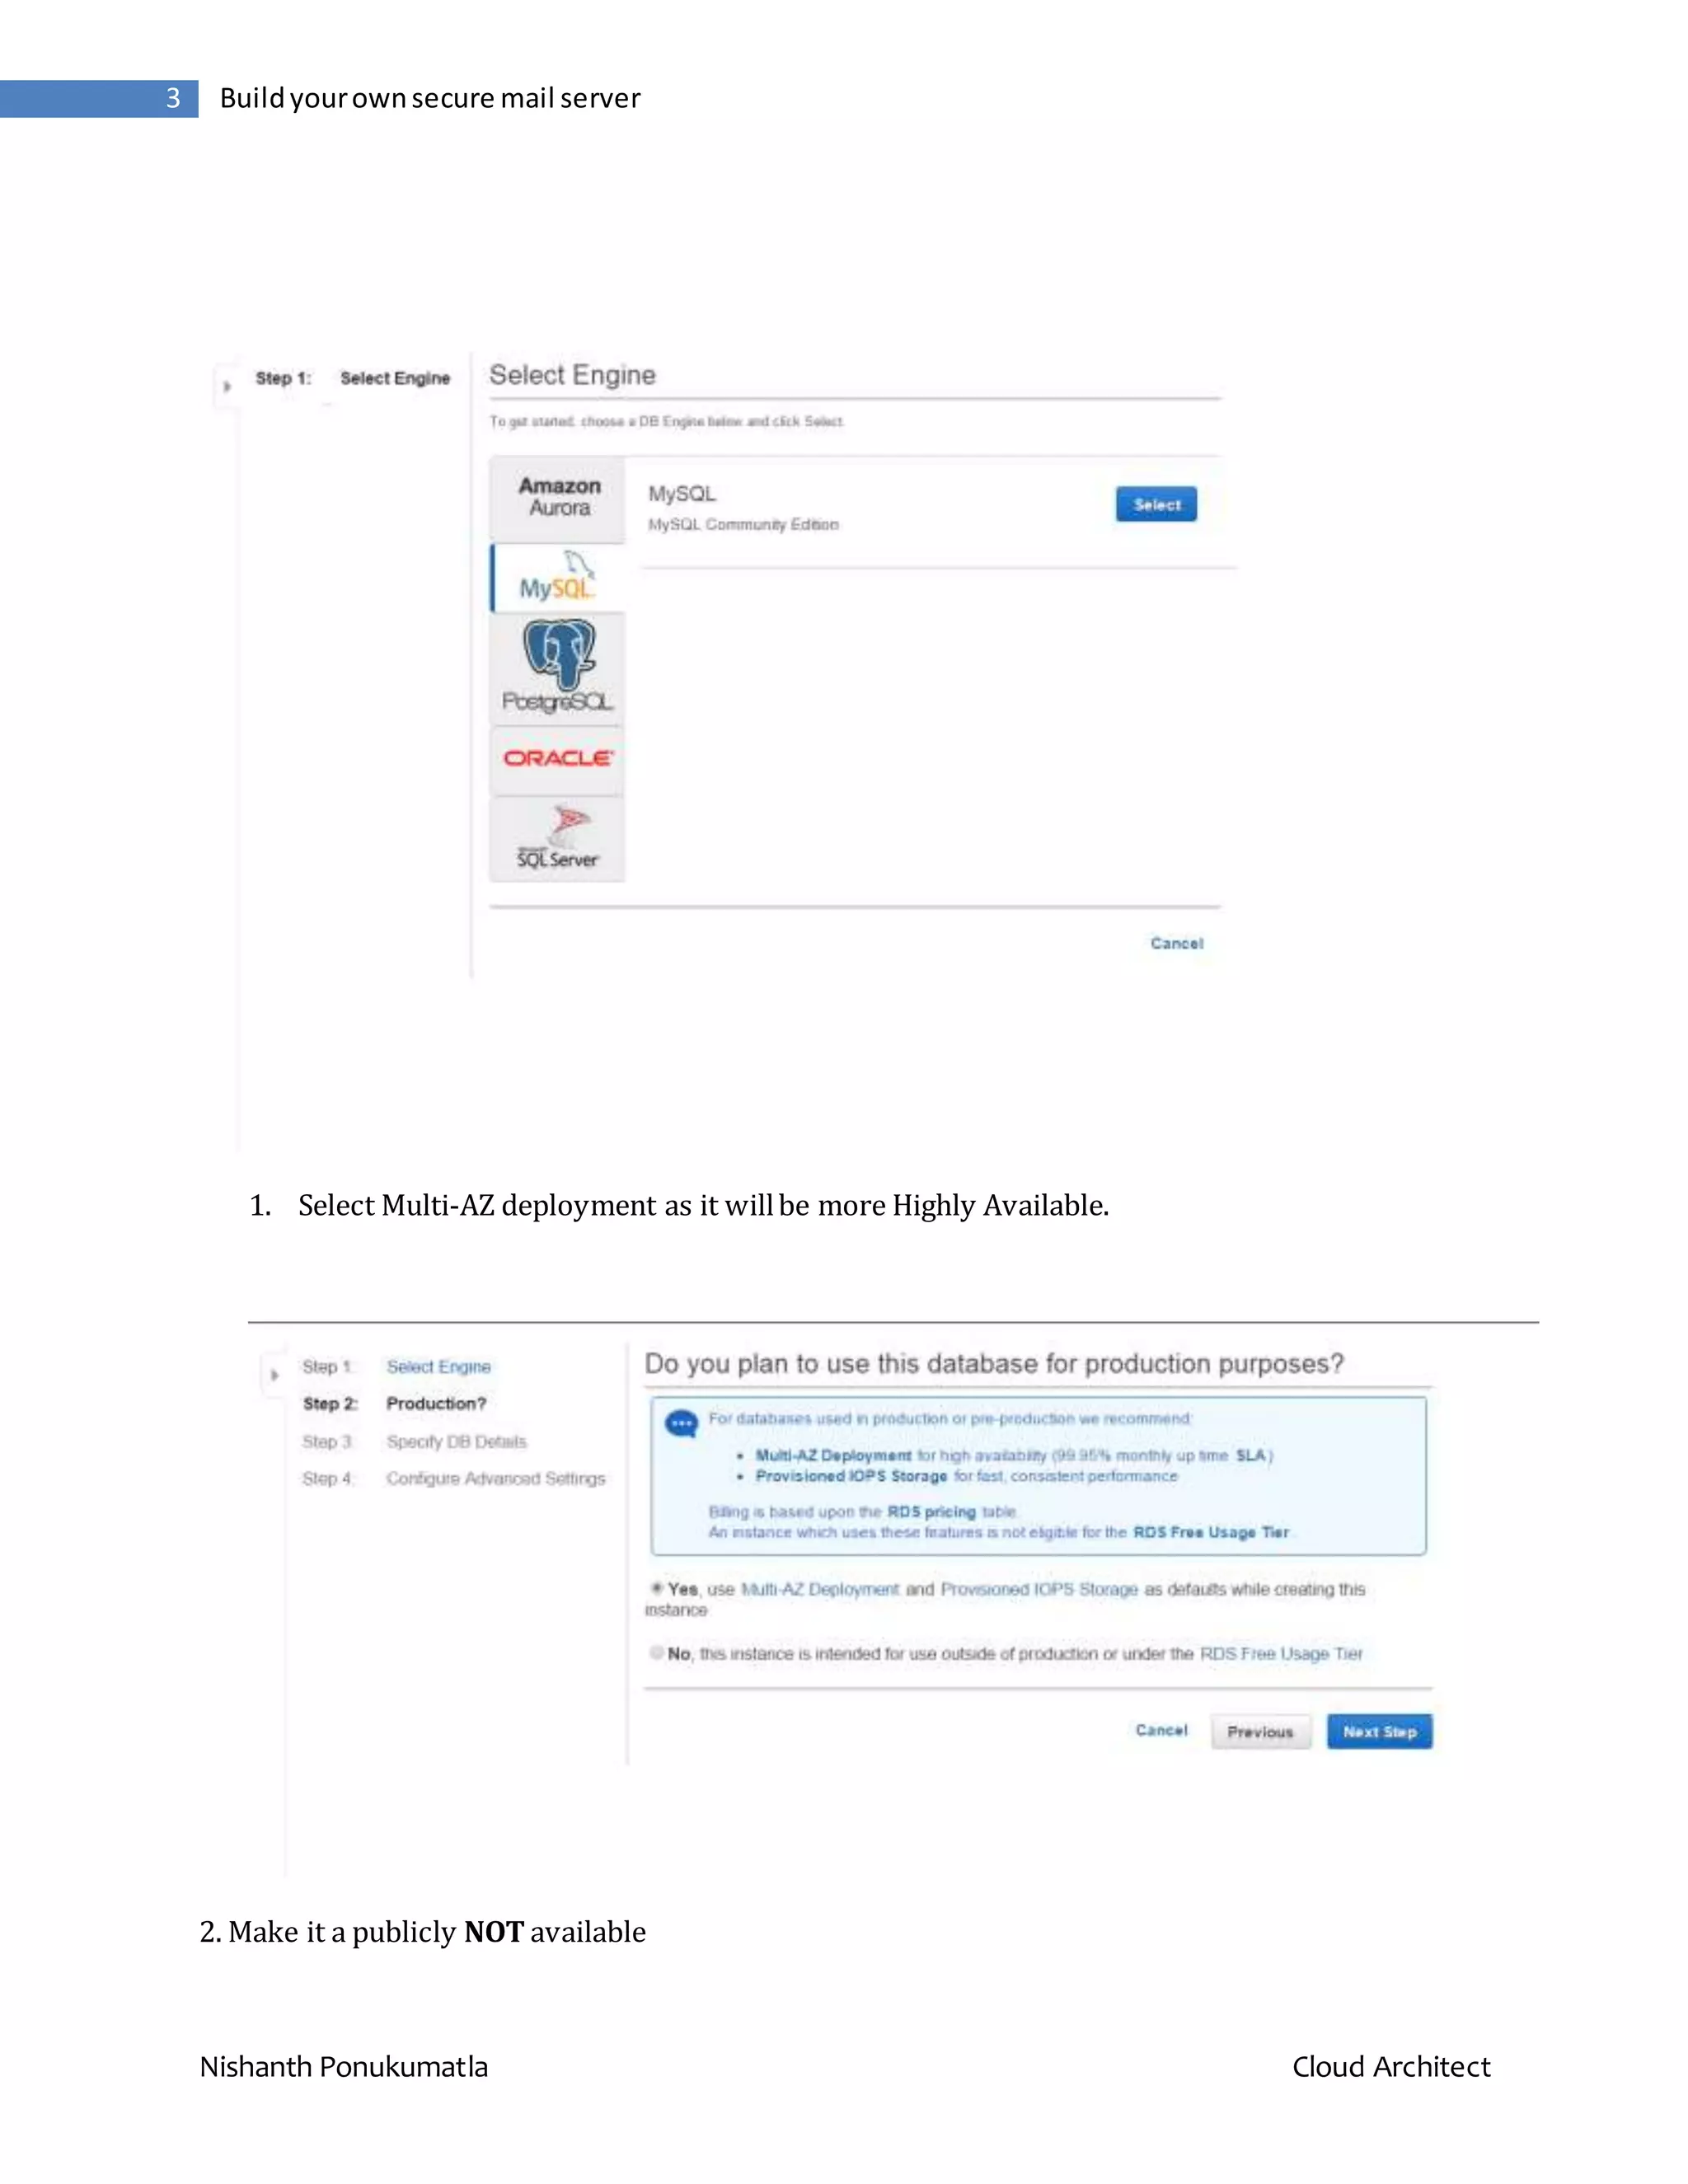
The document describes how to build a secure mail server on AWS using various services like EC2, RDS, SES, and Route53. It involves setting up a MySQL RDS instance for the database, a Postfix server configured to use the RDS backend for mail storage and delivery, proxy servers using Nginx to queue incoming mail, and a load balancer and DNS configuration to make the system highly available. Credentials are generated through SES and the Postfix server is configured to relay through SES. This provides a redundant and scalable email infrastructure in the cloud.
![Nishanth Ponukumatla Cloud Architect 4 Buildyourownsecure mail server 3.After launching the RDS instance , make sure to note the “ENDPOINT” of the mysql RDS instance. Setting up the Postfix Server. 1.I chose a R3.largeUbuntu14.4 instance , as it is high on networking performance and has enhanced networking enabled. https://www.exratione.com/2014/05/a-mailserver-on-ubuntu-1404-postfix-dovecot- mysql/ Thelinkabovegivesusa detailedexplanationonhowto setup a postfixserverwithmysql backend. In the instructions in the link above he uses a locally setup mysql server, where as in our case we are using a RDS instance hence where ever he uses 127.0.0.1 to define the mysql server , we replaceit with the “HOSTNAME”of theRDS instance whichwe had noted down earlier. I am specifyingon the hostnameas weare using a private RDS instance and the IP ADDRESS will change periodically by amazon. Once yousetup your postfix server we have little more modification,in order to setup relaying. Relay Configuration Since we are using a relay server wehave to add the followingto the postfix main.cf file. ####RELAYCONFIG### enable_original_recipient=no relayhost=[email-smtp.us-east-1.amazonaws.com]:587 smtp_sasl_auth_enable=yes smtp_sasl_security_options=noanonymous smtp_sasl_password_maps =hash:/etc/postfix/sasl_passwd smtp_use_tls=yes smtp_tls_security_level=encrypt smtp_tls_note_starttls_offer=yes](https://image.slidesharecdn.com/38ba2d84-37b1-4a9d-a93d-2e7d7baf88fd-150923173759-lva1-app6892/75/Build-your-own-secure-mail-server-on-the-cloud-using-Amazon-Web-Services-4-2048.jpg)
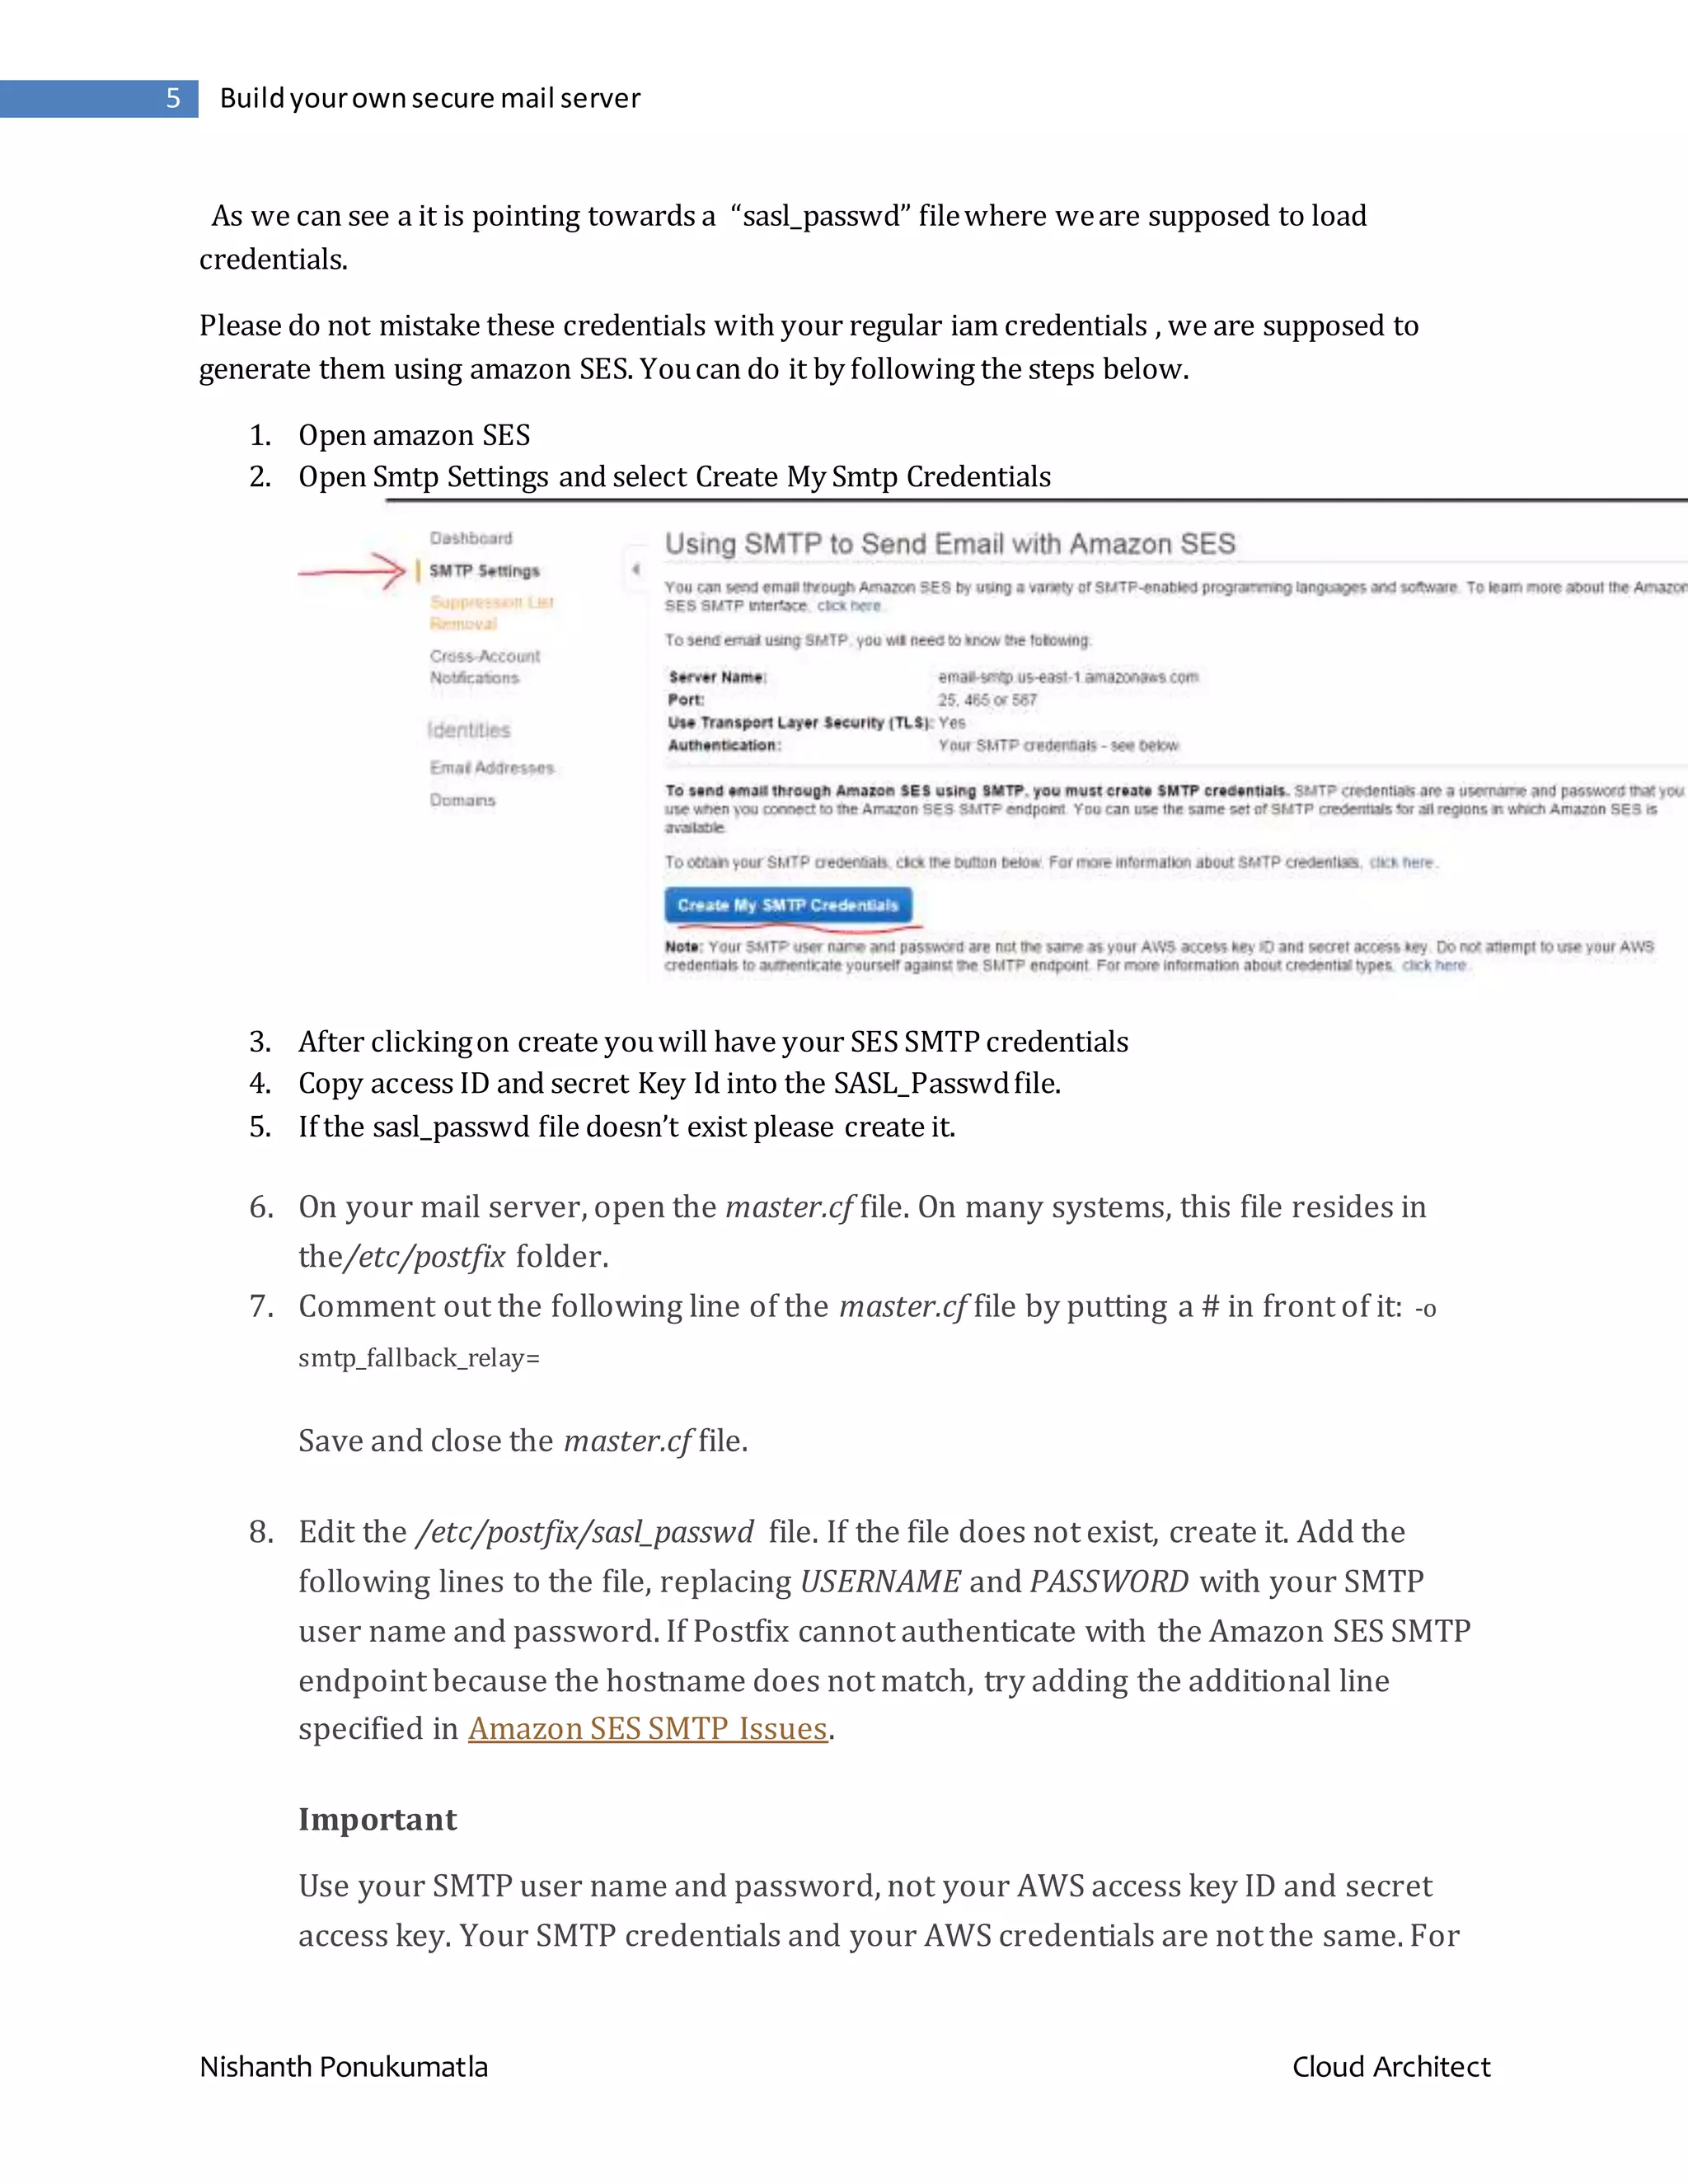
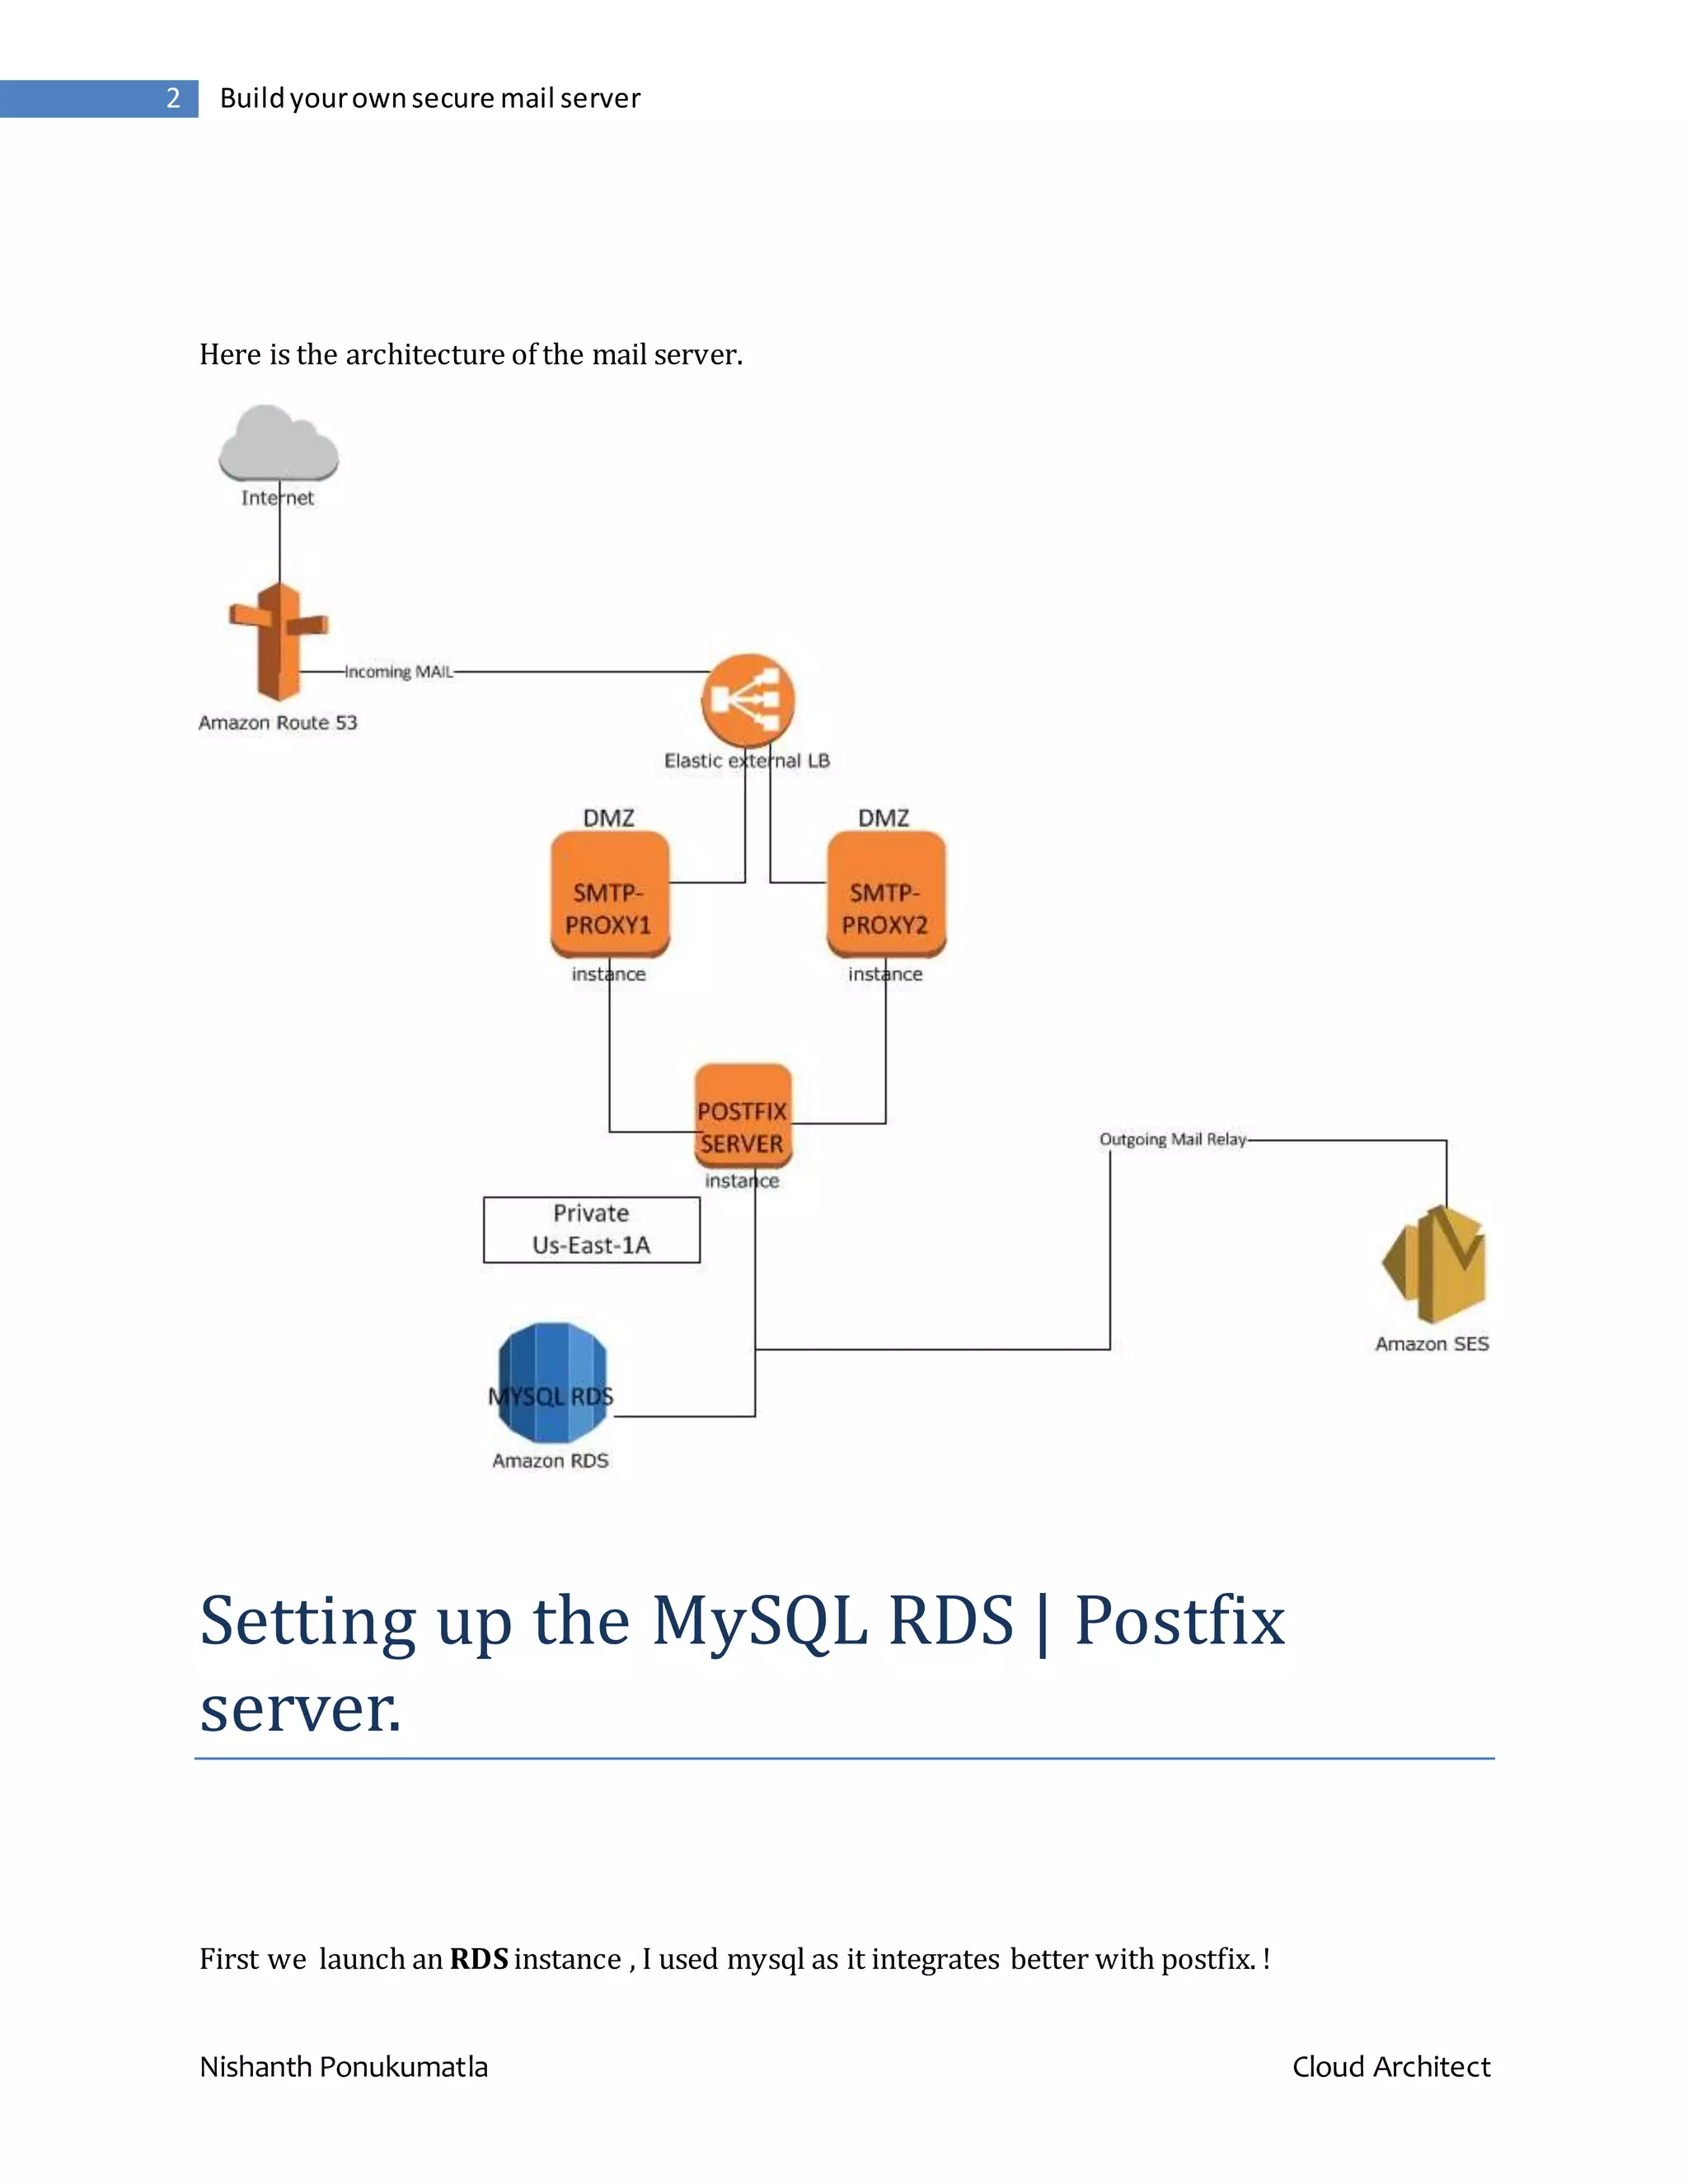
![Nishanth Ponukumatla Cloud Architect 6 Buildyourownsecure mail server information about how to obtain your SMTP credentials, see Obtaining Your Amazon SES SMTP Credentials. [email-smtp.us-east-1.amazonaws.com]:25 USERNAME:PASSWORD Save and close the sasl_passwd file. 9. At a command prompt, issue the following command to create a hashmap database file containing your SMTP credentials. sudo postmap hash:/etc/postfix/sasl_passwd 10. (Optional but recommended) Remove the /etc/postfix/sasl_passwd file. 11. (Optional but recommended) The /etc/postfix/sasl_passwd and /etc/postfix/sasl_passwd.dbfiles you created in the previous steps are not encrypted. Because these files contain your SMTP credentials, it is a good idea to use the following commands to change the owner to root and set permissions to restrict access to the files as much as possible. (Note that if you deleted /etc/postfix/sasl_passwd in the previous step, you should omit it from the commands below.) sudo chown root:root /etc/postfix/sasl_passwd /etc/postfix/sasl_passwd.db sudo chmod 0600 /etc/postfix/sasl_passwd /etc/postfix/sasl_passwd.db 12. Tell Postfix where to find the CA certificate (needed to verify the Amazon SES server certificate). You could use a self-signed certificate or you could use default certificates as follows: If running on the Amazon Linux AMI: sudo postconf -e 'smtp_tls_CAfile = /etc/ssl/certs/ca-bundle.crt' If running on Ubuntu Linux: sudo postconf -e 'smtp_tls_CAfile = /etc/ssl/certs/ca-certificates.crt'](https://image.slidesharecdn.com/38ba2d84-37b1-4a9d-a93d-2e7d7baf88fd-150923173759-lva1-app6892/75/Build-your-own-secure-mail-server-on-the-cloud-using-Amazon-Web-Services-6-2048.jpg)
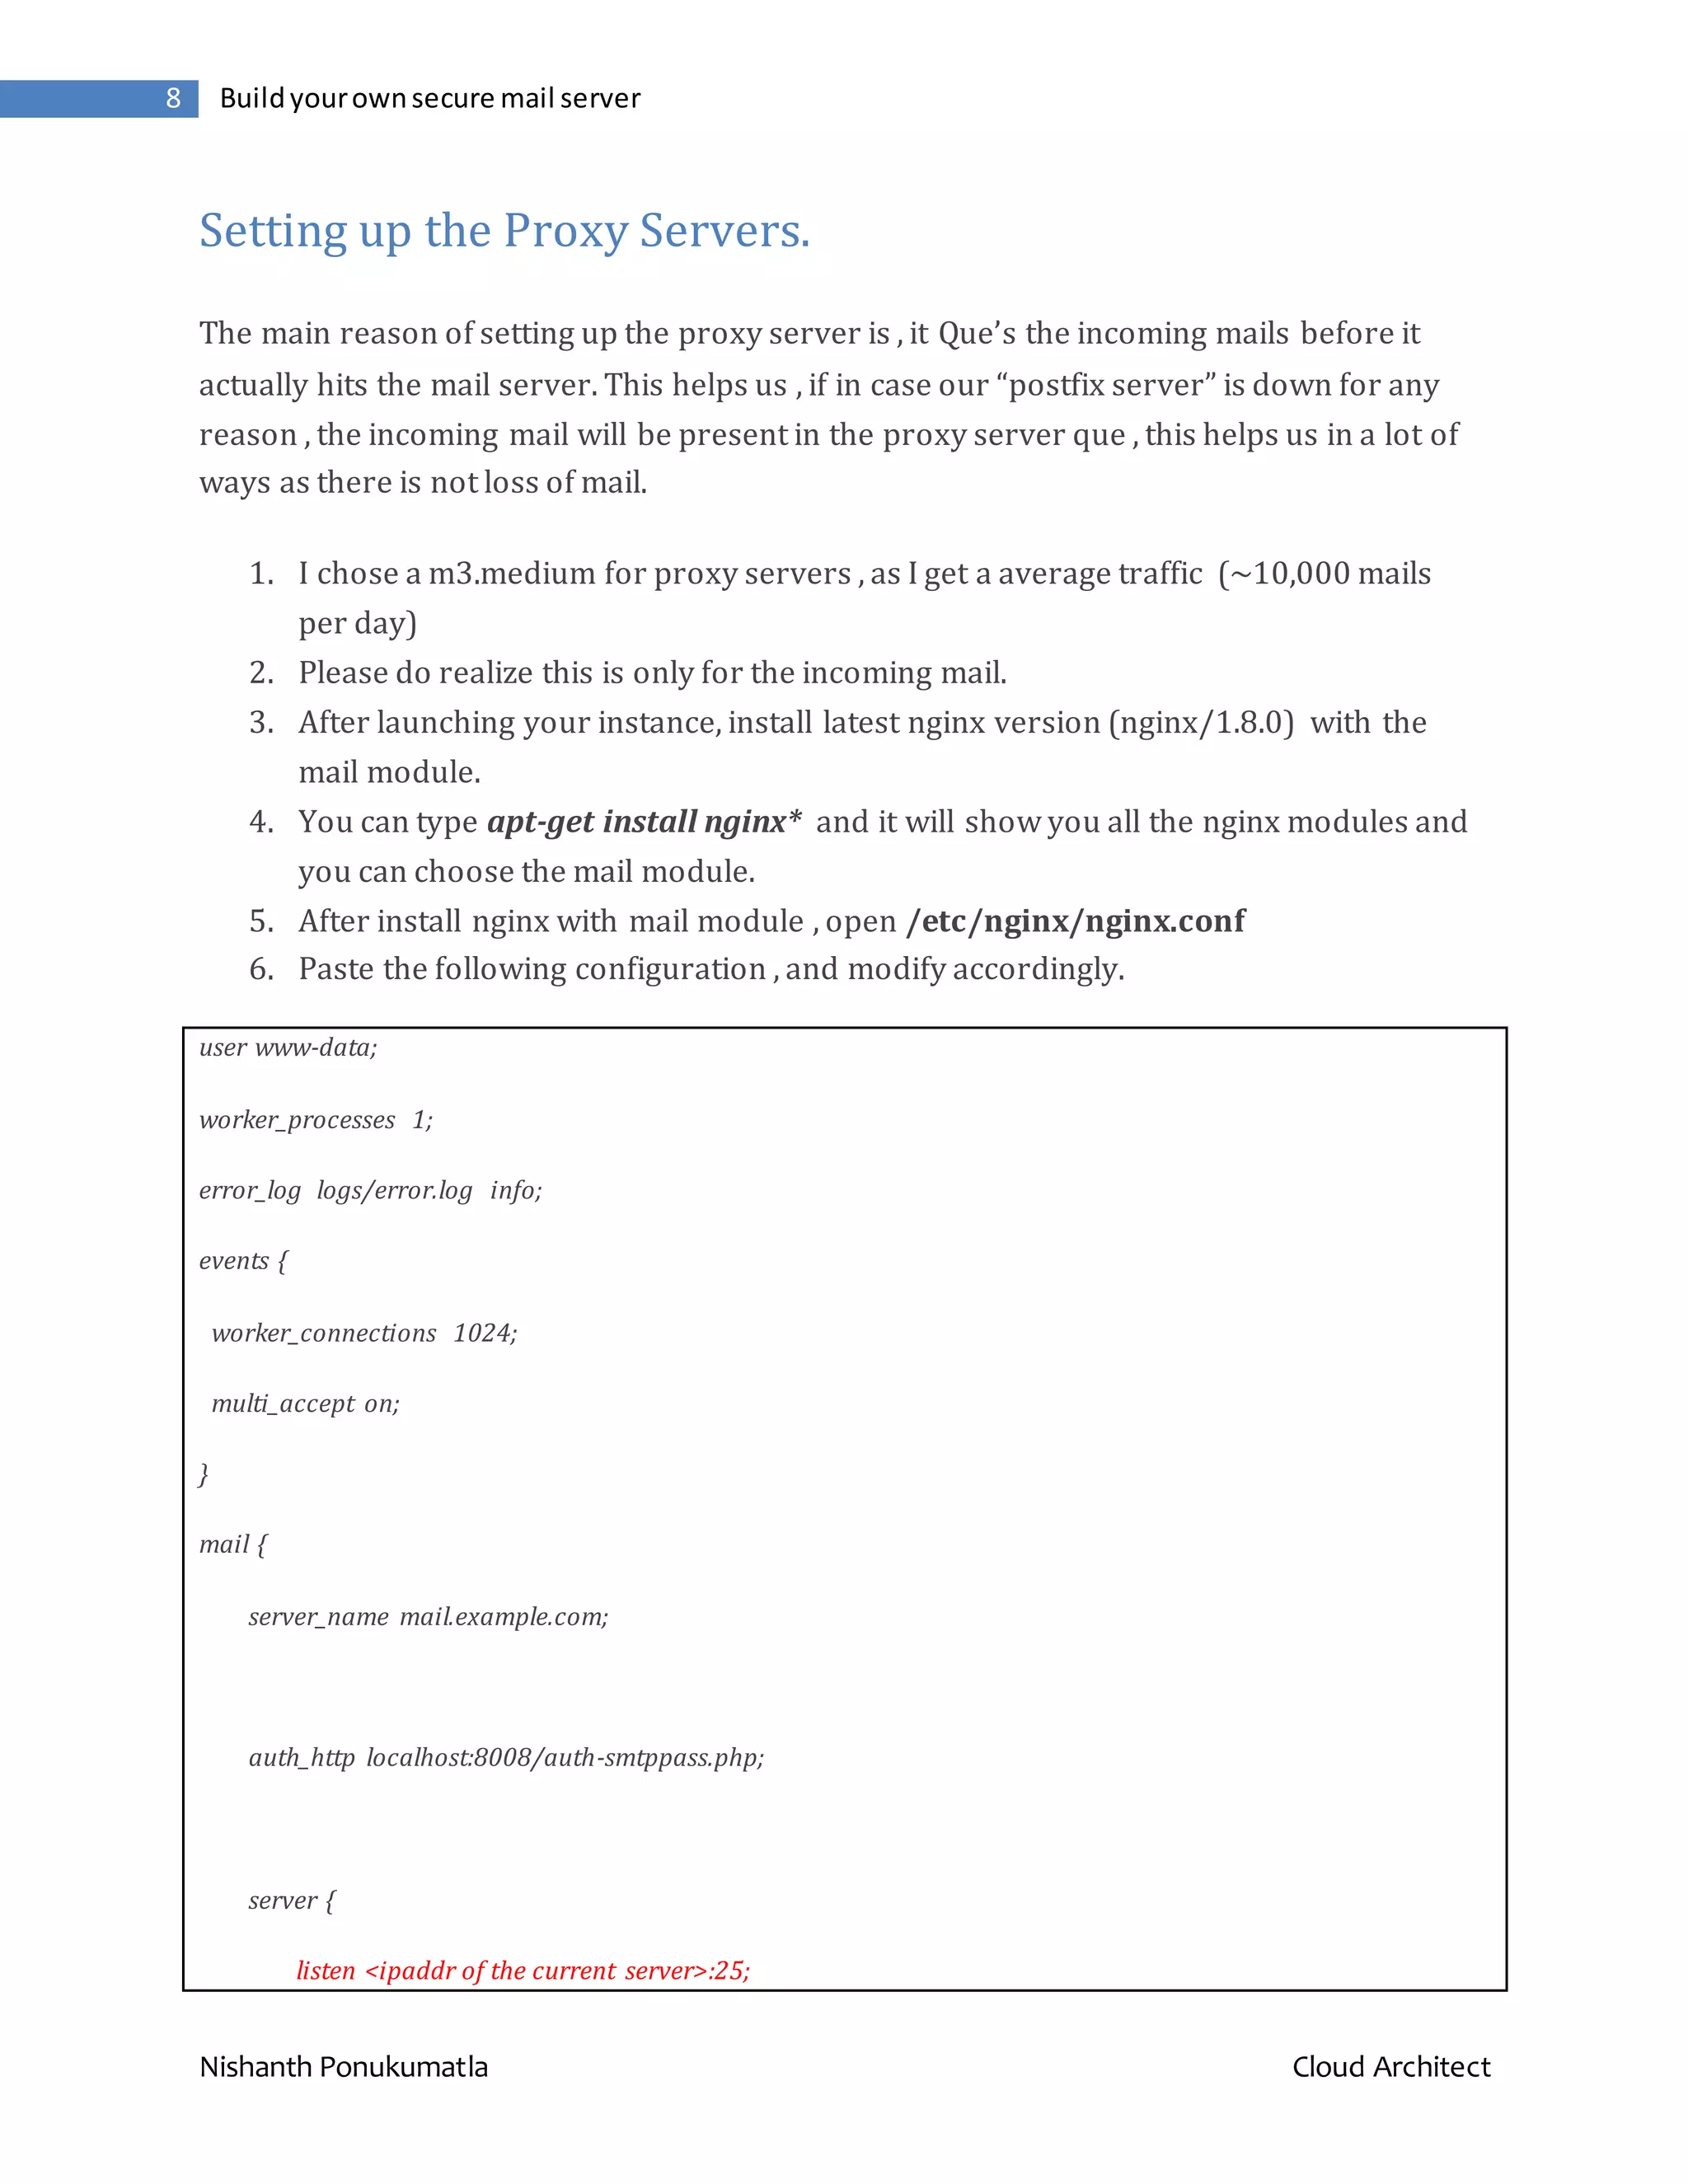
![Nishanth Ponukumatla Cloud Architect 9 Buildyourownsecure mail server protocol smtp; timeout 5s; proxy on; xclient off; smtp_auth none; } } http { log_format main '$remote_addr - $remote_user [$time_local] ' '"$request" $status $bytes_sent ' '"$http_referer" "$http_user_agent" ' '"$gzip_ratio"'; server { listen 127.0.0.1:8008; server_name localhost; access_log /var/log/nginx/localhost.access_log main; error_log /var/log/nginx/localhost.error_log info; root /var/www/localhost/htdocs; location ~ .php$ { add_header Auth-Server <ipaddr of the mailserver>; add_header Auth-Port 25; return 200;](https://image.slidesharecdn.com/38ba2d84-37b1-4a9d-a93d-2e7d7baf88fd-150923173759-lva1-app6892/75/Build-your-own-secure-mail-server-on-the-cloud-using-Amazon-Web-Services-9-2048.jpg)