Summary: in this tutorial, you’ll learn how to use the Django ListView to display a list of tasks for the Todo list application.
This tutorial begins where the Django Todo App tutorial left off.
Introduction to the class-based views #
In the previous tutorials, you have learned how to build a blog application using function-based views.
The function-based views are simple but flexible. In the earlier versions, Django only supported function-based views. Later, Django added support for class-based views that allow you to define views using classes.
Class-based views are an alternative way to implement views. They do not replace the function-based views. However, they have some advantages in comparison with the function-based views:
- Organize code related to HTTP methods like
GETandPOSTusing separate methods, instead of conditional branching in the same function. - Leverage multiple inheritances to create reusable view classes.
We’ll use the class-based views to build the Todo application.
You can download the final code for this Django ListView tutorial here.
Defining a class-based view #
To display a list of objects, you define a class that inherits from the ListView class. For example, the following defines the TaskList class in the views.py of the todo application:
from django.shortcuts import render from django.views.generic.list import ListView from .models import Task class TaskList(ListView): model = Task context_object_name = 'tasks' # ... Code language: Python (python)The TaskList is a class based-view that inherits from the ListView class. In the TaskList class, we define the following attributes:
modelspecifies the objects from which model you want to display. In this example, we use theTaskmodel. Internally, Django will query all objects from theTaskmodel (Task.objects.all()) and pass it to a template.context_object_namespecifies the variable name of the model list in the template. By default, Django usesobject_list. However, the nameobject_listis quite generic. Therefore, we override thecontext_object_nameby setting its value totasks.
By convention, the TaskList class will load the todo/task_list.html template. The template name follows this convention:
app/model_list.htmlCode language: Python (python)If you want to set a different name, you can use the template_name attribute. In this tutorial, we’ll use the default template name, which is task_list.html.
Define a route #
Change the urls.py of the todo application to the following:
from django.urls import path from .views import home, TaskList urlpatterns = [ path('', home, name='home'), path('tasks/', TaskList.as_view(),name='tasks'), ] Code language: Python (python)How it works.
First, import the TaskList class from the views.py module.
from .views import home, TaskListCode language: Python (python)Second, define tasks/ URL that displays the task list:
path('tasks/', TaskList.as_view(),name='tasks'),Code language: Python (python)In this code, we map the URL tasks/ to the result of the as_view() method of the TaskList class.
Note that you can specify the attributes of the TaskList class in the as_view() method. For example, you can pass a template name to the as_view() method as follows:
path('tasks/', TaskList.as_view(template_name='mytodo.html'),name='tasks'),Code language: Python (python)The as_view() method has arguments which are corresponding to the attributes of the TaskList class.
Creating a Django ListView template #
Define the task_list.html in the templates/todo directory of the Todo app:
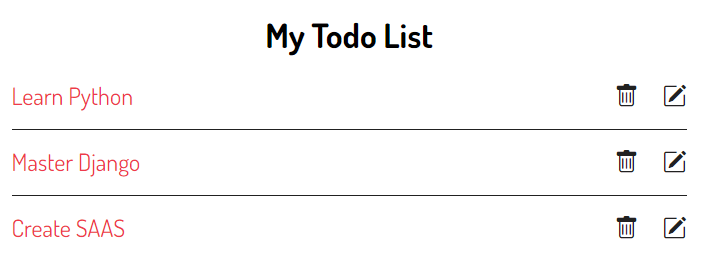
{%extends 'base.html'%} {%block content%} <div class="center"> <h2>My Todo List</h2> {% if tasks %} <ul class="tasks"> {% for task in tasks %} <li><a href="#" class="{% if task.completed%}completed{%endif%}">{{ task.title }}</a> <div class="task-controls"> <a href="#"><i class="bi bi-trash"></i> </a> <a href="#"><i class="bi bi-pencil-square"></i></a> </div> </li> {% endfor %} {% else %} <p>? Yay, you have no pending tasks!</p> {% endif %} </ul> </div> {%endblock content%}Code language: HTML, XML (xml)The task_list.html template extends the base.html template of the project. In the task_list.html template, we iterate over the tasks QuerySet and display each of them as an item on a list.
Also, we add the completed CSS class to the a tag if the task is completed. This CSS class will add a line-through to the item.
If the tasks QuerySet is empty, we display a message saying that there are no pending tasks.
Including ListView link in the base template #
Modify the base.html template to include the My Tasks link in the navigation:
{%load static %} <!DOCTYPE html> <html lang="en"> <head> <meta charset="UTF-8"> <meta name="viewport" content="width=device-width, initial-scale=1.0"> <link rel="stylesheet" href="{% static 'css/style.css' %}" /> <title>Todo List</title> </head> <body> <header class="header"> <div class="container"> <a href="{%url 'home'%}" class="logo">Todo</a> <nav class="nav"> <a href="{%url 'home'%}"><i class="bi bi-house-fill"></i> Home</a> <a href="{% url 'tasks' %}"><i class="bi bi-list-task"></i> My Tasks</a> </nav> </div> </header> <main> <div class="container"> {%block content %} {%endblock content%} </div> </main> <footer class="footer"> <div class="container"> <p>© Copyright {% now "Y" %} by <a href="https://www.pythontutorial.net">Python Tutorial</a></p> </div> </footer> </body> </html> Code language: HTML, XML (xml)If you open the URL:
http://128.0.0.1:8000/tasks/Code language: Python (python)you’ll see the task list as follows:
You can download the final code for this Django ListView tutorial here.
Summary #
- Create a class-based view that displays a list of objects by inheriting from the
ListViewclass.