Thymeleaf is a Java template engine. It develops templates for both web and standalone applications. This template engine uses the Natural Templates concept to inject logic into your layout, without compromising your design. With Thymeleaf, you’ll have control over how an application will process the templates that you create.
You can use Thymeleaf to process six types of templates: HTML, XML, Text, JavaScript, CSS, and RAW. Thymeleaf refers to each of the templates as a template mode, with HTML being the most popular template created on this engine.
Initializing Thymeleaf in Your Application
There are two ways to add Thymeleaf to your Spring Boot application. You can select Thymeleaf as a dependency when generating your boilerplate with Spring’s initializr tool. You also have the option of adding it later to your build specification file in the dependencies section.
If you selected one of the Gradle project options, the file that contains the dependencies is the build.gradle file. However, if you chose Maven, then that file is pom.xml.
Your pom.xml file should contain the following dependency section:
 <dependency>

     <groupId>org.springframework.boot</groupId>

     <artifactId>spring-boot-starter-thymeleaf</artifactId>

</dependency>
While your build.gradle file should contain the following dependency section:
 dependencies {

     implementation 'org.springframework.boot:spring-boot-starter-thymeleaf'

}
The sample application used in the article is available in this GitHub repository and is free for you to use under the MIT license.
By adding Thymeleaf to your Spring application you’ll gain access to its core library, which allows you to use Thymeleaf’s Spring Standard Dialect. The Spring Standard Dialect contains unique attributes and syntax that you can use to add different features to your layouts.
Using Thymeleaf in Spring Boot
When using Thymeleaf in your Spring application, the first step is to create your template document. For this sample application, the template document is HTML. You should always create your Thymeleaf templates in Spring Boot’s templates folder, which is available in the resources file.
The home.html File
 <!DOCTYPE html>

<html xmlns:th="http://www.thymeleaf.org">

<head>

   <title>Generic Website</title>

</head>

<body></body>

</html>
The Thymeleaf template above is a general HTML5 template, with one foreign attribute (xmlns:th). The purpose of the xmlns:th attribute is to provide the scope for all the th:* attributes that you will use in this HTML document. The other attributes and tags in a Thymeleaf template are traditional HTML tags and attributes.
Creating a Header
One of the first and most important aspects of any website or application is the header. It tells what the application is about (through the logo) and helps you to easily navigate your application. A basic header should have a logo, as well as several navigation links.
 <!DOCTYPE html>

<html xmlns:th="http://www.thymeleaf.org">

 <body>

   <div id="nav">

       <h1>LOGO</h1>

     <ul>

     <li> <a id="current">Home </a> </li>

     <li> <a>About</a> </li>

     <li> <a>Services</a> </li>

     </ul>

   </div>

 </body>

</html>
Thymeleaf allows you to add the header above to any page in your web application using the th:insert attribute. The th:insert and th:replace attributes accept what Thymeleaf calls fragment expression values. Fragment expressions allow you to place fragments of markup at any location in your layout.
<div th:insert="~{header :: #nav}"></div> Inserting the markup above at the top of the home.html <body> tag will insert the header markup at the top of your home page. A fragment expression has several components, two are optional and two are required:
- A tilde (~), which is optional.
- A pair of curly braces ({}), which is optional.
- The name of the template that contains the markup you wish to insert (header.html).
- The CSS selector of the markup that you wish to insert (#nav).
So, the following markup produces the same result as the one above.
<div th:insert="header :: #nav"></div> Populating Your Template Body
Thymeleaf allows you to use five types of expressions in your templates:
- Fragment Expression (~{…})
- Message Expression (#{…})
- Link URL Expression (@{…})
- Variable Expression (${…})
- Selection Variable Expression (*{…})
A message expression allows you to add externalized fragments of text to your layout. With message expressions, you can easily replace or reuse the text in your layout. When using a message expression, you should always place the external text fragments in a .properties file under the resources folder.
For this sample application, that file is messages.properties, which contains the following fragment of text:
placeholder.text=Lorem ipsum, dolor sit amet consectetur adipisicing elit. Dolorem porro non quae obcaecati illo laboriosam. You should note that the fragment of text (or the message) above has a unique key (placeholder.text). This is because every message file can contain a collection of different messages. So, you will need a key to insert a specific message into your layout.
<p th:text="#{placeholder.text}"></p> Inserting the markup above into the body of your HTML file will effectively display the placeholder text as a paragraph in your view. Unlike the fragment expression, every aspect of the message expression is compulsory. A message expression requires:
- A number sign (#).
- A pair of curly braces ({}).
- The key that holds the message you wish to insert (placeholder.text).
Styling Your Template
Another important file in the resources folder is the static file. This file stores your CSS files and any images you plan to use in your application. To link your external CSS file to the Thymeleaf HTML template you’ll need to use the link URL expression. The link URL expression processes both relative and absolute URLs.
<link rel="stylesheet" th:href="@{/css/style.css}" /> Inserting the markup above into the <head> of your HTML file will allow you to style your template using a style.css file. This file is available in a css folder under the static section of the resources file of the sample application. You should always assign the link URL expression to the th:href attribute.
Thymeleaf provides several other attributes that you can use to enhance the design of your layout. One such attribute is the th:style attribute, which you can use to add images to your layout.
<div id="showcase" th:style="'background: url(/images/background.jpg) no-repeat center center fixed;'"> The markup above uses the th:style attribute to add a background image to a specific section of your layout. Thymeleaf has over a hundred different attributes that you can use to add style and functionality to your layouts.
The Variable Expression
The variable expressions are the most popular and arguably the most complex expressions that Thymeleaf uses. Thymeleaf variable expressions allow you to collect data from either the application context or an object in the application and inject that data into the template. Depending on the source of the data that you want to render to your view, there are two types of variable expressions that you can use.
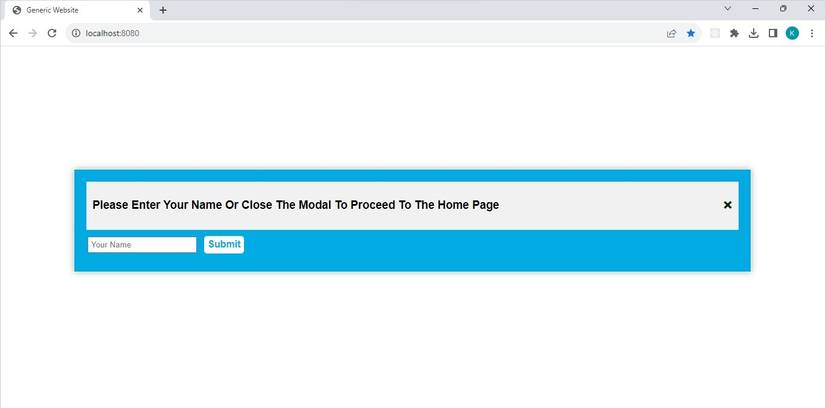
The primary variable expression uses the dollar sign and allows you to collect data from the application context (which is data associated with the different tasks that are running in the application). For example, if you wanted to capture a user’s data from a modal, then the dollar sign variable expression is the more practical choice. If you execute the sample project and navigate to http://localhost:8080/ in your browser, you will see the following modal:
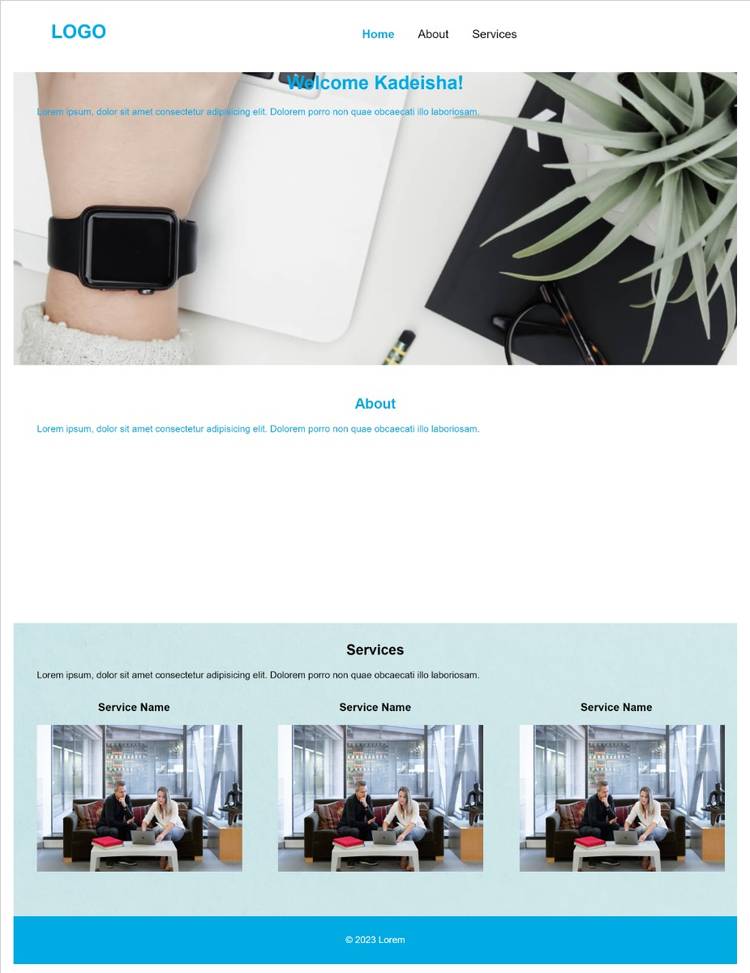
After you either close the modal or submit a name, the application will navigate to the home page. On the home page, you’ll see a generic website that displays the word "Welcome", followed by the string that you just submitted in the modal.
The sample application uses the variable expression to complete this process. The simple form in the modal.html file has the following markup:
 <form id="form" th:action="@{/home}" method="post">

   <input type="text" name="userName"class="form-control" placeholder="Your Name" />

   <button type="submit" class="btn">Submit</button>

</form>
When a user submits the form, it triggers the th:action attribute that has the value of a post URL, which you can find in the WebController class.
 @PostMapping("/home")

   public String processName(String userName, Model model) {

       model.addAttribute("userName", userName);

       return "home";

   }
The processName() method accepts the string that the user supplies to the modal, then assigns that string to a variable called userName. Using the variable expression, the controller then injects the username variable into the layout.
<h1>Welcome <span th:text="${userName}"></span>!</h1> The selection variable expression uses an asterisk, and it is most useful when you are dealing with more complex applications. For example, an application that requires users to sign in can use the selection variable expression. You can collect the username from the user object and insert it into the layout.
Alternate Template and Styling Options
Though Thymeleaf is the more popular template option for Spring Boot applications, there are several other equally viable options. These include JavaServer Pages (JSP), Groovy-based templates, FreeMarker templates, and Mustache templates. In addition to creating custom CSS styling, you can also opt to use a CSS framework to style your layout.


