Updated on December 16, 2025
Your Android app can answer user questions, provide personalized recommendations, and resolve support issues 24/7, all within the familiar tap-and-swipe experience your users love.
This isn’t just futuristic thinking, it’s possible with a quick OpenAI integration!
With the conversational AI market expected to reach between $32.62 billion and $44.8 billion by 2030, and consumer spending on mobile apps projected to hit $150 billion, integrating AI agents has become essential for app success. Whether you are a seasoned developer or an entrepreneur with a budding app idea, adding an AI-powered chatbot can significantly boost user engagement, streamline operations, and drive revenue growth.
This comprehensive guide will give you the step-by-step process to integrate a cutting-edge mobile chatbot into your Android app.
Ready to transform your app into an intelligent, proactive companion? Let’s dive into the future of mobile app development!
You might like these articles: 1. How to Integrate OpenAI into a WordPress Website? 2. How to Integrate OpenAI with ReactJS Website? 3. Build an Enterprise Customer Support Chatbot For NextJS WebsiteChoosing the Right Chatbot Platform for Android: 2025 Edition
Adding a chatbot presents an exciting opportunity for your Android app, but selecting the right approach is crucial for success. Let’s explore your options:
1. Building Your Chatbot
Pros:
- Complete control over chatbot functionality and AI training
- Deep integration with your app’s specific features and database
- Unique competitive advantages and innovative use cases
- Full data ownership and privacy control
- Unlimited customization possibilities
Cons:
- Requires significant development expertise in NLP, machine learning, and API integration
- Time-intensive process (typically 3-6 months for full implementation)
- Ongoing maintenance, updates, and AI model training needed
- Higher upfront costs and resource requirements
2. Using Pre-Built Chatbot Platforms
Pros:
- Faster implementation (often within days or weeks)
- Ready-to-use AI models and natural language processing
- Regular updates and maintenance handled by platform providers
- Extensive feature libraries and integrations
- Lower initial investment and predictable costs
Cons:
- Less control over specific AI behaviors and responses
- Potential limitations in deep app integration
- Recurring subscription costs
- Dependency on third-party platform reliability
So, Which is Right for You? Consider These Factors:
- Technical Expertise: If you have developers comfortable with NLP and API integration, building your chatbot offers ultimate control. But for faster implementation with less technical know-how, pre-built solutions shine.
- Desired Functionalities: Building your own might be necessary if you envision a highly customized chatbot with specific features unique to your app. However, most pre-built platforms offer robust features covering common use cases.
- Budget and Time Constraints: Building your chatbot requires significant development resources and time. Pre-built options are typically faster and more cost-effective, especially for simpler chatbot needs.
Popular Pre-Built Chatbot Platforms for Android Apps:
1. Kommunicate: Hybrid AI with human handoff, robust analytics, and easy Android SDK integration
2. Dialogflow: Google’s advanced NLP with seamless Android integration and voice capabilities
3. Rasa: Open-source platform for building AI-powered chatbots with customizable features and community support.
Remember, the “right” approach depends on your needs and resources. Carefully evaluate your options and choose the path that best empowers your app to leverage the power of chatbots!
This next part will explain how to add an AI agent to your Android App using Kommunicate
Kompose by Kommunicate is one such AI chatbot builder. They provide learn and grow algorithms built in that learn with each conversation. So let’s get right into it and start building an Android chatbot.
Enhance support workflows, accelerate resolutions, and boost efficiency with AI-powered email ticketing from KommunicateStep-by-Step Android Chatbot Integration Guide
It’s simple; Use the Kommunicate dashboard or create your own using the signup page, navigate to the bot section, and select the create bot option to build a chatbot; if not, experiment with the sample bots that are already provided. Integrating the Kompose chatbot into your Android app is quick. As a result, we’ll walk you through the steps so you can begin answering support questions in minutes.
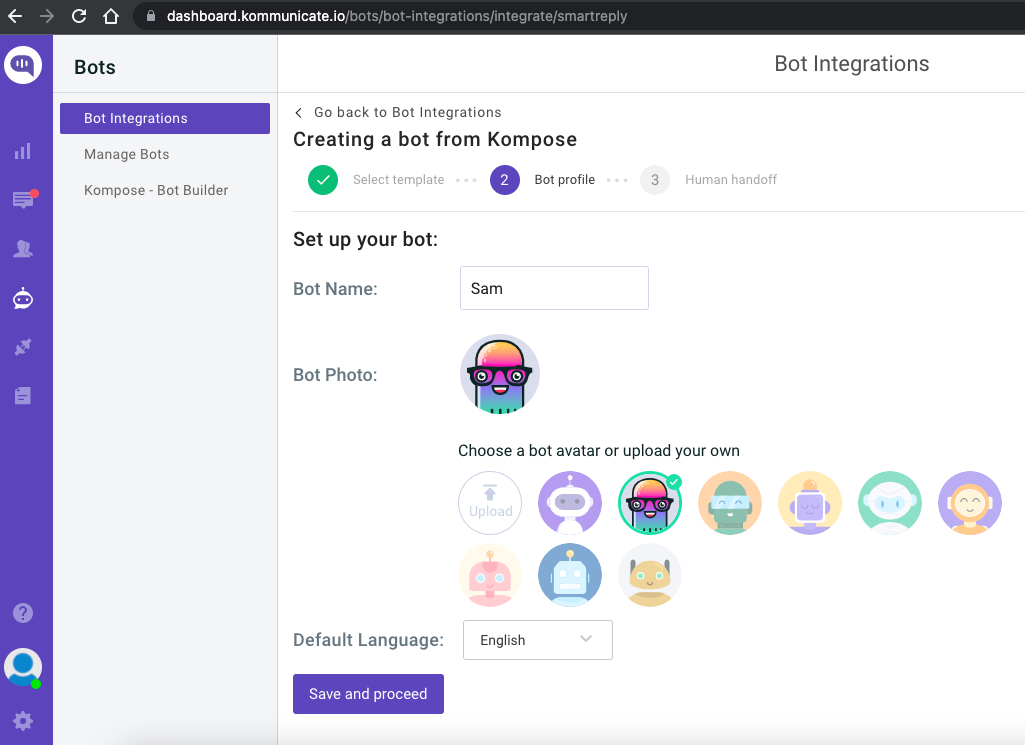
Because the goal here is to add a chatbot to an Android app, I’ll skip the detailed instructions for building a chatbot. However, you can begin by reading our article “How to Create a Chatbot” for a step-by-step guide.
Start Building Your AI Chatbot Without Sign upIntegrate Chatbot into Android App
Prerequisites
- Android 5.0 (API level 21) or higher
- Java 21 or higher
- Kotlin version: 2.0 or higher
- Android Gradle Plugin 8.0 or higher
Step 1: Adding Gradle Dependency to Your App
Launch Android Studio and open your project. If you’re used to working with external libraries or SDKs, adding the Kommunicate SDK is a breeze.
If you are using Gradle 6.7 or lower, add the following code to your root build.gradle file:
allprojects { repositories { maven { url 'https://kommunicate.jfrog.io/artifactory/kommunicate-android-sdk' } } }If you are using Gradle 6.8 or higher, add the following to your settings.gradle file:
dependencyResolutionManagement { repositories { maven { url 'https://kommunicate.jfrog.io/artifactory/kommunicate-android-sdk' } } }Next, for all Gradle versions, add the dependency to your module build.gradle file:
dependencies { implementation 'io.kommunicate.sdk:kommunicateui:2.10.0' }Once the build sync is done, you have installed Kommunicate on your app and can proceed to the next step.
Step 2: Initialize SDK
After the Gradle sync with the kommunicate dependency is complete, you can initialize the SDK by calling the following method:
| Kommunicate.init(context, APP_ID); |
You can initialize the SDK in your Activity’s onCreate() function. Just make sure it’s initialized before calling any Kommuniate SDK methods. The APP_ID parameter will be set to the application id (APP ID) you just got from the Kommunicate dashboard.
Step 3: Set up ProGuard Rules and Permissions
- Add these ProGuard rules to the proguard-rules.pro file. If you skip this step, then your app might crash if the minify enable is set to true.
-keep class net.sqlcipher.** { *; } -keep class javax.crypto.** { *; } -keepattributes *Annotation*2. If you need to use \features like Camera, Storage, Location, then you need to add them to your own app’s AndroidManifest.xml file.
If you use the Camera and Gallery Storage feature, add these permissions:
<uses-permission
 android:name="android.permission.CAMERA"
 tools:node="merge" />

<uses-permission
 android:name="android.permission.WRITE_EXTERNAL_STORAGE"
 android:maxSdkVersion="32"
 tools:ignore="ScopedStorage"
 tools:node="merge" />
<uses-permission
 android:name="android.permission.READ_EXTERNAL_STORAGE"
 android:maxSdkVersion="32"
 tools:node="merge" />

 <!--Permissions to be used when your app targets API 33 or higher-->
<uses-permission android:name="android.permission.READ_MEDIA_IMAGES" />
<uses-permission android:name="android.permission.READ_MEDIA_VIDEO" />
<uses-permission android:name="android.permission.READ_MEDIA_AUDIO" />
If you use the Location feature, add these permissions:
 <uses-permission
 android:name="android.permission.ACCESS_COARSE_LOCATION"
 tools:node="merge" />
 <uses-permission
 android:name="android.permission.ACCESS_FINE_LOCATION"
 tools:node="merge" />
If you use the Audio record / Speech to text feature, add these permissions:
<uses-permission
 android:name="android.permission.RECORD_AUDIO"
 tools:node="merge" />
Step 4: Initialize Conversation With the Created Chatbot
Kommunicate includes a ready-to-use Chat UI, so the only thing left to do in this step is to launch the chat screen.
Here’s how you can start the conversation:
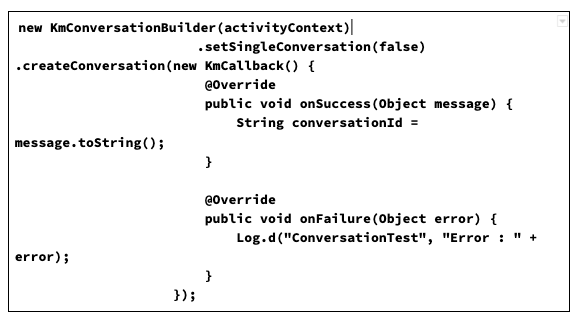
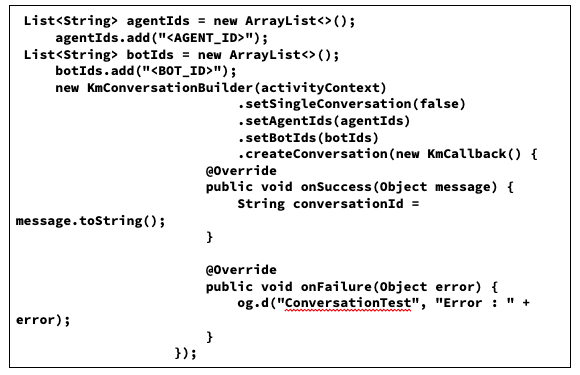
Also, if you have a list of human agents and/or multiple bots and need to start a conversation with them, use the builder described below:
You’re finished! Launch the Android app and communicate with the chatbot. In a few simple steps, you can easily integrate a chatbot into your Android app. If you require any additional information, please review the Kommunicate documentation.
Step 5: Customization
The ability to brand the look and feel of the chat UI as well as customize the colors, strings, and fonts is granted. Kommunicate includes simple settings for customizing different elements and enabling or disabling specific features.
To accomplish this, Essentially, the setting file must be downloaded and the properties modified.
- Download the settings file from here (Right click -> Save as -> Save)
- Place the downloaded applozic-settings.json file under your app/src/main/assets/ folder.
Step 6: To Change the Background Color
Modify the hex color codes in the properties listed below in the applozic-settings.json file.
| “sentMessageBackgroundColor”: “#5c5aa7”,“receivedMessageBackgroundColor”: “#e6e5ec”,“sentMessageCreatedAtTimeColor”: “#ede6e6”,“receivedMessageCreatedAtTimeColor”: “#8a8686”,“sentMessageTextColor”: “#FFFFFFFF”,“receivedMessageTextColor”: “#646262” |
Step 7: To Change the Attachment Options
By changing the values in the applozic-settings.json file, you can hide or show the media attachments options such as camera, emoji, files, and location sharing.
| “attachmentOptions”: { “:location”: false, // Location sharing option will be disabled “:camera”: true, “:file”: true, “:audio”:true } |
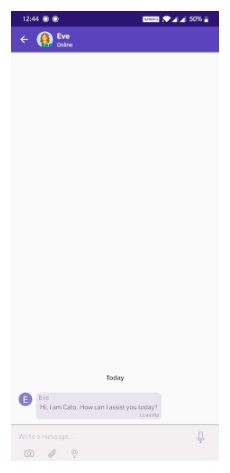
More customisation and configuration can be found in the kommunicate documentation. And this is how the bot’s first-screen interaction should look.
Conclusion:
Congratulations! You’ve now mastered the complete process of integrating an AI-powered chatbot into your Android app. By following this comprehensive 2025 guide, you’ve positioned your app to leverage the explosive growth in conversational AI and meet the evolving expectations of mobile users.
Not only that, but if you want to develop your chat implementation and directly integrate other bot platforms like Dialogflow, Amazon Lex, or custom bot into your Android app using Kommunicate SDK, you can do so.
Integrating a chatbot isn’t just about adding a feature—it’s about fundamentally transforming your app into a proactive, intelligent companion that anticipates user needs and provides instant value. With the foundation you’ve built using this guide, you’re well-equipped to navigate the exciting future of conversational AI in mobile apps.
The chatbot revolution is here, and your Android app is now ready to be part of it. Start building, keep experimenting, and watch as your chatbot transforms user engagement and drives your app’s success in 2025 and beyond!
Naveen is an accomplished senior content writer with a flair for crafting compelling and engaging content. With over 8 years of experience in the field, he has honed his skills in creating high-quality content across various industries and platforms.
At Kommunicate, we are envisioning a world-beating customer support solution to empower the new era of customer support. We would love to have you on board to have a first-hand experience of Kommunicate. You can signup for free and start delighting your customers right away.


