How to Install NetBox Network Documentation and Management Tool on Ubuntu 22.04
On this page
- Prerequisites
- Step 1 - Configure Firewall
- Step 2 - Install and Configure PostgreSQL
- Step 3 - Install and Configure Redis
- Step 4 - Download NetBox
- Step 5 - Configure NetBox
- Step 6 - Install NetBox
- Step 7 - Configure Gunicorn and Create a Service File
- Step 8 - Install Nginx
- Step 9 - Install SSL
- Step 10 - Configure Nginx
- Step 11 - Upgrade NetBox
- Conclusion
NetBox is an open-source IP address (IPAM) and datacentre infrastructure management (DCIM) web application used to manage and document computer networks and IP addresses. The network engineering team at DigitalOcean initially conceived it. It is written using the Django Python framework and uses the PostgreSQL database for data storage. It also uses the Redis database for caching queries.
This tutorial will teach you how to install the NetBox tool on a Ubuntu 22.04 server and Nginx as a reverse proxy server.
Prerequisites
A server running Ubuntu 22.04.
A non-root user with sudo privileges.
A fully qualified domain name (FQDN) like
netbox.example.com.Make sure everything is updated.
$ sudo apt update $ sudo apt upgrade
Few packages that your system needs.
$ sudo apt install wget curl nano software-properties-common dirmngr apt-transport-https gnupg2 ca-certificates lsb-release ubuntu-keyring unzip -y
Some of these packages may already be installed on your system.
Step 1 - Configure Firewall
The first step is to configure the firewall. Ubuntu comes with ufw (Uncomplicated Firewall) by default.
Check if the firewall is running.
$ sudo ufw status
You should get the following output.
Status: inactive
Allow SSH port so the firewall doesn't break the current connection on enabling it.
$ sudo ufw allow OpenSSH
Allow HTTP and HTTPS ports as well.
$ sudo ufw allow http $ sudo ufw allow https
Enable the Firewall
$ sudo ufw enable Command may disrupt existing ssh connections. Proceed with operation (y|n)? y Firewall is active and enabled on system startup
Check the status of the firewall again.
$ sudo ufw status
You should see a similar output.
Status: active To Action From -- ------ ---- OpenSSH ALLOW Anywhere 80/tcp ALLOW Anywhere 443 ALLOW Anywhere OpenSSH (v6) ALLOW Anywhere (v6) 80/tcp (v6) ALLOW Anywhere (v6) 443 (v6) ALLOW Anywhere (v6)
Step 2 - Install and Configure PostgreSQL
NetBox works with PostgreSQL 11 and above. Ubuntu 22.04 ships with PostgreSQL 14 by default. We will use PostgreSQL 15 for our tutorial.
Run the following command to add the PostgreSQL GPG key.
$ curl https://www.postgresql.org/media/keys/ACCC4CF8.asc | gpg --dearmor | sudo tee /usr/share/keyrings/postgresql-key.gpg >/dev/null
Add the APT repository to your sources list.
$ sudo sh -c 'echo "deb [signed-by=/usr/share/keyrings/postgresql-key.gpg arch=amd64] http://apt.postgresql.org/pub/repos/apt $(lsb_release -cs)-pgdg main" > /etc/apt/sources.list.d/pgdg.list'
Update the system repository.
$ sudo apt update
Now, you can install PostgreSQL using the command below.
$ sudo apt install postgresql postgresql-contrib
The postgresql-contrib package contains some extra utilities.
Check the status of the PostgreSQL service.
$ sudo systemctl status postgresql ? postgresql.service - PostgreSQL RDBMS Loaded: loaded (/lib/systemd/system/postgresql.service; enabled; vendor preset: enabled) Active: active (exited) since Tue 2022-11-27 9:10:35 UTC; 5s ago Process: 30544 ExecStart=/bin/true (code=exited, status=0/SUCCESS) Main PID: 30544 (code=exited, status=0/SUCCESS) CPU: 2ms Dec 27 9:10:35 netbox systemd[1]: Starting PostgreSQL RDBMS... Dec 27 9:10:35 netbox systemd[1]: Finished PostgreSQL RDBMS.
You can see that the service is enabled and running by default.
Launch the PostgreSQL shell.
$ sudo -i -u postgres psql
Create the NetBox database.
postgres=# CREATE DATABASE netbox;
Create the NetBox user and choose a strong password.
postgres-# CREATE USER netbox WITH PASSWORD 'Your_Password';
Change the database owner to NetBox user.
postgres-# ALTER DATABASE netbox OWNER TO netbox;
Exit the shell.
postgres-# \q
Verify that your credentials work.
$ psql --username netbox --password --host localhost netbox Password for user netbox: psql (15.1 (Ubuntu 15.1-1.pgdg22.04+1)) SSL connection (protocol: TLSv1.3, cipher: TLS_AES_256_GCM_SHA384, bits: 256, compression: off) Type "help" for help. netbox=>
Exit the shell by typing \q.
Step 3 - Install and Configure Redis
Ubuntu ships with Redis 6.0.16. For our tutorial, we will install the latest version from the official repository.
Import the official Redis GPG key.
$ curl -fsSL https://packages.redis.io/gpg | sudo gpg --dearmor -o /usr/share/keyrings/redis-archive-keyring.gpg
Add the APT repository to your sources list.
echo "deb [signed-by=/usr/share/keyrings/redis-archive-keyring.gpg] https://packages.redis.io/deb $(lsb_release -cs) main" | sudo tee /etc/apt/sources.list.d/redis.list
Update the system repository list.
$ sudo apt update
Issue the following command to install the Redis server.
$ sudo apt install redis
Confirm the Redis version.
$ redis-server -v Redis server v=7.0.7 sha=00000000:0 malloc=jemalloc-5.2.1 bits=64 build=2260280010e18db8
Let us verify the service connection by using the following command.
$ redis-cli
You will be switched to the Redis shell.
The first step is to set the password for the Redis default user. Replace Your_Redis_Password with a strong password of your choice.
127.0.0.1:6379> acl setuser default >Your_Redis_Password
Test the Redis Authentication.
127.0.0.1:6379> AUTH Your_Redis_Password OK
Ping the service.
127.0.0.1:6379> ping PONG
Exit the service by typing exit.
Step 4 - Download NetBox
NetBox requires Python Django to work. The first step in installing NetBox is to install the required Python packages. Run the following command to install the required Python packages.
$ sudo apt install -y python3 python3-pip python3-venv python3-dev build-essential libxml2-dev libxslt1-dev libffi-dev libpq-dev libssl-dev zlib1g-dev
Check the Python version.
$ python3 -V Python 3.10.6
Create the base directory for the NetBox install.
$ sudo mkdir -p /opt/netbox/
Switch to the directory.
$ cd /opt/netbox
Clone the master branch of the NetBox's GitHub repository into the current directory.
$ sudo git clone -b master --depth 1 https://github.com/netbox-community/netbox.git .
The --depth 1 flag retrieves only the most recent commit of the repository. If you want to download the entire commit history, you can omit the flag.
Check the latest version of NetBox from the releases page and check it out using Git. At the time of writing the tutorial, 3.4.1 is the latest version available.
$ git config --global --add safe.directory /opt/netbox $ sudo git checkout v3.4.1
Before checking it out, you need to add the directory to Git's safe directory list. This is a new security feature available in the recent Git versions.
The next step is to create a system user and group for NetBox.
$ sudo adduser --system --group netbox
Give the user permission on NetBox's media directory.
$ sudo chown --recursive netbox /opt/netbox/netbox/media/
Step 5 - Configure NetBox
Switch to the NetBox configuration directory.
$ cd /opt/netbox/netbox/netbox/
Copy the example configuration file to create the actual file.
$ sudo cp configuration_example.py configuration.py
Before proceeding with the configuration, we need to create a secret key for NetBox. Note down the key because we need it for the configuration.
$ python3 ../generate_secret_key.py dSSWi$Ar2cVvu1)V!B82sY1tJAQK9r)vzM8ReQRF7@C^+$=1+(
Open the configuration file for editing.
$ sudo nano configuration.py
Find the ALLOWED_HOSTS variable and set its values as follows. This variable holds a list of the valid hostnames and IP addresses by which this server can be reached.
ALLOWED_HOSTS = ['netbox.example.com', '<yourserverIP>']
The next step is to edit the database details. Configure the database details as follows.
DATABASE = { 'NAME': 'netbox', # Database name 'USER': 'netbox', # PostgreSQL username 'PASSWORD': 'Your_Password', # PostgreSQL password 'HOST': 'localhost', # Database server 'PORT': '', # Database port (leave blank for default) 'CONN_MAX_AGE': 300, # Max database connection age } Configure the Redis configuration as shown. Enter the Redis password you set in step 3.
REDIS = { 'tasks': { 'HOST': 'localhost', 'PORT': 6379, # Comment out `HOST` and `PORT` lines and uncomment the following if using Redis Sentinel # 'SENTINELS': [('mysentinel.redis.example.com', 6379)], # 'SENTINEL_SERVICE': 'netbox', 'PASSWORD': 'Your_Redis_Password', 'DATABASE': 0, 'SSL': False, # Set this to True to skip TLS certificate verification # This can expose the connection to attacks, be careful # 'INSECURE_SKIP_TLS_VERIFY': False, }, 'caching': { 'HOST': 'localhost', 'PORT': 6379, # Comment out `HOST` and `PORT` lines and uncomment the following if using Redis Sentinel # 'SENTINELS': [('mysentinel.redis.example.com', 6379)], # 'SENTINEL_SERVICE': 'netbox', 'PASSWORD': 'Your_Redis_Password', 'DATABASE': 1, 'SSL': False, # Set this to True to skip TLS certificate verification # This can expose the connection to attacks, be careful # 'INSECURE_SKIP_TLS_VERIFY': False, } } Add the secret key's value to the variable.
SECRET_KEY = 'dSSWi$Ar2cVvu1)V!B82sY1tJAQK9r)vzM8ReQRF7@C^+$=1+(' By default, NetBox uses the local filesystem to store uploaded files. You can store files on a remote filesystem by installing the django-storages library. Run the following command to add the django-storages package to the NetBox's requirements.txt which will then get installed in a later step. We also need to configure the storage parameters. Uncomment the storage section of the configuration file and proceed as follows.
STORAGE_BACKEND = 'storages.backends.s3boto3.S3Boto3Storage' STORAGE_CONFIG = { 'AWS_ACCESS_KEY_ID': 'Key ID', 'AWS_SECRET_ACCESS_KEY': 'Secret', 'AWS_STORAGE_BUCKET_NAME': 'netbox', 'AWS_S3_REGION_NAME': 'eu-west-1', } Other storage types are also supported including FTP, SFTP, Dropbox, and other S3 providers. To learn how to configure them, you can read up the django-storages help page.
Save the file by pressing Ctrl + X and entering Y when prompted.
Step 6 - Install NetBox
Run the NetBox upgrade script.
$ sudo /opt/netbox/upgrade.sh
The upgrade script performs the following tasks.
- Create a Python virtual environment
- Installs all required Python packages
- Run database schema migrations
- Builds the documentation locally (for offline use)
- Aggregate static resource files on disk
Activate the virtual environment created by the upgrade script.
$ source /opt/netbox/venv/bin/activate
The next step is to create a superuser to access NetBox. But first, switch to the required directory.
(venv) $ cd /opt/netbox/netbox
Create the superuser.
(venv) $ python3 manage.py createsuperuser
You will get the following output.
Username (leave blank to use 'navjot'): Email address: [email protected] Password: Password (again): Superuser created successfully.
NetBox includes a housekeeping management command that handles recurring cleanup tasks, such as clearing out old sessions and expired change records. You can either run the command manually or use cron to run it at regular intervals. NetBox provides a shell script to run the housekeeping tasks. Run the following command to create a soft link for the script in the Cron daily directory. This will ensure that the command will run daily.
(venv) $ sudo ln -s /opt/netbox/contrib/netbox-housekeeping.sh /etc/cron.daily/netbox-housekeeping
The final step is to test whether the NetBox application works. But first, we need to open port 8000 for testing. You can use any port though.
(venv) $ sudo ufw allow 8000
Start a development instance of NetBox.
(venv) $ python3 manage.py runserver 0.0.0.0:8000 --insecure
If successful, you will get the following output.
Performing system checks... System check identified no issues (0 silenced). December 27, 2022 - 09:27:37 Django version 4.1.4, using settings 'netbox.settings' Starting development server at http://0.0.0.0:8000/ Quit the server with CONTROL-C.
You should be able to access NetBox via the URL http://<yourserverIP>:8000/. You will get the following screen.
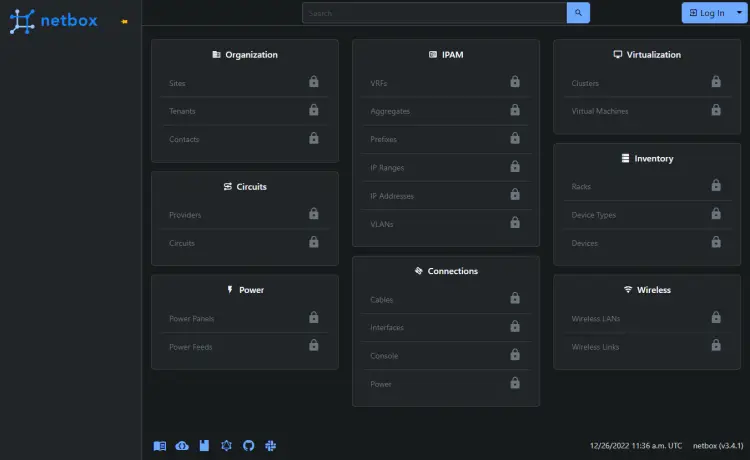
Click the Log In button to open the Login page and enter the superuser credentials created earlier.
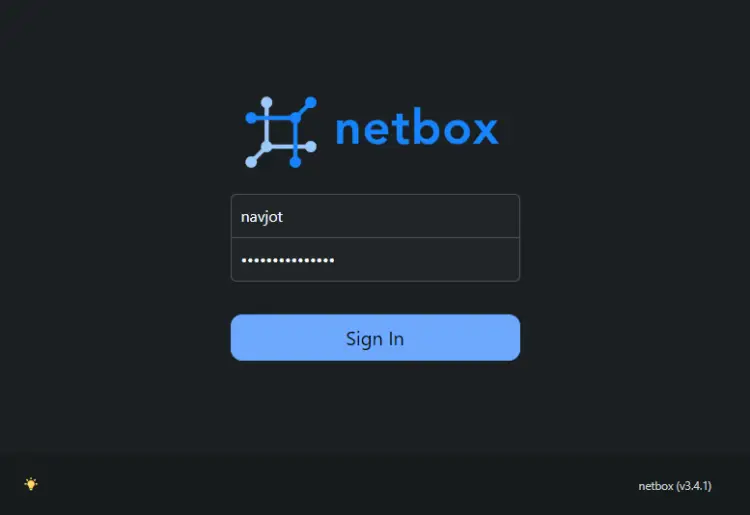
You will be taken back to the NetBox dashboard.
Press Ctrl + C key to stop the server. Deactivate the Python virtual environment.
(venv) $ deactivate
Step 7 - Configure Gunicorn and Create a Service File
NetBox runs as a WSGI application behind an HTTP server. NetBox automatically installs the Gunicorn server. In this step, we will configure Gunicorn and create a service file for NetBox so that it can be run in the background and across system reboots.
NetBox ships with a default Gunicorn configuration file. Create a copy of it.
$ sudo cp /opt/netbox/contrib/gunicorn.py /opt/netbox/gunicorn.py
The default configuration should suffice for our purposes. Depending upon your needs, you can edit the file to change the hostname, and port number or make performance improvements by changing threads, workers, and the number of requests.
The next step is to copy both NetBox and Gunicorn service files to the /etc/systemd/system directory.
$ sudo cp -v /opt/netbox/contrib/*.service /etc/systemd/system/
Reload the service daemon.
$ sudo systemctl daemon-reload
Start and enable the netbox and netbox-rq services.
$ sudo systemctl start netbox netbox-rq $ sudo systemctl enable netbox netbox-rq
Check the status of the WSGI service.
$ sudo systemctl status netbox
You will get a similar output.
? netbox.service - NetBox WSGI Service Loaded: loaded (/etc/systemd/system/netbox.service; enabled; vendor preset: enabled) Active: active (running) since Tue 2022-12-27 09:28:23 UTC; 17s ago Docs: https://docs.netbox.dev/ Main PID: 4180 (gunicorn) Tasks: 6 (limit: 1030) Memory: 357.9M CPU: 7.747s CGroup: /system.slice/netbox.service ??4180 /opt/netbox/venv/bin/python3 /opt/netbox/venv/bin/gunicorn --pid /var/tmp/netbox.pid --pythonpath /opt/netbox/netbox --config /opt/netbox/gunicorn.py netbox.wsgi ??4181 /opt/netbox/venv/bin/python3 /opt/netbox/venv/bin/gunicorn --pid /var/tmp/netbox.pid --pythonpath /opt/netbox/netbox --config /opt/netbox/gunicorn.py netbox.wsgi ??4182 /opt/netbox/venv/bin/python3 /opt/netbox/venv/bin/gunicorn --pid /var/tmp/netbox.pid --pythonpath /opt/netbox/netbox --config /opt/netbox/gunicorn.py netbox.wsgi ??4183 /opt/netbox/venv/bin/python3 /opt/netbox/venv/bin/gunicorn --pid /var/tmp/netbox.pid --pythonpath /opt/netbox/netbox --config /opt/netbox/gunicorn.py netbox.wsgi ??4184 /opt/netbox/venv/bin/python3 /opt/netbox/venv/bin/gunicorn --pid /var/tmp/netbox.pid --pythonpath /opt/netbox/netbox --config /opt/netbox/gunicorn.py netbox.wsgi ??4185 /opt/netbox/venv/bin/python3 /opt/netbox/venv/bin/gunicorn --pid /var/tmp/netbox.pid --pythonpath /opt/netbox/netbox --config /opt/netbox/gunicorn.py netbox.wsgi Dec 27 09:28:23 netbox systemd[1]: Started NetBox WSGI Service. Dec 27 09:28:24 netbox gunicorn[4180]: [2022-12-27 09:28:24 +0000] [4180] [INFO] Starting gunicorn 20.1.0 Dec 27 09:28:24 netbox gunicorn[4180]: [2022-12-27 09:28:24 +0000] [4180] [INFO] Listening at: http://127.0.0.1:8001 (4180) Dec 27 09:28:24 netbox gunicorn[4180]: [2022-12-27 09:28:24 +0000] [4180] [INFO] Using worker: gthread Dec 27 09:28:24 netbox gunicorn[4181]: [2022-12-27 09:28:24 +0000] [4181] [INFO] Booting worker with pid: 4181 Dec 27 09:28:24 netbox gunicorn[4182]: [2022-12-27 09:28:24 +0000] [4182] [INFO] Booting worker with pid: 4182 Dec 27 09:28:24 netbox gunicorn[4183]: [2022-12-27 09:28:24 +0000] [4183] [INFO] Booting worker with pid: 4183 Dec 27 09:28:24 netbox gunicorn[4184]: [2022-12-27 09:28:24 +0000] [4184] [INFO] Booting worker with pid: 4184 Dec 27 09:28:24 netbox gunicorn[4185]: [2022-12-27 09:28:24 +0000] [4185] [INFO] Booting worker with pid: 4185
As you can see, Gunicorn listens at port 8001 by default. This information will be useful when configuring Nginx as a reverse proxy server.
Step 8 - Install Nginx
Ubuntu 22.04 ships with an older version of Nginx. To install the latest version, you need to download the official Nginx repository.
Import Nginx's signing key.
$ curl https://nginx.org/keys/nginx_signing.key | gpg --dearmor \ | sudo tee /usr/share/keyrings/nginx-archive-keyring.gpg >/dev/null
Add the repository for Nginx's stable version.
$ echo "deb [signed-by=/usr/share/keyrings/nginx-archive-keyring.gpg arch=amd64] \ http://nginx.org/packages/ubuntu `lsb_release -cs` nginx" \ | sudo tee /etc/apt/sources.list.d/nginx.list
Update the system repositories.
$ sudo apt update
Install Nginx.
$ sudo apt install nginx
Verify the installation.
$ nginx -v nginx version: nginx/1.22.1
Start the Nginx server.
$ sudo systemctl start nginx
Step 9 - Install SSL
We need to install Certbot to generate the SSL certificate. You can either install Certbot using Ubuntu's repository or grab the latest version using the Snapd tool. We will be using the Snapd version.
Ubuntu 22.04 comes with Snapd installed by default. Run the following commands to ensure that your version of Snapd is up to date. Ensure that your version of Snapd is up to date.
$ sudo snap install core $ sudo snap refresh core
Install Certbot.
$ sudo snap install --classic certbot
Use the following command to ensure that the Certbot command runs by creating a symbolic link to the /usr/bin directory.
$ sudo ln -s /snap/bin/certbot /usr/bin/certbot
Run the following command to generate an SSL Certificate.
$ sudo certbot certonly --nginx --agree-tos --no-eff-email --staple-ocsp --preferred-challenges http -m [email protected] -d netbox.example.com
The above command will download a certificate to the /etc/letsencrypt/live/netbox.example.com directory on your server.
Generate a Diffie-Hellman group certificate.
$ sudo openssl dhparam -dsaparam -out /etc/ssl/certs/dhparam.pem 4096
To check whether the SSL renewal is working fine, do a dry run of the process.
$ sudo certbot renew --dry-run
If you see no errors, you are all set. Your certificate will renew automatically.
Step 10 - Configure Nginx
Open the file /etc/nginx/nginx.conf for editing.
$ sudo nano /etc/nginx/nginx.conf
Add the following line before the line include /etc/nginx/conf.d/*.conf;.
server_names_hash_bucket_size 64;
Save the file by pressing Ctrl + X and entering Y when prompted.
Create and open the file /etc/nginx/conf.d/netbox.conf for editing.
$ sudo nano /etc/nginx/conf.d/netbox.conf
Paste the following code in it.
server { # Redirect any http requests to https listen 80; listen [::]:80; server_name netbox.example.com; return 301 https://$host$request_uri; } server { listen 443 ssl http2; listen [::]:443 ssl http2; server_name netbox.example.com; access_log /var/log/nginx/netbox.access.log; error_log /var/log/nginx/netbox.error.log; # TLS configuration ssl_certificate /etc/letsencrypt/live/netbox.example.com/fullchain.pem; ssl_certificate_key /etc/letsencrypt/live/netbox.example.com/privkey.pem; ssl_trusted_certificate /etc/letsencrypt/live/netbox.example.com/chain.pem; ssl_protocols TLSv1.2 TLSv1.3; ssl_ciphers 'ECDHE-ECDSA-AES256-GCM-SHA384:ECDHE-RSA-AES256-GCM-SHA384:ECDHE-ECDSA-CHACHA20-POLY1305:ECDHE-RSA-CHACHA20-POLY1305:ECDHE-ECDSA-AES256-SHA384:ECDHE-RSA-AES256-SHA384'; ssl_prefer_server_ciphers on; ssl_session_cache shared:SSL:50m; ssl_session_timeout 1d; # OCSP Stapling --- # fetch OCSP records from URL in ssl_certificate and cache them ssl_stapling on; ssl_stapling_verify on; ssl_dhparam /etc/ssl/certs/dhparam.pem; client_max_body_size 25m; # Proxy everything over to the netbox server location /static/ { alias /opt/netbox/netbox/static/; } location / { proxy_set_header X-Real-IP $remote_addr; proxy_set_header X-Forwarded-Proto $scheme; proxy_set_header X-Forwarded-Host $http_host; proxy_pass http://127.0.0.1:8001; } } Save the file by pressing Ctrl + X and entering Y when prompted once finished.
Verify the Nginx configuration file syntax.
$ sudo nginx -t nginx: the configuration file /etc/nginx/nginx.conf syntax is ok nginx: configuration file /etc/nginx/nginx.conf test is successful
Restart the Nginx service.
$ sudo systemctl restart nginx
You can now access the NetBox Dashboard via the URL https://netbox.example.com.
Step 11 - Upgrade NetBox
Upgrading NetBox is quite easy. The steps involve checking out the master branch of the Git repository, pulling the latest commits, and then checking out the new stable version.
Switch to the NetBox directory.
$ cd /opt/netbox
Checkout the master branch.
$ sudo git checkout master
Pull the latest commits from the repository.
$ sudo git pull origin master
Checkout the new version. If 3.4.2 is the newer version, you can check that out.
$ sudo git checkout v3.4.2
Run the upgrade script.
$ sudo ./upgrade.sh
For the upgrade process, the script performs the following functions.
- Destroys and rebuilds the Python virtual environment
- Installs all required Python packages (listed in
requirements.txt) - Installs any additional packages from
local_requirements.txt - Applies any database migrations that were included in the release
- Builds the documentation locally (for offline use)
- Collects all static files to be served by the HTTP service
- Deletes stale content types from the database
- Deletes all expired user sessions from the database
Restart the Gunicorn and NetBox service.
$ sudo systemctl restart netbox netbox-rq
Conclusion
This concludes our tutorial about installing NetBox Network Documentation and Management Tool on a Ubuntu 22.04 server along with NGinx as a reverse proxy server. If you have any questions, post them in the comments below.

