PyQt5 Tutorial - Layout da grade
Vamos aprender outro método de layout no PyQt5 neste tutorial - o layout da grade.
PyQt5 Layout de Grade
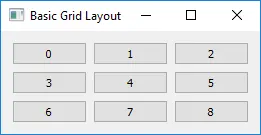
A classe QGridLayout apresenta os widgets em uma grade. O QGridLayout leva o espaço disponível para ele e o divide em linhas e colunas e então coloca cada widget na célula correta.
import sys from PyQt5.QtWidgets import QWidget, QGridLayout, QPushButton, QApplication class basicWindow(QWidget): def __init__(self): super().__init__() grid_layout = QGridLayout() self.setLayout(grid_layout) for x in range(3): for y in range(3): button = QPushButton(str(str(3 * x + y))) grid_layout.addWidget(button, x, y) self.setWindowTitle("Basic Grid Layout") if __name__ == "__main__": app = QApplication(sys.argv) windowExample = basicWindow() windowExample.show() sys.exit(app.exec_()) Onde,
grid_layout = QGridLayout() O QGridLayout do QWidgets especifica o formato do layout a ser o layout da grade.
self.setLayout(grid_layout) Define o layout da classe para ser apenas o método definido de layout out - layout de grade.
grid_layout.addWidget(button, x, y) O método addWidget da classe QGridLayout coloca o widget button na célula gird em x , y. A posição superior-esquerda é por padrão (0, 0).
PyQt5 Grid Layout Span
Normalmente, cada widget consome uma célula da grade, mas também é possível para o widget ocupar mais células utilizando números de linhas e colunas de addWidget() método sobrecarregado.
addWidget(self, QWidget, row, column, rowSpan, columnSpan, Qt.Alignment alignment=0) O terceiro e o quarto parâmetros são de espaçamento de linhas e colunas, igual a um por padrão. Se o spanning for -1, o widget da célula irá se estender para a borda direita ou para a borda inferior.
import sys from PyQt5.QtWidgets import QWidget, QGridLayout, QPushButton, QApplication class basicWindow(QWidget): def __init__(self): super().__init__() grid_layout = QGridLayout() self.setLayout(grid_layout) button = QPushButton("1-3") grid_layout.addWidget(button, 0, 0, 1, 3) button = QPushButton("4, 7") grid_layout.addWidget(button, 1, 0, -1, 1) for x in range(1, 3): for y in range(1, 3): button = QPushButton(str(str(3 * x + y))) grid_layout.addWidget(button, x, y) self.setWindowTitle("Basic Grid Layout") if __name__ == "__main__": app = QApplication(sys.argv) windowExample = basicWindow() windowExample.show() sys.exit(app.exec_()) 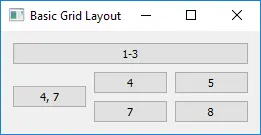
PyQt5 Esticamento da Grelha
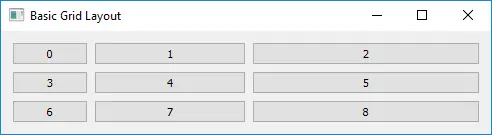
setColumnStretch e setRowStretch define o fator de alongamento da coluna ou linha. O fator de estiramento é um número relativo em relação a outra coluna/linha. Colunas/linhas com um fator maior ocupam mais do espaço disponível.
import sys from PyQt5.QtWidgets import QWidget, QGridLayout, QPushButton, QApplication class basicWindow(QWidget): def __init__(self): super().__init__() grid_layout = QGridLayout() self.setLayout(grid_layout) for x in range(3): for y in range(3): button = QPushButton(str(str(3 * x + y))) grid_layout.addWidget(button, x, y) grid_layout.setColumnStretch(x, x + 1) self.setWindowTitle("Basic Grid Layout") if __name__ == "__main__": app = QApplication(sys.argv) windowExample = basicWindow() windowExample.show() sys.exit(app.exec_()) grid_layout.setColumnStretch(x, x + 1) Ele define o fator de estiramento das três linhas como 1, 2, 3 respectivamente, portanto, a ordem da largura da coluna é Terceira Coluna > Segunda Coluna > Primeira Coluna.

Founder of DelftStack.com. Jinku has worked in the robotics and automotive industries for over 8 years. He sharpened his coding skills when he needed to do the automatic testing, data collection from remote servers and report creation from the endurance test. He is from an electrical/electronics engineering background but has expanded his interest to embedded electronics, embedded programming and front-/back-end programming.
LinkedIn Facebook