CodeGuru content and product recommendations are editorially independent. We may make money when you click on links to our partners.
Learn More Introduction
The very foundation of any .NET program is a Class. Knowing how to create your own classes and derived objects from that class is an essential skill to learn, especially if you are new to Object Orientation. Today I will show you how to create your own class and create objects representing that class.
First, the basics…
What is a Class?
A class is a template from which objects are created. Look at a television set, for example. You may have a Hisense 32 inch flat screen TV, while your friend may have an old Blaupunkt TV set since the early 80’s. Each of these televisions look, behave and are different from one another but are still classified as a TV. Any object in real life can be related to the above test; cars, cell phones, trees, modems, plates and cups.
What Makes Each Object Different?
Properties and methods make each object different. Properties make each object look and feel different whereas methods make each object behave differently.
Properties
Properties describe objects. A color is a property. Height, weight, size are all properties. In Visual Basic, this simple formula is functionally the same. You can have various properties set up in your class, but provide different settings for each different object.
Methods
Methods determine how an object behaves. Some cars are lower on fuel consumption than others, but still have the same capabilities as other cars. In Visual Basic, you will have to write the method for the object; but how that method is ultimately implemented may be different from another object.
A Sample Project
It is always best to learn with an example. Fire up Visual Studio and create a new Visual Basic Windows Forms project. You may name the project anything you like. Design your Form to resemble Figure 1 below.
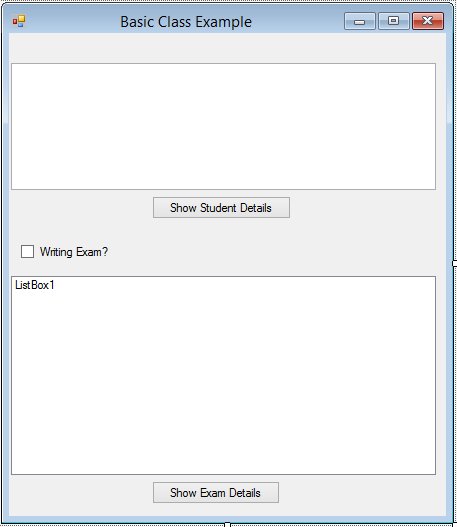
Figure 1 – Our Design
After you have designed your form, add a new class to your project by clicking Project, Add Class and give it a name such as StudentClass. Then, add the following code into the class you have just created:
Private strStudentName As String ' Student Name Private strStudentSurname As String ' Student Surname Private strStudentNumber As String ' Student Number Public Property StudentName As String 'Student Name Property Get Return strStudentName End Get Set(value As String) strStudentName = value End Set End Property Public Property StudentSurname As String ' Student Surname Property Get Return strStudentSurname End Get Set(value As String) strStudentSurname = value End Set End Property Public Property StudentNumber As String ' Student Number Property Get Return strStudentNumber End Get Set(value As String) strStudentNumber = value End Set End Property
This creates three properties, which can be read as well as changed during runtime. The three properties allow for the Student Name, surname and number to be entered into the system during runtime, as well as to read each property. It is quite simple. For more information regarding properties, have a look here.
Add the following code to the StudentClass:
Private blnWriting As Boolean 'Is Student Writing Exam? Public Property WritingExam As Boolean 'Writing Exam Property Get Return blnWriting 'Get Setting End Get Set(value As Boolean) blnWriting = value ' Provide Setting End Set End Property
This property will be used to determine if the student is still writing exam or not. Now, let’s give the Student class a method! Add the following code:
Public Function WriteExam() Dim strWriting As String = "" ' String To Be Returned If blnWriting Then 'If Writing strWriting = strStudentName & " " & strStudentSurname & ", " & strStudentNumber & " Is Still Writing Exam." 'String to inform about progress of exam Else strWriting = strStudentName & " " & strStudentSurname & ", " & strStudentNumber & " Has Finished Writing Exam." 'String to inform about progress of exam End If Return strWriting ' Return Writing String End Function
This method is very, very basic. All it does is: It checks the Boolean property to see if the student is still writing his exam. If the student is still writing his exam, the string gets created as such. If the student has finished writing, a string gets built to inform us as such. For more information regarding methods, have a look here.
As this is just an example, let me leave the StudentClass as is. As you can see, it is very easy to create a functional class without any real effort. Now, let us make use of this class!
Go to your Form’s code and add the following line of code:
Private objStudent As New StudentClass 'Create New Student Object
This creates a new StudentClass object, which we can now refer to from Form1 (which is a separate class). Add the Form_Load event:
Private Sub Form1_Load(sender As Object, e As EventArgs) Handles MyBase.Load objStudent.StudentName = "Hannes" 'Set StudentName Property objStudent.StudentSurname = "du Preez" 'Set StudentSurname Property objStudent.StudentNumber = "123456" 'Set StudentNumber Property End Sub
This sets the objStudent object’s properties. Add the next code behind the ‘Show Student Details‘ button:
Private Sub Button1_Click(sender As Object, e As EventArgs) Handles Button1.Click TextBox1.Text = objStudent.StudentName & Environment.NewLine _ & objStudent.StudentSurname & Environment.NewLine _ & objStudent.StudentNumber End Sub
Here, I simply displayed the objStudent’s object’s properties I set earlier. Now, add code for the CheckBox:
Private Sub CheckBox1_CheckedChanged(sender As Object, e As EventArgs) Handles CheckBox1.CheckedChanged objStudent.WritingExam = CheckBox1.Checked 'Use Checked Property Of CheckBox To Set WritingExam Property End Sub
By checking the Checkbox, I set the WritingExam property to True. By unchecking the checkbox, the WritingExam property gets set to False. Add the final piece of code for the ‘Show Exam Details‘ button:
Private Sub Button2_Click(sender As Object, e As EventArgs) Handles Button2.Click ListBox1.Items.Add(objStudent.WriteExam()) 'Call WriteExam Method From Student Object End Sub
Inside this button, the WriteExam method gets called to display the appropriate message inside the ListBox.
Conclusion
There you have it! Now you can add a Class with Properties and Methods to your apps and use them productively. Obviously this is only the tip of the iceberg; the onus now rests on you to delve a bit deeper. Until next time, cheers!


