DataWorks Data Map provides the Metadata Acquisition feature to help you consolidate and manage metadata from various systems. You can view the collected metadata from various data sources in Data Map. This topic describes how to create a Database Collector to collect metadata from your data sources into DataWorks.
Prerequisites
You must create a data source in your workspace before you can perform metadata acquisition. For more information about how to create a data source, see Resource Management.
Overview of metadata acquisition
After you create a data source in a workspace, DataWorks can acquire its metadata. When you enable metadata acquisition in Data Map, the system performs a one-time full acquisition of existing metadata, followed by daily incremental acquisitions. The collected metadata is then available in Data Map. This lets you view a data overview, manage tables using classification and grouping, and view data lineage.
If the default execution plan does not meet your needs, you can modify it. For more information, see Manage a Database Collector.
After you attach a MaxCompute or E-MapReduce (DLF) data source to the Data Development module, the system automatically manages the Database Collector. No manual management is required.
If you create a physical table in a data source but cannot find it in the Data Development module, you can manually run a metadata acquisition task for that data source to resolve the issue.
Supported data sources and acquisition methods
Data source type | Metadata acquisition method | Is the Database Collector visible in Data Map? | Metadata update timeliness | ||
Table/Field | Partition | Data lineage | |||
AnalyticDB for PostgreSQL |
| Yes | Depends on the custom execution plan | Not supported | Real-time |
AnalyticDB for MySQL |
| Yes | Depends on the custom execution plan | Not supported | Real-time Note You must submit a ticket to enable the data lineage feature for your AnalyticDB for MySQL instance. |
AnalyticDB for Spark |
| Yes | Real-time | Not supported | Real-time |
CDH Hive |
| Yes | Depends on the custom execution plan | Real-time | Real-time |
Data Lake Formation (DLF) | Automatic acquisition | No | Real-time | Real-time | N/A |
E-MapReduce (DLF) Note You must enable EMR_HOOK for the cluster. |
| No | Real-time | Real-time | Real-time |
E-MapReduce (HMS / RDS) Note You must enable EMR_HOOK for the cluster. |
| Yes | Real-time | Real-time | Real-time |
Hologres |
| Yes | Depends on the custom execution plan | Not supported | Real-time |
Lindorm |
| Yes | Depends on the custom execution plan | Not supported | Real-time |
MaxCompute |
| No | Regular project: Real-time External project: T+1 | Regions in China: Real-time Regions outside China: T+1 | T+1 |
StarRocks |
| Yes |
| Not supported | Real-time Note Only instance mode supports data lineage acquisition. Connection string mode does not. |
Other data source types (MySQL, PostgreSQL, SQL Server, Oracle, Table Store (OTS), Clickhouse, etc.) |
| Yes | Depends on the custom execution plan | Not supported | Not supported |
Limits
You can perform metadata acquisition only for data sources that are configured in the workspace you are currently logged in to. To acquire metadata from a data source in another workspace, ask the workspace administrator to add you as a member. For more information, see Add a workspace member.
When you acquire metadata from a data source that uses a whitelist for access control, you must configure the database whitelist in advance. For more information, see Whitelists to configure when a data source for metadata acquisition has access control enabled.
Cross-region metadata acquisition is not recommended. The DataWorks region should be the same as the data source region. To perform cross-region metadata acquisition, you must use a public endpoint when you create the data source. For more information, see Data Source Management.
Using a MySQL Database Collector to acquire metadata from an OceanBase data source is not supported.
Feature entry point
In the navigation pane on the left, click Metadata Acquisition.
On the Data Source tab, you can manage the Database Collectors for your data sources. If no data sources exist, you can click Create Data Source to go to the data source configuration page and create one.
View a Database Collector
Overall statistics
On the Metadata Acquisition page, the Data Source tab outlines metadata acquisition. This tab displays the number of data sources for which a Database Collector has been created.

Details
You can also click the Manage button in the upper-right corner of a data source to open its details page. On this page, you can view the Status, Execution Plan, Last Run Time, Last Duration, and Average Duration of the corresponding Database Collector in a specific workspace, along with the number of tables that were updated and added during the last run.

Manage a Database Collector
Click the Manage button in the upper-right corner of the target data source. You are taken to the Collected tab by default, where you can perform the following operations on existing Database Collectors.
Run a Database Collector
You can manually run a Database Collector to execute a metadata acquisition task. On the Collected tab, find the target data source and click Run in the Actions column.
Modify the execution plan of a Database Collector
On the Collected tab, find the target Database Collector and click Edit in the Actions column to modify its execution plan. The supported execution plans are Manual and Periodic.
Manual: You must manually trigger metadata acquisition and updates after configuring the Database Collector for the target data source.
Periodic: After you configure the Database Collector for the target data source, the system periodically collects and updates metadata based on the configured execution plan. No manual trigger is required.
Remove a Database Collector
On the Collected tab, find the target data source and click Remove in the Actions column to remove its Database Collector. The data source is then moved to the Uncollected tab, and metadata acquisition stops.
Create a Database Collector
After you create a data source or register a cluster, you can enable metadata acquisition in Data Map and then view the acquisition status on the Collected tab.
If you remove a Database Collector and later need to restart data collection, you can create a new one from the Uncollected tab. The following steps describe this procedure.
At the top of the list, click the Uncollected tab.
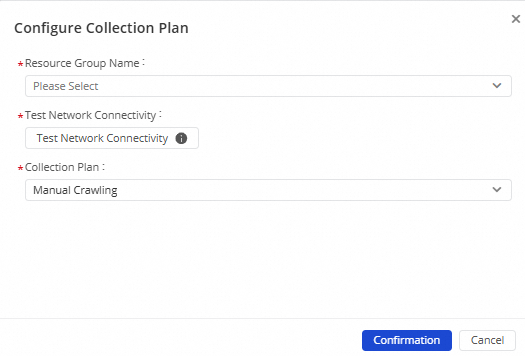
Find the target data source and click Metadata Acquisition in the Actions column. In the Configure Execution Plan dialog box, configure the parameters.
NoteThe configuration interface for the execution plan may vary depending on the data source. Refer to the actual interface in the product.
Parameter
Description
Resource Group Name
Select a resource group that is connected to the data source network. Data Map supports the following two types of resource groups. Select one as needed:
Your exclusive resource group for scheduling.
Your serverless resource group (general-purpose resource group).
Connectivity Test
After you select a resource group name, you can click Test Connectivity to verify the connection between the resource group and the data source again. If the message Connectivity Test Failed appears:
Confirm whether a whitelist is enabled for the data source. To acquire metadata from a data source with whitelist-based access control enabled, configure the whitelist permissions. For more information, see Network connectivity solutions and Add a whitelist.
If no whitelist is enabled for the data source, establish a network connection for the data source. For more information, see Resource group operations and network connectivity.
Execution Plan
Options include Manual, Monthly, Weekly, Daily, and Hourly. The system generates an execution plan based on the selected cycle and performs metadata acquisition for the target data source at the scheduled time.
Manual: Manually trigger metadata acquisition and updates based on your business needs.
Monthly: Automatically acquire metadata once at a specified time on a specified day of each month.
ImportantSome months do not have a 29th, 30th, or 31st day. Select end-of-month dates with caution.
Weekly: Automatically acquire metadata once at a specified time on a specified day of each week.
If you do not enter a Time, the acquisition runs at 00:00:00 on the specified days of the week by default.
Daily: Automatically acquire metadata once at a specific time each day.
Hourly: Automatically acquire metadata once at the
Nth minuteof each hour.
After you confirm the configuration, click Confirm.
The system performs metadata acquisition based on the configured execution plan. If you selected manual acquisition, go to the Collected tab, find the target data source, and click Run in the Actions column to run the acquisition task.
Notes on configuring whitelists for cloud products
For example, with ApsaraDB RDS for Alibaba Cloud, you must add the required IP address CIDR blocks to the database whitelist for metadata acquisition. Before you configure the whitelist, note the following:
Cloud products support standard and enhanced IP whitelist modes. The whitelist group that you configure can affect network connectivity during metadata acquisition:
If your database uses the standard IP whitelist mode: This mode does not distinguish between classic network and VPC whitelist groups.
If your database uses the enhanced IP whitelist mode:
The enhanced whitelist mode uses separate whitelist groups for classic networks and VPCs.
NoteIn enhanced whitelist mode, you must specify a whitelist group for network isolation. For example, an IP address in a classic network whitelist cannot be used to access the RDS instance from a VPC, and vice versa.
If you use an exclusive resource group for scheduling to connect to the database through a VPC, use the VPC whitelist group.
If you use a public endpoint or a classic network address to access the database, use the classic network whitelist group.
If you switch the database from standard IP whitelist mode to enhanced IP whitelist mode:
RDS copies the standard IP whitelist into two separate groups: one for the classic network and one for the VPC.
Additional notes on whitelist configuration:
Configuring a whitelist does not affect the normal operation of the RDS instance.
The default IP whitelist group (default) cannot be deleted. It can only be cleared.
Do not modify or delete system-generated groups to avoid issues with related products, such as ali_dms_group (the IP address whitelist group for DMS) and hdm_security_ips (the IP address whitelist group for DAS).
NoteWhen you configure a database whitelist, create a separate whitelist group for DataWorks.
The default IP whitelist contains only 127.0.0.1. This means that by default, no external IP address can access the RDS instance.
For more information about configuring an RDS whitelist, see Connect to an ApsaraDB RDS for MySQL instance. The process is similar for other data source types. Refer to the specific configuration steps for your data source.
What to do next
After acquiring metadata, you can perform operations in Data Map, such as viewing a data overview, managing tables by classification and grouping, and viewing data lineage. For more information, see Data overview, Look up a table, and Business-centric management: Data collections.